EVERSPRING SF813 User manual

1
SF813 SMOKE DETECTOR
The photoelectric Smoke Detector is a Z-Wave
TM
enabled device which is fully
compatible with any Z-Wave
TM
enabled network. Z-Wave
TM
enabled devices
displaying the Z-Wave
TM
logo can also be used with it regardless of the
manufacturer, and ours can also be used in other manufacturer’s Z-Wave
TM
enabled networks. Inclusion of this detector on other manufacturer’s Wireless
Controller menu allows remote operation of connected modules when the
detector is triggered. Z-Wave node in the system also acts as a repeater, so as
to re-transmit the RF signal to ensure that the signal is received by its intended
destination by routing the signal around obstacles and radio dead spots.
The detector is designed to sense smoke that comes into the detector chamber.
It does not sense gas, heat, or flame. The working principle is when the smoke
detector detects a certain density of smoke, the horn of smoke detector will
sound and in the meantime, the detector will emit the signals to the associated
devices for further execution. It can provide precious time for you and your
family to escape before a fire spreads.
Product Overview
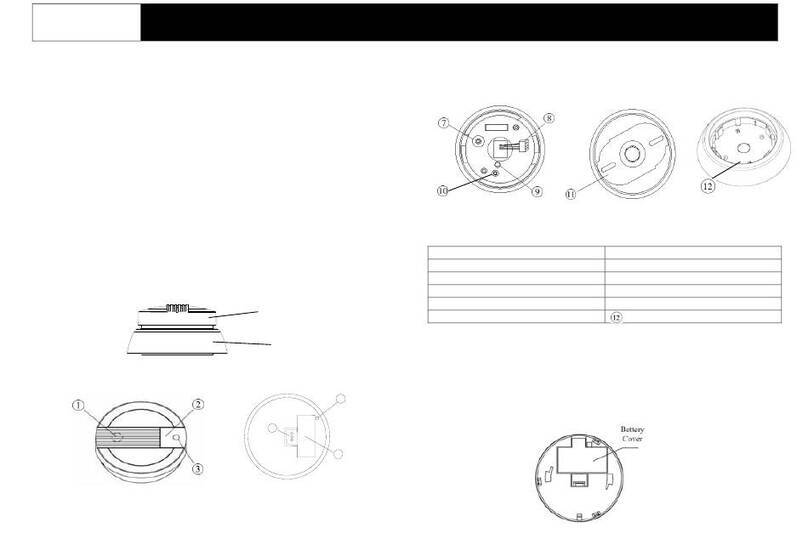
Battery Compartment Cover LED
Link Key Test/Silence Button
Tamper Switch Mounting Bracket
Buzzer Bracket Fastener
Adding to Z-Wave
TM
Network
Inside the detector, there is a link key which is used to carry out the function of
inclusion, exclusion, association and reset. When battery is applied for the first
time, the LED will flash on and off alternately and repeatedly for 4 minutes,
implying that it has not been assigned a node ID and cannot work with Z-Wave
enabled devices. The Smoke Detector will stay “awake” for 10 minutes when
power is first applied to allow time for configuration. This unit supports the Auto
Inclusion function when power is applied and no node ID is stored in the memory.
The Detector may automatically execute the function of inclusion when...
Auto Inclusion
1. The power is applied for the first time and no node ID has been stored in
the detector.
2. The execution of exclusion/reset is successful where the stored node ID is
cleared.
Note: The duration for Auto Inclusion is 4 minutes during which period the node
information of explorer frame will be emitted once every 5 seconds. Unlike the
“inclusion” procedure shown in the table below, the execution of Auto Inclusion
is automatic without the necessity of pressing the link key.
Action/Status
Description LED & Buzzer Indication
No node ID The Z-Wave Controller does not allocate a
node ID to the detector. LED 2-second on, 2-second off
Inclusion
1. Have the Z-Wave Controller enter
inclusion mode. LED flashes and buzzer sounds
when link key is pressed. LED
lights for 1 second and buzzer
sounds for 1 second upon
successful operation.
2. Pressing link key three times within 1.5
seconds will enter inclusion mode.
3. Detector stays “awake” for 10 minutes.
Exclusion
1. Have the Z-Wave Controller enter
exclusion mode. LED flashes and buzzer sounds
when link key is pressed. LED
lights for 1 second and buzzer
sounds for 1 second upon
successful operation.
2. Pressing link key three times within 1.5
seconds will enter exclusion mode.
3. Detector stays “awake” for 10 minutes.
Reset
1. Pressing link key three times within 1.5
seconds will enter exclusion mode.
LED flashes and buzzer sounds
when link key is pressed.
2. Within 1 second, press link key again
and hold until LED is off (about 5 sec.).
LED is on for 5 seconds and
buzzer sounds for 5 seconds.
3. Node ID is excluded, and the device
reverts to factory default state. LED 2-second on, 2-second off

2
Association
1. Have the Z-Wave Controller enter
association operation.
LED flashes and buzzer sounds
when link key is pressed. LED
lights for 1 second and buzzer
sounds for 1 second upon
successful operation.
2. Pressing link key 3 times within 1.5
seconds will enter association
operation.
3. Detector stays “awake” for 10 minutes.
Refer to group support as described on
page 5 for more details.
Failed or successful results in including/excluding the node ID can be viewed on the Z-Wave
Controller.
Choosing a Mounting Location
The detector is designed for use in a single residential unit only, such as a single
family home or apartment. It is not meant to be used in lobbies, hallways,
basements, or another apartment in multi-family buildings, unless there are
already working detectors in each family unit. Smoke detectors, placed in
common areas outside of the individual living unit, such as on porches or in
hallways, may not provide early warning to residents. In multi-family buildings,
each family living unit should set up its own detectors.
The detector is not meant to be used in non-residential buildings. Warehouses,
industrial or commercial buildings, and special purpose non-residential buildings
require special fire detection and alarm systems. This detector is not a suitable
substitute for complete fire detection systems for places where many people live
or work, such as hotels or motels. The same is true of dormitories, hospitals,
nursing homes, or group homes of any kind, even if they were once single family
homes.
For complete coverage in residential units, the detector should be installed in all
rooms, halls, storage areas, basements and attics in each family living unit.
Minimum coverage is one detector on each floor and one in each sleeping area.
Useful tips are listed as the following:
1. Install a detector in the hallway outside every separate bedroom area as
shown in FIGURE 1. Two detectors are required in homes with two
bedroom areas as shown in FIGURE 2.
2. Install a detector on every floor of a multi-floor home or apartment as shown
in FIGURE 3.
3. Install a minimum of two detectors in any household.
4. Install a detector inside every bedroom.
5. Install smoke detectors at both ends of a bedroom hallway if the hallway is
more than 40 feet (12 meters) long.
6. Install a detector inside every room where one sleeps with the door partly or
completely closed, since smoke could be blocked by the closed door and a
hallway alarm may not wake up the sleeper if the door is closed.
7. Install detectors as close to the center of the ceiling as possible. If this is
not practical, put the detector on the ceiling, no closer than 4 inches (10 cm)
from any wall or corner as shown in FIGURE 4.
FIGURE 1
Locations for placing smoke
detectors in single-floor residence
with only one sleeping area.
FIGURE 2
Locations for placing smoke
detectors in single-floor residence
with more than one sleeping areas.
FIGURE 3
Locations for placing smoke
detectors for a multi-floor
residence.
FIGURE 4
Recommended best and
acceptable locations to
mount smoke detectors.

3
8. If ceiling mounting is not possible, put wall-mounted detectors between 4
and 6 inches (10~15 cm) from the ceiling (FIGURE 4).
9. If some of your rooms have sloped, peaked, or gabled ceilings, try to mount
detectors 3 feet (0.9 meter) measured horizontally from the highest point of
the ceiling as shown in FIGURE 5.
Locations Not To Install the Detector
Nuisance alarms take place when smoke detectors are installed where they will
not work properly. To avoid nuisance alarms, do not install smoke detectors in
the following situations:
1. Combustion particles are the by-products of something that is burning.
Thus, in or near areas where combustion particles are present you do not
install the smoke detectors to avoid nuisance alarms, such as kitchens with
few windows or poor ventilation, garages where there may be vehicle
exhaust, near furnaces, hot water heaters, and space heaters.
2. Do not install smoke detectors less than 20 feet (6 meters) away from places
where combustion particles are normally present, like kitchens. If a 20-foot
distance is not possible, e.g. in a mobile home, try to install the detector as
far away from the combustion particles as possible, preferably on the wall.
To prevent nuisance alarms, provide good ventilation in such places.
IMPORTANT: For any reason, do not disable the detector to avoid nuisance
alarms.
3. When air streams passing by kitchens, the way how a detector can sense
combustion particles in normal air-flow paths is graphically shown in
FIGURE 6, which indicates the correct and incorrect smoke detector
locations concerning this problem.
4. In damp or very humid areas, or near bathrooms with showers. Moisture in
humid air can enter the sensing chamber, then turns into droplets upon
cooling, which can cause nuisance alarms. Install detectors at least 10 feet
(3 meters) away from bathrooms.
5. In very cold or very hot areas, including unheated buildings or outdoor
rooms. If the temperature goes above or below the operating range of
smoke detector, it will not work properly. The temperature range for your
smoke detector is 0°C to 49°C (32°F - 120°F).
6. In very dusty or dirty areas, dirt and dust can build up on the detector’s
sensing chamber, to make it overly sensitive. Additionally, dust or dirt can
block openings to the sensing chamber and keep the detector from sensing
smoke.
7. Near fresh air vents or very drafty areas like air conditioners, heaters or fans,
fresh air vents and drafts can drive smoke away from smoke detectors.
8. Dead air spaces are often at the top of a peaked roof, or in the corners
between ceilings and walls. Dead air may prevent smoke from reaching a
detector. Refer to FIGURE 4 and 5 for recommended mounting locations.
9. In insect-infested areas, it is probable that the insects may enter a detector’s
sensing chamber to cause a nuisance alarm. Where bugs are a problem,
please get rid of them before putting up a detector.
10. Near fluorescent lights, electrical “noise” from fluorescent lights may cause
nuisance alarms. Install smoke detectors at least 5 feet (1.5 meters) away
from such lights.
WARNING: Never remove the battery to stop a nuisance alarm. Cooking smoke
or a dusty furnace, sometimes called “friendly fires” can cause the alarm to
sound. If this happens, open a window or fan the air around the detector to get
rid of the smoke or dust. The alarm will turn itself off when the smoke is gone.
If nuisance alarms persist, clean the detector as described in this Manual.
FIGURE 5
Recommended location to
mount smoke detectors in
rooms with sloped, gabled
or peaked ceiling.
FIGURE 6
Recommended smoke detector locations
to avoid air streams with combustion
particles.

4
WARNING: Do not stand close to the detector when the alarm is sounding.
The alarm is loud in order to wake you in an emergency. Too much exposure
to the horn at close range may be harmful to your hearing.
Installation
Battery Installation
1. Open battery compartment (see itemin product overview).
2. Install battery into compartment and make sure the “+” and “-“ ends of each
battery are aligned properly.
3. After battery is installed in compartment, you will hear a chirp which
indicates the unit is receiving battery power.
Unit Installation
1. At the place where you are going to install the detector, draw a horizontal line
six inches long.
2. Remove the mounting bracket from the detector by rotating it
counterclockwise.
3. Place the bracket so that the two longest hold slots are aligned on the line. In
each of keyhole slots, drawing a mark to locate a mounting plug and screw.
4. Remove the bracket.
5. Using a 3/16-inch (5mm) drill bit, drill two holes at the marks and insert plastic
wall plugs. Put the detector away from getting plaster dust on it when you drill
holes for mounting.
6. Using the two screws and plastic wall plugs supplied, fix the bracket to the wall.
7. Line up the slot of the bracket with the detector. Push the detector onto the
mounting bracket and turn it clockwise to fix it into place. Pull outward on the
detector to make sure it is securely attached to the mounting bracket. (FIGURE
7)
FIGURE 7
CAUTION: This smoke alarm comes with cover latches that will prevent the
smoke alarm cover from closing if battery is not installed. This tells you that the
smoke alarm will not work until a new battery is properly installed.
NOTE: alarm horn will beep once after the detector is installed with battery and
mounted with bracket 2-4 seconds. This means the smoke alarm is working
normally and also indicates that the battery is positioned properly. Close cover,
and then press the test button, holding it down for about 3 seconds until the
horn sounds. The horn should sound a loud, pulsating alarm. This means the
unit is working properly.
Operation
Standby Mode
The red LED, as the ALARM indicator, can be seen through the clear test button
on the cover of the unit. When the red LED flashes once 334 seconds, it
indicates the smoke detector is under normal operation. When the detector
senses smoke, the unit will instantly sound an audible alarm with 3 beeps, pause,
and then 3 beeps. The red LED will also flash continuously and rapidly.
Silence Feature
The silence function can temporarily quiet an alarm for up to 10 minutes. To use
this feature, press the test/silence button on the cover when it alarms. However,
if the smoke concentration around the detector is still at alarming level after 10
minutes of silence, the unit will re-alarm immediately.
Low Battery Warning Signal
If the alarm horn begins to beep once in 43 seconds with LED flashing, this
signal means that the detector’s battery is weak. This low battery warning signal
should last for up to 30 days, but you should replace the battery immediately to
secure your protection.
Tamper Switch Feature
If the smoke detector is not mounted into the bracket properly within 5 minutes
after battery is installed, the tamper function is triggered and the Yellow LED is
steadily on. If the smoke alarm is still not mounted into the bracket properly 5
minutes after battery is installed, you will hear temporal three sounds with yellow
LED steadily on until smoke alarm is mounted back into bracket properly.
Mounting
bracket
Test / Silence Button
&
Power / Smoke Alarm
LED indicator

5
Malfunction (Error) Signal
If you hear 3 beeps with yellow LED flashing 3 times in 43 seconds, it indicates
that the unit does not work properly. Please have it repaired or serviced.
Testing Your Smoke Detector
Test the alarm weekly by pushing firmly on the test button with your finger for
around 4 seconds until the horn sounds. The sound pattern is 3 beeps, pause,
and then 3 beeps with red LED flashing continuously and rapidly. If the smoke
alarm beeps three times with yellow LED flashing three times in 43 seconds, it
indicates the smoke alarm is not working properly and that it needs to be
repaired or serviced.
WARNING: Never use an open flame to test your detector. You may set fire to
damage the detector, as well as your home.
WARNING: When you are not testing the unit and the alarm horn sounds a loud
continuous sound, this means the detector has sensed smoke or combustion
particles in the air. Be sure that the alarm horn is a warning of a possible
serious situation that requires your immediate attention.
Programming
1. Z-Wave’s Group (Association Command Class Version 2)
The Smoke Detector supports association Group1 for 1 node and Group2 for up
to 3 nodes. This has the effect that when the detector is triggered, the device(s)
associated with the detector will receive the relevant reports. Please refer to
the sections below for more details on the reports that the detector will emit
when event occurs.
Group1 Commands
1.1 Smoke Event Report
Once the detector is triggered by smoke, the detector will send
SENSOR_ALARM_REPORT command (Sensor Type = 0x01, Sensor State =
0xFF) to the node of Group1 to inform there is a smoke event. The command
will be re-sent if the node of Group1 does not receive the signal. When the
event is cleared, the detector will send SENSOR_ALARM_REPORT command
(Sensor Type = 0x01, Sensor State = 0x00) to the node of Group1.
1.2 Tamper Trigger Report
When the tamper is triggered (that is, the detector is opened with tamper switch
being released), the detector will emit ALARM_REPORT command (Alarm Type
= 0x03, Alarm Level = 0x01) to the node of Group1.
1.3 Low Battery Report
When the battery level of the detector drops to an unacceptable level, the
detector will send ALARM_REPORT command (Alarm Type = 0x01, Alarm Level
= 0x01) to the node of Group1. The detector will detect the battery condition
once every 6 hours. If the Low Battery condition remains, the command signal
will be sent to the node of Group1 once every 6 hours.
Group2 Commands
1.4 Commands for other devices
When the detector is triggered by smoke, the detector will send Basic Set
command (Value = 0xFF) to the nodes of Group2 to inform there is a smoke
event. When the event is cleared, the detector will send Basic Set command
(Value = 0x00) to the nodes of Group2.
2. Command Classes
The Smoke Detector supports Command Classes including…
* COMMAND_CLASS_BASIC
* COMMAND_CLASS_SENSOR_ALARM
* COMMAND_CLASS_ASSOCIATION_V2
* COMMAND_CLASS_MANUFACTURER_SPECIFIC
* COMMAND_CLASS_VERSION
* COMMAND_CLASS_BATTERY
* COMMAND_CLASS_ALARM
* COMMAND_CLASS_WAKE_UP_V2

6
Troubleshooting
Symptom Possible Cause Recommendation
LED not illuminating, the
detector not working
Run out of battery power; check if
reverse battery polarity
Replace a new battery
Check if the detector is out of
order
Do not open the detector;
send it to the local retailer.
LED cannot display and the
detector not working when
pressing the test button
Reverse battery polarity or poor
battery connections
Refit the battery with correct
polarity
Run out of battery power Replace a new battery
Button pressing time is not long
enough; it should be pressed and
held for more than 1 second
Press and hold the button for
longer than 1 second
The detector does not stay
awake for 10 minutes when
power is first supplied
Check if detector is out of order Remove the battery, press
link key several times to
release the existing battery
power and wait for approx.10
seconds before replacing the
battery.
Specifications*
Operating Frequency 908.42 MHz
Battery Type 3V CR123A battery x 1
Battery Life 2 years**
Alarm Audibility 85db@3m
Operating Range 30 meters open space (indoor)
Alarm Temperature 57°C - 65°C (134°F - 149°F)
Operation Temperature 0°C - 49°C (32°F - 120°F)
Relative Humidity 10 - 85%
Size 120mm (diameter) x 5.3mm (depth)
*Specifications are subject to change without notice
**1 trigger per day
A501112066R 2013/07
WARNING:
Do not dispose of electrical appliances as unsorted municipal waste, use
separate collection facilities.
Contact your local government for information regarding the collection systems
available.
If electrical appliances are disposed of in landfills or dumps, hazardous
substances can leak into the groundwater and get into the food chain, damaging
your health and well-being.
When replacing old appliances with new ones, the retailer is legally obligated to
take back your old appliance for disposal at least for free of charge.
Table of contents
Other EVERSPRING Smoke Alarm manuals
Popular Smoke Alarm manuals by other brands

System Sensor
System Sensor B224RB Installation and maintenance instructions

VESDA
VESDA VESDA-E VES-A00-P Product guide

Xtrails
Xtrails VESDA-E VEP-A10-P Product guide

System Sensor
System Sensor i4 Series COSMO-2W Installation and maintenance instructions

System Sensor
System Sensor Innovair DH100 Installation and maintenance instructions

Quell
Quell QC1500 user manual