EVERSPRING SF804 User manual

SF804
User manual - Manuale utente - Guía de usuario

1
SF804 Smoke Detector
Installation Instructions
General Introduction
The SF804 Smoke Detector is designed to sense smoke that comes into the
detector’s chamber. It does not sense gas, heat, or flame. When it detects a
certain density of smoke the horn will sound and the RF module will emit signals
to the Gateway. Its great compatibility with our U-Net family security products
makes it suitable for smart home cloud based platforms such as Homesys.
Product Layout
The sensor consists of two parts; a sensor module and a transmitter module The
transmitter module can be detached by twisting it clockwise against the sensor
module.
Sensor Module : Front and Back view
Transmitter module: Front and Back view
Binding with Homesys
1. Twist the transmitter module clockwise to detach it from the sensor module
2. Disconnect the connector from the connector pins of the sensor module.
Take note of the connector direction as you will need to connect it back later.
3. Open the battery cover.
Horn Tamper switch
Test Button Connector
Smoke LED Learning key
Connector pins ○
10 Link LED
Cover Latch ⑪Mounting bracket
Battery Cover Skirt Panel
4
5
6
Sensor module
Transmitter module

2
4. Prepare one 9V alkaline battery. Do not insert it into the unit yet.
5. Log into the Homesys account from a web browser.
6. Select “System”, then “Add a Device”,
7. Select “Smoke Detector”.
8. The following screen will appear. This means the gateway is entering binding
mode.
9. Insert the batteries with correct polarity at this point.
10.Plug the connector back to connector pins of the sensor module. Make
sure its direction is correctly inserted according to the sticker affixed on the
sensor.
11.
The screen below will appear in 10 seconds if the process is successful.
12.
Time-out will occur if the binding process was unsuccessful. Please refer to
the “Manual Binding” procedure.
Manual Binding
1. Repeat steps 4 to 8 of the Binding with Homesys section.
2. With the battery inserted and connectorconnected to sensor module,
press and hold the Learning keyfor 3 seconds then release, and the Link
LED ○
10 will start to flash. This implies SF804 has now entered binding
mode.
3. Within 5 seconds, the Link LED will stop flashing and then turn off, indicating

3
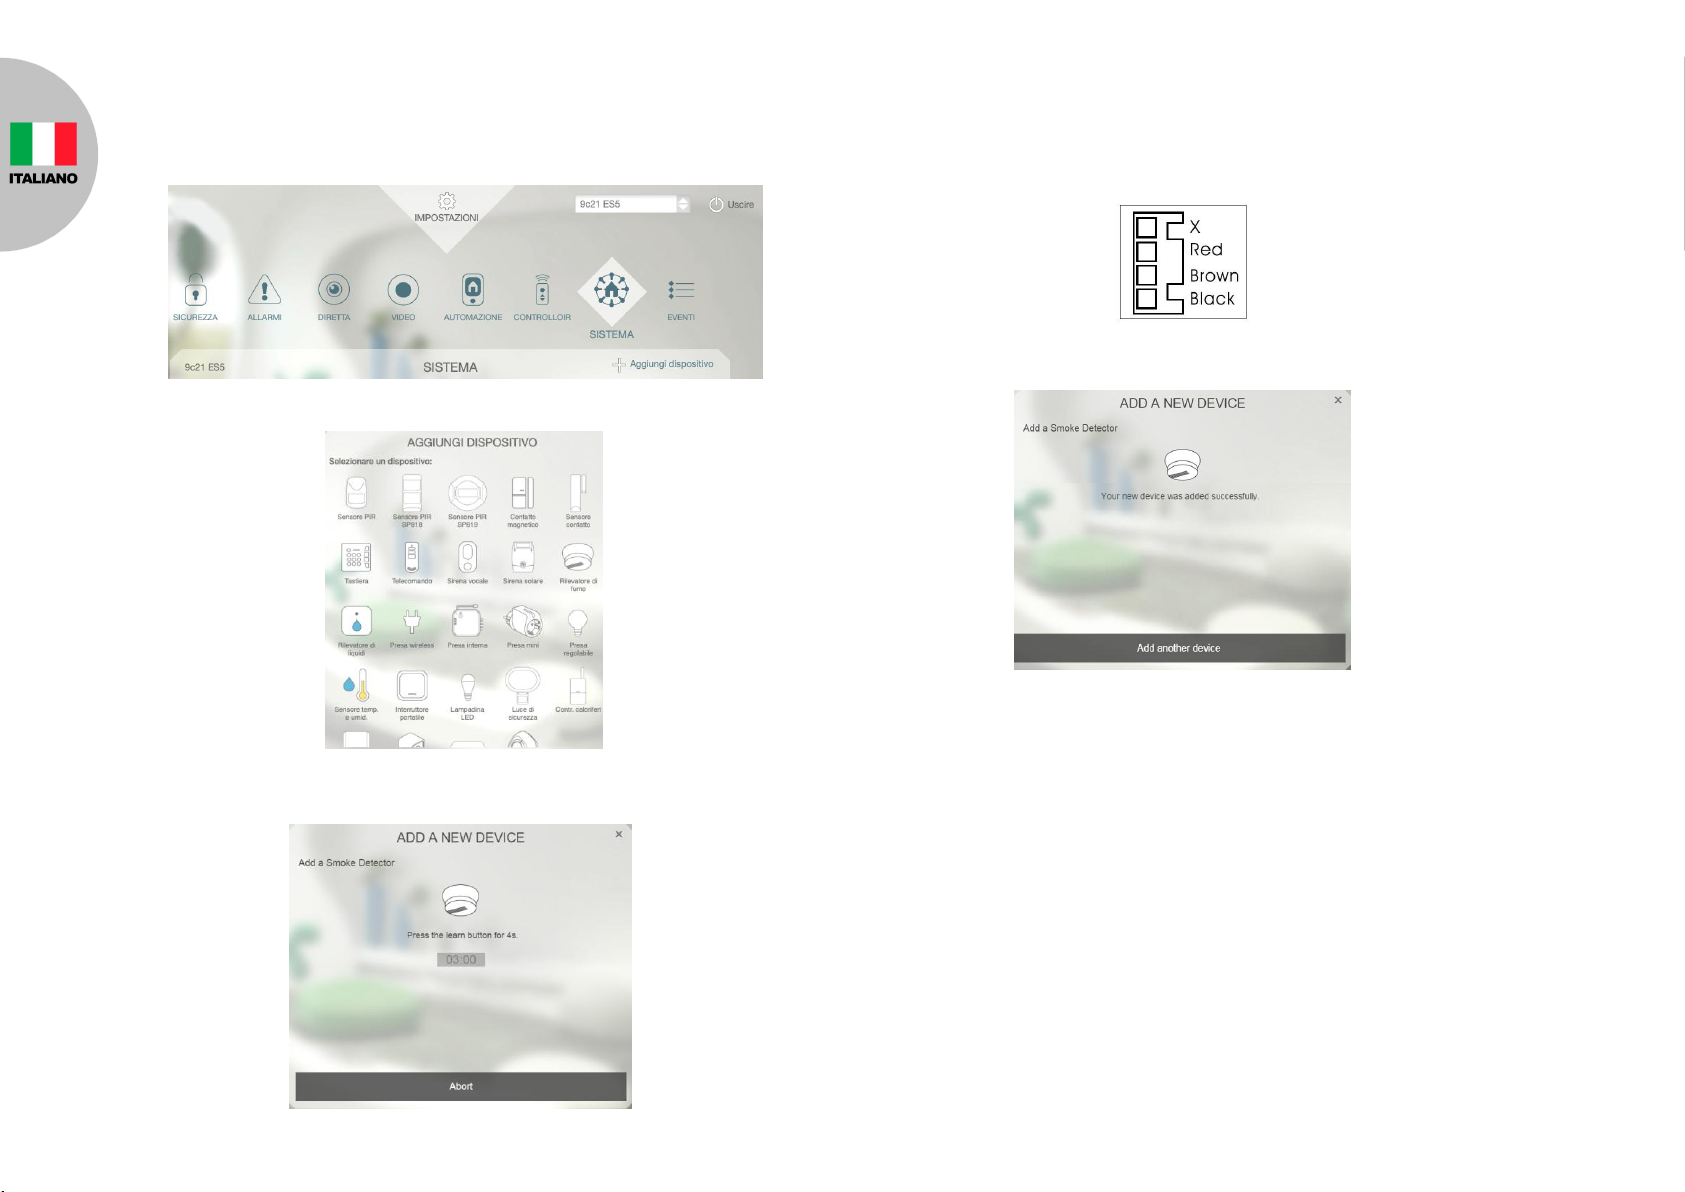
the learning procedure is completed. The screen below will appear
indicating the process is successful.
Testing
1. Assemble the transmitter module back to the sensor module.
Note: The smoke LED will flash once every 30 seconds to indicate normal
operation
2. Press and hold the test button for 3 seconds, the sensor LED will flash and
the horn will emit a loud sound.
3. If the test is successful the system will trigger an alarm and the smoke
detector will sound (alarms are listed in “Events”).
Note: It is necessary that the Homesys gateway is powered and connected
to internet.
4. If the test is unsuccessful, please check the troubleshooting.
Mounting the SF804
The detector is designed for use in a single family home or apartment. For
complete coverage, it should be installed in all rooms, halls, storage areas,
basements and attics in each family living unit. Minimum coverage is one
detector on each floor and one in each sleeping area.
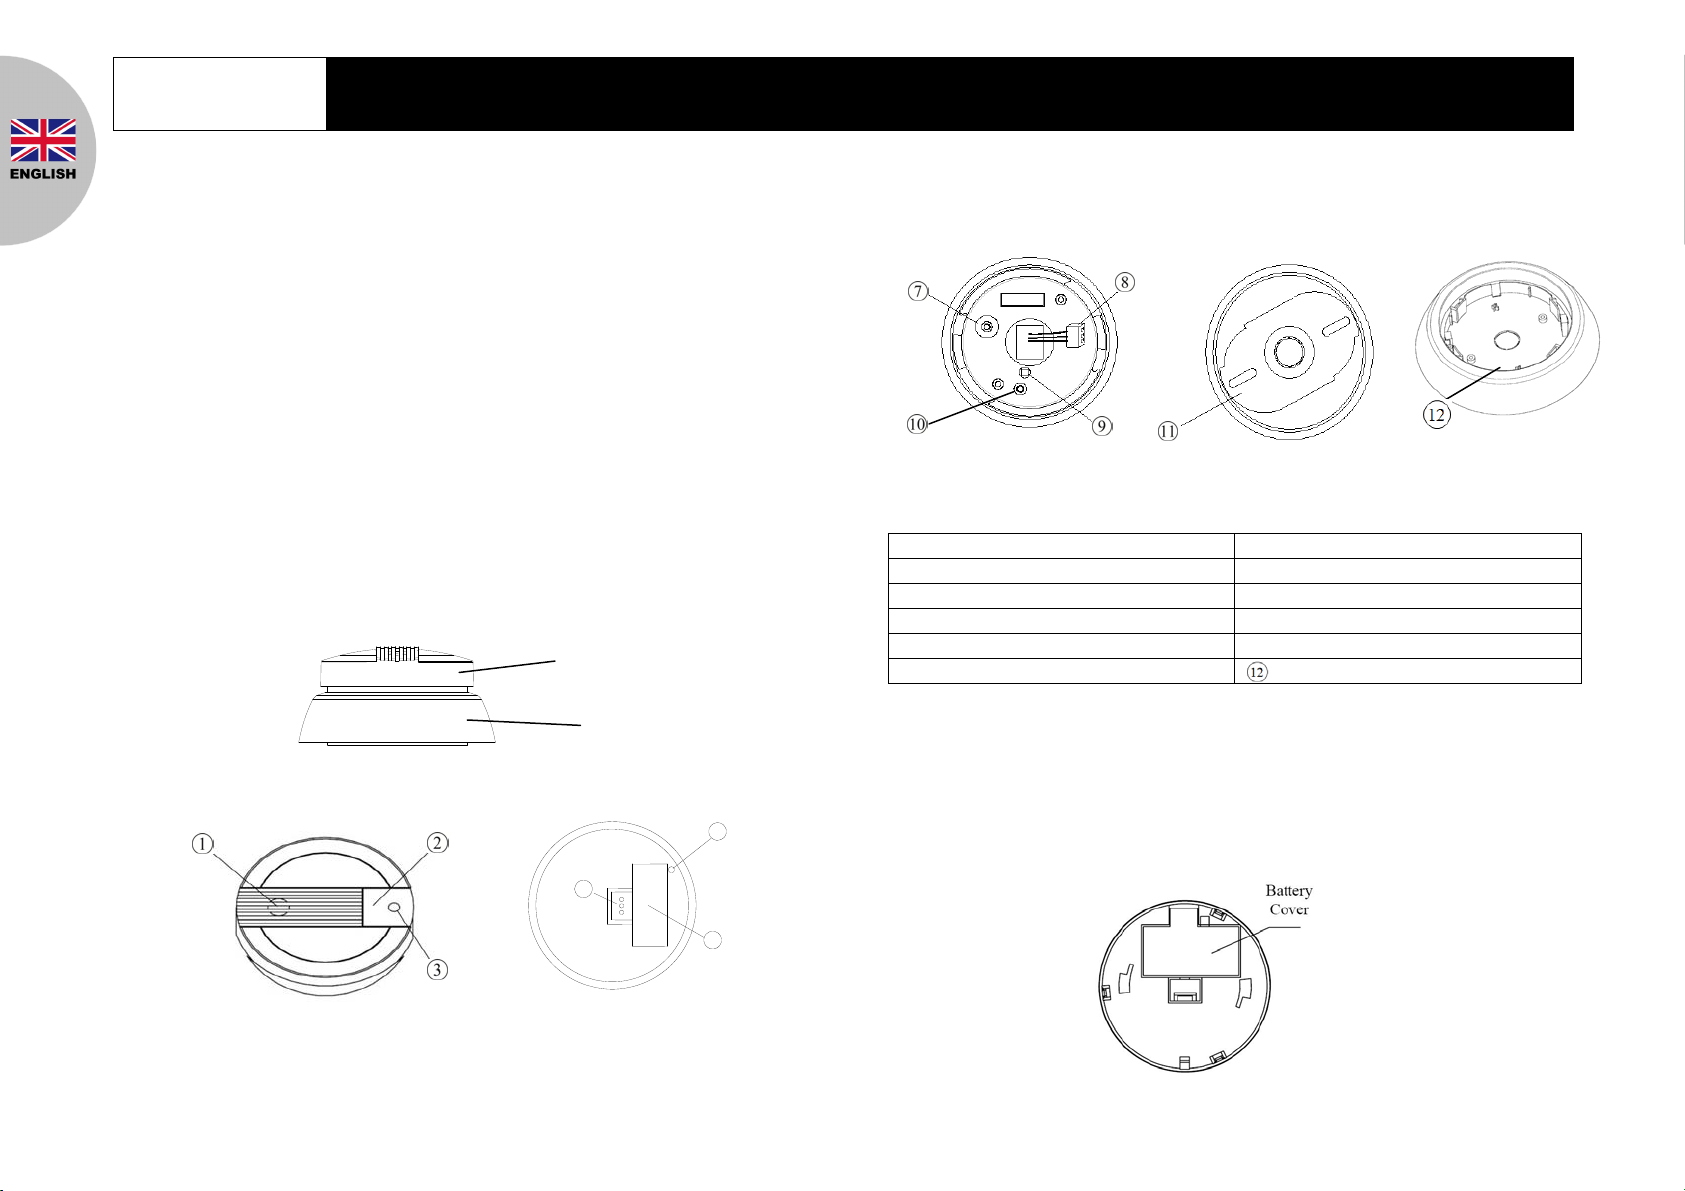
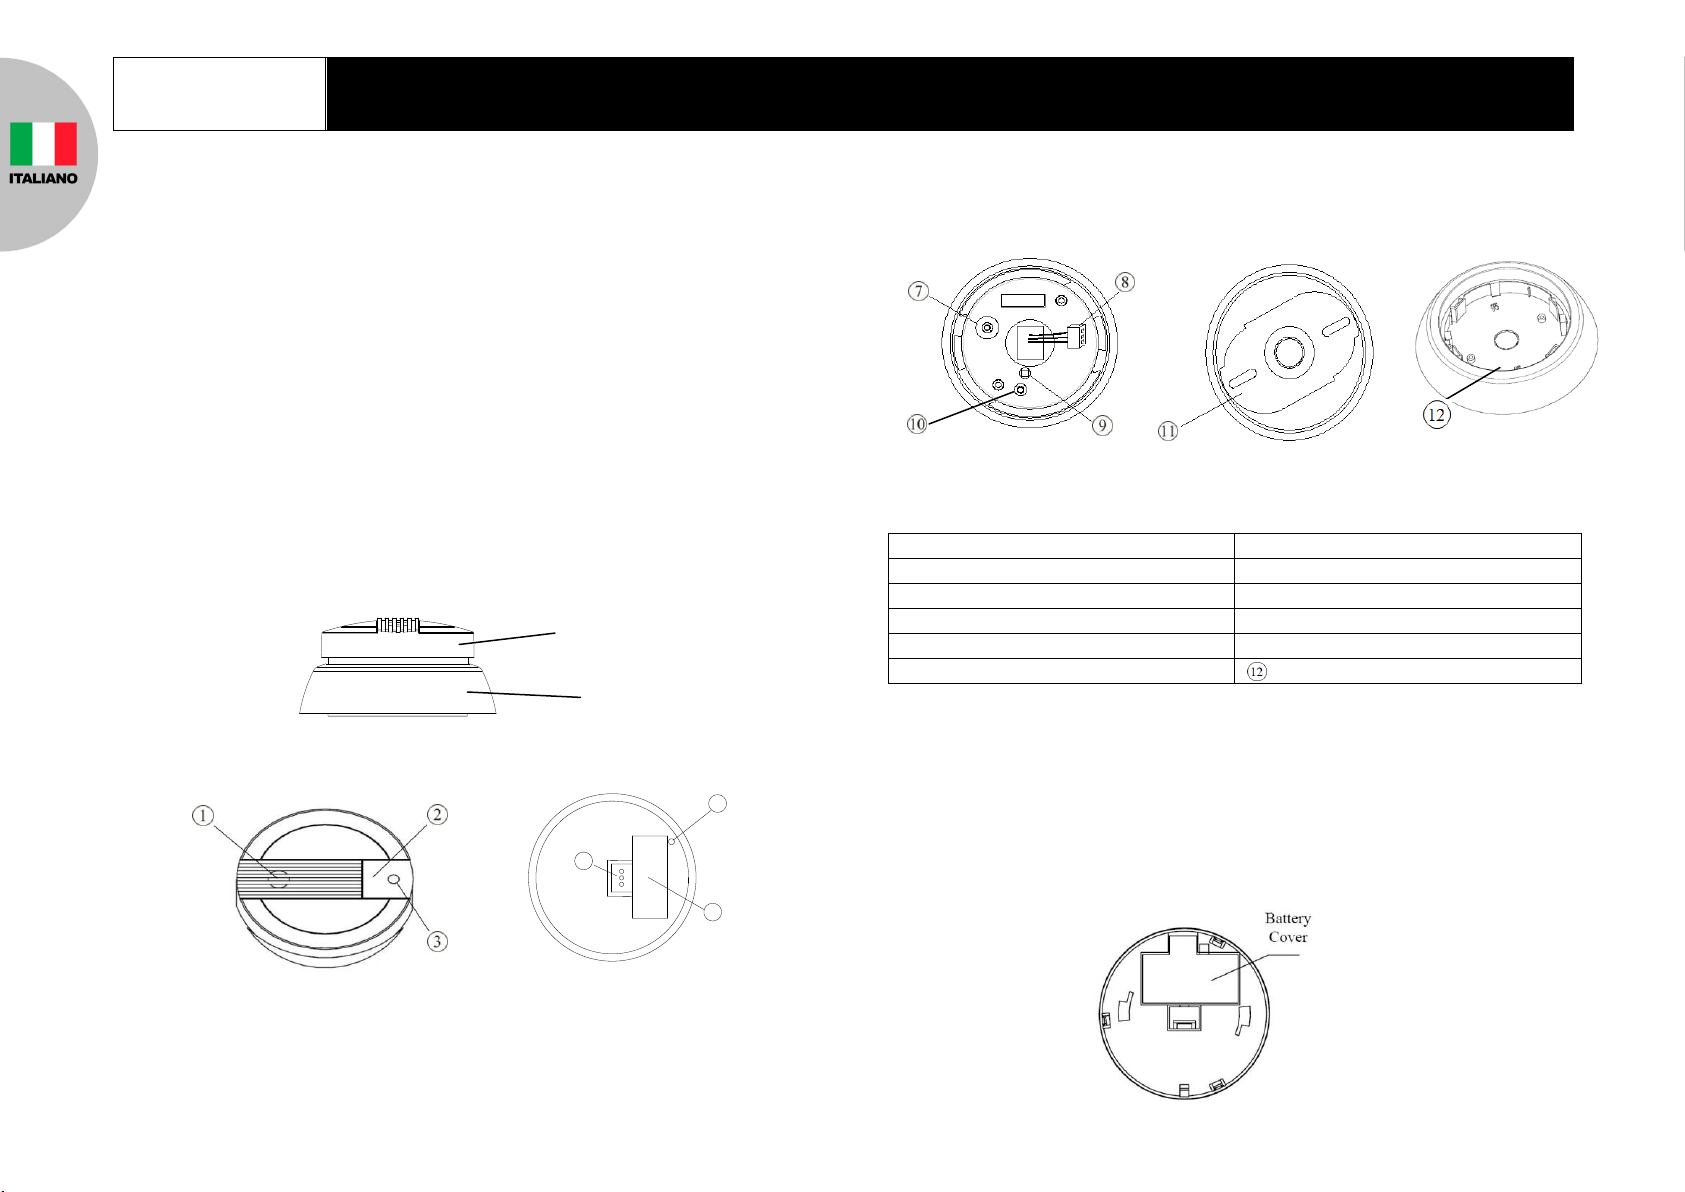
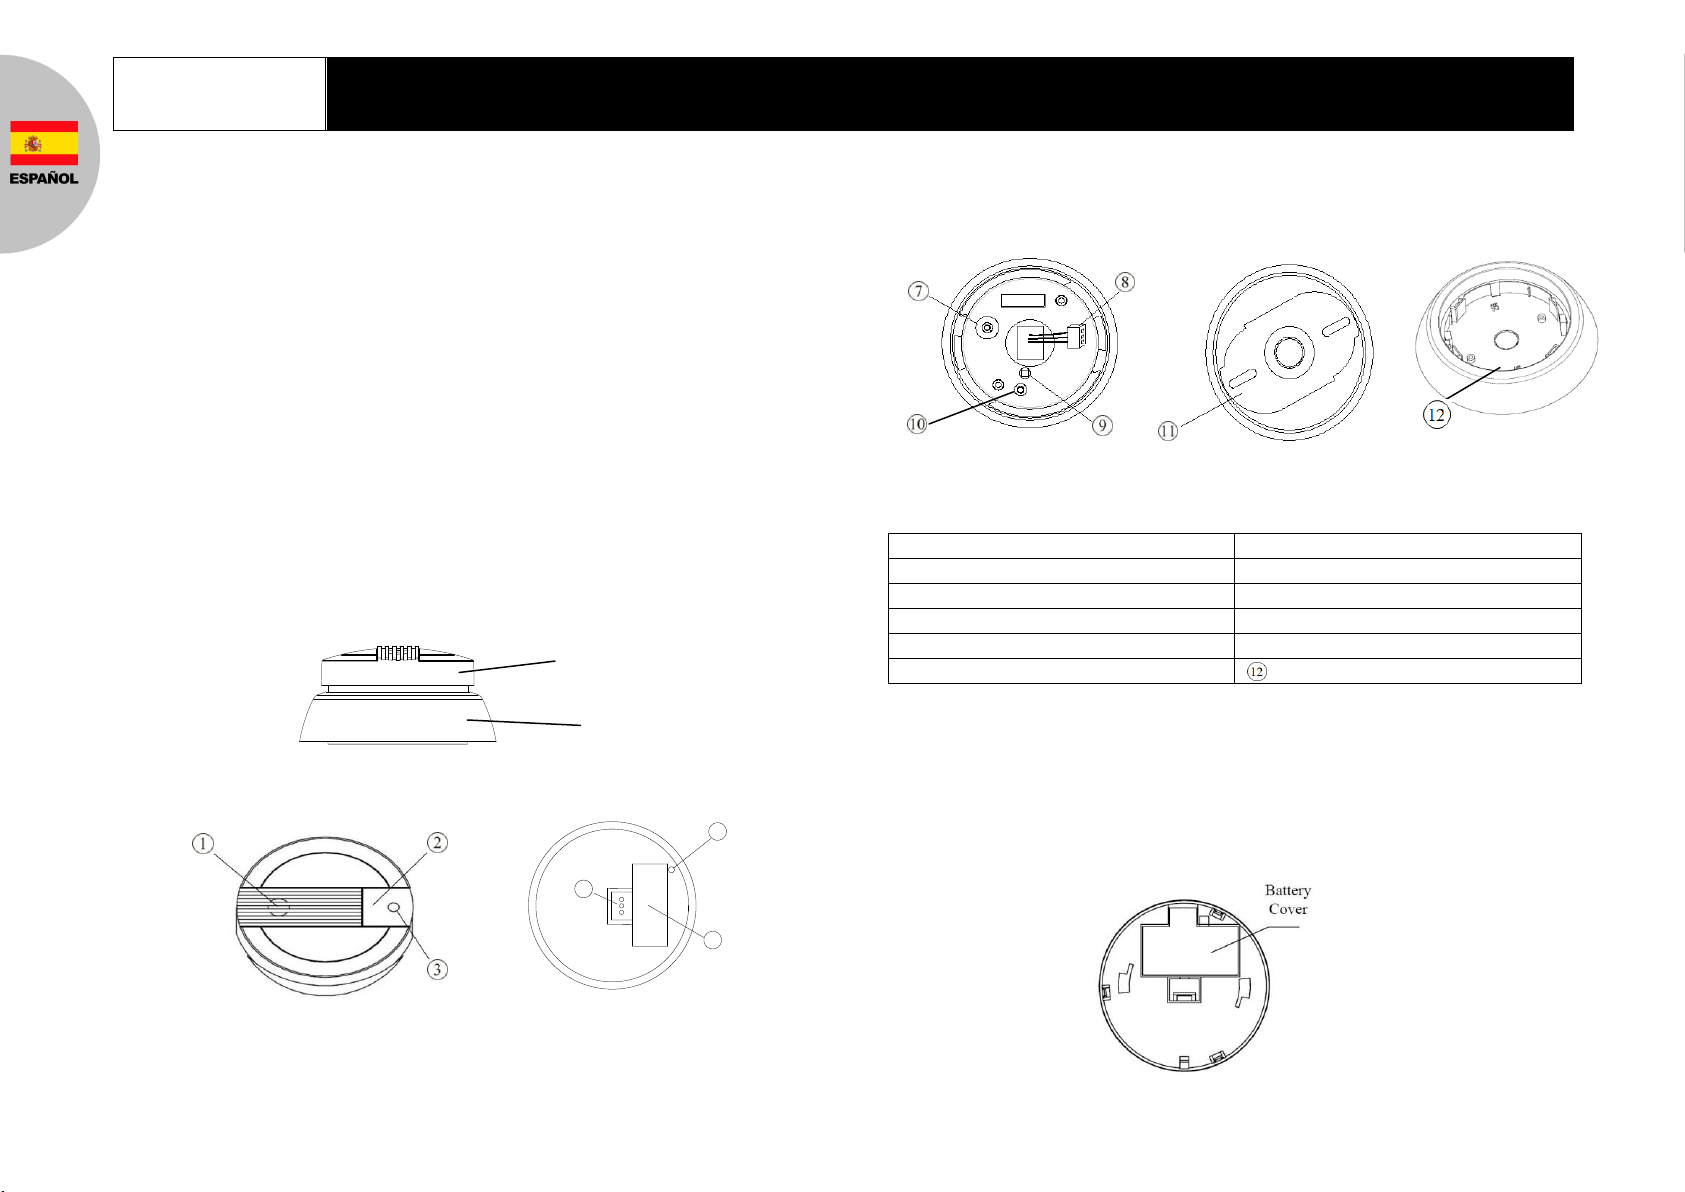
1. Remove the mounting bracket ⑪from the detector by rotating it
counterclockwise.
2. Use a 5mm drill bit to drill two holes and insert the provided plastic wall plugs.
3. Use the two screws and provided plastic wall plugs to attach the bracket to the
wall.
4. Line up the slot of the bracket and the detector. Push the detector onto the
mounting bracket and turn it clockwise to fix it into place. Pull outward on the
detector to make sure it is securely attached to the mounting bracket.
Tamper Protection
Tamper switch is set inside the housing of SF804 to prevent it from being forcibly
removed.
Maintenance
1. One 9V alkaline battery is supplied in the SF804. Replace the battery once
a year. When battery level drops, the detector will beep once every 30
seconds and emit radio signals to the gateway. When this occurs, the
battery should be replaced immediately.
2. Clean and vacuum the dust off the detector’s sensing chamber with a soft
cloth when changing the battery.

4
Troubleshooting
The troubleshooting table lists some possible causes and solutions. Please
contact your original retailer or nearest service center if the below solutions
cannot solve your problem.
Symptom Possible Cause Recommendation
SF804 LED indicator not
illuminating 1. No battery is
inserted or battery is
flat gateway.
2.The smoke detector
may be out of order.
1. Check if the battery is inserted
properly or replace battery
2. Send the device in for repair
and do not open it
No alerts from the
smoke sensor appear
on Homesys interface
1. Binding process
failed.
2. The smoke detector
cannot communicate
with the gateway
HSC04.
1. Follow the steps for “Manual
Binding”.
2. Place the smoke detector closer
to the gateway.
Reset to factory default:
To reset SF804 back to factory default state:
1. Insert the batteries into the unit
2. Press and hold the Learning key for more than 3 seconds and release. The
red LED starts to blink.
3. Within 30 seconds, press and hold the button for more than 6 seconds. The
LED will start to flash, implying the device is reset back to factory mode
Specifications
** Specifications are subject to change and improvement without notice.
www.everspring.com
3F., No. 50, Sec 1, Zhonghua Rd., Tucheng Dist.,
New Taipei City 23666, R.O.C A501112395R01
Battery Type 9V /540mA alkaline battery x 1
Operating Frequency 868MHz (EU) / 923MHz (America)
Range Up to 200 meter line of sight
Battery Life (alkaline) About 1 year @stand-by mode

5
SF804
Sensore di fumo
Guida all’installazione
Introduzione
Il sensore di fumo SF804 rileva la presenza di fumo analizzando l’aria all’interno
della cassa di rilevamento. Non rileva gas, calore o fiamme. Quando rileva fumo
emette un segnale acustico di allerta, inoltre avvisa la central via segnale
wireless. SF804 funziona nel sistema smart home basato su cloud Homesys.
Descrizione
Il dispositivo è compost da due parti; il sensore di fumo ed il trasmettitore. The
transmitter module can be detached by twisting it clockwise against the sensor
module.
Sensore : Vista frontale e posteriore
Trasmettitore: Lato frontale e posteriore
Aggiungere ad Homesys
1. Ruotare il trasmettitore in senso orario per separarlo dal sensore
2. Separare il connettore dai pin ai quail è agganciato sul lato sensore.
Prendere nota della posizione originale dei pin in modo da poter ricollegare il
connettore nella stessa posizione.
3. Aprire il coperchio batteria.
Foro del sensore
Sensore anti vandalism
Bottone di prova
Connettore
LED fumo
Bottone di ricerca
Pin per connettore
○
10 LED ricerca
Aggancio al trasmettitore
⑪Placca di montaggio
Coperchio batteria
Base transmettitore
4
5
6
Sensore di fumo
Transmettitore

6
4. Preparare una pila 9V alkaline. Per il momento non inserire la batteria.
5. Accedere al proprio sistema Homesys da pagina web.
6. Selezionare “Sistema” quindi “Aggiungi dispositivo”,
7. Selezionare “Sensore di fumo”.
8. Appare la seguente schermata. Significa che la centrale IPBOX ha iniziato la
ricerca di dispositivi.
9. Inserire le batterie con la polarità corretta.
10.Collegare di nuovo il connettore ai pin posti sul lato posteriore del
sensore. Assicurarsi che il connettore sia collegato come indicato dall’etichetta
posta sul sensore.
11.Se il processo ha successo, entro 10 secondi appare la seguente schermata.
12.Se la ricerca non dá esito, dopo 3 min il conteggio scade. Leggere “Ricerca
manuale”per aggiungere il dispositivo.
Ricerca manuale
1. Ripetere i passi da 4 a 8 di “Aggiungere ad Homesys”.
2. Tenere premuto il bottone di ricerca per 3 secondi quindi rilasciare, il LED
ricerca ○
10 inizia a lampeggiare. Questo significa che il dispositivo ha
iniziato la ricerca.
3. Entro 5 secondi, il LED link si spegne, questo indica che èstata trovata

7
una centrale IPBOX.
Prova dispositivo
1. Riagganciare il trasmettitore al sensore.
Nota: Il LED fumo lampeggia una volta ogni 30 secondi per indicare che il
sensore è operativo
2. Premere e tenere premuto il bottone di prova per 3 secondi, il sensore LED
lampeggia e il sensore emette un forte segnale acustico.
3. Se la prova ha successo il sistema attiva un allarme e il sensore di fumo
emette un segnale acustico d’allarme (la lista delle allerte si trova in
“Eventi”).
Nota: E’necessario che la central Homesys sia accesa e collegata ad
internet.
4. Se la prova non ha successo, consultare “Domande frequenti”.
Installare SF804
Il dispositivo è stato creato per utilizzo in una singola casa o appartamento. Per
ottenere una copertura ideale, andrebbe installato in ogni stanza. La copertura
minima consigliata èdi un sensore per piano e uno per ogni stanza da letto.
1. Rimuovere la placca di montaggio ⑪dalla base ruotando la placca in senso
antiorario.
2. Utilizzare un trapano con punta da 5mm per effettuare due fori sul soffitto ed
inserire i tasselli.
3. Usare le due viti incluse nella confezione per fissare la placca al soffitto.
4. Riagganciare la placca alla base girando la base in senso orario. Tirare
leggermente il sensore per verificare che sia ben fissato al soffitto.
Protezione anti vandalismo
All’interno del dispositivo c’è un sensore anti vandalism che impedisce di togliere il
sensore di fumo dalla parete.
Manutenzione
1. Se il livello della batteria del sensore è troppo basso, il dispositivo emette un
beep ogni 30 secondi oltre ad inviare un messaggio alla central.
Rimpiazzare le batterie appena possibile.
2. Quando si sostituisce la batteria, rimuovere polvere o ragnatele dal
sensore.

8
Domande frequenti
La lista con le domande frequenti mostra alcuni problemi ricorrenti, le cause e
soluzioni. Se non si trova una risposta al proprio problema, contattare il proprio
fornitore o il servizio asistenza piu vicino.
Sintomi
Possibili cause
Soluzioni
Il LED non si accende e
il dispositivo non
risponde
1. Batterie scariche o
non inserite.
2.Malfunzione.
1. Verificare se le batterie sono
state inserite correttamente o
rimpiazzarle
2. Inviare il dispositivo al centro
riparazioni
La centrale non riceve
allarmi dal sensore di
fumo
1. Il dispositivo non è
stato aggiunto alla
centrale
2. Il sensore di fumo
non comunica con la
centrale.
1. Seguire il procedimento di
“Ricerca manuale”.
2. Spostare la tastiera piu vicino
alla centrale.
Ripristino a valori iniziali:
Per ripristinare SF804 a valori iniziali:
1. Inserire le batterie nel dispositivo
2. Tenere premuto il bottone di ricerca per 3 secondi poi rilasciare, il LED inizia
a lampeggiare.
3. Entro 30 secondi, tenere premuto il bottone di ricerca, questa volta per 6
secondi. Se l’LED lampeggia piano, significa che il dispositivo è stato
ripristinato
Specifiche tecniche
** Le specifiche sono soggette a modifiche senza preavviso.
www.everspring.com
3F., No. 50, Sec 1, Zhonghua Rd., Tucheng Dist.,
New Taipei City 23666, R.O.C A501112395R01
Tipo batteria
9V /540mA alkaline battery x 1
Frequenza wireless
868MHz (EU) / 923MHz (America)

9
SF804
Detector de humo
Guía de instalación
Introducción
El detector de humo SF804 envia alertas anti encendio cuando en la Cámara de
medida del sensor hay humo en una cierta densidad El detector detecta solo
humo, no detecta gas, calor o flamas. Cuando se detecta humo, la sirena se
activa y la caja de transmisión envía un señal a la pantalla de control.
Vista producto
The detector esta compuesto por un detector de humo y la caja de transmisión
del señal inalámbrico. Las dos partes se pueden repartir girando la caja de
transmisión en sentido horario.
Caja del sensor : Vista frontal y posterior
Caja de transmisión: Vista frontal y posterior
Añadir a un sistema Homesys
1. Separar la caja sensor desde la base rotando en sentido anti horario
2. Desconectar el conector de los pines en la caja sensor. Tomar nota de la
posición para reconectarlo despues.
3. Abrir la cobertura de la batería
Cámara de medida
Botón anti manipulación
Botón de prueba
Conector
LED alarma
Botón de búsqueda
Pines para conector
○
10 LED de búsqueda
Pestillo cobertura
⑪Soporte para instalación
Cobertura batería
Panel a falda
4
5
6
Caja del sensor
Caja de transmisión

10
4. Preparar una batería 9V alcalina. No poner la batería de momento.
5. Ingresar a su cuenta por navegador web
6. Seleccionar “Sistema”y “Añadir un nuevo equipo”.
7. Seleccionar “Detector de humo”.
8. Esta pantalla significa que la gateway está buscando dispositivos.
9. Poner las baterías con polaridad correcta.
10.Conectar otra vez el conector a los pines en la caja del sensor .
Asegurarse que la posición sea correcta como indicado en la imagen.
11.Si dentro de 10 segundos el operación tiene éxito aparece la siguiente
pantalla.
12.Si el operación de búsqueda no tiene éxito. Chequear “búsqueda manual”.
Búsqueda manual
1. Repetir los pasos 4 ~ 8 de “Añadir a una gateway”.
2. Poner la batería y fijar el conectora los pines en la caja del sensor,
presionar y detener el botón de búsquedapor 3 segundos y soltar, el LED
de búsqueda ○
10 parpadea. Esto significa que SF804 está buscando
dispositivos.
3. Dentro de 5 segundos el LED de búsqueda deberia apagarse indicando que

11
la búsqueda tuvo éxito. Esta es la pantalla de confirmación.
Prueba
1. Reconectar la caja de transmisión con la caja del sensor.
Nota: El LED alarma parpadea una vez cada 30 segundos para indicar
que el detector funciona normalmente
2. Presionar y detener el botón de prueba por 3 segundos, el LED alarma
parpadea y el sensor emite un señal acústico fuerte.
3. Si la prueba tiene éxito el detector emite un señal ácustico y dispara un
alarma en el sistema (la lista de alarmas está en “Eventos”).
Nota: Es necesario que la gateway este encendida y conectada a internet.
4. Si la prueba no tiene éxito,chequear preguntas frecuentes.
Instalación SF804
El detector de humo esta proyectado para una familia o apartamento. Para una
protección completa, instalar un detector en cada habitación, pasillo, sótano I
ático. Para una protección mínima instalar un detector en cada piso.
1. Separar la caja del sensor⑪de la base rotando en sentido anti horario
2. Utilizar una taladrora con punta de 5mm, para hacer dos agujeros en la pared,
luego insertar las tuercas
3. Utilizar los dos tornillos y las tuercas de plástico para fijar la base a la pared.
4. Fijar otra vez el detector a la base chequeando la posición de las palanquitas
internas, empujando un poco el detector y rotando en sentido horario.
Chequear si el detector está fijado bien a la base.
Protección anti-manipulación
El botón anti manipulación esta dentro de la caja SF804 para evitar que alguien
pueda desactivar el detector.
Manutención
1. El sensor de humo funciona con una batería alcalina de 9V, que
normalmente funciona por 1 año. Cuando el nivel de la batería baja
demasiado, el detector emite un señal acústico cada 30 segundos y envia
un mensaje a la gateway. Cuando ocurre, remplazar en seguida la batería.
2. Limpiar bien el hueco del sensor para que el polvo o algo sucio no
obstruye el sensor de humo.
Preguntas frecuentes
En esta lista aparecen las preguntas mas frecuentes. Si no se encuentra
solución, llame a su tienda o al centro servicios mas cercano.

12
Síntomas
Causa
Solución
Los LED no se
encienden
1. No hay baterías o se
agotaron
2.Falla interna
1.Chequear si se pusieron
correctamente las baterías o
remplazarlas
2.Enviar el producto al centro
servicios sin abrirlo.
No aparecen las alertas
disparadas por el
detector
1. El proceso de
búsqueda no tuvo
éxito
2. El detector está
fuera de alcance de
la gateway
1.Intentar con la “búsqueda
manual”.
2.Cambiar la posición de la
gateway
Restablecimiento a valores de fábrica
Para restablecer SF804 a valores de fábrica:
1. Poner la batería en el dispositivo
2. Presionar y detener el botón de búsqueda por mas de 3 segundos y soltarlo.
El LED rojo empieza a parpadear.
3. Dentro de 30 segundos, presionar y detener el botón de búsqueda por mas
de 6 segundos. El LED parpadea mas lento, para indicar que el detector ha
vuelto a valores de fábrica.
Especificaciones
** Las especificaciones están sujetas a cambio sin previa notificación.
Batería
9V /540mA alkaline battery x 1
Frecuencia radio
868MHz (EU) / 923MHz (America)
Vida batería (alkalina)
Hasta 1 año @ (sin alarmas)
Table of contents
Languages:
Other EVERSPRING Smoke Alarm manuals
Popular Smoke Alarm manuals by other brands

INIM Electronics
INIM Electronics V200 quick start guide

LOXONE
LOXONE Smoke Detector Air quick guide

Xtralis
Xtralis vesda LaserFOCUS VLF-500 Product guide

ELRO
ELRO FC400211 instruction manual

FIBARO
FIBARO Smoke Sensor short service guide

System Sensor
System Sensor OSI-RIE Series Installation and maintenance instructions