EVO Gimbals EVO RAGE3 User manual

20810 Sockeye Pl #200
Bend, OR 97701
Support and Sales Quesons:
Tel: (866) 977-6688 Monday to Friday 9AM to 5PM Pacific Time
or email support@evogimbals.com
EVOGimbals.com
English Manual V1.0


CONTENTS
Packing List 1
Disclaimer and Warning 2
Get to Know The EVO RAGE3 7
Preparing and Charging the Baeries 8
Installaon 10
Balance Adjustment 13
How to Use 16
APP Operaons 23
Calibraon and Firmware Upgrade 25
Specificaons 29
Product Dimensions 30
Warranty 31
My Notes 33

1 2
PACKING LIST DISCLAIMER AND WARNING
The EVO RAGE3 comes with the following items. If any item is missing, please
contact EVO Gimbals.
Baery Charger
Tripod
Micro USB Cable Storage Case
Shoulder Strap Manual
18650 Li-ion Baery
Canon Camera Control
Cable EVO-Micro-002
EVO RAGE3 Gimbal
1
1
1
3
Panasonic Camera Control
Cable EVO-CTIA-002
1
1
1
Canon Camera Control
Cable EVO-Mini-002
1
1
Sony Camera Control
Cable EVO-Mul-002
1
1
1
Thank you for purchasing the EVO RAGE3. The informaon contains herein affects your safety and your legal
rights and responsibilies. Read this enre document carefully to ensure proper configuraon before use.
Failure to read and following instrucons and warnings herein may result in serious injury to you or
bystanders, or damage to your device or property.
EVO Gimbals reserves the right of final explanaon for this document and all relevant documents relang to
the RAGE3 and the right to make changes at any me without noce. Please visit EVOGimbals.com for the
latest product informaon.
By using this product, you hereby signify that you have read this document carefully and that you understand
and agree to abide by the terms and condions herein. You agree that you are solely responsible for your own
conduct while using this product, and for any consequences thereof. You agree to use this product only for
purposes that are proper and in accordance with all terms, precauons, pracces, policies and guidelines
EVO Gimbals has made and may make available.
EVO Gimbals accepts no liability for damage, injury or any legal responsibility incurred directly or
indirectly from the use of this product. Users shall observe safe and Iawful pracces including, but not limited
to, those set forth herein.
All product names or marks referred to hereunder are trademarks or registered trademarks of their respecve
holders.
The following terms are used throughout the product literature to indicate various levels of
potenal harm when operang this product.
WARNING: Procedures, which if not properly followed, may incur property damage, grave accident, or
serious injury.
CAUTION: Procedures, which if not properly followed, may incur property damage and serious injury.
NOTICE: Procedures, which if not properly followed, may incur property damage or minor injury.

34
DISCLAIMER AND WARNINGDISCLAIMER AND WARNING
Battery Safety Guidelines
1. Prevent the baeries from coming into contact with any kind of liquid. Do not leave baeries out in the
rain or near a source of moisture. Do not drop the baeries into water. If the inside of the baery comes in
contact with water, chemical decomposion may occur, potenally resulng in the baery catching on fire,
and may even lead to an explosion.
2. If the baery falls into water with the stabilizer during use, take it out immediately and put it in a safe and
open area. Maintain a safe distance from the baery unl it is completly dry. Never use the baery again, and
dispose of the baery properly as described in the Baery Disposal secon below.
3. If the baery catches fire, use water, water spray, sand, fire blanket, dry powder, or carbon dioxide fire
exnguisher immediately to put out the fire. Please exnct the fire by applying the methods recommended
above according to the actual situaon.
4. Never use non-EVO Gimbals baeries. If replacement or backup is needed, please purchase new baeries
from EVO Gimbals' official website or authorized channels. EVO Gimbals takes no responsibility for any
damage caused by non-EVO Gimbals baeries.
5. Never use or charge swollen, leaky, or damaged baeries. Never use or charge if the baery smells, or
overheats (exceeding maximum temperature of 160°F / 71°C). If your baeries are abnormal, contact EVO
Gimbals for further assistance.
6. The baery should be used within the temperature range from -10° C to 50° C. Use the baery in
environments above 50° C can lead to a fire or explosion. Use of baery below - 10° C can lead to serious
baery damage.
7. Do not use the baery in strong electrostac or electromagnec environments. Otherwise, the baery
protecon board may malfuncon.
8. Do not disassemble or use any sharp object to puncture the baery in any way. Otherwise, the baery
may leak, catch fire or explode.
9. Do not mechanically strike, crush, or throw the baery. Do not place heavy objects on the baery or
charger.
10. Electrolytes inside the baery are highly corrosive. In case of accidental contact of any electrolytes with
your skin or eyes, rinse immediately with water for at least 15 minutes and seek medical advice as soon as
possible.
11. Do not use the baery if it has been involved in a crash or heavy impact.
12. Do not heat the baery and never put the baery in a microwave oven or in a pressurized container.
Warning
Read the ENTIRE User Guide to become familiar with the features of this product before operang. Failure to
operate the product correctly can result in damage to the product or personal property and cause serious
injury. This is a sophiscated product. It must be operated with cauon and common sense and requires
some basic mechanical ability. Failure to operate this product in a safe and responsible manner could result in
injury or damage to the product or other property. This product is not intended for use by children without
direct adult supervision. DO NOT use with incompable components or in any way otherwise as menoned
or instructed in the product documents provided by EVO Gimbals. The safety guidelines herein contain
instrucons for safety, operaon and maintenance. It is essenal to read and follow all of the instrucons and
warnings in the User Guide, prior to assembly, setup or use, in order to operate the product correctly and
avoid damage or serious injury.
Safe Operation Guidlines
CAUTION:
1. The RAGE3 is a high-precision control device. Damage may be caused to The RAGE3 if it is dropped or
subject to external force, and this may result in malfuncon.
2. Make sure the rotaon of the gimbal axes is not blocked by external force when The RAGE3 is turned on.
3. The RAGE3 is not waterproof. Prevent contacts of any kind of liquid or cleaner with The RAGE3. It is
recommended to use dry cloth for cleaning.
4. Protect The RAGE3 from dust and sand during use.
WARNING:
To avoid fire, serious injury, and property damage, observe the following safety guidelines when using,
charging, or storing your baeries.

5 6
DISCLAIMER AND WARNINGDISCLAIMER AND WARNING
13. Do not place the baery cell on a conducve surface (such as a metal desk surface).
14. Prevent use of wires or other metal objects that could cause posive and negave short-circuit to the
baery.
15. If the baery terminal is dirty, wipe it with a clean, dry cloth. Otherwise it will cause a bad baery
connecon, which may result in energy loss or charging failure.
Battery Charging
1. Do not aach the baeries to a wall outlet or car charger socket directly. Always use a EVO Gimbals
approved adapter for charging. EVO Gimbals takes no responsibility if the baery is charged using a non-EVO
Gimbals charger.
2. Do not put the baery and charger near flammable materials or on flammable surfaces (such as carpet or
wood). Never leave the baery unaended during charging to prevent an accident.
3. Do not charge the baery immediately aer use, because the baery temperature may be too high. Do not
charge the baery unl it cools down to normal room temperature. Charging the baery with its temperature
over 40°C or lower than 15°C may lead to leakage, overheang, or damage.
4. Examine the charger before use, make sure there is no damage to the enclosure, cord, plug, or other parts.
Never use a damaged charger. Do not clean the charger with any liquid containing alcohol or other flammable
solvents. Disconnect the charger when not in use.
Battery Storage
1. Keep baeries out ohe reach of children and pets.
2. Do not leave the baery near heat sources such as a furnace or heater, or inside a vehicle on hot days.
Never expose the baery in any environment with temperatur over 60°C. The ideal storage temperature is
22°C-28°C.
3. Store baeries in a dry environment.
4. Do not leave the baery unused for too long aer it has been completely discharged to prevent
over-discharge of baery which may result in baery damage and permanent failure.
Battery Maintenance
1. Never use the baery when the temperature is too high or too low.
2. Do not store the baery in any environment with a temperature of over 60°C.
Transportaon Noce
1. Discharge the baery power to 5% or lower before carrying the baery on an airline flight. Only discharge
the baery in a fireproof locaon, ideally in a dry and open area.
2. Do not store or transport baeries together with metal objects such as eyeglasses, watch, and jewelries,
etc.
3. Do not transport damaged baeries. When transporng, be sure to discharge the baery to les than 50%.
Baery Disposal
1. Dispose the baery in a specific recycling area only aer a complete discharge. Do not throw away the
baery in regular trash containers. Strictly follow your local regulaons regarding the disposal and recycling
of baeries.
NOTICE:
Battery Use
Make sure the baeries are fully charged before each me of use.
Battery Charging
The baery will stop charging automacally when it is full. Disconnect the baeries from the charger when
fully charged.
Battery Storage
1. Discharge the baery to 40%-65% if it will NOT be used for over 10 days. This can greatly extend the
baery life.
2. The baery enters hibernaon mode when voltage gets too low. Charge the baery will bring it out of
hibernaon.
3. Remove baeries from the stabilizer when not in use and store them in a specialized container.
Battery Disposal
If the baery cannot be fully discharged, do not leave it in the recycling box, but contact a professional
baery disposal/recycling agent for further assistance.
7 8
PREPARING AND CHARGING THE BATTERIESGET TO KNOW YOUR NEW EVO RAGE3
For the first use of The EVO RAGE3, please use the dedicated charging device contained in the package to
fully charge and acvate the baeries to ensure the normal use of The RAGE3.
3
3
2
2
1
1
Output
Voltage
Input
Current Funcon
The Micro USB port can only be used firmware upgrade, and can neither be used for
power input nor output.
The DC 8.0 Power Output outlet can be used for charging cameras like Canon D5
series (see more on page 22 - DC 8.0v Power Oulet Usage)
The camera control interface port is used to control camera sengs and charge some
cameras. Please see EVOGimbals.com for the current list of compable cameras.
8V 2A
5V 1A
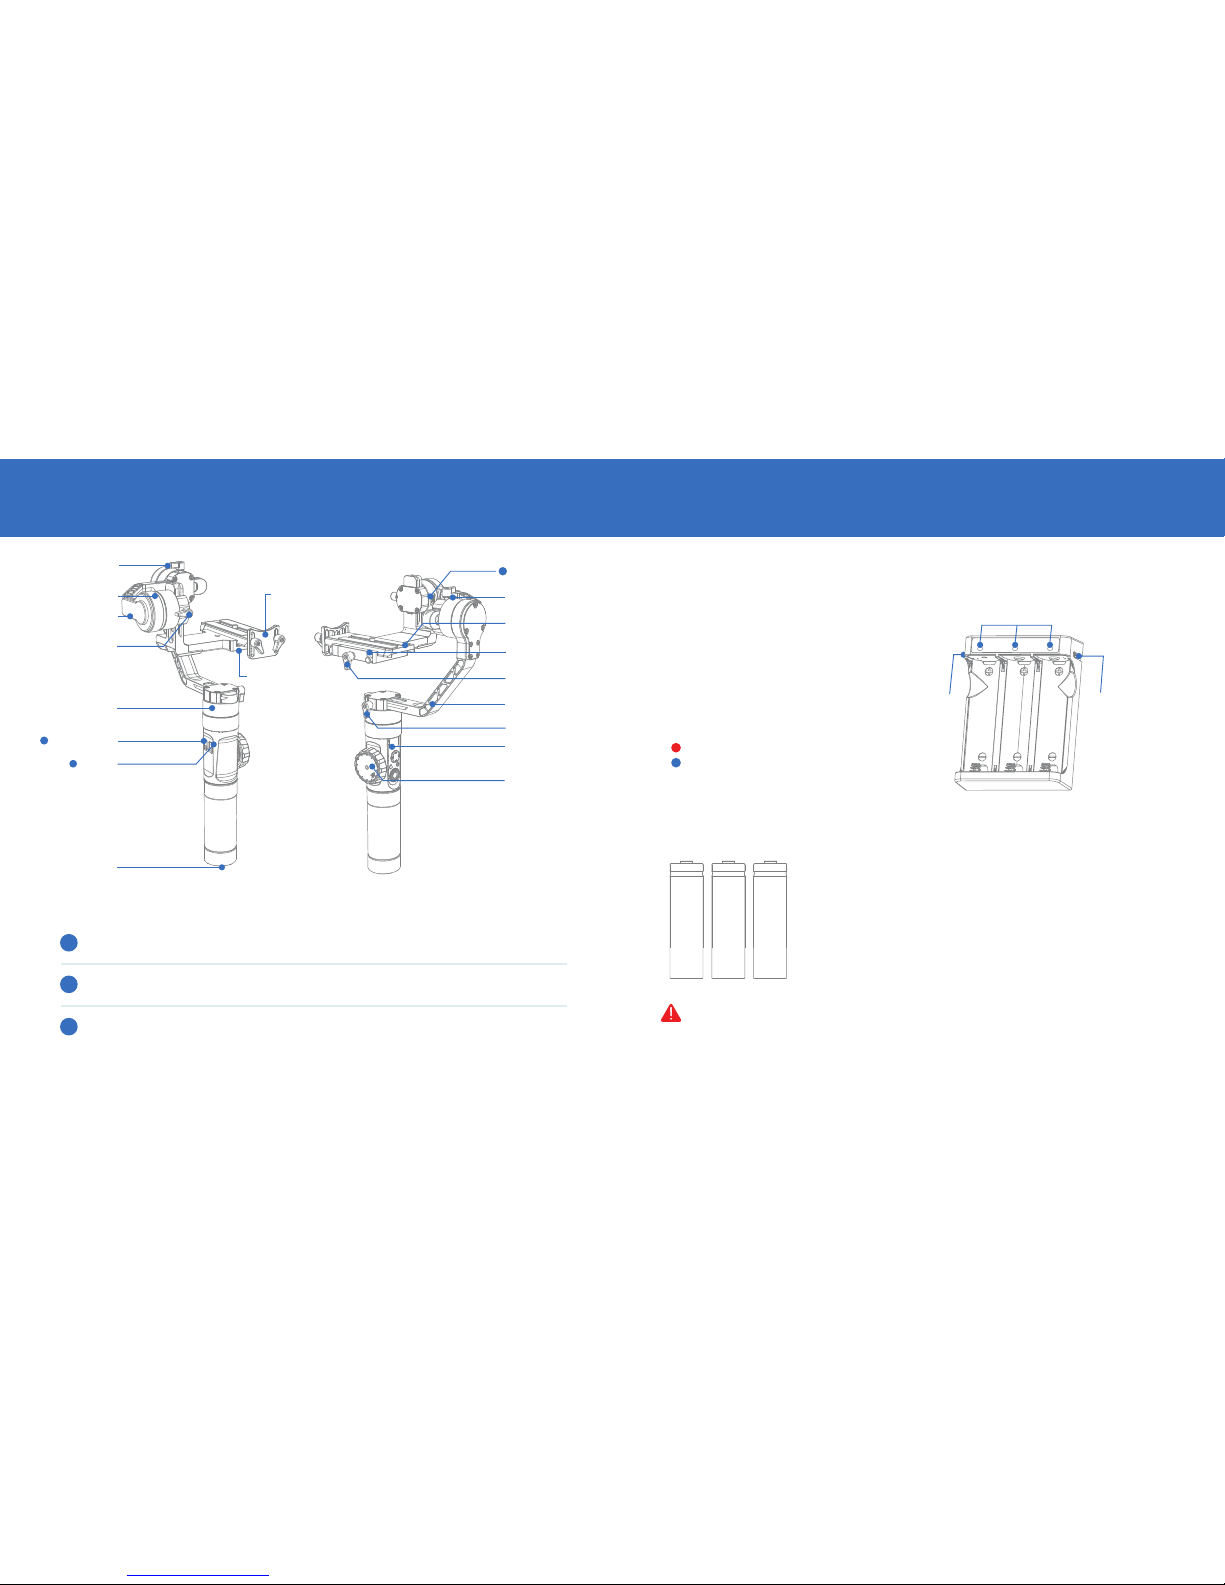
Thumb Screw Camera Control
Interface
Roll Axis Motor
Camera
Mounng Plate
Safety Lock
Mounng Plate
Thumb Screw
Vercal Arm
Control Panel
(see more on page 16)
Lens Support
Status Indicator Lights
Follow Focus
Controller
Camera Mounng
Screw
Tilt Axis Motor
Horizontal Arm
Thumb Screw
Thumb Screw
Pan Axis Motor
Micro USB Port
DC 8.0V
Power Outlet
1/4”-3/8”
Threaded Hole
Mico USB PortMico USB Port
Charger & Battery Description
Charger Specificaons
Name: EVO 18650*3 Li—ion baery charger
Model: ZC—18650—3
Input: 5V=2400mA
Output: 4.2V=800mA*3
Solid RED light when charging.
Solid BLUE light when fully charged.
Battery Specifications
Name: EVO 18650 HIGH CURRENT Li—ion baery
Model: IMR 18650
Capacity: 2000mAh
Voltage: 3.7V
NOTICE:
1. Please read the disclaimer and warning herein as well the descripon
on the baery label carefully before using the baeries.
2. The ZC-18650-3 charger is for charging EVO’s IMR 18650 Li—ion
Baery only. Do not charge baeries of other models or brands,
otherwise It may lead to an accident.
Please use and charge baeries provided or approved by EVO Gimbals only. EVO Gimbals will not take
any responsibility for explosion, fire and/or accidents caused by non-EVO baeries.
9 10
INSTALLATIONPREPARING AND CHARGING THE BATTERIES
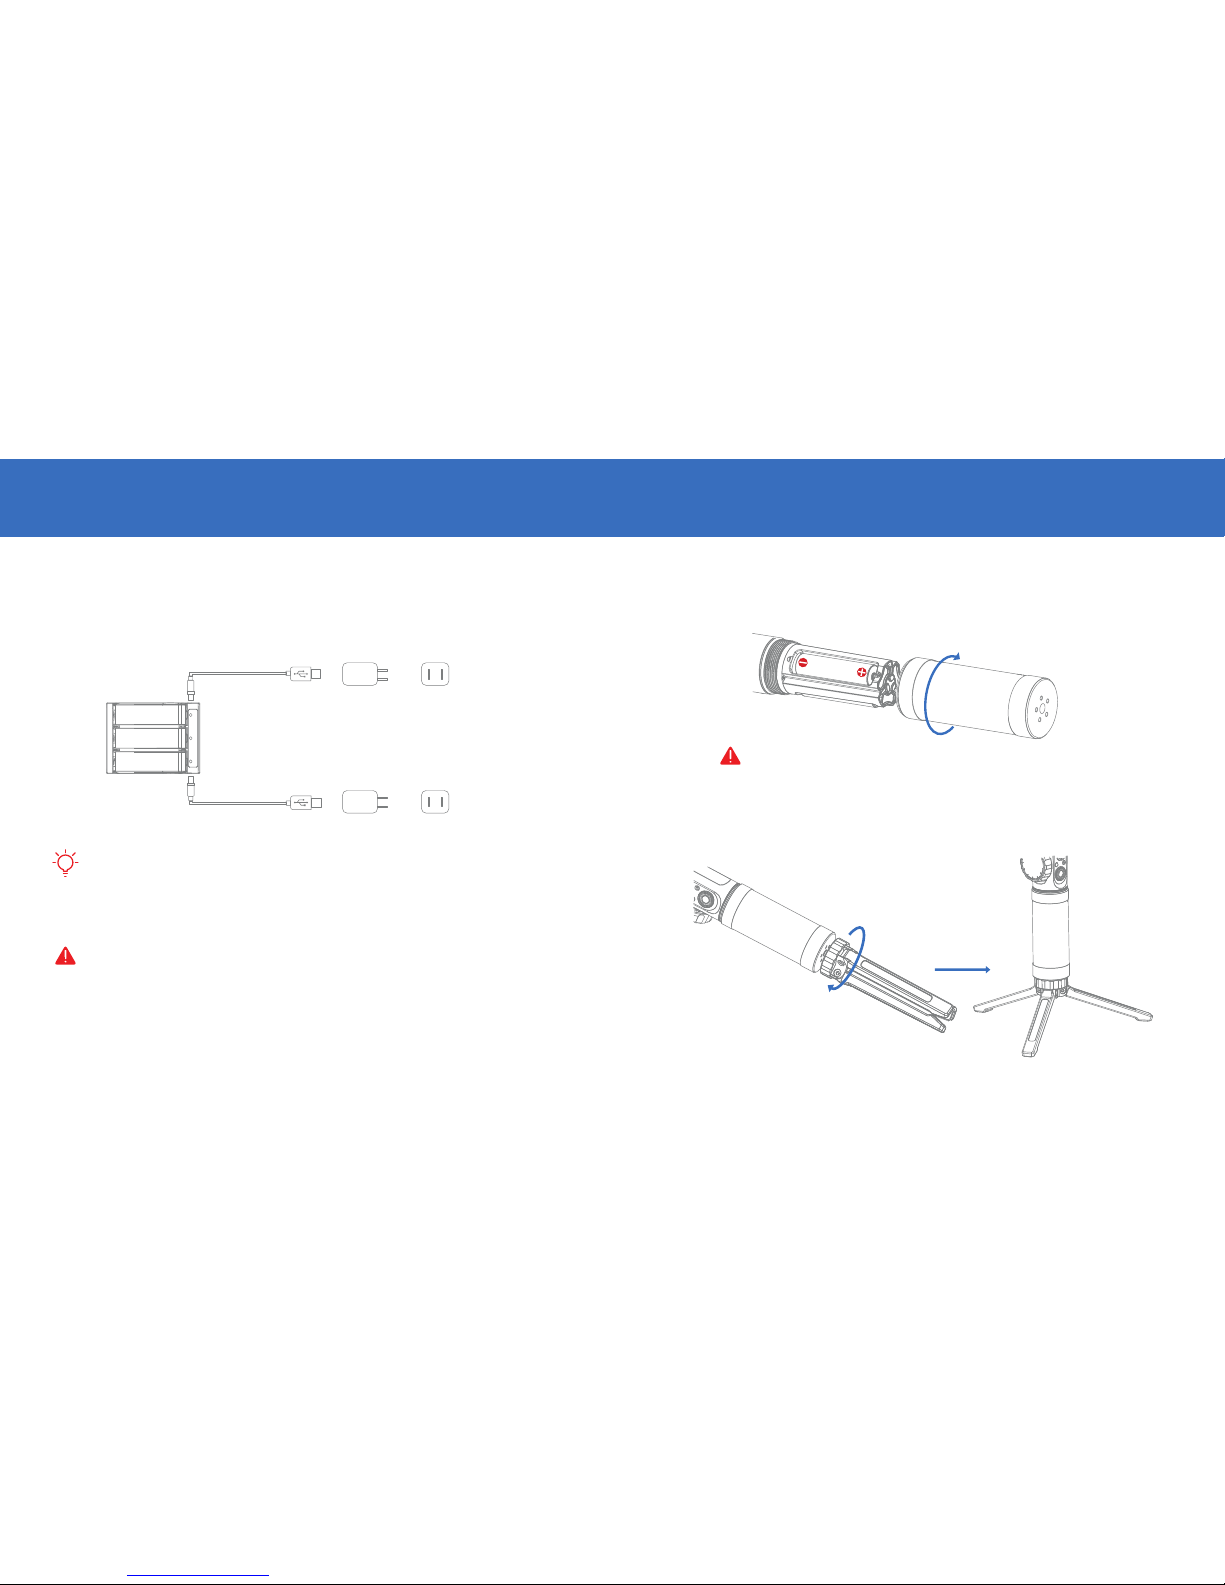
Charging Procedure
1. Insert the baeries into the charger in the right direcon (posive/negave end) accordingly.
2. Connect the charger to the adapter Via the Micro USB cable.
3. Plug the adapter into the power outlet to start charging.
Battery Installation
Unscrew the baery compartment and insert the three IMP 18650 baeries in the right direcon
(posive/negave end), then ghten the baery compartment.
Tripod
Get the tripod ready and ghten it to the 1/4”-3/8” threaded hole at the boom of the stabilizer, then
unfold the tripod on a flat surface.
There is a Micro USB 5V power input port on both sides of the charger, which supports one adapter
or two adapters charging simultaneously (faster).
2. The simultaneous charging with two adapters may fail when the power is under charged (like when the
current of adapter is below 1000mA); Adapter with higher current capacity is recommended
3. The USB Port along side the stabilizer does not support charging to baeries.
1. Please use qualified standard 5V/22000mA adapter for baery charging; Charging me depends
on the maximum input current current of the adapter.
2. The stabilizer comes standard with three high-discharge-rate dedicated baeries. Please use and charge
baeries provided or approved by EVO Gimbals only.
3. Please make sure all three baeries are fully charged. Either under charged baery can
lead to the failure of the stabilizer.
Micro USB Cable Adapter Power Outlet
Adapter Power Outlet
Micro USB Cable
Please use and charge baeries provided or approved by EVO Gimbals only.

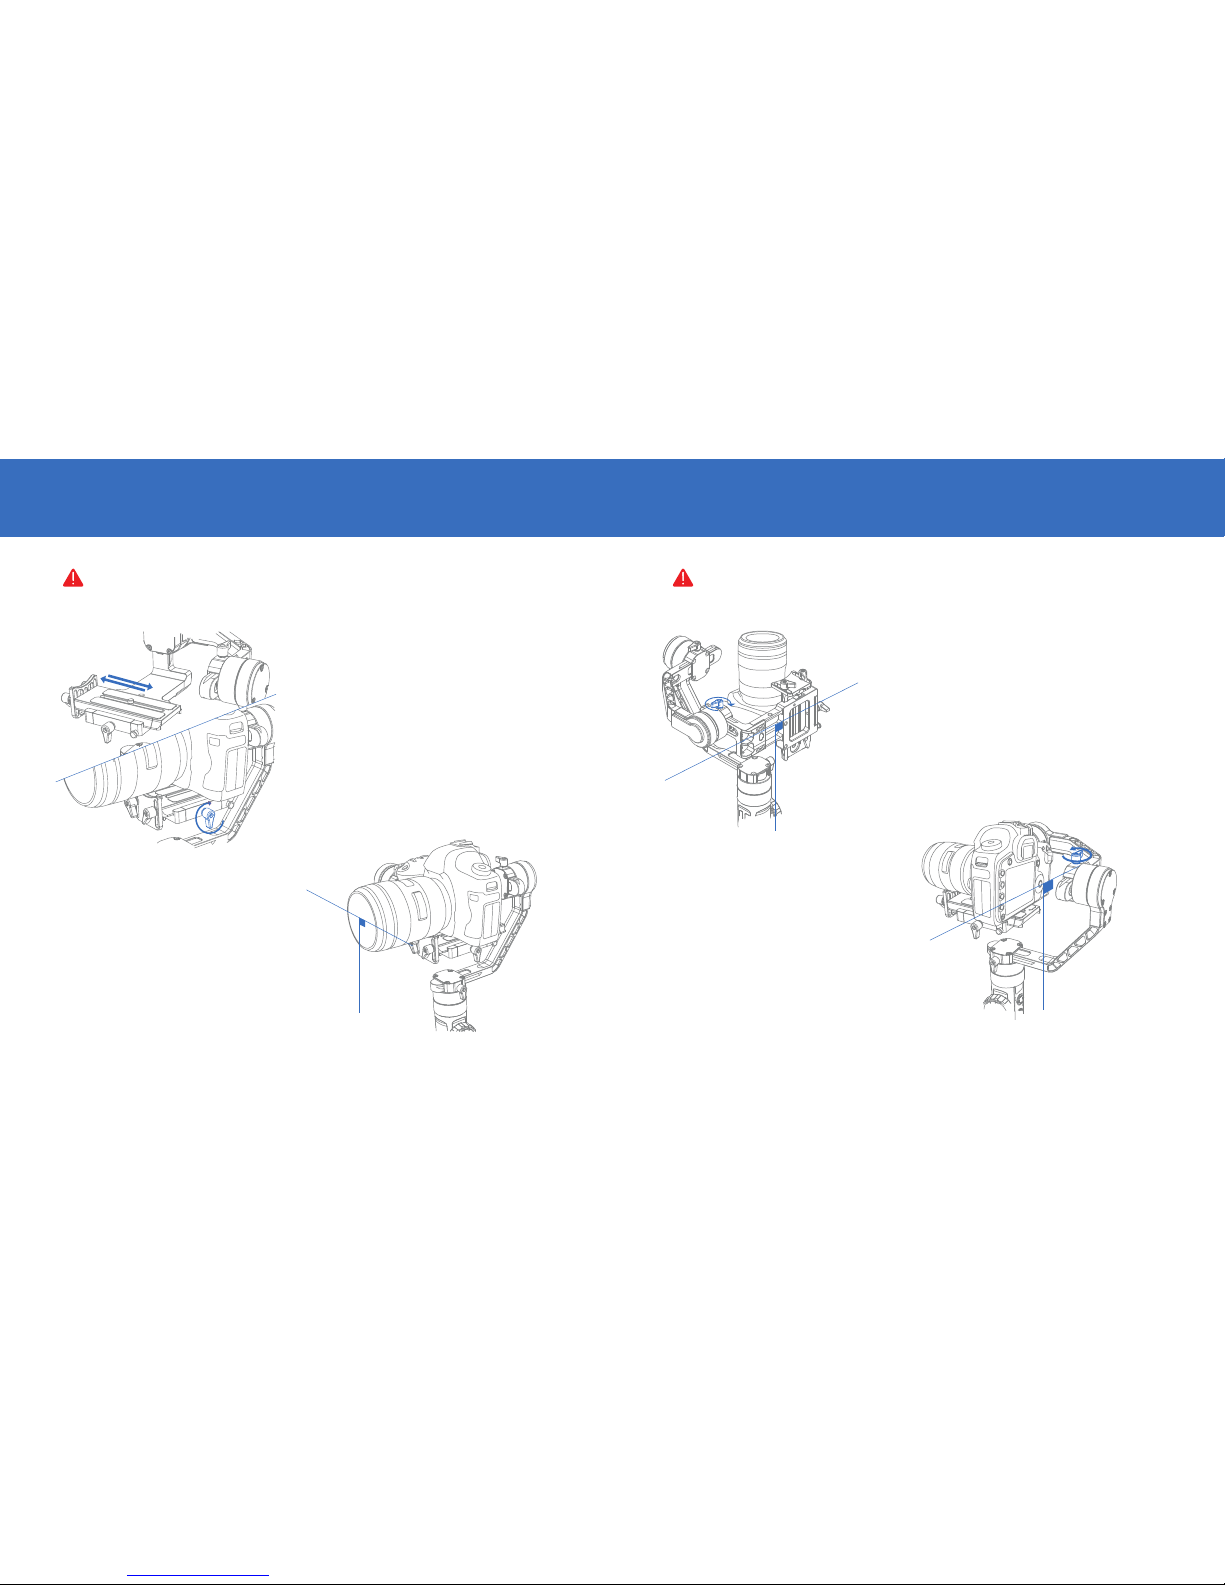
2. Install the camera to the quick release plate following the direcon of the arrow mark, then ghten the
1/4” screw at the boom.
3. Slide in the quick release plate installed with the camera following the direcon of the arrow mark on
camera mounng plate, then ghten the thumb screw to finish the installaon of the quick release plate.
4. Loosen the screws on lens support and adjust the support to keep the lens firm and stabilized.
NEVER POWER ON THE STABILIZER WITHOUT YOUR CAMERA MOUNTED & BALANCED - doing
so can cause damage to the unit; When powering on the stabilizer please be sure to lightly hold the
camera close to level with one hand to ensure proper startup rotaon.
11 12
INSTALLATIONINSTALLATION
Installing Camera
1. Loosen the mounng plate thumb screw, press and hold the safety lock while sliding out the quick release
plate (to the opposite direcon of the arrow mark on it).
EVO Gimbals Control Cable Function Table
Camera brand Canon Sony Panasonic
Camera model 5D2/5D3
EVO-Mini-002
Micro USB to Mini USB Micro USB to Micro USB Micro USB to Mul USB Micro USB to CTIA
EVO-Micro-002 EVO-Mul-002 EVO-CTIA-002EVO-Mul-001
GH4/GH5
Sony camera with
MULTI interface
5D4
CCI Cable model
Camera control cable
Photo
Video
Real-Time preview
AV
TV
ISO
EV
Zoom1
Focus2
Camera charging
Standard camera cable
X X
X
X
X
X
X
X
X
X
X
X
X
X
X
X
X
X
X
X
X
X
X
X X
33
1 Zoom control only compatible with Sony electronic zoom lenses.
2 Electronic follow focus control only compatible with servo driven Canon model cameras & lenses.
3 Requires EVO Pro-Focus drive adapter (sold separately).
3
Connecting Camera Control Cable
In the case of Canon camera, connect the control cable to the port on
the lt motor axis with the Micro USB end, and then the other end to
the le-side port on the camera.
Please make sure the stabilizer is powered off or in standby
mode when connecng the camera control cable in case of
malfunconed rotaon.
13 14
BALANCE ADJUSTMENT BALANCE ADJUSTMENT
Please make sure the camera is properly mounted and balanced, otherwise the stabilizer may fail
to start or operate normally.
The balance status of the stabilizer will greatly affect the run me.
Level Adjustment on Tilt Axis
Loosen the thumb screw on the quick release plate
so that it can slide forward or backward.
Balance Adjustment on Tilt Axis
Loosen the thumb screw (rotate about 3 mes); Adjust the Tilt
Axis unl the camera can stay sll with the lens facing up (i.e.
the camera stays sll and vercal to the ground), complete
this step by ghtening up thumb screw.
Balance Adjustment on Roll Axis
Loosen the thumb screw (rotate about 3 mes);
Adjust the Roll Axis unl the camera can stay sll.
Complete this step by ghtening up thumb screw.
Hold the horizontal arm on the Tilt Axis with one
hand and adjust the posion of the camera to find a
level balance where the camera can stay sll and
almost level with its lens facing to the front.
Complete this step by ghtening up the camera
mounng thumb screw.
15 16
BALANCE ADJUSTMENT CONTROL PANEL OVERVIEW
Balance Adjustment on Pan Axis
Loosen the thumb screw on the pan axis. Adjust the pan axis unl the camera can stay sll while keeping the
vercal arm level when turned to the right/le side. Complete balance adjustment by ghtening up all thumb
screws.
If the Camera installed is too light that it’s
impossible to achieve balanced adjustment,
please purchase the dedicated
counterweight (100g) provided by EVO
Gimbals and install it under the camera
mounng plate to finish balance installaon.
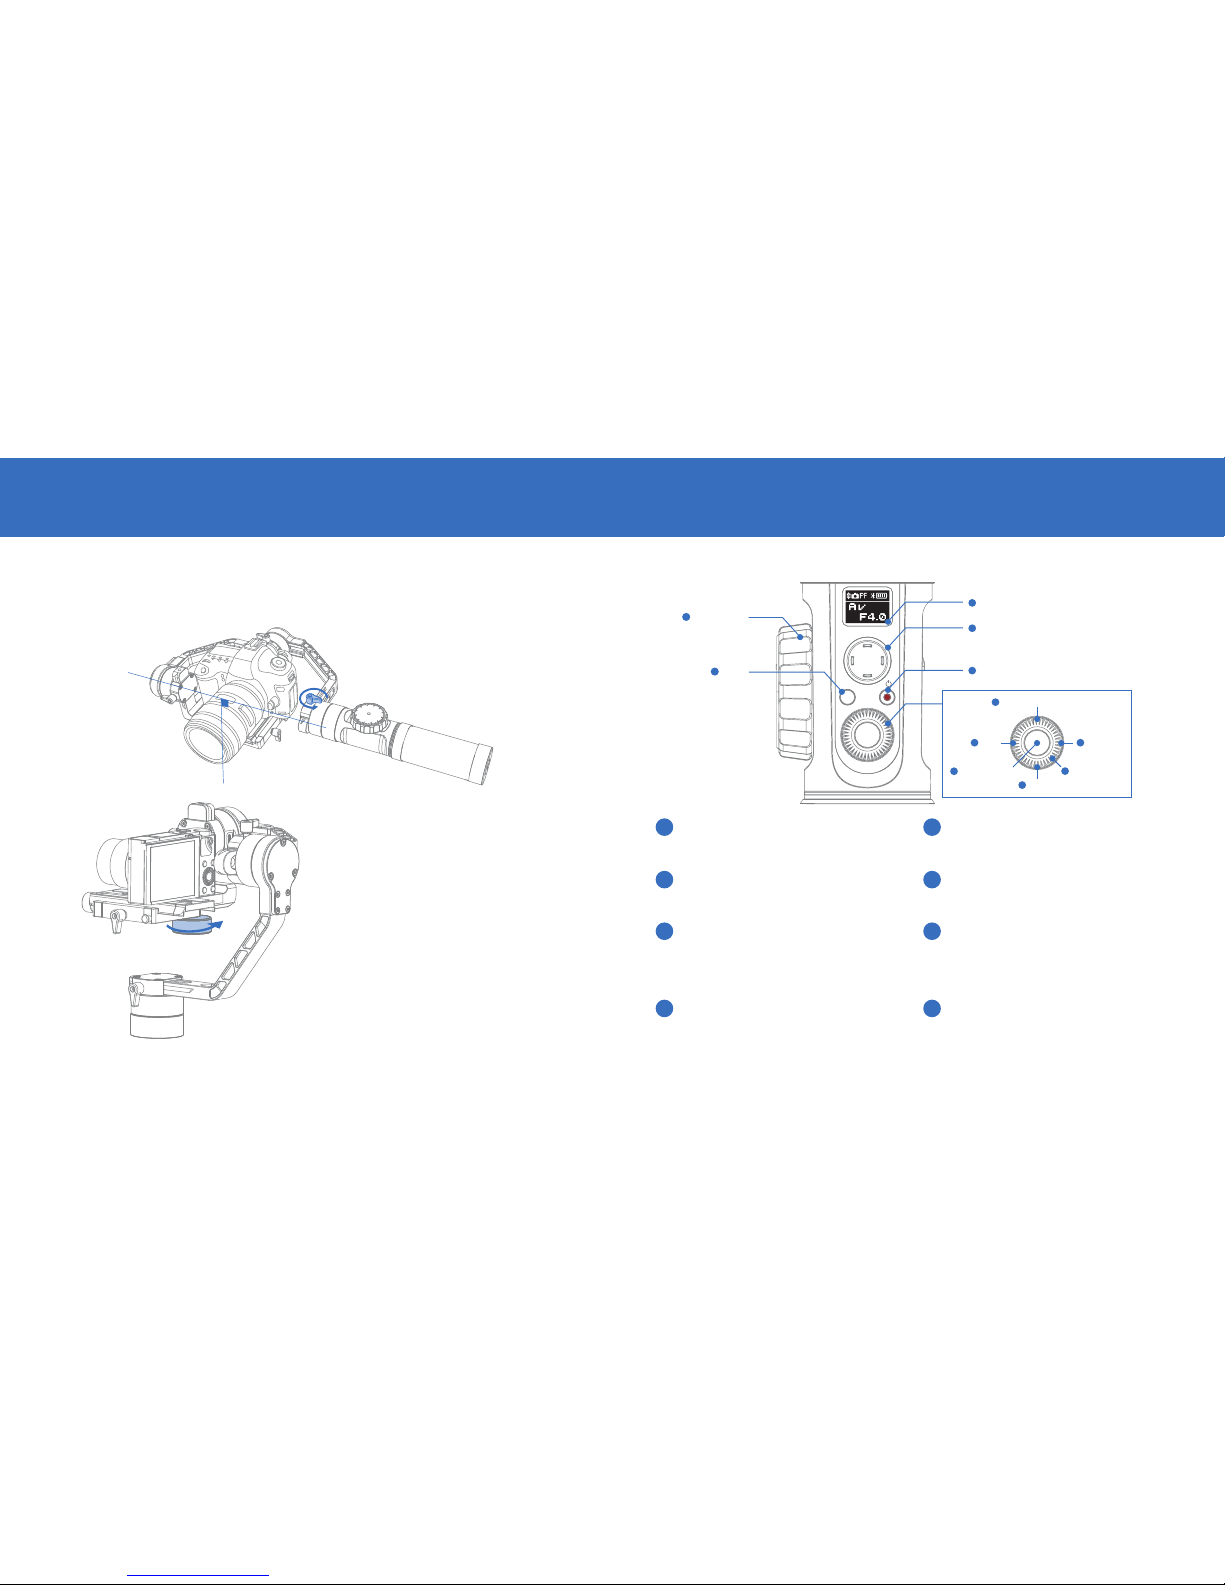
MENU
Mode
LV
1
10 Follow Focus
Controller
11 Mode
OLED Display
Real-Time Preview
2Joysck
3
4
Menu
Shuer Release
9
7
ON / OFF & Video
Le
5Right
6
Control Dial
8
1OLED Display
Stabilizer status and camera parameters
display (see more on page 18).
3ON / OFF & Video*
• Long press for 3 seconds to power 0n/off.
• Single press to start/end video recording.
5Left*
• In main screen, single press to return to
previous opon.
• In menu screen, single press to return to
previous screen
7Shutter Release*
• Halfway press the buon to acvate auto
focus.
• Full press the buon to take single shots.
2Joystick
Four-way direcon control of the
camera/lens.
4Real-Time Preview*
Single press the buon to enter the
real-me preview mode.
6Right*
• In main screen, single press to move to
next opon.
• In menu screen, single press to confirm
selecon.
8Dial*
• In main screen, rotate the dial to adjust
camera parameters.
• In menu screen, rotate the dial to switch
between opons.
Control Panel Description

Panasonic Camera Control Function Description
Please refer to the instrucon on Camera Control Cable Configuraon on page 19 to choose the right opon
for your camera.
1. Shuer release: Halfway press "Shuer Release" buon to realize auto focus and take single shots.
2. Video recording: Single press "ON/OFF&Video" buon to start or end video recording.
Sony Camera Control Function Description
Please refer to the instrucon on Camera Control Cable Configuraon on page 19 to choose the right opon
for your camera.
1. Shuer release: Fully press "Shuer Release" buon to realize auto focus and take single shots.
2. Video recording: Single press "ON/OFF&Video" buon to start or end video recording.
3. Zooming: Rotate the "Follow Focus Controller" to control the focal length.
Note: The non-motor-driven lens does not support opcal zoom (recommended motor-driven lens: E PZ
18-105mm F4 GOSS, E PZ 16-50mm F3.6-5.6 OSS).
17 18
CONTROL PANEL OVERVIEWCONTROL PANEL OVERVIEW
OLED Display Description
Display screen
for camera
params seng
Display screen
for stabilizer
modes (camera
params seng
unavailable)
Menu screen
PF
F
L
AV
TV
ISO
Sensi: Camera focus sensivity control; with 3 adjustable opons: low, medium and high;
Motor: Stabilizer motor force adjustment; with 3 adjustable opons: low, medium and high;
Camera: Extension interface configuraon to adapt different camera models;
Opons: Close, Sony, Panaso (Panasonic), Canon
Calibraon: Six—side calibraon for stabilizer; See more on page 25.
Angle: Fine tunes the motor angle on the lt/roll axis; See more on page 27.
About: Displays soware version and stabilizer model informaon.
RAGE3 Canon Controlability Table
Camera Mode
AV
TV
P
M
X
X
X
X
Photo Video AV TV ISO EV
Note: For Canon 5D4, the EV can be adjusted by seng ISO to “AUTO” while the Mode Dial is set to “M”. Canon cameras, under
real-me review, can realize focus control.
Camera Connecon Status
Photo Mode
Video Mode
Bluetooth Connecon
Baery Level (stabilizer)
Pan Follow Mode
Follow Mode
Lock Mode
Aperture Value
Time Value
ISO
EV
Menu Description
9
7
5
7
5
10
Menu
Single press to enter or exit the menu.
11 Mode
• Press for 1 second to enter or exit standby mode.
• Single press to switch between Pan Follow and Lock Mode.
• Quick double press to enter Follow Mode.
• Quick triple press to enter Turn Back Mode (180º rotaon on Pan axis)
* Marks funcons that are only available for Canon cameras properly connected to the stabilizer.
See more at EVO Gimbals Control Cable Funcon Table on page 12.
10 Follow Focus Controller*
Rotate the controller tp adjust the focal
length in real-me and realize follow focus
control.
1. For Sony and Panasonic mirrorless camera with EVF, Real-me Preview is not needed.
2. When mounng a Sony camera to the stabilizer, make sure to power on the stabilizer before the camera,
otherwise the stabilizer may fail to control the camera.
3. When powering on the stabilizer, please hold the camera with one hand in case of malfunconed rotaon.
4. When powering on, avoid shaking ohe stabilizer which may lead to start-up failure.

19 20
STABILIZATION MODES
POWER ADJUSTMENT & CAMERA CONTROL SETTINGS
Stabilization Mode Description
The stabilizer enters Pan Follow Mode (PF) by default each me when powered on. Switch into Lock Mode (LM)
by single pressing on Joysck. Double press Joysck to enter Full Follow Mode (FF). Triple press Joysck to
enter Turn Back Mode (TB - 180º rotaon on Pan axis). Single press Joysck while in Lock Mode, Full Follow
Mode or Turn Back Mode will return to the Pan Follow Mode.
PF PF
LM FF
PF
TB
Pan Follow Mode Pan Follow Mode Pan Follow Mode
PF
Pan Follow Mode
Lock Mode Full Follow Mode Turn Back Mode
One Click One Click One Click One Click
Two Clicks Three Clicks
Tilt Axis
Roll Axis
Pan Axis
Tilt Axis
Roll Axis
Pan Axis
Tilt Axis
Roll Axis
Pan Axis
Pan Follow Mode (PF): The camera
pans le/right following the movement
of the stabilizer while the lt and roll
axes are locked. Push the joysck
up/down allows manual control of the
lt axis.
Lock Mode (LM): This mode locks
movement of all three axes to keep the
camera fixed on a shoong direcon.
Push the joysck up/down and
le/right allows manual control of the
lt axis and pan axis.
Full Follow Mode (FF): The camera
pans and lts following the movement
of the stabilizer. Push the joysck
le/right allows manual control of the
roll axis.
Motor Power Adjustment
The motor force of the stabilizer needs to be adjusted (3 levels) to adapt the stabilizer to cameras and lens of
different weight for ideal use.
Camera Control Cable Configuration
Please choose the corresponding opon to configure your camera control cable.
2. Rotate the dial to choose the
appropriate motor force (3 levels), press
right to confirm the opon, then
restart the stabilizer to finish.
2.Rotate the dial to choose your camera
brand, press to confirm the opon and
restart the stabilizer to finish.
1. Sing|e press Menu and rotate the dial
to "motor", then press right to enter the
"motor" seng.
1. Sing|e press Menu and rotate the dial
to "camera”, then press right to enter the
“camera” seng.
1.You need to restart the stabilizer to finish adjustment and configuraon of motor force and camera
control cable.
2. Aer re-seng the parameters, the stabilizer will enter standby mode, please long press mode buon to
acvate the camera.
Motor Force
Low
Medium (default)
High
Weight Capacity Compable Camera & Lens Examples
Light Sony A7S Camera+SEL35F28Z Lens
Canon 5D Camera+EF 50mm F/1.8 II Lens
Canon 5D Camera+EF 24-70mm F/2.8 L II USM Lens
Medium
Heavy
If either the motor force is set too high or too low (unmatched with weight capacity), it can lead to
camera shake and affect normal use of the stabilizer.
If there is no opon to match your camera brand or there is no need to connect your camera, choose "Close".

21 22
USING RAGE3 INVERTED DR-E6 CHARGING FOR CANON CAMERAS
Note: The size of the camera and its balance condion when mounted may affect the performance
when inverted. For certain camera models, test inverted and re-posion the camera if necassery.
Note: Original Canon DR-E6 DC power
connector is recommended. Please follow
instrucon on how to power on or off, otherwise
the camera may fail to start.
Please ensure balanced installaon of the
camera when inverted and do not rotate or
shake the handle while transfering to inverted
(as seen in graphic).
The DC 8.0V power outlet on the side of the RAGE3 can be used for charging Canon 5D cameras through a DC
power connector - DR-E6 (purchased separately).
Charging 5D3 / 5D4 camera:
Powering on:
1. Connect the power input end of the connector to the DC
8.0V power outlet, then connect the other end to the
camera.
2. Mount and balance the camera on the RAGE3 gimbal, then
start up the camera.
Powering off:
Power off the camera first, then unplug the connector from
the RAGE3 gimbal.
Charging 5D2 camera:
Powering on:
1. Start up the RAGE3 by holding the mode buon to enter
standby mode.
2. Connect the power input end of the connector to the DC
8.0V power outlet, then connect the other end to the
camera.
3. Install the camera to the stabilizer and adjust gimbal
balance.
4. Power on the camera and long press mode buon to
acvate the stabilizer.
Powering off:
Power off the camera first, then unplug the
connector from the stabilizer.
How To Use The RAGE3 Inverted
Normal Posion
Inverted Posion
DC 8.0 V Power Outlet Usage

23 24
APP OPERATION APP OPERATION
Connecting the Stabilizer to Smartphone
1. Power on the stabilizer.
2. Confirm Blutooth is acvated on your smartphone.
3. Open the EVO Gimbals Remote App on your phone.
4. Tap on the Connect Your Device buon and search for nearby
signals, choose your stabilizer to connect.
EVO Gimbals Remote App Download
Download the EVO Gimbals Remote App from either the Apple App Store or Google Play.
Control Screen:
Stabilizer control
panel via Bluetooth.
Calibraon Screen:
Calibraon is
required when
deviaons are found
in the 3 axes and the
leveling of the
camera. Tap "Start
Calibraon", and
complete the 6—side
calibraon procedure
following onscreen
illustraons.
Photo Sengs:
Control resoluon,
panoramic and
exposures.
Main Screen
The EVO Gimbals Remote App is subject to regular updates.
Main Features of the APP

25 26
CALIBRATION AND FIRMWARE UPGRADECALIBRATION AND FIRMWARE UPGRADE
1. Power on the stabilizer and enter the standby mode, press menu, rotate the dial to “calibraon” opon, press
right to enter the opon.
2. As seen below, conduct the six-side calibraon following the 6 steps shown in the graphs, finish by pressing
any buon to exit the menu.
a) Slight deviaon is found in the lt angle of the camera in level posion aer startup.
b) Slight deviaon is found in the roll angle of the camera in level posion aer startup.
c) Frequent small angle correcon is found when the camera is in level posion while the
stabilizer stays sll.
a) Slight deviaon is sll found in level posion aer the inializaon of the stabilizer.
b) Stabilizer unused for a long me.
c) Too large temperature difference between operaon environments.
Slight deviaon is sll found in the lt or roll angle of the camera in level posion aer
the inializaon and six—side calibraon of the stabilizer.
Six—Side Calibration
STEP 1
STEP 2
STEP 3
1. Correctly install the baeries.
2. Hold the camera mounng plate with one hand, long press the power buon to start up the stabilizer; Long
press the Mode buon to enter the standby mode while holding the camera mounng plate through the whole
process in case of start—up failure.
If the angle deviaon sll persists aer the calibraon, please try again following the procedure.
When do you need to calibrate the stabilizer?
When…
Please calibrate the stabilizer when necessary to ensure normal use.
Start Up
Calibraon
Conduct
Six-Side
Calibraon
Fine tune
motor force
Start Up Calibration
How
27 28
CALIBRATION AND FIRMWARE UPGRADECALIBRATION AND FIRMWARE UPGRADE
STEP 4
STEP 5
STEP 6
Six-side calibration through the EVO Gimbal Remote App
Please refer to "App Operaons" for more informaon; Connect the stabilizer to the EVO Gimbals remote App
via bluetooth. Click on the gear icon in the boom le corner, then select “Calib” and follow the app instrucons.
Six—side calibraon is to make all six sides of the camera mounng plate vercal to the level surface.
Motor Fine-Tuning
Fine tune the motor through stabilizer:
Power on the stabilizer and enter standby mode, then rotate the dial and press right to enter the "angle"
opon; Adjust the value of the lt and roll axis angle to your actual needs.
Fine tune the motor through the EVO Gimbal remote App:
Please refer to "APP Operaons" for more informaon; Connect the stabilizer to the EVO Gimbal Remote App
via Bluetooth, then enter "Gimbal Seng" screen and adjust the value of the lt and roll axis angle to your
actual needs.
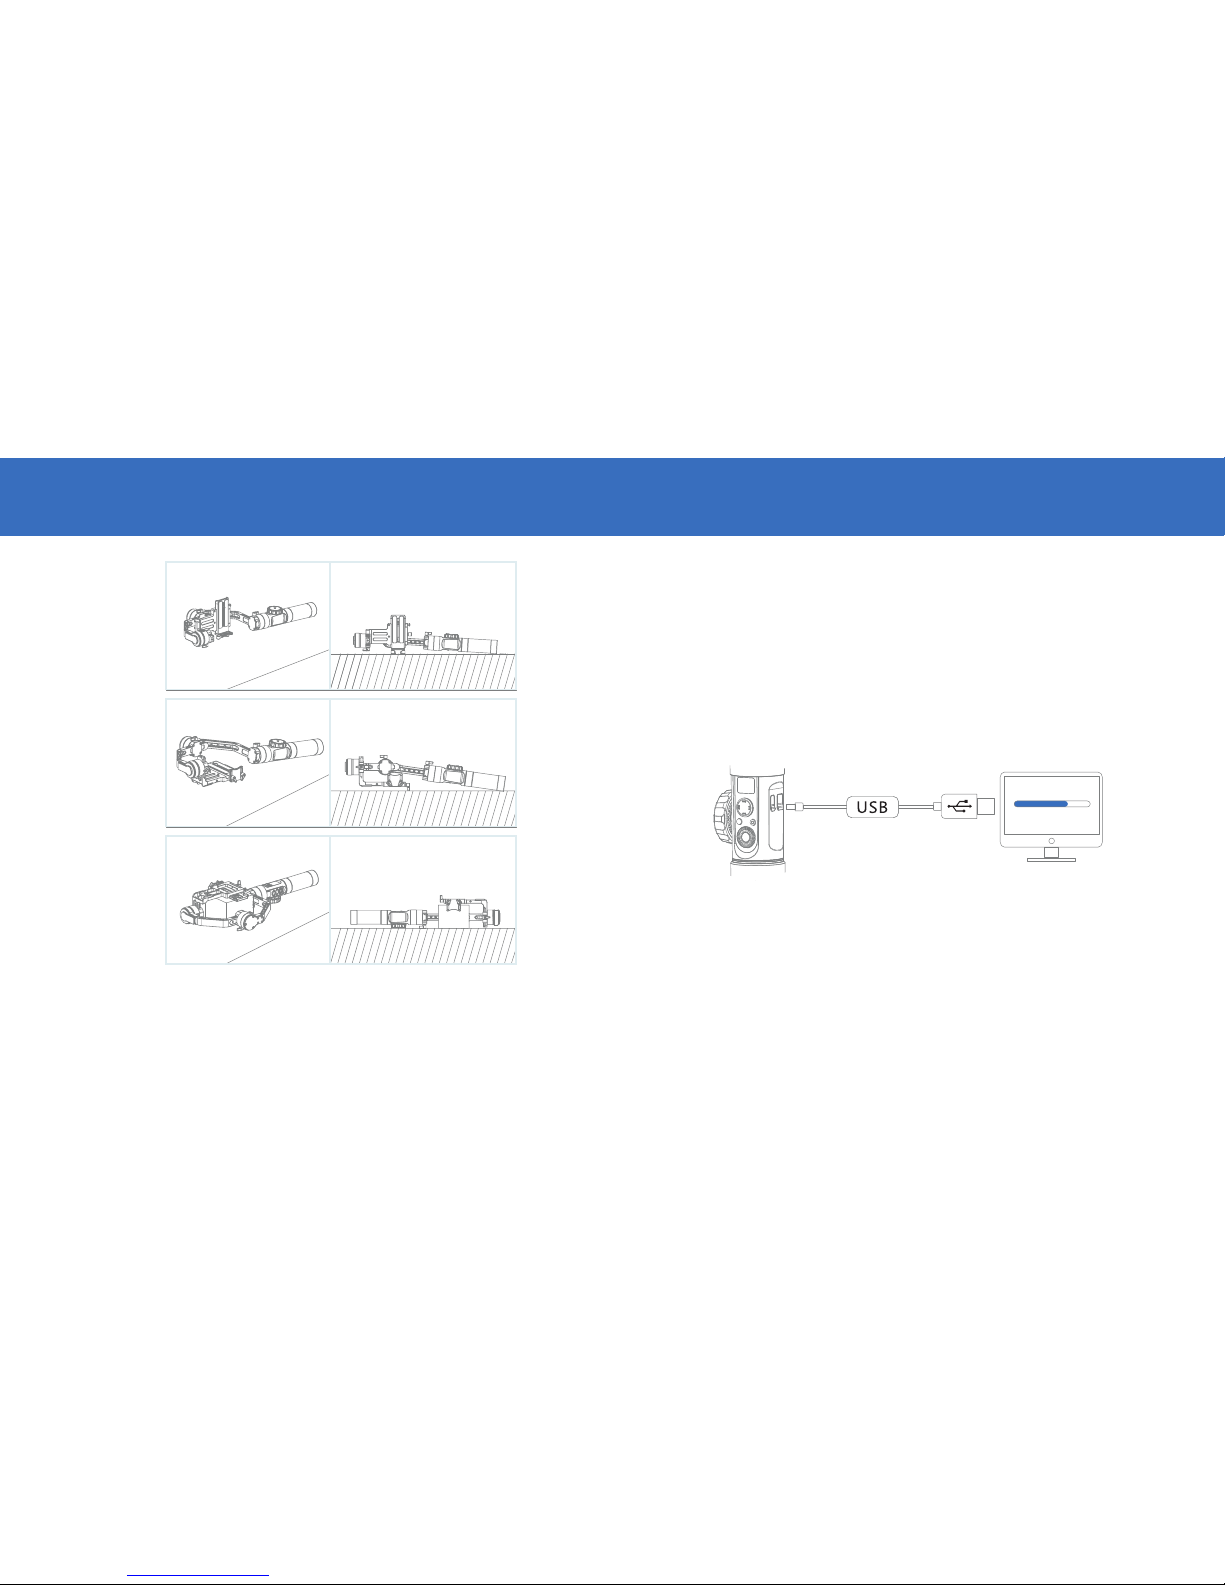
Connect the RAGE3 to your computer via Micro USB cable for the firmware upgrade and calibraon.
1. Visit EVOGimbals.com and click "Downloads” in the top menu and find the RAGE3 Gimbal. Download and
Calibraon Tool, the latest firmware version and USB Driver that works with your computer.
2. Connect the computer and RAGE3 together using the USB cable and power on the RAGE3
3. Using the Calibraon Tool, follow the instrucons to upgrade the firmware on the RAGE3
Firmware Update...
Firmware Update
Make sure the baeries have been
properly installed before upgrade.

29 30
SPECIFICATIONS PRODUCT DIMENSIONS
Input Voltage
Operaon Current
Operaon Temperature
Operaon Time
Charging Time
Weight
Tilt Angle Range
Roll Angle Range
Pan Angle Range
Following Deviaon
Following Deveaon
Payload
Compable Camera Sizes
Product Dimensions
Min
9.8V
110mA
-10ºC
12h
-135º
+/-0.01º
+/-0.05º
500g
Standard
11.1V
25ºC
2.5h
1250g
360º
360º
Max
12.6V
6000mA
45ºC
18h
+185º
+/-0.03º
+/-0.1º
3200g
Well balanced with camera
mounted
Charging current 2400mA
Excluding baeries
Unlimited rotaon
Unlimited rotaon
Notes
The max horizontal length from the point of camera gravity to the roll axis is 90mm, from the
1/4” threaded hole to lt axis 90mm, and from gravity point to quick release plate 65mm.
210* 118* 450mm
450mm
210mm
45mm
118mm

31 32
WARRANTY WARRANTY
WARRANTY PERIOD:
The warranty period is (1) Year from the original date of purchase. During this warranty period, under normal use, EVO
Gimbals will at its opon, repair and/or replace parts detemined to be defecve.
WARRANTY DOES NOT COVER:
1. Any unauthorized maintenance, misuse, collision, liquid infiltraon (water damage), or modificaons.
2. Incorrect Use of Product: altering soware, removing serial numbers/logos, using cameras not approved by EVO.
3. Damage due to fire, flood, acts of God, misuse and related damage.
4. Any prepaid freight for warranty service.
WARRANTY SERVICE:
If any product issues arise please contact your dealer first. Many gimbal performance problems can be solved with a simple
calibraon sequence. Be sure to visit www.EVOGimbals.com for the latest tutorial videos.
If it is found that service on your gimbal is needed please visit our official website (www.EVOGimbals.com) or email us
[email protected] to start a warranty claim.
WARRANTY REGISTRATION:
Please register your warranty so we can provide you with the latest firmware updates, user manuals and tutorial videos. To
register your warranty please and/or obtain warranty service for your gimbal, visit Our Web Site: EVOGimbals.com
Parts: For a period of one (1) year from the original date of purchase of product (“Parts Warranty”), EVO Gimbals will supply
new or refurbished replacement parts in exchange for parts determined to be defecve.
This Limited Warranty covers only the hardware components packaged with the Product. It does not cover technical
assistance for hardware or soware usage and it does not cover any soware products whether or not contained in the
Product; any such soware is provided “AS IS” unless expressly provided for in any enclosed soware Limited Warranty.
Please refer to the End User License Agreements included with the Product for your rights and obligaons with respect to
the soware.
Instrucons: To obtain warranty service, you must deliver the product, freight prepaid, in either its original packaging or
packaging affording an equal degree of protecon to the EVO Gimbals authorized service facility specified. It is your
responsibility to backup any data, soware or other materials you may have stored or preserved on your unit. It is likely that
such data, soware, or other materials will be lost or reformaed during service and EVO Gimbals will not be responsible
for any such damage or loss. A dated purchase receipt is required. For specific instrucons on how to obtain warranty
service for your product, visit Our Official Web Site: EVOGimbals.com
Or email EVO Gimbals Customer Support
For an accessory or part not available from your authorized dealer please visit our website.
Repair / Replacement Warranty: This Limited Warranty shall apply to any repair, replacement part or replacement product
for the remainder of the original Limited Warranty period or for ninety (90) days, whichever is longer. Any parts or product
replaced under this Limited Warranty will become the property of EVO Gimbals.
This Limited Warranty only covers product issues caused by defects in material or workmanship during ordinary consumer
use; it does not cover product issues caused by any other reason, including but not limited to product issues due to
commercial use, acts of God, misuse, limitaons of technology, or modificaon of or to any part of the EVO Gimbals
product.
This Limited Warranty does not cover EVO Gimbals products sold AS IS or WITH ALL FAULTS or consumables (such as
fuses or baeries). This Limited Warranty is invalid if the factory-applied serial number has been altered or removed from
the product. This Limited Warranty is valid only in the United States.
LIMITATION ON DAMAGES: EVO GIMBALS SHALL NOT BE LIABLE FOR ANY INCIDENTAL OR CONSEQUENTIAL
DAMAGES FOR BREACH OF ANY EXPRESS OR IMPLIED WARRANTY ON THIS PRODUCT.
DURATION OF IMPLIED WARRANTIES: EXCEPT TO THE EXTENT PROHIBITED BY APPLICABLE LAW, ANY IMPLIED
WARRANTY OF MERCHANTABILITY OR FITNESS FOR A PARTICULAR PURPOSE ON THIS PRODUCT IS LIMITED IN
DURATION TO THE DURATION OF THIS WARRANTY.
Some states do not allow the exclusion or limitaon of incidental or consequenal damages, or allow limitaons on how
long an implied warranty lasts, so the above limitaons or exclusions may not apply to you. This Limited Warranty gives
you specific legal rights and you may have other rights which vary from state to state.
EVO Gimbals (“EVO Gimbals”) warrants this product against defects in material or workmanship for the me periods and as
set forth below. Pursuant to this Limited Warranty, EVO Gimbals will, at its opon, (i) repair the product using new or
refurbished parts or (ii) replace the product with a new or refurbished product. For purposes of this Limited Warranty,
“refurbished” means a product or part that has been returned to its original specificaons. In the event of a defect, these
are your exclusive remedies.
Labor: For a period of one (1) year from the original date of purchase of the product (“Labor Warranty”), EVO Gimbals will,
at its opon, repair or replace with new or refurbished product, product determined to be defecve. If EVO Gimbals elects
to replace the product aer this Labor Warranty has expired but while the Parts Warranty below is sll in effect, it will do so
for the applicable labor charge.

3433
NOTES NOTES
Table of contents
Other EVO Gimbals Camera Accessories manuals


