EVX e-TRACK Series User manual
EVMSolutions(Pty)Ltd210MainStreet,SomersetWest,WesternCape,SouthAfrica,7130
[email protected] Support:0728424282 www.evx.co.za
Document Number: 100-(1011-3)-301-3
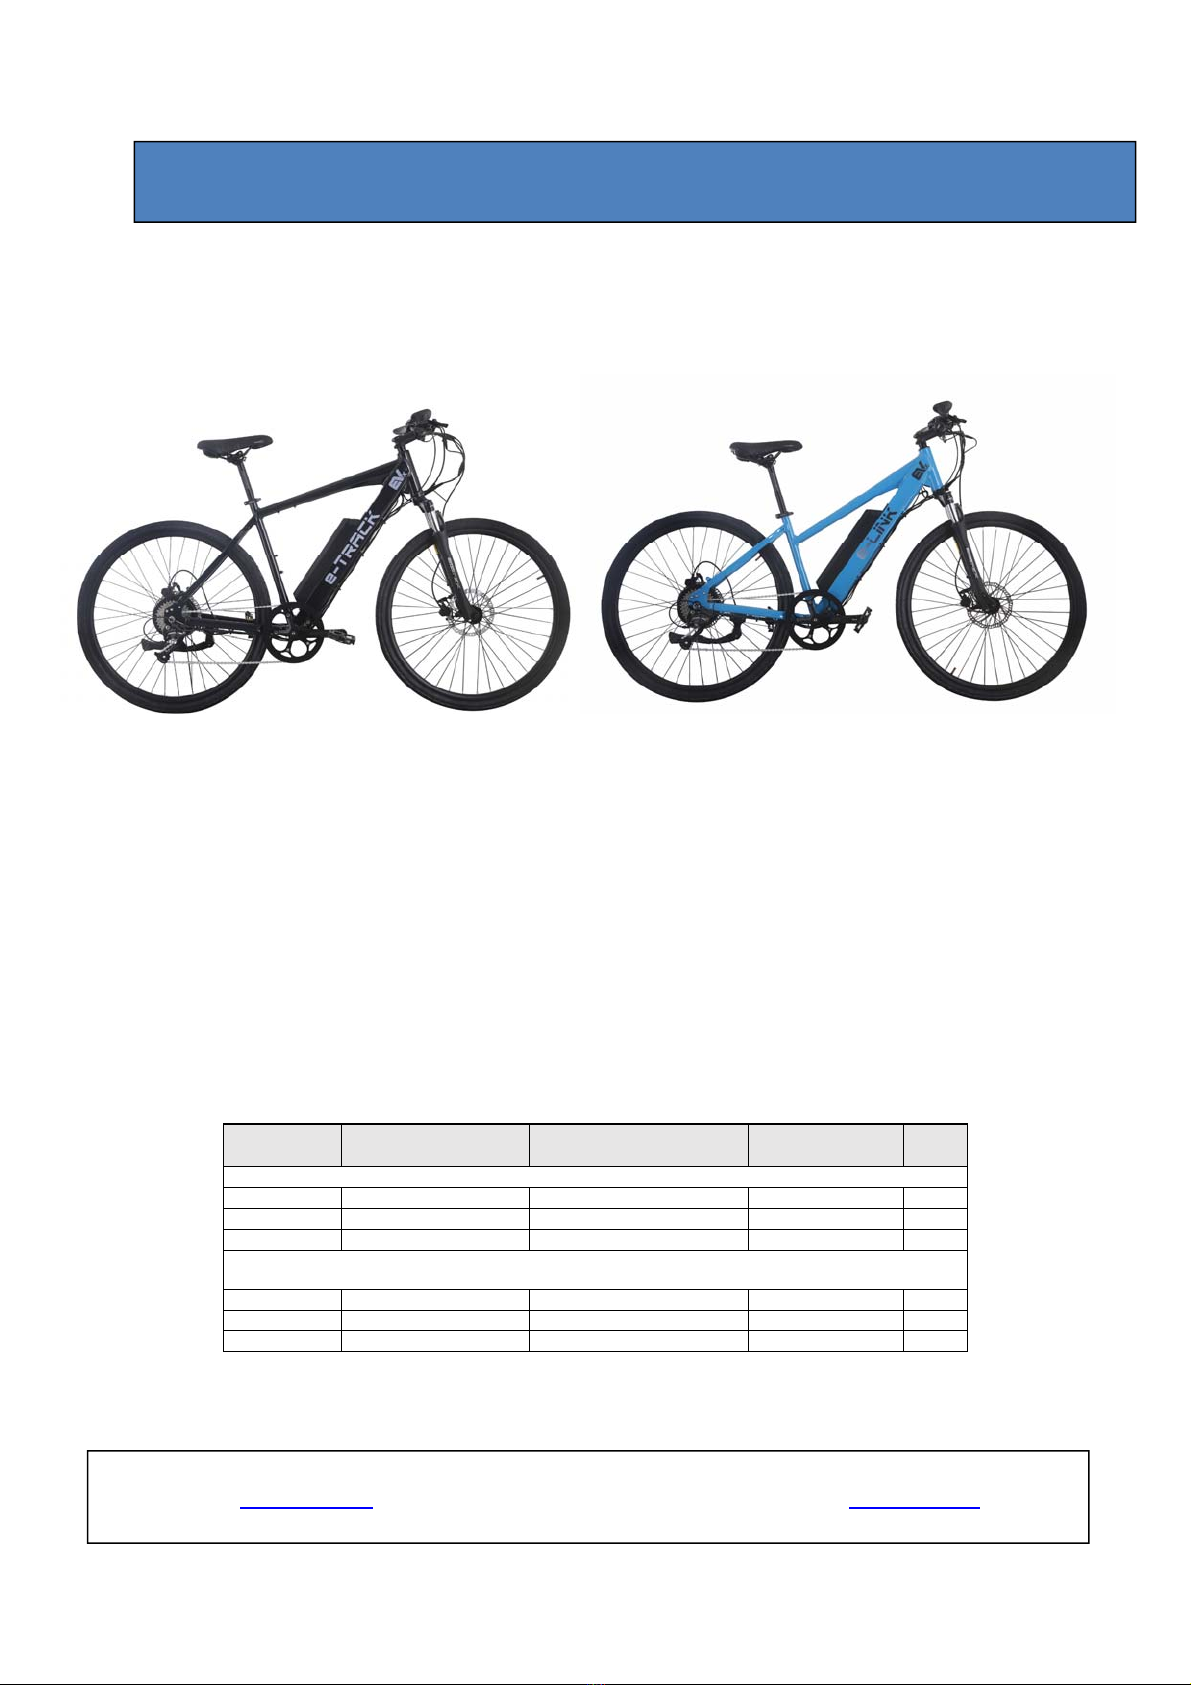
EVx : e- LINK and EVx : e-TRACK Electric Bicycle
Ownerʼs User Manual
A product proudly supplied to you by EVM Solutions(Pty) Ltd
This User manual is applicable to the following models:
EVMmodel
number
PRODUCTCODE
DESCRIPTION/MODEL COLOUR SIZE
Men
1011 1011‐0.5/0.42‐XL‐BLK e‐Bike(XL)8.8AHBATTERY GRAPHITEBLACK XL
1011 1011‐0.5/0.42‐XL‐BLUE e‐Bike(XL)8.8AHBATTERY ROYALBLUE XL
1012 1012‐0.5/0.42‐L‐SILV e‐Bike(L)8.8AHBATTERY BRIGHTSILVER L
Unisexor
Ladies
1013 1013‐0.5/0.42‐M‐RED e‐Bike(M)8.8AHBATTERY TRAFICRED M
1013 1013‐0.5/0.42‐M‐GYEL e‐Bike(M)8.8AHBATTERY GREENYELLOW M
1013 1013‐0.5/0.42‐M‐LBLUE e‐Bike(M)8.8AHBATTERY HIMMELBLUE M
EVX E-BIKE USER INSTRUCTIONS

1
EVMSolutions(Pty)Ltd210MainStreet,SomersetWest,WesternCape,SouthAfrica,7130
[email protected] Support:0728424282 www.evx.co.za
Document Number: 100-(1011-3)-301-3
Thank you for choosing an EVx Electric e-Bike!
JoinusonourjourneytoaGreenFuture!
Our products combine the latest innovations in Battery Electric Technology to offer low cost of ownership to our
customers. The EVx team is constantly searching for new solutions to challenge the current status quo, breaking down
barriers to technology and offer unique solutions to our customers mobility requirements.
Our vision is the rapid enablement of GREEN Transportation systems in order to radically reduce and eliminate CO2
pollution of Petrol and Diesel Vehicles ensuring a Green and sustainable planet for generations to come. This product is
brought to you for your enjoyment and pleasure in the outdoors but can also replace a daily commute to and from work
elimination carbon emissions in our cities.
ThisusermanualCoverthedetailsofusingandoperatingourrangeofmen’s(e‐Track)andladies(e‐Link)e‐
bikes
Please read through this guide to learn about your e-bike and what owning an e-bike will mean for you.
Safety First!
Your e-bike there to enhance your outdoor lifestyle and activities. Always adhere to best practices and
discuss safety precautions when driving in groups. Always wear a bike helmet (It is a regulatory requirement
in South Africa) and use appropriate bike clothing. Obey all traffic rules in order to be safe to ride another
day.
An important part of your personal safety is to ensure your e-Bike is maintained properly and all mechanical
components are properly fastened and locked.
Your e-bike is in essence a mechanical vehicle with wearing parts and it will always require basic
maintenance and care to ensure an extended life.
Please perform regular preventative maintenance and inspections of your e-bike, we invite you to join us
on this experience and take advantage of the technology in our product.
Instructions, videos and live support are being created and will be made available on our website to offer all
the knowledge you need to know your EVx e-Bike and get the best out of it.
1. INTRODUCTION

2
EVMSolutions(Pty)Ltd210MainStreet,SomersetWest,WesternCape,SouthAfrica,7130
[email protected] Support:0728424282 www.evx.co.za
Document Number: 100-(1011-3)-301-3
Pleasefollowtheunbox,assemblyandfirstuseandinstructionsfoundinthepackingdelivered.Thefullwarranty conditions
can be found at the end of this document.
REMOVETHEE‐BIKEFORMITSPACKINGASEXPLAINEDINSECTION11.
The product had been prepared for easy unbox for your convenience.
Although every care has been taken to protect your e bike during transit, damage in transit do sometime occur.
Please inspect your product visually before use and if you observe any damage before use – please report any
damage immediately to us via email.
Take pictures if you suspect excessively rough handling.
ASSEMBLY
After removing the e-Bike from the packing, assemble your e-bike as explained in Section11 of this guide.
We will also publish assembly videos on the website (or invite a handy friend to assist you ) or give us a call if you
are uncertain. You can also visit your nearest bicycle shop for sound advice. You can also send us an email to
[email protected] and we can send you more specific info as continuous feedback keeps us generating more guides.
Be sure all the moving and removeable parts on your e-Bike are properly torqued, tightened and connected-
inparticulartheitemsyouhadtoinstall.
If you have any doubts, contact us by sending us an email at info@evx.co.za
BEFORERIDINGEVxE‐BIKE
Register your EVx e-Bike by sending us an email at : [email protected]
First read the sections further in this guide to familiarize yourself with the functions and safety precautions before you ride.
Your e-Bike will be used in an unknown and sometimes untested environment (if you are young at heart) and this may cause
wear and tear or even breakage of certain items.
Be assured we will be there for your support to ensure you will enjoy a long-lasting experience with your e-Bike. Please feel
free to interact with our team and followers on Facebook or Instagram
We invite you to read and reach out to us if you have any questions.
We will do our best to assist you.
Enjoytheride!
EVx Electric Vehicle Team
2. WARRANTY AND SAFETY INFORMATION

3
EVMSolutions(Pty)Ltd210MainStreet,SomersetWest,WesternCape,SouthAfrica,7130
[email protected] Support:0728424282 www.evx.co.za
Document Number: 100-(1011-3)-301-3
Gettingtoknowyourproduct.
This e-Bike use the concept of “PedalAssist”, also known as “Pedelec”, (pedalelectriccycle) where the
rider's pedaling is assisted by a small electric motor. Pedelec’s include an electronic controller which control
and cuts power to the motor when the rider is not pedaling or when a certain speed is obtained.
Pedelecs are useful for people who ride in hilly areas or in strong headwinds.
We recommend that you ride your bike with the power off at first, to get familiar with your e-Bike’s braking
and gear shifting until you are familiar and comfortable with the controls and the “feel”, you can then start
testing the assist levels incrementally to get comfortable with the optimal settings for you.
ChargingtheBattery
The EVx Electric e-Bike’s comes with a high-capacity Lithium Ion rechargeable battery. The battery needs to
be fully charged before your first use. The intelligent charger that came with your e-Bike will control the
battery pack charging and will automatically end charging when the battery is fully charged. Make sure your
battery is fully charged before you go on a long trip.
The battery can be charged on your bike or you can remove it from the e-Bike to charge it at a convenient
location inside your house or at a charging station (See Removing Battery pack later in this document)
Tochargethebattery:
Be sure the e-Bike is powered off.
Be sure to always use onlythecharger supplied with the product. (Using another charger may void
your battery warranty)
The charger must be plugged into a 220/230 50 Hz AC supply. (The usual power outlet available in a
South African home)
Onboardcharging:
Stand on the left side and locate the charge port cover on the bottom of the battery pack.
Lift the rubber dust cap away to expose the DC charge port.
Carefully, plug the charger into the charger port
Connect the AC power cable into the charger and plug the cable into the power outlet.
The charger will automatically start charging if the battery needs to be charged.
When the charger is charging the battery, the indicator LED will turn RED.
When the charger is complete, the charger will turn GREEN.
Charging takes between 1 and 6 hours, depending on battery size and initial charge level. (see
verifying battery charge level further in the document)
When the pack is fully charged, the charger’s light will change from amber to green and
automatically stop charging.
Disconnect the charger from the wall. Remove the charger plug from battery and close the
rubber dust cap.
Use your battery often so it exercises the cells and is kept healthy
3.PREPERATION FOR FIRST USE

4
EVMSolutions(Pty)Ltd210MainStreet,SomersetWest,WesternCape,SouthAfrica,7130
[email protected] Support:0728424282 www.evx.co.za
Document Number: 100-(1011-3)-301-3
Caution:
Ensure a correct electrical plug is fitted to the electrical cord of the charger.
Do not charge he battery with any charger which is not supplied or approved to charge your bike.
Do not place anything over the charger or cover its body while it is charging.
The charger can become warm during charging.
Do not use the charger in wet areas or in rain.
Do not drop the charger or subject to high vibration.
Notes
If your battery is low, you should choose a lower level of assist if going on stops and hills.Thesportsmode
willdemandenoughpowerforthebatterytothinkisdepletedatapointwhenyoucanstillgetrange
atalowerassist.

5
EVMSolutions(Pty)Ltd210MainStreet,SomersetWest,WesternCape,SouthAfrica,7130
[email protected] Support:0728424282 www.evx.co.za
Document Number: 100-(1011-3)-301-3
TurningthebicycleONandOFF
Pedal Assist and Throttle will be active only if the power is turned ON. The electric bicycle can however be
used like a normal bicycle with the power turned ON or OFF.
Figure1Switchingthee‐bikeon
Locate the power button on the rear face of the LCD Display.
Have both feet off the pedals as the torque sensor will calibrate when turning on.
Press and hold the power button for a couple of seconds
The LCD display panel will turn on, giving an indication of the battery’s charge level and
selected assist level.
The e-Bike can now ride on battery power alone. Throttle and pedal Assist will be available
at the same time.
Pressing and holding the power button again will turn off the controller.
Power should be turned off after each ride to avoid draining the battery.
4. PREPARING FOR YOUR FIRST DRIVE

6
EVMSolutions(Pty)Ltd210MainStreet,SomersetWest,WesternCape,SouthAfrica,7130
[email protected] Support:0728424282 www.evx.co.za
Document Number: 100-(1011-3)-301-3
Beforegettingontothetrackorroad.
SAFETYFIRST!
Always wear an approved Bike Helmet, Gloves and suitable clothing for your own protection. (Beware: Loose
clothing can get caught in the chain and may cause an accident)
Perform a quick visual inspection of the e-Bike, check if all gear is fitted properly, the tires are pressurized, and you
have enough battery charge available.
GettingontotheBikeandRide.
If you are not an experienced biker, make sure you are comfortable driving the e-Bike firstly with the power switched
off and make sure of the safety of your surroundings and other bike users or vehicles. We recommend a 15-minute
pedal, stop /start, gearshift and brake session firstly for at least 10 to 15 minutes to make sure you are comfortable
to ride the e-Bike.
Once you are comfortable driving and operating the bike you can now switch the power on and prepare for your
first pedal assist drive.
Prepare firstly to drive in a quiet environment without any major traffic or other bike users and get fully acquainted
with the pedal assist and the power settings.
UsingtheBrakes
The Front brake lever is on the Right hand Side of the handle bar while the Rear brake lever is on the Left Hand side
of the handlebar (see figure 2)
Figure2:LocationoftheRear(Left)andFrontBrakes(Right)
5. DRIVING
Front Brake Lever
Rear Brake Lever

7
EVMSolutions(Pty)Ltd210MainStreet,SomersetWest,WesternCape,SouthAfrica,7130
[email protected] Support:0728424282 www.evx.co.za
Document Number: 100-(1011-3)-301-3
Braking
The brake's main function is to slow down or to stop the bicycle in an emergency. The bike has front and
rear disc brakes which is the very best available for e-Bikes.
• It is recommended to always use both Front and Rear Brakes together for the best stopping experience.
The front brake will provide the majority of the bicycle's stopping power.
• Experiment with usage of the brakes whilst driving slowly first, sudden aggressive use of only the rear brake
may cause the tail of the bike to slip whilst sudden aggressive use of only the front brake may cause the driver
to tilt over the handlebar.
• The front wheel brake is controlled by the lever on the right - hand side of the handlebar
when seated.
• The rear wheel brake is controlled by the lever on the left - hand side of the handlebar
when seated.
• The control system automatically cuts power to the motor when either brake is being used.
During the first 40 to 50 Full stops, the brakes will wear down in a “settling in” period and for optimal
brake efficiency, an adjustment must be made at this point.
Changinggears
The gear lever (shifter) is located on the right side of the handlebar when seated.
Figure3:LocationoftheGearShifterlevers(Upordown)
Referring to figure 3: Push the gear shifter lever 1 to select Lower gears. Low gears are used for starting
to drive from a stationary position or when riding slowly or climbing. Pull the gear shifter lever 2 (behind
the grip) to engage higher gears when riding at speed. The mid gears fit into the space between. You will
quickly get used to using the gear settings that are most comfortable for your ride and trip.
The gear shifting system and motor assist are entirely independent; neither affects the other’s
performance. Both work toward the goal of propelling the bike, of course, and their contributions are
additive.
Gear Shifter Lever 1
(Push lever for Lower Gears)
Gear Shifter lever 2
(Pull lever to select
Hi
g
her Gears
)

8
EVMSolutions(Pty)Ltd210MainStreet,SomersetWest,WesternCape,SouthAfrica,7130
[email protected] Support:0728424282 www.evx.co.za
Document Number: 100-(1011-3)-301-3
TheAssistControl
The assist control system can be used to maintain a constant level of pedal assist.
Figure4:UsingAssistControl
HowtousetheAssistcontrolfeature:
• Turn your bike on.
• Using the +or ‐ Buttons, (See Fig 4) you can select the Assist levels between ECO (
Battery efficiency ), 1, 2, 3 andS– (Sport – Maximum Power to the Motor ).
• The LCD will illuminate to indicate the Assist Level you are selecting
• Once you start pedaling, the controller will make the motor turn accordingly.
• The bike will now maintain a constant Pedal Assist until:
1.
The brakes are applied, or
2.
The + or - buttons are pressed to adjust the Assist level, or
3.
You stop pedaling, or
4.
The battery runs down completely
Once you are riding you can push the Throttlelever – this will increase power to the battery and the e-Bike
will accelerate. Using the Throttle assist will allow more power to the motor – irrespective of the assist level.
Note: If your battery level is low, we recommend selecting a lower assist level as the Battery Management
system can deactivate the assist support to protect the battery from getting too low. Charge your
battery fully before each ride.
Assist Control
Buttons + (Increase)
and – (Decrease)
Throttle Assist

9
EVMSolutions(Pty)Ltd210MainStreet,SomersetWest,WesternCape,SouthAfrica,7130
[email protected] Support:0728424282 www.evx.co.za
Document Number: 100-(1011-3)-301-3
Howtoreadthebatterylevel
Figure5:Batterylevelindicatedinthedisplay
To accurately read the battery’s charge state, let go of the throttle. The display lights will stabilize after 1
second to give an indication of the battery’s level.
Your battery level is low and it reaches
2Bars:The battery level is low and should be recharged soon. Select a lower assist level
1Bar:Stop using the throttle and recharge the battery pack.
The LCD display also give you an indication of the battery’s voltage. The battery’s voltage will vary greatly
depending on a variety of conditions. The voltage will decrease temporarily when using the throttle
and/or assist. It will also drop when going uphill regardless of the charge state due to . This is normal
during operation. The voltage will also be lower if the battery has been in a cold environment.
The charge in the battery can also be witnessed by pressing the button above the four LED’s on the battery.
Fig6.Pushtodisplaybatterychargelevelindicatoronbattery

10
EVMSolutions(Pty)Ltd210MainStreet,SomersetWest,WesternCape,SouthAfrica,7130
[email protected] Support:0728424282 www.evx.co.za
Document Number: 100-(1011-3)-301-3
BatteryRange
The useful range that van be obtained from a full battery charge depend on a lot of factors for example
how it is ridden, the terrain, (even or hilly) tire pressure,(flat or pressurized) outside temperature,
weight of the driver and wind.
After a few rides, you will get a sense of the electric bicycle’s range capability. Expect lower range
when driving in windy conditions and in a hilly terrain.
Factorsthatwilldecreaserange:
• Rapid accelerations using the motor
• Uphill riding
• A Heavy rider.
• Headwinds
• Under-inflated tires
• Extreme hot or cold weather
How to increase your range:
• Start by pedaling instead of only using the motor
• Avoid rapidly accelerating using the throttle
• Pedaling to help the motor up steep hills. Use your gears
• Reduce your average assist level and pedal along with the motor
• Reduce payload weight
• Properly inflating your tires between 3.5to4bar
• Coast to a stop and avoid rapid decelerations
Notice:Riding downhill or pedaling when not using the throttle will not recharge the battery
pack. Do not over-inflate the tires.
BatteryInformationandSafety
AbouttheLithiumbattery
The Lithium battery does not have a “memory effect” associated with older battery technologies. It is highly
recommended you charge the battery after every ride even if the battery is only lightly used.
An on-board circuit prevents the battery from over-charging. As the battery receives more charge cycles,
the capacity will become decreased. Charging a partially flat battery is not considered a full charge cycle.
Note:We recommend that the battery must be recharged at least once every month. A battery left
unused for several months may result in permanent capacity loss.
The battery’s capacity will be temporarily reduced in cold environments. We recommend to remove the
battery and store the battery in a sheltered place if the bicycle is not in use and have to be kept outdoors
for long periods.
11
EVMSolutions(Pty)Ltd210MainStreet,SomersetWest,WesternCape,SouthAfrica,7130
[email protected] Support:0728424282 www.evx.co.za
Document Number: 100-(1011-3)-301-3
BatterySafetyInformation
• Use only the charger supplied with the bicycle.
• Improper usage can cause explosion or fire.
• Do not short-circuit the battery’s terminals.
• Do not use the bicycle if the temperature is over 45˚ Celsius (Extreme Hot temperature may damage the
battery.)
• Do not disassemble the battery pack.
• Do not submerge the battery in liquid or use in wet areas.
• Do not set flame to the battery.
• Do not expose battery to freezing temperatures for an extended period.
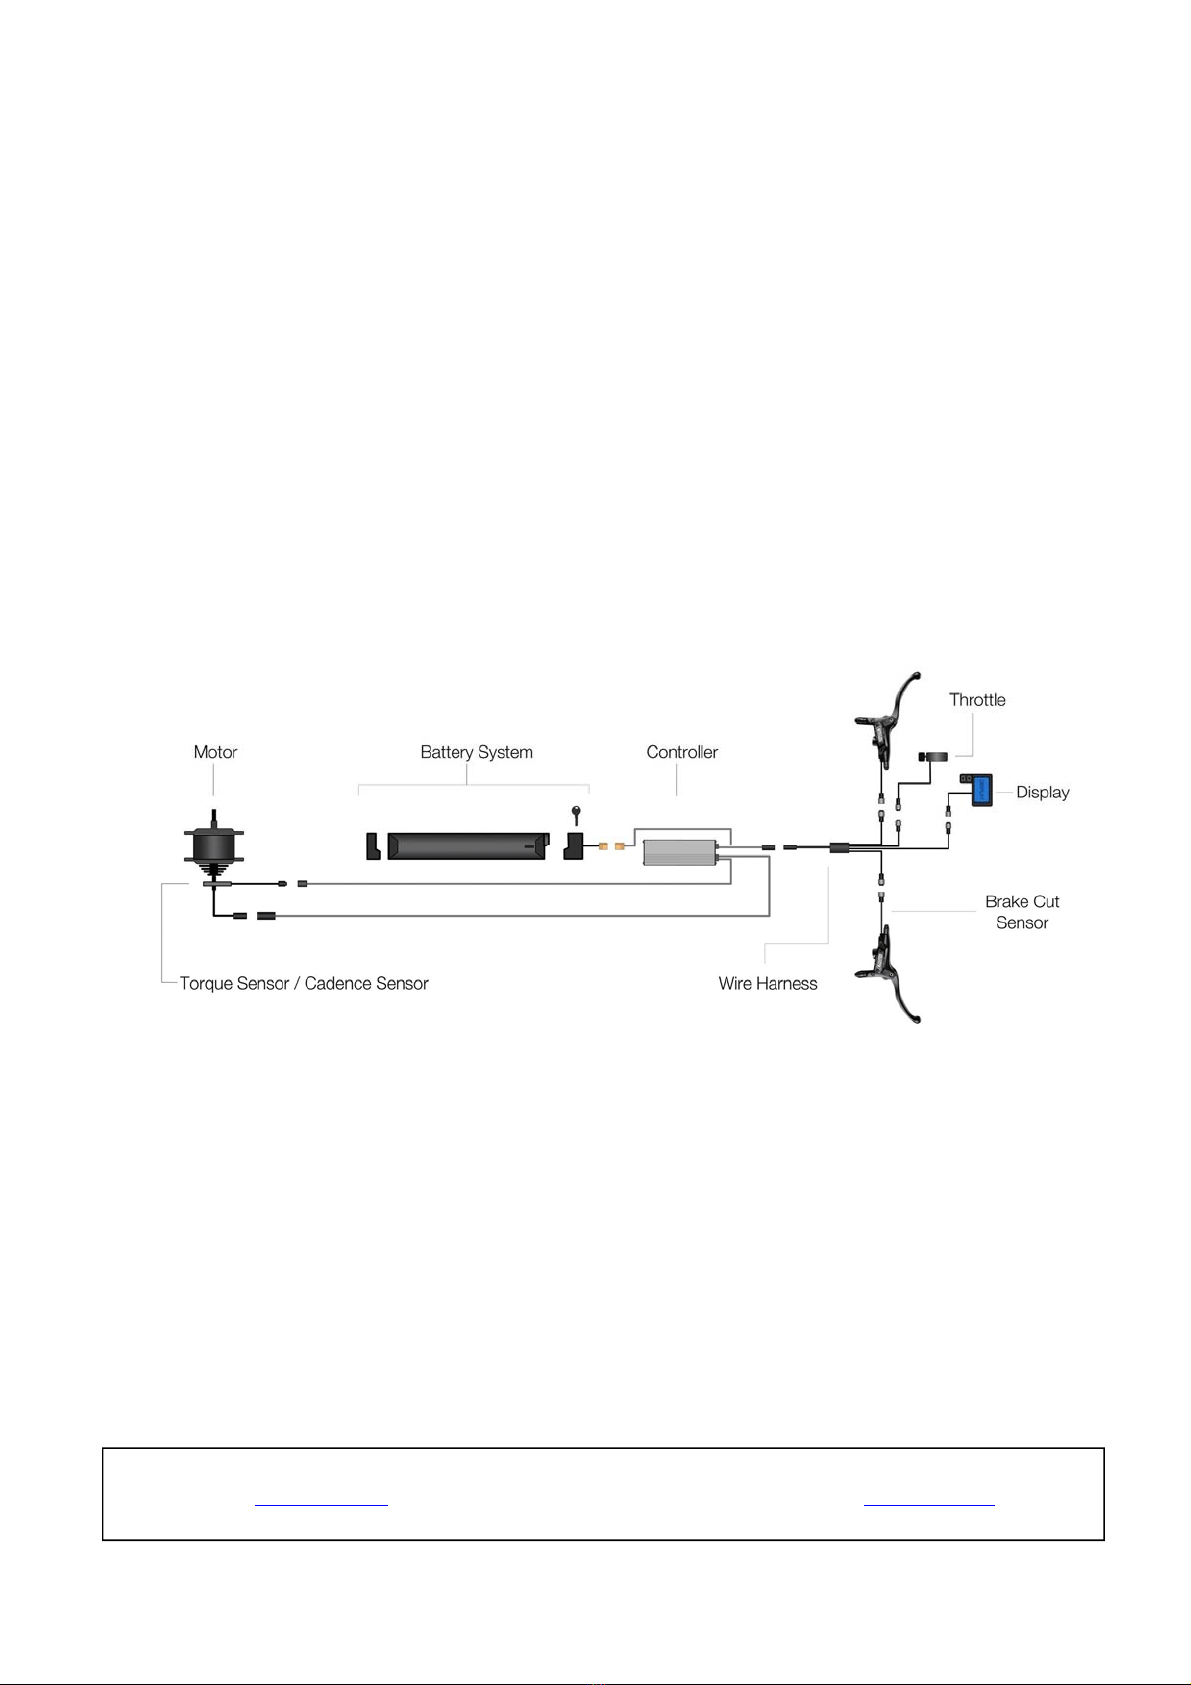
Figure7BicycleElectricandElectronicModules

12
EVMSolutions(Pty)Ltd210MainStreet,SomersetWest,WesternCape,SouthAfrica,7130
[email protected] Support:0728424282 www.evx.co.za
Document Number: 100-(1011-3)-301-3
Keypartsoftheelectricbicycle
An electric bicycle is a lot like a normal bicycle. The major difference is the inclusion of a motor which provides a
boost when desired. An onboard rechargeable lithium battery supplies the motor with electric power. The bicycle
can be ridden using both pedal power and battery power at the same time.
Controller
The controller regulates how much power is sent from the battery to the motor.
Throttle
The throttle allows the rider to control the bike’s speed. It sends a signal to the controller telling it how much
power to send to the motor.
Battery
Electrical energy is stored in the battery pack. It is composed of many smaller battery cells.
Charger
The charger plugs into an electrical outlet and is used to put energy back in the battery pack to be used by the
e-Bike electric motor when driving. The more energy that is discharged from the battery pack, the longer it will
take to recharge.
Display
The display reads the battery’s voltage. This will give an approximation of the battery’s charge state. The
display may have other buttons to control other functions.
Motor
The motor is built into the hub of the rear wheel. When power is sent to the motor, it will begin to spin,
propelling the bike forward.
GearLever(Shifter)
The gear shifter changes the ratio between the pedals and the rear wheel. It is used to find a more comfortable
pedaling setting under different riding conditions. The low gear is used for pedaling during starts, uphill or
loaded riding. The higher gears are use when pedaling downhill or during faster riding.
Brakes
The brakes use friction to slow the bike down. The levers on the handlebars control the braking. The brakes
have an electrical switch which cuts the power to the motor at the moment when the brakes are used. This
prevents accidental accelerations while braking.
Fuse
The battery has a fuse which is used to prevent excessive amounts of power surging through the wires and
damaging the electronics. When the fuse is tripped, it will need to be replaced.
TireandInnertube
The tire is made of rubber and provides traction for your bicycle. The Inner- tube, is a rubber tube inside the
tire retains the tire’s air.
TirePressure
Tire pressure can be measured with a tire gauge. The tire pressure is measured in Bar or KPa. Pumping more
air into the tire increases the pressure (Bar or KPa) and makes the tire harder. Releasing air from the tire
decreases the pressure (Bar or KPa) and makes the tire softer. Both over and under inflating the tire can have
negative effects. Properly inflate your tires between 3.5to4bar(350KPato400KPa)
6. MAINTENANCE AND CARE
13
EVMSolutions(Pty)Ltd210MainStreet,SomersetWest,WesternCape,SouthAfrica,7130
[email protected] Support:0728424282 www.evx.co.za
Document Number: 100-(1011-3)-301-3
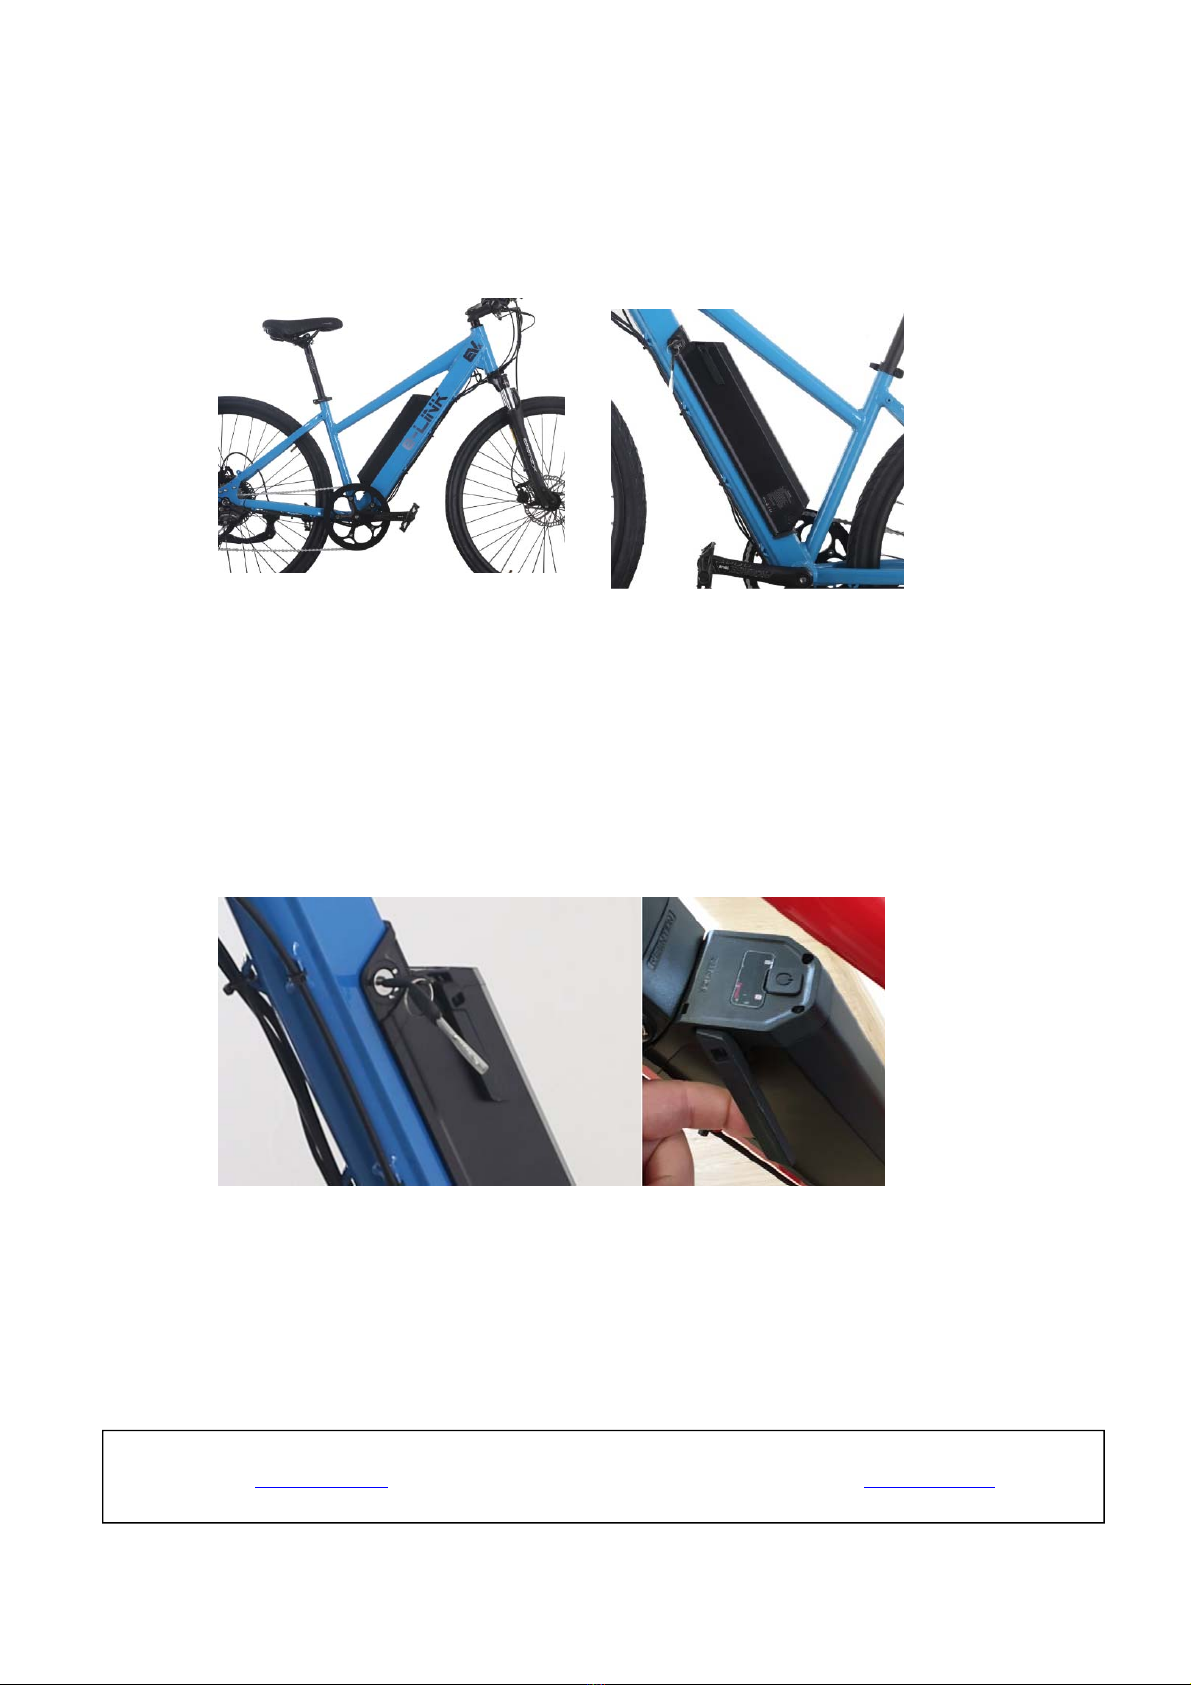
Removingthebattery
The battery can be removed from the bike. This is useful for storing the bike or when the bike is being
transported.
Figure8:Locationofthebatteryandkeyholeofthebatteryonthee‐Bike
• Turn off the bicycle.
• Stand on the left-hand side of the bicycle when facing to the front of the bicycle.
• Locate the Keyhole on top of the battery.
• Insert the battery key into the keyhole.
• Turn the key counterclockwise and hold.
• Lift the battery lever- positioned next to the key shown in figure 9 below.
Figure9:Locationofthekeyandlevertoreleasethebatteryonthee‐Bike
• Pull the upper portion of the battery towards you.
• The battery will pivot sideways and can be lifted away from the bike.
• To replace the battery – hook it in on the bottom, make sure it is aligned and push it into place.
NOTE: If the battery is not properly seated, the connector will not make contact and the unit may not switch on.
14
EVMSolutions(Pty)Ltd210MainStreet,SomersetWest,WesternCape,SouthAfrica,7130
[email protected] Support:0728424282 www.evx.co.za
Document Number: 100-(1011-3)-301-3
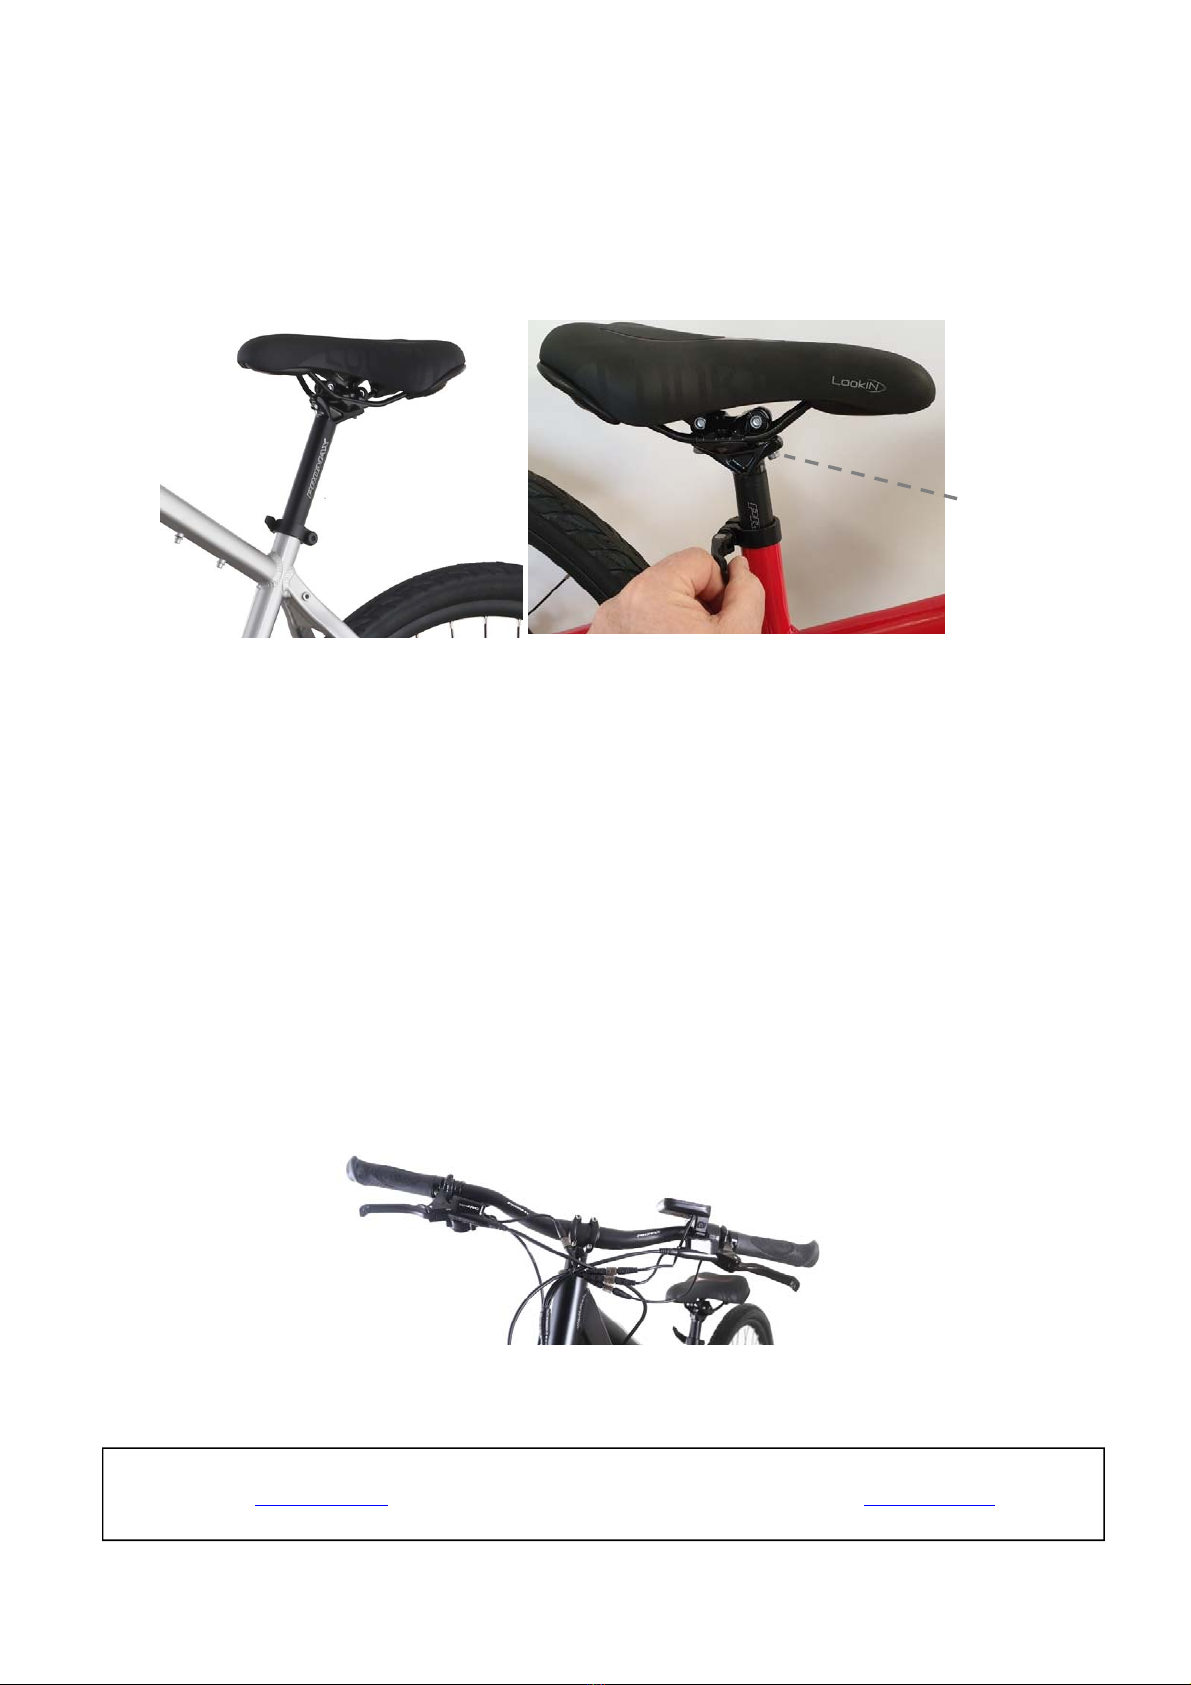
Adjustingthebicycleforridingcomfort
1. Adjusting the seat height
Figure10:TheSeatheightadjusterclampandseattiltadjustment
With reference to Figure 10: Pull the seat clamp lever outward to loosen the seat post and loosen the lock nut
if needed. Adjust the seat the desired height. The maximum height should not extend beyond minimum
extension mark marked on the seat post. Tighten the seat clamp and close the lever to lock in the seat’s height.
2. Adjustingtheseattilt
Adjust the seat tilt and seat distance forward or backward by screwing the Allen screws (Shown in Figure 10)
in or out Tighten the bolts securely to lock in your desired position. Both the front screw and the rear screw
have to be adjusted to enable tilt.
3. Adjustingthehandlebartiltangle
Use a 4mm Hex wrench to loosen the screws near the center of the handlebars. Tilt the handlebars to the desired
position. Re-tighten the screws securely to lock in the handlebars. Be sure all screws are tightened equally.
Figure11:Thehandlebartiltadjustmentscrewpositions
Seat
Tilt adjustment
Screws
(One if front
and one to the
rear)

15
EVMSolutions(Pty)Ltd210MainStreet,SomersetWest,WesternCape,SouthAfrica,7130
[email protected] Support:0728424282 www.evx.co.za
Document Number: 100-(1011-3)-301-3
BasicBicycleSafety
• Always wear a helmet.
• Use a light and wear reflective clothing when riding at night.
• Reduce speed when riding on a wet surface.
• Properly inflate tires.
• Apply the rear brake before using front brake in low traction conditions.
• Do not follow other vehicles too closely.
• Do not race or taunt other cyclists.
• Brake disk rotors can get extremely hot for brief periods after braking.
• Do a pre-trip inspection
• Inspect the tires, brake pads and chain condition regularly.
• Do not ride up or down extremely steep inclines.
• Do not exceed the weight carrying capacity.
Figure12:TheChainandBrakepadsshouldbeinspectedregularly
ElectricBicycleSafety
• For maximum stability, avoid accelerating or braking while turning.
• Avoid riding in extremely wet conditions.
• Do not leave the electric bicycle in the rain.
• Discontinue the use of the electric bicycle if the battery pack is damaged due to crash or a
drop.
• Do not disassemble the battery pack.
• Do not use the charger outdoors in wet conditions.
• Do not jump with the electric bicycle. (This e-Bike is not for extreme sports)
• The motor can get hot, do not touch the body of the motor after riding.
7. SAFETY INFORMATION

16
EVMSolutions(Pty)Ltd210MainStreet,SomersetWest,WesternCape,SouthAfrica,7130
[email protected] Support:0728424282 www.evx.co.za
Document Number: 100-(1011-3)-301-3
Use only EVx supplied spare parts for optimum performance and reliability
DESCRIPTION SPAREPART
NUMBER
BrakePads(Set) SP001LY
BrakeLever(RH) SP002LY
BrakeLever(LH) SP003LY
BrakeCable(RH) SP004LY
BrakeCable(LH) SP005LY
ReplacementBattery8.8AH SP006LY
ReplacementBattery11.6AH SP007LY
Chain SP008LY
ElectricMotor SP009LY
Saddle SP010LY
SideStand SP011LY
BatteryCharger SP012LY
FrameeTrack SP013LY
FrameeLink SP014LY
If you experience a problem with your e-Bike and you cannot repair it yourself, please contact
your nearest EVx dealer for inspection or repair.
Do not modify your product, it may render the product unsafe and any modifications will void
your warranty.
Before you store your e-Bike we recommend you clean your e-Bike and wipe of all dirt.
EVx recommend that you store your e-bike indoors if possible, out of rain, dust or harsh direct
sun.
If you store the e-Bike outdoors, we recommend you use a suitable cover.
8 . SPARES AND ACESSORIES
9 . RETURNING FOR REPAIR OR SERVICE
10 . STORAGE

17
EVMSolutions(Pty)Ltd210MainStreet,SomersetWest,WesternCape,SouthAfrica,7130
[email protected] Support:0728424282 www.evx.co.za
Document Number: 100-(1011-3)-301-3
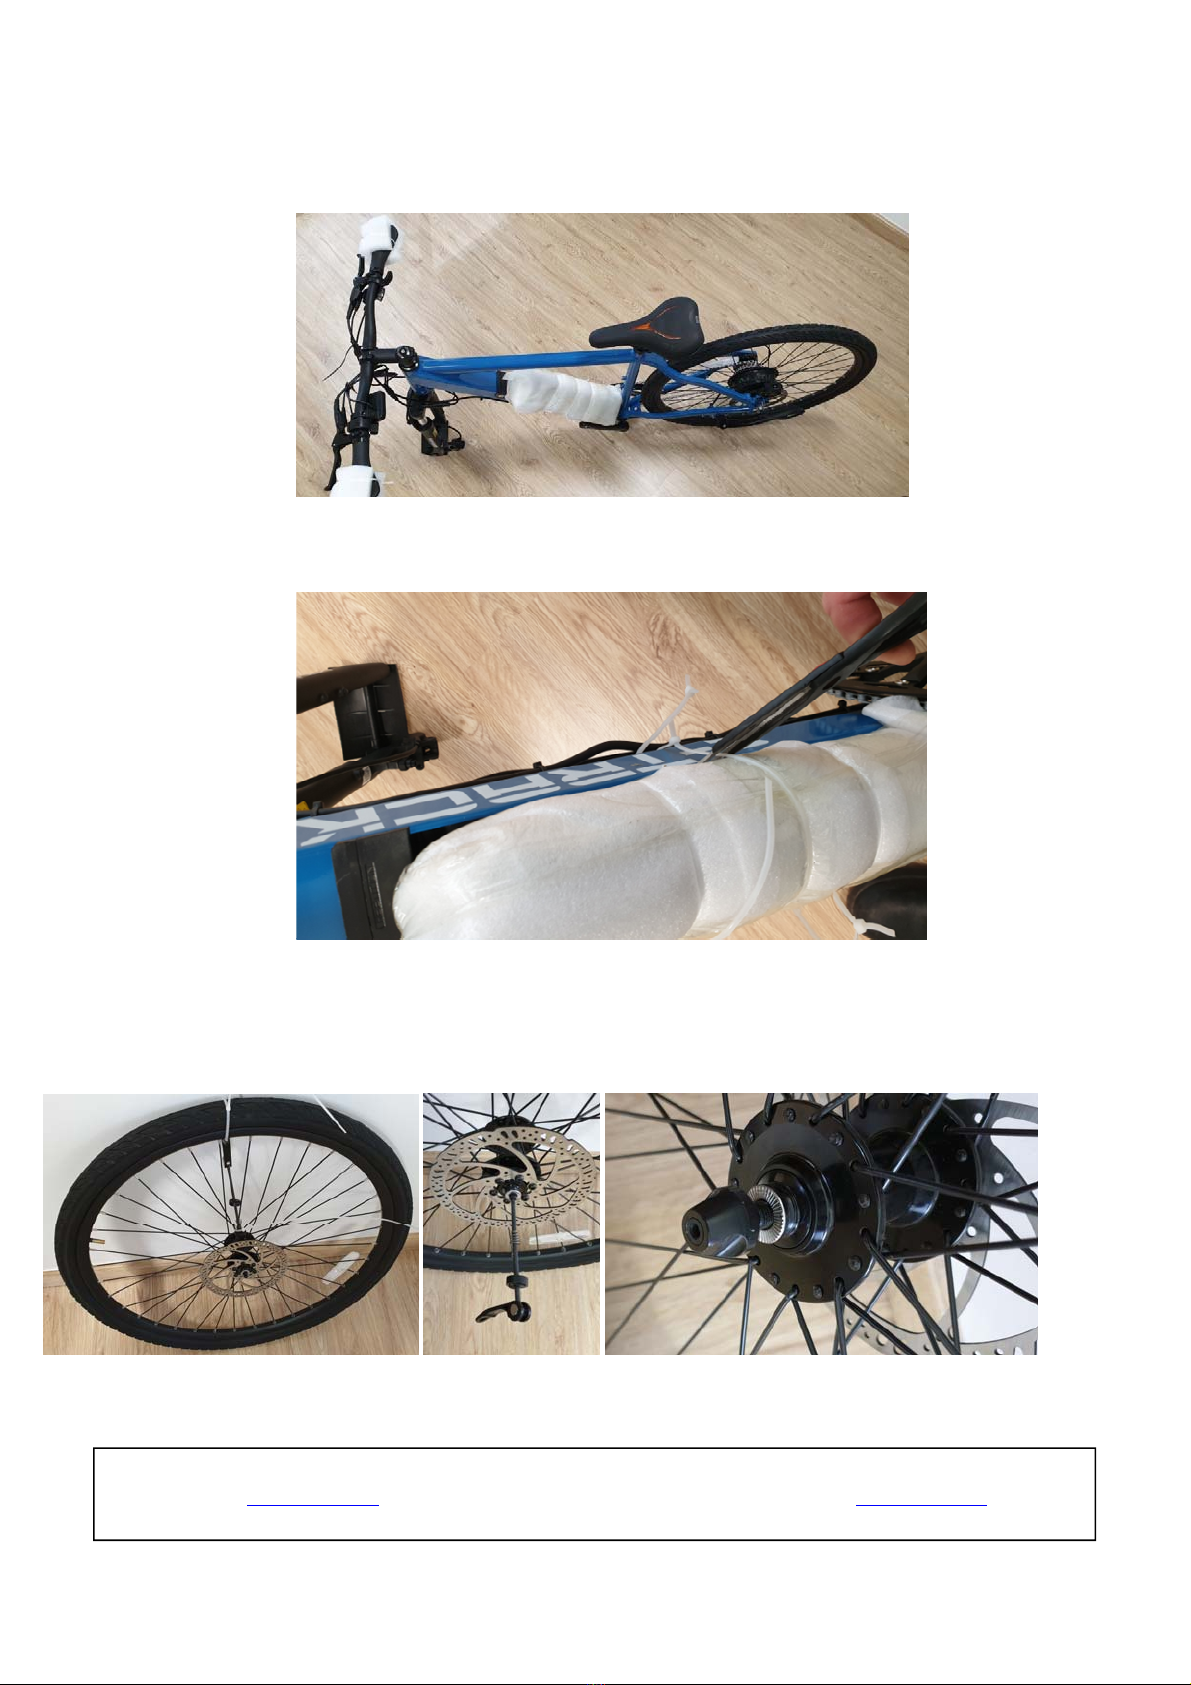
Open the box to start the unpacking.
Fig 13 Open the box
Remove the protection materials and remove the box containing the charger
Fig 14 Remove the packing protection materials
Fig 15 Remove the Front Wheel from the box
11 . ASSEMBLY PROCEDURE
18
EVMSolutions(Pty)Ltd210MainStreet,SomersetWest,WesternCape,SouthAfrica,7130
[email protected] Support:0728424282 www.evx.co.za
Document Number: 100-(1011-3)-301-3
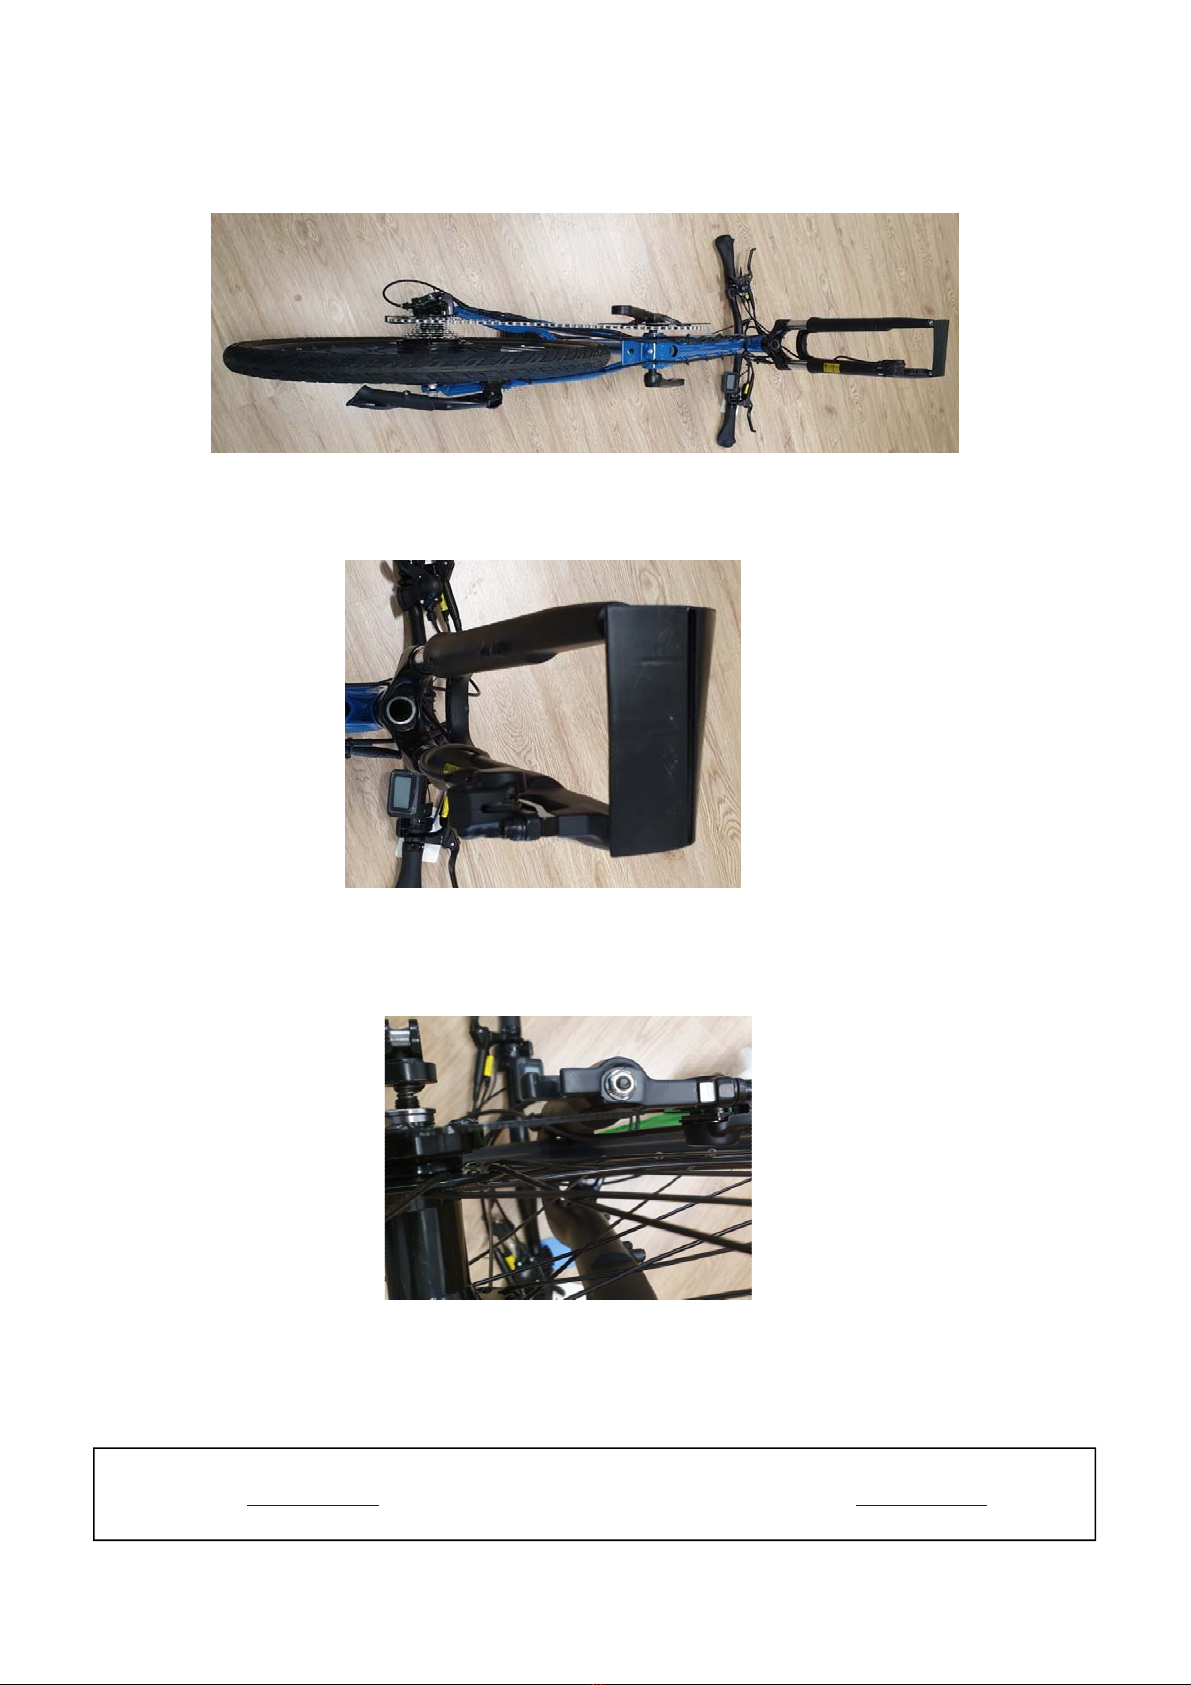
Fig 16 Remove the e-Bike from the box and place it on its handles.
Fig 17 Remove the Battery from the frame
Remove the Front Wheel Shaft (Fixed to the Front Wheel Spokes) and unscrew the shaft lock nut.
Insert the shaft into Wheel and screw the shaft lock nut back
Fig 18 Preparing the Front Wheel for assembly.
19
EVMSolutions(Pty)Ltd210MainStreet,SomersetWest,WesternCape,SouthAfrica,7130
[email protected] Support:0728424282 www.evx.co.za
Document Number: 100-(1011-3)-301-3
Fig 19 Place the e-Bike on the seat and the handlebars.
Fig 20 Remove the protective plastic inserted into the Front Wheel shaft position by pulling it upward
Fig 21 Align the Front Wheel Brake disk with the Brake Pads and lower the wheel onto the frame
This manual suits for next models
4
Table of contents


