manuals.online logo
Brands
  1. Home
  2. •
  3. Brands
  4. •
  5. EXALite
  6. •
  7. Dj Equipment
  8. •
  9. EXALite EXL-M Beam RGBW 36W User manual

EXALite EXL-M Beam RGBW 36W User manual

1
EXL-M Beam RGBW
36W
User Guide
EXALITE
2
Professional Entertainment Technology
TABLE OF CONTENTS
1. Safety instruction
2. Technical Specification
3. How To Set The Unit
4. How To Set The Unit
5. Troubleshooting
6. Fixture Cleaning
1. Safety Instruction
●Please read carefully the instruction,which includes important information about the
installation,,usage andmaintenance.
●Please leep this User Guide for future consultation.If yousell the unit to another user,be sure that
they also receive this instruction booklet.
●Unpack and check carefully there is no transportation damage before using the unit .
before operating,,ensure that the voltage and frequency of power supply match the power
requirements of the unit.
●It’s important to ground the yellow/green conductor toearth in order to avoid electric shock..
●The unit is for indoor use only.Use only in a dry Iocation.
●The unit must be installed in a iocation with adequate ventilation,at least 50cm from adiacent
surfaces.Be sure that no ventilation slots are blocked.
●Disconnect main power before replacement or servicing.
●Make sure there is no flammable materials close to the unit while operating as it is firehazard.
●Use safety cable when fixes this unit.Don’t handle the unig by taking its head only,but always
by taking its base.
●Maximum ambient temperature is ta:40℃.Don’t operaterature is higher than this.
●Unit surface temperature may reach up to 85℃.DON’t touch the housing bare-hand
during its operation.Turn off the power and allow about 15 minutes for the unit to
cool down before replacing or serving.
●In the event of serious operating problem,stop using the unig immediately.never
try to repair the unit by yourself.Repairs carred out by unskilled people can lead
to damage or malfunction .please contact the nearest authorized technical
assistance center.always use the same type spare parts.
3
●Do not touch any wire during operation as high voltage might becausing electric
shock.
Warning
●To prevent or reduce the risk of electrical shock or fire ,do not expose the unit
to rain or moisture.
●Do not open the unit within five minutes after switching off.
●The housing,the lenses,or the ultraviolet filter must be replaced if they are
visibly damaged.
Caution:
There are no user serviceable parts inside the unit.Do not open the housing or attempt
any repairs yourself.In the unlikely event your unit may require service,please
contact your nearest dealer.
Installation
The unit should be mounted via its screw holes on the bracket.Always ensure that
the unit is firmly fixed to avoid vibration and slipping while operating.And make
sure that the structure to which you are attaching the unit is secure and is able
to support a weight of 10 times of the unit’s weight. Also always use a safety
cable that can hold 12 times of the weight of the unit when installing the fixture.
The equipment must be fixed by professionals.And it must be fixed at a place where
is out of the touch of people and has no one pass by or under it.
2. Technical specification
●Extremely small,fast and powerful led moving beam.
●DMX channels:13.
●Pan/Tilt:540°/240°.speed adjustable
●Smooth electronic dimming:0-100﹪
●Electronic strobe with pulse and random effects
●Optional easy controller CA-8 or CA-9 RTX for instant lighting shows at your
fingertips
●High efficiency,low power consumption
●Super compact,low weight
Voltage:220V~240V,50/60HZ
Fuse:1A
Power consumption:70W
Light source:36W (R G B W)
Dimension:176*126*288mm
Weight:3.5Kg
4
3.How To Set The Unit
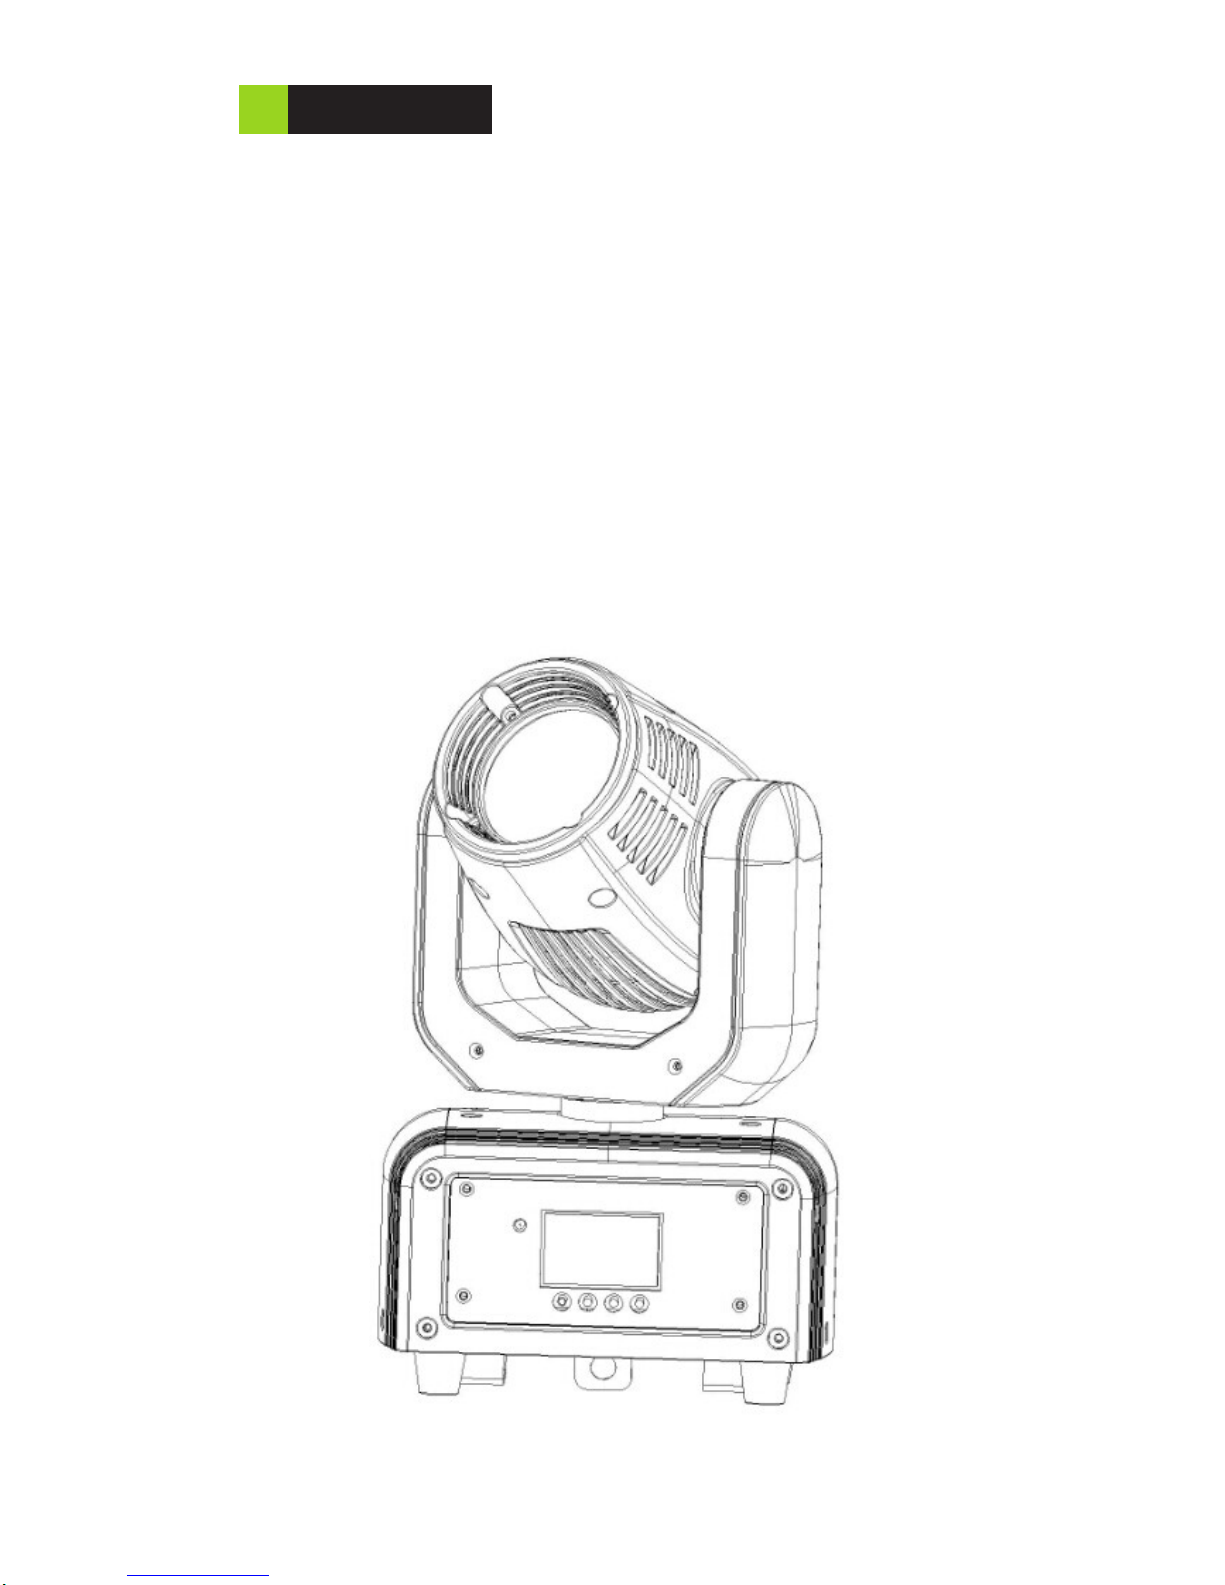
3.1 Control panel
Display
To show the various menus and the selected functions
Led LAMP:
DMX ON DMX input present
Button
MENU
To select the programming functions
5
DOWN To go backward in the selected functions
UP To go forward in the selected functions
ENTER To confirm the selected functions
Only for remote control
Connecting with CA-8/CA-9/CA-9RTX to control the unit for Stand by, Function and Mode
function.
Mains input
Connect to power supply.
Mains output
Connect to supply power to the next unit
DMX input/output
For dmx512 link,use 35-pin xlr cable to link the unit together.
3.2 main function
To select any of the given functions,press the MENUbutton up to when the required one is
showing on the display.Select the function by ENTER button and the display will blink. Use
DOWN and UP button to change the mode. Once the required mode has been selected, press the
enter button to setup.to go back to the functions without any change press the MENU button
again.Hold and press the MENU button about one second or wait for one minute to exit themenu
mode.
The main functions are showing below:
MENU:
1
DmxAddr
Address
Address
000-512
2 WorkMod
Dmx512
Auto
Sound
3 PT Sett
Xrevise
Yrevise
XYfbsti YES
NO
4 Control
Chunl 01
Chunl01 0-255
... ...
... ...
Chunl 15
0-255
5 REST YES
6
NO
DMXAddress
Select DMX Address ,press the enter button to confirm,the present address will blink on the
display. Use the UP and DOWN button to adjust the address from 1 to 512.Once the address has
been selected,press the ENTER button TO setup ,to go back to the functions without any change
press the MENU button again. Button again. Hold and press the MENU button about one second
or wait for one minute to exit the menu mode.
Show mode
Select Show Mode,press the ENTER button to confirm ,present mode will blink on the
display.Use the DOWN and up button to select the 13CH or 9CH or 8CH mode. Once the
mode has been selected ,press the enter button to setup,to go back to the functions without any
change press the MENU button button again.Hold and press the MENU button about one second
or wait for one minute to exit the menu mode.
Black Out
Select Slave Mode ,press the ENTER button to confirm,present mode will blink on the
display .Use the DOWN and UP button toselect the AUTO (yes blackout)or No (no
blackout)mode.Once the mode has been selected,press the ENTER button to setup,to go back to
the functions without any change press the MENU button again.Hold and press the MENU button
about one second or wait for one minute to exit the menu mode..
Sound Sense
Select Sound Sense,press the ENTER button to confirm,present mode will blink on the
display.Use the DOWN and UP button to select sound mode.Once the mode has been
selected,press the ENTER button to setup ,to go back to the functions without any change press
the MENU button again. Hold and press the MENU button about one second or wait for one
minute to exit the menu mode.
PAN inverse
Select Pan Inverse,press the ENTER button to confirm,present mode will blink on the display. Use
the DOWN and UP button to select the Yes(pan inversion)or No (normal) mode. ONCE the mode
has been selected press the ENTER butoon to setup,to go back to the functions without any change
press the MENU button again.Hold and press the MENU button about one second or wait for one
minute to exit the menu mode.
Tilt inverse
Select Pan Inverse,press the enter button to conform,present mode will blink on the display.Use
the DOWN and UP button to select the Yes (tilt inversion) or No(normal)mode.
Once the mode has been selected,press the ENTER button to setup,to go back to the functions
without any change press the MENU button again.Hold and press the MENU button about one
second or wait for one minute to exit the menu mode.
7
Auto Test
Press the MENU button up to when the Auto-Test is blinking on the display.Pressing ENTER
button and the unit will run self-test by built-in program.To go back to the functions press the
MENU button again.Hold and press the MENU button about one second or wait for one minute to
exit the menu mode.
Defaults Setting
AUTO Defaults:Mostly automatic mode,for non professional users,detailed explanation as
followings:
●Slave Mode : Auto
●Sound State : off
●Pan inverse : No
●Tilt inverse : No
(Notice:other settings are NOT changed while choosing Defaults Setting!)
Press the ENTER and the corresponding functions will set to defaullts setting,to go back to the
functions without any change press MENU button again.Hold and press the MENU button about
one secon or wait for one minute to exit the menu mode.
Reset
Press the MENU button up to when the Reset is blinking on the display Pressing ENTER button
and all channels of the unit will return to their standard position.
3. How To Control The Unit
4. You can operate the unit inthree ways:
●Master/slave built-in preprogram function
●Universal dmx controller
No need to turn the unit off when you change the DMX address,as nes dmx address
setting will be effect at once.
4.1Master/Slave Built In Preprogrammed Function
By linking the units in master/slave connection,the first unit will control the
other units to give an automatic,sound activated,synchronized light show.This
function is good when you want an instant show.You have to set the first unit in
master mode show mode and select AUTO or sound mode.its DMX input jack will have
nothing plugged into it,and its master led will be constantly on and sound led will
flash to the music.The other units will have to set in slave mode and select Slave
mode,Their DMX cables plugged into the dmx input jacks(daisy chain)and the slave
led lights will constantly on.
4.2 DMX Controller
By using a universal DMX controller to control the units,you will need to set DMX address
from 1 to 512 so that the units can receive DMX signal.
Press the MENU button up to when the DMX address is showing on the display .pressing
8
ENTER button and the display will blink.Use DOWN and UP buttonto change the dmx512
address .Once the address has been selected,press the ENTER button to setup,to to back to the
functions without any change press the MENU button again.Hold and press the MENU button
about one second or wait for one minute to exit the menu mode.
9
channel 1
Electronic shutter effect
0 - 19
Shutter closed
20 - 49
Shutter open
50 - 64 Strobe 1 (fast →slow)
65 - 69 Shutter open
70 - 84
Strobe 2: opening pulse
(fast →slow)
85 - 89
Shutter open
90 - 104
Strobe 3: closing pulse (fast
→
slow)
105 - 109
Shutter open
110 - 124
Strobe 4: random strobe (fast
→
slow)
125 - 129 Shutter open
130 - 144 Strobe 5: random opening pulse (fast →slow)
145 - 149 Shutter open
150 - 164 Strobe 6: random closing pulse (fast →slow)
165 - 169 Shutter open
170 - 184
Strobe 7: burst pulse (fast
→
slow)
185 - 189 Shutter open
190 - 204
Strobe 8: random burst pulse (fast
→
slow)
205 - 209
Shutter open
210 - 224 Strobe 9: sine wave (fast →slow)
225 - 229 No faction
230 - 244 Strobe 10: burst (fast →slow)
245 - 255 Shutter open
Channel 2 0-255 Dimmer
0 →100% intensity
Channel 3 0-255 Pan 0 - 540°
Channel 4 0-255 Pan fine
Pan fine (Least Significant Byte)
Channel 5
0-255
Tilt 0 - 240°
Channel 6 0 - 255
Tilt fine
Tilt fine (Least Significant Byte)
Channel 7 0-255 0-100%Pan/Tilt Speed
Channel 8
0-255
color macro
Channel 9
0 - 255
Macro speed 0
→
100%
Channel 10 0 - 255 Red 0 →100%
Channel 11 0 - 255 Green 0 →100%
Channel 12 0 - 255 Blue 0 →100%
Channel 13 0 - 255 White 0→100%
10
1. if you using a controller with 5 pins DMX out put,you need to use a 5 to 3 pin
adapter-cable.
2. At last unit,the dmx cable has to be terminated with aterninator.Solder a 120 ohm 1/4w
resistor between pin 2(DMX-) and pin 3(DMX+) into a 3-pin XLR-plug and plug it in
the DMX-out put of the last unit.
3. Connect the unit together in a ‘daisy chain’ soldered joints or corroded connectors can
easily distort the signal and shout down the system.
4. The DMX output and input connectors are pass-through to maintain the DMX
circuit,when one of the units’power is disconnected.
5. Each lighting unit needs to have an address set to receive the data sent by the
controller.The address number is between 0-511(usually 0 &1 are epual to 1).
6. The end of the DMX 512 system should be terminated to reduce signal errors.
7. 3 pin xlr connectors are more popular than 5 pin XLR.
3 pin XLR:Pin 1:GND,Pin2:Negative signal(-),Pin 3:Positive signal(+)
5 pin XLR:Pin1:GND,Pin 2;negative signal(-),Pin 3:Positive signal(+),Pin 4/pin 5 ;Not
used.
5 Troubleshooting
Following are a few common problems that may occur during operation.Here are some
suggestions for easy troubleshooting:
1. The unit does not work,no light and the fan does not work
a. check the connection of power and main fuse.
b. Measure the mains voltage on the main connector.
c. Check the power on Led.
2. Not responding to dmx controller
a. DMX LEDshould be on.If not ,check DMX connectors,cables to see if link properly.
b. If the DMXl LED is on and no response to the channel,check the address settings and
DMX polarity.
c. If you have intermittent DMX signal problems,check the pins on connectors or on PCB
of the unit or the previous one.
d. Try to use another DMX controller.
e. Check if the DMXcables run near or run alongside to high voltage cables that may cause
11
damage or interference to Dmx interface circuit.
3. Some units don’t respond to the easy controller
a. You may have a break in the DMX cabling.Check the LEDfor the response of the
master/slave mode signal.
b. Wrong DMX address in the unit .Set the proper address.
4. One of the channels is not working well
a. The stepper motor might be damaged or the cable connected to the PCB is broken.
b. The motor’s drive IC on the PCB might be out of condition
5. Fixture Cleaning
The cleaning of intermal and external optical lenses and/or mirrors must be carried out
periodically to optimize light output.Cleaning frequency depends on the en vironment in
which the fixture operates :damp,smoky or particularly dirty surrounding can cause greater
accumulation of dirt on the unit’s optics.
a. Clean with soft cloth using normal glass cleaning fluid.
b. Always dry the parts carefully.
c. Clean the external optics at least every 20 days.clean the internal optics at least every
30/60 days.
12
PRODANCE, s.r.o.
Osadní 799/26, 170 00 Praha 7
T: 220 806 054 E: i[email protected]
www.prodance.cz
6:Electrical diagram

Other EXALite Dj Equipment manuals

EXALite EXX-ML Beam 10R 280W User manual

EXALite

EXALite EXX-ML Beam 10R 280W User manual

EXALite EXX-ML Beam 17R 350W User manual

EXALite

EXALite EXX-ML Beam 17R 350W User manual

EXALite EXL-2 User manual

EXALite

EXALite EXL-2 User manual

EXALite EXL-XL Profile Zoom CW 300W User manual

EXALite

EXALite EXL-XL Profile Zoom CW 300W User manual

EXALite TH-327 User manual

EXALite

EXALite TH-327 User manual

EXALite EXL-L User manual

EXALite

EXALite EXL-L User manual

EXALite EXL-IP65 User manual

EXALite

EXALite EXL-IP65 User manual

Popular Dj Equipment manuals by other brands

Eliminator LED Fury operating instructions

Eliminator

Eliminator LED Fury operating instructions

Chauvet Freedom Par Quad-4 IP Quick reference guide

Chauvet

Chauvet Freedom Par Quad-4 IP Quick reference guide

Elation Artiste Monet user manual

Elation

Elation Artiste Monet user manual

Antari HZ-1000 user manual

Antari

Antari HZ-1000 user manual

Senna LightWall user manual

Senna

Senna LightWall user manual

Nicols BIRDY XS III user manual

Nicols

Nicols BIRDY XS III user manual

Starway LASERLAB 200 user manual

Starway

Starway LASERLAB 200 user manual

Martin Punisher X250 user manual

Martin

Martin Punisher X250 user manual

Chauvet DJ ILS Command user manual

Chauvet DJ

Chauvet DJ ILS Command user manual

Numark iM1 quick start guide

Numark

Numark iM1 quick start guide

Velleman HQ Power VDLLP56SB2 user manual

Velleman

Velleman HQ Power VDLLP56SB2 user manual

Vicoustic VicBooth Ultra 1x2 installation manual

Vicoustic

Vicoustic VicBooth Ultra 1x2 installation manual

NEO ELIPSOLED LITE 50 user manual

NEO

NEO ELIPSOLED LITE 50 user manual

Chauvet Q-Spot 560 Quick reference guide

Chauvet

Chauvet Q-Spot 560 Quick reference guide

involight COBPAR100HEX user manual

involight

involight COBPAR100HEX user manual

Cameo AURO SPOT Z 300 user manual

Cameo

Cameo AURO SPOT Z 300 user manual

Qtx PAR-T Bar user manual

Qtx

Qtx PAR-T Bar user manual

Numark STEALTH CONTROL Quick start manual

Numark

Numark STEALTH CONTROL Quick start manual

manuals.online logo
manuals.online logoBrands
  • About & Mission
  • Contact us
  • Privacy Policy
  • Terms and Conditions

Copyright 2025 Manuals.Online. All Rights Reserved.