ExamVision Essential User manual

1
Congratulations on
your new LED system

2
Introduction
Getting started - Using your light for the rst time
Light cable direction
Replaceable cable
Help and guidance
Warranty
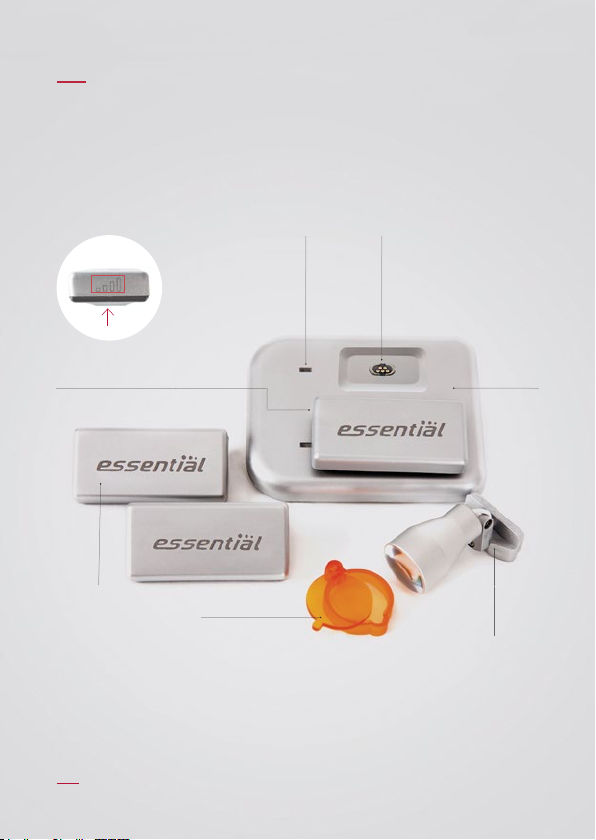
Your control unit and light
PowerBand
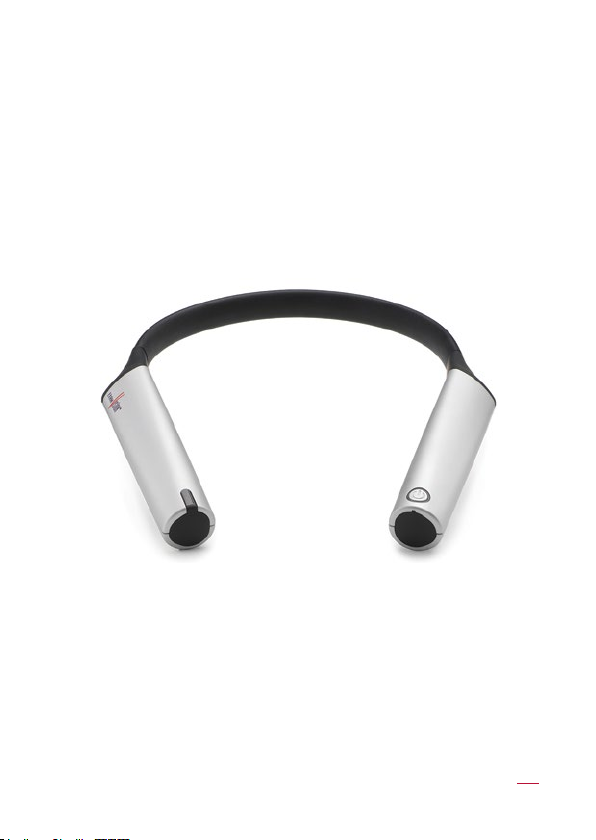
Focus™ Xtend
Essential One
Essential Alpha
Symbols and instructions for proper use
3
4
4
4
5
6
10
12
16
18
Content

3
You have chosen a high-quality light system, tailored to deliver the
exact amount of illumination, right where you need it.
ExamVision´s light systems have from 2 to 24 hours operating time,
depending on chosen light system and light intensity.
Our light systems are designed for either hands-free or touch-free
operation for sterile environments.
To achieve the optimum result from your new light system, please
follow the guiding instructions and videos carefully – or ask your
local ExamVision dealer for assistance.
Introduction
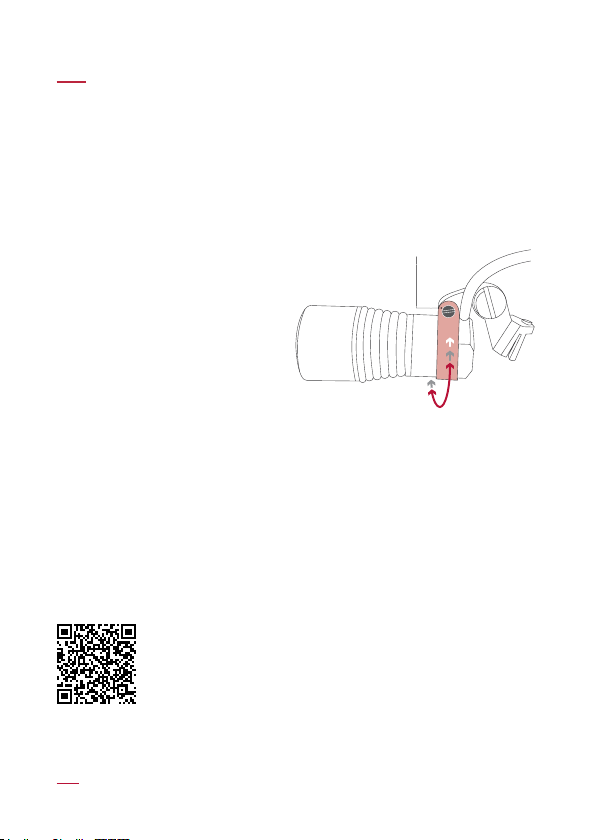
Light cable direction
With the exception of Essential One LED, which is wireless, the light
cable can be attached to the right or left loupe temple. For optimal
balance, we recommend that the cable then runs around the back
of your neck and attaches to the control unit on the opposite side.
Focus™ and Essential
Nano lights:
To change the cable direction,
loosen the small screw and
gently turn the ring to the
desired position. Ensure that
the ring touches the cable and
then tighten the screw.
Essential Alpha light:
To change the cable direction,
simply direct the cable to the right or left loupe temple.
Replaceable cable
Focus™ and Essential Nano lights: If your cable becomes damaged
you can replace it easily. Please contact your local ExamVision
dealer who can arrange a replacement.
Ring
Loosen
the screw
Help and guidance
Visit our Service Center on the ExamVision YouTube
channel for helpful videos. To watch now, just scan
the QR code.
For further technical specications see examvision.com
Getting started – Using your light for the rst time
4

5
Warranty
PowerBand control unit/Focus™ Xtend control unit/Focus™
True & Bright and Essential Nano light system and accessories
Covered by 3 years manufacturer warranty.
Focus™ True & Bright and Essential Nano replaceable cable
and backplate
Covered by 1 year manufacturer warranty.
Essential Alpha control unit, battery, light, cable and accessories
Covered by 1 year manufacturer warranty.
Essential One
Covered by 2 years manufacturer warranty.
Essential One battery, charger and accessories
Covered by 1 year manufacturer warranty.
Normal wear and tear, damage due to improper use or maintenance is
not covered by warranty. In the event of malfunction, please return the
device to your ExamVision dealer for repair.
Please also see examvision.com/warranty

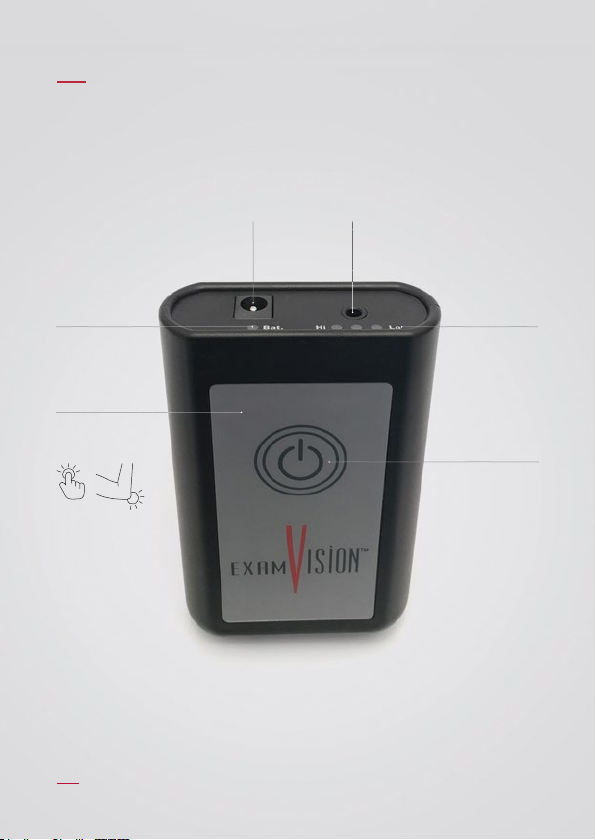
6
Charging Port LED Port
Power
Button
Touch-Free
Motion Sensor
PowerBand

7
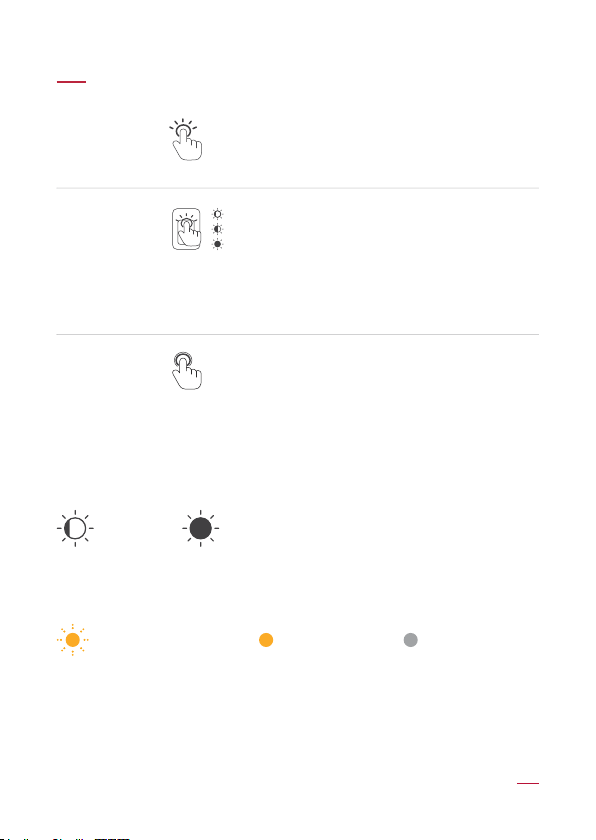
Operating your PowerBand
Power on
Press the Power Button
once.
Switch between
operating sides
To switch the operating
mode between Power
Button and Touch-Free
sensor, press the Power
Button 3 times
in quick succession.
When the light flashes
RED, the Power Button
is active.
When the light flashes
GREEN, the Motion
Sensor is active.
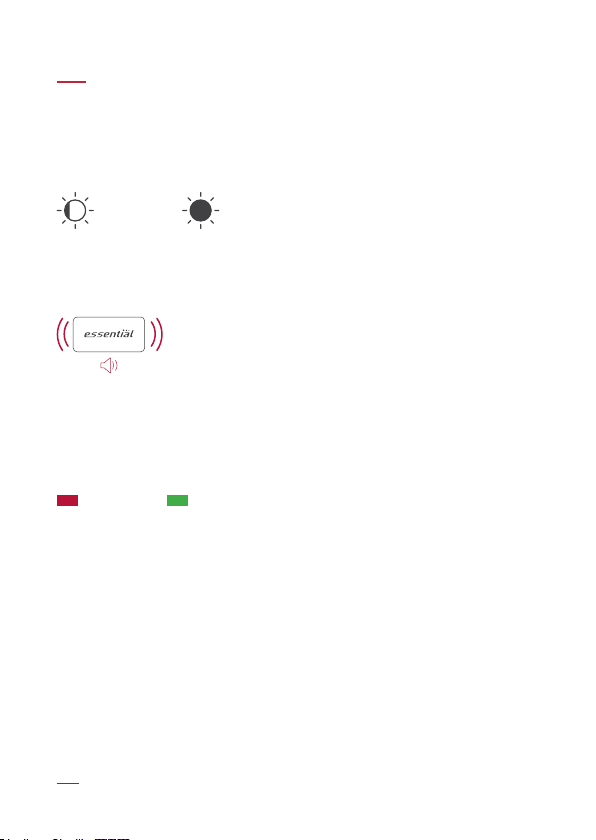
Changing light intensity
A single click changes
through light intensity
from low to high.
Power off
Press and hold for
2 seconds.
Right side
Touch-Free Motion Sensor
Left side
Power Button
3
3
1
2´
3´
Changing light intensity
Moving your hand
past the sensor
changes through
the light intensity
from low to high.
Power off
Hold your hand over
the sensor for 3 seconds.
1
11 1

8
Memory
When you turn off the PowerBand, it will retain the settings (light
intensity and operating mode).
Working time
Working time of your battery varies with light intensity. The lowest
setting can give you up to 24 hours continuous use, and the highest
setting approximately 12 hours.
Battery level status
Battery charging status
Please note: The lamp unit cannot be turned on, while the
PowerBand is charging.
Average charging time for an empty battery is 2.5 hours.
Operating your PowerBand
Light continuously green
100% - 20% charged
Light continuously yellow
20% - 10% charged
Light continuously red
10% - 0% charged
Light flashes red Light flashes yellow Light flashes green Continuously green
10
%
- 0
%
charged
10
%
- 20
%
charged
20
%
- 99
%
charged
100
%
charged
24 hours 12 hours
9
LED
Port
Charging
Port
Power Button
Light Intensity
Indicator
Pressable
Front Panel
Battery Level
Indicator
Focus™ Xtend
10
11
Press the Power Button once.
(The control unit will not activate unless
there is a lamp unit plugged in.)
The Focus™ Xtend control unit may be
operated hands-free, by pressing the
front panel with e.g. the elbow.
A short press on the panel changes
through 3 light intensities.
Press and hold for 2 seconds.
Power on
2´
Power off
Changing
light
intensity
1
1
1
Operating your Focus™ Xtend
Working time
Working time of your battery varies with light intensity, from 6 up to
24 hours continous use.
Battery charging status
When the battery needs charging, the charge indicator will flash.
Average charging time for an empty battery is 2.5 hours.
Bat. Bat. Bat.Needs charging Charging Charged
24 hours 6 hours
1
12
Light Intensity
Control
LED
Lamp
Curing Filter
Rechargeable
Lithium-ion
Batteries (3)
Magnetic
Charging
Port
Battery Level
Indicator
Charging
Pad
12
Essential One
13
Operating your Essential One
Place the battery pack on the connection
pad of the light.
Turn the light on/off by a single tap on
the top of the battery.
Your light has two different intensities,
controlled by a quick tap on the right side.
Turning
on/off
1
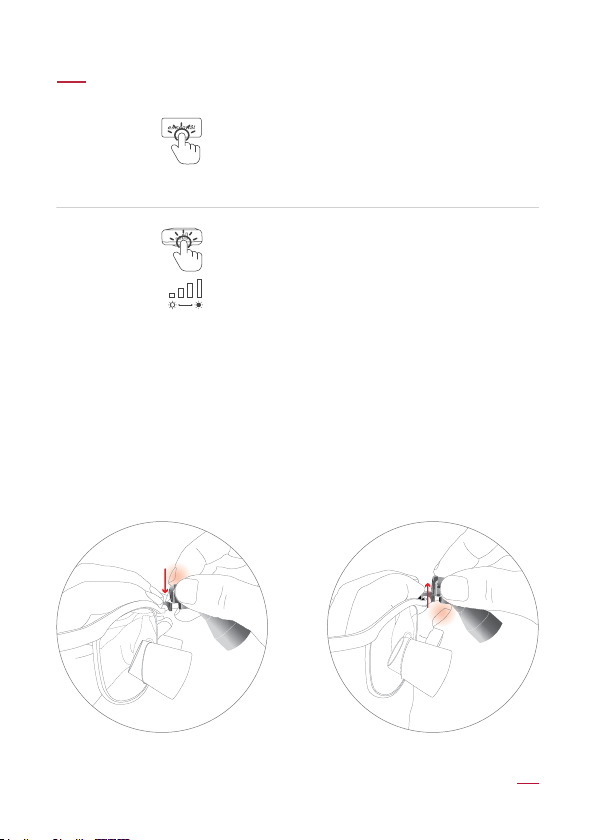
Note
When attaching or detaching the headlamp onto the framepart of
Essential One, slide the lamp on and off along the rails of the connector.
Ensure this is done vertically straight, as shown below with the red
arrows. Apply light pressure above when pressing the lamp into place.
When removing, apply pressure directly below with your thumb.
Do not twist it horizontally outwards.
Changing
light
intensity
1
Attaching lamp Detaching lamp
14
Operating your Essential One
Working time
Working time of your battery varies with light intensity, from 2 up to
3.5 hours of continous use.
Battery charging status
When the battery beeps, it needs charging.
Connect the charging pad to charger and place the battery on the
charging pad.
Average charging time for an empty battery is 1.5 hours.
3.5 hours 2 hours
Charging Battery charged

15

LED Port
Battery Charging
Indicator
Charging
Port
Main Control
on/off & light intensity
Battery Level
Indicator
Essential Alpha
16

17
Rotate the button to turn the light
on and off.
Rotate the button to alter light intensity.
Power
on/off
Changing
light intensity
Operating your Essential Alpha
Working time
The lowest setting can give you up to 12 hours continuous use, highest
setting approximately 4 hours.
Battery level status
The power indicator will show how much charge remains in the battery.
Battery charging status
25% charged
75% charged
50% charged
100% charged
Charging Battery charged
12 hours 4 hours

18
Manufacturer
ExamVision ApS. Industrivej 11, 8305 Samsø. Denmark.
www.examvision.com
Consult instructions for use
For digital versions in various languages, please follow
this link: examvision.com/support
Caution. Correct use and maintenance
Do not modify or alter your ExamVision product. Avoid touching the lamp
housing during extended use at high light intensity as it may become warm.
Do not expose the product to extreme hot, cold or moist conditions.
The LED devices have a very powerful light, do not look directly into the light
and do not point it into the eyes of other people. Only use the original, supplied
charger, as any other charger may damage the product.
Do not short circuit your ExamVision product.
To obtain an optimal lifetime, always handle the devices with care.
Do not attempt to repair your ExamVision product yourself. Should the devices
become damaged or not work properly, contact your ExamVision dealer for
further help.
Care and cleaning
Clean with a soft cloth and ensure all jacks and connections are free of dust.
Battery Care
The battery is partially charged from the manufacturer. Best practice is to
keep your battery charged at more than 30%. Partial charges do not harm
your battery.
indicator
Symbols and instructions for proper use
19
Battery lifetime
When your battery is reaching the end of its natural life, after about 500
charges, you will nd it needs to be charged more frequently.
Water resistance
Your ExamVision light and control unit are not designed to be immersed in
water. Clean off any splashes immediately to avoid damaging your unit.
Disinfection
Use only alcohol-free disinfection products, such as ExamVision
Disinfectant Wipes (available from your ExamVision dealer). Do NOT use
alcohol-based products, ultrasonic cleaners, autoclave or other chemical
disinfection. A wet wipe could short circuit the battery, if the wipe touches
both contact points at the same time. Do NOT use UV disinfection methods
that raise the temperature of the loupes or light.
Charger output
PowerBand: DC 5V.2A.10W
Focus™ Xtend: DC 12V.1A.12W
Essential One: DC 5V.2.4A.12W
Essential Alpha: DC 5V.1A.5W
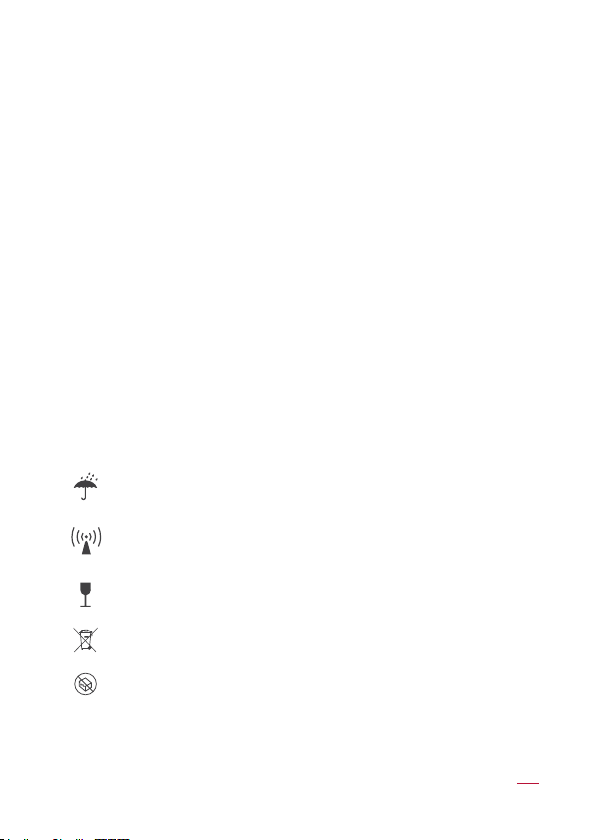
Keep dry
Interference may occur in the vicinity of equipment marked with
this symbol
Fragile, handle with care
Do not dispose of electronic products in the general waste stream
Do not use if package is damaged

20
21.10.20761.EN
facebook.com/ExamVisionDK
instagram.com/examvision/
linkedin.com/company/examvision-aps
www.examvision.com
Other manuals for Essential
2
Table of contents
Other ExamVision Medical Equipment manuals

Popular Medical Equipment manuals by other brands


Flaem
Flaem NEBULAIR+ quick guide

Orliman
Orliman STAR BRACE LSO-B Use and maintenance instructions

Thomashilfen
Thomashilfen ThevoRelief Series user manual

bort medical
bort medical StabiloPro Knee Brace Open Style manual

Atmos
Atmos S61 Servant operating instructions

Stryker
Stryker IsoTour Standard 2874 Operation manual


