Firefly DE550 User manual

1
Firefly DE550/551 User Manual Version: 3.3
WIRELESS OTOSCOPE
THANKS FOR SELECTING A WIRELESS FIREFLY OTOSCOPE
To take full advantage of this product’s advanced capabilities, and to
properly and safely use this product, please read the manual carefully.
DE550/551
User Manual

2
Firefly DE550/551 User Manual Version: 3.3
Copyright 2016 by Firefly Global. All rights are reserved. No one is permitted to reproduce or
duplicate, in any form, this manual or any part thereof without permission from Firefly Global
(www.Fireflyglobal.com).
Firefly Global assumes no responsibility for any injury, or for any illegal or improper use of the
product, that may result from failure to use this product in accordance with the instructions,
cautions, warnings, or indications for use published in this manual.
Software in this product is copyright of Firefly Global and its vendors. All rights are reserved.
The software is protected by U.S. and international copyright laws and international treaty
provisions applicable worldwide. Under such laws, the licensee is entitled to use the copy of
the software incorporated with this instrument as intended in the operation of the product in
which it is embedded. The software may not be copied, decompiled, reverse-engineered,
disassembled or otherwise reduced to human-perceivable form. This is not a sale of the
software or any copy of the software; all rights, title, and ownership of the software remain
with Firefly and/or its vendors.
Caution: Changes or modifications not expressly approved by Firefly Global will void the
purchaser’s authority to operate the equipment and its warranty.

3
Firefly DE550/551 User Manual Version: 3.3
Table of Contents
Introduction................................................................................................................4
Warnings & Cautions ..................................................................................................5
Check List....................................................................................................................7
Nomenclature .............................................................................................................8
Operation ....................................................................................................................9
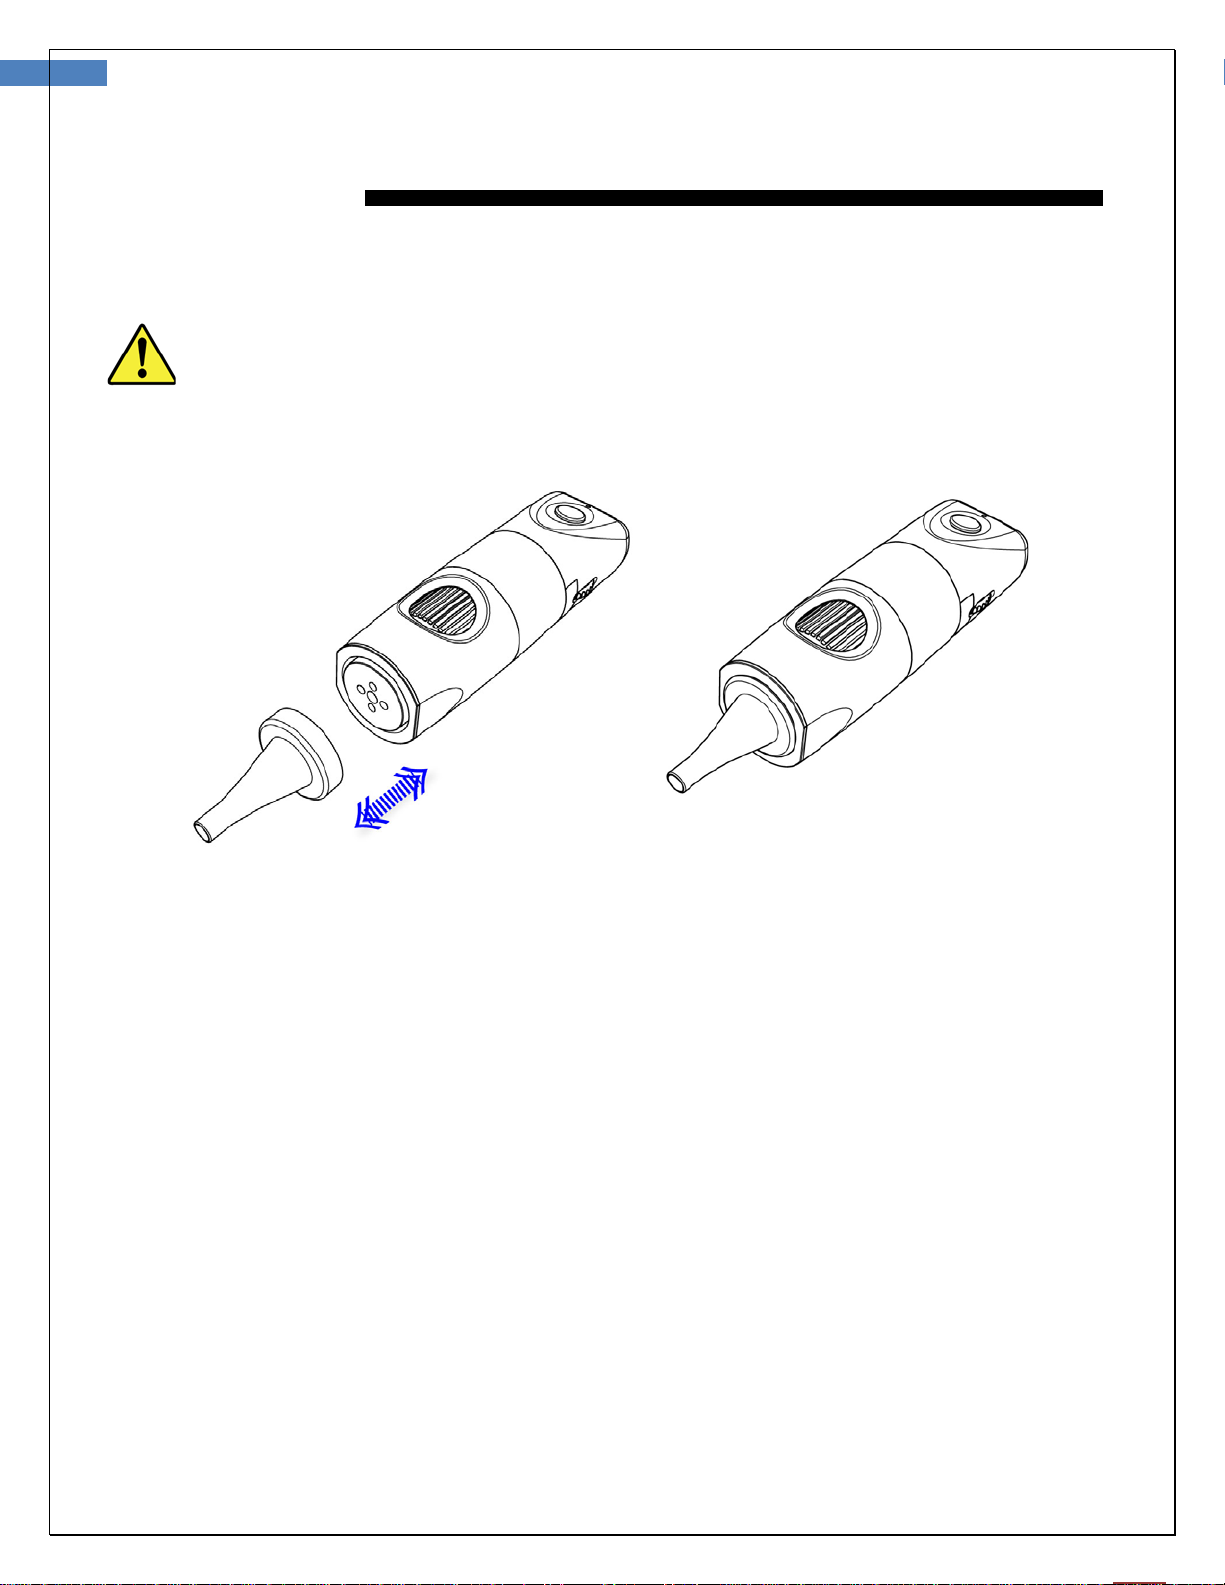
Setting up the Otoscope with Specula:......................................................................................9
Connecting to PC and Powering the Device On:........................................................................ 10
Charging the Battery:............................................................................................................. 11
Channel Mapping:.................................................................................................................. 11
Recommended Holding Position: ............................................................................................. 12
Brightness Adjustment: .......................................................................................................... 12
Using the Image Capture Control: ........................................................................................... 12
Using Focus:.......................................................................................................................... 13
Launching the Software Application for Windows:..................................................................... 15
Viewing the Images: .............................................................................................................. 15
Saving Images and Changing Image File Type:......................................................................... 16
Changing the Location where Images are Saved:...................................................................... 17
Changing the Location of an Image Already Taken: .................................................................. 17
Launching the Software Application for Mac: ............................................................................ 20
Viewing the Images: .............................................................................................................. 20
Album Manager Feature: ........................................................................................................ 21
Selecting Correct Device:........................................................................................................ 21
Saving Images or Videos: ....................................................................................................... 22
Deleting or Renaming an Image or Video Already Taken: .......................................................... 22
Creating a New Folder or Setting Default Folder: ...................................................................... 23
Moving an Image:.................................................................................................................. 24
Icons and Functions:.............................................................................................................. 24
Maintenance and service..........................................................................................25
Service policy............................................................................................................26
Specifications............................................................................................................27
Limited Warranty......................................................................................................28
Troubleshooting........................................................................................................31

4
Firefly DE550/551 User Manual Version: 3.3
INTRODUCTION
The Wireless Firefly Otoscope System consists of a wireless digital Otoscope, a compact USB receiver,
software application and a charge cable. Only a computer equipped with a free USB port is needed to use
the system.
The Wireless Firefly Otoscope System is designed for effective operation under a variety of conditions and
typical video parameters are set at the factory. The software allows users to adjust most parameters
including Saturation, Hue, Brightness, Contrast and Sharpness for desired applications.
System Requirements
The Firefly Otoscope System requires a user PC system running Windows XP Service Pack 2 or later
operating system, a viewing screen, and a PC with an available USB 1.1 or 2.0 port.
Intended use
The Wireless Firefly Otoscope System is intended to allow inspection of the external ear, ear canal, and
tympanic membrane under magnification.
User Profile
The Wireless Firefly Otoscope System is intended for applications such as:
Science Education
Medical examinations
Veterinary use
Self-health monitoring
Warranty Registration
Register your Firefly device at http://www.fireflyglobal.com/warranty-registration/ within two weeks of
your purchase and maintain your original receipt.

5
Firefly DE550/551 User Manual Version: 3.3
WARNINGS &CAUTIONS
Please familiarize all
operating personnel
with the
general
saf
et
y
information in this
summary.
Specific
warnings
and
cautions a
r
e
also found
throughout
this manual.
Warning A warning statement in this manual identifies a condition or practice which if
not corrected or discontinued immediately, could lead to injury, illness, or
death.
Do not use in the presence of flammable anesthetics.
This
product
has no user
se
rv
iceable
/
replaceable
parts.
Please
refer all
service
to
authorized service personnel.
This
instrument
is not
intended to be used in the eye.
Caution
A caution
statement
in this manual identifies condition
or
practice,
which
if
not
corrected
or
discontinued
immediate
l
y
, could lead to equipment
failure,
e
quipment damage,
or data
loss.
In
order to obtain
optimum performance and
ensure patient safety,
thoroughly read this manual
.
Do not use the Firefly Otoscope if
y
ou
notice any
signs
of
damage
to the
components
of
th
e
system. Contact customer
service
f
o
r immediate
assistance
.
Do not attempt to
disinfect
the Firefly Otoscope System
using
glutaraldehyde
pro
duc
t
s
, ethylene
oxide gas, steam or any other liquid or
gas disinfectant.
The signal
output
(USB
P
o
r
t
)
connector
is
intended
for
con
nect
i
on
of only
devices
complying
wit
h
IEC
60601
-
1,
or other IEC
standards
(for
example,
IEC 60950), as
app
r
opriate to
the device.
Conn
ecting
additional
devices
to the Firefly Otoscope System
is not allowed.
This
product complies
w
i
th
current
re
qu
ire
d
standards
for
electromagnetic interference
and should not present
p
r
oblems
to other

6
Firefly DE550/551 User Manual Version: 3.3
equipment
or be affected by other
devices. As
a
precaution,
avoid
using
th
is
device
in close proximity to other
e
quip
ment.
Do not apply alcohol,
ch
e
m
icals,
or
water to
the lens. Any liquids
entering
the
optical
assembly
will
damage
internal
components.

7
Firefly DE550/551 User Manual Version: 3.3
CHECK LIST
Before starting, check that all the following items have been included with your product. If anything is
missing, contact your dealer.
Otoscope x 1pc Receiver x 1 pc USB charger cable x 1 pc
Software Application CD
(Mac version available
online)
Power Adapter x 1pc
100-240V AC to 5V USB DC
Notice: Actual Shape may vary.
Specula (S/M/L) x 3 sets

8
Firefly DE550/551 User Manual Version: 3.3
NOMENCLATURE

9
Firefly DE550/551 User Manual Version: 3.3
OPERATION
Setting up the otoscope with specula
:
Only accepts original specula qualified for use with Firefly otoscopes.
Plug the specula into the round concave guide
in front. To remove: Simply pull to unplug the
specula.
Ensure a tight fit for proper operation and
adjust specula such that the circular opening
is centered on the screen.

10
Firefly DE550/551 User Manual Version: 3.3
Setting up the Software Application
:
Prior to using the Firefly Otoscope for the first time, install the FireflyPro software application following the
instructions provided with the installation CD.
Connect to PC
:
Connect the compact receiver to the
PC’s
USB port.
Power the Device On
:
Push the ‘Power Button’ at the rear of the otoscope to activate the device. An indicator light will turn on to
confirm the power status.

11
Firefly DE550/551 User Manual Version: 3.3
Charging the Battery:
Duration:
The Wireless Firefly Otoscope has a built-in high efficiency lithium battery that enables more than
2.5 hours continuous operation.
Charging the Battery:
Through the mini-USB port at the rear of the otoscope, the embedded battery can be charged
with the provided USB DC cable. The cable must be connected to the USB port of a PC or to the
“USB Power Adapter”, which can charge directly from a wall outlet.
Overload Protection:
The overload protection circuit will prevent overcharging when the battery is full and the
“Indicator” will turn green.
Power Indication:
The power indicator light is normally red during operation, but it will turn blue when the
remaining battery life is less than 30 minutes.
The lithium battery is a delicate and consumable item. It is expected to last through years of
use and is guaranteed for twelve months from its purchase against defects. If there is any
battery related issue, please contact customer service immediately. Battery replacement by
unauthorized personnel or replacement with unauthorized batteries may damage the system and
voids the overall warranty.
Channel Mapping:
On the rear right side of the otoscope, there is a
switch allowing users to set the wireless channel.
Both the receiver and otoscope must be set to
the same channel for proper operation:
CH 1: Channel 1
CH 2: Channel 2
CH 3: Channel 3
CH 4: Channel 4

12
Firefly DE550/551 User Manual Version: 3.3
Recommended holding position:
It is suggested to hold the otoscope, transparent cover forward, with the thumb held on
the equipment. This holding position offers relative stability and allows lens control. The index finger is
still free to rotate and adjust the focus wheel (as shown).
Brightness Adjustment:
On left rear side of the otoscope, a knob allows the
user to control the brightness of the LEDs:
Backward Turn: Decrease Brightness
Forward Turn: Increase Brightness
Using the Image Capture Control:
Press and release the Capture button to capture image
frames. The system will generate a shutter sound from
the PC speaker as confirmation.

13
Firefly DE550/551 User Manual Version: 3.3
Using Focus:
Based on the relative distance of the observed object, the focus wheel can be turned for a clear image.
When a higher magnification is required, the focus wheel can be turned to the left (see below). If a
larger field of view is required, the otoscope can be moved farther away and the wheel turned to the
right.
Default Position: Match “50” to the triangular marker

14
Firefly DE550/551 User Manual Version: 3.3
Standby and Remove device:
To temporarily turn off or remove the device, push and release the power button to the “OFF” position.
Next, exit the FireflyPro software application. You can then remove the USB receiver from the PC.

15
Firefly DE550/551 User Manual Version: 3.3
Launching the Software Application for Windows:
Double-click the FireflyPro.app icon on your computer desktop:
Viewing the Images:
FireflyPro software controls your Firefly Otoscope. The Otoscope communicates with the PC through
the USB compact receiver. The user can configure the video properties, review live images, capture
images, record video clips and perform a variety of powerful measurement and documentation
functions.
The main features of FireflyPro are shown below:

16
Firefly DE550/551 User Manual Version: 3.3
Saving Images:
There are three ways to save an image:
1. Pressing the snapshot button on the Firefly device.
2. Clicking the Camera icon in the menu bar.
3. Pressing the center button on your mouse (middle click).
Changing Image File Type:
Select between BMP, JPG-lossless or JPG-recommend image file types. There are two ways to change
the image file type:
1. Change the Default Image File Type:
In the menu bar go to Device > Settings, then select the desired image file type using the Image Format
dropdown selection. This will set the default format for all captured images.

17
Firefly DE550/551 User Manual Version: 3.3
2. Change the Format of an Existing Image
From the Image View Bar, Right click on an image and select Save as. Then select the file type from the
dropdown and click Save.
Changing the Location where Images are Saved
Changing the Location of an Image Already Taken:
Right click on the image in the Image View Bar and click Save As. You can then select the saving location on
your computer using the dropdown directory field at the top of the window.
Changing the Default Location for Saving Images:
Click the ‘Save picture path’ icon. Select the desired location from the drop down directory and click
OK. Next to the ‘Save picture path’ icon is a Default checkbox. Check this box if you wish
to save the new picture path as the default location for saving images.

18
Firefly DE550/551 User Manual Version: 3.3
Tool bars:
The Tools bars enable quick access to the functions of FireflyPro software. The tool bars can be grouped
into Control, Images and Device tool bar sets.
Control Tool bar:
Icon Icon Name Function Description
Play Start the video stream preview
Pause Freeze live video image frame
Video Setting Configure video properities
Video Recording
Video recording and settings (frame, period, quality, codec etc...)
Undo Undo the previous Rotation, Text Comment and Zoom
Redo Redo the previous Rotation, Text Comment and Zoom
ROI Select region of interest (ROI) on live video stream
Undo ROI Revoke ROI selection
Rotation Rotate live video 0°, 90°, 180°, 270°
Mirror Mirror live video horizontally
Flip Flip live video vertically
Text Comment Add text layer on image
Image Measure Launch image measurement application
Zoom + Zoom-in live video up to 300%
Zoom - Zoom-out live video down to 10%
Zoom Ratio Set Zoom ratio from 10-300

19
Firefly DE550/551 User Manual Version: 3.3
Image tool bar:
Icon Icon Name Function Description
Save Image Store frozen image
Image Capture Capture and store instant image from live video
Image Browsing Browse images in working directory
Working
Directory Pop-up to select working directory path
Working directory path
Device Tool bar:
Icon Icon Name Function Description
Refresh Camera View
Refreshes the live video connection in the
camera window
Select Device Select the proper device for best results
Change Video Format Select between multiple video and resolution
options
Save Video Format Saves the selected video format as new
default format
Note: Make sure you have the proper device selected. If you're not sure use the Select Device
icon.

20
Firefly DE550/551 User Manual Version: 3.3
Launching the Software Application for Mac:
Double-click the FireflyPro.app icon on your computer desktop:
Viewing the Images:
FireflyPro software controls your Firefly Otoscope. The Otoscope communicates with the Mac through
the USB compact receiver. The user can configure the video properties, review live images, capture
images, record video clips and perform a variety of documentation functions.
The main features of FireflyPro are shown below:
Rotation Flip Settings Album Manager
Close window
Maximize window
Minimize window
Grid for DE300/350
Resolution
Zoom In
Zoom Out
Take Photo
Take Video
Device information
Window
Percentage
Other manuals for DE550
2
This manual suits for next models
1
Table of contents
Other Firefly Medical Equipment manuals