Excellent GREX.600W.WH Manual

Informacje techniczne
Technical informations
Техническая информация
Technische Informationen

2
Wymagania bezpieczeństwa - instalacja
1. Montaż grzałki może wykonać wyłącznie instalator z właściwymi uprawnieniami.
2. Podłączaj urządzenie tylko do prawidłowo wykonanej instalacji elektrycznej
(patrz dane znamionowe na grzałce).
3. Dopuszcza się krótkie włączenie zimnej grzałki na wolnym powietrzu na okres nie dłuższy
niż 3 sekundy.
4. Bezwzględnie, nie wolno włączać grzałki w pustym grzejniku!
5. Zapewnij, aby przewód zasilający nie stykał się z gorącymi elementami grzałki lub grzejnika.
6. Podczas montażu lub demontażu, urządzenie nie może znajdować się pod napięciem.
7. Nie wolno ingerować we wnętrze urządzenia.
8. Moc grzałki nie może być większa od mocy grzejnika dla parametrów 75/65/20° C.
9. Ciśnienie w grzejniku nie może przekroczyć 10 atm. W grzejniku elektrycznym zapewnij
poduszkę powietrzną,a w grzejniku podłączonym do instalacji c.o. pozostaw 1 zawór
otwarty, aby nie dopuścić do wzrostu ciśnienia na skutek rozszerzalności cieplnej cieczy.
10. Urządzenie przeznaczone jest do użytku domowego.
11. Montuj urządzenie zgodnie ze wszystkimi lokalnymi przepisami dotyczącymi wymagań
bezpieczeństwa urządzeń elektrycznych, w tym dopuszczalnej lokalizacji i odległości
od miejsc mokrych.
Wymagania bezpieczeństwa - użytkowanie
1. Element grzejny podczas pracy musi być w pełni zanurzony w cieczy.
2. Regularnie sprawdzaj, czy urządzenie nie jest uszkodzone i czy użytkowanie jest bezpieczne.
3. Jeżeli przewód zasilający uległ uszkodzeniu, urządzenie nie nadaje się do użytku.
Odłącz od zasilania i skontaktuj się z producentem lub dystrybutorem.
4. Nie dopuszczaj do zalania obudowy grzałki.
5. Nie stosuj grzałki w instalacji c.o., gdzie temperatura wody w grzejniku może przekraczać 82° C.
6. Grzejnik lub grzałka mogą rozgrzać się do wysokich temperatur. Postępuj ostrożnie przy
kontakcie z grzejnikiem.
7. Nie otwieraj obudowy.
8. Podczas pracy grzałki w grzejniku podłączonym do instalacji c.o. zawsze zapewnij, aby jeden
zawór pozostał otwarty.
3
9. Urządzenie może być używane przez dzieci powyżej 8 roku życia oraz osoby o ograniczonej
sprawności umysłowej lub zycznej wyłącznie pod nadzorem lub po przeszkoleniu dotyczącym
zasad bezpiecznej obsługi i zagrożeń wynikających z użytkowania.
10. Urządzenie nie jest zabawką. Chroń przed dziećmi.
11. Czyszczenie można wykonywać wyłącznie po odłączeniu urządzenia od sieci zasilającej.
12. Czyszczenie urządzenia przez dzieci w wieku poniżej 8 lat dopuszczalne jest wyłącznie pod
właściwym nadzorem.
Przeznaczenie
Grzałka jest elektrycznym urządzeniem grzewczym przeznaczonym wyłącznie do wbudowania
w grzejniki wodne (samodzielne lub podłączone do instalacji c.o.) służące jako ogrzewacze po-
mieszczeń lub suszarki do ubrań i ręczników. Grzałkę należy dobrać do grzejnika tak, aby jej moc
znamionowa była zbliżona do mocy grzejnika dla parametrów 75/65/20° C.
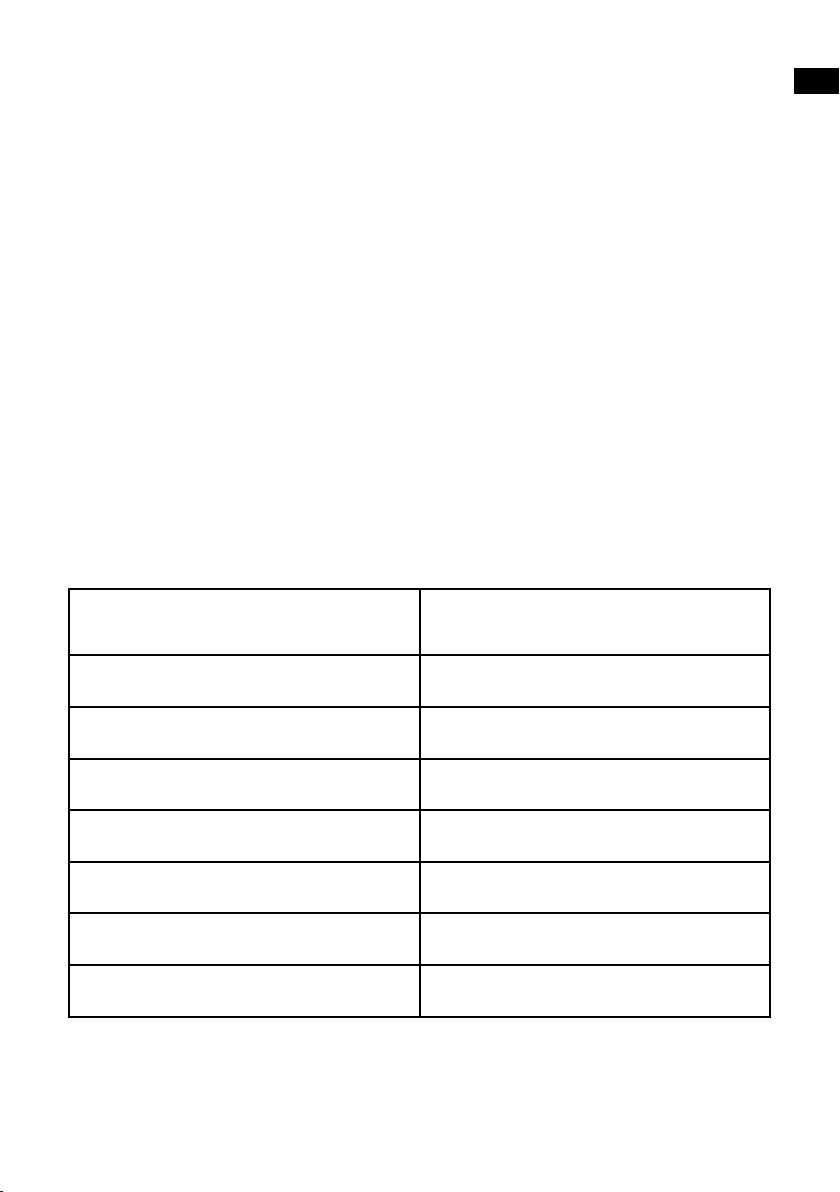
Dane techniczne
SW (Kabel spiralny z wtyczką)
Y
230 V / 50 Hz
600 [W]
Klasa I
G 1/2”
IPx5
365 mm

4
Instalacja lub demontaż
Poniżej zestawione zostały podstawowe wymagania i zasady, których należy bezwzględnie prze-
strzegać, aby zapewnić długotrwałą niezawodną pracę urządzenia.
1. Przeczytaj rozdział: Wymagania bezpieczeństwa— instalacja.
2. Wkręcaj grzałkę wyłącznie za pomocą właściwego klucza płaskiego (rozmiar 22).
3. Grzałkę należy instalować u dołu grzejnika, prostopadle do układu rurek, zachowując
przestrzeń na właściwą cyrkulację czynnika grzewczego.
4. Stosuj właściwe czynniki grzewcze (woda, specjalne produkty na bazie wody i glikolu
przeznaczone do stosowania w układach centralnego ogrzewania, oleje grzewcze
o parametrach zgodnych z wymaganiami producenta grzałki i grzejnika).
5. Nie włączaj grzałki, jeżeli nie jest w pełni zanurzona w cieczy.
6. Zapewnij środki ochrony przed zbyt dużym wzrostem ciśnienia w grzejniku (poduszka
powietrzna w grzejniku elektrycznym, otwarty jeden z zaworów grzejnika w instalacji c.o.).
7. Nie zalewaj grzejnika cieczą o temperaturze wyższej niż 65° C.
8. Przy podłączaniu urządzenia na stałe do instalacji, stosuj się do następujących wytycznych:
a. Żyła brązowa — podłączenie do obwodu fazowego (L).
b. Żyła niebieska — podłączenie do obwodu neutralnego (N).
c. Żyła żółto-zielona — podłączenie do uziemienia (PE).
9. Przed zalaniem grzejnika upewnij się, że połączenie grzałki i grzejnika gwarantuje szczelność.
10. Instalacja c.o. musi być wyposażona w zawory umożliwiające odcięcie grzejnika.
11. Temperatura czynnika w instalacji c.o.nie może przekraczać 82° C.

5
Uwagi przed demontażem:
1. Przed rozpoczęciem demontażu odłącz trwale urządzenie od sieci zasilającej i upewnij się,
że grzejnik nie jest gorący.
2. Uważaj — grzejnik z grzałką wypełniony cieczą może być bardzo ciężki. Zapewnij właściwe
środki bezpieczeństwa.
3. Przed demontażem upewnij się, że woda znajdująca się wewnątrz grzejnika i instalacji nie
spowoduje szkody (zakręć właściwe zawory, opróżnij grzejnik, itp.).
Utylizacja
Niniejszy produkt jest urządzeniem elektrycznym i podlega specjalnym wymaganiom dotyczącym
gospodarowania odpadami elektrycznymi i elektronicznymi. Nie wyrzucaj go z innymi odpadami
komunalnymi. Po zakończeniu użytkowania należy oddać go do punktu zbiórki i recyklingu urzą-
dzeń elektrycznych. Szczegółowych informacji udzieli Państwu punkt sprzedaży lub producent.
Dziękujemy za wkład w ochronę środowiska.
Konserwacja
• Przed wykonaniem czynności konserwacyjnych zawsze odłączaj urządzenie od sieci.
• Okresowo sprawdzaj poziom cieczy w grzejniku i dbaj, aby element grzejny był całkowicie
zanurzony.
• Czyść produkt wyłącznie na sucho lub wilgotną szmatką z małą ilością detergentu bez
zawartości rozpuszczalników i materiałów ściernych.

6
PL
Przycisk TIMER
Wskaźnik TIMER
Wskaźnik pracy grzałki
włączanie i wyłączanie grzałki
Funkcje
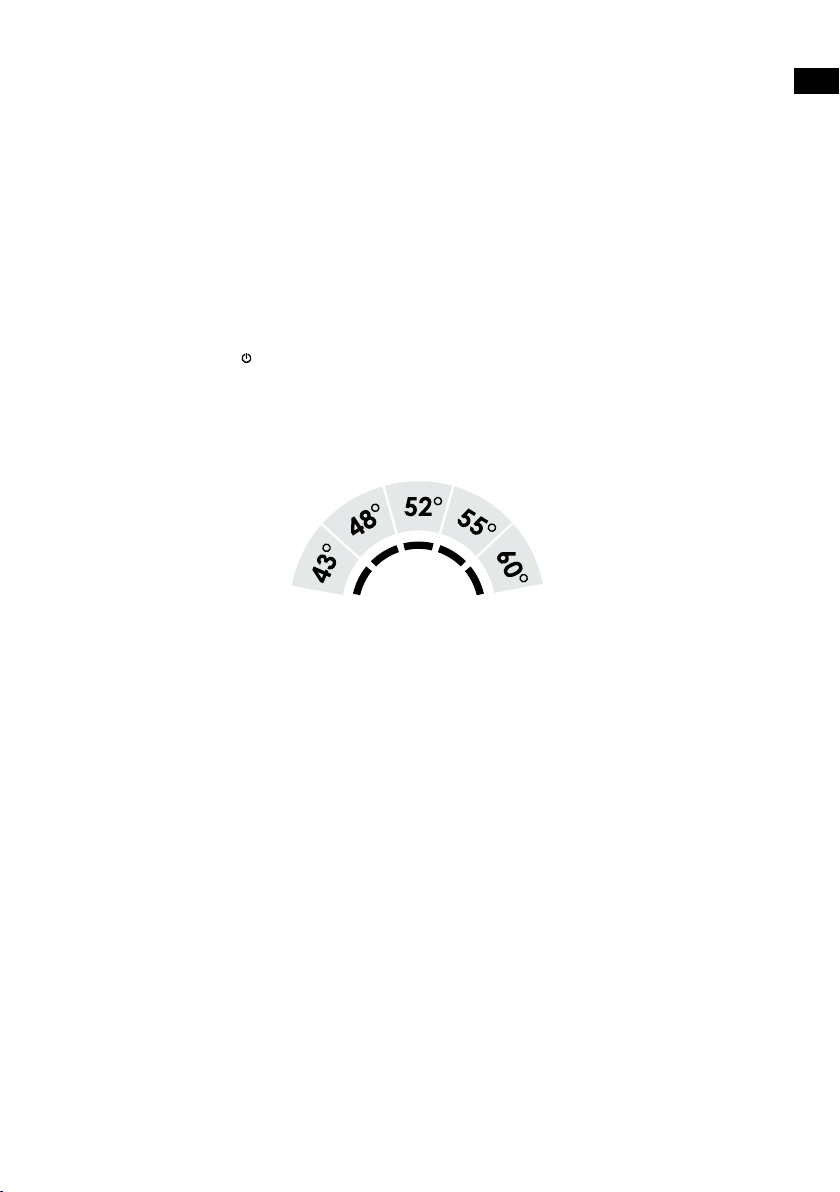
Grzałka posiada 1 nastawę temperatury grzejnika (domyślnie 48° C) i rozszerzony zakres dostęp-
nych opcji automatycznego wyłączenia grzania od 1 do 5 godzin. Taka funkcjonalność sprawia,
że jest to produkt dopasowany w szczególności do realizacji funkcji suszenia w łatwy i wygodny
sposób. Istnieje możliwość zmiany temperatury grzania na inną: 43, 48, 52, 55, 60° C, która po
ustawieniu zostanie zapamiętana i stanowić będzie nowy poziom temperatury pracy suszarki.
Wbudowany czujnik temperatury zabezpiecza grzejnik przed zamarznięciem w przypadku wykry-
cia temperatury niższej od 5-7° C. Dioda LED przy włączniku błyska okresowo — sygnalizując
aktywną ochronę przeciwzamarzaniową.
Obsługa
Grzałkę włącza się klawiszem . Dioda LED znajdująca się przy klawiszu świeci się, gdy
grzałka jest włączona i regulator utrzymuje nastawioną temperaturę grzania.
Układ sterujący pracą grzałki załącza grzałkę tylko wtedy gdy temperatura grzejnika jest
niższa niż temperatura nastawiona (domyślnie 48° C). Po uzyskaniu wymaganej temperatury
grzałka włącza się okresowo tylko w celu utrzymania temperatury. Dzięki temu zużycie energii
elektrycznej jest zdecydowanie niższe, niż wynikało by to z teoretycznych obliczeń opartych na
znamionowej mocy grzałki.
W prawej górnej części panelu sterującego znajduje się przycisk (TIMER) służący do
ustawiania czasu automatycznego wyłączenia grzania. Kolejne naciśnięcia klawisza zapalają
diody LED na wskaźniku czasu grza nia i pozwalają na ustawienie wartości od 1 do 5 godzin.
Po tym czasie grzałka automatycznie wyłączy się.
— dłuższe przytrzymanie klawisza ustawia czas na 5 godz. lub wyłącza TIMER,
— klawisz działa również, gdy grzałka jest wyłączona. Po jego naciśnięciu grzałka włączy się
i ustawi czas TIMERA na 1 godz.,
— aby wyłączyć TIMER należy kilkakrotnie nacisnąć klawisz lub po prostu — wyłączyć i włączyć
grzałkę,

7
— diody LED wskaźnika TIMERA będą po kolei gasły wraz z upływającym czasem do wyłączenia.
Konstrukcja grzałki, jak również właściwości zyczne różnych czynników grzewczych mogą spo-
wodować nierównomierny rozkład temperatury na grzejniku, w tym również stan, że dolne rurki
grzejnika mogą być zimne. Taki stan jest całkowicie normalny i nie jest efektem wadliwej pracy
grzałki.
Funkcja serwisowa zmiany temperatury grzania
Grzałka posiada 1 nastawę temperatury grzejnika (domyślnie 48° C) i rozszerzony zakres dostęp-
nych opcji automatycznego wyłączenia grzania od 1 do 5 godzin. Taka funkcjonalność sprawia,
że jest to produkt dopasowany w szczególności do realizacji funkcji suszenia w łatwy i wygodny
sposób. Istnieje możliwość zmiany temperatury grzania na inną: 43, 48, 52, 55, 60° C, która po
ustawieniu zostanie zapamiętana i stanowić będzie nowy poziom temperatury pracy suszarki.
Wbudowany czujnik temperatury zabezpiecza grzejnik przed zamarznięciem w przypadku wykry-
cia temperatury niższej od 5-7° C. Dioda LED przy włączniku błyska okresowo — sygnalizując
aktywną ochronę przeciwzamarzaniową.
Grzałka jest zaprogramowana fabrycznie tak, aby temperatura nastawy po włączeniu grzałki wy-
nosiła 48° C. Możliwe jest zmiana tej wartości na inną poprzez wykonanie poniższej sekwencji
czynności:
1. Odłącz urządzenie od prądu (np. wyjmij wtyczkę z gniazdka).
2. Naciśnij klawisz i trzymając ten przycisk, podłącz grzałkę z powrotem do zasilania.
3. Puść klawisz .
4. Na panelu grzałki zacznie pulsować jedna z 5 diod wskaźnika TIMERA. Klawiszem wybierz
żądaną wartość temperatury grzałki wg tabeli poniżej:
5. Odczekaj 10 sekund lub naciśnij klawisz TIMER w celu zatwierdzenia wybranej wartości.

8
Sygnalizacja stanów awaryjnych
Grzałka posiada aktywne funkcje monitorowania i sygnalizacji różnych stanów alarmowych.
Stan awarii sygnalizowany jest na wskaźniku diodowym TIMERA w taki sposób, że dwie skrajne
diody świecą stale, a dioda środkowa błyska na zasadzie: „kilka błysków i dłuższa przerwa”.
Ilość błysków oznacza kod błędu wg opisu poniżej:
a) „Praca w suchym grzejniku” (Kod: 2 błyski) — Układ elektroniczny wykrył sytuację wskazującą
na brak czynnika grzewczego wewnątrz grzejnika. Należy sprawdzić poprawność zalania.
b) „Przegrzanie” (Kod: 3 błyski) — Zbyt wysoka temperatura czynnika grzewczego
w grzejniku.
• Jeżeli grzałka grzeje mimo jej wyłączenia — prawdopodobnie nastąpiło uszkodzenie
elektroniki i konieczna jest naprawa w serwisie.
• Jeżeli grzałka jest zamontowana w grzejniku pracującym w instalacji c.o. z gorącą wodą,
sygnalizacja alarmu nie oznacza awarii grzałki a jedynie sygnalizuje wysoką temperaturę.
Należy upewnić się, że temperatura wody w instalacji nie przekroczy 82°C, gdyż grozi to
uszkodzeniem bezpiecznika termicznego w grzałce.
c) „Uszkodzony czujnik temperatury” (Kod:4 błyski) — możliwa awaria układu elektronicznego.
Prawdopodobnie grzałka wymaga naprawy w serwisie.
d) „Ostrzeżenie przed otwartym obiegiem wody w instalacji c.o.” (Kod: 5 błysków) — istnieje
ryzyko, że grzejnik podłączony do instalacji c.o. posiada zaburzoną cyrkulację z powodu
ucieczki ciepła do instalacji.
Uwaga: zakręcając zawory do instalacji c.o. należy zawsze zostawić 1 z zaworów otwarty,
tak aby nie doprowadzić do wzrostu ciśnienia w grzejniku.
Stan alarmowy można skasować poprzez wyłączenie i ponowne włączenie grzałki.
W sytuacji wystąpienia stanu awaryjnego należy wyłączyć grzałkę i odczekać ewentualnie
aż grzejnik ostygnie. Przed ponownym włączeniem należy przeanalizować przyczynę awarii i ją
usunąć. Jeżeli po włączeniu nadal sygnalizowany jest stan alarmowy — należy skontaktować się
z dystrybutorem lub producentem.

9
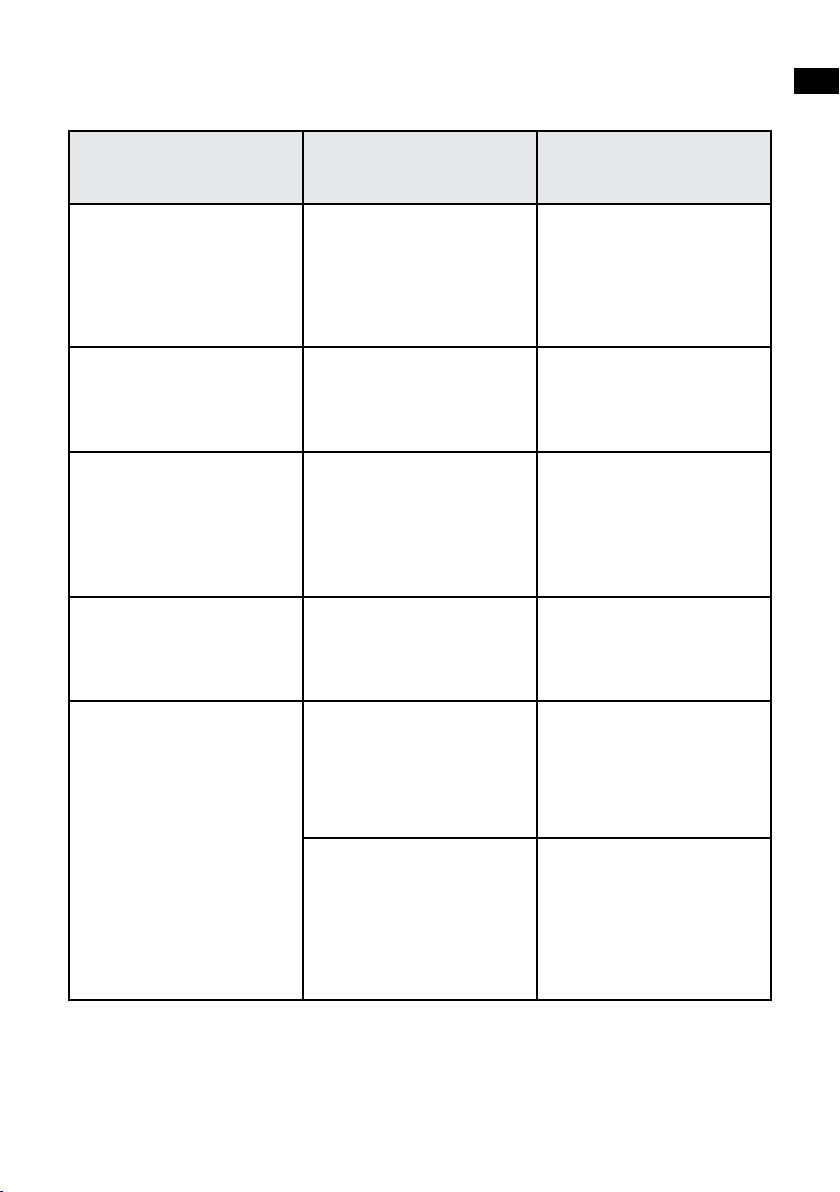
Usuwanie problemów
Grzałka sygnalizuje stan
awaryjny (skrajne diody
świecą stale, środkowa
pulsuje).
Patrz opis stanów
awaryjnych.
Postępuj wg wskazań
z rozdziału „Sygnalizacja
stanów awaryjnych”.
Grzejnik jest zupełnie
zimny,diody na grzałce świe-
cą poprawnie.
Zadziałanie bezpiecznika
termicznego, uszkodzenie
elektroniki.
Produkt wymaga naprawy
w serwisie.
Grzałka wyłączona, nie daje
się włączyć. Nic nie świeci. Brak prawidłowego zasilania,
Uszkodzenie elektroniki.
Sprawdzić czy grzałka
jest właściwie podłączona.
Jeżeli tak, produkt będzie
wymagał naprawy
w serwisie.
Grzałka grzeje bez kontroli,
nie można jej wyłączyć.
Uszkodzenie elektroniki. Produkt wymaga naprawy
w serwisie.
Włączenie grzałki powoduje
zadziałanie zabezpieczeń
w instalacji elektrycznej.
Uszkodzenie mechaniczne
grzałki na skutek zbyt wyso-
kiego ciśnienia w grzejniku
(brak poduszki powietrznej).
Grzałka wymaga naprawy
w serwisie.
Osłabiona izolacja elektryczna
elementu grzejnego lub inne
uszkodzenie.
Skontaktować się z elektry-
kiem w celu werykacji
źródła problemu.
Skontaktować się z serwisem
producenta.

10
Safety requirements - installation
1. Fitting and connection of the heating element should only be performed by a qualied installer.
2. Connect the unit to a sound electrical installation (see the ratings on the heater).
3. Switching on the heating element in the open air to test the device is permitted for a maximum
of 3 seconds.
4. Never test a heating element that is already in- stalled. Do not turn the heating element on in
an empty radiator!
5. Ensure that the power cord does not touch the hot parts of the heating element or radiator.
6. Before installing or removing the device, make sure it is disconnected from the power source.
7. Do not open the device — any interference with internal components will invalidate the warranty.
8. The heating element’s power output must not exceed the radiators power output for
the parameters 75/65/20° C.
9. The pressure in the radiator should not exceed 10 atm. Ensure that an air cushion is preserved
in electric radiators. In central heating systems, leave one valve open to prevent pressure build
up due to the thermal expansion of the liquid.
10. The device is intended for home use only.
11. Fitting and Installation of the device must be carried out in accordance with all local regulations
for electrical safety, including installation within permissible locations only. Observe bathroom
electrical zone regulations.
Safety requirements — use
1. The heating element must be fully submerged in the heating liquid during its operation.
2. Regularly check the device for damage to ensure it is safe to use.
3. If the power cord is damaged the device should not be used. Unplug the device and contact
the manufacturer or distributor.
4. Do not allow ooding into the heating element casing.
5. Do not use the heating element in heating systems where the water temperature exceeds 82° C.
6. The heating element and radiator can heat up to high temperatures. Please be cautious — avoid
direct contact with the hot parts of the equipment.
7. Do not open the heating element casing.
8. In the central heating system, always make sure that one valve of the radiator remains open.
9. Ensure that minors aged 8 and above or those with a physical or mental disability are
supervised if operating the device.

11
10. The device is not a toy. Keep it out of the reach of children.
11. The device must be disconnected from the mains during cleaning and maintenance.
12. Cleaning of the equipment by children under 8 years of age is only permitted under appropriate
supervision
Intended use of device
The heating element is an electric device intended solely for installation in radiators (standalone or
connected to the central heating system) to serve as space heaters, or clothes and towels dryer.
Heating element power output should be matched with radiator output for parameters
of 75/65/20° C
Technical information
SW (Spiral cable with plug)
Y
230 V / 50 Hz
600 [W]
Class I
G 1/2”
IPx5
365 mm

12
Installation or removal
Below we list some basic requirements and principles which must be followed to ensure long
term, reliable operation of the product.
Before installation or rst use:
1. Read the chapter Safety requirements - Installation.
2. Fit the heating element using the correct spanner (size 22).
3. The heating element must be installed at the bottom of the radiator, perpendicular
to the radiator pipes, while preserving space for the proper circulation of the heating medium.
4. Use a suitable heating medium for lling the electric radiator, i.e. (water, special products based
on water and glycol for use in central heating systems, or oil which complies with the require-
ments of the manufacturer of the radiator and heating element).
5. Do not switch the heating element on if it is not fully immersed in radiator heating medium.
6. Make sure an adequate air cushion is present to protect against excessive pressure build up
within the heater (always leave one of the radiator valves open).
7. When lling the radiator with hot liquid insure that the liquid temperature does not exceed 65° C.
8. Follow the subsequent guidelines when connecting the electrical installation:
a. Brown wire — live connection to the circuit (L).
b. Blue wire — connect to neutral (N)
c. Yellow & green wire — earth connection (PE).
9. Before lling the radiator with heating medium, ensure that the heating element is tted properly
and that it is water tight.
10. In central heating installation radiator must be tted with the valves enabling disconnection of
the radiator from the rest of the system.

13
11. The temperature of the heating agent in the central heating system must not exceed 82° C!
Notes prior to removal:
1. Before dismantling permanently, disconnect the heating element from the mains and ensure
that the radiator is not hot.
2. Be aware. A radiator lled with liquid can be very heavy. When moving the radiator, ensure that
you take the necessary safety precautions.
3. Before disassembly, close the appropriate valves and drain the radiator completely to avoid
causing any damage.
Product disposal
This product should not be disposed of as general waste but should be brought to the appropriate
collection point for recycling of electric and electronic devices. This information is provided by the
sign on the product, user manual and packaging. Information on the appropriate point for used
devices can be provided by your local authority, product distributor or the store from where the
product was purchased.
Thank you for your effort towards protecting the environment.
Maintenance
• Before performing maintenance, always unplug the unit from the mains system.
• Periodically check the uid level in the radiator and ensure the heating element is completely
submerged.
• Clean the product with a dry or damp cloth. If necessary, use a very small amount of detergent,
ensuring that it contains no solvents or abrasives.

14
PL
TIMER button
TIMER indication
Indication of heater current working state
On / off button
Functions
Heater has 1 xed temperature setting (default temperature of 48° C) and an advanced range
of automatic switch off functions after 1-5 hours. This makes the product convenient and user-
-friendly - perfect for drying clothing and towels. The default heating temperature for the towel rail
can be set to any of the following values: 43, 48, 52, 55 or 60° C. A built-in temperature sensor
protects the towel rail from freezing in situations where the temperature falls below 5-7° C. The
LED diode next to the on/off button will ash recurrently, indicating that the anti-freeze protection
is active.
Heater use
The heater is turned on by pressing the on/off button. The LED diode at the on/off button lights up
when the heater is on and the regulator maintains the set heating temperature.
the heater control panel turns the device on only when radiator temperature is lower
than the set temperature (default temperature of 48° C). On reaching the required temperature,
the heater will turn on recurrently to maintain the set temperature only. This function allows much
lower energy consumption than calculations based on the heaters nominal heat output might indi-
cate. In the upperleft part of the control panel, there is a (TIMER) button which can be used to set
the automatic switch off time of the device. Every subsequent pressing of the buttons will light up
diodes on the heating time indicator and allow the user to preset the “switch off” time of the device
to between1 and 5 hours from the current time.
After this time, the heater will turn off automatically.
— Longer pressing of the button will automatically set the timer to 5 hours or, turn off the TIMER
function,
— The button can also be used when the heater is off. On pressing the button, the heater will
automatically turn on and set the TIMER to 1 hour,,
— If you want to turn the TIMER off, press the button several times or simply turn the heater off
and on,
— TIMER LED diodes will turn off one by one, to display the correct, remaining drying time.
15
The construction of the heater as well as physical characteristics of various heating liquids may
cause an uneven heat distribution inside the towel rail. As a result, bottom pipes of the towel rail
may stay cool. Such phenomenon is completely normal and is not an indication of heater failure.
Modication of radiator heating temperature
The default temperature of the heater is 48° C. The user can modify the heating temperature by
following these steps:
1. Disconnect the device from the electricity supply (i.e. unplug the device).
2. Press and hold the on/off button while reconnecting the heater to the electricity supply.
3. Release the button .
4. One of 5 TIMER diodes will start ashing. Select the required temperature value by pressing
the button until the corresponding diode starts ashing. Temperature values for each diode are
shown in the table below:
5. Wait for 10 seconds or press the TIMER button in order to conrm your chosen value.

16
Device malfunction alert
Heater has built-in malfunction monitoring and alert functions. Device malfunction is signalled in
the following way: the two outer diodes shine with constant light while the middle diode ashes in
the following manner — several ashes followed by a longer break. The number of diode ashes
indicates an error code as described below:
a) “Running in dry conditions” (error code: 2 ashes) — electronic system identied a situation in
dicating too little heating liquid inside the towel rail. Check to see if the towel rail has been pro-
perly lled with heating medium.
b) “Overheating” (error code: 3 ashes) - the temperature of heating liquid inside the towel rail
is too high
• If the heater heats up despite being turned off, it is likely that the electronics have been
damaged. The heater should be returned to the supplier/manufacturer for repair.
• the heater is installed inside a towel rail that is connected to a central heating system with
hot water in the system, an alert does not mean that the heater has been damaged. The
alert signals that temperature of the installation is too high. Please ensure that temperature
of the water inside the installation does not exceed 82° C as this could cause damage to the
heater’s thermal fuse.
c) “Temperature sensor damaged” (error code: 4 ashes) — There is a possibility of electronic
system malfunction. The heater will most likely need repair.
d) “Warning against possible heat escape into the system in central heating installations”
(error code: 5 ashes) — there is a risk of a heat escape into the system if device is operating
with the central heating system on and system water in circulation.
Attention: when closing the central heating installation valves, ensure that 1 valve remains open.
This will prevent pressure in the towel rail from rising excessively.
The malfunction alert may be removed by turning the heater off and on again.
In the case of a malfunction alert, turn the heater off and wait for the towel rail to cool down. Check
the device for a possible cause (referring to the manufacturer “problem solving” guide) and try to
resolve it. If the heater is still signalling malfunction after it is turned on again, you should contact
your supplier or, alternatively, the product manufacturer.
17
Problem solving
The heater is signalling
malfunction alert (outer
diodes shine constantly,
while the middle one
pulsates).
See description
of malfunctionsalerts.
Follow the steps specied
in the paragraph relating
to “Device malfunction
alerts”.
Radiator is completely cold,
diodes shine correctly.
The thermal fuse has been
damaged — an electronics
failure.
The device must be returned
for repair.
Heater is off, it cannot be
turned on. Diodes do not
work.
No power supply.
Electronics failure.
Check that the heater is
correctly connected. If the
connection is correct, the
product must be returned
for repair.
Device heats without
control, it cannot be
turned off.
Electronics damage.
Product requires repair at
an authorized repair point.
Turning the heater on
causes the electrical installa-
tion’s safety devices to
activate.
Mechanical damage to device
resulting from excessive
pressure inside the radiator
(i.e. no air cushion).
Product requires repair at
an authorized repair point.
Damage of electric isolation
of the heating element
or other damage.
Please contact an electrician
in order to verify the
source of the problem.
Alternatively, contact an
authorized service point.

18
Sicherheitsanforderungen - Montage.
1. Die Montage des Heizkörpers darf nur von einen qualizierten Fachmann durchgeführt werden.
2. Schließen Sie das Gerät nur an eine ordnungsgemäß ausgeführte elektrische Installation an
(Beachten Sie die Kennzeichnung auf der Heizpatrone).
3. Es ist zulässig die Heizpatrone außerhalb des Heizkörpers kurz einzuschalten. Sie darf aber
nicht länger als 3 Sek. eingeschaltet sein.
4. Es ist absolut nicht zulässig die Heizpatrone in einen nicht befüllten Heizkörper einzuschalten.
5. Stellen Sie sicher, dass das Versorgungskabel keine heißen Elemente des Heizkörpers oder
der Heizpatrone berührt.
6. Bei der Montage oder Demontage darf sich das Gerät nicht unter Spannung benden.
7. Öffnen Sie auf keinen Fall das Gehäuse des Gerätes.
8. Bei den Parameter 75/65/20° C .darf die Nennleistung der Heizpatrone nicht größer als die
Heizleistung des Heizkörpers sein.
9. Der Druck im Heizkörper darf 10 atm nicht überschreiten. Sorgen Sie unbedingt dafür, dass bei
einem Elektroheizkörper ein Luftkissen im Heizkörper verbleibt. Ist der Heizkörper an eine Zen-
tralheizung angeschlossen muss bei Betrieb der Heizpatrone immer ein Ventil geöffnet sein.
Durch diese Maßnahmen wird ein Druckanstieg aufgrund der thermischen Ausdehnung der
Flüssigkeit verhindert.
10. Das Gerät ist für den Hausgebrauch vorgesehen.
11. Installieren Sie das Gerät gemäß den örtlich geltenden, gesetzlichen Sicherheitsvorgaben
von elektrischen Anlagen unter Beachtung der Lage und des Abstandes zu Wasserquellen.
Sicherheitsanforderungen — Nutzen
1. Das Heizelement muss im Betrieb vollständig vom Heizmedium bedeckt sein.
2. Überprüfen Sie regelmäßig, ob das Gerät nicht beschädigt und die Benutzung sicher ist.
3. Wenn das Kabel beschädigt ist, dann darf man das Gerät nicht benutzen.
Ziehen Sie das Netzkabel und wenden Sie sich an den Hersteller oder Händler.
4. Vermeiden Sie Feuchtigkeit auf dem Heizpatronen-Gehäuse.
5. Setzen Sie die Heizpatrone nicht bei einer Zentralheizung ein, wo die Wassertemperatur 82° C
überschreiten kann.
6. Der Heizkörper oder die Heizpatrone können sich bis zu hohen Temperaturen erwärmen.
Seien Sie beim Kontakt mit dem Heizkörper vorsichtig.
7. Öffnen Sie das Gehäuse nicht.
8. Während der Benutzung der Heizpatrone in einem Heizkörper, der an die Zentralheizung

19
ageschlossen ist, muss sicher gestellt sein, dass ein Ventil geöffnet ist.
9. Das Gerät kann von Kindern ab 8 Jahren oder Personen mit eingeschränkter geistiger oder
körperlicher Leistungsfähigkeit nur unter Aufsicht oder nach Ausbildung in den Grundsätzen der
sicheren Handhabung und Gefahren benutzt werden.
10. Das Gerät ist kein Spielzeug. Achten Sie hierbei vor allem auf Kinder.
11. Die Reinigung darf man nur dann vornehmen, wenn das Gerät vom Stromnetz getrennt ist.
12. Cleaning of the equipment by children under 8 years of age is only permitted under appropriate
supervision
Bestimmung
Die Heizpatrone ist ein elektrisches Heizgerät, das ausschließlich für den Einbau in Wasserhe-
izkörper bestimmt ist (separat oder an die Zentralheizung angeschlossen) und als Raumheizung
oder Wäschetrockner. Die Nennleistung der Heizpatrone sollte zur Heizkörperleistung angepasst
werden (bei Kenndaten 75/65/20°C).
SW (Spiralkabel mit Stecker)
Y
230 V / 50 Hz
600 [W]
Class I
G 1/2”
IPx5
365 mm
Technische Daten

20
Die Montage und Demontage
Darunter wurden die grundlegenden Anforderungen und Prinzipien aufgeführt, die beachtet
werden müssen, .um eine langfristige und zuverlässige Nutzungsdauer des Gerätes zu
gewährleisten.
Hinweise vor der Montage bzw. der ersten Ingebrauchnahme:
1. Lesen Sie das Kapitel : Sicherheitsanforderungen - Montage.
2. Schrauben Sie die Heizpatrone nurmit einem achen Maulschlüssel (Größe 22) ein.
3. Die Heizpatrone muss an der Unterseite angebracht werden, senkrecht zu den Querrohren
unter Einhaltung eines entsprechenden Freiraumes für die richtige Zirkulation des
Heizmediums.
4. Verwenden Sie nur ein zulässiges Heizmedium (Wasser; spezielle Produkte zur Verwendung in
Systemen der Zentralheizung auf Wasser und Glykol Basis; Heizöle, die den Anforderungen
des Heizpatronen- und Heizkörperherstellers entsprechen).
5. Nehmen Sie die Heizpatrone erst in Betrieb, wenn sich das Heizelement vollständig im Wasser
oder in einer anderen Flüssigkeit bendet.
6. Schützen Sie den Heizkörper vor übermäßigem Druck (Luftkissen in einem Elektroheizkörper,
ein geöffnetes Heizkörperventil bei einer Zentralheizung).
7. Füllen Sie den Heizkörper nicht mit einer Flüssigkeit, derer Temperatur höher ist als 65° C.
8. Beim Anschluss des Gerätes an eineFestinstallation, befolgen Sie die folgenden Hinweise:
a. Braunes Kabel — Anschluss an den Außenleiter (Phase)(L).
b. Blaues Kabel — Anschluss an den Neutralleiter (N).
c. Gelb-grünes Kabel — Anschluss an den Schutzleiter (PE).
9. Vor dem Befüllen des Heizkörpers stellen Sie bitte sicher, dass die Verbindung zwischen der
Heizpatrone und dem Heizkörper dicht ist.
10. Die Installation der Zentralheizung muss mit entsprechenden Ventilen ausgestattet
sein, so dass eine Absperrung des Heizkörpers möglich ist (Mischbetrieb).
Table of contents
Languages:
Popular Electric Heater manuals by other brands

STIEBEL ELTRON
STIEBEL ELTRON IA 2054 extreme Operation and installation

EUROM
EUROM 350098 Instruction booklet

Vortice
Vortice VORT PROMETEO PLUS HR 400 Instruction booklet

Kambrook
Kambrook KRH500 user guide

Dimplex
Dimplex Apollo APL100 Installation and operating instructions

Sawotec
Sawotec ARI WALL HEATER ARI3-45NB WL manual


