Extreme Dog Fence Basics User manual

Owner’s Manual
www.extremedogfence.com
1-800-305-6116
diy
1-800-305-61161-800-305-61161-800-305-6116

Register Your New
eXtreme Dog Fence®
Containment System within 30 Days of Purchase
to
Acvate your 10 Year Warranty
You will need the following informaon ready to register:
1. Order #
2. Date of Purchase
3. Phone Number
4. E-Mail Address
www.extremedogfence.com 800-305-6116
To register, go to:
www.extremedogfence.com/register
And follow the online direcons.
Thank you for your purchase, and welcome to the family.
CONGRATULATIONS
Activate Your 5 Year Warranty

Hello,
Thank you so much for purchasing the eXtreme Basics Dog Fence. We
know that your pets are close to your heart, and you are doing what you
can to keep them safely contained in your yard.
The eXtreme Basics Dog Fence is both simple to install and effortless to
operate. We have designed our fence to be both, reliable and effective
while allowing your dog the most out of your usable yard space.
This manual is designed to guide you in every aspect on how to install
your dog fence. We also include training information, which is a vital
aspect to the effectiveness of your eXtreme Basics Dog Fence.
We love dogs, just like you do! If we can assist you in any way, please
don’t hesitate to contact us. You can reach us at 800-305-6116, seven
days a week.
Kind Regards,
eXtreme Dog Fence Team

2
Part One: Electric Dog Fence Installation
Contents of Package……………………………………………4
Product Description…....………………………………………..5
Product Features…………………………………………….…..6
Installing Your Dog Fence………………………………….…...7
Properly Fitting the Collar Receiver……………………..…...17
Maintenance…………………………………………………....18
Troubleshooting……………………………………………..…18
Part Two: Training Your Dog
Basics of Training Your Dog…………………………………..22
4 Basic Components...........……………………………….….23
Dog Fence Training Lessons………..…………………….….25
Dog Training Tips………………………………………………31
Troubleshooting………………………………………………..32
Planning Guide………………………………………………....33
Table of contents

Electric Dog Fence Installation
Part 1

4
Digital transmitter
Collar receiver(s)
Installation/training manual
110-240VAC power supply
USB collar charger
1/2 acre of boundary wire (650 feet)
Test light
Probe wrench
Mountain hardware
Training ags
Additional metal probes
3
456
1-800-305-6116
2
1
7
8
9
10 11
Package contents
1
5
3
7
10
2
6
9
4
8
11

5
How Electric Dog Fences Work
We are proud to offer you a reliable, affordable and effective electric dog
fence. Are you wondering how the eXtreme Basics Dog Fence works? Its
actually quite simple! When your dog wears the special collar receiver,
and when you create your boundary with the provided dog fence wire,
the transmitter sends a radio signal that the wire then broadcasts.
Your dog will receive a slight static correction when they approach a
preset distance you decide on. As long as your dog stays near the wire,
the warning tone and correction will continue. This encourages your dog
to return to the safety zone of your yard.
Description
Transmitter
Twisted cable
Boundary Wire

6
Signal Field Width
On the transmitter, you are able to adjust how wide your signal eld will
emit from the wire. This feature exists so that you can make the decision
on how close your dog can get to the wire before the beep and static
correction activate.
Covers Several Acres
The transmitter of the eXtreme Basics Dog Fence is powerful enough to
contain up to 5 acres of land.
Warning Beep
As your dog approaches the warning zone of the boundary wire, the
collar will begin to receive the signal. The collar then activates an audible
beep and light static corrections are administered shortly after. The
closer the dog gets to the wire, the intensity of the beeping will increase.
The number of times that the dog receives the correction will also
increase, however the level of stimulation stays the same.
Features
Boundary wire
Signal eld
20 foot max. radius
Low number of
beep & stimulation
High number of
beep & stimulation

7
Beeping and Flashing Transmitter
Is your transmitter beeping and ashing? This is an indicator that is
designed to let you know that there is not a complete circuit going back
to the transmitter. This either means you have a break or cut in your wire,
or your boundary loop is not hooked up correctly into your transmitter.
Operating Multiple Collars
The eXtreme Basics Dog Fence supports an unlimited number of collar
receivers. Just give us a call if you need to contain another dog.
Simple to install, our fencing system can be ready to use in about one
day. With that being said, if you have any troubleshooting questions after
reading our manual, we are here to help. Contact us at 1-800-305-6116.
7 days per week.
Possible Needed Items
• Additional Boundary wire (if necessary)
• Waterproof Wire Splices (if necessary)
• Electrical Tape
• Lawn Edger or a Spade or Trencher
• Drill (if the wire needs to go through a wall)
• PVC Pipe or Garden Hose (if crossing a gravel driveway, pond or
lake)
Installation Instructions

8
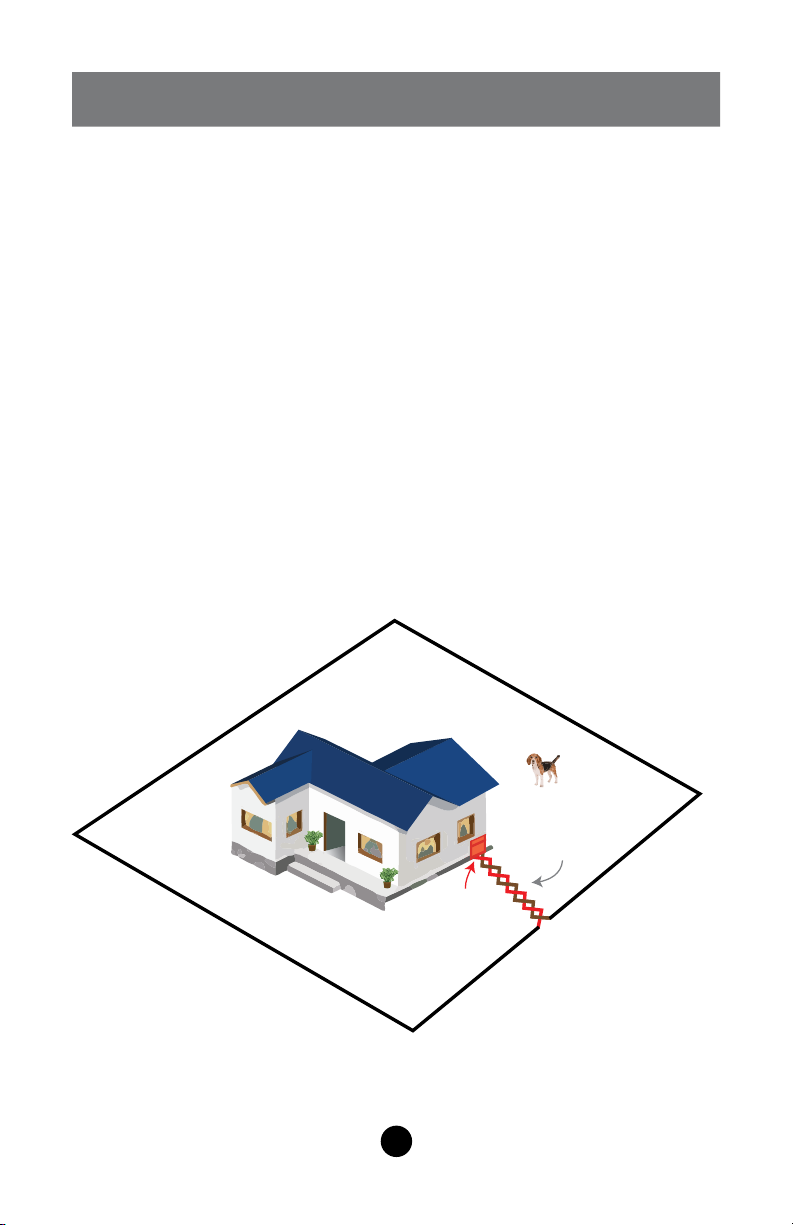
To make sure that your fence is installed correctly, it is a good idea to
draw out a quick diagram of your property. Consider some of the layout
options on the next page.
The way that you lay out your wire needs to accommodate obstructions
that include but are not limited to: utility lines, trees and driveways. It is
very important to have your underground utilities marked ahead of time.
All you need to do is dial 811 and a technician will come out and mark
them.
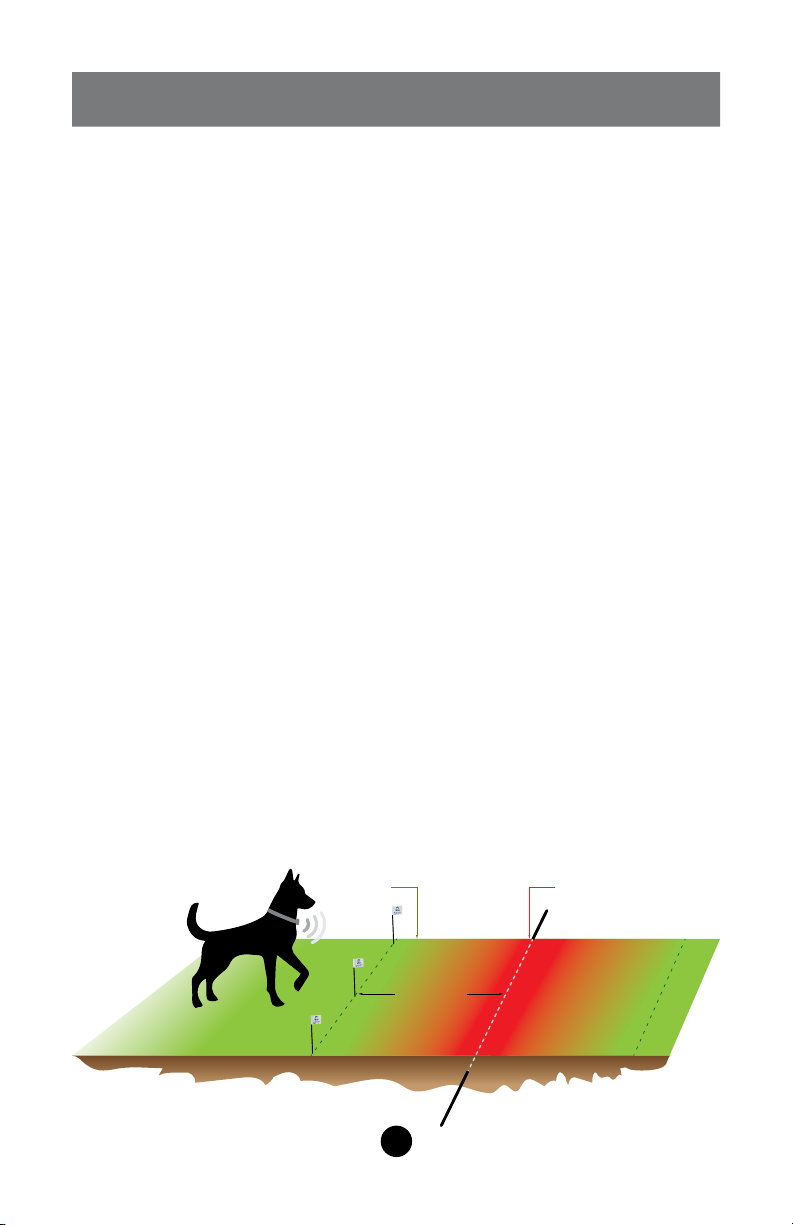
Important: About Placing Your Wire
• If running parallel from electrical, telephone, cable TV or
other buried utilities then you must separate your loop by at
least 7 feet.
• If you are installing one section of dog fence wire parallel
to another, it is important to separate the two sections by at
least 10 feet, or the signal may cancel out.
• If your neighbor has an electric dog fence, be sure to
separate your dog fence wire from theirs by at least 10 feet.
• Avoid running your wire within 4 feet of any steel reinforced
concrete surface (this is because the steel in it may affect
the strength of the signal).
Step 1: Laying out the wire

9
Pinch
Transmitter
Gutters
Back Yard
Boundary Wire
Hourglass
Transmitter
Wire separated
by 2-4 feet to
avoid cancellation
Back Yard
Boundary Wire
Double Loop
Transmitter
Boundary Wire
Wire separated
by 2-4 feet to
avoid cancellation
Existing Fence
Transmitter
Wire separated
by 2-4 feet to
avoid cancellation
Active wire
Single Side
Transmitter
Twisted cable
Boundary Wire
Road
Transmitter
Twisted cable
Boundary Wire
Back and Front
Sample Wire Layout Designs
Allows your dog access to the front
and backyard, but not access between
the two.
The layout to choose if you need to
contain your backyard only. Parallel wires
must be separated by at least 4 feet.
An alternative to the double loop
method, running tight against the front
of the house.
A variation on the double loop method,
where the wire runs parallel on the
fence, separated by at least 4 feet.
Can be used to keep the dog out of
the road. Parallel wires must be
separated by 4 feet.
The most common layout, which
allows the dog access to the front and
backyard.

10
Step 2: Mounting the transmitter
Important Tips
The transmitter needs to be kept indoors, where there is no risk
of it getting wet. For outdoor installation, just make sure that it is
inside of a waterproof container, such as a sprinkler box.
Do not install the transmitter anywhere near metal structures or
electrical devices, including cars. (minimum separation of 4 feet)
A garage or shed that has access to power would be an ideal
place to mount your transmitter.
1-800-305-6116
Transmitter signal
level (1-100) Wire error
Wire OK
Power light
ON/OFF button
Wire terminals Power port
Transmitter signal
eld setting
adjustment

11
The transmitter is the brain of your eXtreme Basics Dog Fence. For this
reason, it is critical to install it safely and properly.
Before you mount the transmitter, be certain that there is a power outlet
that is near. The transmitter should be mounted on an exterior wall, so
that the wire can easily be brought in from outside. Install the transmitter
using the provided mounting hardware. Remember, the transmitter needs
to be mounted away from electrical devices or metal structures, including
cars. Any of these things could interfere with the transmitter signal and
the collar may activate in areas where it should not.
Now it is time to plug in the transmitter and make sure that it turns on. At
this point, no boundary wire should be inserted into the transmitter. After
turning on the transmitter, you should see two lights lit up. The lights will
indicate that the power is connected and that no wire is installed (Break
is lit.) Your transmitter should start beeping, indicating that no wire has
been hooked up yet. After you see the lights and the beeping, you can
simply turn off the transmitter for the time being.
Power On, wire correctly
installed and working
Power On, wire broken
or not installed
1-800-305-6116
1-800-305-6116
1-800-305-6116
1-800-305-6116

12
Be certain that your transmitter is switched to the OFF position before
you connect or disconnect the boundary wire.
Begin by securing one end of your boundary wire to the left terminal of
the transmitter, keeping in mind the wire needs to create a single loop
and meet back at the transmitter’s right terminal.
Twisted wire consists of 2 wires that are twisted around one another
to create a neutral line. This twisted wire will not trigger the collar’s
correction. It can be used to carry your dog fence signal from the
transmitter to the boundary wire, in a front and backyard containment
layout, without blocking access to the
other side of the yard. Twisted wire
cannot be spliced into an arbitrary
location, on a single loop wire layout,
to create a neutral section. Two ends
of twisted wire can never be spliced
to a single end of boundary wire. For
more information on twisted wire usage, please see our video at:
www.extremedogfence.com/videos
These wires must
be twisted together
tightly. This can be done quickly and easily,
using a power drill. Begin by securing one end of both wires.
Connect the other ends to a power drill. When the drill spins, the
wires will wrap around one another.
Step 3: Test For Wire Failures
Helpful Tip:

13
Important:
Important:
The green “OK” light on the transmitter will be lit. Please view the
image on page 11 as a reference. If you don’t see exactly what is
shown in the image on the right hand side of page 11, please turn to the
troubleshooting section on page 18.
The signal eld on your transmitter represents how close the dog can
get to the wire before the collar is activated. The higher the number on
the transmitter, the wider the distance of the signal eld. View the chart
below, and the picture on page 6 for further explanation.
The signal eld setting regulates
the distance at which the dog’s
collar is activated. However
it has nothing to do with the
correction strength of the collar
itself.
When you are testing the connection of the wire, be certain that
your dog is not wearing his collar receiver, and that the collars are
switched to the off position.
Before you bury the wire, the system must be tested thoroughly.
Step 4: Setting Boundary Range
Relation between the transmitter
signal length and the control range
Transmitter signal strength
25
20
15
10
5
0
1000
Control range in feet

14
Important:
If the transmitter ever loses power the boundary setting will reset
back to 33.
After the transmitter has been turned on, the default signal eld setting of
33 will be displayed. Considering your layout, use the table to choose the
signal eld setting that you desire. To adjust the signal eld width, use
the + and – buttons on your transmitter.
Before testing the fence:
• Don’t put the collar receiver on your dog just yet.
• Be certain that your collar receiver is fully charged.
• Check to see if your collar receiver is switched to the off position.
• Whenever the collar receiver is switched on, don’t touch the metal
contact points on the collar.
• Bring your collar receiver about 20 feet from your dog fence wire.
• Attach your test light to the metal probes on the collar.
• Press the power switch to the ON position (green light should be
illuminated).
• Press the ON/OFF button on your collar so that the collar is turned
ON.
Step 5: Testing The Fence
Note: The corresponding ranges that are shown in the table
(previous page) are only estimations and will differ for each installation.
You will have to test these settings and see what works with your fence.

15
• Hold the receiver by the plastic case and slowly walk toward your
boundary wire, making sure that your skin is not making contact with
the collar’s metal probes.
When you enter the signal eld of your boundary, the collar will emit a
warning beep and the LED test light should be illuminated. This means
the system is working properly.
When the collar is taken out of the signal eld, the warning beep will stop
and the LED on the test light will turn off. This is exactly how the system
is intended to work.
Should the system not work as described, be certain that you have
followed all of the preceding steps. If there is still a problem, please turn
to troubleshooting on page 18.
If the system is working as it should, the transmitter can now be adjusted
to the signal eld width that is appropriate for your situation. After doing
this, retest the collar on your wire, to make sure that it is activating
exactly where you want it to in your yard. Repeat, if needed.
Note: Use the table on page 13 to estimate what number to turn
your boundary zone setting to. However, keep in mind that the table
is just an estimate, which can differ depending on the surroundings
and objects that are close to the wire.

16
After you have chosen your suitable signal eld setting, move the collar
toward the wire to imitate your dog that is approaching the boundary. Be
sure to test the entire perimeter of the boundary, to make sure that each
area is performing as it should. If separate areas test differently, you may
need to change the layout of your wire in order to achieve the results you
are looking for.
Tip: Should you decide to keep your eXtreme Basics Dog Fence
above ground, please make sure that the wire is fastened securely
to the ground to avoid a tripping hazard.
When installing underground, begin by digging a shallow trench that
is no more than 5 inches deep. Bury the wire, being certain that it is
completely contained within the trench.
After you have successfully completed steps 1-5, it is safe to bury
your wire. Our heavy duty wire is waterproof, so that you can bury it
underground, or keep it on top of the ground if you need to.
If you decide to, you can tack the wire to the top of the ground, using
landscaping staples.
Step 6: Burying the Wire

17
Before Beginning:
Important:
Your collar receiver comes with both short and long contact probes.
Decide on which set of probes will work best for your dog, according to
the dog’s size, and the length of their fur. Keep in mind that it is crucial
that the contact probes are in direct contact with the skin on your dog’s
neck. When the collar is on the dog’s neck, the receiver should be
located under the dog’s chin. It should be relatively tight, to make sure
that the contact probes are making direct contact, but not so much that
your dog isn’t able to breathe freely. You should be able to insert one
nger beneath the prongs and your dog’s neck.
Fitting The Collar On Your Dog
• Be certain that your collar receiver is turned to the OFF position.
• Be sure to read the second part of this manual, which details dog
training. Fence training your dog begins on page 22.
• Your dog is not going to understand how the electric dog fence
works without leash training rst. If you skip training, your dog is
likely to run through the boundary instead of retreating from it.
• If your dog has not been properly trained, do not leave him or her
unattended while they are wearing the collar.
• Do not leave the collar on for more than 12 hours a day, to avoid
irritation, which (if left untreated) could lead to a condition called
“pressure necrosis”.
• Never connect a leash to your dog’s collar receiver. Doing so would
cause the contact points to dig into the dog’s neck.

18
Very little maintenance is required of the collar receivers. Note that the
transmitter is not waterproof, and must be mounted in a weatherproof
location.
During intense thunder storms, the recommendation is to unplug the
transmitter from power and disconnect the wires. Any type of power
surge from lightning will damage the system. If a dog fence surge
protector is available be sure to include it in you installation.
Remember, each time that the transmitter loses power, you need to reset
your boundary setting. Be sure to test the system on a regular basis,
using the testing procedure that is described on STEP 5.
Problem: The collar receiver is not activating
in the signal eld.
1. Make sure that the receiver is turned on, and is fully charged.
2. Make sure that the transmitter is turned on.
3. Be certain that the dog’s collar is properly tted. You should only
be able to insert one nger between the dog’s neck and the contact
probes.
4. Try trimming down your dog’s hair in the location of where the
contact points are touching. Use the longer metal probes if
necessary.
5. If the collar is still not working, please call 800-305-6116.
Maintaining Your System
Troubleshooting
Table of contents
Other Extreme Dog Fence Pet Care Product manuals
Popular Pet Care Product manuals by other brands

Petsafe
Petsafe VT-100 Training guide

Silicon Graphics
Silicon Graphics PETBLE SmartTag instruction manual

Bluefang
Bluefang BF-16 user manual

PawHut
PawHut D00-142 Assembly & instruction manual

INVISIBLE FENCE
INVISIBLE FENCE Pet Keeper IFA12 Operation, Installation & Training Manual

Smart Retract
Smart Retract Bow Wow Barrier user guide

Guardsman
Guardsman G1508 FITTING INSTRUCTION

Petsafe
Petsafe Drinkwell PWW00-13705 quick start guide

High Tech Pet Products
High Tech Pet Products Power Pet Door Installation & operating instructions

Prevue Hendryx
Prevue Hendryx Play Tower 7362 quick start guide

Savic
Savic Access basic manual

Innotek
Innotek BC-200 Operation guide