extreme fliers MICRO DRONE 3.0+ User manual

Micro Drone 3.0 +
User Guide

DISCLAIMER
Please read Instructions and Disclaimer carefully before operation. This product is not suitable for people
under the age of 14. By using this product you hereby agree to this disclaimer. You agree that you are
responsible for your own conduct while using this product and agree to never use this product in a way that
infringes personal privacy, local laws and regulations. Extreme Fliers shall not be held liable for any damage
or legal responsibilities and/or accidents resulting from the use of this product. Full guidance is available on
www.microdrone.co.uk
BRITISH CIVIL AVIATION AUTHORITY
1

13. Left control stick
Sideways banking
14. Sideways Trim
15. Standard & Stunt mode
12. Power switch
16. Mode 2 / Mode 4
3. Speed setting
2. Power indicator
1. Antenna
4. Gimbal
7. Turning trim
8. LCD screen
6. Pitch Trim forwards/backwards
5. Right control stick
forwards/backwards, left/right
9. Record Video,
start/stop for each press
10. Activate Smart Orientation
(see guidelines)
17. Remote Controller
(Transmitter) 11. Return Home (see guidelines)
MICRO DRONE 3.0+: Flight in the Palm of Your Hand
HANDSET
The Micro Drone 3.0+ is your personal Drone, bringing together sophisticated technology in a small size
Device. Whether you’re an expert pilot or first timer, it gives users a taste of features you would normally find
in a larger system, which is safe, fun, easy to use, that anyone can fly.
Always set the Home Point when activating Return Home and Smart Orientation.
11. Propeller Guards (optional)
9. Propeller: Red/Grey A
2. Motor Arm A
10. Battery
1. Shell / PCB
7. Propeller: Black/White B
8. Propeller: Red/Grey B
6. Propeller: Black/White A
4. Motor Arm C
15. Blue LED (back)
14. White LED (front)
12. Landing legs
13. Rubber tips
3. Motor Arm B
5. Motor Arm D
16. Magnetic Connector
19. Camera Antenna
18. Camera Module
20. Swivelling lens
21. Wired Connection Port
22. SD Card slot (optional)
17. Micro Gimbal
2

QUICK START GUIDE
1. DOWNLOAD THE APP
2. CHECK / INSTALL BLADES
www.microdrone.co.uk/app
Watch training videos
MICRO DRONE 3.0 Watch training videos
Check you have the correct blades attached.
Check the clockwise and counter clockwise blade has been correctly installed on the corresponding
motor arm.
3. SET UP TRANSMITTER
Power on the handset
(4 x AA Batteries required).
Place the Drone on a flat, open ground with front
facing away from you.
4. CHOOSE SPEED SETTING
Slow – ideal for beginners
Fast – highly responsive
Insane – suitable for expert users
3

5. POWER ON DRONE
Insert the battery by sliding into position and attach the Camera with magnetic connection.
Do not force the battery
Pins may bend - carefully realign if necessary
6. SYNC THE DRONE
Wait until the blinking LEDs turn solid, then push the throttle stick up and down once.
Check propellers spin freely by applying a little power. Switching propellers will cause Drone
to flip over or not take off.
4
7. LAUNCH THE APP
Search and connect to Micro Drone 3.0 WiFi
Enter the Fly Screen
Select Handset or Phone in App Settings
Place Smartphone into Flight Mode to prevent notifications and incoming calls causing disruptions

5
10. TAKE OFF
Push the left throttle stick up slowly to take off
Gently toggle the left right control sticks to learn
basic navigation
Keep low altitude and use wide open space for first
flight
9. SET TRIM SETTINGS
Trim settings should be set to the centre point for balanced flying, indicated by long beep. Toggle the
trim buttons to make the Drone hover.
Keep low altitude and use a wide open space for first flight
8. SET GYRO HOME POINT
Place Drone in the direction you intend to fly.
When Drone and Handset is Synced, hold both control sticks to the bottom right corner for 5 seconds.
Essential for Smart Orientation and Return Home functionality.

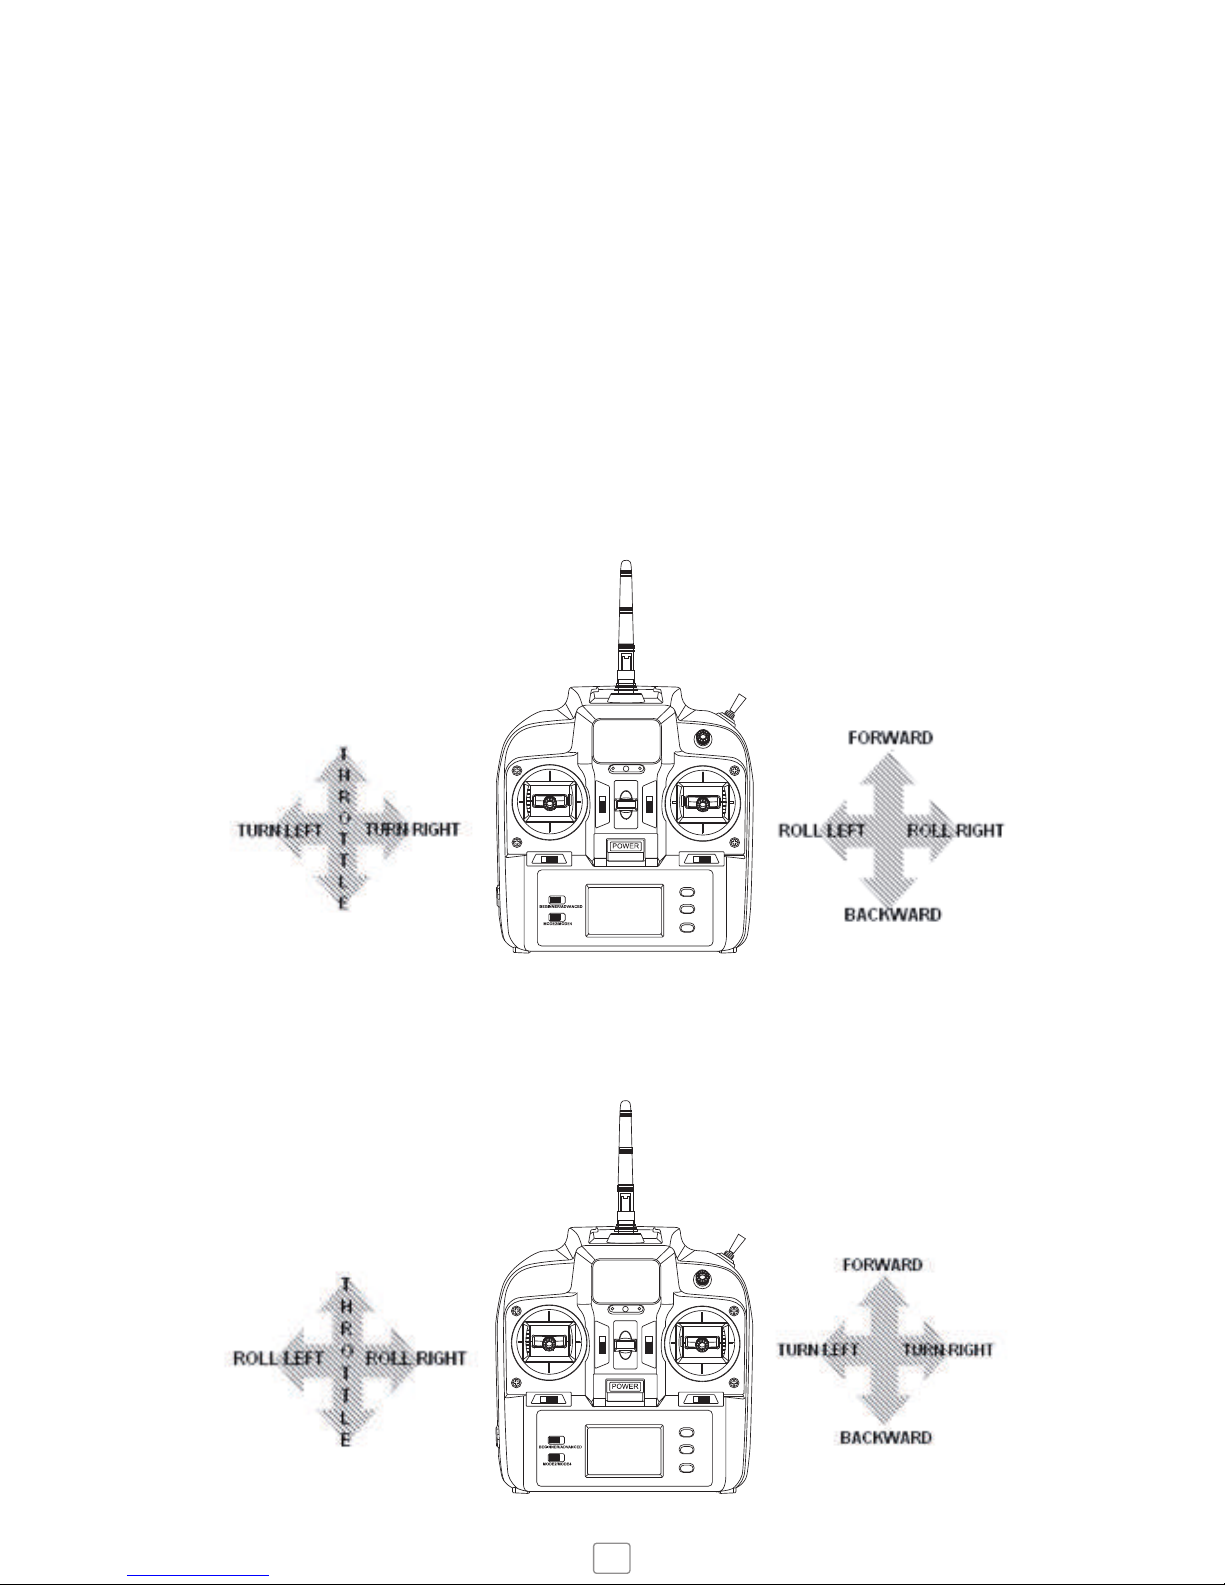
To ensure steady flight, set the 3 trimmers to fine tune the controls. The trim buttons are located aside
to the left and right control sticks to set the turning, forward / backward pitch and side to side banking.
Each time you click the trim button you will hear a beep, a long beep indicates that the trim is set to the
centre. Note the trim buttons change depending on if it’s in mode 2 or mode 4.
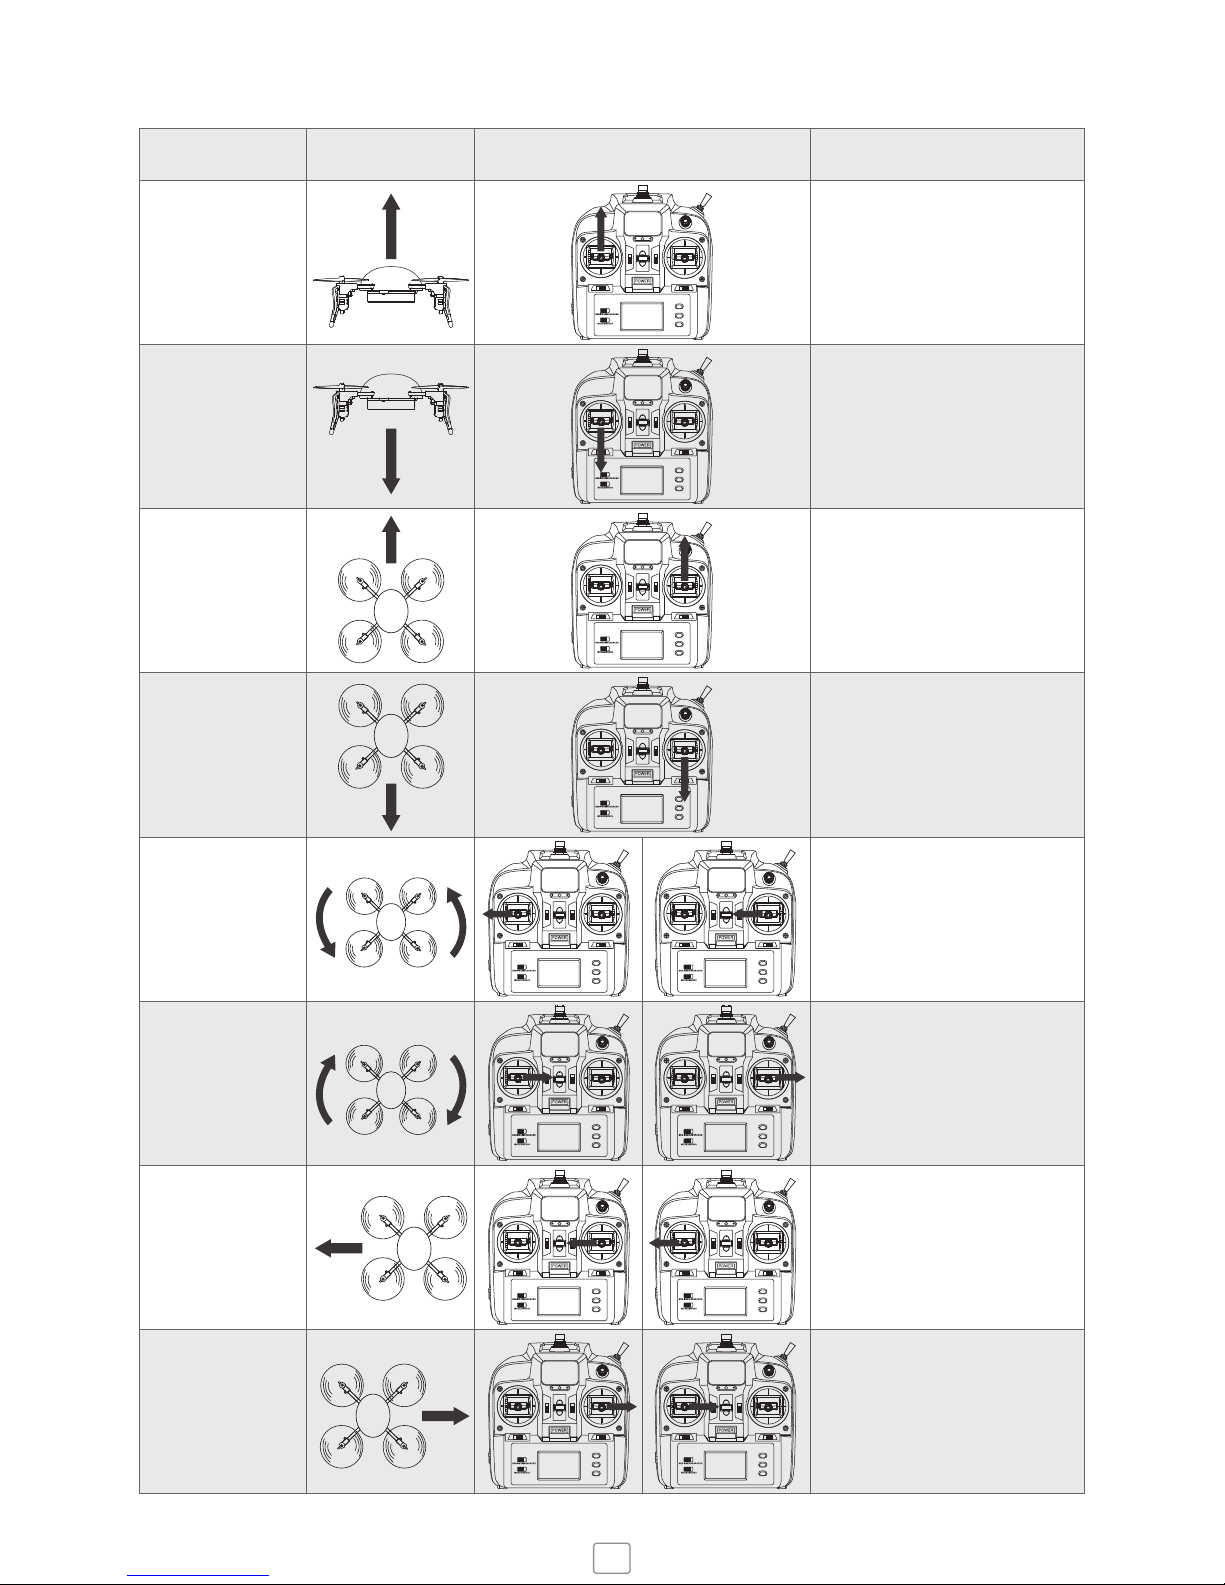
Push the throttle up to around quater or half way and Micro Drone will take off.
We recommend removing the propeller guards when attaching the Camera or Camera/Gimbal
OPERATING TIPS
Connect the USB charger to any USB plug such as a computer or wall charger.
Disconnect the battery from Micro Drone then connect to the USB charger jack, the red light on the
charger will flash to indicate charging.
When charging is finished, the red light will turn solid green.
Full charge takes about 60 mins.
1. Batteries should be removed from the handset before storing.
2. Always use new batteries in the handset to maintain a good connection.
Functions may not work when less than 50% capacity.
3. Never charge unattended.
4. Follow best practices for storing Li-Po Batteries for long life, see more on
www.microdrone.co.uk/blogs/news
NOTES ON CHARGING
12. LANDING
To land, hover over a level ground and gently lower the throttle to descend.
After landing remove Camera and disconnect Battery.
Never approach or touch the Drone while blades are spinning.
Always cut the power using Controller/App first.
11. PHOTOS AND VIDEOS
Shoot photos or videos using the Micro Drone App
Requires SD Card (Class 6 or above) to store footage on board the Drone.
Connect the camera module using Wired Connection Port.
6

Mode 2
Mode 4
MODE 2 AND MODE 4: Explanation
Once you’ve learned to fly Micro Drone or any kind of Helicopter on a certain transmitter Mode, the chances
are that you’ll stick with that same mode throughout your flying days. Re-learning to fly on a different mode
is essentially the same as starting from sctatch, so we’ve made it with the two most common flight controls
and outlined how these work for Micro Drone.
The transmitter modes for Micro Drone echo the ones for R/C Airplanes (in terms of turning). With that in
mind we have designed Micro Drone with Mode 2 and Mode 4 industry standards making it user friendly for
first time users or for Radio Control pilots accustomed to professional flying. The handset allows you to
switch between Mode 2 and Mode 4. The slider is located at the bottom/left.
7

Direction
Up
Down
Forward
Backward
Turn Left
Turn Right
Banking (roll)
to the Left
Banking (roll)
to the Right
Drone Mode 2 Mode 4 Notes
For first flight power up to around 60%
throttle then ease off to the hover
position. Practice hovering at 1-2
metres
Avoid landing on surfaces that are
hard, dusty or wet.
Do not land near people or objects
that could collide or cause damage to
the aircraft.
Push the navigation stick slowly to
prevent the Drone from sudden
movements.
Aim to fly in a straight line, cross wind
may alter the course, toggle the roll
stick to maintain trajectory if
necessary.
Look at the White LED lights as
reference for the Front of the Drone as
you turn.
If the front of the Drone rotates to face
you (nose in), the navigational controls
will feel opposite to your position.
The roll stick controls the Drone’s Left
and Right tilt. When filming, avoid roll
to capture quality level footage.
The further you push the control stick,
the further the Drone will tilt, up to a
40 degree angle.
FLIGHT OPERATIONS
8

ACCELEROMETER
Switch on to control the Drone by tilting your smartphone. Once
activated, tap and hold the right touchpad then tilt. Release the
touchpad to hover.
HOME SCREEN
Training Videos
Review Footage
SCREEN VIEW
Full Screen or 3D Split
Screen for FPV
SOCIAL INTEGRATION
TRIM BARS
Adjust the Pitch, Roll and
Yaw. Tap the centre point to
reset.
TOUCH PAD
Control the Drone via your
Smartphone or Handset,
touch anywhere on the
screen.
PHOTO – tap once to take a photo
VIDEO – tap once to start recording and
again to stop recording.
SETTINGS
Swipe up to hide
menu bar
SMART ORIENTATION
Align the Drone and Smartphone
controls to fly on a locked heading
MODE
Switch the flight screen touchpad
between Mode 2 and Mode 4
BACK
To the flight screen
TRIM BAR
Hide the Trim bar from the
flight screen
CONTROL
Tap Phone to control the Drone via
Smartphone WiFi or Handset (default) to
control via the 2.4ghz Radio Handset
SPEED SETTING
Slide the bar to adjust the speed setting
to your preference
RESET
To the Default settings
FULLY-FEATURED ACCOMPANYING APP
Micro Drone 3.0 & 3.0+ has a companion App that is feature rich and intuitively designed. It can be used for
First Person View via the live streaming video as well as control of the Drone and collecting, managing and
sharing your videos.
iOS has some weird connection issue we couldn't figure out - when connecting iPhone to the
Drone's WiFi, you might notice it connects, disconnects then reconnects again after 5 seconds (after
that it's fine)
Check periodically for new updates and features on the App Store and Google Play (iOS and Android)
9

TRIMMER FUNCTIONS
Forward and Backwards Trim
Direction Mode 2 Mode 4 Action Required
If Micro Drone drifts forward, click the
trim down until balanced.
If Micro Drone drifts backward, click trim
up until balanced.
Banking Trim (roll side to side)
If Micro Drone drifts to the left, click the
trim to the right until balanced.
If Micro Drone drifts to the right, click
the trim to the left until balanced.
Turning Trim (rotating clockwise or counter-clockwise)
If Micro Drone drifts to the left, click the
trim to the right until balanced.
If Micro Drone drifts to the right, click
the trim to the left until balanced.
10

MOTOR DIAGRAM
Clockwise
Left Right
Clockwise
Counterclockwise
Front
Counterclockwise
Arm A
Arm D
Arm B
Arm C
Back
Ensure the Correct Blade is fitted to correct Clockwise or Counterclockwise motor arm.
To adjust the camera angle, push down on
the Gimbal button and adjust using the right
stick. Once reached desired angle while
holding in position, push the gimbal button
back up.
To lock the angle of the camera. The camera
will automatically adjust it's position as the
Drone flies forward or backwards.
11
CAMERA ANGLE ADJUSTMENT
Switching into Gimbal Mode will disable pitch controls - be sure to switch back into flying mode as
soon as possible once the angle of the gimbal has been adjusted, to avoid loss of control.

SMART ORIENTATION
RESET THE GYROS
This feature unlocks the orientation so that the navigation is not determined by the direction which the
Drone is facing.
In standard mode with Smart Orientation off, the drone has a front and a back, determined by the Black /
Red blades or White / Blue LEDs, so when you navigate forwards, it moves in the direction that the front is
facing (ie if the black blades are facing you, it moves towards you). This can be difficult to make out when
the Drone is a long distance away. Smart orientation helps with this.
Setting up Smart Orientation
When pairing the Drone, you must position the quadcopter such that its front points away from you. Once
paired it’s forward position will be fixed, every direction Forward/Backward/Left/Right will be set from this.
Activate by pressing the button once, the red light will indicate it is on.
When you take off with the Drone facing forward from you, the micro-controller continuously adjusts the
navigation so that even when you turn the Drone 90 degrees to the left/right, it will still go
forward/backward on the fixed axis you set at the beginning.
Smart orientation is useful for learning to fly the Drone, sending it out over long distance and more
convenient for shooting video (as the Drone moves in fixed lines, allowing you to focus on the video and
shoot panning shots while rotating the Drone at the same time).
In the event of the Gyro loosing orientation, unstable flight, or drifting, the Gyros may need resetting.
Together: push the left control stick to the bottom right corner and push the right stick to the bottom right
corner. Hold for 5 seconds and the Drone’s LEDs will flash rapidly to indicate recalibration.
12

RETURN HOME
Users are advised to familiarise themselves with this feature before use. Unlike a GPS return home system,
this uses a programmed method that memorises it’s start heading and is designed to help pilots return the
Drone on a straight axis when you have lost control.
For this to work correctly, when pairing the Drone, you must position the Drone on the ground such that its
front points away from you on the line you wish it to return.
This function is based on the assumption that the user is flying the Drone in front of them. Hold down the
Return home button and the Drone will fly back towards the pilot in a straight line on a fixed axis, let go of
the button and the Drone will stop returning.
When Drone is directly ahead of the
pilot, will return in a straight line.
When Drone is ahead but over to the right
of the pilot, it will return in a straight line
and end up to the right side(use the
side-to-side control stick to move the
Drone inline with the pilot).
When Drone is behind the pilot,
it will continue to fly in a straight
line away from the pilot. Always
fly ahead of you when using
Return home.
Use the roll stick depending on where the Drone is located in relation to you.
The altitude stick must continue to be controlled while using return home.
Select a faster Return speed by selecting one of the Speed Settings.
13

Forward rolls
Backward rolls
Left rolls
Right rolls
Push the throttle up then push the right stick
up to roll forward. Gently ease off to recover
to the hover position.
Push the throttle up then push the right stick
down to roll backwards. Gently ease off to
recover to the hover position.
Push the throttle up then push the banking
stick left to roll left. Gently ease off to recover
to the hover position.
Push the throttle up then push the banking
stick right to roll right. Gently ease off to
recover to the hover position.
MID AIR FLIPS
Aggressive Maneuvers and Flips
Micro Drone can perform mid-air flips with a specially designed, preprogramned algorithm. To activate this,
it must be switched into Stunt Mode, slide to the right.
WARNING: in Stunt Mode, moving the control sticks will perform aggressive maneuvers and could cause
Micro Drone to crash if not controlled carefully. If doing for the first time, we suggest familiarising yourself
with the controls before attempting this. Hover Micro Drone at least 3 metres from the ground then push
the control sticks in the direction you want to flip. Switch back in to Standard Mode for regular flying.
TROUBLESHOOTING / FAQ’s
Inspect the Drone before every flight and replace any parts that are damaged.
Change any blades that are bent, chipped or broken and that they all stop spinning at the same time.
See our troubleshooting page on www.microdrone.co.uk/faq
GET INVOLVED
Drone technology is developing at a rapid pace and we encourage you to get involved as we continue
building Micro Drone and this exciting hobby.
Find out about upcoming events, such as Battle of the Drones, Maker Events, First Person View racing
meetups and other activities. Details and information will be posted on the Extreme Fliers Facebook page.
14

EU Declaration of Conformity
Extreme Toys Ltd
12 Deer Park Road
London SW19 3TL
www.microdrone.co.uk
Customer Support Hotline: +44(0)20 8543 6259
Customer Support Email: support@extremefliers.co.uk
We, Extreme Toys Ltd, declare under our sole responsibility that the enclosed product is in conformity with
the applicable requirements of the following directives:
EMC Directive: 2014/30/EU
R&TTE Directive: 1999/5/EC
RoHS Directive: 2011/65/EU
WEEE Directive: 2012/19/EU
Please visit www.microdrone.co.uk/euro-compliance for full details.
USA FCC Declaration of Frequency
We, Extreme Toys Ltd, declare that the enclosed product, Micro Drone 3.0, FCC ID 2AHQ4EFMD3040057 has
the ability to work in the 2.4G frequency band, locked to work only in: 2412-2462MHz.
For any questions please email: certification@extremefliers.co.uk
Date: 25th April 2017

Table of contents