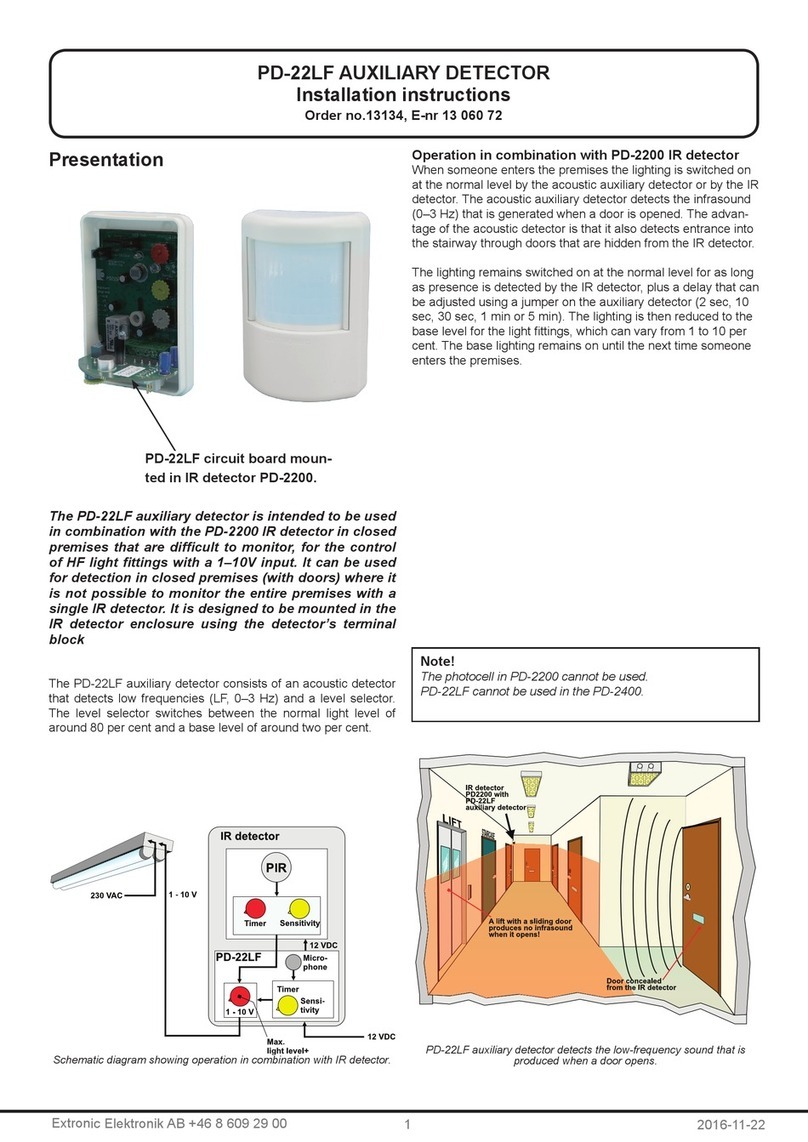
Extronic PD-2200 User manual

1. Introduction
The detector is a passive infra-
red detector for presence detec-
tion. It has a very sensitive dual-
element, low-noise pyroelectric
detector. Electronics and softwa-
re in microprocessor is special-
ly constructed for presence de-
tection.
PD-2200 requires a 10–16 VDC
supply.
PD-2400 requires a 24 VDC/
VAC supply.
NOTE! PD-2400 is primarily in-
tended for presence detection
in systems for ventilation control
where 24 VDC is used.
PD-2400 must not be used in systems for lighting control, since
other components of such a system (logic modules, level selec-
tors, etc) are designed for 12 VDC operation and cannot there-
fore be easily combined.
In systems for lighting control by presence detection, the PD-2200
IRdetectorshouldbeused,asthisisdesignedfor12VDCoperation!
Software will analyse the signal from the pyroelectric detector
and measure noise level and signal power and sum of pulses.
Counting the pulses is a slower method that detects presence in
a locality with low activity with week signals as a result.
With a switch you can alter the signal process to be adapted to pre-
mises with high or low activity. A build in photocell can be used for
blockingtheswitchinglightonfunctionwhenthereisenoughdaylight.
The lens in the detector, collects heat radiation from different
elds, in to the sensor element. There are several different lenses
for different type of premises (ofce, corridor, and culvert a.s.o).
When a person passes cross over one eld, there will be a strong
signal in the sensor element. When one moves along the eld
(away from or toward the detector) in its direction, will also a
signal occur, but weaker.The detector should therefor be pla-
ced so one passes across (90º) through the lens eld. Corner
placing of the detector is more or less always the most optimal.
(See handbook for “Presence Detection” for placing advice)
2. Connection – Adjustment.
Opening of the front. The cover opens in the middle at the top or
underneath with a screwdriver that turns. See picture!
Terminals
Relay; NO (Normal Open), C
(Closed), C (Common), NC
(Normal closed).
Change over contacts. At detec-
ting C and NO close. After cho-
sen time laps, contact C and NO
in relay open.
Voltage supply; + -
After connection it takes up to two minutes until the detector is
stabilized and works correct.
PD-2200: Detector requires 10–16 VDC. A suitable power supp-
ly is the EXE-2000.
PD-2400: Detector requires 15-26 VAC/18-37 VDC.
TP; Test-Point 0-5 VDC
Measure the voltage with a digital multimeter connected bet-
ween - and TP on PD-2200, or between the two metering points
marked TP on PD-2400. This measures the signal strength.
If a digital multimeter is connected and voltage between – and TP
is measured, is that a measure of signal strength.
The sensitivity adjustment does not effect this signal output.
• At low noise level you can await a voltage level not over 0.3
VDC.
• At strong detection, the voltage level is at close 5V.
• At maximum sensitivity lies the trigger level at 0.6 V.
PRESENCE DETECTOR PD-2200 and PD-2400
Installation instructions
Art. No. 13140 / 13144
Extronic Elektronik AB | 08 609 29 00 12016-11-04

Jumper
“LED”; If jumper is placed at “ON” the LED will light at detec-
tion. When placed in “OFF” LED will not light at detection. LED
should be disabled after adjustments to prevent and minimise
sabotage.
“Occupancy Activity” (different activity)
• “Low/Ofce” is used in premises where one is sitting still
i.e. ofce, storage room and libraries. Sensitivity increases
when relay is activated.
• “Activity High” is used where people is visiting the premises
for a short time, in other word in well-dened passages.
Potentiometers
Time; time delay until relay drops after last detection. Time can
be set from 2 sec. to 20 minutes.
Sensitivity; The potentiometer is used to set the sensitivity for
direct signal strength, pulse count and in Activity low/ofce mo-
de. The detector also adjusts its own sensitivity to suit the exis-
ting noise level.
Photocell; the photocell will block the light when its darker than
chosen level. When relay is activated the photocell is disabled.
When photocell is turned down to min. photocell is likewise
disabled. When potentiometer is turned towards max. Detector
LED will start indicate photocell status. LED ash faster when
blocking and slow when not blocking.
LED will go back to normal function 30 sec. after adjustment is
nished. When Logic Module’s are used, the photocell shall be
disabled(off).
Vertical adjustment
Adjusting the vertical detecting elds by pushing the board up-
wards and downwards. The scale gives angel between upper
eld and the given horizontal line. Board being pushed upward
detecting elds will go lower vice versa.
Board vertical adjustment is factory set for - 5°.
3. Choice of lens
There are several different lenses for PD-2200/-2400 that can
be used for different functions. Long distance lenses for corri-
dors up to 80 meter (lens 47). Lenses with many narrow elds
for use i.e classrooms (lens 51).
All lenses are described in handbook for “Presence Detection”.
PD-2200/-2400 are supplied as standard with lens no. 15. With
58 elds in 3 layers. Detection area is 40 x 40 meters and suita-
ble to be placed in a corner.
The detector should be installed at a height and to be direc-
ted against the part of the man who radiates the most energy
(trunk). Suitable installation height is usually 1.6 to 1.9 m.
4. Changing and adjusting a lens
Changing lens
1. Press the looking device
inside the cover lose.
2. Remove the clips from
outside and remove the
old lens.
3. Fit the new lens with the
ribbed surface outwards and
with the lens number in the
top right hand-hand corner,
as seen from the front.
Adjusting the lens
With eld indicator diode BL-1 you can “see” the sensing elds
of the detector in the room. Especially recommended when
long-range lenses are used.
Vertical angel is adjusted by moving the board upwards and
downward.
Horizontal angel is adjusted by moving the lens right or left.
Masking of lens element.
For limited detection area the lens can be masked. Self-adhesi-
ve aluminium folio tape of the same type used for window glass-
break protections will block the sensitivity 100%.
Extronic Elektronik AB | 08 609 29 00 22016-11-04

5. Signal analyse
PD-2200/-2400 with microprocessor analysing the signals from
the pyroelectric detector has algorithms that continuous counts
single pulse, sum of pulse and noise level.
Single pulse is a method used for ex. entering into a premises.
A fast method that activate when signal is strong enough.
Sum of pulse a slower method of
measurement that takes longer de-
tecting a human. Used i.e. when low
activity, as for sitting people and sig-
nal does not reach level single pulse.
Level is chosen with potentiometer
“Sensitivity”
PD-2200/-2400 automatically adjust sensitivity after estimated
noise level. A time laps of 1-2 minutes after movements detec-
ted by detector before the detector will increase sensitivity. Chan-
ge of sensitivity with up to 20% from adjusted value.With jumper
“Activity High/Low-Ofce” adjustment of detector is possible ac-
cording to locality.In localities with part time low activity where de-
tection is unclear the detector could let the light be switched on
for a longer period.
6. Commissioning
Checklist
Check the installation using the checklist below. If in doubt, re-
fer to the manual “Energy-efcient detection technology”, order
no. 35100.
Always consider the following questions for each installation:
1. Is the correct detector being used?
2. Is it placed in the correct corner?
3. Is it at the correct height?
4. Is the correct lens tted?
5. Is the correct logic unit being used?
6. Is the power supply correctly rated for the detectors,
relays and logic?
7. Do you have the necessary skills and tools to carry out
nal adjustment of the installation?
You should also answer the following questions about the light
sources:
1. Is the correct type of light source being used?
2. Is the correct control method being used for the
light source?
3. Is the correct type of ballast being used?
If you can answer yes to all the questions in the checklist then
you can continue with commissioning.
• Check the voltage and polarity, and connect the power
supply.
• Set the “Photocell” to “Off”. If the photocell is not to be used
it should always be turned off. See the “Photocell” section if
the photocell is to be used.
• Turn down the delay time to “Min” using the “Time” poten-
tiometer.
• Move the jumper to the “Activity High” position.
• Carry out a run test in the entire area covered by presence
detection.
Note! The lens must be tted and the cover must be in pla-
ce. Adjust vertically and horizontally as required.
• After completing the run test and adjustment, set the time
to the lowest possible. In the case of dynamic lighting con-
trol in a stairwell or corridors, for example, this should be
1–2 minutes. In other applications, such as a classroom or
garage, the time should be set to 6–8 minutes or according
to the light source manufacturer’s recommendations.
• Set the jumper according to the level of activity in the
premises.
• Disconnect the LED when adjustment is complete (see
“Jumpers”), to reduce the risk of tampering.
7. Technical specication
Adjustment:
Vertical: +10º to –20º calibrated scale
Horizontal: Up to 30º.
Electrical:
Voltage: 10 - 16 VDC.
Current: 25 mA vid 13,8 VDC.
Start-up time: < 2 minutes.
Relay output: Changeover contacts
1 A / 30 VDC, 100 VDC/0,3A
0,5 A // V125 VAC (resistive).
LED: Walking test (switchable).
Test point::For background interference..
Detector: Dubbelelements-, lågbrus,
pyroelektrisk IR-detektor.
Enclosure: IP42.
Dimensions: 102 x 70 x 50 mm.
Weight: 98 g.
Extronic Elektronik AB | 08 609 29 00 32016-11-04

8. Accessories
Field indication diode BL-1
Used for adjusting detection area. Art. No. 13035.
For further information see handbook “Presence Detection”
Protective Grille
For mounting in exposed premises as for indoor sports. There is
also one model that can be used for mounting a detector in 45º
with angel plate to a wall.
For further information see handbook “Presence Detection”
Universal bracket
BR1, BR2, BR3 can be used when the detector cannot be
mounted directly in the corner. With the bracket the detector can
be moved out a short distance and still give maximum covera-
ge. Use with precaution.
Contact Extronic for further advice and information when a
bracket is used.
Lens-library
See lens-library in handbook for a great number of changeable
lenses.
Handbook
Handbook “Presence Detection”.
Rectier EXE-2000 (13,65 VDC) and
EXE-2400 (27,8 volt)
Rectiers for mounting on DIN rail and suitable for NORM box.
It has current limitation / short-circuit proof, max. 1,5 A and
suitable as power supply for PD-2200 and PD-2400.
The following accessories are only compatible with PD-2200
(12 VDC).
Logic modules
As for manually switched on lighting.
EX-11: Two channels i.e. one channel for main lighting and one
for board lighting.
EX-13: Four + One channel i.e. in a divided Gym with two levels
of lighting in each half and air-condition.
EX-22: Like EX-11 but guided by DSI-protocol and constant-
lighting with compensation for lights from windows.
For further information see handbook “Presence Detection”
Level control
Level switches NV2 / NV2-DSI: Are intended for use on HF
ttings with 1-10 V low-level input, dimmable 1-100%, and for
control by presence sensors. Using the level switch, one can
switch between two preset lighting levels.
Level switches NV2T / NV2T-DSI: As NV2 / NV2-DSI but they
also have a built-in timer for control of the supply voltage. Push-
buttons, photocells etc. can also be connected.
Acoustic detectors
Detector AD-500 / AD-600 has an input for PIR presence detector.
Help detector
Detector AD-300, acoustic help detector that switches light on.
Detector AD-350, acoustic help detector that keeps light on.
9. BL-1 eld indicator
The BL-1 eld indicator diode makes
it easier to align the PD-2200. It al-
lows you to “see” the detector’s de-
tection elds in the room, which ma-
kes it easier to aim the detector. In
order to use the BL-1 eld indicator.
Mounting
First remove the LED jumper, then press BL-1 down over the
three pins so that the small LED is in line with the centre of the
detector element and facing forwards.
Adjusting the detection area
When the detector is powered up the LED will come on and pro-
vide a point source of light at the focus of the lens system. Re-
t the front cover on the detector. BL-1 will now allow you to see
each individual detection eld when you look towards the de-
tector from various distances and angles. When a lens segment
lights up it means that you are looking at the corresponding de-
tection eld.
By moving back and forth at different distances you can deter-
mine what the detector “sees” and adjust the detection area
precisely, then mask off those lens segments that “see” potenti-
al sources of interference.
Remove BL-1 after adjustment. Reset the LED switch to the re-
quired position and ret the fr
Field indicator BL1 LED
Extronic Elektronik AB | 08 609 29 00 42016-11-04
This manual suits for next models
3
Other Extronic Security Sensor manuals