eXuby STB-1103 User manual

ex=Xubv
USER'S MANUAL
STB-1103
CONVERTER BOX
To insure that the product operating at its best,
please read this user.s manual before use and keep it for future reference.

Content
OK/(LIST) key
PVR (TV Recording)
Safetywarning
Important: Safety Instructions
A
A

Safety Warni
ng
Precautions
Please read these precautions before operating this iinit.
1.Power cord protection
:?eaa::I:basneyrvmea{iuenf%`,',°onwsjn°:.theunit.andtoprotectagainstelectricshock,fireorpersonahniury,
:R::dptthheepA#;rwm:¥cwohr€na;°anynfer:t+nfe°art:isca°pnpn,:acnt:negs:heACPowercord.
:B:vneortpaT:ea#t:ar:yp:Pr,:hc:&nc,;:£ecr3:rde,rncaonr;.way.
• Never make or change connections with the power switched on.
2.Placement
Avoid placing the unit in areas of:
•Direct sunlight or heating radiators
•High temperature (over 35C ) or high humidity (over goo/a)
•Dust as the internal parts may be seriously damaged.
3.Non-use periods
When the iinit is not being used, turn it off. When left unused for a long period of lime, the urn
should be unplugged from the power source.
4.No fingers or other objects inside
• Touching internal parts of (his unit is dangerous, and may cause serious damage to the unit. Do
not attempt to disassemble the unit.
• Do not put any foreign object in this unit
5.Keep away from water
• Keep the unit away from flower vases, tubs, sinks, etc. if liquids are spilled Into the unil. serioiis
damage could occur
Overview Of The Equipment
1. Front panel
123
1. USB Jack
2.Remote control signal sensor
3.LED display windows
4.Change channel down button
5.Change channel lip button
6. Powe r on/off button
7.Work light
2. Rearpanel
4567
1. RF IN: Connect to terrestrial antenna.
2. RF OUT: CH3/4 NTSC RF output
3. COAXIAL: Digital Coaxial output
4. HD OUT: Digital HDTV video output with HDCP, HDMl version 1.3
5. L-AUDIO-R: Analog audio output
6. VIDEO: Composite Video output
7. Y/Cb/Cr: Conponent Y/Cb/Cr output

Overview Of The Equipment
3. Remote Control Unit
I,I:Ill:11.Ill:;-,I,-:,::(:":,;1111111'111
The remote key List:
• STANDBY® : Press to turn on or standby
• HDMl: Adjust resolution
• MUTE: Press to mute the sound of T\/ audio, press again
will restore the sound
• 0 -9: Press to enter the required numbers in the input box
or select a channel towatch
Press directly to tur`e a particular channel.
• REC: Presstostartrecording
• STOP. : Press tostop playback or recording
• MENU: Press to display the Main Menu on the screen
• Exm Press to return to the previous menu
• A/T/CH+/-: Move cursor up/down ; Channel + / -
• 1/>/VOL+/-: Move cursor lefvright : Volume + /-
• 01(: Confirm
LIST Press to display all TV channels or all Radio channels
• ltl/»l: Prev/Next
• 41/~: Rev/Fwd
• FAV: Press to display the favorite channel's list for setting
• EPG: ElectronicprogramGuide
• -: Presstoinputadash inavirtilal channel number
• CC: Press to turn on/off closed captioning
• INFO: Show/Hideserviceinfo:
Press once a Service Info Bar will appear
Press again to show Detail Info
Press again to show Program Info
• PLAY > : Press to resume playback
• PAUSE ll: Presstopauseplayback
• RECALL C:: Pressto switch between current & lastTV channel
• HOLD: This is a Control Key under USB/Video and PVR mode
• REPEAT: Press this button to repeatthe current options
• USB: Press toviewthe content of connected external HDD or
Flash drive.
• TIMER: Press to go to Programmed Time Recording setup
• AUDIO:SwitchAudiochannel
• PVR LIST: Personal video recording list
• GOTO: Setthe playtlme of media.
5
Overview Of The Equipment
INFO. key
Press .INFO" key to dlsplay the lntormatlon banner while vlewing T\/ programs.
Infomation banner.
AUDIO key
Some I)rograms may have multilingual aud`o language and this audio broadcast may be on a dlfferent
audio mode such as Stereo, Left or Right. All the available audio languages will be displayed on tt`e
audio track window when you press ttie L/R key. The screenshct illustrates this below. If there is no
audio output after you have selected the audio language, it indicates that there is no audio on the
ciirrent audio mode, so you have to select the previous audio mode.
CC key
11 & P+ (PREV / NEXT) key & 11< & >>1 (F.R. / F.F) key
The PREVINEXT key and F.R./F F. key can be used diinng playback of murlimedia programs from
your external US8 device. Press the PREVINEXT key to go to the I)revious/next program and
F R./F F. key to fast forward or rewind duning playback.
6

Overview Of The Equipment
EPG key
Press EPG key to display the on screen electronic program guide.
Thls displays a 7 days Electronic Program Guide for all programs being broadcast from all
OK/(LIST) key
Press OK key to display all 1`/ channels or all Radio channels. Follow the help information
at the bottom of the window to select preferred channel.
FAV key
Cable Connections

Menu Operation
• Program
• Picture
• Channel Searcli
• Time Setting
• Option
• System
•USB
Menu Operation

Menu Operation Menu Operation
CC Display
CC OFF, CC1, CC2, CC3, CC4, CC5, CC6
CC Pos't'on
Auto, Top, Bottom
Front Size
Default. Sin
Il,M
ium, Large
Front Color
Default, Wh
e,B
ck, F`ed. Green, Blue, Ye
ow, Magenla. Cyan
BG Color
Default, Wh
a,B
ck, Red, Green. Blue, Ye
ow, Magenta, Cyan
CC Transparency
Default. So
Transparent. Transparent
12

Menu Operation
_I--.--i:`:-:-i-.:--.i
Menu Operation

PVR (TV Recording)
Recording way
1 Real-time recording
•> When watching the TV program, if you need to record and save the curl.en( TV program,
please insert USB hard drive, arid set up the recording and saving route and position
Please be advise that all your recording contents are for yoiir personal enjoyment purl)ose only,
they can not be used for commercial. distribution & public showing purpose.
Timeshift
The Timeshift function allows you to pause the TV program being viewed. Once paused the TV
program ls being stored on your connected USB Hard Drive or Flash Drive.
When watching a progi.am. press the PLAY key on the remote control to activate the function.
You can now use the F.R. (Rewind function) lo go back to the point you began the TIMESHIFT
function or F.F. (Fast Forward) to catch up to live viewing. If you wish to stop the TIMESHIFT
function, press the STOP key.
TIMESHIFT
PVR RECORD
FORMAT
Works
Vvorks
Fat32
Works
Vvbrks
NTFS
Works
works
NTFS / FAT 32
doesn't work
Works
NTFS / FAT 32
PVR (TV
Recording)
Recording
-> Press the remote.s ®REC. key to enter the recording status, and press the -Stop. key when
you finished the recording. so the whole record function will be done.

Appendix
Troubleshooting
lf you have difficulty with your digltal T\/ set-top receiver, there are several possibilities you should
investigate before calling for a service technician.
Problein,
Pos§ible\ Causes,
what to DO
The display on the front
Power cord is not connected
Check that the power cord is
panel does not light up
plugged into power socket
No sound and no picture
The receiver i§ under standby
Press POVVER key on the front
panel to swilch to operation mode
No slgnal when selectlng
The antenna is disconnected
Check antenna connection
Program parameters are set
Set correct parameters
channels
incomectly
Picture only ,but no
Audio cable is not connected
Connect it securely
securely
System in MUTE mode
Press MUTE key on the RCu to
restore volume
Volume is set to minimum
Increase the volume to suitablelevel
sound
Audio setting parameter is \^rong
Please go to Audio Setting menu,
Select proper audio mode and
proper audio language
Sound only, but nopicture
video cable is not connected
Connect the video cable securely
securely
Tlie ciJrrent channel is in radio
Normal
mode
Video and audio
Select properAudio channel
sound
correctly
Signal is too weak
Check to make sure that the signal
phenomenon
cord has been connected tightly
Remote control unit doesnotwork
RCU is not aimed at the sensor
Aim at the sensor on the front
on the front panel
panel
Not enough power in the battery
Change battery
of the remote control
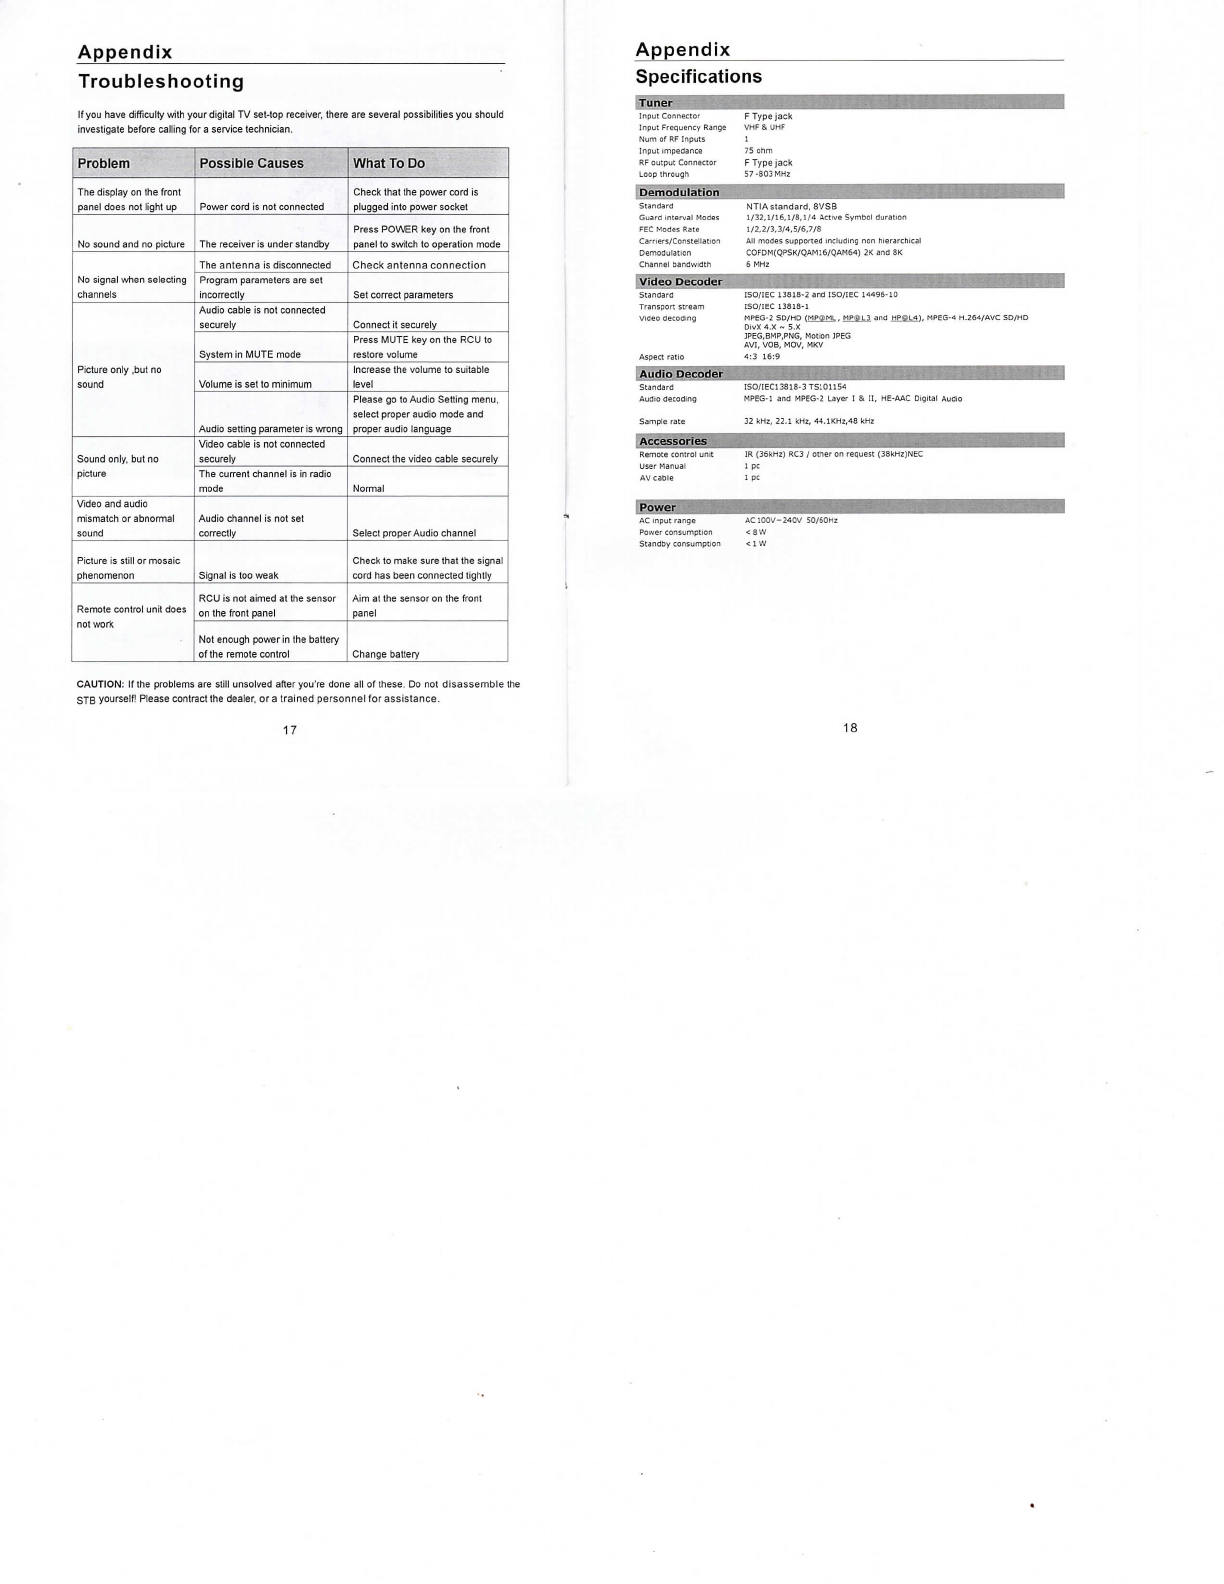
Appendix
Specifications
TunieT ;:, ;J{'?i, I 8.;'S`,,-i,I,'=`Tu ` ll|'.|E.
Input connector F Type jack
Input Frequenay Range VHF & UHF
Num of RF Inputs i
Input Impedance 75 ohm
RF output Connector F Type jack
Loop througli 57 -803 MHz
rm+drL*±AF#LE± -
Standard NTIA standard. 8VSB
Guard Interval Modes 1/32,1/16,I/8,1/4 Active symbol duratlon
FEC Modes Rate i/2,2/3, 3/4,5/6,7/8
Camers/Constellation All modes supported lncludlng nan hlerarchlcal
Democlulation COFDM(QPSK/QAM16/QAM64) 2K and 8K
Channel bandwldth 6 Mllz
`yt4+fi I.ai.art _-± _
Standard ISO/IEC 13818-2 and lso/IEC 14496-10
Transport stream ISO/IEC 13818-1
Video clecoding MPEG-2 SD/HD (MP®ML, MP@L3 ancl HP@u), MPEG-4 H 264/AVC SD/HD
Divx 4.X ~ 5.X
JPEG,8MP,PNG, Motion JPEG
AVI, V0B, lvlov, MKV
Aspect ratio
Audis\beeoifeitiJ.:.`[+'¥J
S',nd,'d
Audio decoding
Sample rate
i,.-G,*'.-,a-.as E
Remote control unlt
User Manual
AV cable
Table of contents