EZ Able SerenityNow User manual

™Walk In Tub
Installation and Operating Instructions
®
www.ezable.com
877-392-2531
Thank you for purchasing the SerenityNow
Walk-In Tub. For best results, please read and
follow all directions carefully.
PRE-INSTALLATION PLANNING
1. Care and Testing
a. Do not store the Walk In tub outside and be
sure to keep out of sunlight and exposure to
weather.
b. Never lift the tub by the piping. Lift only by the
tub main deck.
Inspect the tub for damage or shortage. Verify
that the tub specifications are correct. If damage
or shortage has occurred notify the distributor or
freight carrier immediately.
c. All our Walk In tubs are factory tested for
leaks and general operation. Because of handling
and shipping, we recommend that you also
perform a similar test prior to installation: Plug
drain with duct tape and fill with water. Have the
electrician make a temporary, safe, grounded
G.F.C.I. protected connection. Press the on/o
button and check for leaks at all pipe connections.
d. If any leaks or controls fail to operate
properly,do not proceed with installation.
Immediately call 877.392.2531 and ask for the
Warranty Department.
2. Determine Your Tub Size
a. If you are replacing a 60” tub with a new
SerenityNow Walk In tub, a color coordinated tub
extension kit is available to fill the area and create
a decorative ledge See Figure 1 .
b. If you plan to finish the area with tile, install
green board or its equivalent and tile the area.
Plan the framing to match the size of the tiles.
See Figure 7 in this manual for more details.
3. Whirlpool Installation Planning
If your SerenityNow Walk In tub is a whirlpool, the suction
line will exceed the overall depth of the unit which
means the back flange will not fit against the stud
wall. Build out a frame ledge away from the studs
approximately 3”. See Figure 1B
NOTE: Before installation, adjust tub levelers
for proper height. Space from floor to bottom
edge of tub rim must be 36- 3/4”to provide
clearance for front cover panel installation.
Take care to test fit all the cover panels for fit
prior to moving the tub into the installation
location. Adjust levelers if necessary. See
Figure 3 for more details.
4. New Installations
For new installations, placement in the room is
Tools you might need for proper installation
•6 D Galvanized Nails or Screws
•Large Level
•Hammer or Screw Gun
•Carpenter’s Square
•Adhesive
•Small Wrench
•Tape Measure
60”
50”
Use Extension Kit or other
finishing materials to cover
this area.
FIGURE 1
SerenityNow
Page 1 of 9


™Walk In Tub
Installation and Operating Instructions
®
www.ezable.com
877-392-2531
INSTALLATION PROCEDURE
1. Begin by preparing your plumbing. You may be
able to reuse the existing water supply lines. Extend
the lines if required to meet the higher than typical
walk in tub. Study the product diagrams and relocate
drain line as required for connection to the overflow
kit provided with your unit.
2. Install the faucet on the tub deck opposite the seat.
Carefully measure and mark hole locations on the
finished side of the tub. Double check hole locations
and drill 1/4” pilot holes. Cut holes to final size
usingthe appropriate size hole saw. Install faucet
according to the manufacturers instructions.
3. Install the drain and overflow assembly on the
tub following the directions enclosed in the overflow
assembly carton. The assembly is a high quality, cable
activated product that once installed will provide easy
operation of the tub drain. Extend height of tub to
maximum for drain install and reinstall back to 36-
3/4”.
4. Prepare the room walls in the install location so the
tub may be placed along the framing. Refer to
the applicable Product Diagram for the tub length,
width and height. The wall board should be cut and
removed at a height above the floor so the tub will fit
against the studs. If you are using the available tub
extension kit, or will extend the enclosure in some
manner to account for the total 60 inch area, install
the required stud framing at this time. Refer to Step
15, Figure 7 of this manual for more information.
Before moving unit into place, the adjustable legs
should be raised to 36 ¾” to allow the drain assemble
to be fitted and the drain seal for the Tip/Toe closure.
Once this is complete you may adjust the legs,
lowering the product to its original height.
5. Install the metal hanger on the long side stud
wall. Measure up from the floor 33 3/4”. This will be
the bottom of the metal hanger. Attach hanger
through the slots to the studs with lag screws with flat
washers. Blocking between the studs may be required.
The tub rim will fit between the angled tabs of the
hanger and framing studs. Some adjustment may be
necessary. See Figure 2
6. Clean the area where the tub will be installed.
This step is important so that all loose particles are
removed and not be pulled into the blower and plug
the air bubblers. The Walk In tub is mounted to a
stainless steel welded support frame.
7. This frame has 6 leveling legs that may be adjusted
independently to account for minor out of level floor
conditions. The side cover panelthat fits along the door
side is provided with the tub. The tub levelers must
be adjusted at the proper height toaccommodate the
panel. Adjust levelers so the opening for the cover
panel is 36 3/4”. Note thatfinished floor level must be
(To Floor)
Studs
Tub Rim
Hanger
Tabs
333”
4
FIGURE 2
SerenityNow
Page 3 of 9

™Walk In Tub
Installation and Operating Instructions
®
www.ezable.com
877-392-2531
at or below the finished bottom edge of the panel so it
may be removed later should maintenance of the tub
be required. See foot adjustment. Figure 3
8. Carefully lift the walk in tub into position. Lower
so the tub rim sets on the metal hanger. Confirm the
tub fits as you expect into the installation area. Make
adjustments if necessary. Connect the water supplies to
the faucet and overflow drain assembly to
the waste pipe. Take care when installing
the drain assembly to prevent damage to
the air tubing or piping underneath the
product.
9. Check the entire tub for level. Tub should be level
from front to back and side to side. Adjust levelers as
needed by simply turning the levelers as required. See
Figure 3B.
10. The next step is to fill the tub for testing. Close
and latch the tub door and turn on the water. As it
fills, keep an eye on all fittings to check for leaks.
When the tub is 3/4 full, shut o the water and
recheck level. If the tub is not level, adjust the leveling
feet as required. Note that the front center
leveling foot is for the door. If you notice any
leaking from the door, adjust this leveler as
needed.
11. Apply a bead of 100% silicone caulking to each
point where the tub contacts the framing studs. Screw
the room side levelers to the floor to prevent the tub
from shifting.
12. If you are using the Tub Extension Kit, you
probably will need to trim it before trial fitting.
Carefully measure and cut the extension kit.There
are a number of dierent configurations possible
depending on the specific installation.
Carefully consider how you want to finish the area
and install your support frame accordingly.
Wood framing must be constructed at the end of the
tub to support the Tub Extension Kit. An example of a
typical installation is shown in Figure 7 .
The Extension Kit may be permanently attached by
using 100% silicone sealant or construction panel
adhesive. Apply adhesive to trimmed edge of the end
cap. Use care to avoid excessive use of adhesive so
it will not be visible after all finish materials have been
installed.
FIGURE 3B
Measure and trim
ends as required.
Tub Extension Kit
Tub
Rim
Extension
Kit Panel
Wall
Studs
Extension is heldin place
with 100% silicone caulk
or panel adhesive.
Partial Room End View
Framing
for end
cap.
FIGURE 7
SerenityNow
Page 4 of 9

™Walk In Tub
Installation and Operating Instructions
®
www.ezable.com
877-392-2531
13. Finish the walls above the tub with water resistant
materials such as ceramic tile or plasticwall surround
panels.
CAUTION
If you use a RUBBER FLOOR MAT in this tub
or shower unit it must be removed after each
usage. If left in the unit, it may cause blisters
or damage to the surface finish. Use of a
rubber floor mat will void warranty.
DOOR OPENING ADJUSTMENT, FOOT
ADJUSTMENT & STABILIZER RODS
The Walk-In tub’s door opening width, adjustable
feet and stabilizer bars come from the factory already
adjusted for proper width, height and stability.
However, due to variances in floor slope, slight
modifications may be required for proper installation.
the following instructions are to be used for these
adjustments.
1. The minimum tub height to ensure proper drain
installation is 37.5” from the top of the tub flange to
the floor in which the tub is being installed on.
Using a tape measure, check the height of the tub at
each foot (6 feet total). If the height is not a minimum
of 37.5” then the foot will need to be adjusted to
achieve the proper height. Figure 9
2. Adjusting the feet. Begin by checking the levelness
of the tub by placing a level on the top of the tub
and checking the level side to side and front to
back. With the levelness determined, to adjust the
feet start at a corner foot and loosen the top .375”
nut approximately .5” by turning the nut counter
clockwise, Adjust the bottom .357” nut up or down to
achieve proper height. Repeat for the other five feet.
Once all the feet have been adjusted to the proper
height, check the levelness again. Now that the
levelness of the tub has been verified, tighten the top
.375” nuts down against the frame. Figure 10
3. With the tub adjusted to the proper height, the door
opening needs to be checked for the proper width.
Figure 11
4. To adjust the door opening first begin by loosening
the stabilizing rods .375” nuts. Figures 12 & 13
Loosen all 8 nuts approximately .5”. Do not take the
rods o. Just make sure the rods are not binding the
tub’s metal frame.
Wall
Studs
Finished Wall Materials
Bathtub Caulking
FIGURE 8
FIGURE 9
37.5”
SerenityNow
Page 5 of 9

™Walk In Tub
Installation and Operating Instructions
®
www.ezable.com
877-392-2531
5. The door width opening is adjusted by raising
or lowering the right (front) frame adjusting screw.
Figure 14 The right (back) frame adjusting screw
should not require any adjustment.
NOTE: Example mentioned is a right-handed unit. For
left-handed units, the frame adjusting screws will be
on the left side of tub.
To ensure a water tight tub door, only small
adjustments should be made to the adjustment screw.
6. To EXPAND the door opening, first loosen the
UPPER adjustment screw nut approximately .25” by
turning it counter-clockwise. Next tighten the LOWER
nut by turning it counter-clockwise.FIGURE 15 This
will cause the frame to expand the door opening.
Make small adjustments to the screws. Re-measure
after each adjustment. Once the opening is at 20.25”
tighten the LOWER nut back up.
7. To DECREASE the door opening, first loosen the
LOWER adjustment screw nut approximately .25”
by turning it clockwise. Next tighten the UPPER nut
by turning it clockwise. FIGURE 16 This will cause
the frame to decrease the door opening. Make small
FIGURE 10
{
{
Incorrect Side
Correct Side
FIGURE 11
Stabilizing Rods
(2 rods)
Stabilizing Rod Nuts
(4 per each rod)
FIGURE 13
FIGURE 12
SerenityNow
Page 6 of 9

™Walk In Tub
Installation and Operating Instructions
®
www.ezable.com
877-392-2531
adjustments to the crews. Re-measure after each
adjustment. Once the opening is at 20.25” tighten the
LOWER nut back up.
8.
Once the door opening has been properly set to
20.25”, the stabilizing bar’s .375” nuts (8 total) can
be tightened.
FIGURES 17 & 18
FIGURE 14
Frame Adjusting Screws
FIGURE 15
FIGURE 16
Upper Nut
Upper Nut
Lower Nut
Lower Nut
Stabilizing Rods
(2 rods)
Stabilizing Rod Nuts
(4 per each rod)
FIGURE 18
FIGURE 17
SerenityNow
Page 7 of 9

™Walk In Tub
Installation and Operating Instructions
®
www.ezable.com
877-392-2531
First, hand tighten the lower nuts against the frame,
centering the rods. Then, tighten the upper nuts to
secure using a wrench. Do not over tighten the nuts as
this may cause misalignment of the tub’s frame and
door opening.
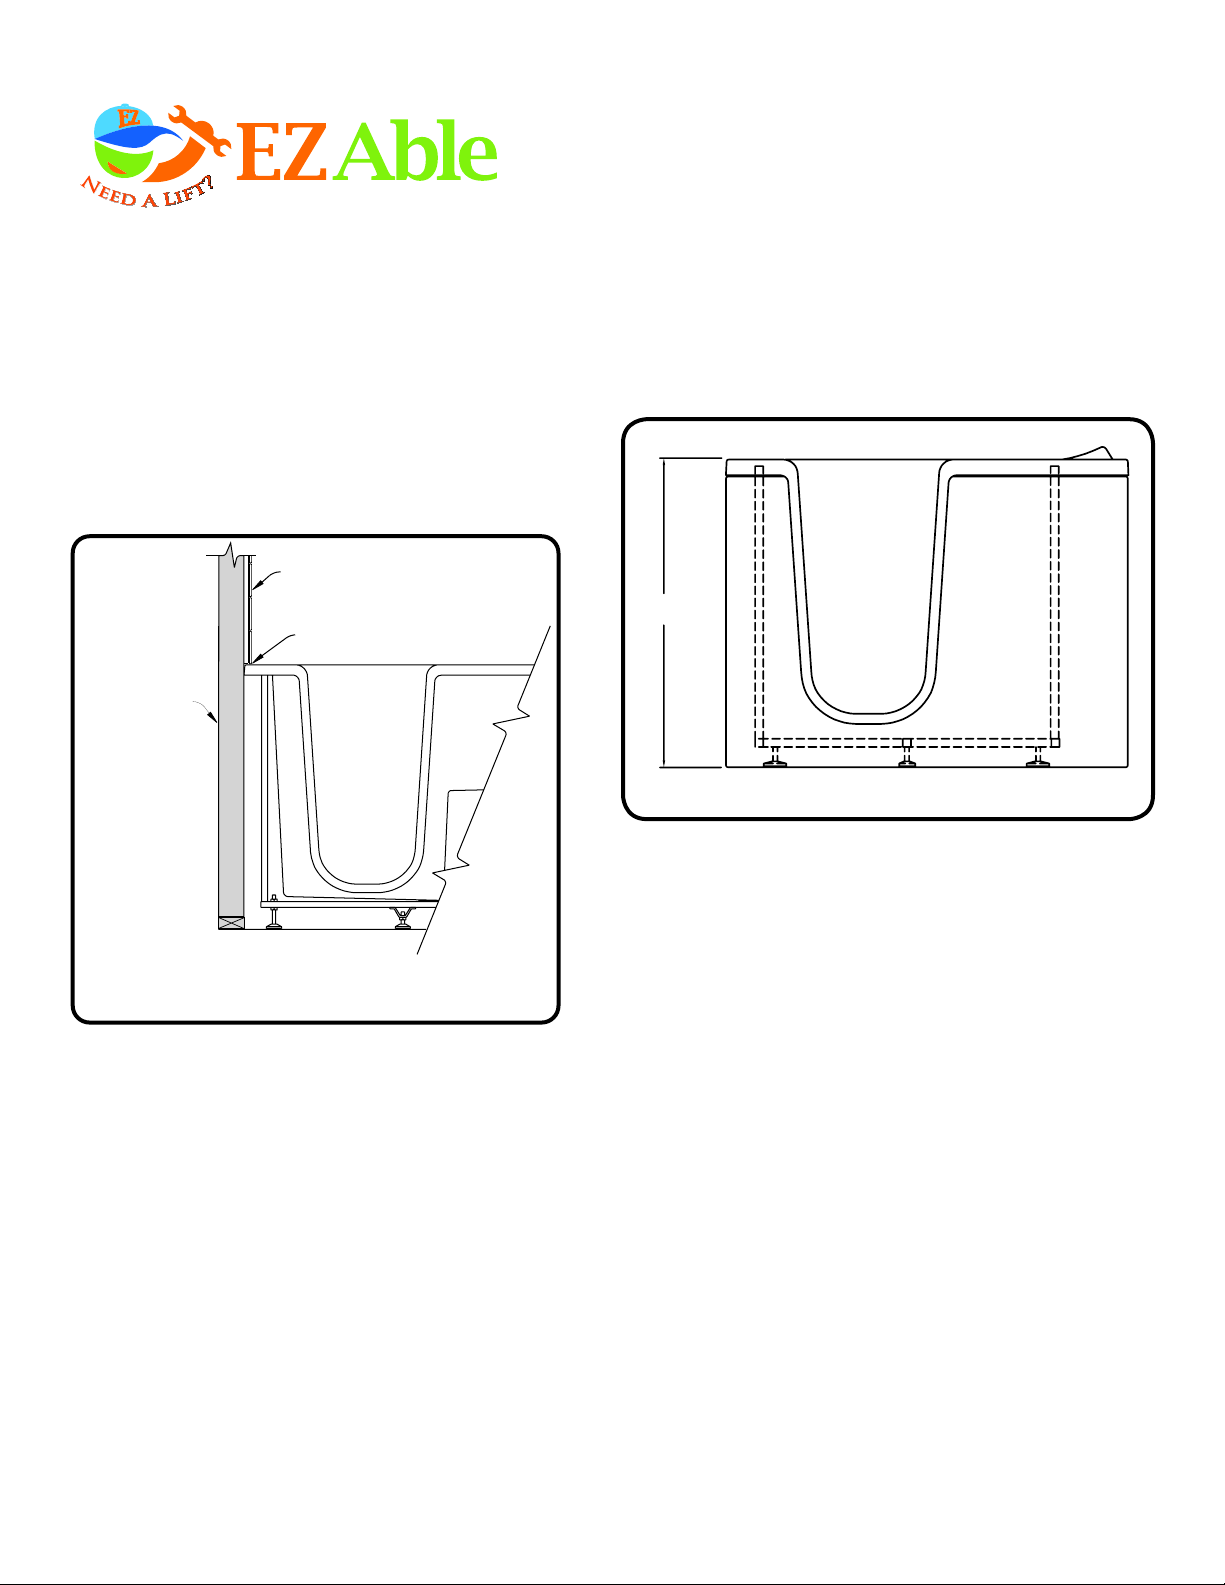
Once the stabilizing bar nuts have been tightened,
check the door opening width to ensure that the
proper width (20.24”) has been maintained.
CARE AND CLEANING
Clean your new Walk In tub with a household liquid
detergent using a soft sponge cloth and warm water.
More persistent stains, tar, or paint can be removed
with naptha or mineral spirits. Remove excess plaster
by scraping with a sharpened softwood stick. Avoid
wire brushes, metal scrapers or tools. Restore dull
areas by rubbing with automotive type body cleaning
compound. DO NOT USE CAUSTIC OR ABRASIVE
CLEANERS AS THEY WILL DAMAGE THE FINISH
OF YOUR WALK IN TUB.
LIMITED WARRANTY
EZ Able®SerenityNow Walk-In Tub is covered
by the manufacturer and is under warranty for
a period of: Three (3) Years for Gelcoat, Ten (10)
Years CenturyStone, One (1) year, pump, parts, and
accessories.
If the product has material defects, manufacturing
defects or other labor defects, during the warranty
period, it will be repaired or exchanged at the
discretion of the warranty department of the
manufacturer. The exchange of a unit is limited to
suppling a replacement unit of comparable size and
style and does not include any costs of removal or
installation.
This warranty will be voided if the unit is moved from
the place of initial installation, or is not installed in
accordance with the instructions supplied by the
manufacturer of the unit. Further, this warranty does
not apply if the unit has been subjected to accident,
abuse, misuse, alterations, alteration of modifications
by the buyer, or anyone representing the buyer. It
does not cover damage caused by chemical corrosion,
natural corrosion, flood, fire or any other act by force
of nature.
The buyer of this product is fully responsible for the
proper installation of this unit. EZ Able®
will not be held responsible for any damages resulting
from improper installation. Consult a plumbing
professional if you feel you cannot install the Walk In
tub.
This warranty does not apply to any equipment or
accessories not installed by EZ Able®, and
EZ Able® will not be held responsible for any results of
such acts.
The owner agrees by use of this unit that the
obligations of EZ Able® shall not exceed
to contingent or indirect damage or injury to the
structure of its contents, that the obligations of the
EZ Able®is limited to those set forth herein,
and that no other obligations, expressed or implied,
are assumed by EZ Able®.
All warranty will be implemented at the discretion of
the manufacturer’s Warranty Department upon
the summation and evaluation of the circumstances
involving the product installation.
For questions or a copy of the complete product
warranty, contact: EZ Able Warranty
Department at 877.392.2531.
SerenityNow
Page 8 of 9

SerenityNow
™Walk In Tub
Installation and Operating Instructions
®
www.ezable.com
877-392-2531
OPERATING INSTRUCTIONS
These operating instructions apply to tubs equipped
with: Air Jets, Water Jets or both. Dual systems have
separate controls for the Air and Water Jets.
NEVER begin filling the tub with the door open.
For safety, the bather should be seated inside the
tub, with the door latched shut before filling the tub
with water.
When seated inside the tub, move the door to the
closed position. Grasp the door closer handle and
move the lever until the tear-drop shaped latches slide
to a stop in the closed position.
Confirm the door is latched shut before filling the tub.
Always fill the tub to 2” above the highest air bubbler,
or highest water jet.
ON/OFF CONTROL OPTIONS
On/O is controlled by an On/O push button
Push Button Operation Press the On/O push
button to activate the system.The system will operate
for 20 minutes and then automatically shut o. If
additional time is desired,press the button again. If
you wish to stop before 20 minutes has passed, press
the button to stop.
IMPORTANT: Automatic Drying Cycle
After the tub is drained, an AUTOMATIC
drying cycle begins. The injector motor will
turn on and operate for approximately 30
seconds.
DO NOT INTERRUPT THIS CYCLE. The system
operates with the bathtubdrained to eject
any water that may have seeped into the
air jet bubblers. The drying cycle eliminates
anywater, and will automatically operate
and shut o without action required of the
user.
If the On/O control is pushed during the Automatic
Drying Cycle, the system stops and resets. It will again
begin the drying cycle 20 minutes later. DO NOT
INTERRUPT THIS CYCLE. The Automatic Drying
Cycle operates on tubs with the On/O push button
or the Electronic Control.
Tubs with Water Jets only do not have the Automatic
Drying Feature.
IMPORTANT SAFETY INSTRUCTIONS
Always drain tub before opening the tub door.
NEVER enter or exit the tub by climbing over the
side. Enter the tub while it is empty, through the door.
Climbing on the tub may result in slips and risk of
injury.
Maximum soaking temperature should not exceed 104
degrees (F) 40 degrees (C). Consult a physician for
specific temperature and length of use specifications,
depending on health considerations.
Children, elderly or infirm bathers must remain under
close supervision.
Do not use while under the influence of alcohol or
drugs.
Use precaution while entering or exiting the bath to
prevent accidental slips or falls.
Periodically test the Ground Fault Circuit Interrupter to
insure it is working properly.
EZ Able®
PO Box 7118 I Traverse City, Michigan 49696 I Tel: (877) 392 2531 IFax: (877) 392 2531 |www.ezable.com
EZ Able Copyright 2013
Page 9 of 9
Table of contents