Faber Opti-V Fire PGF10 User manual

08/51841/0 Issue 2
Model: PGF10
Opti-V Fire
The product complies with the European Safety Standards EN60335-2-30 and the European Standard Electromagnetic Compatibility (EMC)
EN55014, EN60555-2 and EN60555-3 These cover the essential requirements of EEC Directives 2006/95/EC and 2004/108/EC - Patents pending
International Application No. : PCT/EP2013/051263 & PCT/EP058211 GB Application : GB1210108.5
Gebruiksaanwijzing / Installatievoorschrift
UK
NL DE FR
ES
ES

1
2a 2b
650-1100

4
3
5


NL..........................................1
DE..........................................2
FR..........................................3
UK..........................................4
ES..........................................5

Algemeen
In de doos bevinden zich de volgende onderdelen :
- Opti-V fire Model PGF10
- Afstandsbediening inclusief batterijen (type AAA)
Installatie
Het toestel is bedoeld in een kast- of wand opening te
worden ingebouwd .
Het toestel dient middels schroeven in de daarvoor
bedoelde gaten op een basis te worden vast geschroefd.
Zie fig. 2a en Fig 2b voor de aanbevolen inbouwmaten.
Let op de gekozen hoogte: aanbevolen 65cm wanneer
het toestel zittend wordt
gezien tot max 110cm wanneer het toestel staande wordt
gezien. Maatvoering gerekend vanaf de vloer tot onderzijde
haard opening .
Het plaatmateriaal aan de front zijde mag nooit de
haardopening gedeeltelijk afdekken. De inbouwstrip
rondom de haardopening is maatgevend. Dit is
noodzakelijk om service mogelijk te maken zonder het
toestel te hoeven uitbouwen.
Zorg ervoor dat de aansluiting op het stopcontact te allen
tijde bereikbaar blijft.
Voor service is het noodzakelijk om het toestel
spanningsvrij te maken.
Alle componenten kunnen worden vervangen door de
haardopening aan de voorkant van het toestel.
Werking: -
Zet de hoofdschakelaar op ‘I’ (Fig.3 Linksboven achterin
het toestel)
Het ‘Opti-V’ logo wordt gedurende 3 seconden tijdens de
opstart fase zichtbaar.
Per periode van ± 30minuten zal het scherm gedurende ±
5 seconden op zwart gaan. (reset film)
Wanneer het toestel voor een langere tijd niet gebruikt
wordt raden wij aan uit oogpunt van energiebesparing om
de hoofdschakelaar uit te zetten.
Hand bediening: -
De bedieningsknoppen bevinden zich linksboven achterin
het toestel.( Fig.3).
De aan/uit schakelaar (‘O/I’) voor het 100% uitschakelen
van het toestel.
De “stand by” , schakelaar bevindt zich net onder de
hoofdschakelaar.
Indien het toestel op stand-by staat is dit zichtbaar d.m.v.
een rode led (Fig. 4)
Afstandbediening : -
De afstandsbediening werkt alleen indien de
hoofdschakelaar op ‘I’ (fig3) staat
Richt de afstandsbediening links van het midden
(zie fig. 4.)
Opti-V Fire : PGF 10
Aanzetten /stand-by druk op de stand-by knop. (Rode Led
brandt in stand-by stand).
Het volume kan hoger en lager gezet worden
met de + en - knop.
Voor het vervangen of plaatsen van de batterijen zie fig.5,
Onderhoud
Het glas kan regelmatig worden schoongemaakt met een
zachte doek.
Gebruik in geen geval agressieve ruiten reinigers.
Aansluitwaarde
230V 50Hz 80VA
Opgenomen vermogen 0,04 KW
Stand-by opname 1 W
Garantie en Service
Voor service en garantie dient u het product aan te
melden via de website
http://www.gdbservice.com/
Kies de optie Faber en selecteer op elektrisch en kies
voor Opti-V fire PGF10
Het serie nummer van het toestel vindt u aan de
rechterkant binnenzijde
boven het glas . Bewaar de aankoop nota deze geldt als
garantie bewijs .
Recycling
Voor alle elektrische apparaten verkocht in de EU
geldt dat deze dienen te worden
gerecycled aan het eind van de levensduur.
Lever het toestel in bij de een lokaal inleverpunt.
BELANGRIJK: LEES DEZE GEBRUIKSAANWIJZING AANDACHTIG DOOR EN BEWAAR DEZE VOOR NASLAGDOELEINDEN
NL
1

Opti-V Fire : PGF 10 DE
WICHTIG: DIESE ANLEITUNG IST SORGFÄLTIG ZU STUDIEREN UND ZUR SPÄTEREN VERWENDUNG AUFZUBEWAHREN
Allgemein
Im Karton befinden sich folgende Teile:
- Opti-V fire Modell PGF10
- Fernbedienung mit Batterien (Typ AAA)
Sicherheitsanweisungen
Das Gerät darf nur im Innenbereich und in einem nicht
feuchten Raum aufgestellt werden.
Das Gerät erst anschließen, nachdem es vollständig
installiert ist.
Das Gerät ist an eine geerdete Steckdose anzuschließen.
Halten Sie sich an die angegebenen Einbaumaße und
sorgen Sie für Lüftung an der Einbauöffnung.
Keine Gegenstände gleich welcher Art im Gerät
platzieren.
Darauf achten, dass das Gerät nicht von anderen
Wärmequellen angestrahlt wird.
Installation
Das Gerät ist zum Einbau in einer Schrank- oder
Wandöffnung vorgesehen.
Das Gerät ist mit Schrauben in den dazu vorgesehenen
Löchern auf einer
Basis zu verschrauben. Siehe Abb. 2a und Abb 2b für die
empfohlenen Einbaumaße.
Achten Sie auf die gewählte Höhe: Empfohlen wird 65
cm, wenn das Gerät im Sitzen
gesehen wird, bis max. 110 cm, wenn das Gerät im
Stehen gesehen wird. Die Bemaßung wird vom
Fußboden bis zur Unterseite der Kaminöffnung
gerechnet.
Das Blechmaterial auf der Frontseite darf die
Kaminöffnung auf keinen Fall teilweise abdecken. Der
Einbaustreifen um die Kaminöffnung ist maßgebend.
Dies ist erforderlich, um Servicearbeiten zu ermöglichen,
ohne das Gerät ausbauen zu müssen.
Darauf achten, dass der Anschluss an die Steckdose
jederzeit erreichbar bleibt.
Für Servicearbeiten ist es erforderlich, das Gerät
spannungsfrei zu schalten.
Alle Bauteile können durch die Kaminöffnung auf der
Vorderseite des Gerätes erreicht werden.
Funktionsweise: -
Den Hauptschalter auf ‘I’ (Abb.3 oben links hinter dem
Gerät) einstellen.
Das ‘Opti-V’ Logo ist während der Startphase 3
Sekunden lang sichtbar.
In einem Zeitraum von ca. 30 Minuten wird der Bildschirm
ca. 5 Sekunden schwarz. (Film zurücksetzen)
Wird das Gerät für eine längere Zeit nicht benutzt,
empfehlen wir zur Energieeinsparung, den Hauptschalter
auszuschalten.
Handbedienung: -
Die Bedientasten befinden sich unten links hinter dem
Gerät. Abb. 3).
Der Ein/Aus-Schalter. (‘O/I’) zum 100%igen Ausschalten
des Gerätes.
Der “Standby” , Schalter befindet sich direkt unter dem
Hauptschalter.
Ist das Gerät in der Standby-Stellung, ist dies an der
leuchtenden roten LED (Abb. 4) erkennbar.
Fernbedienung : -
Die Fernbedienung funktioniert nur, wenn der
Hauptschalter auf ‘I’ (Abb.3) steht.
Die Fernbedienung auf einen Punkt links von der Mitte
richten (Siehe Abb. 4.)
Einschalten/Standby: Standby-Taste drücken. (Rote LED
brennt in Standby-Stellung)
Die Lautstärke kann mit der + und _Taste höher oder
niedriger eingestellt werden
Zum Auswechseln oder Einlegen der Batterien siehe
Abb.5
Instandhaltung
Das Glas kann regelmäßig mit einem weichen Tuch
gereinigt werden.
Auf keinen Fall aggressive Glasreiniger verwenden.
Anschlusswert
230V 50Hz 80VA
Leistungsaufnahme 0,04 KW
Standby-Aufnahme 1 W
Gewährleistung und Service
Für Service und Garantie müssen Sie das Produkt auf der
Website
http://www.gdbservice.com/
anmelden.
Die Option Faber / elektrisch wählen und daraufhin
Opti-V Fire PGF10
Die Seriennummer des Gerätes finden Sie auf der
rechten Innenseite
über dem Glas. Ankaufrechnung aufheben, sie gilt als
Garantieschein.
Recycling
Für alle in der EU verkauften Elektrogeräte gilt, dass sie
am Ende der Lebensdauer wiederzuverwerten
sind.
Das Gerät bei einer lokalen Sammelstelle
entsorgen.
2

Opti-V Fire : PGF 10
IMPORTANT : CES INSTRUCTIONS DOIVENT ÊTRE LUES ATTENTIVEMENT ET CONSERVÉES AFIN DE POUVOIR ÊTRE
CONSULTÉES ULTÉRIEUREMENT
FR
Informations générales
Components dans la boîte :
- Opti-V fire Modèle PGF10
- Télécommande, pile (type AAA) incl.
Consignes de sécurité importantes
Ne pas utiliser l’appareil à l’extérieur ou dans un endroit
humide.
Ne branchez pas l’appareil avant que l’installation soit
faite complètement.
L’appareil doit être relié à la terre.
Tenez compte avec les dimensions indiquées et n’oubliez
pas de prévoir de la ventilation.
Ne déposez pas d’autres components dans l’appareil.
Pas d’autres sources de chaleur à l’environ de l’appareil.
Installation
Cet appareil est un modèle à encastrer.
A l’aide des vis adaptées, fixez solidement l’appareil. Voir
Fig. 2a et Fig. 2b pour les mesures recommandées.
Faites attention à la hauteur : hauteur recommandée 65
cm, vue d’une position assise,
hauteur recommandée vue d’une position debout : 110
cm. Tenant compte avec des
mesures à partir du sol jusque le bas du foyer.
Les panneaux de front ne peuvent jamais couvrir
partiellement l’ouverture du foyer.
La bande à encastrer autour de l’ouverture du foyer est
décisive. Ceci est nécessaire dans le
cas où un technicien aura besoin d’accéder aux
components intérieurs. Si non, il sera
nécessaire de retirer l’appareil de la cheminée.
La prise doit rester toujours accessible.
Toujours débrancher l’appareil du secteur avant de
réaliser toute opération d’entretien.
Tous les components peuvent être remplacer à la face de
l’appareil.
Fonctionnement
Mettez l’indicateur principale sur « I » (Fig. 3, à gauche, en
haut au fond de l’appareil).
Le logo « Opti-V » devient visible pendant 3 secondes,
pendant la phase d’amorcement.
Tous les ± 30 minutes, l’écran devient noir pendant ± 5
secondes (reset film).
Nous vous conseillons de mettre l’interrupteur principale
sur « O » au moment que l’appareil ne sera pas utilisé
pendant une période prolongée, point de vue d’énergie.
Commande manuelle
Les boutons de commandes se trouvent au fond de
l’appareil, gauche en haut (voir Fig. 3).
L’interrupteur marche/arrêt (« O/I ») : 100%
débranchement de l’appareil.
L’interrupteur « stand-by » , se trouve immédiatement
dessous l’interrupteur principale.
Le led rouge indique que le foyer se trouve dans le mode
stand-by (fig.4).
Télécommande
Fonctionnement de la télécommande : mettez
l’interrupteur principale sur position « I » (Fig. 3).
Dirigez la télécommande vers le centre à gauche
(voir Fig. 4).
Fonctionnement/stand-by : appuyez sur le bouton stand-
by (led rouge s’allume dans le mode
Stand-by).
Le volume peut être réglé avec le bouton + et -.
Placement/remplacement des pilles : voir fig. 5.
Entretien
Pour nettoyage de la vitre : utilisez un chiffon à poussière.
Ne jamais utiliser des produits nettoyants abrasifs ou
des produits spécifiquement conçus pour le nettoyage
des vitres.
Spécifications techniques
230V 50Hz
Puissance 0,04 KW
Puissance Stand-by 1W
Garantie et service après-vente
Nous vous demandons d’annoncer le produit sur notre
site internet http://wwwgdbservice.com/
Choisissez l’option Faber et sélectionnez « Electrique »,
puis « Opti-V fire PGF10 ».
Vous retrouverez le n° de fabrication à l’intérieur de
l’appareil, à droite, dessus la vitre.
Conservez soigneusement votre facture, comme preuve
d’achat.
Recyclage
Pour tous les appareils électriques vendus dans l’Union
Européenne : les appareils ne peuvent pas être remis au
rebut avec les déchets ménagers, lorsqu’ils
arrivent en fin de vie.
Vous pouvez remettre l’appareil à des services
locales compétentes.
3

Contents of Carton
• Opti-V Fire Model PGF10
• Remote control and batteries (AAA type)
Important Safety Advice
When using electrical appliances, basic precautions
should be followed to reduce the risk of fire, electric shock,
and injury to persons, including the following:
If the appliance is damaged, check immediately with the
supplier before installation and operation.
Do not use this appliance in the immediate surroundings
of a bath, shower or swimming pool.
Means for disconnection must be incorporated in the fixed
wiring in accordance with the wiring regulations.
Do not use outdoors.
In the event of a fault switch off the appliance.
Switch off the appliance when not required for long periods.
If the supply cord is damaged, it must be replaced by a
special cord or assembly available from the manufacturer
or its service agent.
Warning - No naked flame sources, such as candles,
should be placed on this apparatus.
Warning - The appliance shall not be exposed to dripping
or splashing and that no objects filled with liquid, such as
vases, shall be placed on the apparatus.
Warning - this appliance is of Class I construction and
must be connected to a mains outlet with protective
earthing connection.
Electrical
WARNING – THIS APPLIANCE MUST BE EARTHED
Do not switch the appliance on until properly installed. Please
read all the safety warnings and operating instructions.
Installation
Warning.
Do not connect the appliance until properly fixed to a secure
base and the instruction leaflet is read fully.
At installation of the appliance, care must be taken not to
damage any cables that may be concealed in the wall.
Please be careful while drilling the holes.
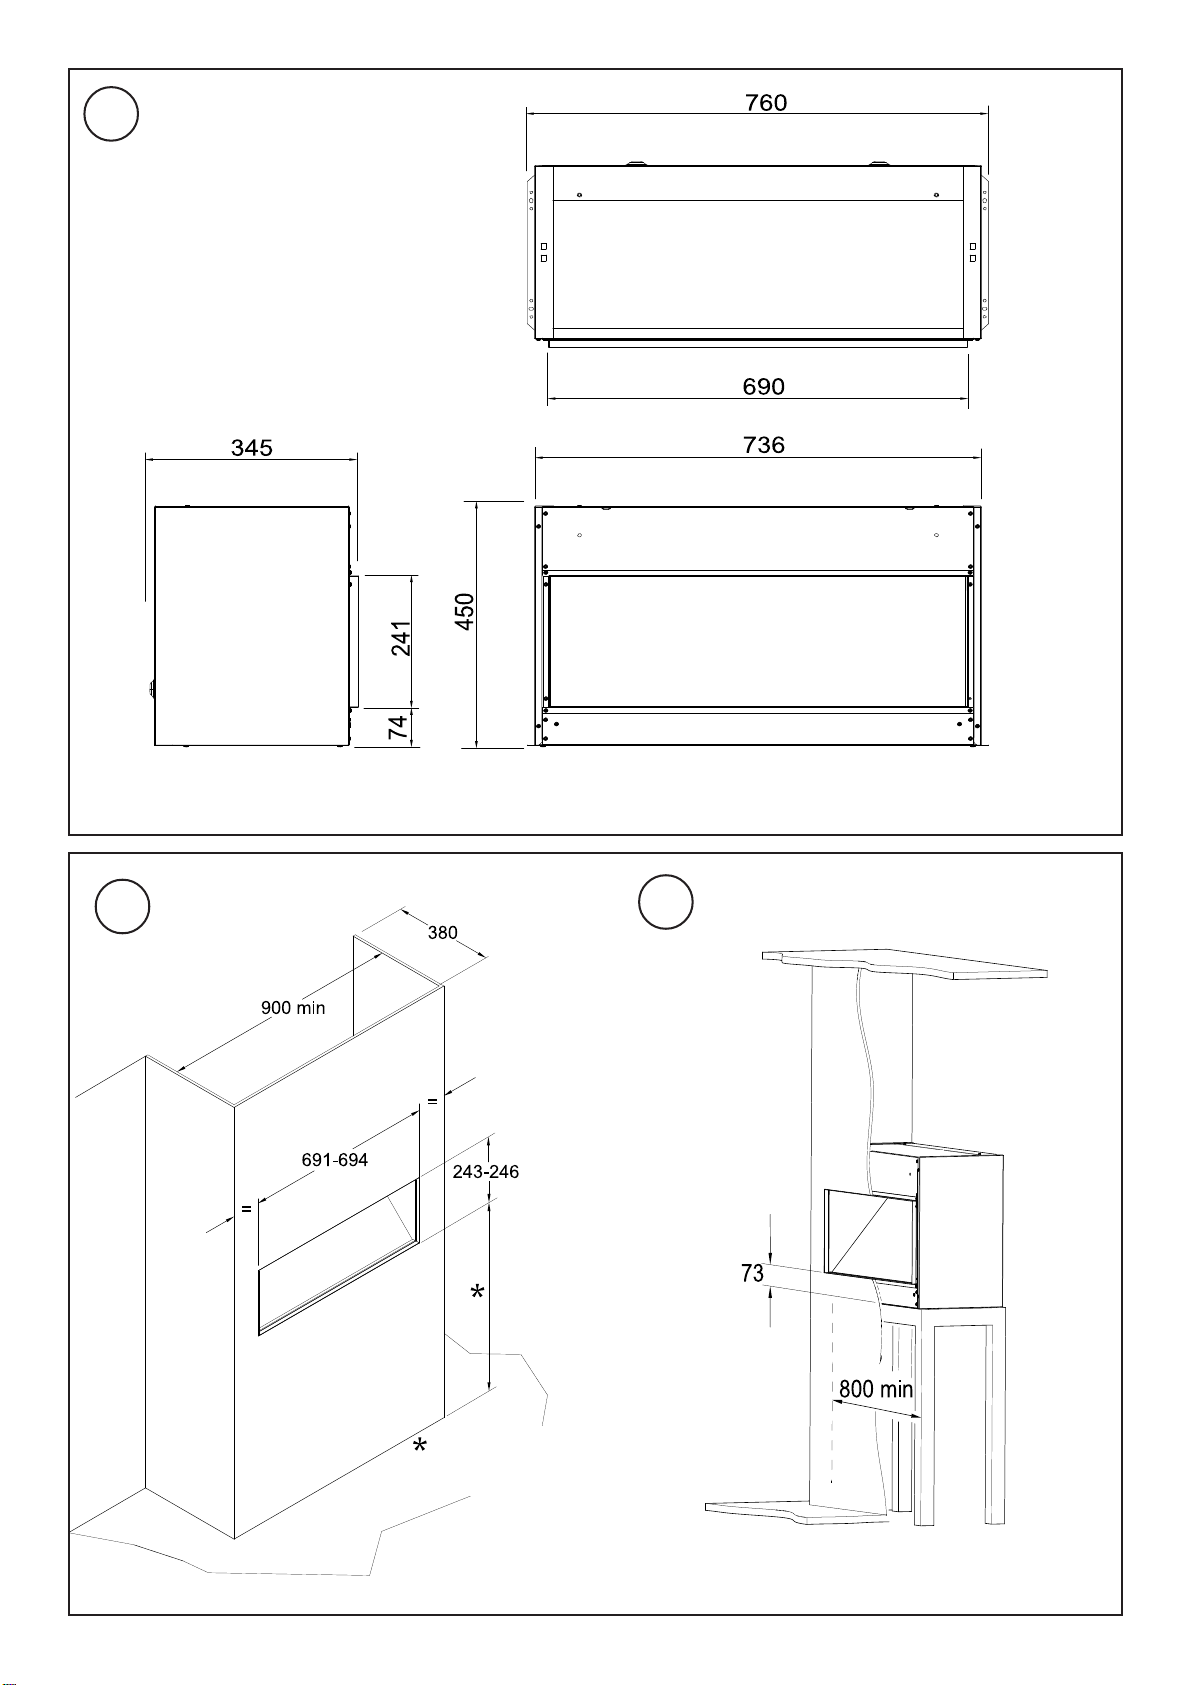
These models are designed to be permanently fixed
for optimum viewing of the display screen see Fig.2a and 2b.
Dimensions indicated * are recommended fixing
dimensions from floor to underside of the wall aperture -
65cm for viewing in a seated position and 110cm for viewing
in a standing position. The outline of the chassis and the
position of the electrical socket are shown as dotted outlines
in Fig.4. Please consult with a qualified electrician for
appropriate wiring requirements.
Operation: -
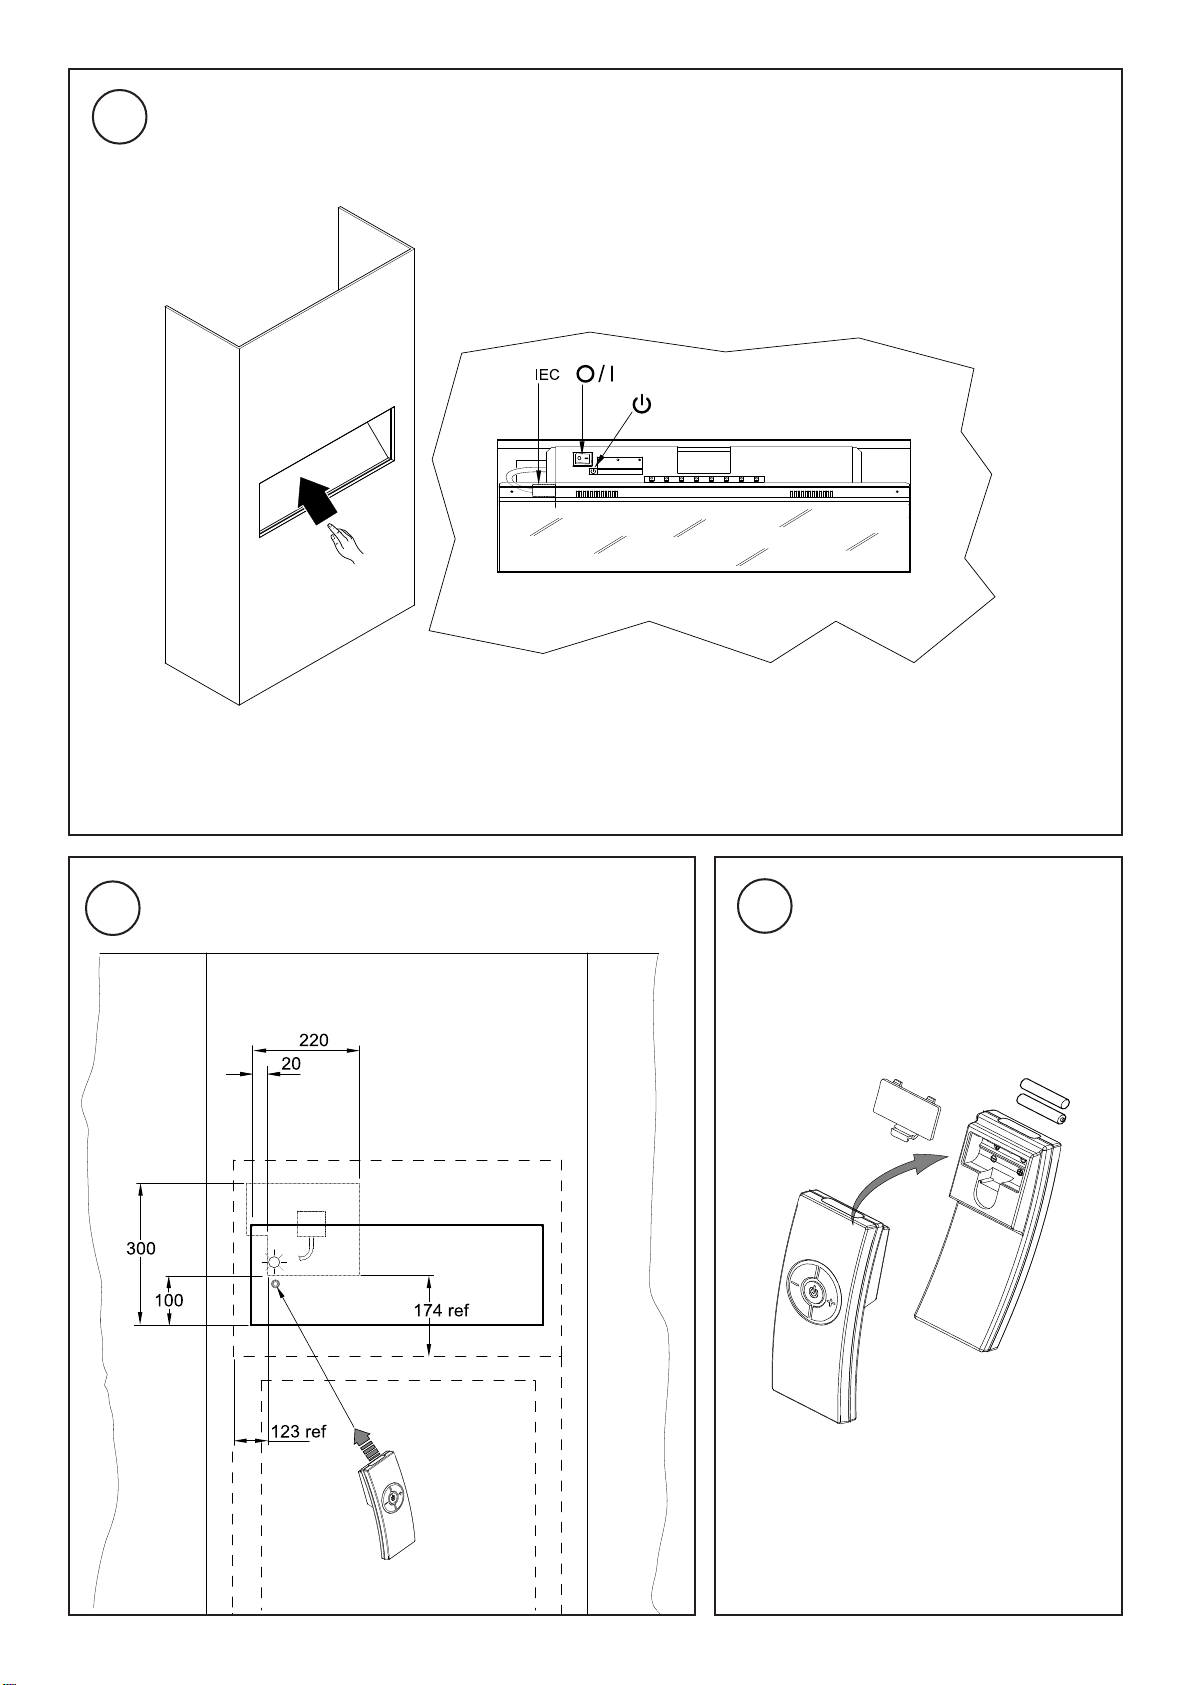
The power ‘ON’ switch (‘O/I’see Fig.3) must first be switched
‘I’ to operate the appliance.
The ‘Opti-V’ logo will appear for about 3 seconds before the
Opti-V Fire : PGF 10
IMPORTANT: THESE INSTRUCTIONS SHOULD BE READ CAREFULLY AND RETAINED FOR FUTURE REFERENCE
flame picture starts .
Note: The user may notice a blank screen for approximately
5 seconds, every 30 minutes. This is normal and should not
be a cause for concern.
Manual Control Operation: -
The manual controls for the screen are located at the inner
top left hand side of the appliance above the glass.(see Fig.3).
The appliance Power switch (‘O/I’ see Fig.3) may be used to
switch the appliance off (‘O’) when it is not required, for
example, overnight or for long periods, to avoid energy
wastage.
The standby button ( ) is located just below the mains
switch.
Remote Control Operation: -
The remote control may be operated once the appliance is
switched ‘I’ (‘I’ see Fig.3). A red light will indicate when the
appliance is in standby mode. (See Fig.4) Aim the remote
control at the screen (I.R. sensor is indicated in Fig. 4). The
audio volume may be adjusted up or down by pressing the
volume control buttons ( + and -). For installing or replacing
the AAA batteries into the remote control - see Fig. 5.
Techical Information:
230V 50Hz
Power consumption 0,04KW
Stand-by Power 1W
UK
4
Cleaning
For general cleaning use a soft clean duster – never use
abrasive cleaners. The glass screen should be cleaned
carefully with a soft cloth. DO NOT use proprietary glass
cleaners.
Warranty and Service
For service and warranty of the product log onto the website
http://www.gdbservice.com/
select Faber and select ‘Electric’. Select model Opti-V Fire
PGF10. The series number of the product can be found on
the label on the right hand side of the product above the
glass. Please retain your receipt as proof of purchase.
Recycling
For electrical products sold within the European Community.
At the end of the electrical products useful life it should
not be disposed of with household waste. Please
recycle where facilities exist. Check with your Local
Authority or retailer for recycling advice in your country.

Opti-V Fire : PGF 10
IMPORTANTE : ESTAS INSTRUCCIONES DEBEN MANTENERSE A RECAUDO A FIN DE PODER SER UTILIZADAS
CUANDO CONVENGA
ES
Informacion general
Contenido de la caja:
- Opti-V fire Modelo PGF10
-Mando a distancia, pila (tipo AAA)
Notas importantes de seguridad
No utilizar el aparato en el exterior o en ambientes
húmedos.
No enchufar el aparato antes de que su instalación se haya
completado correctamente.
El aparato debe ser conectado con toma a tierra.
Tener en cuenta las dimensiones indicadas y no olvidar
prever la ventilación necesaria.
No depositar otros elementos encima del aparato.
No poner otras fuentes de calor cerca del aparato.
Instalación
Este modelo es un aparato encastrable.
Fijarlo de forma sólida utilizando los tornillos suministrados. Ver
Fig. 2a y Fig. 2b, teniendo en cuenta las medidas recomendadas.
Atención con la altura: La altura recomendada es de 65cm para
una vista óptima desde posición sentada y de 110cm para una
posición de pie.
Los paneles frontales no deben jamás cubrir parcialmente
la abertura de la chimenea.
Debe dejarse la correspondiente holgura entorno al aparato.
Esta será necesaria para el caso en que un técnico deba
acceder a los componentes del interior. En caso contrario
deberá retirarse el aparato de la chimenea.
La toma de corriente debe estar siempre accesible.
Desenchufar siempre el aparato antes de realizar cualquier
operación de mantenimiento.
Todos los componentes pueden ser reemplazados desde la
parte frontal del aparato.
Funcionamiento
Poner el interruptor principal en posición « I » (Fig. 3, en la
parte izquierda superior al fondo del aparato).
El logo « Opti-V » será visible durante 3 segundos durante
la fase de encendido.
Cada más o menos 30 minutos la pantalla se pondrá negra
durante 5 segundos (reset film).
Aconsejamos poner el interruptor principal en posición « O »
en el momento en que el aparato no sea utilizado durante un
periodo prolongado.
Control manual
Los botones de control se encuentran al fondo del
aparato en la parte izquierda superior (ver Fig. 3).
El interruptor marcha/paro (« O/I ») : 100%
desconecta el aparato totalmente.
El interruptor « stand-by » , se encuentra
inmediatamente debajo del interruptor principal .
El led rojo indica que la chimenea se encuentra en
posición stand-by (fig.4).
Mando a distancia
Funcionamiento del mando a distancia: poner el
interruptor principal en posición « I » (Fig. 3).
Dirigir el mando a distancia hacia la parte izquierda
(ver Fig. 4).
Funcionamiento/stand-by : Presionar el botón stand-
by (el led rojo se encenderá en modo
Stand-by).
La potencia puede ser regulada con los botones + y -.
Colocación y cambio de las pilas : (Ver Fig. 5).
Mantenimiento
Para limpiar el cristal utilizar una gamuza. No utilizar
nunca productos abrasivos ni concebidos para la
limpieza de cristales.
Especificaciones técnicas
230V 50Hz
Potencia 0,04 KW
Potencia en Stand-by 1W
Garantía y servicio postventa
Rogamos registrar el aparato en nuestra página de
internet http://www.gdbservice.com/
Elegir la opción Faber y seleccionar « Electrique »,
posteriormente seleccionar « Opti-V fire PGF10 ».
Encontrarán el número de fabricación en el interior del
aparato, en su parte derecha encima del cristal.
Conserve su factura de compra.
Reciclaje
Todos los aparatos eléctricos vendidos en la Unión
Europea : Estos aparatos no pueden ser desechados
en un contenedor general. En su caso
deberán ser depositados en el centro de
reciclado pertinente.
5


This appliance complies with the CE directives.
Saturnus 8 NL-8448 CC Heerenveen
Postbus 219 NL-8440 AE Heerenveen
T. + 31(0)513 656500
F. + 31(0)513 656501
Table of contents
Languages:
Popular Indoor Furnishing manuals by other brands

Bestar
Bestar 99700-1152 manual

Southern Enterprises
Southern Enterprises Elements CK727200TX Assembly instructions

avaks nabytok
avaks nabytok REA Lary S1/110 Assembly instructions

Accentrics Home
Accentrics Home DS-D419-006A manual

IVY DESIGN
IVY DESIGN Classic manual

Pronto wonen
Pronto wonen Castano 0776-SB_32 Assembly instructions