manuals.online logo
Brands
  1. Home
  2. •
  3. Brands
  4. •
  5. Faderfox
  6. •
  7. Recording Equipment
  8. •
  9. Faderfox DJ4 User manual

Faderfox DJ4 User manual

micromodul DJ4
User manual
Introduction
Thank you for choosing a Faderfox controller. The DJ4 as successor of the DJ3 is acontroller for
each DJ application with MIDI remote functionality.
The device is designed for live use on stage packed in a solid case with alu faceplate and high quality
controls. All Faderfox controllers are professionally manufactured in small series in Germany,
ensuring high quality.
DJ4 is the perfect solution if you want a compact and solid travel-controller for Traktor Pro.
You will find all necessary controls to mix with two decks perfectly using the internal software mixer
and effects of Traktor Pro. The compact size makes it possible to play everywhere you want.
The device layout is optimized for NI Traktor Pro and has 8 centered pots for EQ and filter, 3 faders,
4push-encoders to control FX, deck, global functions and various colored buttons and LEDs.
There are some improvements like MIDI ports, 4 additional buttons (filter + kill) and better encoder
knobs. New colored controls make it easy to find the right button in dark club situations.
Now the bahavior of the controls is programmable to adapt the device to other applications.
Use the internal 4 setups to save your individual settings.
The factory settings + the enclosed setup files for Traktor Pro and Ableton Live are perfect to
control them out of the box.
Three switchable MIDI routings make the unit much more flexible for complex MIDI setups.
Simultaneous control of external gear and computer software is no problem for the DJ4 due to the
available USB and MIDI ports.
It's also possible to extend your setup by other midi controllers thru the MIDI ports.
Rock the floor with this amazing little box...
Features
-Special controller for DJ software (optimised for Native Instruments Traktor Pro)
-iPad compatible with camera connection kit
-Setup files for Traktor Pro and Ableton Live are shipped with the controller
-USB interface -class compliant / no driver necessary
-MIDI in and out ports with routing and merge functionality
-Controls up to four decks –easy switching between deck A-C and B-D on the fly
-Four FX slots available
- 4 multifunctional push encoders with detents switchable to 7 groups
- 24 colored buttons
-All controls with double function by holding down the shift button
- 22 LEDs in different colors
- 4 internal setups with various programmable functions
-USB bus powering –consumption less than 500mW / 100mA
-Very compact design in a black, plastic casing (desktop format)
-Size 180 x 105 x 70 mm, weight 350 g
-Black aluminium front plate with laser inscriptions (abrasion resistant)
-High-quality faders, pots and encoders from ALPS
-Rubber knobs for best tactile feeling
System requirements
-PC or Mac with a free USB port (1.0 or higher) or a USB hub
-iPad with iOS5 or higher (connection via apple's camera connection kit)
-USB power adapter (5V min 200mA) if you want to control midi gear only
-Traktor Pro 2(as of version 2.10) or Ableton Live (as of version 8.42 or higher)
or any other software which allows user assignments of continuous parameters (CC)
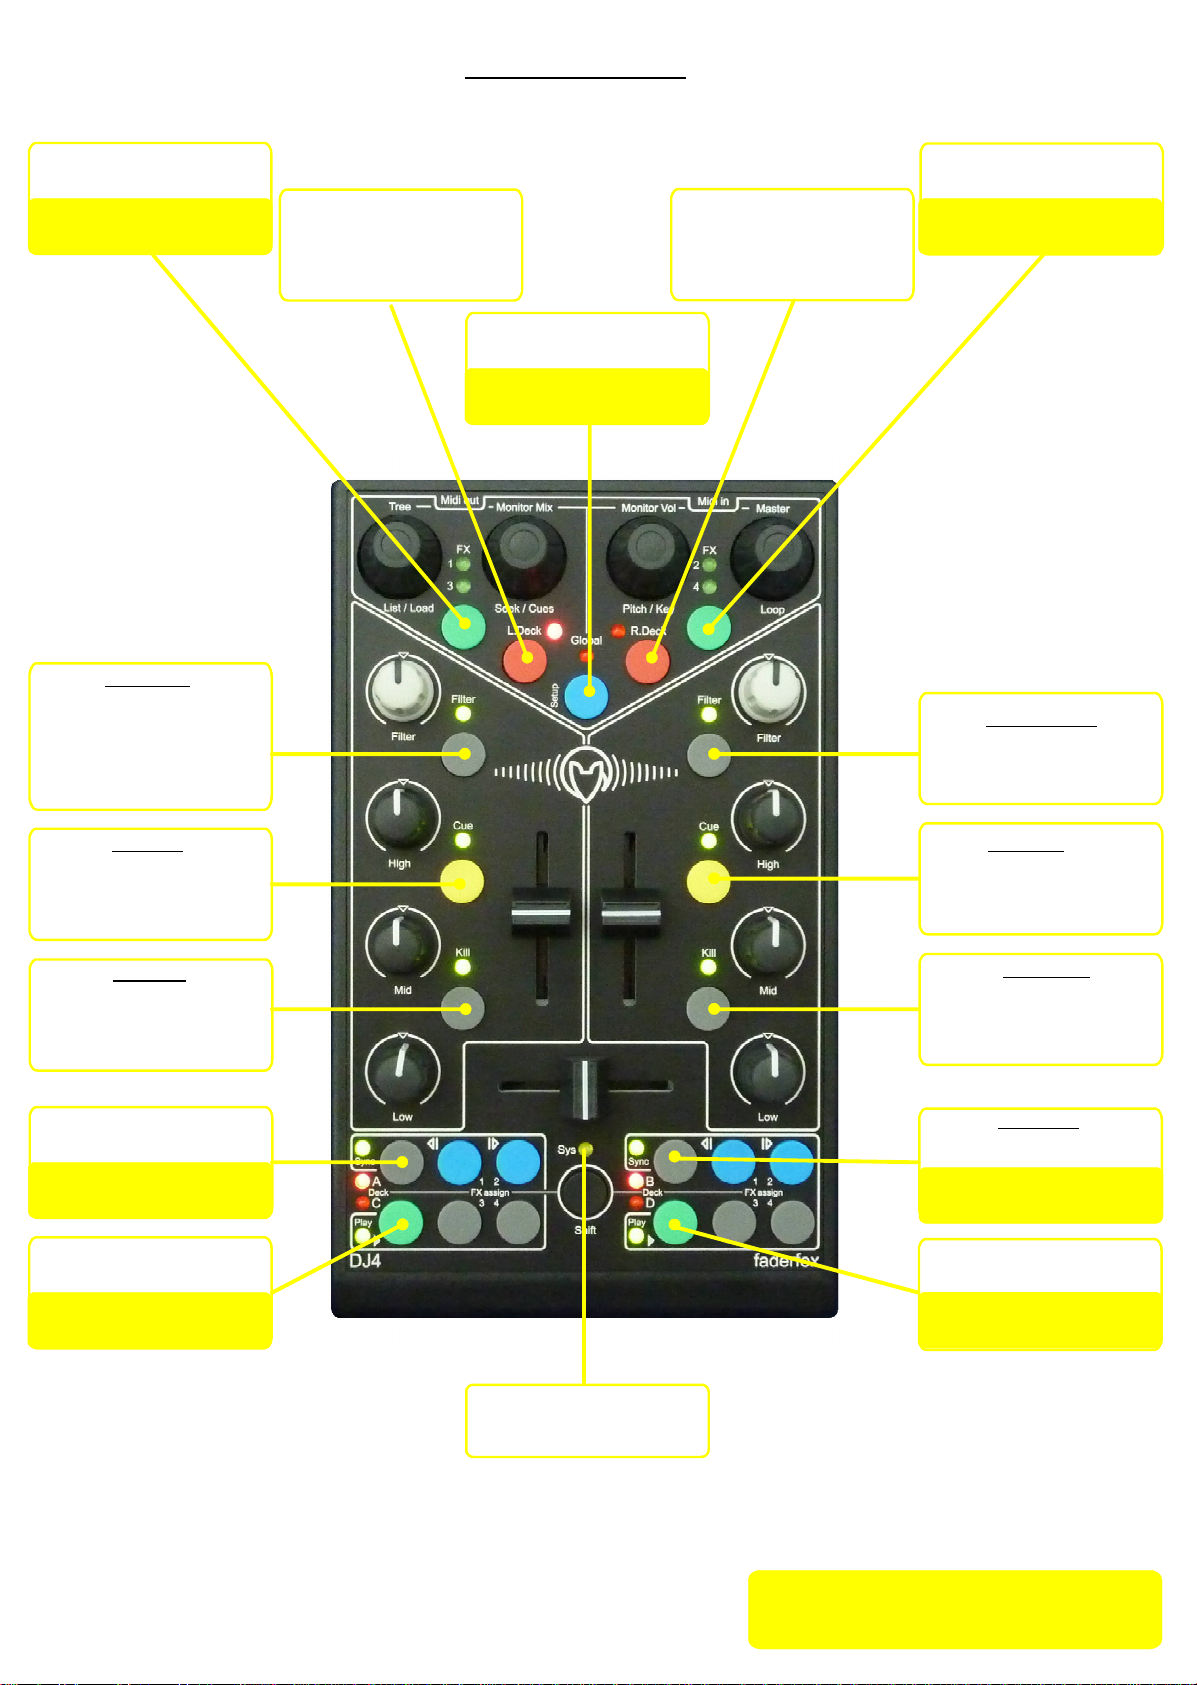
Advanced programming in system mode (for experts only)
-press shift and one of upper green keys to reset the corresponding setup to the factory settings
-Shift key sends also a command which controls modifier 7 in Traktor
that’s necessary for all pots / faders as a condition in Traktor’s assignment table.
-switch off Shift mode to suppress this separate command
- all keys and encoders send different commands by holding shift (second layer)
-Filter mode ’spreaded’ has a finer resolution around center position to optimize the whole pot range
-Filter mode ’double command’ makes it possible to control two filters with the same pot in Ableton Live
to simulate a bipolar filter like in Traktor
-Pot mode ’same commands’ makes it possible to use deck pots / faders in Traktor Pro without parameter
jumps, that works with same commands for the pots / faders independent from deck selections,
the deck selections send also commands for modifier control (M3 and M4) as a condition
for pots and faders in Traktor’s assignment table
-Pot mode ’different commands’ makes it possible to work with each kind of software because all pots and
faders send different commands depending on deck selection and shift (used in Ableton Live setup)
-in Key mode ’toggle’ all key LEDs will be controlled directly in the device in addition
-you can choose between 2 EQ modes for different EQ center values:
value 63-64 as most used standard and value 108 for EQ three in Ableton Live
- 2 Encoder modes are available:
’absolute’ - all encoders work like standard pots (values 0-127)
’relative’ - all encoders send incremental (values 1-5) / decremental (values 127-122) data
(used in Traktor Pro and Ableton Live setups)
-MIDI routings:
-MIDI in to MIDI out: all MIDI data received on MIDI in port are merged to MIDI out port
-MIDI in to USB out: all MIDI data received on MIDI in port are merged to USB out port
-USB in to MIDI out: all MIDI data received on USB in port are merged to MIDI out port
! only one port an be merged to MIDI out at same time !
Command specifications (for experts only)
-please use a MIDI monitoring software to get all the MIDI command codes of the different controls
- all controls send CC data (control change)
-CC numbers are fixed and can not be changed !
-encoder select keys (the upper 5 green / red / blue keys) don’t send MIDI commands
-most LEDs are controlled by feedback data with the same commands as the corresponding keys
(except deck, FX and global select which are only controlled directly in the controller)
-following MIDI channels are in use:
channel 1: Deck A / FX slot 1 / global controls / crossfader
channel 2: Deck B / FX slot 2
channel 3: Deck C / FX slot 3
channel 4: Deck D / FX slot 4
DJ4 - System mode
Sys led
lit =system mode is active
MIDI routing:
USB in > MIDI out
Starts or leaves system mode
MIDI routing:
MIDI in > USB out
MIDI routing:
MIDI in > MIDI out
Selects setup 1 / 3
(setup 1 reserved for Traktor Pro)
Resets setup 1 / 3
(Factory settings)
Selects setup 2 / 4
(setup 4 reserved for Ableton Live)
Resets setup 2 / 4
(Factory settings)
Encoder mode
off = absolute mode (standard)
lit = relative mode
Assign deck D
for all controls on right side
(indicated by red D led)
Assign deck B
for all controls on right side
(indicated by red B led)
Assign deck C
for all controls on left side
(indicated by red C led)
Assign deck A
for all controls on left side
(indicated by red A led)
Shift mode
off = shift doesn't send command
lit = shift sends separate command
Key mode
off = momentary keys
(send by pressing and releasing)
lit = toggle keys
(send only by pressing)
Snap mode
off = jump
(pots/faders send immediately)
lit = snap
(pots/faders send after
catching last value)
Pot mode
off = same commands
independent from deck-select/shift
lit = different commands
depending on deck-select/shift
(also for encoder
push buttons)
(also for faders)
EQ mode
off = center value 63 - 64
(standard)
lit = center value 108
(Ableton Live EQ three)
Filter mode
off = standard
lit = center spreaded
scale for Traktor Pro
blink = double command
to control two filters
in Ableton Live
Hold shift button for 2nd functions
written on yellow (light gray) background
!
Tips general
-connect the controller with the included USB cable before you start Traktor Pro / Ableton Live
-the controller is recognized by the computer as ‘Faderfox DJ4’ or ‘USB audio device’
-MIDI data is sent and received on both USB and MIDI ports (parallel working)
-use MIDI ports to extend your setup with additional MIDI controllers or as alternative to the USB port
-System mode:
-enter and leave System mode by pressing blue Global key while you hold shift
the yellow Sys-LED indicates the active system mode
- 4 setups are available which you can select by the upper green FX keys
-use setups 2 and 3 for your own mappings
-alternate default settings for Deck selects are useful if you work with two DJ4
-independent factory reset for each setup by pressing the associated green FX key while holding shift
-MIDI routings are general preferences and not part of the setups
-switch off Shift mode while mapping any controls in your software to avoid wrong assignments
Tips for Traktor Pro
-select internal setup 1to use the device with Traktor Pro (default factory setting)
-press both red keys to sync the controller to Traktor Pro, that’s important for right deck selections
after reconnection
-Soft takeover functions are activated in the setup (Traktor’s preferences) and in the controller
(Snap mode), so you have to catch the values for each pot / fader which avoids any parameter jumps.
Tips for Ableton Live
-select internal setup 4to use the device with Ableton Live
-to sync the controller to Ableton Live activate the midi map mode in Live shortly [Ctrl / Cmd + M]
(important for LED refresh)
-Snap mode is activated in the controller so you have to catch the values for each pot / fader which avoids
any parameter jumps.
User manual DJ4 version 1
Mathias Fuch€ Software-Entwicklung
Op’n Idenkamp 13a
22397 Hamburg
Germany
info@faderfox.de
www.faderfox.de

Other Faderfox Recording Equipment manuals

Faderfox DL3 User manual

Faderfox

Faderfox DL3 User manual

Faderfox PC44 User manual

Faderfox

Faderfox PC44 User manual

Faderfox micromodul LX1 User manual

Faderfox

Faderfox micromodul LX1 User manual

Faderfox micromodul LV3 User manual

Faderfox

Faderfox micromodul LV3 User manual

Faderfox micromodul uc4 User manual

Faderfox

Faderfox micromodul uc4 User manual

Popular Recording Equipment manuals by other brands

Nady Audio ADI-1 owner's manual

Nady Audio

Nady Audio ADI-1 owner's manual

Pioneer PDR-509 Service schematics

Pioneer

Pioneer PDR-509 Service schematics

Trident 80 EQ owner's manual

Trident

Trident 80 EQ owner's manual

Kramer RC-3TBU user manual

Kramer

Kramer RC-3TBU user manual

Sony RCD-W50C - Cd/cdr Recorder/player Dimensions

Sony

Sony RCD-W50C - Cd/cdr Recorder/player Dimensions

SMA Webconnect Data Module installation manual

SMA

SMA Webconnect Data Module installation manual

Tenma 72-8500 quick start guide

Tenma

Tenma 72-8500 quick start guide

Kenwood IF-10A instruction manual

Kenwood

Kenwood IF-10A instruction manual

AEG Somfy LPT-10 Functional description

AEG

AEG Somfy LPT-10 Functional description

Akai 1722W manual

Akai

Akai 1722W manual

ManoMano LEVERBOX 1520105 quick start guide

ManoMano

ManoMano LEVERBOX 1520105 quick start guide

SPL Stereo Vitalizer Jack 9530 user manual

SPL

SPL Stereo Vitalizer Jack 9530 user manual

Kenwood GE-600 instruction manual

Kenwood

Kenwood GE-600 instruction manual

Steinberg UR12 Package Guide

Steinberg

Steinberg UR12 Package Guide

Eventide DIR911 Specifications

Eventide

Eventide DIR911 Specifications

Philips CDR560BK Specifications

Philips

Philips CDR560BK Specifications

Beijer Electronics X2 extreme 15 HP installation manual

Beijer Electronics

Beijer Electronics X2 extreme 15 HP installation manual

Axxess GMLAN-AMP-01 installation instructions

Axxess

Axxess GMLAN-AMP-01 installation instructions

manuals.online logo
manuals.online logoBrands
  • About & Mission
  • Contact us
  • Privacy Policy
  • Terms and Conditions

Copyright 2025 Manuals.Online. All Rights Reserved.