Fagor FU-7814 User manual

Manual de instalación y uso de la lavadora
Manuel d’installation et d’utilisation du lave-linge
Manual de instalação e utilização da máquina de lavar roupa
Washing machine installation and operation manual

26
27
28
32
42
44
47
AVERTISSEMENTS
SPÉCIFICATIONS
INSTALLATION ET MONTAGE
UTILISATION DE L’APPAREIL
ET CONSEILS PRATIQUES
MAINTENANCE
ET ENTRETIEN DE L’APPAREIL
SÉCURITÉ
ET RÉSOLUTION DE PROBLÈMES
AVERTISSEMENTS SUR
L’ENVIRONNEMENT
index
4
5
6
10
20
22
25
ADVERTENCIAS
ESPECIFICACIONES
INSTALACIÓN Y MONTAJE
USO DEL APARATO
Y CONSEJOS PRÁCTICOS
MANTENIMIENTO
Y LIMPIEZA DEL APARATO
SEGURIDAD
Y SOLUCIÓN DE PROBLEMAS
ADVERTENCIAS SOBRE
EL MEDIO AMBIENTE
lavadoraíndice
lave-linge

70
71
72
76
86
88
91
WARNINGS
SPECIFICATIONS
INSTALLATION AND ASSEMBLY
USING THE APPLIANCE.
PRACTICAL TIPS
MAINTENANCE
AND CLEANING
SAFETY
AND TROUBLESHOOTING
ENVIRONMENTAL
WARNINGS
washing machine
contents
48
49
50
54
64
66
69
ADVERTÊNCIAS
QUADRO TÉCNICO
INSTALAÇÃO E MONTAGEM
UTILIZAÇÃO DO APARELHO
E CONSELHOS PRÁTICOS
MANUTENÇÃO
E LIMPEZA DO APARELHO
SEGURANÇA
E SOLUÇÃO DE PROBLEMAS
ADVERTÊNCIAS SOBRE
O MEIO AMBIENTE
máquina de lavar roupa
índice

70
warnings
This washing machine comes with a
manual that includes operating, maintenance
and installation instructions. Please read all
the instructions before using the washing
machine.
Do not wash items that have previously
been cleaned, washed, soaked or treated
with petrol, solvents for dry cleaning, other
inflammable substances or explosives, as
they produce fumes that could catch fire or
explode.
Do not add petrol, solvents for dry cleaning
or other inflammable or explosive substances
to the wash water as they produce fumes
that could catch fire or explode.
Do not repair or replace any part of the
washing machine or try to carry out any type
of servicing unless it is recommended in the
maintenance instructions in the manual.
Do not climb onto the machine or stand
on the open hatch door.
Do NOT use an extension lead or adaptor
to connect your washing machine to the
mains supply.
The machine should only be used for the
purpose it is designed for.
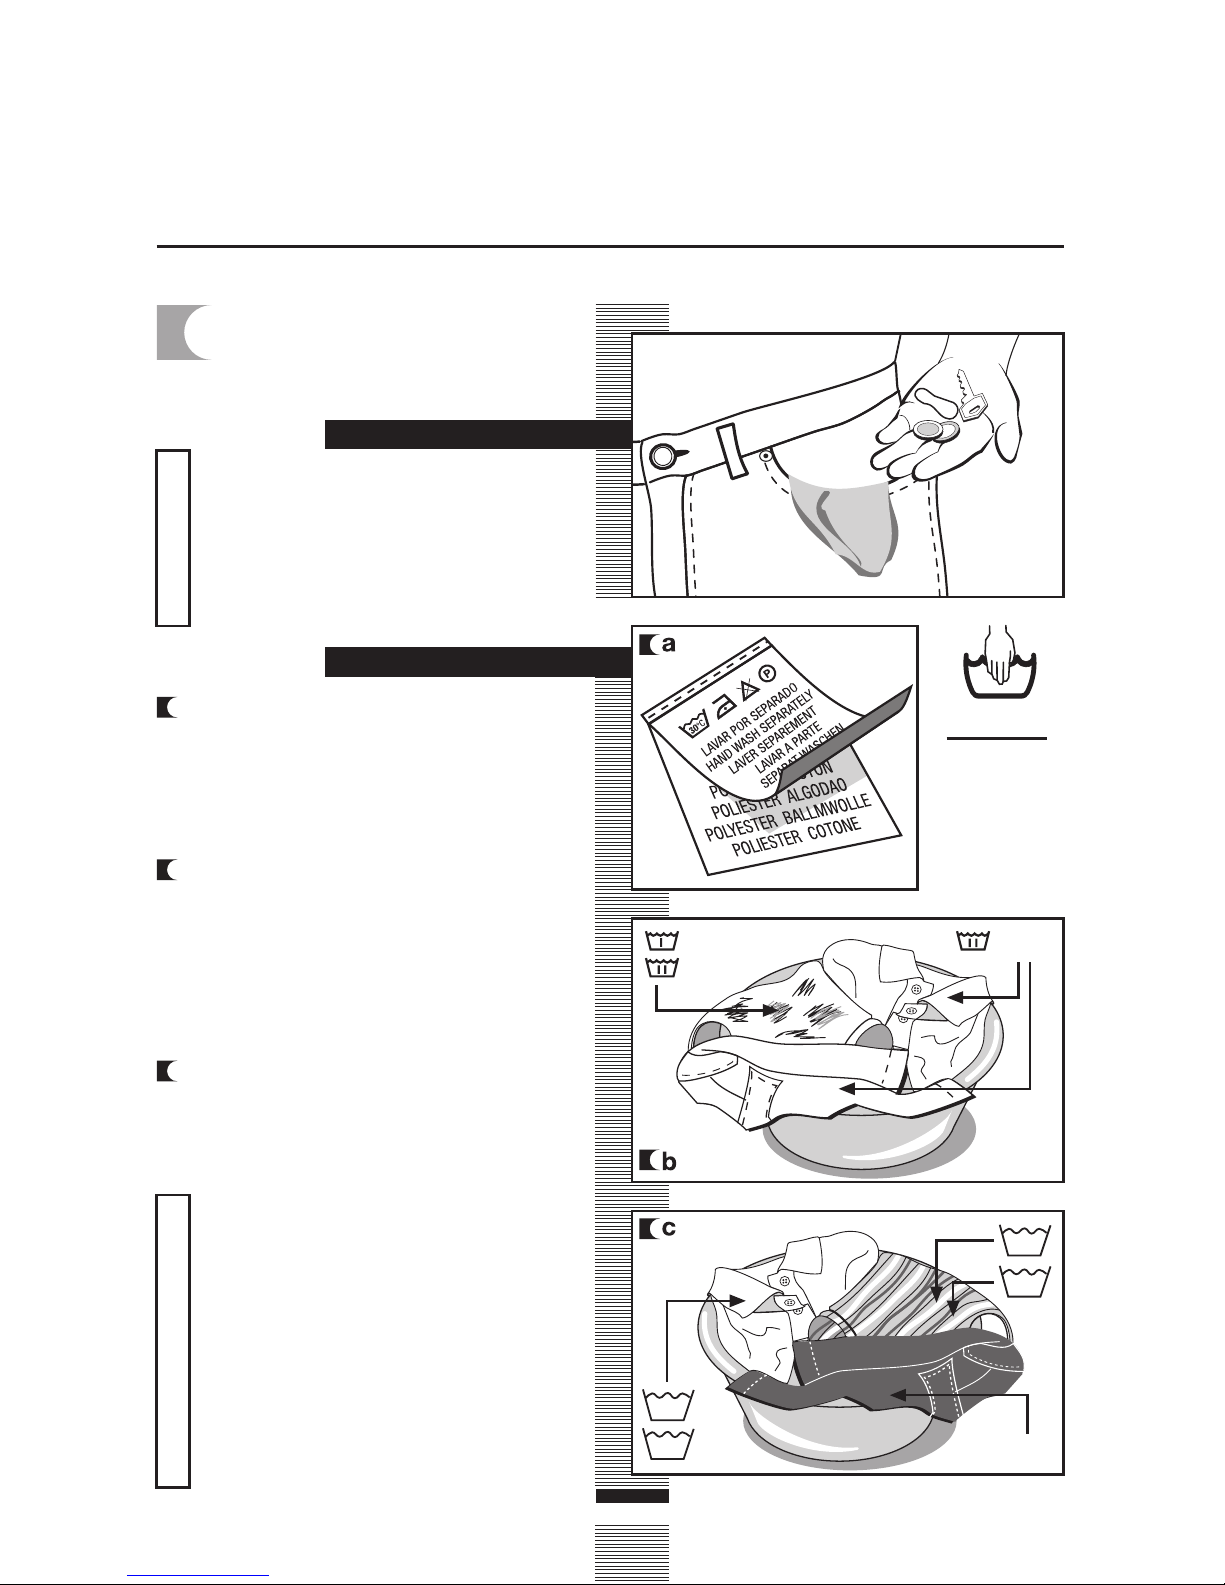
Follow the washing instructions
recommended by the manufacturer of the
garment to be washed.
Do not turn your washing machine on until
you are sure that:
• It has been installed in accordance with
the installation instructions.
• All the water, drainage, mains electricity and
earth connections meet the local regulations
and/or other applicable regulations.
To avoid the risk of fire, electrical shocks, injury or damage when using your washing
machine, please take the following precautions:
thanks for placing your trust in us
Washing in less time.
• The wash programmes do not last as
long giving you more free time.
Time delay.
• To take advantage of cheap electricity
rates.
WITH INNOVATION ALWAYS IN MIND
LCD screens.
• Which allows you to have constant
information about the wash programme
and its duration.
Detergent dispenser designed to offer
maximum convenience.
• Easy to remove for cleaning.
• Possibility of using liquid detergent.
Our new range of washing machines has been designed to make life more convenient for you:
WITH YOUR CONVENIENCE ALWAYS IN MIND
Large hatch.
Maximum opening.
• Designed higher than the normal axis and
with the drum tilted to achieve maximum
ergonomics.
• Its maximum opening makes it much
easier to put clothes in.
Hatch opening button.
• Opens instantly at the simple press of a
button (Depending on model).
Easy-access filter.
• And simple maintenance.
WITH SAVINGS ALWAYS IN MIND
8 kg capacity.
• Which allows you to do less washes and
make savings.

71
washing machine
Water inlet hose
specifications
Drain hose
Work top
Power
cord
Control
panel
Detergent
dispenser
Stainless
steel
drum Filter
Kickplate
Hatch
Rear plugs Drain pipe bender
Levelling
feet
ACCESSORIES LOCATED
INSIDE THE DRUM

72
washing machine
a There are 3 blocking screws on the back
of the washing machine.
b To loose and completely remove the 3
screws together with the metal washer
and the black rubber and plastic tubes
that make up the blocking system.
c Fit the 3 plastic plugs supplied in the
holes you removed the screws from.
installation and assembly
Do not throw the blocking screws away.
You may need to move the washing
machine at a later date.
Important
aRemove the base, corner protectors and
top cover.
1UNPACKING AND
UNBLOCKING THE
WASHING MACHINE
UNBLOCKING
UNPACKING
a
c

DRAINAGE
CONNECTION
CONNECTION TO THE
MAINS WATER SUPPLY
73
CONNECTION TO THE MAINS WATER SUPPLY AND
DRAINAGE
The water supply hose is inside the drum:
aConnect the bent end of the hose to the
threaded inlet of the electrovalve located
at the rear of the washing machine.
bConnect the other end of the hose to the
water intake. Then securely tighten the
connection nut.
installation and assembly
It is important that the drain hose bend
is correctly fastened to the outlet, to
prevent any risk of it becoming
detached and causing flooding.
If your washing machine has a hot
water intake, connect the hose with
the red threaded end to the hot water
tap, and to the electrovalve with the
red filter.
The washing machine must be
connected to the mains water supply,
using the new supply hoses supplied
with the appliance. Do not use water
supply hoses that have been used
before. For your washing machine to
work properly, the mains water
pressure must be between 0.05 and
1MPa (0.05 and 10 Kgr/cm2).
aIt is recommended that you have a fixed
drainage outlet 50 tom 70 cm from the
floor.
Avoid the drain hose being too tight,
kinked or restricted. Use the bend
supplied.
2
Important
a

Important
74
LEVELLING THE WASHING MACHINE AND CONNECTING
IT TO THE MAINS ELECTRICITY SUPPLY
installation and assembly
3
Consult the specifications plate located on the
hatch door of the washing machine before
making the electrical connections. Ensure that
the voltage reaching the plug is the same as
that on the plate.
Do not remove the specifications plate. The
information on it is important.
ELECTRICAL CONNECTION
LEVELLING
It is very important to correctly earth the
washing machine.
The electrical installation, plug, socket,
fuses or automatic switch and counter
must be correctly dimensioned for the
maximum power indicated on the
specifications plate.
Do not plug the washing machine plug into
the socket with wet or damp hands.
To remove the power cord, pull on the body
of the plug.
If the power cord is damaged, it must be
replaced by a cord or special unit provided
by either the manufacturer or your after-
sales service.
With built-in washing machines, the plug
must be accessible after installation.
aFirst of all, we recommend that
you fix and level the rear feet. When
they are properly fixed, secure the
metal locknut tightly to the top
part.
bPut the washing machine into its
niche. Dampen the floor to help
you move the machine into its final
position.
cFinally level and secure the front
feet in the same way as you
levelled the rear feet.
a
b c
Important

When your washing machine has been
correctly installed, we recommend that you
pre-clean the machine.
This is to check that the installation, the
connections and the drainage are all correct,
and to thoroughly clean the inside of the
washing machine before any wash
programmes are run (see the operating
instructions on the following pages).
a Press ON/OFF button.
b Select the normal programme at 60ºC.
c Press the start/pause button.
75
PRE-CLEANING
4
PRE-CLEANING
c
a b

PREPARATION
76
washing machine
a Sort the clothes according to fabric
and how they are made.
We recommend using the delicate
programmes for sensitive fabrics. There
is a special wool programme for
woollens.
b Sort clothes according to how soiled
they are.
•Wash lightly soiled garments using a
short programme.
•Use a programme without prewash for
medium-soiled garments.
•Wash heavily soiled garments using a
long programme with prewash.
c Sort your clothes according to
colour.
Wash whites and coloureds
separately.
using the appliance and practical tips
Importante
Make sure
beforehand
that your
woollens can
be machine-
washed.
Before placing the clothes in the drum,
make sure all the pockets are empty.
Any small objects may block the drain
pump.
Prewash
Wash
Wash
1PREPARING
GARMENTS FOR
WASHING
30
60
90
40
Cold
Important
We recommend loading the washing
machine to its full capacity. This means
savings on water and energy.
Whenever possible, we recommend
that you wash garments of different
sizes within the same wash
programme. This improves the washing
action and also aids the correct
distribution of the garments in the drum
when spin-drying, and the washing
machine will therefore be quieter.
It is a good idea to put small garments
in a wash bag.
SORTING THE CLOTHES
Important

77
2USING DETERGENT AND ADDITIVES
eco-note
using the appliance and practical tips
Remember that concentrated detergents
exist which are more environment- and
nature-friendly.
The use of more detergent than
necessary will not improve your
washing results, and apart from costing you
money it will have a negative effect on
the preservation of the environment.
We therefore recommend you follow
the detergent manufacturer’s
instructions.
WASH PREWASHFABRIC SOFTENER
a
c
aYour washing machine’s detergent
dispenser has three compartments.
bIf you are going to use liquid detergent
you must close the wash compartment
flap. Take the blue tab protruding from
the bottom of the compartment between
2 fingers and pull outwards as far as it
will go. Release the flap and it will remain
in the vertical position and prevent the
liquid detergent from getting out. It must
be open for powdered detergent. Put it
in the horizontal position, pressing the
top tab with your finger and pushing it
back as far as it will go.
cPut the detergent, either liquid or powder,
or additive into the detergent dispenser
before starting the wash programme.
The liquid level must never be higher
than the MAX mark printed on the
dispenser wall.
Remember that the amount of detergent to
be used will always depend on:
The amount of clothes to be washed.
How heavily the clothes are soiled.
The water hardness (information about
water hardness is available from the relevant
local authorities).
We recommend the use of a
decalcifying product if the water
hardness is high in your area.
Important
Important
b
DETERGENT
AND ADDITIVES

78
3SELECTING THE WASH
PROGRAMME using the appliance and practical tips
To select a wash programme, proceed as
follows:
aSwitch the washing machine on by
pressing ON / OFF.
bActivate the programme selector by
pressing it to release it (depending on
the model).
cSelect the wash programme by turning
the programme selector (see programme
table).
ab
c
programme
selector start/
pause
button
additional
function
button
time
delay
button
spin and
anti-crease
button
ON/
OFF
button
additional
function
button
time
delay
button
spin
button
screen
screen
door opening
button

79
using the appliance and practical tips
When you select the programme, the following
information will be displayed:
1 Wash programme phases:
Prewash
Wash
Rinse
Spin-drying
2. No. of revolutions
3. Programme No. (for a few seconds)
and then its duration.
Additional functions
Easy iron
Extra rinse
Intensive wash
There are four types of programmes:
Normal programmes
Delicate programmes
Wool programmes
Auxiliary programmes
We recommend you choose a wash
programme without prewash whenever
possible. This will save you money and help
protect the environment.
eco-note
1
23
1
23
Normal Delicate Wool Auxiliary
PROGRAMMES
Normal cold
Quick 30ºC
Normal 30ºC
Normal 40ºC
Normal 60ºC
Normal 90ºC
Prewash 60ºC
Delicate cold
Delicate 30ºC
Delicate 40ºC
Delicate 60ºC
Wool cold
Wool 35ºC
Rinses
Spin-drying
Drain/End
1
2
3
4
5
6
7
8
9
10
11
12
13
14
15
16

Cotton/Linen
delicate colours
very light soil
Cotton/Linen
whites/colours
very light soil
Cotton/Linen
delicate colours
light soil
Cotton/Linen
fast colours
light soil
Cotton/Linen
fast colours
medium soil
Cotton/Linen
whites
heavy soil
Cotton/Linen
whites/fast colours
heavy soil
Synthetic/mix
cotton delicate colours
very light soil
Synthetic/mix cotton
delicate colours
light soil
Synthetic/mix cotton
delicate colours
medium soil
Synthetic/mix cotton
white/fast colours
medium soil
Wool/wool mix
white/colour
very light soil
Wool/wool mix
white/colour
light soil
Cotton/cotton mix
Synthetic/Delicate
Wool/wool mix
Cotton/cotton mix
Synthetic/Delicate
Wool/wool mix
Cotton/cotton mix
Synthetic/Delicate
Wool/wool mix
YES NO YES
YES
YES
YES
YES
YES
YES
YES
YES
YES
YES
YES
YES
YES
YESNO NO
NO
Cold
Cold
WOOL Cold
WOOL 35
_
_
_
80
(*)
Programme for wash and energy consumption assessment in
accordance with standard EN60456, press intensive wash button.
1
2
3
4
5 (*)
6
7
8
9
10
11
12
13
14
15
16
Normal cold
Quick 30ºC
Normal 30ºc
Normal 40ºC
Normal 60ºC
Normal 90ºC
Prewash 60ºC
Delicate cold
Delicate 30ºC
Delicate 40ºC
Delicate 60ºC
Wool cold
Wool 35ºC
Rinses
Spin-drying
Drain /End
Normal programmesDelicate programmesWool prog.Auxiliary prog.
30
30
40
60
90
60
40
60
40
3030
YES NO
YES NO
YES NO
Extra
rinse
Intensive
wash
Easy-iron
Spin speed
selection
No spin
Anti-crease
Recommended
temperature
Programme Fabric type
Max.
load of
clothes (Kg)
Possible option buttons

0,10/59
0,25/30
0,30/59
0,60/59
1,52/59
2,20/64
1,50/64
0,10/45
0,20/45
0,40/45
1,00/45
0,05/55
0,45/55
0,05/25
0,05/0
0,00/0
50
30
52
57
80
110
100
50
50
55
70
30
40
23
10
2
Normal wash, rinses,
automatic additive absorption
if desired and long final spin
SHORT wash, rinses,
automatic additive absorption
if desired and final long spin
Normal wash, rinses,
automatic additive
absorption if desired
and long final spin
Prewash, normal wash, rinses,
automatic additive absorption
if desired and long final spin
Delicate wash, rinses,
automatic additive
absorption if desired
and gentle final spin
WOOL wash, rinses,
automatic additive
absorption if desired
and gentle final spin
Rinses, automatic
additive absorption if
desired and long final spin
Drain and final long spin
Drain and end of programme.
Takes programme to
final position
_
_
81
NOTE: the KWh and litre consumptions and programme durations may vary depending
on the type and amount of clothes, mains water pressure, etc.
8
2
8
8
8
8
8
3,5
3,5
3,5
3,5
2
2
8
8
8
Anti-crease
Wash
product
compartment
Programme
description
TURBO TIME PLUS
Total
consumption
KWh/litres
Approx.
duration
(minutes)
Max.
load of
clothes (Kg)

82
4SPIN SPEED SELECTION
using the appliance and practical tips
SPIN DRYING
The wash options must always be selected after
choosing the wash programme. Any programme
change during selection cancels the previously
selected options.
a Spin speed selection and anti-crease
button.
The programme selected is associated
with certain spin revolutions, as shown
on the display.
b It can be modified by pressing the spin
drying button and the number of
revolutions will be reduced by 100
revolutions at a time to 400.
c No spin
Press the spin button again to get to the
no spin option. A programme without a
final spin. It is used to prevent creasing
when washing special fabrics.
d Anti-crease option
The wash programme stops on the last
rinse, with the clothes left in water.
When the function is deactivated, the
washing machine continues the
programme, draining and spin-drying.
It is used, for example, when you are not
at home and want to delay the spin-
drying until you get home, to prevent the
clothes creasing after spin-drying and
being left in the drum to be removed.
b
a
a
Depending on the model, you can open the
hatch by pressing the hatch opening button.
b
If you cannot open the hatch due to a
breakdown or a power cut, proceed as follows:
remove the dispenser by pulling the handle
outwards and pressing the blue lever with your
finger. A button with a slot will appear on the
right. Turn the button to the left with the aid of
a coin and the hatch will open.
If your model of Washing machine does not
have remote opening you have to await about
2 minutes from the end of the programme
before being able to open the hatch.
a
cd
b
OPENING
THE HATCH

83
Time delay selection button
A delay of up to 24 hours can be selected.
The delay must be selected after choosing the
wash programme.
To select the delay time, press the clock button.
Each time the button is pressed the start will
be put back 1 hour.
Cancelling the delay
To cancel the delay you have to press the
clock button successively. The delay will be
cancelled when 24 hours have been reached
and the button is pressed once more. If the
programme is changed the delay is also
cancelled.
5TIME DELAY SECTION AND
ADDITIONAL FUNCTIONS using the appliance
Additional function selection button depending
on programmes.
There are 3 options: easy-iron, extra rinse
and intensive wash.
Press the select button to display the
option required.
By pressing the button several times you
can choose between several combinations
of one, two and up to three additional
functions at the same time depending on
the programme selected.
Button: Easy-iron ( )
This option prevents garments from
creasing by means of carrying out a
special programme with special turns to
fluff out the garments after spin-drying
and make them easier to iron.
Button: Extra rinse ( )
Increases the level of the final rinse
obtained in the clothes; suitable for large
loads and garments belonging to people
with sensitive skin. Increases water
consumption!
Button: Intensive wash ( )
This option, specially recommended for
heavily soiled, stained clothes, achieves
better results by extending the normal
wash cycle.
TIME DELAY
ADDITIONAL FUNCTIONS
If during the additional function selection, the
programme is changed or the ON/OFF button
is pressed, all the functions selected until then
are cancelled.
Important
Select
Select
Select

84
Start/pause button
aTo start up the washing machine you
have to press the start / pause button.
The display will constantly show the
minutes left until the wash is over.
6STARTING UP AND
BLOCK FUNCTION SELECTION using the appliance
STARTING UP
Block function selection
The various buttons can be blocked to prevent
them from being pressed and affecting the
selected wash programme and options. This
can be used to stop children playing with the
buttons, etc.
The block function should be activated after
the wash programme has been selected
together with all its options.
Activating the block function
aThe block function is activated by
pressing the start/pause button and
holding it down for at least 3 seconds.
The display will show if it is activated.
Deactivating the block function
bThe block function is cancelled when
the wash programme comes to an end.
If you want to deactivate the block
function before the end of the
programme, you have to hold the start
button down again for at least 3 seconds.
After 3 seconds, the block function
indicator will disappear from the display,
and it will go into pause status.
The ON/OFF button does not cancel
the block function.
BLOCK FUNCTION
a
b
a

85
When the programme is running you can see
which phase it is at on the display, as well as
how long there is to the end of the programme.
The active phases will appear successively at
the top of the display as the programme
progresses. The time remaining until the end of
the programme will also appear on the display.
It updates at regular intervals, but not minute by
minute.
Any option button can be selected provided the
wash phase in which it takes effect has not been
passed and when the programme accepts the
option.
Pressing the delay button during the wash has
no effect on the washing machine.
Pressing the start/pause button during the wash
activates the PAUSE function.
7WASH PROGRAMME PHASES AND POWER CUTS
using the appliance
If there is a power cut, when the electricity
comes back on the washing machine will
continue to run from where it left off (it has
several hours of memory). The same will happen
if the ON/OFF button is pressed.
warnings
Level the washing machine by adjusting the
feet to reduce the noise caused by spin-drying.
Try and wash clothes of different sizes in the
same wash programme to favour the distribution
of the clothes inside the drum during spin-drying.
PROGRAMME
PHASES
All the models have a safety system for spin-drying
that prevents spin-drying from being carried out if the
distribution of the clothes inside the drum is too
concentrated. This prevents the appliance from
vibrating too much.
If you find that the clothes are not properly wrung out,
try spin-drying them again after having distributed the
clothes more evenly in the drum.
Important
If you change the wash programme during
the wash using the selector, the PAUSE
function is activated and the programme is
cancelled.
If you need to add or remove a garment,
press the start/pause button and make sure
that the water level is not above the door
overflow level and that the temperature
inside is not high. Press the start/pause
button again to restart the wash from the
same cycle phase it had stopped at.
POWER CUTS
POWER CUTS

86
washing machine
maintenance and cleaning
After each wash, leave the door open
for a while to allow the air to circulate
freely inside the machine.
From time to time, depending on the
hardness of your water, it is
recommendable to run a full wash cycle
using a decalcifying product.
This will extend the life of your washing
machine.
MAINTENANCE
The washing machine should be
disconnected from the mains electricity
supply before any cleaning or
maintenance is carried out.
A dirty or incorrectly fitted siphon
will prevent the additives from
being taken in and leave water
inside the compartment at the end
of the wash.
Important
1CLEANING THE DETERGENT DISPENSER
Important
Clean the detergent dispenser whenever
there is any washing product residue left
inside.
aPull outwards on the handle and
press the blue lever with your finger
to remove the detergent dispenser
completely.
Use warm water and a brush to
clean the compartments.
bAlso clean the additive
compartment siphon. To remove
it, pull the flap at the back out.
Once it has been cleaned, put it
back pressing down to make sure
that it fits right in. Put the dispenser
back into the washing machine.
b
a
Table of contents
Other Fagor Washer manuals

Fagor
Fagor FFT-76 Service manual

Fagor
Fagor FF-6214 User manual

Fagor
Fagor 3FE-9214 User manual

Fagor
Fagor FF-8012 User manual

Fagor
Fagor 3FE-8212 User manual

Fagor
Fagor FET-6412WS User manual

Fagor
Fagor FET-2086 User manual

Fagor
Fagor IO-WMS-1731 User manual

Fagor
Fagor 3FE-7314IT User manual

Fagor
Fagor FET 313 User manual

Fagor
Fagor 3FE-8314IT User manual

Fagor
Fagor FFT-53 Service manual

Fagor
Fagor 3FE-8812X User manual

Fagor
Fagor 3FE-8314IT User manual

Fagor
Fagor LAP-08 Quick guide

Fagor
Fagor FET-5310 User manual

Fagor
Fagor 3FE-7212 User manual

Fagor
Fagor FET 3106N User manual

Fagor
Fagor FU-6116IT User manual

Fagor
Fagor FE 9214 User manual