Fagor LAP-08 Quick guide

WASHING MACHINES
LAP-08 / LAP-10
LA-11 / LA-14 / LA-18 / LA-25 / LA-35
LA-45 / LA-60 / LA-120
LR-11 / LR-14 / LR-18 / LR-25/ LR-35
LN-11 / LN-14 / LN-18 / LN-25 / LN-35 /LN-60
LAP-0820 / LAP-1025
FWH-25 / FWH -30 / FWH -40 / FWH -60 / FWH -80
FWH -100 / FWH -135 / FWH -275
FWR-25 / FWR -30 / FWR -40 / FWR -60 / WFR -80
FWS -25 / FWS -30 / FWS -40 / FWS -60 / FWS -80 / FWS -135
MAINTENANCE AND
CONFIGURATION MENUS TP2

2
MAINTENANCE AND CONFIGURATION TP2
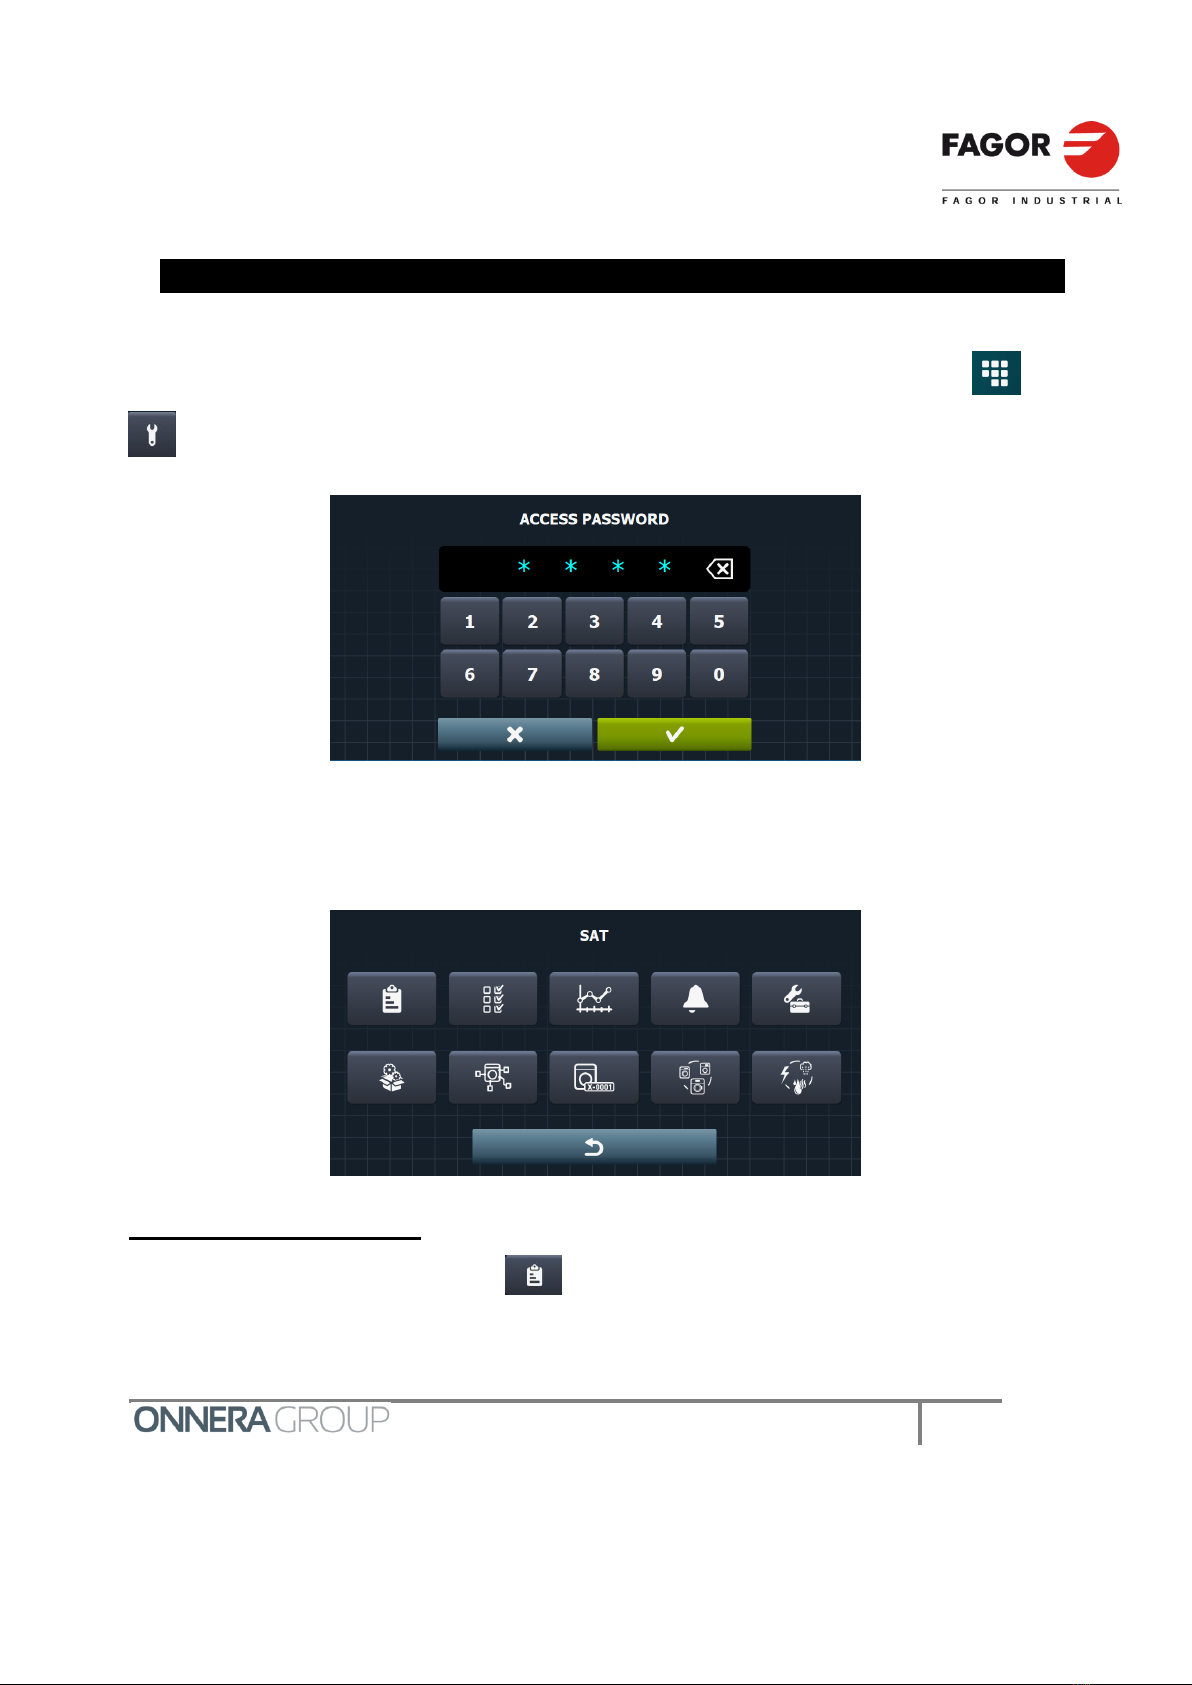
0. Maintenance .............................................................................................5
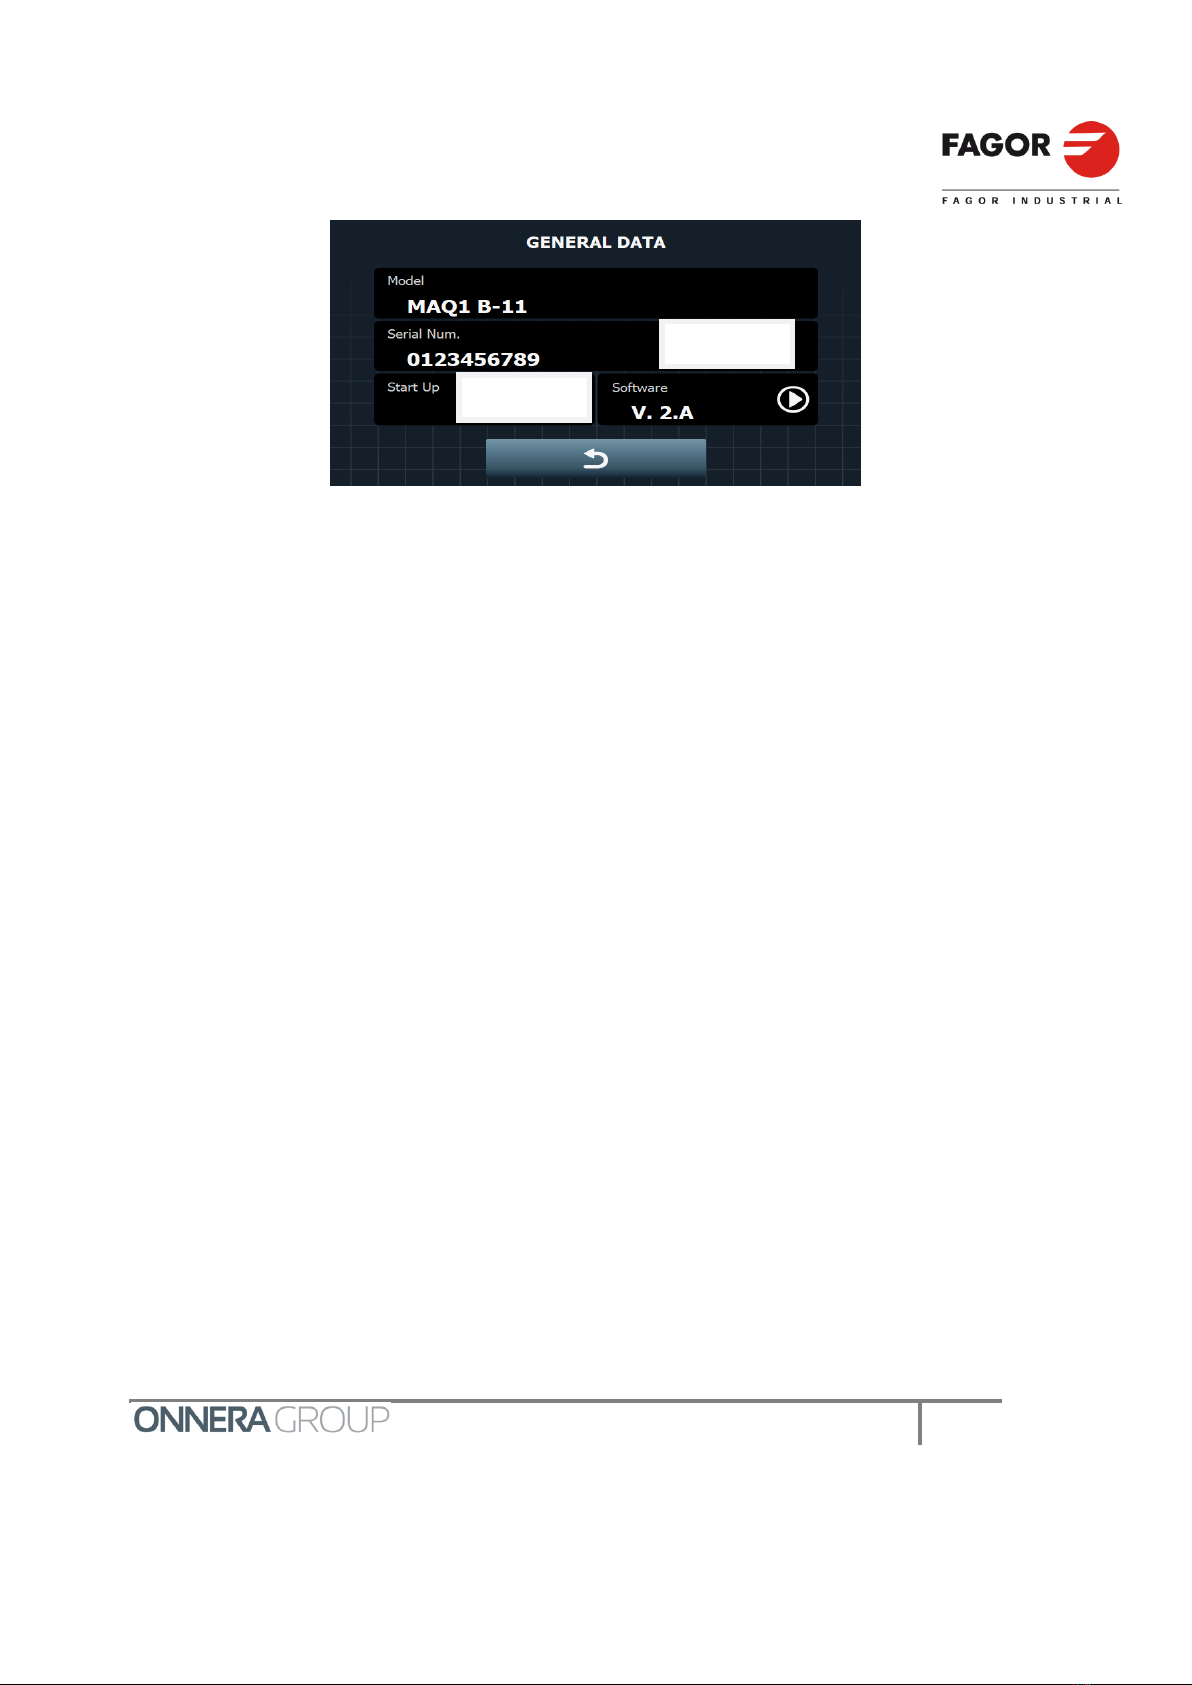
0.1 General information .................................................................................................5
0.1.1 Model ....................................................................................................................... 6
0.1.2 Serial No .................................................................................................................. 6
0.1.3 Start-up date............................................................................................................ 6
0.1.4 Software version ..................................................................................................... 6
0.1.5 Update software ...................................................................................................... 7
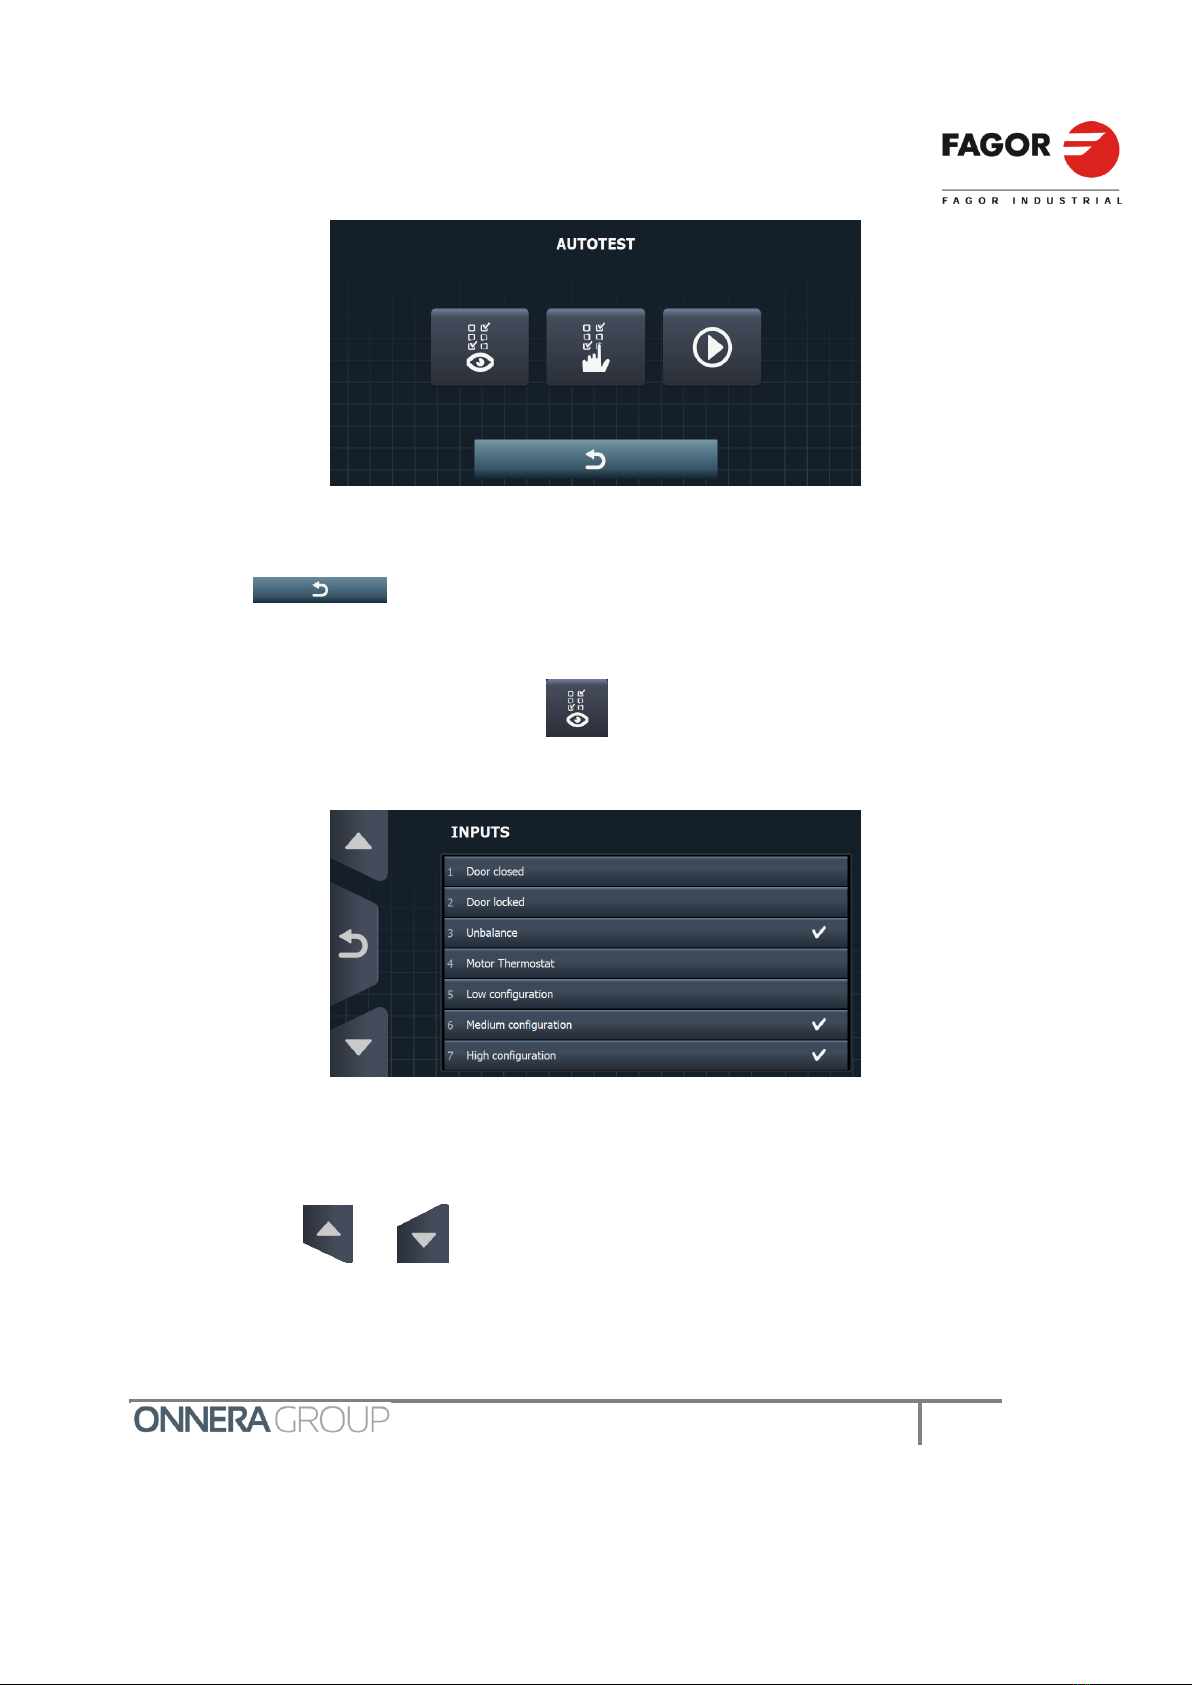
0.2 Autotest.....................................................................................................................7
0.2.1 Status of the inputs................................................................................................. 8
0.2.2 Updating the outputs .............................................................................................. 9
0.2.3 Autotest Programme............................................................................................... 9
0.3 Log...........................................................................................................................11
0.3.1 Error log................................................................................................................. 11
0.3.2 Partial values log................................................................................................... 12
0.3.3 Total values log..................................................................................................... 13
0.3.4 Download log to USB............................................................................................ 14
0.4 Configure alarms ....................................................................................................14
0.4.1 E4: Maximum water level reached ....................................................................... 14
0.4.2 E3: Drainge failure / water in tub.......................................................................... 14
0.4.3 E5: Water inlet fault............................................................................................... 15
0.4.4 E6: Heating fault.................................................................................................... 15
0.4.5 Set steam inertia ................................................................................................... 16
0.5 Advanced maintenance .........................................................................................16
0.5.1 Exhibition Mode .................................................................................................... 17
0.5.2 Continuous mode.................................................................................................. 18
0.6 Factory parameters ................................................................................................18
0.7 Kits...........................................................................................................................19
0.7.1 Weighing system................................................................................................... 19
0.7.2 Tilting system........................................................................................................ 20
0.7.3 Extra dosing .......................................................................................................... 21

3
0.7.4 Braking kit ............................................................................................................. 21
0.7.5 Printer kit ............................................................................................................... 21
0.7.6 Sluice ..................................................................................................................... 21
0.7.7 Types of drain pumps ........................................................................................... 21
0.7.8 Water recovery ...................................................................................................... 22
0.7.9 WiFi module kit ..................................................................................................... 22
0.8 Model .......................................................................................................................23
0.9 Operating mode ......................................................................................................23
0.10 Type of heating .....................................................................................................24
1. OPL configuration menu........................................................................25
1.1 Language ................................................................................................................25
1.2 Time .........................................................................................................................27
1.3 Date..........................................................................................................................27
1.4 Units of measure ....................................................................................................28
1.5 Beep.........................................................................................................................28
1.6 Thermal stop ...........................................................................................................28
1.7 HUD..........................................................................................................................29
1.7.1 OFF screen ............................................................................................................ 29
1.7.2 Main screen......................................................................................................... 31
1.7.3 Run screen.......................................................................................................... 32
1.8 Automatic shutdown ..............................................................................................33
1.9 Energy saving .........................................................................................................33
1.10 Promotional video ................................................................................................33
1.11 Restricted access .................................................................................................34
1.12 Levels ....................................................................................................................34
1.13 Speed.....................................................................................................................35
1.14 Import / Export files..............................................................................................37
1.15 Water saving by weight........................................................................................37
1.16 RABC .....................................................................................................................39
2. Self service configuration menu ...........................................................40

4
2.1 Language ................................................................................................................40
2.2 Time .........................................................................................................................42
2.3 Date..........................................................................................................................42
2.4 Units of measure ....................................................................................................43
2.5 Beep.........................................................................................................................43
2.6 Thermal stop ...........................................................................................................43
2.7 HUD..........................................................................................................................44
2.7.1 Promotional video................................................................................................. 44
2.7.2 Main screen (Self-service mode).......................................................................... 45
2.7.3 Run screen (Self-service mode)........................................................................... 47
2.8 Restricted access ...................................................................................................48
2.9 Levels ......................................................................................................................48
2.10 Speed.....................................................................................................................49
2.11 Import / Export files..............................................................................................51
2.12 Water saving by weight........................................................................................51
2.13 RABC .....................................................................................................................53
2.14 Grace period .........................................................................................................53
2.15 Collection period ..................................................................................................54
2.16 Currency................................................................................................................55
2.17 Method of Payment ..............................................................................................57
2.17.1 Coin...................................................................................................................... 58
2.17.2 Pay Centre ........................................................................................................... 58
2.17.3 Card reader.......................................................................................................... 58
2.18 Prices.....................................................................................................................58
2.19 Price programming...............................................................................................60
2.19.1 Date...................................................................................................................... 61
2.19.2 Start/end time ...................................................................................................... 61
2.19.3 Programme(s) & Prices....................................................................................... 62
2.19.4 Calendar .............................................................................................................. 63
2.19.5 Import................................................................................................................... 63

5
0. MAINTENANCE
With the washing machine switched on and without running any programmes, press and
. The password access screen is displayed.
To go to this submenu, enter the password (1357).
The following options are available in this submenu:
0.1 General information
In the main screen, select the icon . The washing machine general information is displayed
on the screen.

6
0.1.1 Model
Information box for the model configured. Behind the model identifier a letter is displayed
indicating the type of heating configured (No letter –Hot water, E –Electric, S –Steam).
0.1.2 Serial No
Field with machine serial No consisting of 10 digits.
To the right of the serial No there is a hidden button (transparent) which if it is pressed and held
down for 5 seconds, will allow the machine serial number to be edited manually.
0.1.3 Start-up date
Field with the appliance start-up date.
By default the machine is provided without a date (empty) in this field. There is a hidden button
(transparent) to the right of this field. If it is pressed and held down for 5 seconds, the start-up date will
be deleted (displaying --.--.--), indicating that a flag has been activated and the historic data will
automatically be deleted (errors, partial values and total values).
Once the flag has been activated, the next time the machine is switched on the “Start Date” will
be saved.
0.1.4 Software version
This permits the washing machine software version to be displayed.

7
0.1.5 Update software
Option that permits the software of the existing cards to be updated. The new software to be
recorded will be taken via USB. To update the new software, use the key.
When the software is updated, the washing machine configuration is maintained together with
that of the existing programmes and the list of programmes in favourites. A SW update will update the
application and the factory programmes and configurations. The programmes created by the user or
which have been modified from the library are maintained.
To return to the factory conditions after updating the SW, run “factory parameters” afterwards.
Press to return to the SAT screen.
0.2 Autotest
On the main maintenance screen, select the icon to go to autotest. This option allows
you to view the status of all the inputs, and to activate any of the outputs in order to test the correct
operation of the different machine components (the inputs/outputs are displayed according to the
configuration of existing kits).
The inputs and outputs which are available in ALL the machines are ALWAYS displayed. The
inputs and outputs which are exclusive to a particular feature (for example, Self-service, Sanitary, Extra
dispensers, Tanks (T1, T2, T3), Tilting…) will only be available if the feature is activated.
On leaving the output activation screen, all the outputs are deactivated.
It is also possible to run a programme that helps to test the machine, guiding the user through
the machine test process.
Select the Autotest option, and the following screen is displayed.

8
Press to return to the main SAT screen.
0.2.1 Status of the inputs
On the Autotest screen, when the icon is pressed, the status of the inputs is displayed in
the next screen.
If an input is active, this is shown on the screen with a dot.
The first 5 inputs are displayed on this screen. To view the remaining inputs and scroll through
the screen use the and keys.

9
Press to return to the autotest screen.
0.2.2 Updating the outputs
On the Autotest screen, when the icon is pressed, it is possible to force the outputs of the
plate, going to next screen.
The first 5 outputs are displayed on this screen. To view the remaining outputs and scroll through
the screen use the and keys. To force the outputs just press the required output.
Press to return to the autotest screen.
0.2.3 Autotest Programme
On the Autotest screen, press the icon to go to the autotest programme.
The phases and parameters of the autotest programme are shown below:

10
PHASE
WASH
AUTOTEST
1
RINSE
AUTOTEST 1
SPIN AUTOTEST
1
WASH
AUTOTEST
2
SPIN AUTOTEST
2
TYPE
WASH
RINSE
SPIN
RINSE
SPIN
TIME (MIN)
1.
2.
1.
2.
10.
TEMPERATURE
28º
60º
LEVEL
MIN
MIN
MAX
SPEED
Wash speed:
NORMAL
NORMAL
NORMAL
Spin speed:
FAST
MAX
INPUT
Water inlet
HOT
REG (hw;cw)
COLD
GENERAL
Wash rates:
15;05
05;05
05;05
Move filling:
YES
YES
NO
Thermal stop:
YES
YES
Movement in
drainage:
YES
YES
NO
Drainage:
D1
D1
D1
Optimum
distribution
YES
YES
Pause
programme:
NO
YES
YES
YES
NO
Untangling
YES
YES
DOSING
(START/TIME/DELAY)(SEC)
Dosage 1:
ML/10/0
Dosage 2:
ML/10/10
ML/10/10
Dosage 3:
ML/10/20
Dosage 4:
ML/10/30
Dosage 5:
L/10/0
Dosage 6:
L/10/10
Dosage 7:
L/10/20
Dosage 8:
L/10/30
Dosage 9:
T/10/0
Dosage n:
T/10/10

11
Running the autotest programme is the same as running any other programme with one
exception.
When the “Stop programme” parameter is active in the current phase, a pause is made before
starting to run the phase in question as occurs with any programme. However, in addition to the pause,
a summary is displayed of the most significant parameters from the previous phase (maximum
temperature reached, maximum speed reached, maximum level reached and true phase time).
In addition, when the programme ends, the same parameters are displayed, referring to the
maximum programme values.
It is possible to display all the parameters (settings, true values and status of inputs and outputs),
by pressing the RUN MENU button as in a normal run command.
0.3 Log
On the main maintenance screen select the icon , and go to the log menu.
Press to return to the SAT screen.
2 different types of log can be viewed on this screen:
-Error log
-Value log
0.3.1 Error log
On the log screen, press the key and go to the error log. The last 20 errors recorded are
displayed, together with the date / time at which they occurred.

12
The first five errors recorded are displayed on the screen. To view the following errors, use the
and keys to scroll through the list.
Use the key to delete the values recorded.
Press to return to the log screen.
0.3.2 Partial values log
On the log screen, press the key to go to the partial values log. All the data recorded since
the last time the partial log was reset are displayed on screen.
The first five values recorded are displayed on the screen. To view the following values, use the
and keys to scroll through the list.
Use the key to delete the values recorded.
Press to return to the log screen.

13
0.3.3 Total values log
To access the total values log, press the key, and the data recorded since the manufacture
of the appliance are displayed.
The first five values recorded are displayed on the screen. To view the following values, use the
and keys to scroll through the list.
Press to return to the log screen.
The data stored, in either partial values or in total values, are as follows:
▪Total hours of operation
▪Total hours of operation washing (any phase which is not spinning)
▪Total hours of operation spinning
▪Maximum temperature reached
▪Maximum level reached
▪Maximum speed (RPM) reached
▪Total no of errors classified by error type
▪Cycles run by each output
The error log and the partial values log can be deleted using the button . However, the
total values log can never be deleted.

14
0.3.4 Download log to USB
Using the key, the log can be downloaded to a USB flash drive. Every time a download is
made, a folder is created with SerialNo_Date_Time_Log, creating a unique “.sts” file with all the
information.
In addition, different machine parameters are downloaded (Serial No, Model, Date, Time, Heating
type, operation mode (OPL/Self-service), Start date and SW version) for subsequent loading in the Wash-
Control.
Press to return to the log screen.
0.4 Configure alarms
On the maintenance screen, select the icon, and go to the alarm configuration screen.
Press to return to the initial SAT screen.
The following errors can be configured:
0.4.1 E4: Maximum water level reached
You can override this error by pressing . Default Enabled.
0.4.2 E3: Drainge failure / water in tub
Press the key to modify error 3, drainage failure. The time after which the error is
displayed on the screen can be configured.
The error time can be configured. Range, from 5 to 30 minutes. The default time programmed is
10 minutes.

15
To change the time, use the keys and .
Press to return to the initial alarm configuration screen, or press to return
to the alarm configuration screen and confirm the changes.
0.4.3 E5: Water inlet fault
Press the key on the error configuration screen to modify error 5, water inlet fault. The
time after which the error is displayed on the screen can be configured.
The error time can be configured. Range, from 5 to 30 minutes. The default time programmed is
5 minutes.
To change the time, use the keys and .
Press to return to the initial alarm configuration screen, or press to return
to the alarm configuration screen and confirm the changes.
0.4.4 E6: Heating fault
Press on the error configuration screen to cancel 6, heating fault. By default it is enabled.

16
Press to return to the initial SAT screen.
0.4.5 Set steam inertia
Pressing on the icon the display would show a screen to be able to set the vapor inertia in
percentage.
This percentage is how long before the slogan they have to cut to heat. For example, if it is set to
10%, it would stop heating 10% before the set-up (i.e. when reaching 90%). This percentage will be
limited from 0% to 20% and default will be set at 10%. In Steam Machines This option will be active and
set to 10% by default.
0.5 Advanced maintenance
On the Maintenance screen, select the icon , and press “OK” to go to the advanced
maintenance screen. A special password (0888) is required to access this section.

17
On this screen, enter the password (0888), and confirm it with the key to go to the
advanced maintenance screen.
Press to return to the initial SAT screen.
0.5.1 Exhibition Mode
Press the key in the advanced maintenance menu to set the machine to exhibition
mode, ignoring all the errors that are triggered.

18
In exhibition mode, the washing machine ignores all the errors which are triggered, and runs a
short demo programme.
When this programme is run, a short demo programme is run which passes through all the
washing phases. It will only run with the door locked, machine active and the motor will turn indefinitely
at 0.5 V, alternating the direction of rotation, without activating any other input.
The message that the washing machine is running in exhibition mode is displayed on the screen.
0.5.2 Continuous mode
Press the key on the advanced maintenance screen and select continuous mode.
If this mode is active, any programme can be run indefinitely, that is, when the programme ends,
the door is unlocked, the buzzer is sounded to open the door, but the programme will automatically start
again, locking the door and running the configured phases.
The message that the washing machine is running in continuous mode is displayed on the screen.
0.6 Factory parameters
Press the key on the maintenance screen to go to the load factory parameters option.
A password is required (4321).

19
Enter the code (4321), and press to return to the initial SAT screen, with the message
“Default values updated”.
With this option it is possible to load the washing machine default parameters, except the model,
heating type and self-service parameters which are not reset.
All the new programmes which have been created in the library will be maintained, restoring the
default programmes.
0.7 Kits
Press the key on the maintenance screen to go to the activation / deactivation screen
for the different kits in the washing machine. By default, all the kits are disabled.
Press to return to the initial SAT screen.
The list of Kits is as follows:
0.7.1 Weighing system
Press the button on the extra kits screen to activate this kit to automatically weigh the load,
by measuring the inputs of the weighing shims and calculating the weight of the load before running any
programme.
This kit calculates the percentage weight inserted in the machine with respect to the nominal
weight, adapting the level setting and the dosage times according to the water saving configuration.

20
0.7.2 Tilting system
Press the key on the extra kits screen to activate the tilting kit which enables the tilting for
the loading and unloading of the laundry, taking signals from an external control. This can only be
activated in 45, 60, 80 and 120 kg washing machines.
Operation of the Tilting Kit.
If the tilting kit is active and the washing machine is at rest, the management of the loading or
unloading of the laundry is via the forward or backward tilting signals from the control.
1. Forward tilting: Tilting signal for loading laundry
When this signal is received, if the door is open, the “front inflation” output is activated to inflate
the ball, waiting for the “front pressostat” open signal to display the loading diagram on the screen
and enabling the soak and turn motor functions.
If the output is activated but the input signal is not received, the corresponding error is triggered.
2. Backward tilting: Tilting signal for unloading laundry
When this signal is received, if the door is open, the “rear inflation” output is activated to inflate
the ball, waiting for the “rear pressostat” open signal to display the unloading diagram on the
screen and enabling the soak and turn motor functions.
If the output is activated but the input signal is not received, the corresponding error is triggered.
3. Clockwise/anticlockwise rotation: Motor rotation signal to move the drum and turn the laundry.
If the washing machine is in the loading or unloading position and the rotation signal is received,
the drum will turn at a fixed speed of 0.3V, and the direction of rotation will be displayed on the
screen.
4. Soak: Soak signal to put water in the drum
If the washing machine is in the loading position and the soak signal is received, cold water will
be inserted in the machine while the signal is active, until the maximum tilt level is reached.
If the “front pressostat” and “rear pressostat” inputs are active at the same time, the tilt error is
triggered.
This manual suits for next models
41
Table of contents
Other Fagor Washer manuals

Fagor
Fagor 3FE-8612 User manual

Fagor
Fagor 3FE-9214 User manual

Fagor
Fagor FF-8012 User manual

Fagor
Fagor FEC-2105T User manual

Fagor
Fagor FF-6214 User manual

Fagor
Fagor LP 0820 User manual

Fagor
Fagor 3FE-8812 User manual

Fagor
Fagor FFT-309-311-313 Service manual

Fagor
Fagor 3FE-8812X User manual

Fagor
Fagor ASTRA Series User manual

Fagor
Fagor FU-6116IT User manual

Fagor
Fagor FET-2086 User manual

Fagor
Fagor 3FE-7314IT User manual

Fagor
Fagor 3FE-8212 User manual

Fagor
Fagor FS-3611 Configuration guide

Fagor
Fagor 3FE-7212 User manual

Fagor
Fagor FET 3106N User manual

Fagor
Fagor 925010156 User manual

Fagor
Fagor FU-7814 User manual

Fagor
Fagor FEC-805T User manual