Falcon U842 User manual

Black Blade A
Clockwise
White Blade A
Clockwise
White Blade B
Counter-clockwise
Black Blade B
Counter-clockwise
LED Signal Lights
LED
Running Lights
Blade Guard
Le Trigger
(360° Flip Mode on/off)
Right Trigger
(s ignal lights on/off)
1. Quadcopter
2. Controller
Trim rotaon
Power Indicator
Le Sck
(throle and rotate)
Camera Buon
(take photo)
Video Buon
(recording on/off)
LCD Screen
Right Sck
(move le / right and
forward / back)
Trim le / right
Trim forward / back
360° Eversion
(instant flip)
Mode
(1: beginner, 2: expert)
PRODUCT PARTS
2

1.7*6PB Screw
1. Charge the Baery
2. Warnings
Connect the Li-Po baery to USB before plugging the USB to power or your
computer. One end of the USB charger goes into any free port on your
computer or USB power bank. The other end plugs into your baery. You
may leave the baery in your copter, or remove it for external charging. While
charging, the light will be on solid red. When charging is complete, the light
will blink. The recharge me should be around 120 minutes.When the baery
runs low, the transmier will acvated a “di, di” sound alarm, and the LED lights
on the quadcopter will flash. This indicates that the baery has only a short me
le, so fly the quadcopter back immediately for retrieval.
1.This product is only suitable for competent persons age 14+. This machine
is not a toy for children. It is a hobby flying drone, with fast-spinning propellers.
Use of this product naturally incurs risk of injury, especially if it is misused.
Purchaser accepts this risk by purchasing or using this product.
2.To use this product, make sure you have a large open space, not too close to
people, buildings, or power lines.
3.Please do not use this helicopter in bad weather, such as in strong wind, rain
or snow.
a problem, please contact a local agent for repairs.
5.The product contains many electronic parts, which must be kept dry. Please
avoid exposure to moisture.
should not be expose to heat. Please avoid long exposure to heat or bright
sunlight, which may harm the products exterior.
injury or damage.
8.When you are using these products, please follow all local laws and rules
regarding remote control flying drones.
1. The blade guards are removable. To install each blade guard, press the square
area at the boom of the guard against the matching secon of the copter. Use
the supplied screws to aach each of the 4 guards.
2. Keep the guards installed to protect the copter and users, or remove the guards
for lighter weight and more speed and maneuverability. Note that the blades
(propellers) are easy to replace, but each blade is different. If the incorrect
rotaon-style of blade is used, the quadcopter will not fly.
*This product is equipped with a Li-Po baery. Please take note of appropriate
safety precauons when not in use.
*When the baery is not being used for a long me, remove it and put it in a safe
dry place.
PRECAUTIONS
BLADE GUARD INSTALLATION
CHARGING LI-PO BATTERY
3 4

The Li-Po baeries may be recycled
Please discard old baeries in a proper recycling staon.
Do not throw baeries in the regular trash. If you have quesons,
please contact your local environmental agency to collect old baeries.
*Do not expose the charged baery to high temperatures, such as flames or near
electronic devices. This may cause damage or explosion.
*Make sure all baeries are connected in the proper orientaon to avoid damage
or explosion.
*Do not use the baery to impact any hard surfaces. Avoid contact with metal.
*If the baery becomes damaged, bulges, or appears to change shape, please
stop using the baery and discard it.
*When charging the baery, to avoid accident, put the power supply on the ground.
Avoid seng the charger on cloth or other flammable materials because the
charger will get hot.
*Do not immerse the baery in water. The baery should be kept in a dry place.
*Do not break the baery or aempt to open the baery.
*Do not leave the baery charging without supervision.
2. Install Li-Po Baery in Quadcopter
Install To install the Li-Po baery in the quadcopter,
press the tab at the front of the baery compartment
down to access the baery compartment, and insert
the baery base-first into the compartment so that
the cable on the baery is exposed. To remove the
Li-Po baery from the copter, press down on the tab
with one hand and grasp the baery with your other
hand to pull the baery out by its sides (never pull
the baery out by its cables).
3. Connect the Baery
*For safety, make sure the switch beneath the copter is
in the OFF posion before you electrically connect the
baery cables. Connect the baery to the quadcopter
by gently plugging the cable on the baery to the
power cable underneath the copter. Make the sure
receptacles are oriented correctly so that one
receptacle slides smoothly into the other.
*To disconnect the baery, grasp the plasc receptacles
with your fingers. Never pull the cables apart by pulling
on the cables.
NOTE: The copter will not operate unless you follow
these steps in the order listed.
1. First make sure the quadcopter is OFF. Turn
the controller / receiver ON. This procedure
must be followed precisely for the controller and
copter to find and bind with each other.
2. The controller will beep once and the light will
blink rapidly. Move the LEFT STICK to the top
and then to the boom. The controller will stop
blinking to show the throle is calibrated.
Leave the sck at the boom.
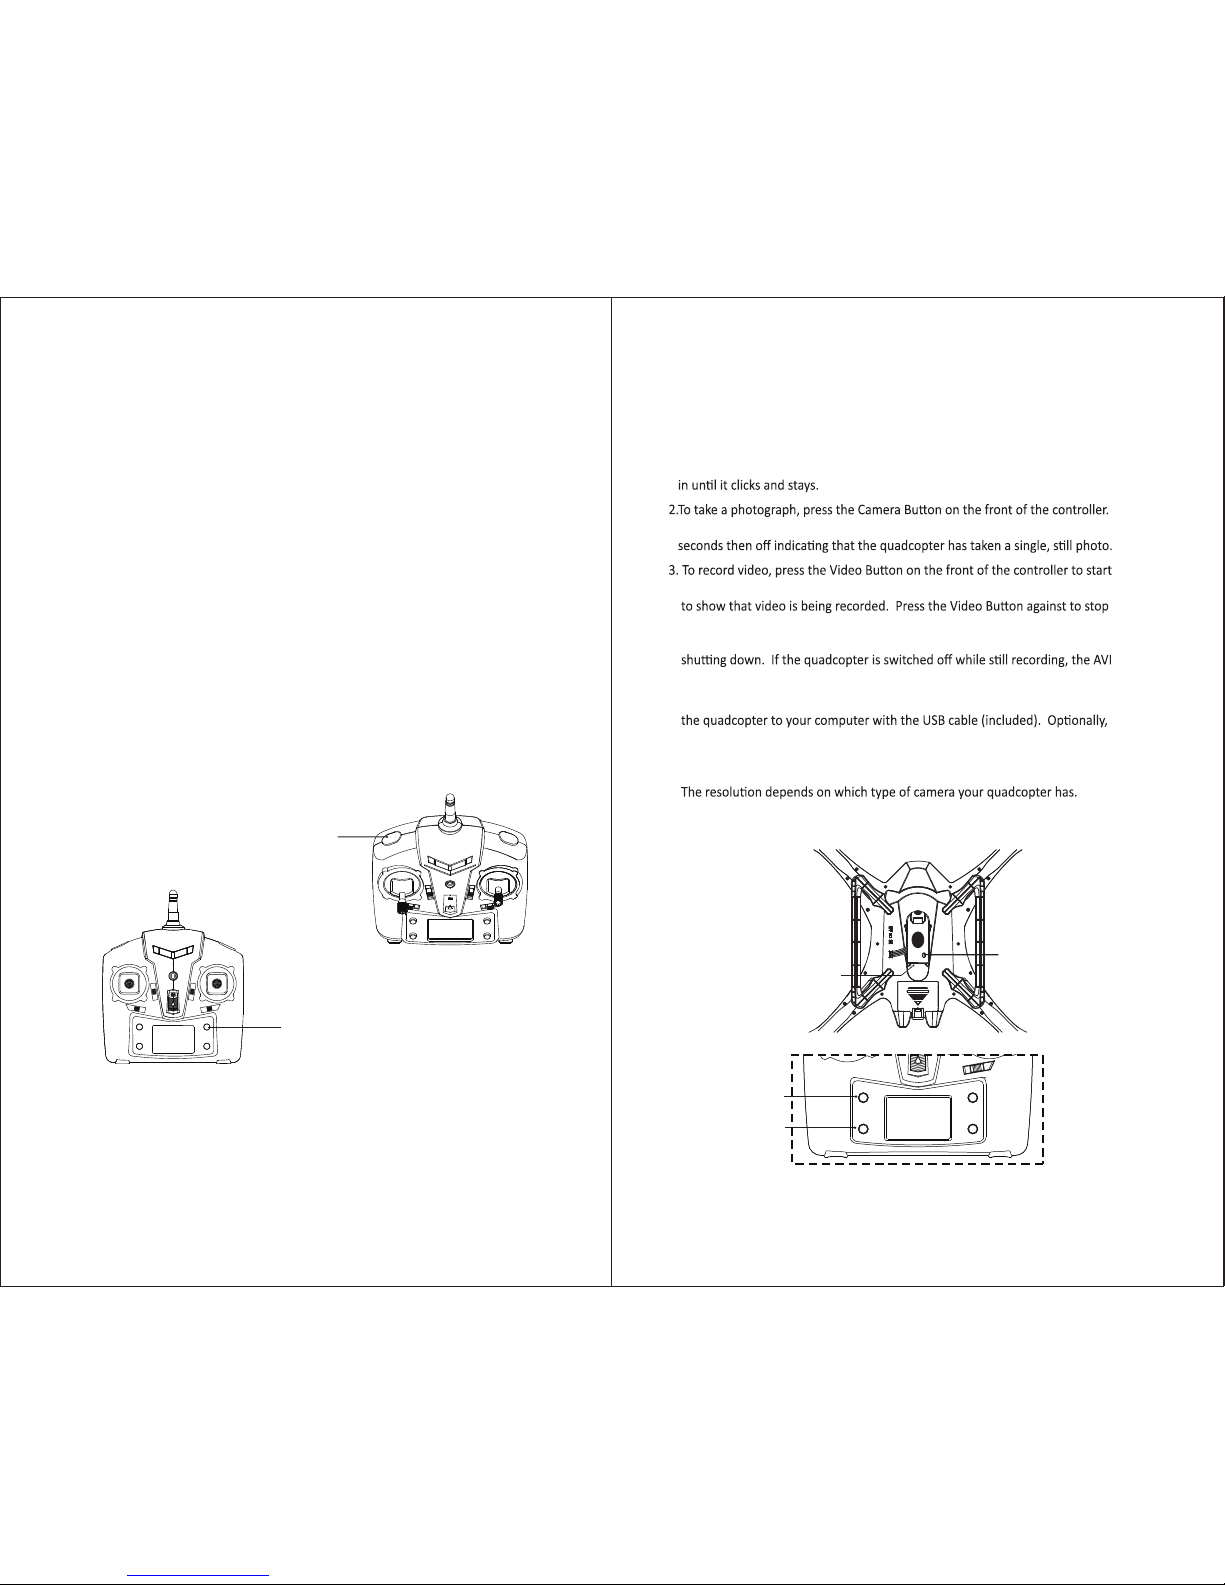
Press Down on
Tab to Access
Baery Compartment
Connect Baery
1. Install 4 AA Baeries in Controller
To assemble the Controller, install 4 1.5V AA baeries (not included) in the
controller/ transmier. You may need a small screwdriver to open and then close
the cover over the baery compartment.
FLIGHT PREPARATION
PRE-FLIGHT ADJUSTMENTS
56

3. Now turn quadcopter ON by flipping the switch underneath the quadcopter to
the ON posion. Aer about 3 second the controller will beep “di do di”.
The lights on the copter will stop flashing. This shows the quadcopter has
become bound to the controller.
4. Put the copter on level ground. Move the
RIGHT STICK on the controller in a circle.
The controller will beep “di do di” and
the copter lights will blink briefly. This
calibrates the copter gyroscopes for level
flying.
Power Switch
Push the LEFT STICK forward to
make the copter go up, or backward
to go down (throle). The throle
will stay where you leave it.
1. Up / Down (Throle)
Push the LEFT ST ICK le or right to
rotate the direcon the copter is
facing (yaw).
Release the sck to stop rotang.
2. Rotate Direcon
3. Move Le / Right
If the copter dris forward or back
when the sck is centered, click this
switch forward or backward unl
the copter is stable.
7. Adjust Forward/Backward Trim (Pitch)
Push the RIGHT STICK le to move
le, or right to move right.
Release the sck to stop moving.
Push the RIGHT STICK forward to
move forward, or back to move
backwards.Release the sck to stop
moving.
4. Move Forward / Backwards
If the copter rotates when the sck
is centered, click this switch le
or right unl the copter is stable.
5. Adjust Rotaon Trim (Yaw)
If the copter dris to the side when
the sck is centered, click this switch
le or right unl the copter is stable.
6. Adjust Le/Right Trim (Roll)
FLIGHT CONTROL
7 8
OFF ON

Press the Mode buon on lower right of the controller to switch between Flight
Mode 1 (maximum Gyro-stability) and Mode 2 (3D expert control). The LCD
screen will indicate the current mode.
Mode 1 automacally uses the 6-Axis Gyro (3 gyroscopes and 3 accelerometers)
to its full capabilies for stable, level flight. Use this mode for beginners, or to
hover for movies and snapshots.
Mode 2 lts the quadcopter more sharply (stronger pitch and roll), for faster
acceleraon. Use this mode for racing and 3D maneuvers.
The quadcopter can easily flip in an enre 360° circle. The copter will quickly
stabilize and level out, but will lose some altude, so first make sure the copter
is flying high above the ground.
To flip in the direcon you choose, first press the LEFT TRIGGER. The controller
will start beeping and enter 360° Flip Mode. Push the RIGHT STICK to flip in the
desired direcon (forward, backward, le, or right) and return to normal flight.
When the baery runs low, the transmier will acvated a “di, di” sound alarm,
the LED lights on the quadcopter will flash and the flip acon will be auto turn off.
To do an instant flip simply press the 360° Eversion buon on the front of the
controller, the quadcopter will flip forward 360°.
Warning: Do not perform a 360° flip unless the quadcopter has enough space
for safety.
Le Trigger
360° Eversion buon
Camera State LED
TF Storage Card
Camera Buon
Video Buon
FLIGHT MODES
1.If a storage card is not already installed, install a micro-SD (also called “TF”)
storage card in the camera underneath the quadcopter. See the small sketch
on the camera itself, which shows how to orient the chip correctly. Press the chip
The red Camera State LED underneath the quadcopter will blink on for about 2
recording. The red Camera State LED underneath the quadcopter will come on
recording.
Note: Always remember to stop the video recording with the controller before
file being stored on the TF card might not be “closed” or stored properly.
4. To quickly retrieve your videos and photos, connect the data port underneath
you have remove the micro-SD (TF) storage card and access the card directly
with your computer. The data on the TF card will appear in folders as JPEG
files and AVI files, which you can move to your computer.
HD829: video 1280 x 720p / 30 FPS; Photographs: 1280 x 720p
HD818: video 1280 x 720p / 60 FPS; Photographs: 1280 x 720p
VIDEO AND CAMERA OPERATION
360° FLIPS
9 10

Below are spare parts for your selecon which you may obtain from your local
distributors.
If the props damaged in the flight, you can replace with aached spare props
according to below steps.
1. Propellers replacement
If the motors damaged or performance degradaon, you can purchase and
replace it according to below steps
2. Motors replacement
INSTALLATION AND REMOVAL OF MOTORS AND PROPELLERS SPARE PARTS
U842-01
A blades
U842-02
B blades
U842-03
A motor
U842-04
B motor
U842-05
aluminum heat cover
U842-06
Li-Po baery
U842-07
transmier receiver
U842-08
motor assembly
U842-09
blade guards
U842-10
base legs
U842-11
motor cover
U842-12
USB data cable
U842-13
HD818 camera
U842-14
HD829 camera
U842-15
Controller
11
1. Remove the LED shade
and four screws of motor holder
1. Remove the LED shade and
four screws of motor holder
2. Remove the two screws of motor
and replace with new one
2. Remove the screw of props
and replace with new one
Table of contents