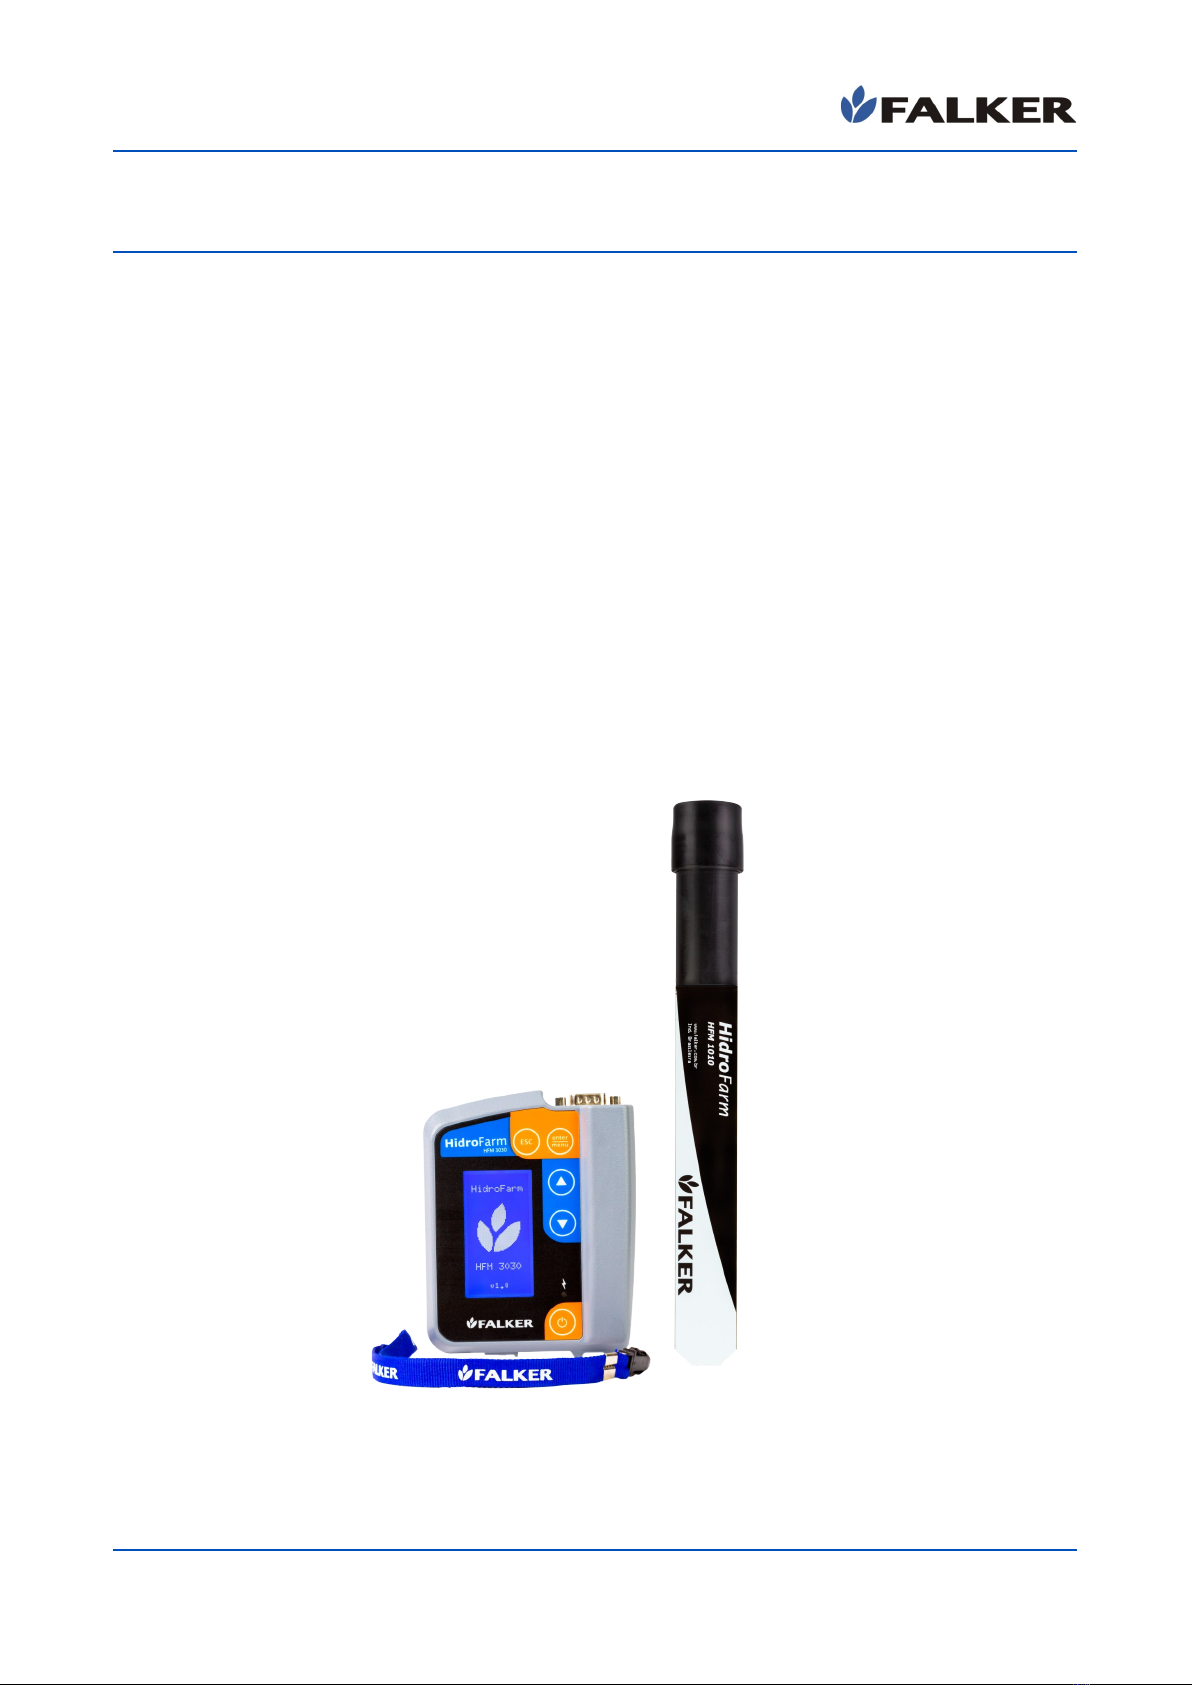
FALKER hidroFarm HFM3030 User manual

Manual
Digital Soil
Moisture Meter
hidroFarm
HFM3030
Revision A
06/2023
MAN_HFM3030

HFM3030
Digital Soil Moisture Meter
All rights reserved.
Falker Automação Agrícola tda.
Copying by any means of this document or part of it without prior written
authorization is expressly prohibited.
Fal er reserves the right to ma e changes to this document or to the
equipment without prior notice. The information contained in this document
is the most current at the time of publication and is provided to facilitate the
use of the equipment.
Although all precautions have been ta en in the preparation of this
document, Fal er assumes no responsibility for any errors or omissions and
no liability is assumed for damages resulting from the use of the information
contained in this manual.
To facilitate understanding and highlighting important aspects, some information
is formatted as follows.
Note:
They present some detail or better explain some point of the text.
ATTENTION:
Indicate points to be observed by the user for correct use and
maintenance of the equipment.
CAUTION:
They warn of situations that can permanently damage the equipment or cause other serious
damages.
www.falker.com.br
2 de 31

HFM3030
Digital Soil Moisture Meter
Índice
1 Introduction......................................................................................................4
2 The Equipment..................................................................................................5
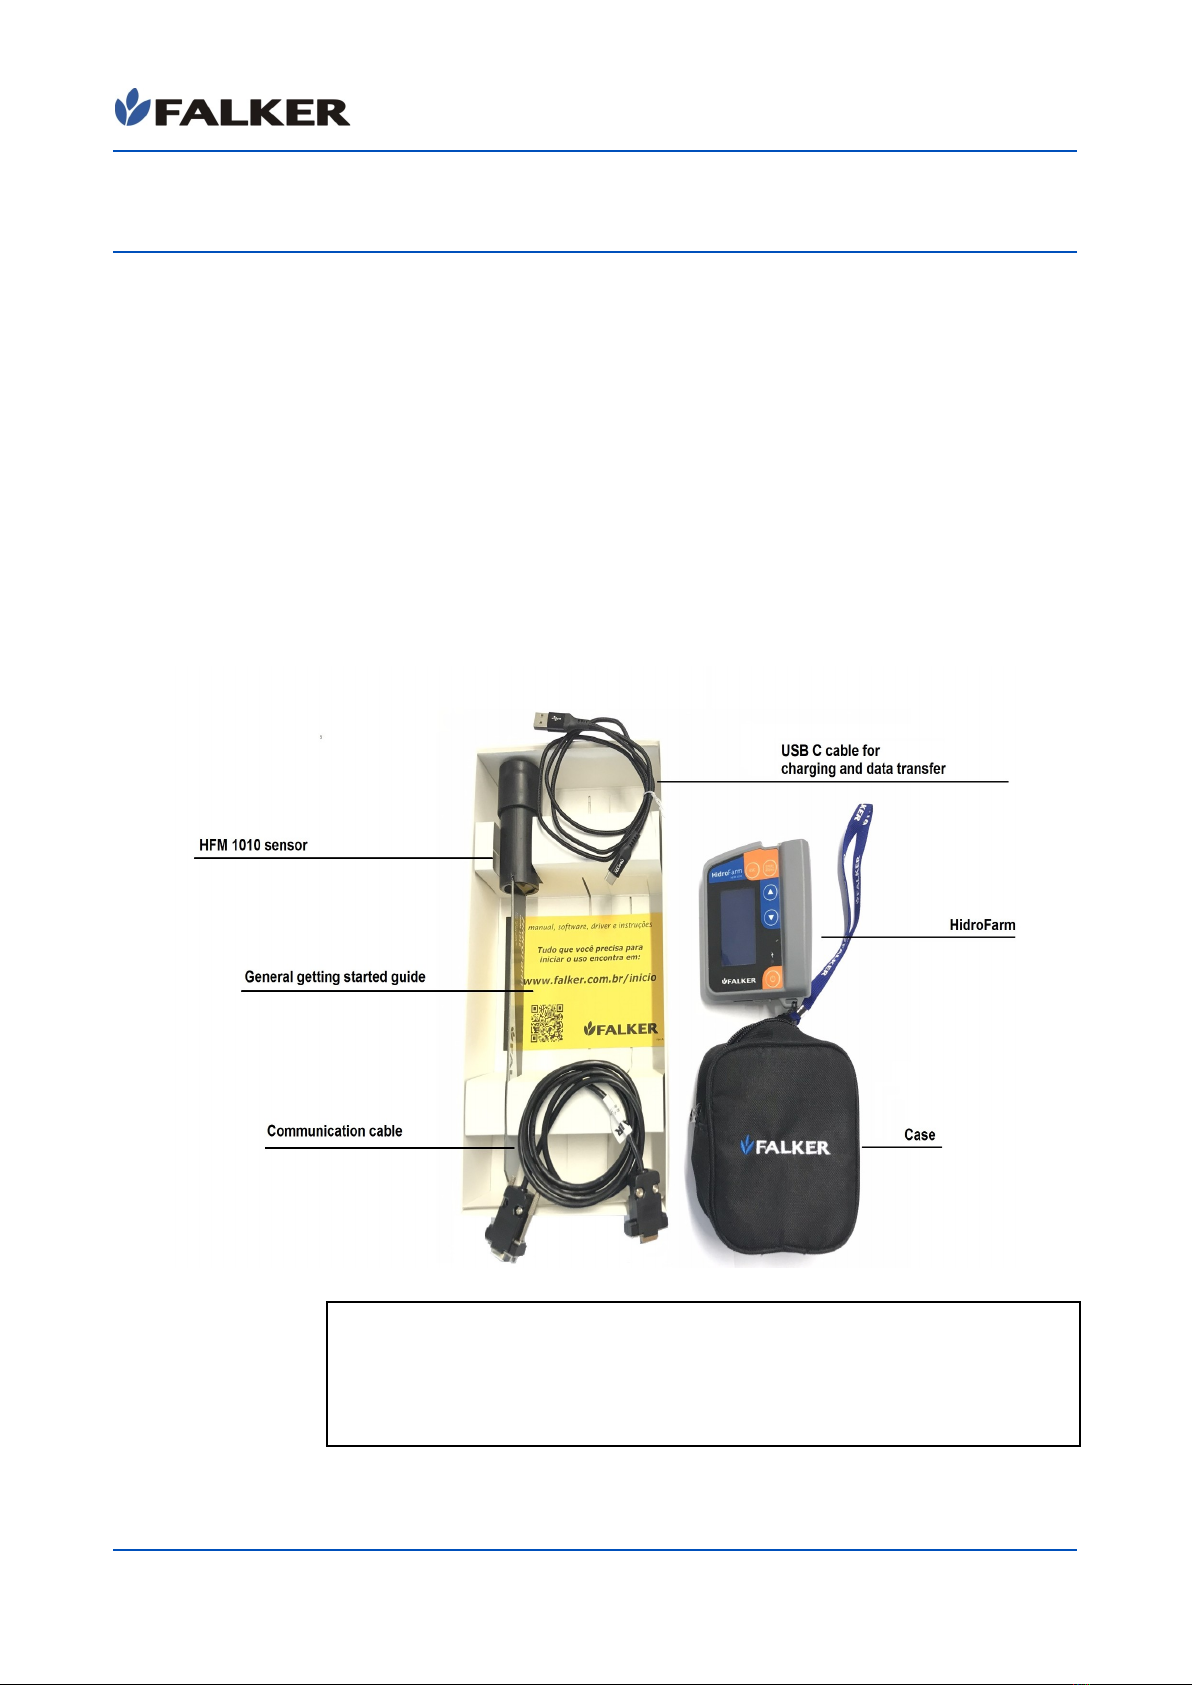
2.1 Accessories.................................................................................................6
3 Basic concepts..................................................................................................7
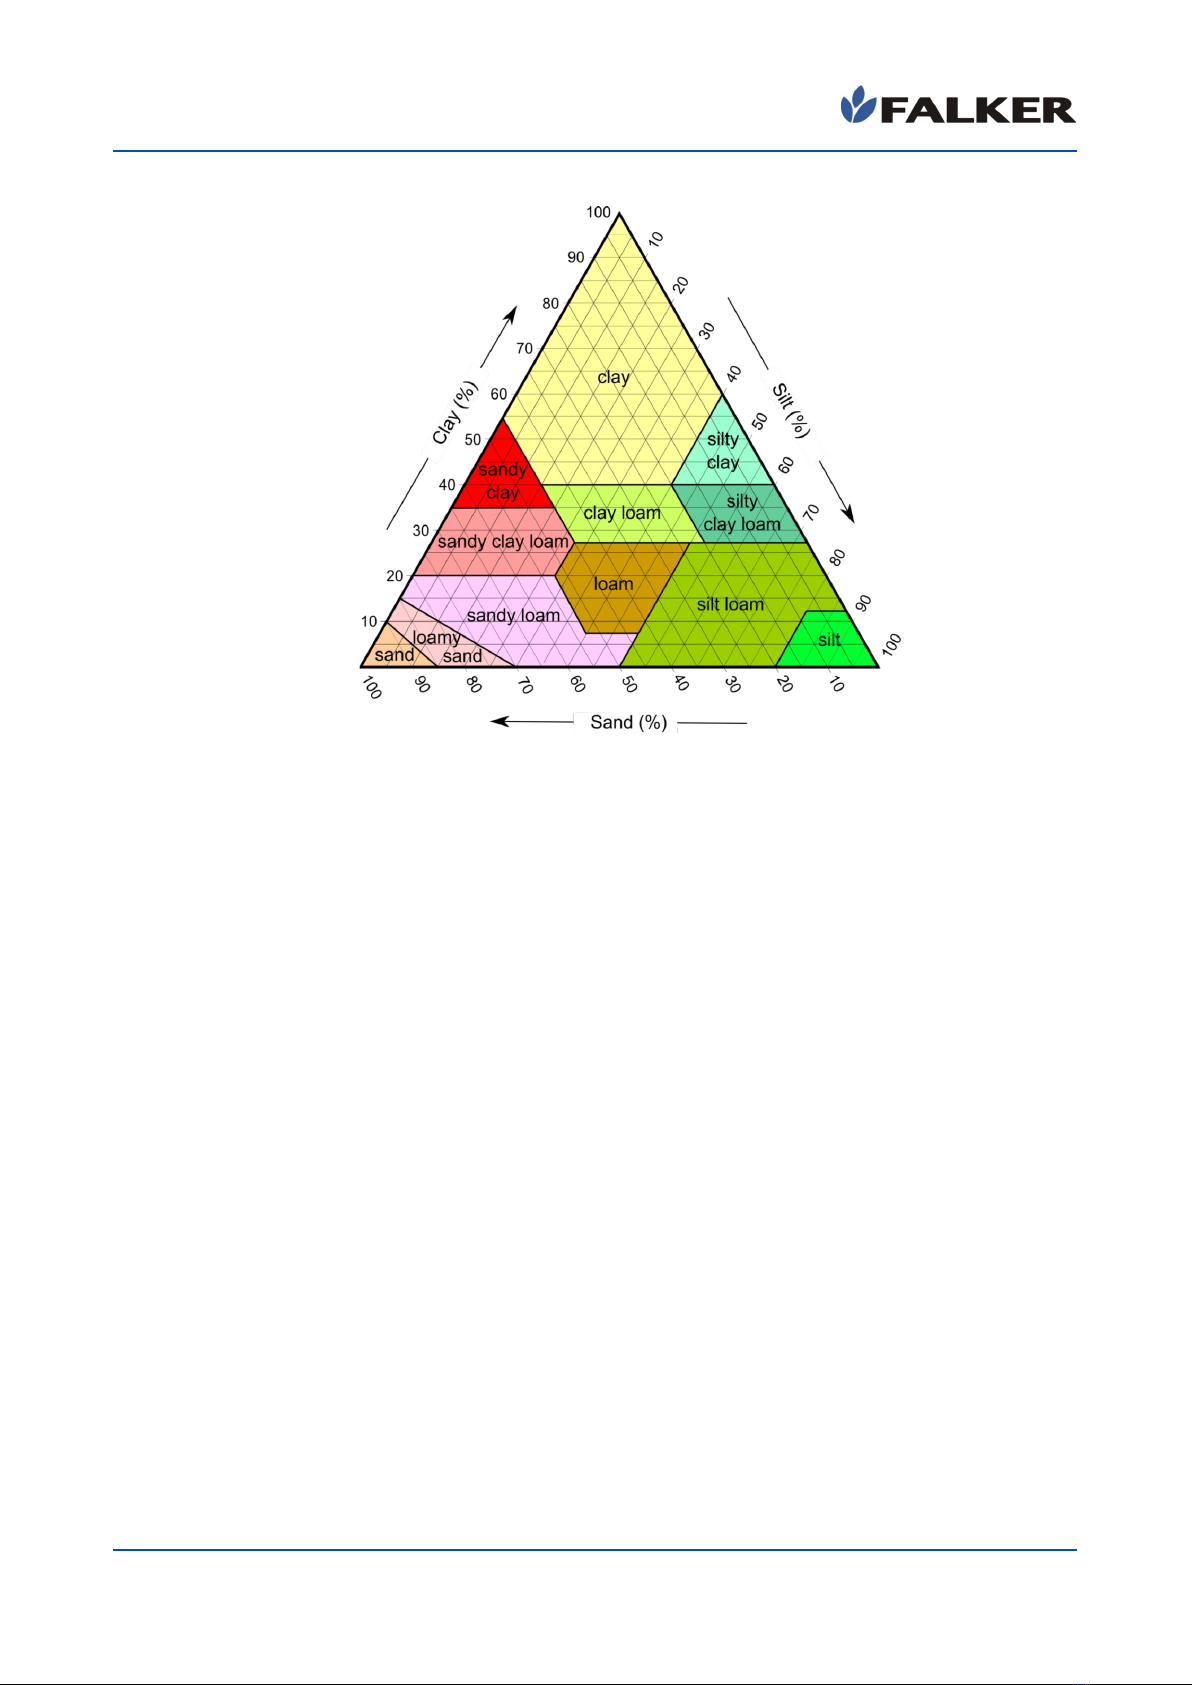
3.1 Volumetric Humidity x Gravimetric Humidity..............................................7
3.2 Point of Permanent Wilt and Field Capacity..................................................7
3.3 Measurement range..................................................................................10
3.4 One-off measures....................................................................................10
3.5 Measurement of humidity in organic materials.........................................10
3.6 Sensor life................................................................................................11
3.7 Comparing measurements.......................................................................11
4 Installation......................................................................................................11
4.1 Direct Insertion.........................................................................................11
4.2 Insertion using Auxiliary Tool...................................................................12
4.3 Using and Installing the Extender..............................................................14
4.4 Connection Between Meter and Sensor......................................................15
5 Operation........................................................................................................16
5.1 Basic Operation.........................................................................................16
5.2 Basic operation.........................................................................................17
5.3 Data acquisition........................................................................................18
5.4 Data visualisation......................................................................................20
5.5 Manage.....................................................................................................21
5.6 Bluetooth..................................................................................................23
5.7 Settings....................................................................................................24
5.8 Internal GPS..............................................................................................24
5.9 Screens.....................................................................................................25
5.10 Fal er Water - Data Visualization and Analysis.........................................27
5.11 Data transfer...........................................................................................28
6 Basic maintenance...........................................................................................29
6.1 Battery charging........................................................................................29
6.2 Device cleaning.........................................................................................29
6.3 Software atualization................................................................................29
6.4 Another questions....................................................................................30
7 Technical specifications...................................................................................31
7.1 Dimensional information...........................................................................32
7.2 Anatel homologation for equipment HFM3030i.........................................32
7.3 CE and FCC mar ing for equipment HFM3030i..........................................32
3 de 31

HFM3030
Digital Soil Moisture Meter
1 Introduction
The HidroFarm – Electronic Soil Moisture Meter - is an equipment that
allows the measurement of soil volumetric moisture in a simple and direct
way. It allows the technician responsible for the rapid identification of soil
moisture content to control the availability of water to the crop and, if
necessary, providing information for immediate change of water
management in the analyzed area.
The measurement is made by an electromagnetic measure called ISAF
(High Frequency Soil Impedance), which is proportional to the humidity. With
innovative technology, HidroFarm analyzes moisture at a higher
measurement volume and reduces the influence of other soil factors.
This manual covers all aspects related to the use of the equipment and
guidelines for starting to use the Web Application and Fal er Water App,
which allows the visualization and analysis of collected data. However, this
document is not an agronomic manual, and does not include post-
measurement actions related to the treatment of volumetric soil moisture
index.
Thank you for choosing Falker!
4 de 31

HFM3030
Digital Soil Moisture Meter
2 The Equipment
The equipment is supplied in a canvas case, suitable for use in the field.
The following items are provided:
•Electronic equipment HFM3030
•1 HFM1010 Sensor
•Connection cable with HidroFarm Sensor
•Protective case
•Handle safety strap
•Warranty term
•General Start Guide
•USB-A – USB-C Cable
Figure 1: Equipment Set
ATTENTION:
As an accurate measurement device, the HFM3030 must be transported
with care. The equipment's case was designed to protect it in the best
possible way for transport, but combined with the practicality of use. It is
not a pac age to be transported as cargo.
5 de 31

HFM3030
Digital Soil Moisture Meter
2.1 Accessories
In addition to the items that come with the equipment, the following
codes can be used to purchase accessories or replacement items.
Tabela 1: Accessories Commercial Codes
F K9020 USB-A - USB-C Cable
F K9030 USB-A Output Soc et Charger
HFM8200 HidroFarm Sensor Connection Cable
HFM1010 ISAF Soil Moisture Sensor 20 cm
HFM8330 Extender for sensor installation – 30 cm
6 de 31

HFM3030
Digital Soil Moisture Meter
3 Basic concepts
This chapter presents some basic concepts for the user to carry out a
correct interpretation of the results obtained with the equipment, since the
determination of moisture is an essential factor for the success of several
interventions carried out in the soil..
3.1 Volumetric Humidity x Gravimetric Humidity
HidroFarm informs users the value of soil volumetric moisture in%, ie the volume
of water contained in a given volume of soil sample. It is the same moisture that is
obtained in the evaluation with undisturbed samples, withdrawn with rings of nown
volume. Volumetric moisture may be related to gravimetric moisture. Therefore, it is
necessary to now the soil density, since the gravimetric moisture refers to the
percentage of the sample weight corresponding to the water. The following formula
can be used to establish a relation:
•Gravimetric Humidity
Ug=mass of water(g)
mass of soil (g)×100
•Volumetric Humidity
Uv=Ug×100× Ds
from density to density alone (g / cm³), to gravimetric umidation (%) and to
volumetric umidation (%).
The density of water as 1 g / cm³ is considered in the formulas cited
above.
3.2 Point of Permanent Wilt and Field Capacity
There are two soil attributes that are fundamental for the understanding
and use of soil moisture data: the permanent wilting point (PMP) and the
field capacity (CC). The PMP is the moisture content at which the plant can
no longer draw water from the soil. CC is the maximum capacity of the soil
to retain water, above which losses occur due to percolation of water in the
profile or through surface runoff. These two factors are variable according to
the soil class. For a better understanding of these factors, it is recommended
to read the Nota de Aplicação – Aplicações do HidroFarm -
NAP_HFM2010_001, available on the Fal er website.
It is quite usual to manage irrigation systems with the use of these
attributes, triggering the systems before the soil reaches the PMP content
and turning off when the field capacity humidity is reached, reducing water
losses, reducing irrigation costs and increasing productivity. The
determination and classification of the type of the soil in which it is being
wor ed can be done with the data of% of clay that is obtained in physical
analyzes of the soil, using the triangle of figure 2.
7 de 31

HFM3030
Digital Soil Moisture Meter
Figure 2: Soil texture classes triangle
The graph of Figure 3 shows the soil texture classes and their respective average
CC and PMP points for most volumetric moisture content cultures read in
HidroFarm.
8 de 31

HFM3030
Digital Soil Moisture Meter
Figura 3: Moisture content ranges for soil classes.
Subtitle
CC – Field Capacity:
Maximum humidity for soil water storage.
Range of available soil water to plants.
PMP – Permanent Withering Point:
Humidity in which the plant dies from dehydration.
9 de 31

HFM3030
Digital Soil Moisture Meter
3.3 Measurement range
The value reported by the meter refers to the average soil volumetric
moisture present at a distance of 15 cm from the sensor and along its 20 cm
length. See section 8 for more details.
Figure 4: Example of the area of coverage of the waves emitted by the sensor.
This feature may lead to an incorrect interpretation of the HidroFarm
values. Soon after a rainfall, natural or via central pivot, it is possible that
only part of the soil profile has been moistened, because the front of soil
wetting ta es some time to expand and stabilize according to the soil type,
being this time larger in clayey soils, which have a large presence of
micropores. Therefore, if the wetting front has reached only 10 cm, it means
that we will have another 10 cm of dry soil that will be in contact with the
plate. Thus, the reported value will be the average humidity of the 10 cm wet
and the other 10 cm dry.
The frequency range at which moisture is measured greatly reduces the
interference of factors such as texture and salinity, ensuring accuracy within
the limits of the equipment.
ATTENTION:
In order to obtain a measurement with greater
accuracy than those described in this manual, a
specific sensor calibration is recommended. There are
several methodologies available for this.
3.4 One-off measures
It is not possible to perform specific measurements of humidity with the
sensor, such as determining the exact humidity at 15 cm depth. If the sensor
is installed horizontally, at 15 cm depth, it will perform the average reading
in an area of 30 cm in diameter, that is, the range from 0 to 30 cm deep.
3.5 Measurement of humidity in organic materials
The use of the HidroFarm sensor to measure grain moisture or organic
maintenance is advisable only after a specific evaluation. The presence of
large air gaps between the particles of the material may impair the quality of
the measurement. A specific calibration is therefore required in these cases.
The standard equipment calibration was developed for mineral soils.
10 de 31

HFM3030
Digital Soil Moisture Meter
3.6 Sensor life
The sensor is made from materials resistant to time exposure, mainly
based on fiberglass. When permanently installed in the ground, it must be
maintained with the protective cap.
The biggest cause of sensor wear is the installation process and its
friction with the ground. In case of successive installations, the soil texture
and presence of stones will determine the useful life. In soils without gravel,
tests were carried out with a useful life of more than 400 installations.
3.7 Comparing measurements
Several studies have shown that soil moisture can vary greatly over small
ranges. With this, it can not be guaranteed that two sensors, installed side
by side, will provide the same reading.
4 Installation
Among the applications and ways of using HidroFarm we can
highlight the continuous monitoring and the instant measurement.
Continuous monitoring occurs when the user leaves the sensor installed in a
particular location and performs periodic measurements. This form of use presents
advantages as to the quality of the data obtained, because with the sensor
permanently installed, the soil around this tends to be structured in a natural way,
improving the contact with the active area of the sensor.
An instantaneous measurement can also be made with HidroFarm and, for this type
of measurement, a greater attention is paid to the installation procedures described
below.
HidroFarm measures soil moisture using electromagnetic principles.
Electromagnetic waves are emitted and the response of the soil to these waves is
analyzed. The water presents different responses of the structure of the soils. The
technology used is unique, called ISAF (High Frequency Ground Impedance). For
proper operation, it must be completely buried, with the active area in permanent
contact with the ground..
For best results with measurements, the sensor must be installed using one of
the following methods:
- Direct insertion (item 4.1)
- Insertion using auxiliary tool (item 4.2)
To eep the sensor installed at greater depths, the HFM8330 extender must be
used. Further details on the installation and use of this accessory can be found in
item 4.3
4.1 Direct Insertion
This method can only be used on soils with low compaction. It consists of drilling
the soil with the sensor itself.
11 de 31

HFM3030
Digital Soil Moisture Meter
To drill the ground with the sensor, grasp it with one hand in an upright position
and then press it down with the other hand, without ma ing lateral movements or
exerting impacts on it.
This method is most appropriate when the instantaneous measurement of data is
required, since the soil structure is little affected.
Figure 5: Direct insertion of the sensor into the ground
CAUTION:
If you notice that due to the force applied to the sensor to bury it in the ground, any deformation
or torsion occurs in your active area, immediately interrupt the direct insertion procedure and
start using the auxiliary tool insertion method. Otherwise, the sensor may be permanently
damaged.
To finish this installation step, lightly press the ground on the sides of the sensor
so that there is direct and complete contact between the sensor and the ground.
Figure 6: Ensuring contact between the ground and the sensor
4.2 Insertion using Auxiliary Tool
12 de 31

HFM3030
Digital Soil Moisture Meter
If it is not possible to drill the ground with the sensor itself, use a cutting tool
(cutting blade, nife) to create only an incision, a "tear" in the ground, facilitating
sensor entry.
This method presents lower initial precision because it changes the soil structure
around the sensor. If the sensor is installed a long time, this method can be used
without loss in data quality, since the soil will tend to its natural condition over
time.
Figure 7: Insertion of the sensor into a tear made in the ground
After insertion of the sensor into the created incision, the contact between soil
and the sensor must be guaranteed. The best way to ensure this contact throughout
the sensor is to insert a cutting blade about 20 cm away from where the sensor was
installed on both sides and press the ground towards the sensor.
Figure 8: Use of cutting blade to ensure contact between the ground and the sensor
ATTENTION:
The entire active area of the sensor must be in contact
with the ground.
13 de 31

HFM3030
Digital Soil Moisture Meter
Note:
The longer the sensor remains installed at the same point,
the greater its accuracy due to the accommodation of the
soil in its surroundings. Therefore, if feasible, eep the
sensor installed at the same point and perform the
measurements over time without changing the sensor
position.
4.3 Using and Installing the Extender
To eep the sensor permanently installed at greater depths, it is
necessary to use the optional extender for sensor installation - 30cm -
HFM8330. This accessory allows the installation of the sensor up to 30 cm
depth, which allows the evaluation of the range of 30 cm to 50 cm from the
soil profile.
For installation, remove the topsoil from the depth required to assess the
range of interest.
Install the sensor as recommended in 4.1 or 4.2.
Note:
Even for the measurement in deeper layers, it is necessary
a maximum contact of the soil particles with surface of
the sensor, in order to guarantee a high precision in the
obtaining of the humidity of the ground.
Connect the extension cable to the sensor. Attach the extender sleeve to
the sensor handle.
Apply the silicone that comes with the accessory and wait about 15
minutes to ensure the silicone is dry.
Figure 9: Sensor installed in the subsurface of the floor together with the extender after
opening the trench
Replace the removed soil to open the hole, leaving it again at the same
level as the soil.
ATTENTION:
Insert the sensor into the ground without the extender. Installing the sensor
with the extender may cause it to break.
14 de 31

HFM3030
Digital Soil Moisture Meter
Figure 10: Sensor and extender installed and ready for measurement.
Place the cap that was used on the sensor at the end of the extender, aiming at
protecting the connector.
Note:
Soil moisture located in the layer immediately above where the sensor is
located does not interfere with the measurement..
4.4 Connection Between Meter and Sensor
With the sensor installed in the ground, remove the sensor cover, ta ing care not
to displace the sensor and cause the soil to disintegrate in its surroundings.
Connect one end of the communication cable to the meter and the other to the
sensor.
Turn on the meter and verify that the letter “S” appears in the lower left corner of
the main screen. It indicates that the meter has detected the sensor and is able to
ta e measurements. During measurements, the connection to the sensor is
graphically represented on the screen..
Note:
For connection between the sensor and the meter when
using the extender, repeat the same steps as in this item.
ATTENTION:
HidroFarm uses electromagnetic waves to perform
moisture measurement. Therefore, when making a
measurement, stay away from the sensor and do not
allow the cable to come into contact with the ground,
thus avoiding interference. Always keep the same
pattern in measurements to ensure repeatability of .
ATTENTION:
When the sensor is not in use, keep it with the cap as
the connector is sensitive to moisture.
15 de 31

HFM3030
Digital Soil Moisture Meter
5 Operation
5.1 Basic Operation
To turn on the device, press the on/off located on the down side of
the panel. To turn off, hold down the on/off button at least for five
seconds.
When using the HFM3030 for the first time, the language and local
operating time of the equipment are defined..
Figure 11: First use screens
To set time, GPS signal is required. If a message of no GPS signal is
displayed, go to an outdoor place.
If it is not possible to perform this operation, it will be possible to set the
time at another moment, in the device settings menu. To start the use
without setting time, turn off and turn on the deviceso the the Gps no
signal message will be displayed.
16 de 31

HFM3030
Digital Soil Moisture Meter
5.2 Basic operation
Figure 12: User interface
The operation of the device is done with the following buttons
and the screen, where the measurement values, warnings and user
information as the state of charge, memory occupation and GPS signal are
displayed.
When turning on the device, after an initialization screen, the main screen
appears. The following information is displayed on this screen: battery level
and GPS position indication at the top. Also time indication (only when GPS is
receiving data) and memory usage are displayed at the bottom.
The memory usage is shown by the icon (memory card) represented by
the filling steps, which indicate the memory usage.
The icon with 4 vertical bars indicates the device’s GPS signal strength. If
it has a signal, the main screen also indicates the time, based on data from
the GPS itself.
17 de 31

HFM3030
Digital Soil Moisture Meter
Figure 13: Main screen
In the main screen, there are 5 options:
•Acquire: menu used to acquire new data.
•View: menu used to visualize acquired..
•Gerenciar: menu que permite definir referência, adicionar, editar ou
apagar trabalho.
•Bluetooth: menu that allows to enable or disable Bluetooth and
display its status.
•Settings: menu of the device’s settings.
All the above menu offer their own options.
The navigation between the menu options is done by the following
buttons e . The button selects the choosen option. The button
returns to the previous screen.
5.3 Data acquisition
Utilize o menu “Aquisição” para realizar medições.
After selecting the “Acquire” menu, the wor selection screen will be
opened, as shown in the figure 5 below.
Figure 14: Work selection
18 de 31

HFM3030
Digital Soil Moisture Meter
After selecting the desired wor , the following screen will be displayed:
Figure 15: “New day” or “Continue” screen
There is the option to continue one day wor or start a new day. After selection, the calibration
screen will open.
Figure 16: Measurement screen
To perform measurements, the user must access the “Measurement”
option in the menu. Obtaining data with HidroFarm is a quic and simple
procedure.
In measurement mode, pressing , the meter will communicate with the
sensor and read the moisture.
19 de 31

HFM3030
Digital Soil Moisture Meter
The data obtained in the measurement, as well as its attributes, are
automatically stored in the equipment's memory. If the data was obtained in
error, the user can erase it and redo the measurement. On the measurement
screen, using the directional arrows, four features can be accessed.
Figure 17: Resources of the measurement screen
•See latest: feature used to chec measurements ta en at the current
point.
•New measure: Performs a measurement.
•Erase latest: delete the last measurement at the current point.
CAUTION:
For equipment conservation, avoid impacts, falls and exposure to rain
5.4 Data visualisation
HidroFarm has basic features for viewing data on the equipment itself,
without the need for data transfer.
In the “View” menu, the job selection will open. After selecting the job,
the date selection shown in the figure below will open.
Figure 18: Home screens for choosing the point to be viewed
After selecting the point, the measurement visualization screen opens..
20 de 31
Table of contents
Popular Measuring Instrument manuals by other brands

Graco
Graco 255348 instructions

GEORGE FISCHER
GEORGE FISCHER +GF+ SIGNET 9020 Intelek-Pro instruction manual

Promet
Promet FiBO 250 quick start guide

Lambrecht
Lambrecht 8126 X81 operating instructions

Vidicode
Vidicode Call Recorder Octo manual

Keysight Technologies
Keysight Technologies N5221A Service guide

ColorLite
ColorLite ColorCube quick start guide

geo-FENNEL
geo-FENNEL FL 550H-G user manual

Omega
Omega Vortex FV100 Series user guide

Blue-White industries
Blue-White industries F-410 instruction manual

Watts
Watts BLUCHER Connected Roof User manual & installation guide

Boumatic
Boumatic StepMetrix Installation, Operation Maintenance & Service Instructions