Fanotec Ninja 4 User manual

© 2005-2011 Nodal Ninja®
- 1 -
Fanotec®Spherical Panoramic Tripod Head
Nodal Ninja 4
Manual

© 2005-2011 Nodal Ninja®
- 2 -
Contents
Introduction.............................................................................................3
Nodal Ninja 4 Features...........................................................................4
Nodal Ninja 4 Exploded View .................................................................9
Parts List......................................................................................10
Upper Assembly ............................................................................................10
Lower Assembly ............................................................................................10
PartSpecications .......................................................................11
Lower Rail Assembly.....................................................................................11
Upper Rail Assembly.....................................................................................12
Hard Shelled Cases for Nodal Ninja 4..................................................13
Basic Assembly ....................................................................................14
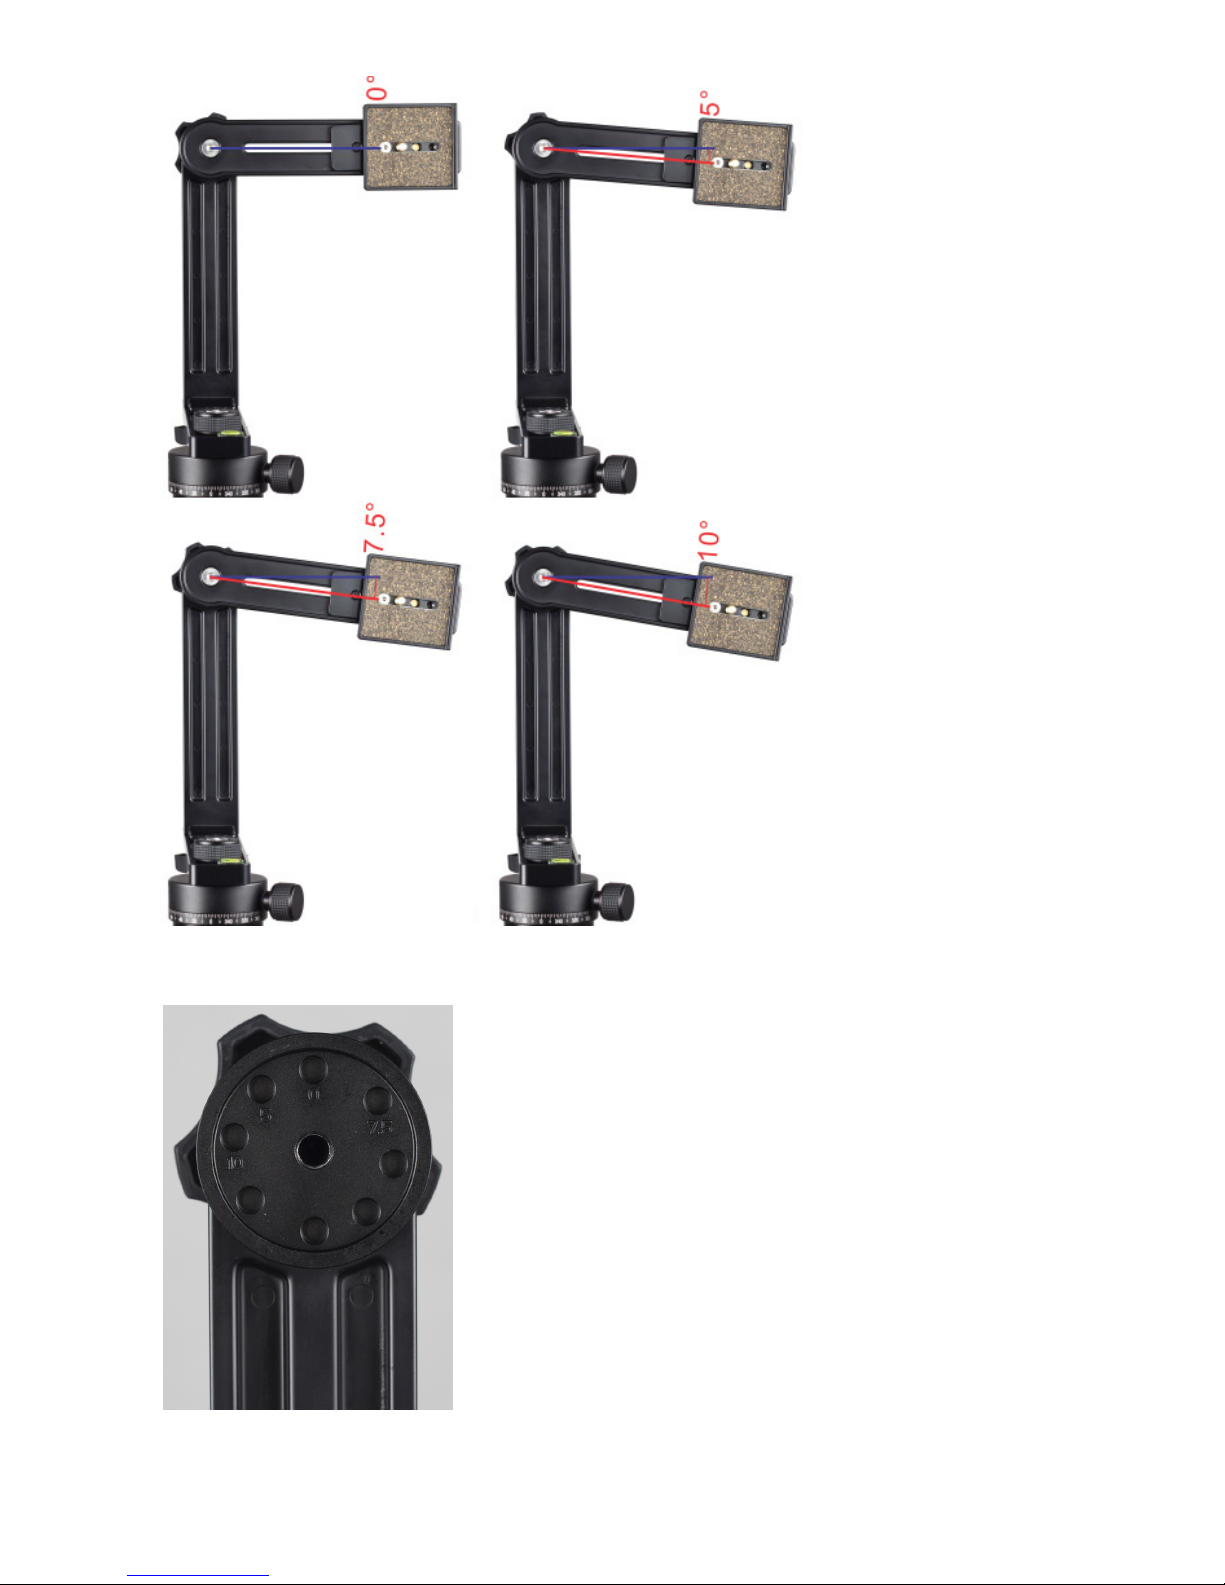
Removing and Replacing Detents .......................................................15
Setting up with Known NNP .................................................................16
Setting the lower rail ....................................................................16
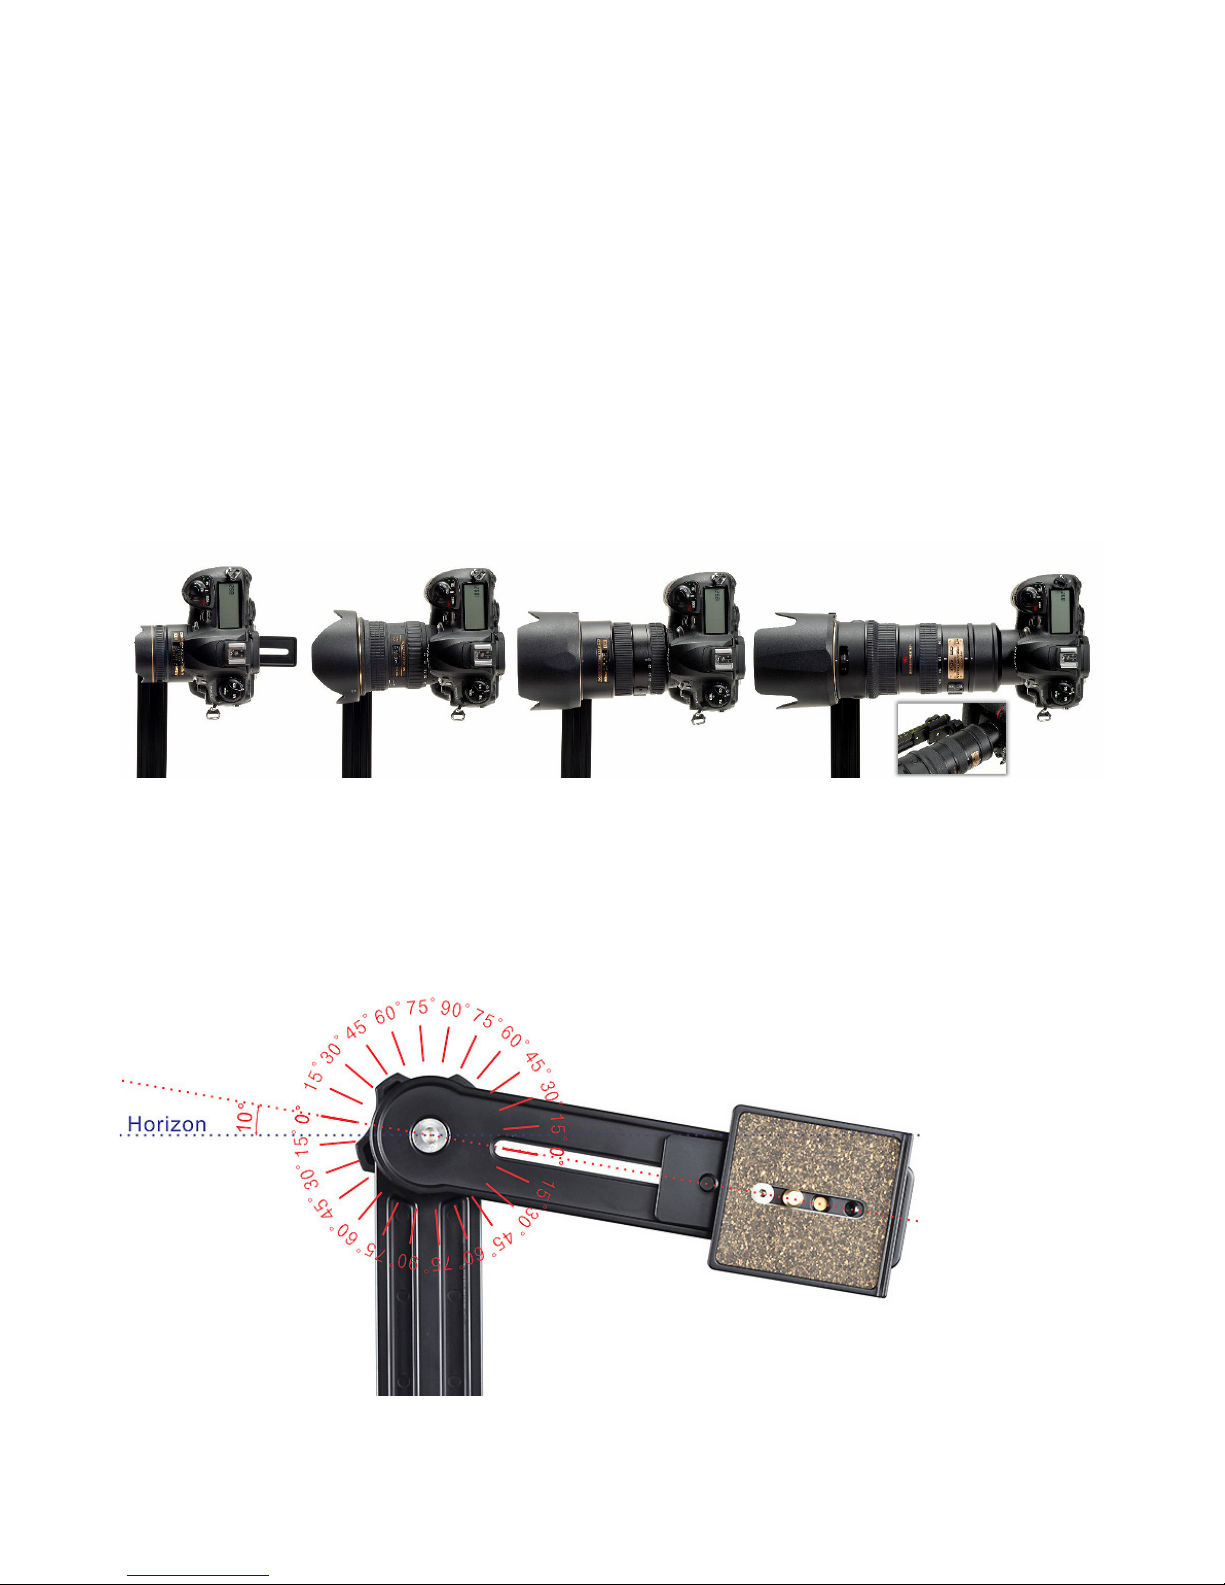
Setting the upper rail ...................................................................17
Using the Camera Mounting Plate (NCP1)...........................................18
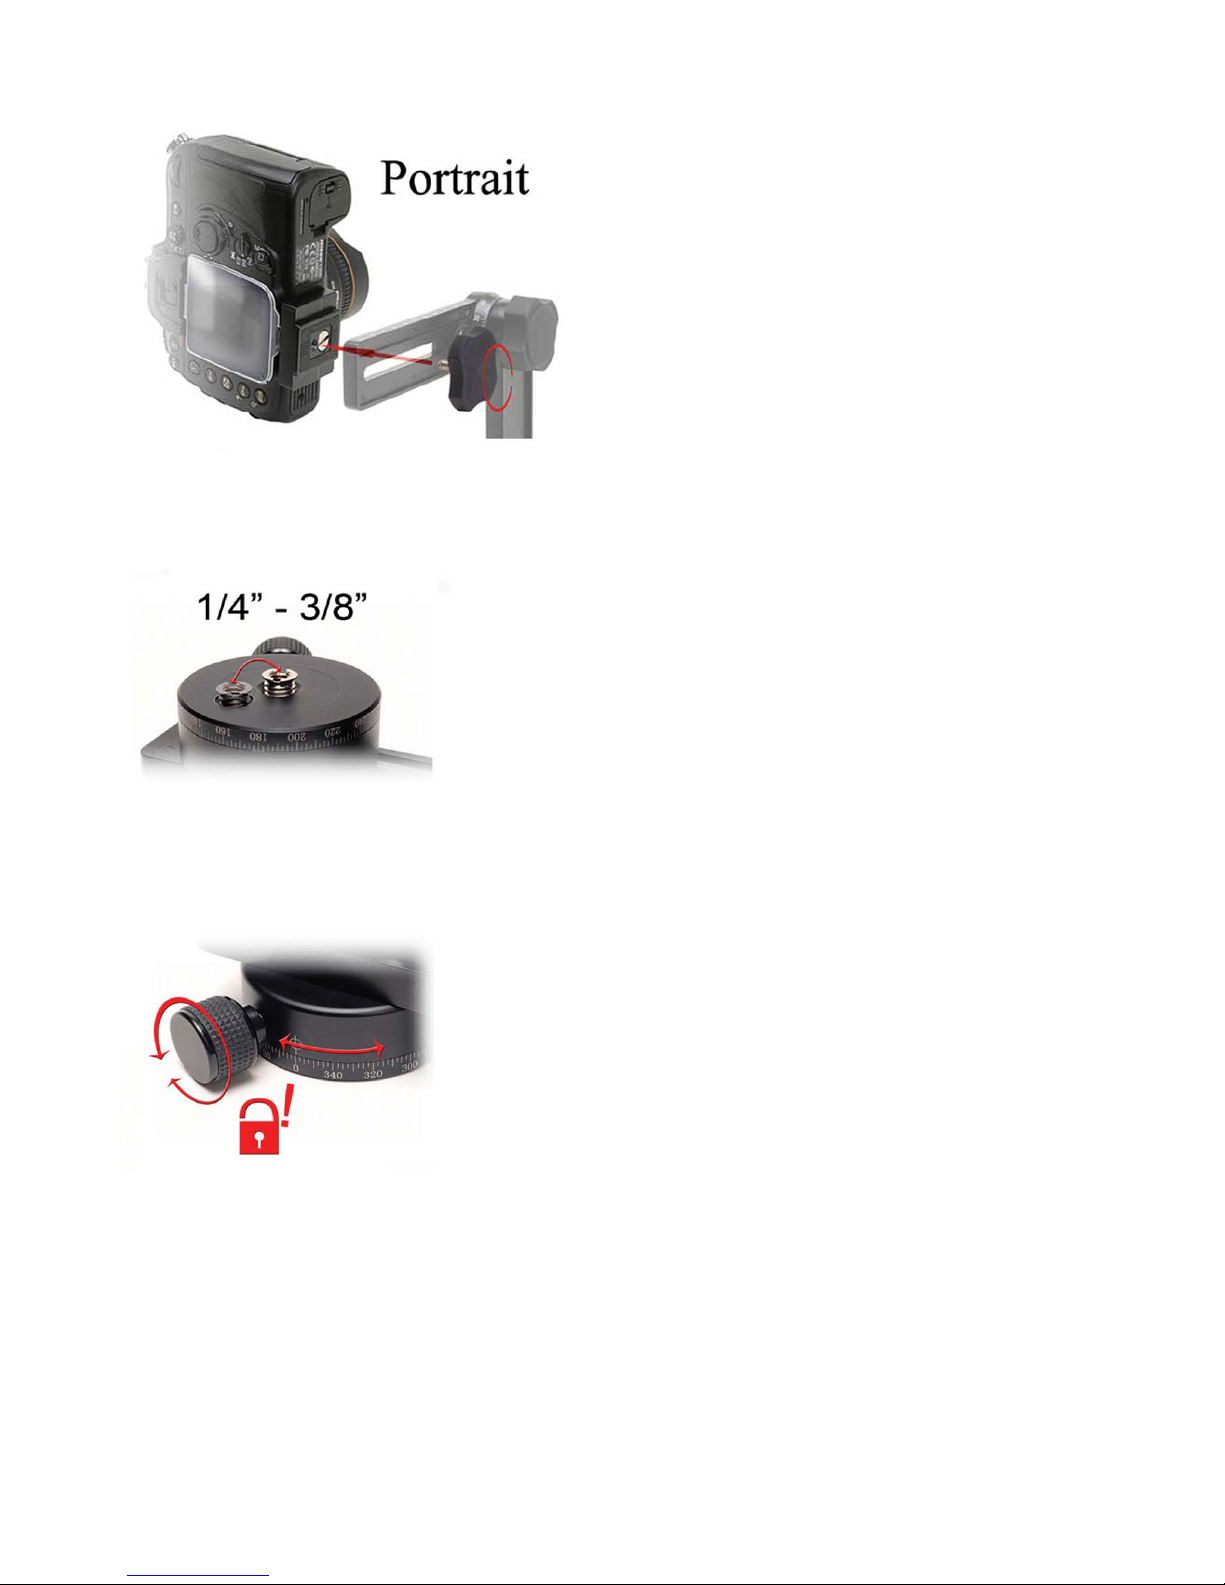
Mounting in Landscape Mode ..............................................................19
Quick Release Adapters.......................................................................20
Fanotec’s Arca Style Swiss Quick Release Clamp......................20
Cameras / Grips with Off-axis Tripod Mounts.......................................21
About Parallax ......................................................................................22
Finding the Entrance Pupil of a Lens....................................................23
Warranty ...............................................................................................27
Returns .................................................................................................28
Copyright Information ...........................................................................29
Contributors ..........................................................................................30

© 2005-2011 Nodal Ninja®
- 3 -
Introduction
Congratulations on your recent purchase and welcome to the exciting and growing world of
panoramic photography. Panoramic photography is one of the fastest growing segments in
photography. With developments in hardware and software this technology allows for the
creation of seamless stitching of multiple images. From simple two shot panoramic images
or complex 100+ shot super mega pixel mosaics, the Nodal Ninja is hardware designed to
work in conjunction with your camera and lens to eliminate parallax when shooting adjacent
images. Our panoramic tripod head is a quality piece of equipment designed to give you
many years of use.
Nodal Ninja 4 is the new affordable spherical panoramic tripod head from FANOTEC that
will take your photography to new heights. It features a precise upper rotator with 15 degree
stops, a design borrowed from the new Ultimate M1.
Nodal Ninja 4 vs Nodal Ninja 5
−Slightly shorter vertical and upper rails than NN5
−Easier to use upper rotator with 15 degree positive stops
−Support offset of +/- 5, 7.5, or 10 degree from the horizon
−Support use of FANOTEC lens rings with new QR clamp (coming soon)
−More affordable than NN5
−Same load rating to support up to 7.7lbs (3.5kg)
−Limit to 100mm focal length only (35mm equivalent and 25% overlap)
Note: NN4 will use all accessories from NN3 and 5 series.

© 2005-2011 Nodal Ninja®
- 4 -
Nodal Ninja 4 Features
WehavecompiledalistofthefeaturesandbenetsofNodalNinja.Whenshoppingpanoramic
tripod heads you need as much information as you get. We feel Nodal Ninja offers the best
performance with features against price. Here is a summary of the strong points of Nodal
Ninja 4.
−The NN4 is an affordable spherical panorama head that will take your photography to
new heights.
−It supports a wide range of lenses from ultra wide angles to 100mm (35mm equivalent
focal length and 25% overlap) telephotos.
−The upper rotator can be installed with an offset of +/- 5, 7.5, or 10 degree from the
horizon, making it perfect for single row spherical panoramas with various sheye
lenses.

© 2005-2011 Nodal Ninja®
- 5 -

© 2005-2011 Nodal Ninja®
- 6 -
−The Nodal Ninja 4 can support up to 7.7lbs (3.5kg) large DSLR cameras and supports
the advanced rotators RD8, RD16, and RD3L.
−Longer arms – (about ?1mm longer than NN3). This helps to accommodate larger
cameras like the D2X, D3 or MK II, MK III, and cameras with battery packs and even
many medium and large format cameras.
−Allows your camera to be mounted in landscape mode.

© 2005-2011 Nodal Ninja®
- 7 -
−Allows your camera to be mounted in portrait mode.
−Fits all tripod heads – uses both 3/8” & 1/4” thread mount adapter.
−Small Rotator Base - less foot print to edit out when doing full spherical panos.
−Closed rail design – assures your expensive camera won’t slip off accidentally.
−Detachable upper arm detents to rotate about any desired increment.
−Large easy to turn knurled edge adjustments knobs (great with gloves in cold weather).
−Allows the use of many Quick Release Adapters.
−As small as 10 degree click stops in lower arm rotator are possible.

© 2005-2011 Nodal Ninja®
- 8 -
−Reversible detent rings.
− Detentringscanbedisabledontheywithoutanytool.
−More precise rotator base with locking function.
−Made to higher precision tolerances than earlier models.
−Demarcations in increments of 2.5 degree on both upper and lower rotators, great for
doing high resolution mosaics at longer focal lengths.
−Rail stops for “remembering” camera and lens settings.
−Leveling – built-in quality bubble level for exact leveling.
−Lower and upper arm rulers for precise measuring of Entrance pupil settings.
−Compact – breaks down to only ?2mm x ?3mm (?4”x?5”).
−Weight – only ?6grams.
−Attractive foam lined zippered hard shell carry case.
−Customer support.
−Two year manufacture warranty.

© 2005-2011 Nodal Ninja®
- 9 -
Nodal Ninja 4 Exploded View

© 2005-2011 Nodal Ninja®
- 10 -
Parts List
Upper Assembly
−1 – Upper Rotator Tightening Knob (part# N5UTK)
−2 – Metal Washer (part# N5MW1)
−3 – Upper Arm Rotator Detent Pins 4ea (part# N5URDP)
−3a – Upper Arm Rotator Hex Screws 4ea (part# N5URHS)
−4 – Vertical Rail (part# N5VR)
−5 – Upper Horizontal Arm (part# N5UHR)
−6 – Rail Stop Screw (part# NRS)
−7 – Camera Mounting Knob (part# N5CMK)
−8 – Metal Washer (part# N5MW1)
−9 – Camera Mounting Plate (part# NCP-1)
−10 – Rail Stop Plate (part# NRS)
−11 – Upper Arm Support Screw
Lower Assembly
−12 – Lower Horizontal Rail (part# N5HR)
−13 – Rail Stop Plate (part# NRS)
−14 – Lower Detent Release Knob with Rubber O-Ring (part# N5LRRK )
−15 – Lower Rotator Tension Knob (part# N5LRTK)
−16 – Vertical Rail Mounting Knob (part# N5VRMK)
−17 – Metal Washer (part# N5MW1)
−18 – Lower Rotator Lock Knob (part# N5LRLK)
−19 – Rail Stop Screw (part# NRS)
−20 – Lower Rotator Outer Housing (part# N5LROH)
−21 – Lower Rotator Hex Screws 2ea (part# N5LRHS)
−22 – Lower Rotator Detent Pin (part# N5LRDP)
−23 – Reversible Detent Ring (part# N5(degrees))

© 2005-2011 Nodal Ninja®
- 11 -
Rings available:
10/12 degrees, number of stops around n = 30/36
15/18 degrees, number of stops around n = 24/20
20/24 degrees, number of stops around n = 18/15
30/36 degrees, number of stops around n = 12/10
45/60 degrees, number of stops around n = 8/6
90/120 degrees, number of stops around n = 4/3
45&60/90&120 degrees, number of stops around n = 8+6/4+3
−24 – Lower Rotator Inner Housing (N5LRIH)
−25 – 3/8” to 1/4” Screw Adapter (N38/14)
Part Specications
Lower Rail Assembly
Adjustment distances from the lower rotator center point to the upper vertical arm mounting
point, minimum adjustment distance 53mm (2 1/4”), maximum distance ?7mm (?8”).
The lower horizontal rail is used to slide the upper vertical assembly (when attached) into 1
of 2 needed entrance pupil positions depending on the camera and lens being used. The rail
has a laser engraved scale marked in millimeters (1 mm intervals). The grooves of the scale
arelledwithwaterresistantpainttoincreaseclarity.
The lower rail assembly incorporates the “lower rotator assembly”. The lower rotator assembly
allows for 360 degree horizontal rotation. The rotator base is engraved with demarcations
in 2.5 degree intervals, with longer tic marks at 5 and 10 degree intervals. Numerical values
every 20 degrees with diamond tic marks every 10 degrees make for great visual reference
when rotating or panning the camera/lens across the horizontal plane. Mounting a camera/
lens in horizontal mode allows for very precise rotation to shoot across the horizon line.
Using in conjunction with the upper rotator allows for very precise rotation for single row and
mulitrow spherical panoramas.

© 2005-2011 Nodal Ninja®
- 12 -
Upper Rail Assembly
Overall dimensions of upper rail = ?9mm x ?10 mm x ?11 mm (?12” x ?13” x ?14”). Adjustment
distances from the upper rotator center point to the upper rail camera mounting point,
minimum adjustment distance 33mm (1 1/2”), maximum distance ?15mm (?16”). This would
be the maximum distance from camera mount to entrance pupil (a.k.a. nodal point) of a
particular lens. The upper horizontal rail is used to slide the camera/lens into 1 of 2 needed
entrance pupil positions depending on the camera and lens being used. The rail has a laser
engravedscalemarkedinmillimeters(1mmintervals).Thegroovesofthescalearelled
with water resistant paint to increase clarity.
The upper rail assembly incorporates the “upper rotator assembly”. The upper rotator
assembly allows for 360 degree vertical rotation. The rotator is engraved with demarcations
in 2.5 degree intervals, with longer tic marks at 5 and 10 degree intervals. Numerical values
of 0, 30, 60, and 90 degrees with diamond marks every 10 degrees. These markings add for
great visual reference when tilting the camera to do mulitrow panoramas and full spherical
panoramas.
?17 Note: The upper rotator assembly can be locked “positively”every 15 degrees. The weight
load limit of camera/lens with this locking detent system is approximately 10kgs (20 lbs).
The upper rotator detents can be easily detached by unscrewing the 4 hex screws (see
3a above). This will free the rotator for detent free rotation. This is ideal when using longer
focal length lens and for those doing mosaic photography. When opting to detach the upper
detents the weight load limits decreases to approximately 7kgs (15lbs).

© 2005-2011 Nodal Ninja®
- 13 -
Hard Shelled Cases for Nodal Ninja 4
We have available very attractive hard shelled cases.
These cases are padded with a foam
lining.
Dual zippered for added opening
convenience.

© 2005-2011 Nodal Ninja®
- 14 -
Basic Assembly
NN4 comes preassembled in two parts – upper and lower assembly.
Place vertical arm assembly on lower rail assembly and Secure with the Vertical Rail Mounting
Knob. Place vertical arm assembly on lower rail assembly and Secure with the vertical rail
friction set knob.
Make sure the vertical assembly is positioned so the upper rail is facing so it’s on the inside.
You will see the vertical rail also has two feet at the base – the longer is to point inwards
towards lower rotator.

© 2005-2011 Nodal Ninja®
- 15 -
Removing and Replacing Detents
Disassemble the lower rotator assembly by
completely unscrewing the friction set knob on
top (with markings).
Using the enclosed hex key loosen the inner hex screw enough to release detent ring. Some
units may have the hex key tool located inside the tension knob as shown above left. Place
the detent ring with desired side face up. Tighten hex screw and reassemble.
At the time of this writing we have the following rings available:
−10/12 degrees, number of stops around n = 30/36
−15/18 degrees, number of stops around n = 24/20
−20/24 degrees, number of stops around n = 18/15
−30/36 degrees, number of stops around n = 12/10
−45/60 degrees, number of stops around n = 8/6
−90/120 degrees, number of stops around n = 4/3
−45&60/90&120 degrees, number of stops around n = 8+6/4+3

© 2005-2011 Nodal Ninja®
- 16 -
Setting up with Known NNP
If you already know the “No Parallax Point” (NNP) of your camera and lens there are only
two adjustments to deal with on Nodal Ninja to properly position it. The exception would be
if your camera, or battery grip, has an offset tripod mount in which case you will need to
compensate with a t-adapter as explained later. In the samples to follow we’ll use the NN3
in some images as the same basic principles apply.
Setting the lower rail
With the camera/lens mounted rotate the “upper”
rail so it is perpendicular to the ground. Point the
camera directly down making sure the barrel of
the lens is in line with the upper rail.
Loosen the lower vertical rail knob (shown in
image as adjustment knob) slide the vertical
and upper assembly back and forth on the lower
rail unit the camera/lens is positioned directly
over the lower rotator knob (with marking). You
canlookthroughthecameraviewndertohelp
center.Oncecenteredyouhaveyourrstoftwo
settings.
Insert a rail stop as shown
and tighten to lock and
remember this position. The
lower position is now set and
will not change regardless of
lens or focal length
.

© 2005-2011 Nodal Ninja®
- 17 -
Setting the upper rail
Loosen the upper rotator knob and
rotate the upper rail with camera/lens still
attached so it points straight out (parallel
with the ground) as shown to the right.
This position is known as 0 degrees. Next
loosen the camera mounting knob and
slide the camera on the upper rail until the
NNP of the lens is centered with the upper
rotator. In the example we show the Nikon
D70 with 10.5mm lens. The NPP point on
this lens is very near the gold ring. So we
slide the camera/lens on the rail so the ring
is centered with the upper rotator, which is
also in line with the center of the vertical
rail.
Insert a rail stop as shown and tighten
to lock and remember this position. The
upper position is now set unless you
change camera and or lenses or vary the
focal length it will remain as is.
Using the rail stops after you learn your
settings will allow you to remember the
same position when re-mounting your
camera. You can place the rail stop on
either side of the camera plate. The image
shows the rail behind the plate.

© 2005-2011 Nodal Ninja®
- 18 -
Using the Camera Mounting Plate (NCP1)
When mounting the camera plate (CP) make
sure it is perpendicular to the camera body
toassureasnugt.DoNOTtwisttheCPto
tighten, secure using the 1/4 screw with coin
or screwdriver. Twisting the CP to tighten
may damage the rubber skid plate on your
camera base. This would also apply to using
the t-adapter as well.
When using the CP mounting plate it is
possible to rotate it 180 degrees on the base
of the camera giving a bit more forward
or backward movement, depending on
which way it is mounted. This is a personal
preference as some cameras allow for a
better grip in one position while others will
allow for a better grip (more surface mounting
area) in the opposite position.
This setup allows you mount your camera
and lens in portrait mode (sideways) onto the
upper rail on Nodal Ninja.

© 2005-2011 Nodal Ninja®
- 19 -
Mounting in Landscape Mode
Mounting your camera and lens in landscape mode allows for horizontal panning only.
NN4 will support lenses up to 100mm. When using lens of this length may be better to mount
using the lens tripod mount.

© 2005-2011 Nodal Ninja®
- 20 -
Quick Release Adapters
Fanotec’s Arca Style Swiss Quick Release Clamp
ThenewlowproleArcaStylePlatebyFanotecmountstothebaseofyourcamera.
This plate can used with Fanotec’s Arca Style Clamp (ASQRC-2) and/or most Arca Style
Clamps for mounting in a reproducible manner.
Incorporated into the plate is a 10mm offset for battery grips (as with some Canon Grips)
where the tripod mount is not centered with the barrel of the lens.
Not recommended for use with NN3 if used with Camera Plate and Arca Style Clamp.
Table of contents
Other Fanotec Camera Accessories manuals
Popular Camera Accessories manuals by other brands

Acebil
Acebil P-30GX Operation manual

SSS Siedle
SSS Siedle Scope S 851-0 Product information

Rollei
Rollei Pro Transmitter Mark II instructions

Ikelite
Ikelite DLM Dome Port with Zoom Extension .375 Installation and use

Sony
Sony LC-H300 operating instructions

Moog Videolarm
Moog Videolarm AD8C-9 Specifications