Fantom Drives Netbook Mate DVD Docking unit Instruction Manual

QuickStart
Installation Guide
Thank you for choosing Fantom Drives! Your Fantom Drives
Netbook Mate has been built to the highest standard of quality and
workmanship and, when used according to the instructions in this
guide, will provide years of trouble-free operation. We at Fantom
Drives take great pride in bringing personal satisfaction to each of
our customers.
Your Netbook Mate is compatible with all USB-capable Apple
Macintosh computers running MacOS 10.4.11 (or greater) and
PC-Compatible computers running Windows XP, Windows 2003,
Windows Vista, and Windows 7.
11-22-2009 nbmm Rev B
The material in this document is for information only and is subject to change without notice. While reasonable efforts have been made in the preparation
of this document to assure its accuracy, Fantom Drives and Fantom Drives assume no liability resulting from errors or omissions in this document, or from
the use of the information contained herein.
Fantom Drives reserves the right to make changes in the product design without reservation and without notification to its users.
Fantom Drives, The Fantom Drives Logo, Fantom Drives and the Fantom Drives logo are registered trademarks of Fantom Drives. Mac Mini, Macintosh, and
the MacOS Logo are trademarks of Apple Computer Inc. Microsoft Windows and the Windows Logo are registered trademarks of Microsoft Corporation.
All other names and logos are property of their respective owners.
Copyright © 1999, 2009 Fantom Drives. All rights reserved. This publication may not be reproduced, stored in a retrieval system, or transmitted in any form
or by any means, in whole or in part, without the prior written consent of Fantom Drives, 20525 Manhattan Place, Torrance CA 90501.
WARNING - TO REDUCE THE RISK OF FIRE OR ELECTRIC SHOCK,
DO NOT EXPOSE THIS APPLIANCE TO RAIN OR MOISTURE.
CAUTION - TO REDUCE THE RISK OF ELECTRIC SHOCK, DO NOT
REMOVE COVER (OR BACK). NO USER-SERVICEABLE PARTS
INSIDE. REFER SERVICING TO QUALIFIED SERVICE PERSONNEL.
FCC Compliance Statements
This equipment has been tested and found to comply with the limits for a Class B digital device, pursuant to Part 15 of the FCC rules. These limits
are designed to provide reasonable protection against harmful interference in residential installation. This equipment generates, uses, and can radiate
frequency energy and, if not installed and used in accordance with the instructions, there is no guarantee that interference will not occur in a particular
installation. If this equipment does cause harmful interference to equipment off and on, the user is encouraged to correct the interference by one or more
of the following measures:
• Reorient or relocate the receiving antenna
• Increase the distance between the equipment and receiver
• Connect the equipment into an outlet on a circuit different from that to which the receiver is connected
• Consult the dealer or an experienced radio/TV technician for help
Fantom Drives
20525 Manhattan Place
Torrance, CA 90501
Sales: 310-320-7272
Support: http://www.FantomDrives.com/support
www.FantomDrives.com
Windows & Mac
DANGER - THIS DEVICE CONTAINS A CLASS 1 LASER DEVICE.
INVISIBLE LASER RADIATION WHEN OPENED AND INTERLOCK
FAILED OR DEFEATED. AVOID DIRECT EXPOSURE TO BEAM.
Docking Station by Fantom Drives with optical
multidrive and removable USB disk module
By MicroNet

- 2 -
One Year Limited Warranty
Fantom Drives warrants this product (the “Product”) against defects in material or workmanship
as follows:
1. LABOR: For a period of one (1) year from the original date of purchase from Fantom Drives or
its authorized relseller, Fantom Drives will repair defective Product (or, at its option, replace with
a new or recertified product) at no charge. After this 1 year period, you must pay for all labor
charges.
2. PARTS: For a period of one (1) year from the original date of purchase from Fantom Drives or
its authorized reseller, Fantom Drives will supply, at no charge, new or rebuilt replacement parts
in exchange for defective parts of this Product. Any replacement parts will be warranted for the
remainder of the original warranty period or ninety (90) days from installation by Fantom Drives.
All exchanged parts replaced under this warranty will become the property of Fantom Drives.
This warranty only covers the hardware components packaged with the Product. This warranty
does not cover any software contained in, or included with, the Product; any such software is
provided “AS IS”. Please refer to any documentation included with the software for your rights and
obligations with respect to the software.
This warranty extends only to you, the original purchaser. It is not transferable to any one who
subsequently purchases the Product from you.
Proof of purchase in the form of a bill of sale (which is evidence that the Product is within the
warranty period) must be presented to obtain warranty service.
To obtain warranty service you must take the Product, or deliver the Product freight prepaid, in
either it’s original packaging, or in a package that provides the Product with a degree of protection
equivalent to that of the original packaging, to Fantom Drives. Please contact Fantom Drives at
the number listed on the rback cover for further information.
Fantom Drives is not responsible for any damage to, or loss of, any programs, data, or other
information stored on any media or any part of any Product serviced hereunder. Be sure to remove
all features, parts, options, alterations, and attachments not under warranty prior to returning
the Product to Fantom Drives. Fantom Drives is not liable for any loss or damage to these items.
This limited warranty does not cover: (1) any consumables (such as batteries) supplied with this
product; cosmetic damages; damage or loss to any software programs, data or removable stor-
age media; or damage due to the Product such as but not limited to excessive heat or humidity,
or modifications of this Product; (2) improper installation, operation, testing or maintenance of this
Product; (3) power failure or connection to improper voltage supply; or; (4) attempted repair by any
party other than Fantom Drives. This Warranty does not apply when the malfunction results from
the use of this Product in conjunction with accessories, products or ancillary or peripheral equip-
ment, or where it is determined by Fantom Drives that there is no fault with this Product itself.
This Limited Warranty is invalid if the factory applied serial number has been altered or removed
from the Product.
Repair or replacement as provided under this warranty is the exclusive remedy of the consumer.
Fantom Drives shall not be liable for any incidental or consequential damages for breach of any
express or implied warranty, breach of contract, negligence, strict liability or any other legal theory
related to this product. Such damage include, but are not limited to, loss of profits, loss of data,
loss of use of the product or any associated equipment, down time and purchaser’s time. Except
to the extend prohibited by applicable law, any implied warranty of merchantability or fitness for a
particular purpose on this product is limited in duration of this warranty.
Some states do not allow the exclusion or limitation of incidental or consequential damages, or
allow limitations on how long on implied warranty lasts, so the above limitation or exclusions may
not apply to you. This warranty gives you specific rights; you may have other rights which vary
from state to state. - 11 -
Contents
Introduction ........................................................... FC
Table of Contents ................................................... 2
Parts & Accessories List ......................................... 3
System Requirements ............................................. 3
Connecting the Netbook Mate to Your Computer........ 3
Fantom Drives portable disk at a Glance .................... 4
Using your Netbook Mate’s Optical Drive ................... 5
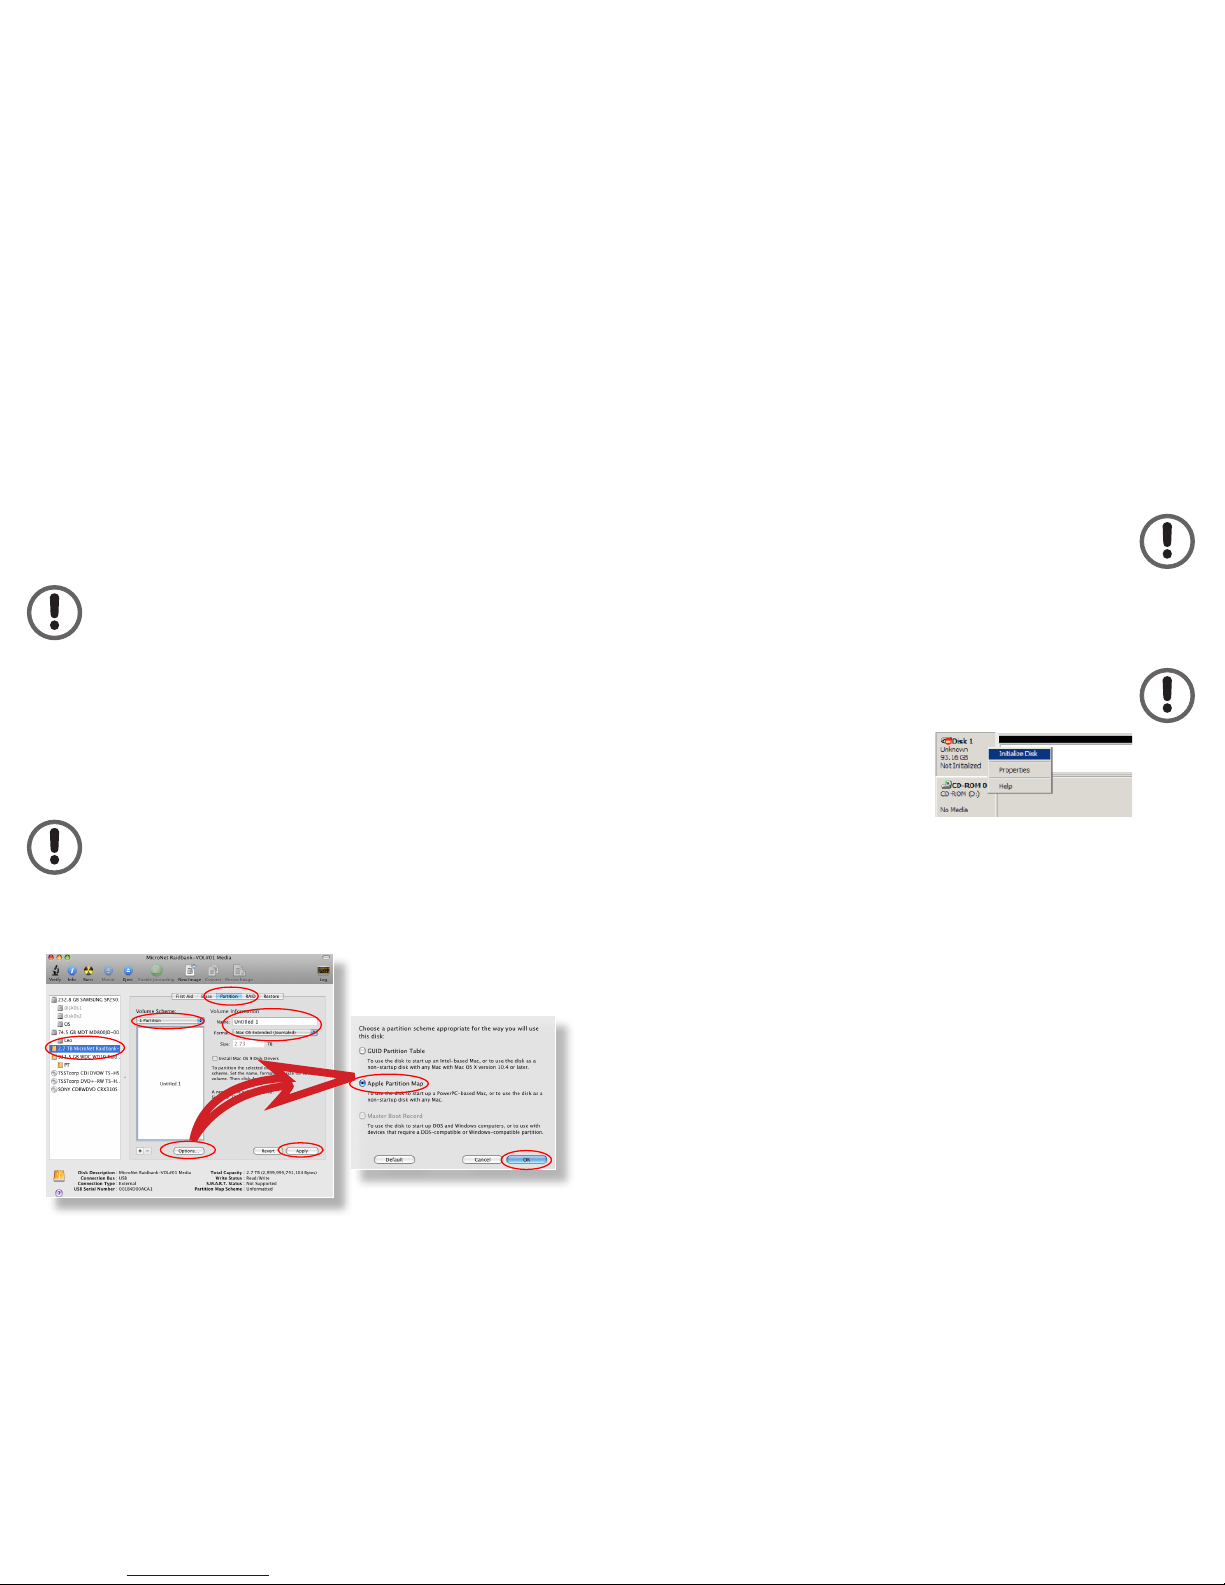
Formatting Your Netbook Mate Disk Module .............. 6
Formatting the drive in Mac OS X .............................. 6
Formatting the drive in Windows ............................... 7
Optimizing Windows Caching Algorithm .................... 8
How to safely dismount and turn off your
disk module ............................................................ 9
Troubleshooting /
Frequently Asked Questions (FAQ) ........................ 10
Contact Information .............................................. BC

Package Contents:
1 Netbook Mate DVD Docking unit
1 Hard Disk Module 1 USB 2.0 Cable
1 Users Manual 1 Power Supply
System Requirements:
Microsoft Windows: PC desktop/laptop/netbook running Microsoft®
Windows® XPSP3 or newer with an available USB 2.0 port.
Mac OS: PCI PowerMac or newer running Apple® MacOS 10.4.11 or
newer with an available USB 2.0 port
Installation:
1. Plug the AC adapter cord into the power port on the back of the drive.
The plug should not require much effort to insert.
2. Plug the AC Adapter into an AC power outlet.
3. Connect the small USB 2.0 connector (USB mini) of the included
USB cable to a the mini USB plug on the Netbook Mate, and the
rectangular end to a free USB port on your computer.
IMPORTANT: USB Plugs are shaped so they can only be
properly inserted one way. Be sure to insert the plugs
properly or you may damage the drive and void the warranty.
The DVD Burner in the Netbook Mate requires USB 2.0
Speed in order to operate correctly. In order to reach USB
2.0 speeds, you must have a computer or host adapter that
has USB 2.0 support. Please check your computer or USB
host bus adapter documentation for more information.
Attaching your disk module to another computer
Your Netbook Mate disk module is connector-compatible with
standard USB devices. To connect the Netbook Mate disk module to
a standalone computer, simply use a standard mini-USB cable (the
same kind as to connect directly to your computer.) If you require
additional cables you may purchase one from your authorized Fantom
Drives reseller.
Q: When I try to burn CDs, I get a “Sense Key” error or other
burning failures
A: This is usually caused by burning at faster speed than the media
allows. Make sure the media you are writing to is compatible with
the speed you are trying to burn. Here are some suggestions to
successful burning:
• Try lowering the burn speed down
• Choose “Write CD” option instead of the “Write Session” option
• Optimize (defragment) your source hard disk drive
• The media used may be of low quality or incompatible- try another
brand.
Q: Can I use my Netbook Mate through a USB hub?
A: Yes, as long as the hub is a powered hub and USB 2.0 compliant.
Bus powered hubs do not work properly with mass storage devices.
For best results Fantom Drives recommends connecting directly to a
USB 2.0 port on the computer.
Q: The solution didn’t work/I have a problem not listed on this page
Fantom Drives offer additional troubleshooting resources on our web
site at www.FantomDrives.com/support
- 3 -- 10 -

Your Netbook Mate at a
glance
Front View
*Additional Disk modules for the Netbook Mate are available to purchase
from Fantom Drives- consult with your Fantom Drives Reseller for details.
Back View
AC Adapter Slot
Host USB Port
Fan On/Off Switch
Security Lock Slot
Using your Netbook Mate
optical Drive
Precautions
• Do not move the drive while it is in operation
• Do not attempt to force the tray open. If the tray is stuck, follow the
emergency ejection instructions below.
• Do not use or store CD/DVD media in dirty or dusty locations;
in locations subject to extreme temperatures; in warm or humid
- 4 - - 9 -
How to Safely
Dismount and Turn Off
Your disk module
What do 'mounting' and 'dismounting' mean? When a device such as
a hard drive is mounted, that means the computer ‘sees’ the device
and is able to communicate with it. When you dismount a device, the
computer no longer sees it. The device may still be running but the
computer cannot access it, as though the device no longer exists.
Never turn off or unplug a hard drive without dismounting it first.
Doing so could cause data on the drive to be lost or damaged.
How to safely dismount and turn off the
drive with the computer running
Mac Users
Drag the icon for the External Hard drive to the Trash. The drive will dismount
and you can then safely turn if off. You may then unplug the power cord and
data cable if you want to disconnect the drive.
PC Users
1. Locate the System Tray. The System Tray includes the time
display in the bottom right, and icons to the left of the time. One of
the icons will be an hot plug icon ( ).
2. Left-click on ( ). You will receive the alert message “Safely
Remove..” followed by the drive description and drive letter for the
device.
3. Left-click on the appropriate device (with the drive letter matching
the one used by the External Hard drive). After a few seconds,
Windows will give you a message that it is safe to remove the device.

- 8 - - 5 -
locations where condensation may form; or in locations exposed to
direct sunlight.
• Do not use cracked, warped or damaged CD/DVD media. The
media may break up inside the drive, damaging it and possibly
leading to injury.
• Do not touch or write on the disc surface.
• Do not drop, bend or flex the discs, or place any heavy objects on them.
• Do not incinerate CD/DVD media: discs that are no longer used
should be disposed of according to local regulations.
Inserting media
1. Press the eject button and wait for the tray to open. If the tray does
not open, there may be a disc already in the drive and you may need
to issue a dismount or eject command from your operating system.
2. Place your CD or DVD disc in the tray label side up.
3. Gently push the tray or press the “Eject” button to close the tray.
4. The disk will mount automatically on your desktop (Mac OS X) or
appear in the designated DVD drive letter (Windows)
Emergency ejection of DVD and CD media
In the event that a media cannot be ejected with the load/eject button
and when no software is controlling the drive, an emergency eject
operation will open the media tray. Insert a small metal poker, such as
an unbent paper clip, into the opening until it presses against the manual
eject mechanism. You will feel the mechanism eject the media tray. Use
this method only when the load/eject button is not working.
Warning! Make sure the drive has been off for a minute or longer,
that the disc has stopped spinning in the drive and that the power
is unplugged before attempting the emergency ejection procedure.
Troubleshooting
Q: My computer will not recognize the drive
A: Make sure the software for your drive is installed following the
instructions. Disconnect the drive and power the unit off. Wait 15
seconds, then power your drive back on. Wait 5 more seconds, then
reconnect the drive to your computer system.
Q: I get clicks and pops when I make an audio CD
A: Audio is sensitive to burn speeds. Many professionals opt to
burn audio CDs at the slowest speed to ensure maximum quality
and playback compatibility.
Optimizing Windows Caching Algorithm
By default, Windows XP
optimizes caching for
performance on external
drives. Vista and Windows
7 optimize caching for
quick removal. As a result,
Windows XP appears to have
faster access to external
disks but at a greater risk
of data corruption and
loss. To change Windows'
caching algorithm, open the
disk management console
located at \Windows\
System32\diskmgmt.msc
on your system drive. A list
of the attached drives and
their respective volumes
will appear. Right-click on
the Fantom external disk in the disk list and select properties. Select
the Policies Tab near the top left of the window, and click your
desired optimization level. press OK when finished, and you may
close the disk management applet.
Optimizing for performance can greatly enhance the
throughput of your disk but is much more vulnerable to data
loss! Make sure to have appropriate backup strategies before
enabling this feature!
Write Protection Switch
Your Netbook Mate Disk Module can be locked into read only mode
to prevent accidental deletions or file modifications. The switch is
location on the side of the disk opposite the signal connector. Please
make sure to set the write protection mode before connecting the
disk module or the lock/unlock status may not be set properly.
Locked
Unlocked

Formatting Your Disk
Module
The portable disk comes preformatted at the factory with the FAT32 file
system, which will mount on most modern operating systems. FAT32
has some limitations, and we recommend you reformat the volume to a
file system format more compatible with your particular computer and
operating system environment.
Formatting a hard drive erases all data contained on it. Please
be sure to create a copy of the files you wish to keep to another
location before reformatting.
Formatting the drive in Mac OS X
1. Launch the “Disk Utility” application located under Applications/
Utilities folder.
2. Highlight your new drive and select the “Partition” tab
3. Select the new partition map type.
4. For each partition in the volume scheme, select the desired file
system format and volume name (optional)
Although it is possible to format a hard drive on Mac OS X
using the DOS file system, we do not recommend this, as
an artificial capacity limit may be imposed on the drive and
performance will be unpredictable.
5. Click the “Options” button. Select “Apple Partition Map” in the
dialog box and click “OK”.
6. Click “Apply.” Your Fantom Drives portable disk is ready to use!
2
3
34
6
5
Formatting the drive in
Windows Hosts
1. Open the disk management console. A list of the attached
drives and their respective volumes will appear. Select the
portable disk Disk.
The Disk Management Console can be found under
\Windows\System32\diskmgmt.msc on your system drive. For
an illustrated guide, please see
http://www.fantomdrives.com/support/faqs
2. Right-click on the drive letter and select Format in the pop-up
menu. The Format dialog box will appear.
Before a new, un-partitioned disk can be used in Windows, it
must contain a disk signature. If the hard disk is not signed
for use, the New Partition option is unavailable (superimposed
no-entry icon). In this case a
signature can be written on the
hard drive by right clicking on
the disk description window and
selecting "Initialize Disk".
3. Under Capacity, verify the drive capacity. It should be
close to the stated capacity of your drive in gigabytes.
4. In the File System pop-up menu, select NTFS. The default
formatting option is full format. A full format will take about
30-90 minutes. A Quick format will take just a minute, but will
do less verifying of the drive than a full format. Click Start. Once
the format process is complete, your External Hard drive is ready
to use.
- 6 - - 7 -
This manual suits for next models
1
Table of contents