FAR LF912RL21W User manual

LF912RL21W

LF912RL21W
GB-1
INSTRUCTION MANUAL
Use all instructions and explanations of the installation
before use. Follow the instructions carefully. Keep
the operation instructions handy for later use. If the
application is sold or passed on, then ensure that the new
owner always receives those operation instructions.
TABLE OF CONTENTS
SAFETY INSTRUCTIONS.............................................................GB-2
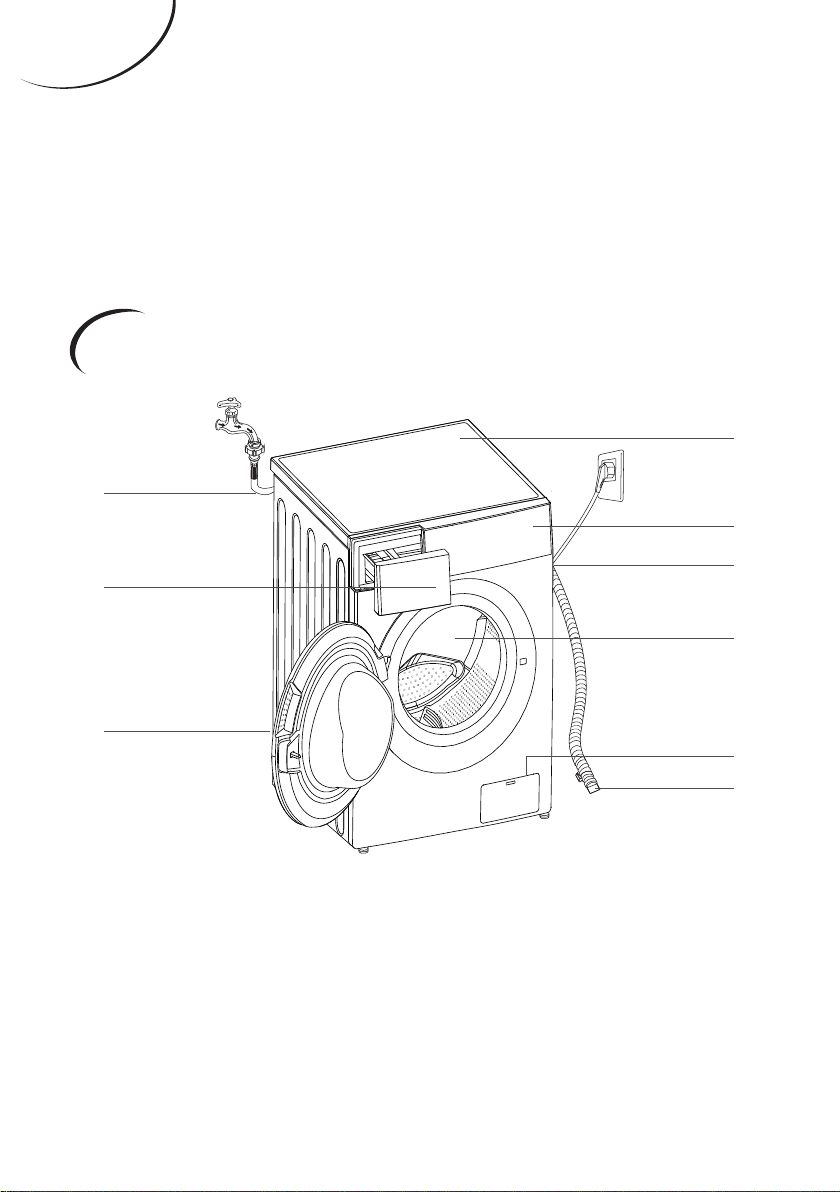
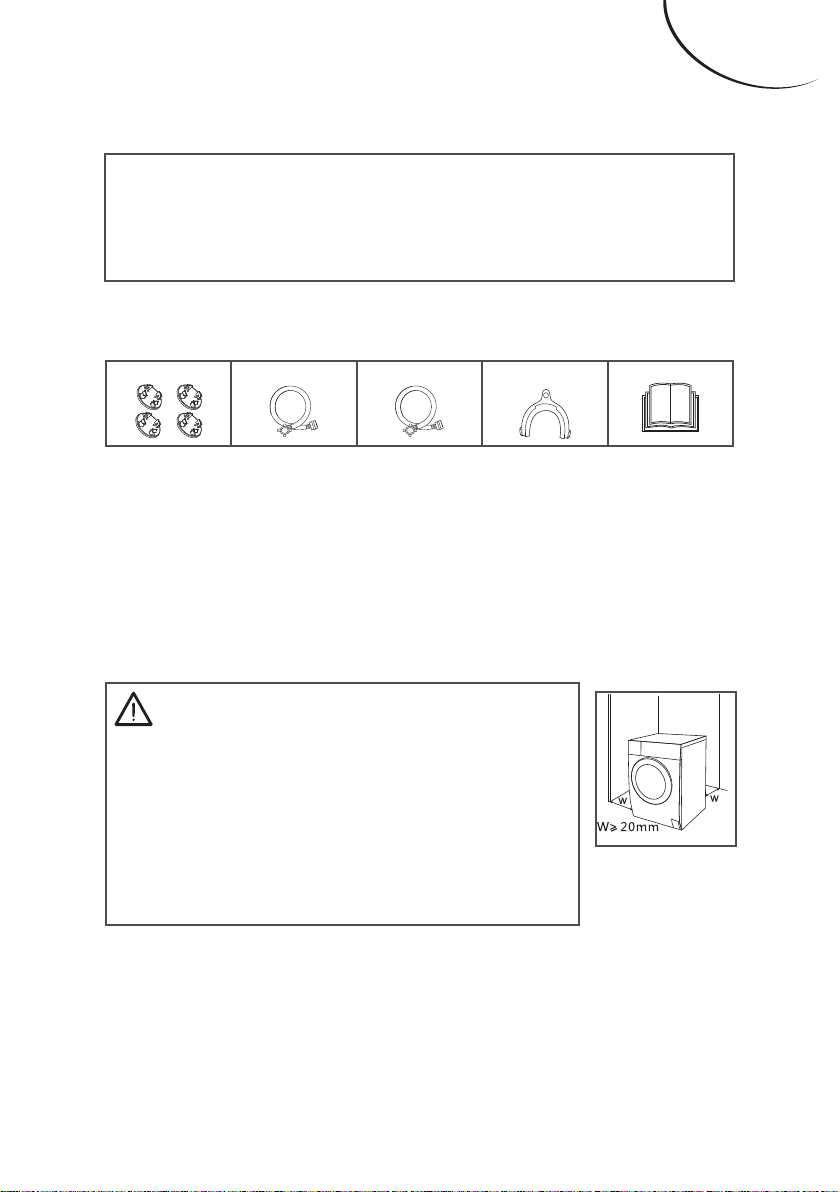
INSTALLATION..............................................................................GB-8
OPERATIONS...............................................................................GB-16
Quick Start.................................................................................GB-16
Before Each Washing.............................................................GB-18
Detergent Dispenser .............................................................GB-19
Control Panel............................................................................GB-21
Option ........................................................................................GB-24
Other Functions ......................................................................GB-26
Programmes............................................................................ GB-30
Washing Programmes Table ...............................................GB-32
MAINTENANCES ....................................................................... GB-34
Cleaning And Care................................................................. GB-34
Troubleshooting.....................................................................GB-40
Technical Specications....................................................... GB-43
Product che...........................................................................GB-44
DISPOSAL OF OLD ELECTRICAL APPLIANCES................. GB-50

ENGLISH
GB-2
SAFETY INSTRUCTIONS
For your safety, the information in this manual
must be followed to minimize the risk of re
or explosion, electric shock, or to prevent
property damage, personal injury or loss of life.
Explanation of the symbols:
Warning!
is combination of symbol and signal word
indicates a potentially dangerous situation
which may result in death or serious injuries
unless it’s avoided.
Caution!
is combination of symbol and signal word
indicates a potentially dangerous situation
which may result in slight or minor injuries or
damage to property and the environment.
Note!
is combination of symbol and signal word
indicates a potentially dangerous situation
which may result in slight or minor injuries.

ENGLISH
GB-3
Warning!
The electric shock!
• If the supply cord is damaged, it must be
replaced by the manufacturer, its service agent
or similarly qualied persons in order to avoid
a hazard.
• e device must be connected to the water
distribution network using the new connection
sets supplied with the device; used connection
sets must not be reused.
• Before any maintenance the device, unplug the
appliance from the mains.
• Always unplug the machine and turn o the
water supply after use. e max. inlet water
pressure, in 1 MPa. e min. inlet water
pressure, in 0.05 MPa.
• To ensure your safety, power plug must be
inserted into an earthed three-pole socket.
Check carefully and make sure that your
socket is properly and reliably earthed.
• Make sure that the water and electrical devices
must be connected by a qualied technician
in accordance with the manufacturer’s
instructions and local safety regulations.

ENGLISH
GB-4
Risk to children!
• is appliance can be used by children aged
from 8 years and above and persons with
reduced physical, sensory or mental capabilities
or lack of experience and knowledge if they
have been given supervision or instruction
concerning use of the appliance in a safe way
and understand the hazards involved. Children
shall not play with the appliance. Cleaning
and user maintenance shall not be made by
children without supervision.
• Children under 3 years of age should be
kept away, unless they are under continuous
supervision.
• Animals and children may climb into the
machine. Check the machine before every
operation.
• Kids should be supervised that they do not
play with the appliance.
• Glass door may be very hot during the
operation. Keep kids and pets far away from
the machine during the operation very wet
rooms as well as in the rooms with explosive or
caustic gas.

ENGLISH
GB-5
• Remove all packages and transport bolts
before using the appliance. Otherwise, serious
damage may result.
• Plug must be accessible after installation.
Risk of explosion!
• Do not wash or dry articles that have been
cleaned in, washed in, soaked in, or dabbed
with combustible or explosive substances (such
as wax, oil, paint, gasoline, degreasers, dry-
cleaning solvents, kerosene, etc.) is may
result in re or explosion.
• Beforehand thoroughly rinse items of washing
by hand.
Caution!
Installing the product!
• is washing machine is for indoor use only.
• It isn’t intended to be built-in using.
• e openings must not be obstructed by a
carpet.
• Washing machine shall not be installed in
bathroom or very wet rooms as well as in the
rooms with explosive or caustic gases.

ENGLISH
GB-6
• e washing machine with single inlet valve
only can be connected to the cold-water
supply. e product with double inlet valves
should be correctly connected to the hot water
and cold-water supply.
• Plug must be accessible after installation.
• Remove all packages and transport bolts
before using the appliance. Otherwise,
serious damage may result. Risk of damaging
appliance!
Risk of damaging appliance
• Your product is only for home use and is only
designed for the textiles suitable for machine
washing.
• Do not climb up and sit on top cover of the
machine.
• Do not lean against machine door.
• Cautions during Handling Machine:
1. e accumulated water shall be drained out
of the machine.
2. Handle the machine carefully. Never hold
each protruded part on the machine while
lifting. Machine door cannot be used as the
handle during the conveyance.

ENGLISH
GB-7
3. is appliance is heavy.Transport with care.
• Please do not close the door with excessive
forces. If it is found dicult to close the
door, please check if the clothes are put in or
distributed well.
• It is forbidden to wash carpets.
Operating the appliance!
• Before washing the clothes at rst time, the
product shall be operated in one round of the
whole procedures without the clothes inside.
• Flammable and explosive or toxic solvents
are forbidden. Gasoline and alcohol etc. Shall
not be used as detergents. Please only select
the detergents suitable for machine washing,
especially for drum.
• Make sure that all pockets are emptied. Sharp
and rigid items such as coin, brooch, nail,
screw or stone etc. may cause serious damages
to this machine.
• Please check whether the water inside the
drum has been drained before opening its
door. Please do not open the door if there is
any water visible.
• Be careful of burning when the product drains
hot washing water.

ENGLISH
GB-8
• Never rell the water by hand during washing.
• After the program is completed, please wait
for two minutes to open the door.
INSTALLATION
1. Water supply hose
2. Detergent
dispenses
3. Door
4. Top cover
5. Control panel
6. Power supply cord
7. Drum
8. Service lter
9. Drain hose
1
4
5
6
7
8
9
2
3

ENGLISH
GB-9
Note!
• e product line chart is for reference only,
please refer to real product as standard.
Accessories
Transport
hole plug Supply
hose cold
water
Supply
hose hot
water
(optional)
Drain
hose
support
(optional)
Owner’s
manual
Installation area
Warning!
• Stability is important to prevent
the product from wandering!
• Make sure that the product
should not stand on the power
cord.

ENGLISH
GB-10
Before installing the machine, the
location characterized as follows
shall be selected:
1. Rigid, dry, and level surface
2. Avoid direct sunlight
3. Sucient ventilation
4. Room temperature is above 0°C
5. Keep far away from the heat
resources such as coal or gas.
Unpacking the washing machine
Warning!
• Packaging material (e.g. Films,
Styrofoam) can be dangerous for
children.
• ere is a risk of suocation!
Keep all packaging well away
from children.

ENGLISH
GB-11
1. Remove the cardboard box and
Styrofoam packing.
2. Lift the washing machine and
remove the base packing. Make
sure the small triangle foam is
removed with the bottom one
together. If not, lay the unit
down with side surface, then
remove the small foam from the
unit bottom manually.
3. Remove the tape securing the
power supply cord and drain
hose.
4. Remove the inlet hose from the
drum.
Remove transport bolts
Warning!
• You must remove the transport
bolts from the backside before
using the product.
• You’ll need the transport bolts
again if you move the product,
so make sure you keep them in a
safe place.

ENGLISH
GB-12
Please take the following steps to remove the
bolts:
1. Loosen 4 bolts with spanner and then
remove them.
2. Stop the holes with transport hole plugs.
3. Keep the transport bolts properly for future
use.
Levelling the washing machine Warning!
Warning!
• e lock nuts on all four feet must be
screwed tightly against the housing.
1. Check if the legs are closely attached to the
cabinet. If not, please turn them to their
original positions tighten the nuts.
2. Loosen the lock nut turn the feet until it
closely contacts with the oor.
3. Adjust the legs and lock them with a spanner,
make sure the machine is steady.
Raise Lower
Lock nut
foot

ENGLISH
GB-13
Connect Water Supply Hose
Warning!
• To prevent leakage or water damage, follow
the instructions in this chapter!
• Do not kink, crush, modify or sever water
inlet hose.
• For the model equips hot valve, connect
it to hot water tap with hot water supply
hose. Energy consumption will decrease
automatically for some program.
Connect the inlet pipe as indicated, there are
two ways to connect the inlet pipe.
1. Connection between ordinary tap and inlet
hose.
clamp nut
slide bushing

ENGLISH
GB-14
2.Connection between screw tap and inlet hose.
Raise
slide bushing
Tap with threads and inlet hose Special tap for washing machine
Connect the other end of inlet pipe to the inlet
valve at the backside of product and fasten the
pipe tightly clockwise.
Drain Hose
Warning!
• Do not kink or protract the drain hose.
• Position drain hose properly, otherwise
damage might result of water leakage.
water supply hosewater Inlet valve

ENGLISH
GB-15
ere are two ways to place the end of drain
hose:
1. Put it into the
water trough. 2. Connect it to the
branch drainpipe of
the trough.
Water
trough
Note!
• If the machine has drain hose support, please
install it like the following.
Hose
Retainer
Trough
Bind

ENGLISH
GB-16
OPERATIONS
Quick Start
Caution!
• Before washing, please make sure it’s
installed properly.
• Before washing at rst time, the washing
machine shall be operated in one round of
the whole procedures without clothes in as
follows.
Warning!
• When installing drain hose, x it properly
with a rope.
• If drain hose is too long, do not force it into
washing machine as it will cause abnormal
noises.

ENGLISH
GB-17
1. Before Washing
Softener
Prewash
Main wash
Plug in Open
tap Load Close
door Add detergent
Note!
• Detergent need to be added in «case I «after
selecting pre-washing for machines with this
function.
2. Washing
Select
Programme Select function or
default Start up
Note!
• If default is selected, step 2 can be skipped.
3. After Washing
«End» on display.

ENGLISH
GB-18
Before Each Washing
• e working condition of the washer should
be (0-40) °C. lf used under 0°C, the inlet valve
and draining system may be damaged. If the
machine is placed under condition of 0°Cor
less, then it should be transferred to normal
ambient temperature to ensure the water supply
hose and drain hose are not frozen before use.
• Please check the labels and the explanation of
using detergent before wash. Use non-foaming
or less-foaming detergent suitable for machine
washing properly.
Check the label Take the items
out of the
pockets
Knot the long
strips.zip or
button
Put small
clothes into the
pillow slip
Turn easy-
pilling and
long-pile fabric
inside out
Separate
clothes with
dierent
textures

ENGLISH
GB-19
Warning!
• When washing a single piece of clothes, it
may easily cause great eccentricity and give
alarm due to great unbalance. erefore, it is
suggested to add one or two more clothes to
be washed together so that draining can be
done smoothly.
• Don’t washing the clothes touching with
kerosene, gasoline, alcohol and other
ammable materials.
Detergent Dispenser
Pre-Wash detergent
Pull out the dispenser
Main Wash
detergent
Softener
Caution!
• Detergent only need to be added in «caseI»
after selecting pre-washing for machines
with this function.
Table of contents
Other FAR Washer manuals