Faro FS1010 User manual

Istruzioni d’uso/Instructions for use/Mode d’emploi/Istrucciones de uso
Automatic Sealer/Sigillatrice automatica FS 1010 –Rev.00 1
AUTOMATIC SEALER
SIGILLATRICE AUTOMATICA
FS1010
Istruzioni d’uso/Instructions for use
Mode d’emploi/Istrucciones de uso

Istruzioni d’uso/Instructions for use/Mode d’emploi/Istrucciones de uso
Automatic Sealer/Sigillatrice automatica FS 1010 –Rev.00 2
Indice
1Istruzioni di sicurezza.........................................................................................................3
2Collegamenti, strumenti di controllo e calibratura.............................................................5
3Dati tecnici .........................................................................................................................5
4Accendere la sigillatrice.....................................................................................................6
5Interfaccia utente FS 1010..................................................................................................6
6Regolazione della temperatura...........................................................................................6
7Passaggio da Celsius a Fahrenheit .....................................................................................7
8Avviare il sistema di trasporto ...........................................................................................7
8.1 Distanza di sigillatura.................................................................................................7
8.2 Parametri di sigillatura ...............................................................................................7
8.3 Saldatura.....................................................................................................................8
8.4 Convalida delle procedure di sigillatura.....................................................................8
8.5 Registrazione dei parametri di sigillatura...................................................................8
9Garanzia .............................................................................................................................9
10 Risoluzione dei problemi ................................................................................................... 9

Istruzioni d’uso/Instructions for use/Mode d’emploi/Istrucciones de uso
Automatic Sealer/Sigillatrice automatica FS 1010 –Rev.00 3
1Istruzioni di sicurezza:
Leggere le seguenti istruzioni di sicurezza prima di accendere la
sigillatrice.
Legenda:
Leggere il manuale utente
ATTENZIONE! Pericolo di scosse elettriche.
I nostri prodotti escono dalla fabbrica in perfette condizioni di sicurezza.
Per mantenere tali condizioni, è necessario osservare le seguenti istruzioni di sicurezza,
l'etichettatura, i marchi e le indicazioni di sicurezza riportate sulla sigillatrice per evitare rischi
alle persone, al prodotto stesso o danni ad altre apparecchiature.
Le presenti istruzioni di sicurezza sono state stilate sulla base delle direttive europee sulla
sicurezza delle apparecchiature elettriche. Osservare eventuali normative nazionai in caso di
deviazioni da quanto prescritto.
Qualora le presenti istruzioni di sicurezza non fossero sufficienti, contattare il produttore
all’indirizzo presente sull’etichetta del prodotto.
Verificare l'imballaggio e dichiarare immediatamente la presenza di eventuali danni
alla società di spedizione.
Prima di usare la sigillatrice, verificare che non riporti danni. In caso di dubbi,
rivolgersi a personale elettricista competente oppure contattarci all'indirizzo riportato
qui di seguito.
Prima di utilizzare la sigillatrice, verificare che la tensione del dispositivo corrisponda
al tipo di corrente in uso nel proprio Paese. Il fusibile posto a fianco dell'interruttore
deve essere adeguato al tipo di alimentazione elettrica. Per 115V: T8A, per 230V:
T4A. La sigillatrice è fornita con fusibile T4A.
La sigillatrice deve essere collegata mediante cavo a una presa con messa a terra. Non
è possibile collegarla a un'alimentazione IT.
Collocare il dispositivo su una superficie stabile.
Spostando la sigillatrice da un ambiente freddo a uno caldo, può verificarsi un
fenomeno di condensazione. Attendere che la temperatura si stabilizzi. La messa in
funzione del dispositivo in presenza di condensa può comportare rischio di
morte!

Istruzioni d’uso/Instructions for use/Mode d’emploi/Istrucciones de uso
Automatic Sealer/Sigillatrice automatica FS 1010 –Rev.00 4
La sostituzione di fusibili e le riparazioni devono essere eseguite solamente da
personale autorizzato. Rivolgersi all'indirizzo riportato qui sotto.
Prima della pulizia: scollegare la sigillatrice dalla presa di corrente! Pulire la
sigillatrice solamente con un panno morbido asciutto o leggermente umido. Non
introdurre acqua all'interno della sigillatrice.
Utilizzare la sigillatrice solamente in luoghi asciutti e a temperature ambiente
comprese tra 15°C e 30°C. L'utilizzo della sigillatrice in condizioni diverse da quelle
specificate, può comportare errori nel funzionamento o danni all'apparecchio.
Attendere che la sigillatrice raggiunga la temperatura ambiente prima di metterla in
funzione.
Sigillare solamente materiale conforme a EN 868-5 e ISO 11140-1. In caso di dubbi,
contattare il proprio rifornitore o il produttore della sigillatrice.
Non sigillare mai sacchetti di polietilene o materiale simile. Ciò può danneggiare la
sigillatrice.
Non inserire mai attrezzi appuntiti o affilati all'interno della fessura. Ciò può
danneggiare la sigillatrice o lo strumento.
Non inserire oggetti nelle fessure di ventilazione del saldatore. Ciò può comportare il
rischio di scosse elettriche o danni alla sigillatrice.
Verificare la sicurezza elettrica della sigillatrice almeno una volta l'anno, eseguendo i
seguenti test: rigidità, dispersione e resistenza di terra.
Non usare la sigillatrice in caso di dubbi sulle condizioni di sicurezza.
L'utente è responsabile dei risultati del lavoro di sigillatura. Verificare frequentemente
la sigillatura. Convalidare la procedura di sigillatura.

Istruzioni d’uso/Instructions for use/Mode d’emploi/Istrucciones de uso
Automatic Sealer/Sigillatrice automatica FS 1010 –Rev.00 5
2Collegamenti, strumenti di controllo e calibratura
1) Pannello di comando
2) Guida carta
3) Ingresso alimentazione
3) Fusibile (dietro ingresso alimentazione)
4) Interruttore
5) Porta RS232
6) Calibratura altezza
3Dati tecnici
Tensione nominale:
115V~ / 230V~ ±10%
Corrente nominale:
0,2 –6,5A
Intervallo di frequenza:
48 - 62Hz
Corrente nominale in entrata:
800 VA
fusibile principale
Per 115V: T8A
Per 230V: T8A
5 x 20 mm
Fusibile circuito termico (interno):
4AT / 250V
5 x 20 mm
Fusibile motore:
0,4A
Recupero automatico
Intervallo di temperatura ambiente:
Da +15°C a +30°C
Intervallo di temperatura di conservazione:
Da -10°C a +50°C
Umidità:
60% H.R. a +30°C
Assenza di condensa!
Categoria di protezione:
IP20
Sicurezza elettrica:
EN 61010-1
Grado di protezione:
I
Grado di inquinamento:
2
Dimensioni (B x H x T):
(380 x 100 x 240) mm
Peso:
7 kg

Istruzioni d’uso/Instructions for use/Mode d’emploi/Istrucciones de uso
Automatic Sealer/Sigillatrice automatica FS 1010 –Rev.00 6
4Accendere la sigillatrice
Leggere le seguenti istruzioni di sicurezza prima di accendere la sigillatrice.
Accendere la sigillatrice mediante l'interruttore posto sul retro. La sigillatrice è adatta a prese
di corrente 115 e 230V con frequenza di 50 o 60 Hz.
La sigillatrice sarà pronta all'uso alcuni minuti dopo l'accensione. Per capirlo, è sufficiente
controllare sul display e attendere un breve segnale acustico.
5Interfaccia utente FS 1010
1) Display
2) Tasti di comando
3) Spia di
funzionamento
L'interfaccia utente comprende un display, una spia di funzionamento, un interruttore motore
e 2 tasti di comando.
Il display mostra la temperatura attuale in gradi Celsius o Fahrenheit.
La spia di funzionamento indica lo stato della sigillatrice. Quando la spia di funzionamento è
di colore verde, la temperatura è stata raggiunta e il dispositivo è pronto per eseguire la
sigillatura.
Regolare la temperatura mediante i tasti di comando.
6Regolazione della temperatura
Regolare la temperatura mediante i tasti di comando. Premere ▲o ▼per aumentare o ridurre
la temperatura. Mantenendo premuto più a lungo il tasto, è possibile aumentare la temperatura
a intervalli di 10°C / 10 F fino a rilascio del tasto.
Premendo un tasto di comando, il display mostra la temperatura impostata. In caso di mancata
attivazione dei tasti per un periodo di tempo, il display torna alla temperatura attuale e la
sigillatrice ripristinerà la nuova temperatura impostata.
La temperatura può essere impostata tra 50 e 200°C.

Istruzioni d’uso/Instructions for use/Mode d’emploi/Istrucciones de uso
Automatic Sealer/Sigillatrice automatica FS 1010 –Rev.00 7
7Passaggio da Celsius a Fahrenheit
Premere contemporaneamente entrambi i tasti per eseguire il passaggio tra Celsius e
Fahrenheit. Ogni volta che vengono premuti contemporaneamente entrambi i tasti, la
sigillatrice commuterà la visualizzazione della temperatura, tra Celsius e Fahrenheit.
Il punto visualizzato sul display segnala che la temperatura è indicata in gradi Fahrenheit.
La temperatura in gradi Celsius è visualizzata sul display senza punto.
8Avviare il sistema di trasporto
Attenzione:
Il sistema di trasporto si avvia solamente al raggiungimento della temperatura impostata
(indicata dalla luce verde)
Il motore si avvia automaticamente se la carta è alimentata dall'estremità sinistra del saldatore.
L'arresto avviene immediatamente dopo che il materiale di imballaggio fuoriesce dalla
sigillatrice.
Attenzione:
In caso di sovraccarico (blocco), il motore del sistema di trasporto verrà arrestato
automaticamente.
In tal caso spegnere il motore, rimuovere il blocco. Per riavviare, attendere un minuto a
motore spento. Riavviare il motore.
8.1 Distanza di sigillatura
Per regolare la distanza dal punto di sigillatura all'estremità del sacchetto, spostare la guida
cartacea sul lato sinistro del saldatore. Prima di fare ciò, allentare la vite sul lato sinistro.
Successivamente, serrare la vite.
Attenzione!
Se la distanza dal punto di sigillatura all'estremità del sacchetto è troppo ridotta, risulta
difficile aprire il sacchetto.
8.2 Parametri di sigillatura
Per ottenere una buona sigillatura, è importante regolare i parametri. La pressione e la velocità
di trasporto sono già adattati ai parametri necessari alla maggior parte dei sacchetti.
L'operatore deve solamente regolare la temperatura. Leggere le istruzioni del produttore del
materiale di imballaggio.
Le seguenti temperature sono fornite a titolo indicativo:
Clear View (Carta / Multistrato) 170 - 185 °C
Clear View (Crepp / Multistrato) 170 - 185 °C
Tyvek 120 - 130 °C

Istruzioni d’uso/Instructions for use/Mode d’emploi/Istrucciones de uso
Automatic Sealer/Sigillatrice automatica FS 1010 –Rev.00 8
Avvertenza!
Non utilizzare sacchetti in Polietilene o altri materiali inadatti. Ciò può danneggiare la
sigillatrice. In caso di dubbi, chiedere al produttore del dispositivo di sigillatura.
Regolare la sigillatrice in modo tale che da una parte la sigillatura rimanga chiusa dopo la
sterilizzazione e dall'altra è possibile effettuare l'apertura a mano.
8.3 Saldatura
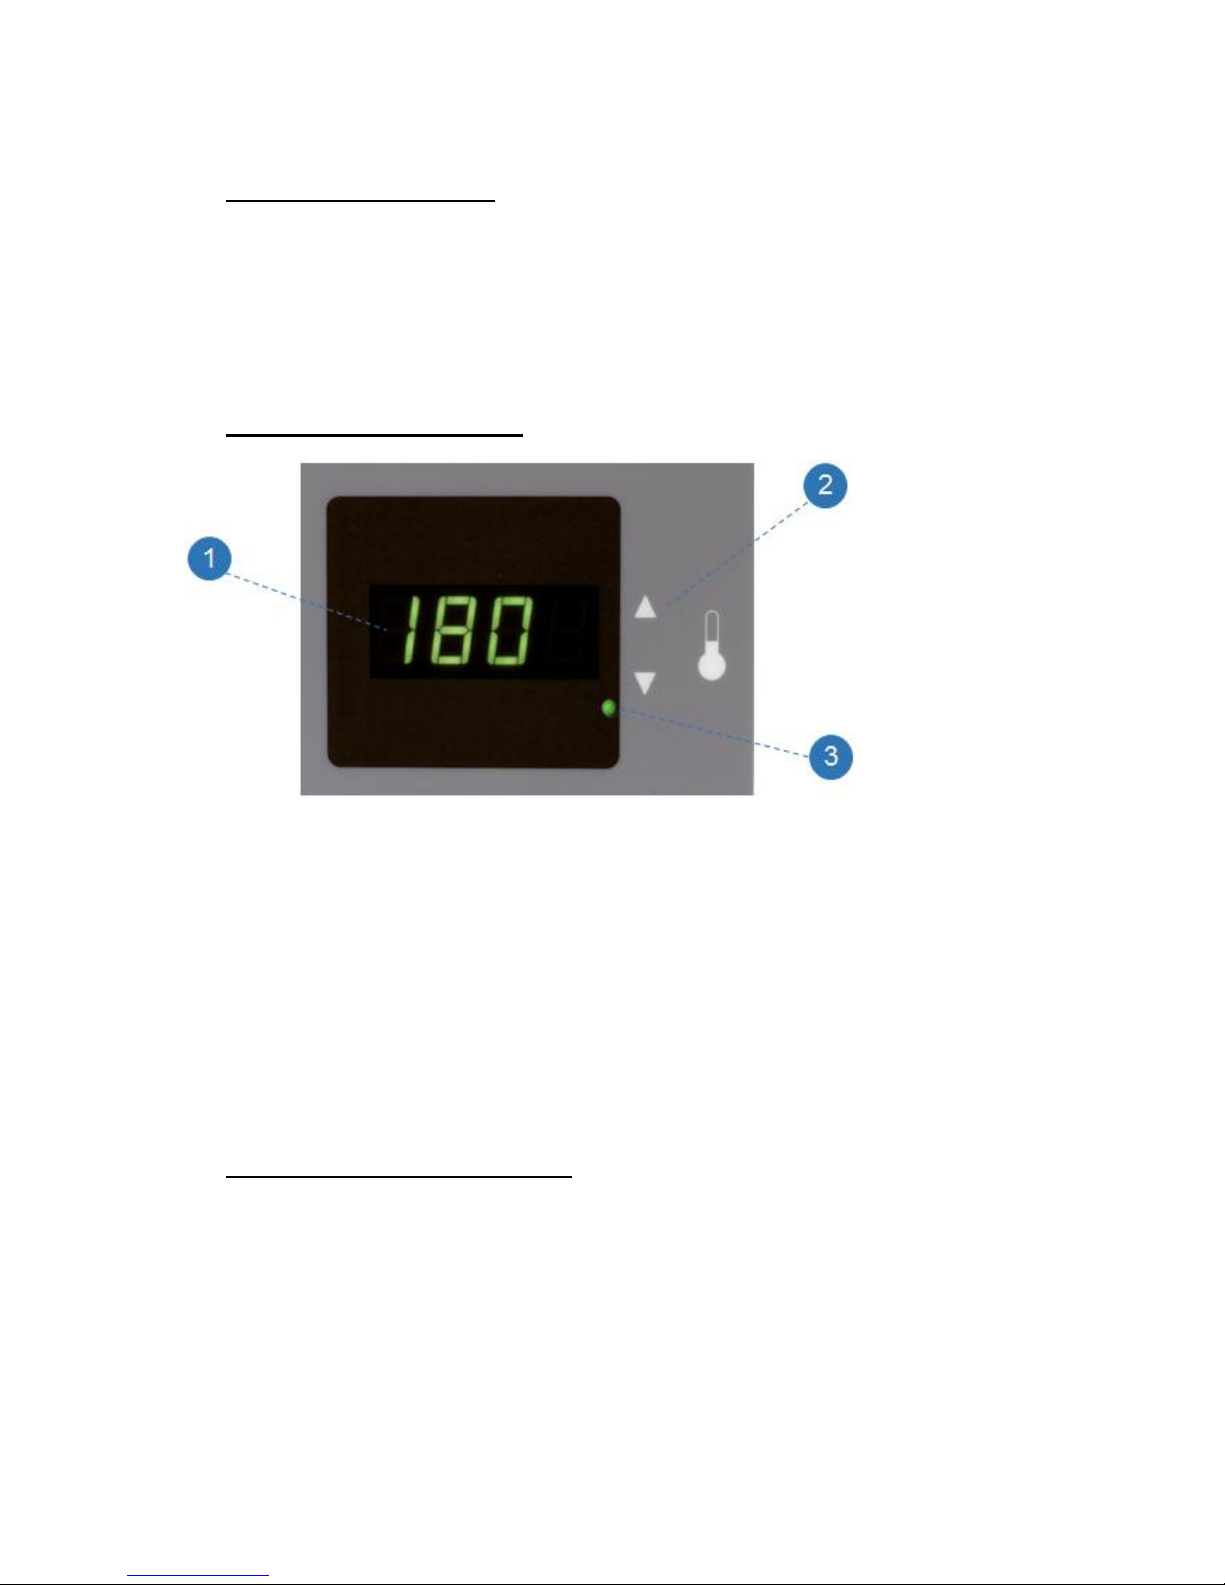
Prima di iniziare la sigillatura, verificare che la temperatura del dispositivo è adatta al
materiale.
In caso contrario, regolare la temperatura di sigillatura.
Quando la sigillatrice è pronta, avviare il motore e alimentare il materiale dal lato sinistro. Il
sacchetto scorrerà attraverso la macchina. Il sacchetto fuoriesce dalla macchina sigillato. Ciò
è visibile grazie alle tre strisce lungo l'intero sacchetto.
Il sacchetto deve essere posizionato con la parte cartacea rivolta verso il basso.
Rispettare la norma relativa alla massima capacità di riempimento del sacchetto. Inserire il
sacchetto con cautela, per evitare che la saldatura avvenga in maniera scorretta.
8.4 Convalida delle procedure di sigillatura
Per garantire che i parametri di sigillatura siano impostati correttamente, è necessario
convalidare il processo di sigillatura e testare la resistenza della sigillatura.
Raccomandiamo di eseguire interventi annuali di manutenzione e convalida. Contattare il
proprio rifornitore o il produttore della sigillatrice.
I parametri della sigillatrice devono essere verificati mediante strumentazioni esterne durante
la fase di convalida.
Inoltre, deve essere effettuato un test di resistenza.
Per test frequenti, il produttore/rivenditore può stabilire una sigillatura tipo per l'esecuzione di
test di resistenza.
8.5 Registrazione dei parametri di sigillatura
Questo dispositivo è dotato di porta RS232. I parametri del processo possono essere registrati
tramite questa porta.
I parametri di comunicazione devono essere regolati come segue:
Baud rate=38400/ Data bits=8/ Parity=none/ Stop bit=1/ RTS=on / DTR=on
Quando la temperatura e la resistenza di sigillatura rientrano nelle deviazioni permissibili,
durante la sigillatura vengono registrati i seguenti dati: valori impostati della temperatura di
sigillatura, della resistenza di sigillatura, della velocità di sigillatura e della temperatura
attuale di sigillatura. Il sistema C-LOG consente di registrare i dati. Un cavo (“null modem”)
lo collega al saldatore. In alternativa, i dati possono essere registrati tramite un sistema di
documentazione.

Istruzioni d’uso/Instructions for use/Mode d’emploi/Istrucciones de uso
Automatic Sealer/Sigillatrice automatica FS 1010 –Rev.00 9
9Garanzia
La garanzia della presente sigillatrice è valida per 2 anni a partire dalla messa in servizio. Per
ottenere la garanzia, è necessario inviare il documento di acquisto e la garanzia sufficiente al
produttore entro un mese dalla messa in servizio. La garanzia è concessa a condizione che
vengano effettuate regolarmente la manutenzione e la calibratura del dispositivo da parte del
produttore o di un'azienda di assistenza autorizzata dal produttore.
La garanzia include le riparazioni gratuite del dispositivo presso la fabbrica e i pezzi di
ricambio necessari, entro il periodo di validità. Errori di trasporto, utilizzo inadeguato o altri
errori da parte dell'utente si intendono esclusi. Si intendono escluse inoltre tutte le parti
soggette a usura. Ogni altra richiesta, nonché i costi di trasporto non rientrano nella garanzia.
Certificato di garanzia
Dispositivo:
FS 1010
N° di serie:*
____________________________________
Data di messa in servizio:*
__________________________________
Referente:*
____________________________________
Nome e indirizzo organizzazione
utilizzatrice:*
Tel.*
Fax:*
E-mail:*
10 Risoluzione dei problemi
Verificare i seguenti punti prima di contattare il servizio manutenzione.
Display non funzionante:
La sigillatrice è collegata alla presa di corrente? La sigillatrice è accesa? La sigillatrice è stata
spenta e riaccesa?
Il motore non si avvia:
La sigillatrice è collegata alla presa di corrente? La sigillatrice è accesa? Il motore è acceso?
La sigillatura è troppo forte / debole:
Il materiale è saldabile in conformità alla norma EN 868-5? La temperatura è adatta al
materiale conformemente alla convalida? Il materiale è stato inserito correttamente?
Il materiale fonde / brucia:
Il materiale è saldabile in conformità alla norma EN 868-5? La temperatura è adatta al
materiale conformemente alla convalida?

Istruzioni d’uso/Instructions for use/Mode d’emploi/Istrucciones de uso
Automatic Sealer/Sigillatrice automatica FS 1010 –Rev.00 10
Table of contents
1Safety instructions............................................................................................................11
2Connections, control and adjustment elements................................................................13
3Technical Data..................................................................................................................13
4Switching on the sealer ....................................................................................................14
5User interface of the FS 1010........................................................................................... 14
6Temperature adjustment...................................................................................................14
7Change from Celsius to Fahrenheit..................................................................................15
8Starting the transport system............................................................................................15
8.1 Sealing edge distance ...............................................................................................15
8.2 Sealing parameters ...................................................................................................15
8.3 Sealing......................................................................................................................16
8.4 Validation of the sealing process .............................................................................16
8.5 Registration of sealing parameters...........................................................................16
9Guarantee .........................................................................................................................17
10 Trouble shooting .............................................................................................................. 17

Istruzioni d’uso/Instructions for use/Mode d’emploi/Istrucciones de uso
Automatic Sealer/Sigillatrice automatica FS 1010 –Rev.00 11
1Safety instructions
Read the following safety instructions before switching on the sealer.
Legend:
Read user manual
CAUTION! Danger of electric shock.
Our products have left the factory safety-related flawless condition.
To preserve this condition, the following safety instructions and type label, markings, safety
instructions on the sealer should be observed or else persons could be endangered or this
product itself or other equipment could be damaged.
These safety instructions have been established on the basis of European Directives about the
safety of electric equipment. Follow national provisions if different from the mentioned
standards.
If these safety instructions are not sufficient, the manufacturer can be contacted at the address
included in the product label.
Please check the package and claim damages immediately to the transport company.
Before using the sealer ensure that the sealer has no damages. In doubt ask electrical
trained staff or contact us under the address below.
Before using the sealer please check if the voltage of the device comply with the
current of your country. The fuse beside the power switch must be adapted to the
power supply. At 115V: T8A, at 230V: T4A. The sealer is supplied with a T4A fuse.
The sealer must only be connected with the supplied power cord to a grounded socket.
It is not allowed to be connected to an IT power supply.
Put the device on a stable surface.
If the sealer is transported from a cold into a warm environment, it is possible that
there will be some condensation. Wait until the temperature is equalised. There is
danger for life, if the device is put into operation when there is any condensation!
Only authorised staff is allowed to exchange fuses and carrying out repairs. Please
contact the address below.

Istruzioni d’uso/Instructions for use/Mode d’emploi/Istrucciones de uso
Automatic Sealer/Sigillatrice automatica FS 1010 –Rev.00 12
Before cleaning: cut the sealer from current! Clean the sealer only with a dry or
slightly moistened smooth wipe. Lever let water come into the sealer.
Only use the sealer in dry rooms at ambient temperatures between 15 and 30°C. If the
sealer is used under conditions out of this specification, functional errors could occur
or the sealer could be damaged. Let the sealer come to room temperature before taking
it into operation.
Only seal suitable packaging material compliant with EN 868-5 and ISO 11140-1. In
doubt contact your dealer or the manufacturer of the sealer.
Never seal polyethylene pouches or similar. This will damage your sealer.
Never feed pointed or flat instruments into the in feed gap. This could damage the
sealer or the instruments.
Never insert parts into the ventilation gaps of the sealer. You could be injured by an
electric shock or the sealer could be damaged.
Check electrical safety of the sealer at least every year: electric strength of insulation,
current leakage and ground connection resistance.
Never use the sealer if there is any doubt if it is in a safe condition.
The user is responsible for a acceptable sealing result. Let the seam be checked
frequently. Let the sealing process be validated.

Istruzioni d’uso/Instructions for use/Mode d’emploi/Istrucciones de uso
Automatic Sealer/Sigillatrice automatica FS 1010 –Rev.00 13
2Connections, control and adjustment elements
1) Operating panel
2) Paper guide
3) Power entry
3) Main fuse (beside the power entry)
4) Power switch
5) RS232 port
6) Height adjustment
3Technical Data
Rated voltage:
115V~ / 230V~ ±10%
Rated current:
0,2 –6,5A
Frequency range:
48 - 62Hz
Rated power input:
800 VA
Mains fuse
At 115V: T8A
At 230V: T4A
5 x 20 mm
Heating circuit fuse (internal):
4AT / 250V
5 x 20 mm
Motor fuse:
0,4A
Auto recovery
Ambient temperature range:
From +15°C to +30°C
Storage temperature range:
From -10 °C to +50°C
Humidy:
60% R.H. at +30°C
No condensation!
Protection category:
IP20
Electrical safety:
EN 61010-1
Protection class:
I
Degree of pollution:
2
Dimensions (B x H x T):
(380 x 100 x 240) mm
Weight:
7kg

Istruzioni d’uso/Instructions for use/Mode d’emploi/Istrucciones de uso
Automatic Sealer/Sigillatrice automatica FS 1010 –Rev.00 14
4Switching on the sealer
Before switching on the sealer, read this manual and the safety instructions!
To switch on the sealer use the switch on the backside of the sealer. This sealer is suitable for
115 and 230 V current at a net frequency of 50 or 60 Hz.
Some minutes after switching on the sealer it will be ready for use. This can be recognised by
a look on the display and a short beep.
5User interface of the FS 1010
1) Display
2) Input keys
3) Control
The user interface consist of a display, one control lamp, a motor switch and 2 input keys.
The display shows the actual temperature in Celsius or Fahrenheit.
The control lamp shows the status of the sealer. If the lamp is green the temperature is
reached, and the sealer is ready to seal.
With the input keys the set temperature can be adjusted.
6Temperature adjustment
The temperature is to be changed by the input keys. Press ▲ or ▼ to increase or decrease the
temperature. If the temperature is pressed longer, the temperature will change in steps of
10°C/10 F until the key is released.
If an input key is pressed, the display shows the set temperature. If no key is activated for a
while, the display returns to the actual temperature and the sealer will head for the new set
temperature.
The temperature can be changed between 50 and 200°C.

Istruzioni d’uso/Instructions for use/Mode d’emploi/Istrucciones de uso
Automatic Sealer/Sigillatrice automatica FS 1010 –Rev.00 15
7Change from Celsius to Fahrenheit
To change between Celsius and Fahrenheit press both input keys together. Every time both
keys are pressed together, the sealer will switch between Celsius and Fahrenheit.
If the temperature is displayed in Fahrenheit, there is a dot in the display.
If the temperature is displayed in Celsius, there is no dot in the display.
8Starting the transport system
Attention:
The transports only starts if the set temperature is reached (indicated by the green lamp)
The motor starts automatically when paper is fed in on the left edge of the sealer. It will stop
shortly after the packaging material has left the sealer again.
Attention:
In the case of overload of the motor of the transportation system (blocked) it will be stopped
automatically.
If so, switch off the motor, remove the blockage. To start again, wait one minute while the
motor is switched off. Start the motor again after this time.
8.1 Sealing edge distance
To adjust the distance from the seam to the edge of the pouch, move the paper guide on the
left side of the sealer. Before that, loosen the hand screw on the left side.
Fasten the screw afterwards.
Attention!
If the distance from the seam to the edge of the pouch is too small, it is difficult to open the
pouch.
8.2 Sealing parameters
To get good sealing result, it is important to adjust the sealing parameters. The sealing
pressure and transport speed are already adjusted for most sealing pouches.
Only the temperature must be adjusted by the operator. Read the instructions of the producer
of the packaging material.
The following temperatures are for first orientation:
Clear View (Paper/ Multilayer) 170 - 185 °C
Clear View (Crepp/ Multilayer) 170 - 185 °C
Tyvek material 120 - 130 °C
Warning!
Do not use pouches made from Polyethylene or other unsuitable materials. This could damage
your sealer. In doubt, please ask the manufacturer of this sealing device.

Istruzioni d’uso/Instructions for use/Mode d’emploi/Istrucciones de uso
Automatic Sealer/Sigillatrice automatica FS 1010 –Rev.00 16
Adjust the sealer so that on the one hand the seam keeps closed after sterilisation and on the
other hand fibre free peeling is possible.
8.3 Sealing
Before you start sealing, check if the temperature of the sealer is suitable for the material.
If not, adjust the sealing temperature.
If the sealer is ready to seal, start the motor and feed in the material on the left side. The
pouch will slide through the machine. When the pouch leaves the machine it will be sealed.
This is indicates by three stripes over the entire pouch.
The pouch/ roll must be placed with the paper side facing downwards.
Take care of the norm regarding the maximum filling of the pouch. Feed in the pouch
carefully because otherwise there might be a bad seam.
8.4 Validation of the sealing process
To assure proper settings of the sealing parameters, the sealing process must be validated and
the strength of the seam must be tested.
We recommend annual service and revalidation. Please contact your dealer or the
manufacturer of the sealer.
Within a validation the parameters of the sealer will be checked with external instruments.
On top of that, a strength test will be carried out.
For frequent testing a seam can be set to the manufacturer/ dealer for carrying out a strength
test.
8.5 Registration of sealing parameters
This device is equipped with a RS232 port. Via this port the process parameters can be
registered.
The communication parameters must be adjusted as follows:
Baud rate=38400/ Data bits=8/ Parity=none/ Stop bit=1/ RTS=on / DTR=on
When the sealing temperature and sealing force are within the permissible deviations, the
following data is registered during the sealing: set values of sealing temperature, sealing
strength and sealing speed and the current sealing temperature.
For data recording, the C-LOG record system is available as an accessory. This is connected
with a null modem cable to the sealer. Alternatively, data can be recorded with a
documentation system.

Istruzioni d’uso/Instructions for use/Mode d’emploi/Istrucciones de uso
Automatic Sealer/Sigillatrice automatica FS 1010 –Rev.00 17
9Guarantee
The warranty for this sealer is 2 years after commissioning. To obtain guarantee, the purchase
document and the satisfactory guarantee is to be sent within one month after commissioning
to the manufacturer. The guarantee is granted under the condition that the regular servicing
and calibration of the device is carried out by the manufacturer or a service organisation
authorised by the manufacturer.
The guarantee encloses the free repair of the device at the factory and if necessary spare parts
in the guarantee time. Mistakes by transport, improper use or other mistakes of the user are
excluded. All wearing parts are also excluded. All other claims as well as transport cost are
not a part of the guarantee.
Guaranty certificate
Device:
FS 1010
Serial No.:*
____________________________________
Date of commissioning:*
__________________________________
Contact person:*
____________________________________
Users organisation name and address:*
Tel*
Fax:*
E-mail:*
10 Trouble shooting
Please check the following items before contacting the service.
No display:
Is the sealer connected with the current? Is the sealer switched on? Has the sealer been
switched off and on again?
Motor doesn’t start:
Is the sealer connected with the current? Is the sealer switched on? Is the motor switched on?
Seam is to strong/weak:
Is the material sealable acc. EN 868-5? Is the temperature for the material adjusted acc.
validation? Is the material fed in correctly?
Material is melted /burned:
Is the material sealable acc. EN 868-5? Is the temperature for the material adjusted acc.
validation?

Istruzioni d’uso/Instructions for use/Mode d’emploi/Istrucciones de uso
Automatic Sealer/Sigillatrice automatica FS 1010 –Rev.00 18
Table des matières
1Consignes de sécurité.......................................................................................................19
2Raccordements, contrôle et éléments d’ajustement .........................................................21
3Données techniques..........................................................................................................21
4Allumage de la soudeuse..................................................................................................22
5Interface de l’utilisateur du FS 1010................................................................................22
6Réglage de la température................................................................................................22
7Changer du Celsius au Fahrenheit....................................................................................23
8Démarrage du système de transport .................................................................................23
8.1 Distance du bord étanche .........................................................................................23
8.2 Paramètres de scellage .............................................................................................23
8.3 Scellage ....................................................................................................................24
8.4 Validation du processus de scellage.........................................................................24
8.5 Enregistrement des paramètres de scellage..............................................................24
9Garantie............................................................................................................................25
10 Dépannage........................................................................................................................25

Istruzioni d’uso/Instructions for use/Mode d’emploi/Istrucciones de uso
Automatic Sealer/Sigillatrice automatica FS 1010 –Rev.00 19
1Consignes de sécurité
Lire les consignes de sécurité avant d’allumer la soudeuse.
Légende :
Lire le manuel de l’utilisateur
ATTENTION ! Danger de choc électrique
Nos produits ont quitté l’usine dans un état technique de sécurité irréprochable.
Pour préserver cet état, les consignes de sécurité suivantes, l’étiquette type, les marquages et
les consignes de sécurité sur la soudeuse doivent être respectés, autrement, toute personne
pourrait être en danger ou, ce produit lui-même ou un autre équipement pourrait s’abîmer.
Ces consignes de sécurité ont été établies sur la base des directives européennes sur la sécurité
électrique. Observer toute législation nationale en cas d'écarts par rapport aux exigences.
en Allemagne. Dans d’autres pays, d’autres règles nationales doivent être respectées.
Si ces consignes de sécurité ne suffisent pas, le fabricant peut être contacté à l’adresse
indiquéè sur l’etiquette du produit.
Veuillez vérifier l’emballage et réclamer immédiatement les dommages à la société de
transport.
Avant d’utiliser la soudeuse, assurez-vous que celle-ci ne présente aucun dommage.
En cas de doute, demandez au personnel électrique formé ou contactez-nous à
l’adresse ci-dessous.
Avant d’utiliser la soudeuse, veuillez vérifier si la tension de l’appareil est conforme
au courant de votre pays. Le fusible à côté de l’interrupteur doit être adapté à
l’alimentation électrique. À 115V : T8A, à 230V : T4A. La soudeuse est fournie avec
un fusible T4A.
La soudeuse doit seulement être raccordée au câble électrique fourni à une prise reliée
à la terre. Il est interdit de la raccorder à une alimentation électrique IT.
Placez l’appareil sur une surface stable.
Si la soudeuse est transportée d’un environnement frais vers un environnement chaud,
il est possible qu’il y ait une certaine condensation. Attendez que la température soit

Istruzioni d’uso/Instructions for use/Mode d’emploi/Istrucciones de uso
Automatic Sealer/Sigillatrice automatica FS 1010 –Rev.00 20
ajustée. Il y a un danger de mort si l’appareil est mis en marche en présence de
condensation !
Seul le personnel autorisé peut échanger les fusibles et effectuer les réparations.
Veuillez contacter l’adresse ci-après.
Avant le nettoyage : mettez la soudeuse hors tension ! Nettoyez la soudeuse
seulement à l’aide d’un chiffon doux sec ou légèrement humidifié. Ne laissez jamais
l’eau pénétrer dans la soudeuse.
Utilisez uniquement la soudeuse dans des pièces sans humidité à des températures
ambiantes comprises entre 15 et 30°C. Si la soudeuse est utilisée sous des conditions
hors de cette spécification, des erreurs fonctionnelles pourraient survenir ou la
soudeuse pourrait s’abîmer. Laissez la soudeuse atteindre la température ambiante
avant de la mettre en marche.
Utilisez seulement matériau d’emballage conforme à EN 868-5 et ISO 11140-1. En
cas de doute, contactez votre distributeur ou le fabricant de la soudeuse.
Ne scellez jamais des pochettes en polyéthylène ou semblable. Cela abîmera votre
soudeuse.
N’introduisez jamais des instruments tranchants ou plats dans la fente d’introduction.
Cela pourrait endommager la soudeuse ou les instruments.
N’insérez jamais des pièces dans les fentes de ventilation de la soudeuse. Vous
pourriez vous blesser par un choc électrique ou la soudeuse pourrait s’abîmer.
Vérifiez la sécurité électrique sur la soudeuse au moins chaque année: le test del
rigidité, le test de dispersion, le test de résistance au sol.
N’utilisez jamais la soudeuse si vous doutez qu’elle est dans un état sûr.
L’utilisateur est responsable du résultat du scellage acceptable. Faites fréquemment
vérifier le joint. Faites valider le processus de scellage.
Table of contents
Languages: