FAVI Entertainment RioHD-LED-3 User manual
User Guide
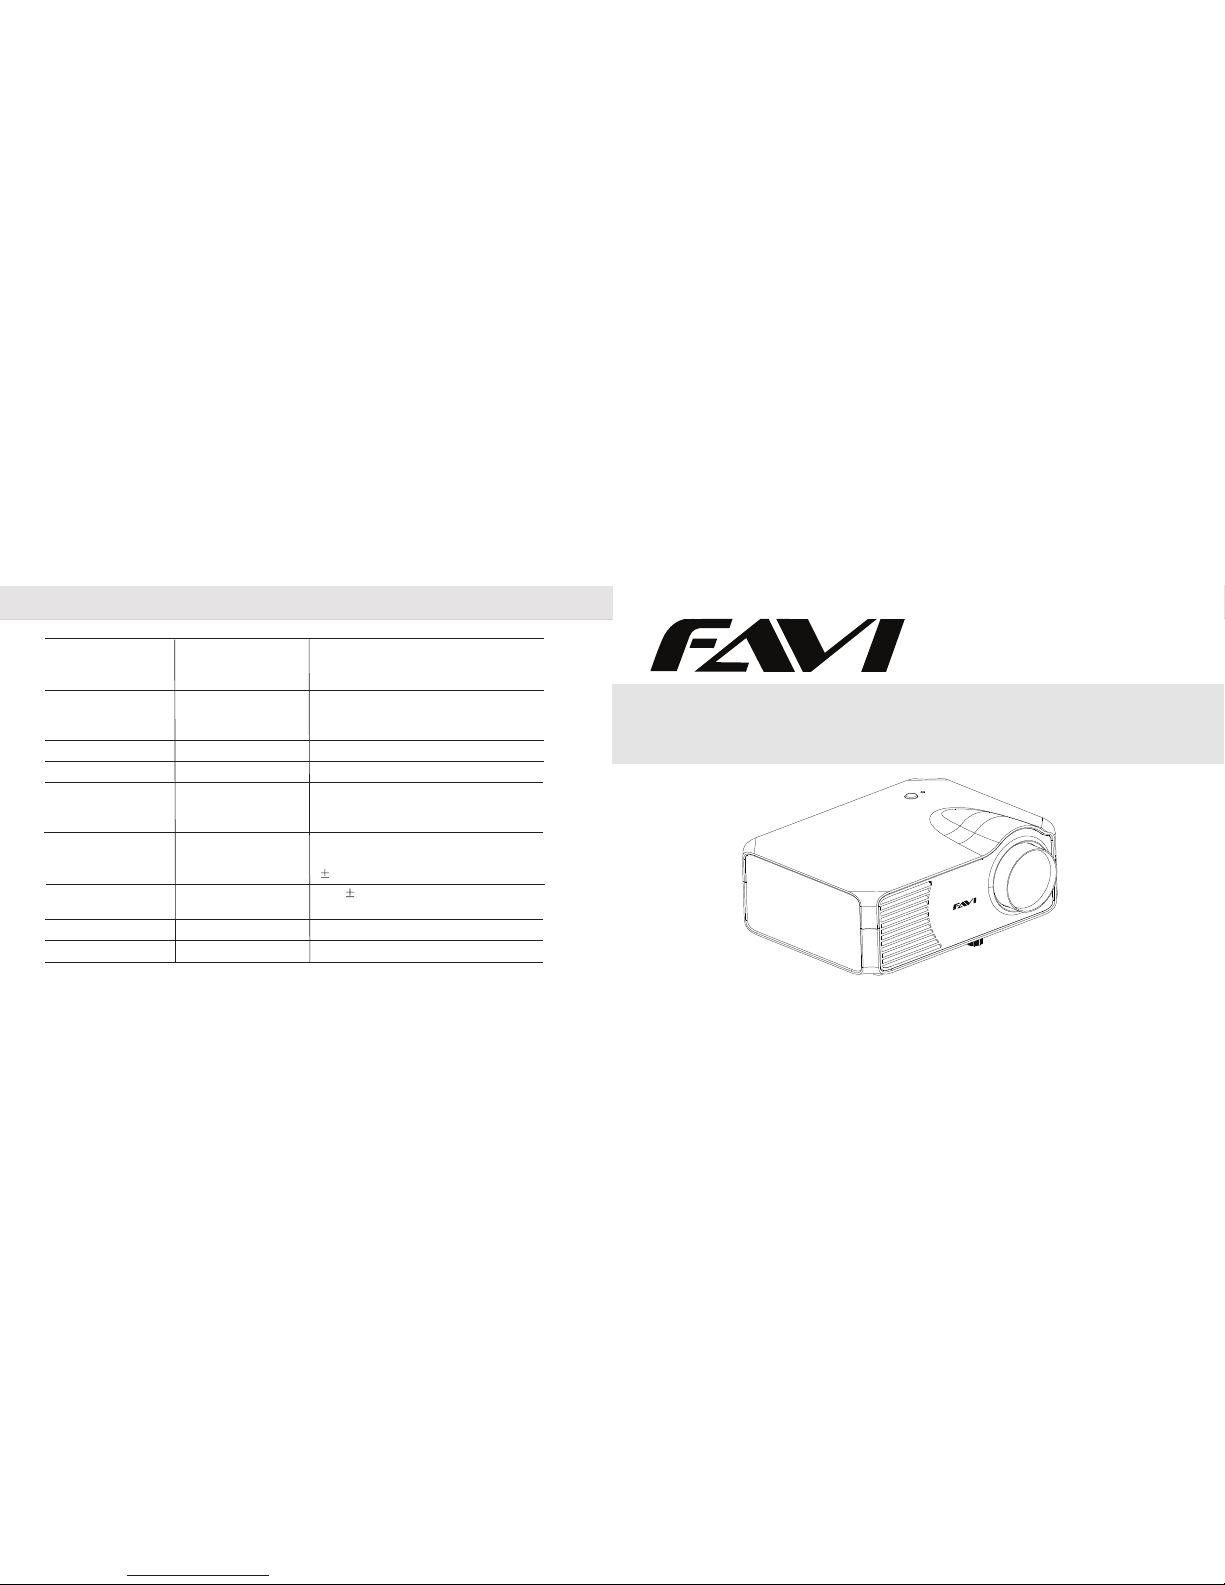
RioHD-LED-3
Specications
14
LCD
Input signal
Output signal
Lens
Lamp
Image
Input power
Power adapter
Model
Native resolution
Support resolution
3.5” TFT
800 x 600
1024 x 768
Video
Audio
Component video, S-video,
VGA, HDMI, USB
Stereo
Speaker 1W x 2
Focus 130mm
Model
Power
Life
LED
70W
20,000 hours
Size
Brightness
Keystone
50-100”
1500 Lumens
15 degree
Voltage
Power
19V 10%
90W
Voltage AC110-240V / 50-60Hz
Projector Dimensions 8.07” x 6.3” x 2.76”
®
®

TABLE OF CONTENT
Safety Precautions ............................................................................................................... 01
What’s in the Box .................................................................................................................. 03
Projector Features ................................................................................................................ 04
Installation .............................................................................................................................. 05
Standard Setting ...................................................................................................... 05
Installation Methods ............................................................................................... 06
Connection Instructions ........................................................................................ 07
Remote Control Features ................................................................................................... 08
Image Adjustment ............................................................................................................... 09
Focus Adjustment .................................................................................................... 09
Keystone Adjustment ............................................................................................. 09
Menu Settings ....................................................................................................................... 10
Troubleshooting ................................................................................................................... 13
Specications ......................................................................................................................... 14
Troubleshooting
13
No power - Check the power cable
No image
Projector turns o
automatically
Remote control
does not function
- Allow 5 minutes (between on and o sessions)
- Check for defective batteries. Replace if needed.
- Aim directly towards the IR receiver.
- Make sure lens cap is removed
- Check power cable and source
- Check input signal
- Clean lter
Problems
Possible solution(s)

Safety Precautions
1
Before using this projector, please read this manual carefully.
WARNING:
Do not stare directly into the light of the lens.
WARNING: To avoid electrical shock, please do not place the projector under
moist conditions.
WARNING:
When turning o the projector, the fans will continue to run for 90 seconds.
Before unplugging the power cable, please be sure the fans have stopped in
order to avoid damage to the projector lamp.
REMOTE CONTROL BATTERY:
Please insert the batteries in correctly. Keep the remote control out of reach
of children or pets.
Menu Settings
12
Multimedia Menu
Setting Menu Menu Setting
OSD Language
Restore factory default
Blending
OSD Duration
Software updates (USB)
English / Germany / Chinese
Yes or No
O / Lower / Middle / High
OFF / 5 sec / 10 sec / 15 sec
Software updates
Supported Multimedia Formats
Type
Movie
Music
Photo
Video Decoder Audio DecoderFormat
.avi
.mpg
.dat
.rm / rmvb
.mov / mkv
.mp3
.wma
.m4a / .acc
.jpg / .jpeg
.bmp
.png
DivX, Xvid, MPEG-4
MPEG-1, MPEG-2
MPEG-1
Real Media, Video
H.264
Prgressive JPEG
Baseline JPEG
BMP
Non-interlaced
Interlaced
MP3, WMA, AAC
MP3
WMA
AAC
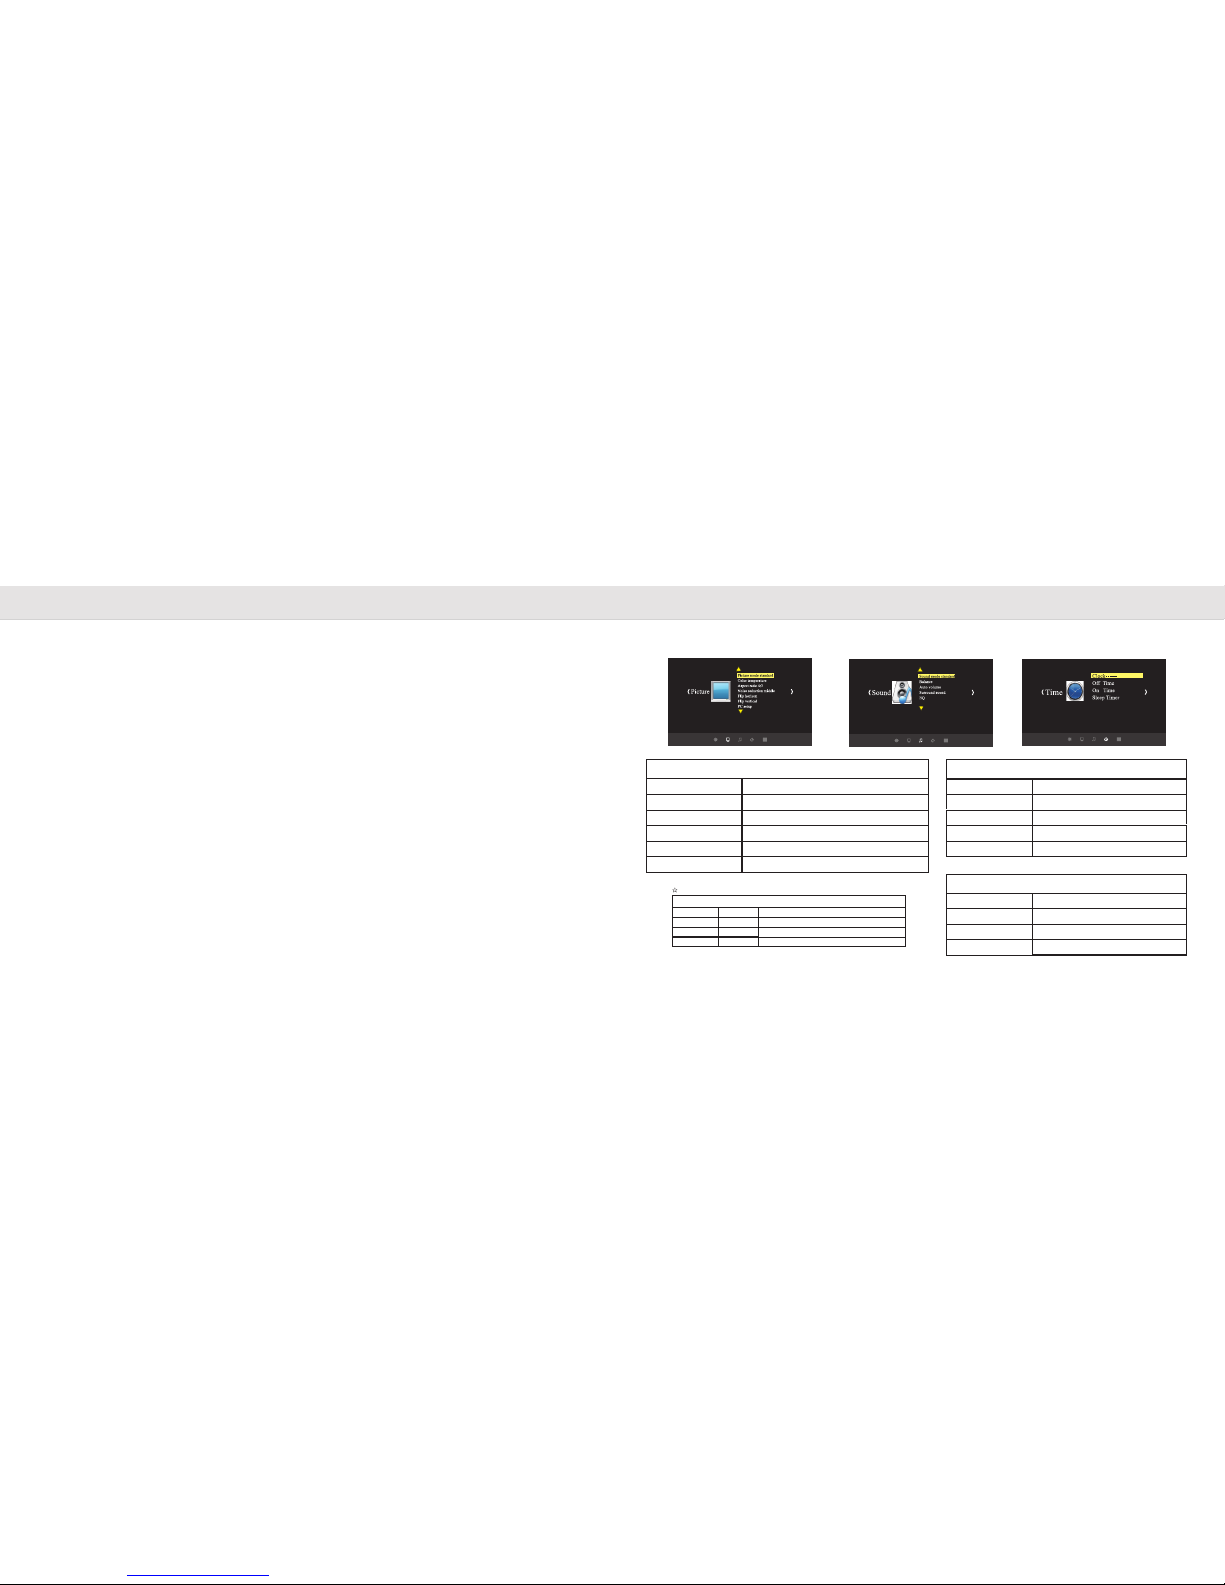
Menu Settings
11
Picture Menu Sound Menu Time Menu
Safety Precautions
WARNING:
Before use, please read this manual carefully. If not operated correctly it can cause
electrical shock or re. When using or repairing this projector, please comply with
the following suggestions.
2
1. Cleaning: When cleaning this projector,
make sure the power is unplugged. Use a
soft cloth to clean. Do not use harsh
cleansers.
2. Accessories: To avoid any damages to
the projector, use accessories enclosed in
the package.
3. Environmental Conditions: Do not
place the projector in wet or moist
conditions.
4. Installation: Please only place the
projector on stable and leveled areas.
5. Ventilation: Do not block ventilation
when in use. Keep lter cleaned or it will
cause the projector to overheat. Rinse
the lter monthly.
6. Power: Match power source (220V or
110V)
7. Ground Cable: 3-pin plug
8. Power Cable: Inspect power cable
before plugging into the power source.
9. Lightning: When not in use for long
period of time or during storms, please
unplug the power cable.
10. Repair: Due to high voltage, do not
attempt to repair the projector yourself.
Please contact:
11. Heat Sensitive Device: Do not use near
other heating devices. This can damage
the performance of the projector.
Picture Menu Sound Menu
Time Menu
Picture mode
Color Temperature
Aspect Ratio
Noise Reduction
Flip Horizon
Flip Vertical
Standard / Soft/ User / Dynamic
Standard / Warm / Cool
4:3 or 16:9 / Zoom 1 / Zoom 2
O / Low / Middle / High
On / O
On / O
Sound Mode
Balance
Auto Volume
Surround Sound
EQ
Clock ----
O time
On time
Sleep timer
Music / Movies / Sports / User / Standard
-50~50
On / O
On / O
(120 / 500 / 1.5K / 5K / 10K) Hz 50
Date / Month / year / Hour / Minutes
O / One time / Everyday / Monday-Friday
O / One time / Everyday / Monday-Friday
O / 10 mins / 20 mins / 30 mins / 60 mins / 90 mins
User mode of picture
Contrast
Brightness
Color
Sharpness
0 - 100
0 - 100
0 - 100
0 - 100
Adjust the dark and brightness area dierence.
Adjust the full picture brightness.
Adjust the picture color.
Adjust the picture sharpness.
NOTE

What’s in the Box
Carefully unpack the product and conrm that all of the items listed below have been
included. If any items are missing, contact your dealer.
1x RioHD-LED-3 Projector
1x Remote Control
1x Power Cable
1x Power Adapter
1x AV Cable
1x User Guide
1x Lens Tissue Wipes
3
Menu Setting Method:
1. When projector is on, press the“menu”key. The menu will show on the screen
(picture 1).
2. Press the “ < / > “ keys to change menu options to “picture” > “sound” > “time”>
“set up” interface.
3. After menu is conrmed, press the “ ^ / “ key to choose sub-menu (picture 2).
4. Press “ < / > “ key to adjust the sub-menu (picture 3).
5. Press the “menu” key to exit the menu setting.
NOTE: If the function mark is grey, it indicates that this function is not valid.
Menu Settings
10
^
Picture 1 Picture 2 Picture 3

Image Adjustment
9
When using the projector for the rst time, please make the following focus adjustments:
Focus Adjustments
Slowly dial the lens until the image is
brought into focus.
Keystone Adjustments
If a projected picture has keystone
distortion, correct image with keystone
dial located under the projector. If the
image becomes trapezoid shaped
when the screen or projector is not
level, reposition the projector to
improve its angle to the screen.
Projector Features
FRONT REAR BOTTOM
4
1. Power Button
2. Indicator Light:
Red – Standby
Green – Active
3. Ventilation Window
4. Focus Lens
5. Interface
6. IR Receiver
7. VGA Port
9. USB Port
10. Speakers
11. Keystone Adjustment
12. High-feet Adjustment
13. Holes for Ceiling Mount
1
2
3
4
5
1 2
1 3
1 1
9
1 0
7
6
8
US B
U S B
®
®
®

Installation
Standard Setting
Refer to the following chart to adjust
your picture size and distance.
NOTE: Distance refers to the distance from the
lens to the projector screen. Image sizes
are measured diagonally and have 3%
margin of error.
5
WARNING:
Please check the following picture for
Keystone adjustment.
Incorrect installation, the
image on the left is smaller.
Screen
Screen
symmetry
axis Projector
Incorrect installation, the
image on the right is smaller.
Correctly installation,
the image is rectangular
.
Remote Control Features
8
4:3
70 inches
82 inches
96 inches
110 inches
16:9Distance
71 inches
88 inches
101 inches
148 inches
50 inches
60 inches
72 inches
100 inches
Turn ON / OFF
Mute
Picture Mode
Sound Mode
Video Mode
Aspect Ratio
Return to previous program
Source
Display
Menu
Exit
Conrm
Up
Down
Left
Right
Previous (red)
Next track (yellow)
Rewind (green)
Fast forward (blue)
Play / Pause
Stop
OK
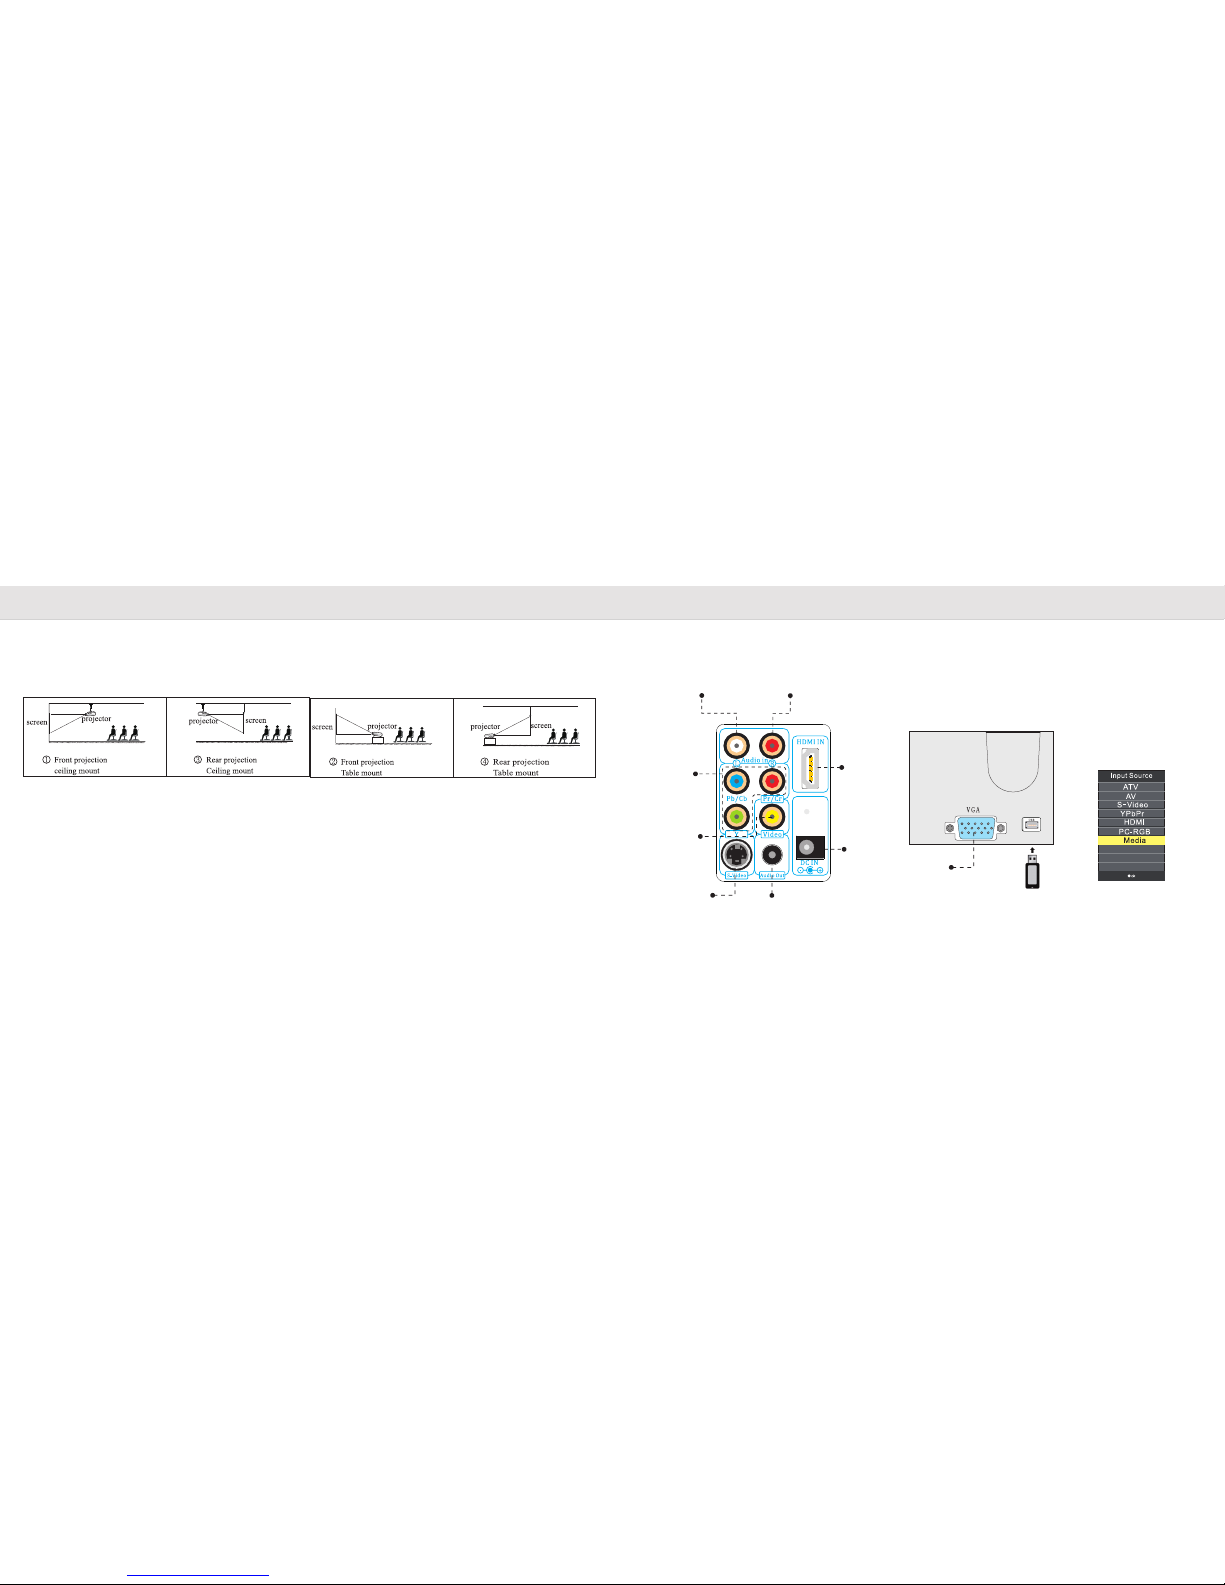
Installation
Connection Instructions
Source switch:
1. Press “source”key on remote
control, the screen will show
source (picture below)
2. Press “ ^ / ”keys to choose
the source mode.
3. Press “ > “ or“ OK “ key to
conrm.
7
Left audio
input
Right audio
input
HDMI input
port
Power
adapter
input port
Component video
(Y/PR/PB)
Video port
S-video port Audio out port
VGA input port
USB
^
Installation
6
Installation Method
Contact a professional service technician to mount this projector to a ceiling.
Follow the instructions below for the correct projector positions:
WARNING:
1. To avoid damage beyond repair or bodily injury, secure the projector mount
rmly to the ceiling or a stable surface.
2. This projector can only be used in an environment with a temperature that does
not exceed the range of 0-35 degree. The projector may malfunction if
temperatures vary outside the normal operating range.
3. The sharpness of the screen might be interrupted when the projector is being
used in a dusty, wet, moist or smoke lled environment. The projector might
malfunction in a moist or wet environment.
4. Proper ventilation can help avoid overheating the projector.
Other manuals for Entertainment RioHD-LED-3
1
Table of contents
Other FAVI Projector manuals

FAVI
FAVI 1500 User manual

FAVI
FAVI E3-LED-PICO User manual

FAVI
FAVI J7-LED-PICO User manual

FAVI
FAVI RioHD-LED-3T User manual

FAVI
FAVI B1-LED-PICO User manual

FAVI
FAVI RioHD-LED-4 User manual

FAVI
FAVI Pico+ J6-LED-PICO User manual

FAVI
FAVI RioHD-LED-4S User manual

FAVI
FAVI Pico+ J6-LED-PICO User manual

FAVI
FAVI RioHD-LED-2 User manual

FAVI
FAVI RioHD-LED-4T User manual

FAVI
FAVI LED-2 User manual

FAVI
FAVI Entertainment RioHD-LED-3 User manual

FAVI
FAVI RioHD-LED-4T User manual

FAVI
FAVI Rio HD User manual

FAVI
FAVI E3-LED-PICO User manual

FAVI
FAVI RioHD-LED-K1 User manual

FAVI
FAVI Pico+ J5-PICO-HD User manual

FAVI
FAVI RioHD-LED-3T User manual

FAVI
FAVI RioHD-LED-3T User manual


