FEHN 700L User manual
FEHN
FEHN - Sit, Stand, Lean, Stetch, Move!
257 Franklin St, Unit 14 Bristol, RI 02809
www.thefehn.com
FEHN
www.thefehn.com
User Manual | Assembly Instructions
Thank you for
choosing the
FEHN. Please visit
our website,
www.thefehn.com
or contact us at
info@thefehn.com
if you have any
further questions
or concerns.

SETTING UP YOUR FEHN CONTINUED CONTENTS
7
WARNING
ASSEMBLY
SETUP
WARRANTY
1
2
5
8
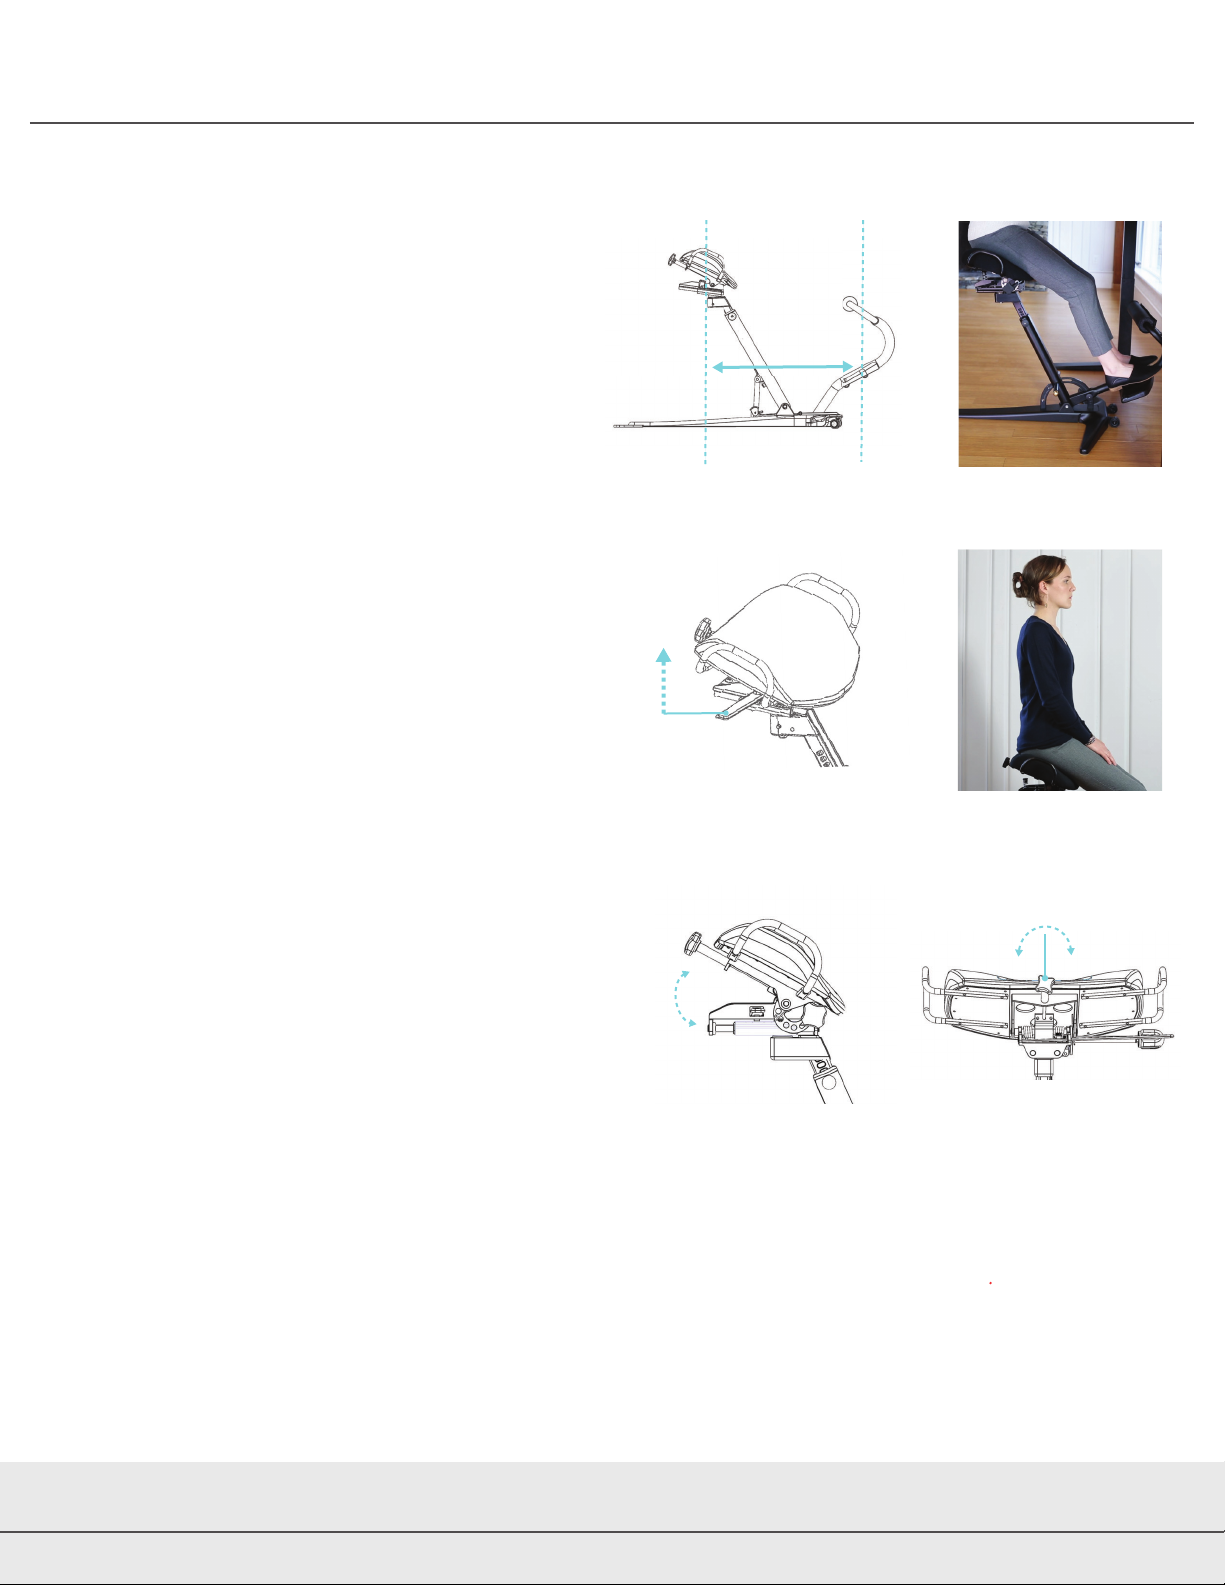
Step 4 - Seat Slider
• To adjust the distance to the footrests
(g. 9), lift the Lever on the right side of
the seat and slide the seat forwards and
backwards. (g. 11)
•Release the Lever to lock it.
•In the correct position, your back should
be aligned with the back edge of the seat
with your feet on the platforms and your
knees slightly bent. (g. 10, g. 12)
Step 5 - Seat Spring Stiness
•The seat spring resistance Knob controls
how easily the seat rocks and how much
support it provides. (g. 13)
•Turn the Knob clockwise to increase the
spring resistance, making it harder to rock
the seat. Turn it counter clockwise to
decrease the resistance. (g. 14)
•Test dierent settings to nd the sweet spot
that gives you the optimal amount of
movement and support.
Conrming and Fine-Tuning Setup
These adjustments should get you started. Spend some time sitting in the chair to conrm that the
seat height, foot rest distance, and spring resistance are set correctly for your comfort needs.
If you have questions about setup or are uncomfortable please contact us at info@thefehn.com or visit
our website for more information.
+
_
How Much Do You Want to Rock?
Setting the Distance to the Footrest
g. 9 g. 10
g. 11 g. 12
g. 13 g. 14
Check Distance to Desk: Now that you
have set your seat height and footrest
distance you may need to readjust the
seat’s distance to the desk. Refer to the
instructions in Step 1.
*
WARNING
Please read this warning carefully before using the FEHN.
The FEHN is different than any other chair on the market,
and requires some time and care when using it.
Please read this warning carefully before using the FEHN.
The FEHN is different than any other chair on the market,
and requires some time and care when using it.
SETTING UP YOUR FEHN CONTINUEDSETTING UP YOUR FEHN CONTINUED
16
•The Assembly and Setup Instructions must be strictly followed. The FEHN should
always be used directly on the floor or other solid, level surface.
•The maximum weight limit is 250 pounds. Maximum height limit is 6’4”.
•Children under the age of 14 should not use the FEHN.
•The seat is designed to move freely. It rocks and swivels 360 degrees. You should
use caution getting in and out of the FEHN; use the handles to stabilize
yourself.
•Always have both feet fully supported by the foot rests or the floor when using
the FEHN.
•Wearing pumps or stiletto heels on the FEHN is not recommended.
•Do not lean sideways on the FEHN.
•Do not sit on the foot rest.
•Always adjust the chair position, height and spring tension as described in the
FEHN Setup Instructions.
•The FEHN is for indoor use only. Do not store the FEHN outdoors, near water, or
at high humidity levels.
•You are solely responsible for determining if you are physically fit and capable of
using the FEHN chair. If you have any doubts about your ability to use the FEHN
safely (including, without limitation, vertigo, balance issues or another injury or
impairment) consult a physician before using the FEHN.
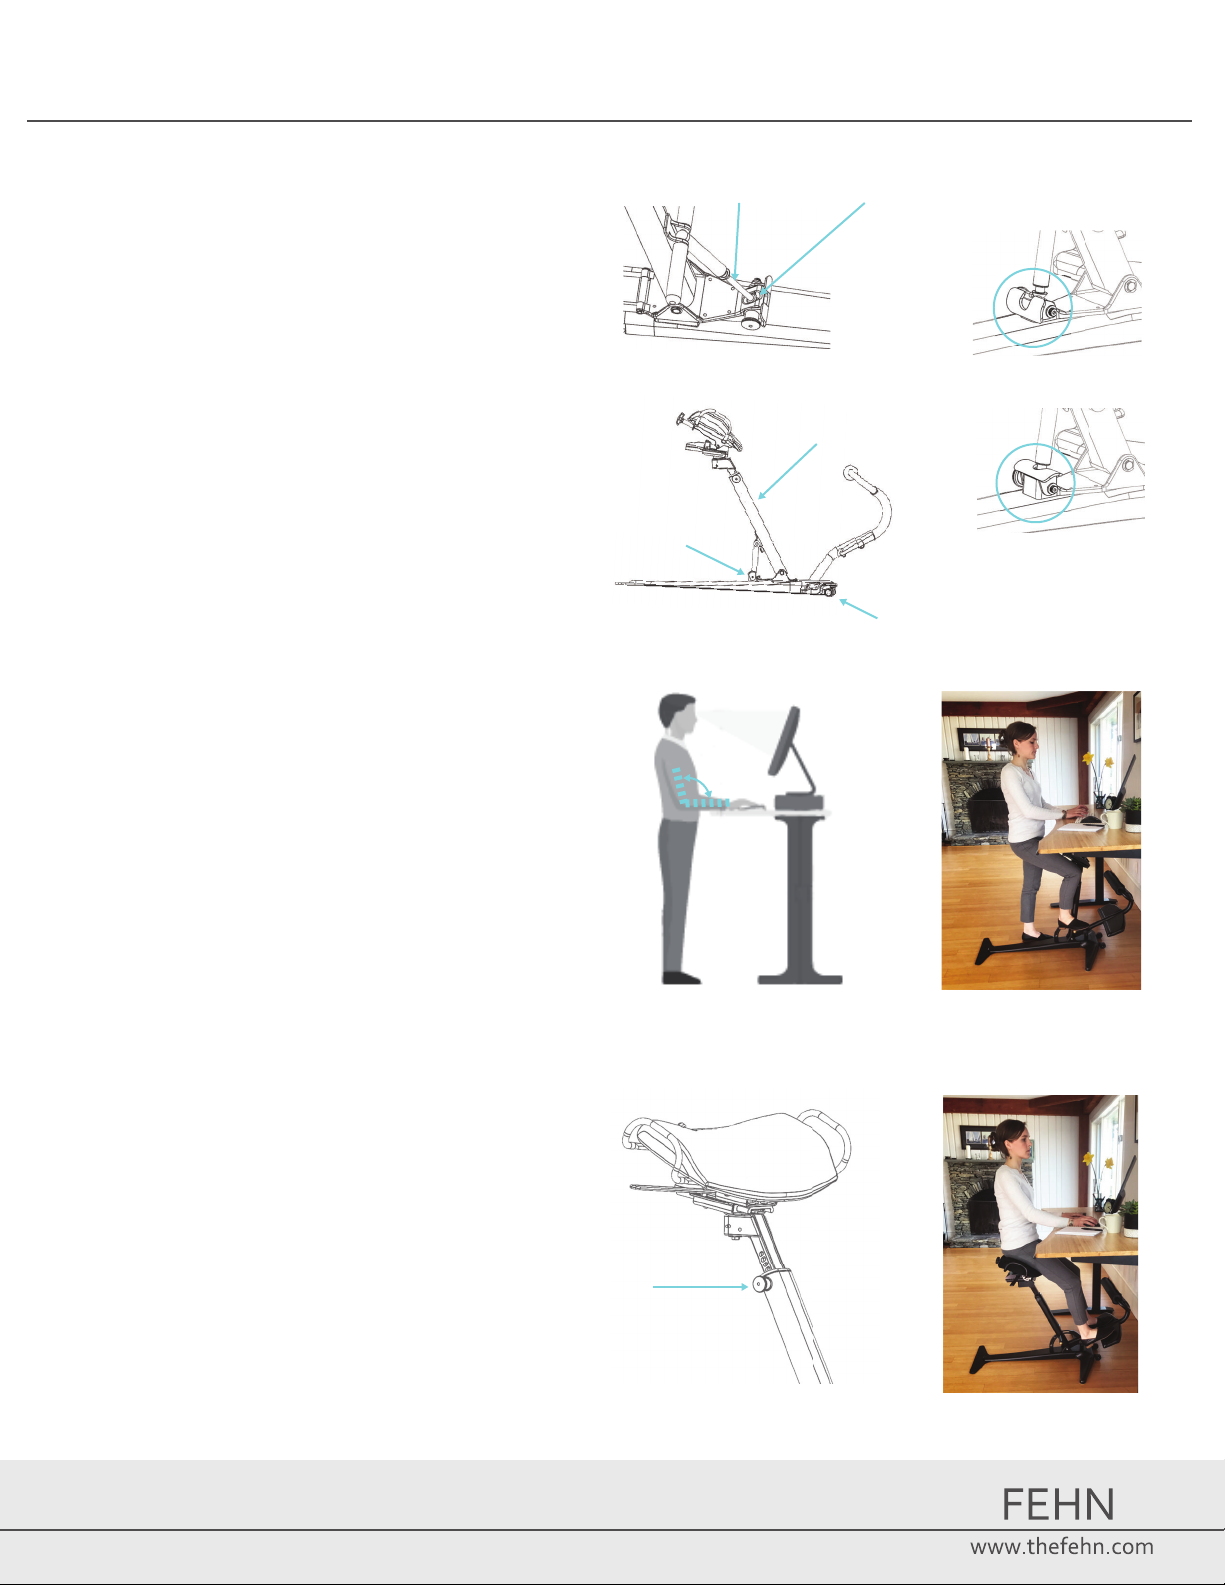
Step 2 - Desk Height
•Fold your seat forward under your desk
and out of the way.
•Move the desk up or down until your
elbows form an angle that is slightly
larger than 90 degrees. (g. 5, g. 6)
Step 3 - Seat Height
Step 1 - Chair Placement
•Caution: Before setting up your Fehn,
make sure the bottom of the Brass
Piston is fully locked into the Piston Lock
Pocket of the base. (g. 1)
•Lock the Seat Tube by rolling the Seat
Tube Foot Lock forward onto the brass
tube with your foot. (g. 2, g. 3)
•Using the front wheels, move the chair to
a comfortable working distance from your
desk. Then unlock the Foot Lock (g. 4)
• No need to perfect the placement now.
You will ne-tune this later once you have
made a couple of other key adjustments.
•A simple Pull Pin allows you to adjust the
height. (g. 7) This adjustment has the
biggest impact on comfort.
•Adjust the height so when seated your
elbows are in the same 90+ degree position
as they were while standing in Step 1. Your
knees should only be slightly bent. (g. 8)
•Make sure the Pull Pin is fully engaged
(you will hear a loud click).
•Do not change the desk height that you
set in Step 1.
Setting the Distance to the Desk
90˚-100˚
g. 5 g. 6
g. 7
g. 8
g. 2 - unlocked
g. 3 - locked
g. 4 wheels
seat tube foot lock
piston lock pocket
brass piston
g. 1
seat tube
pull pin
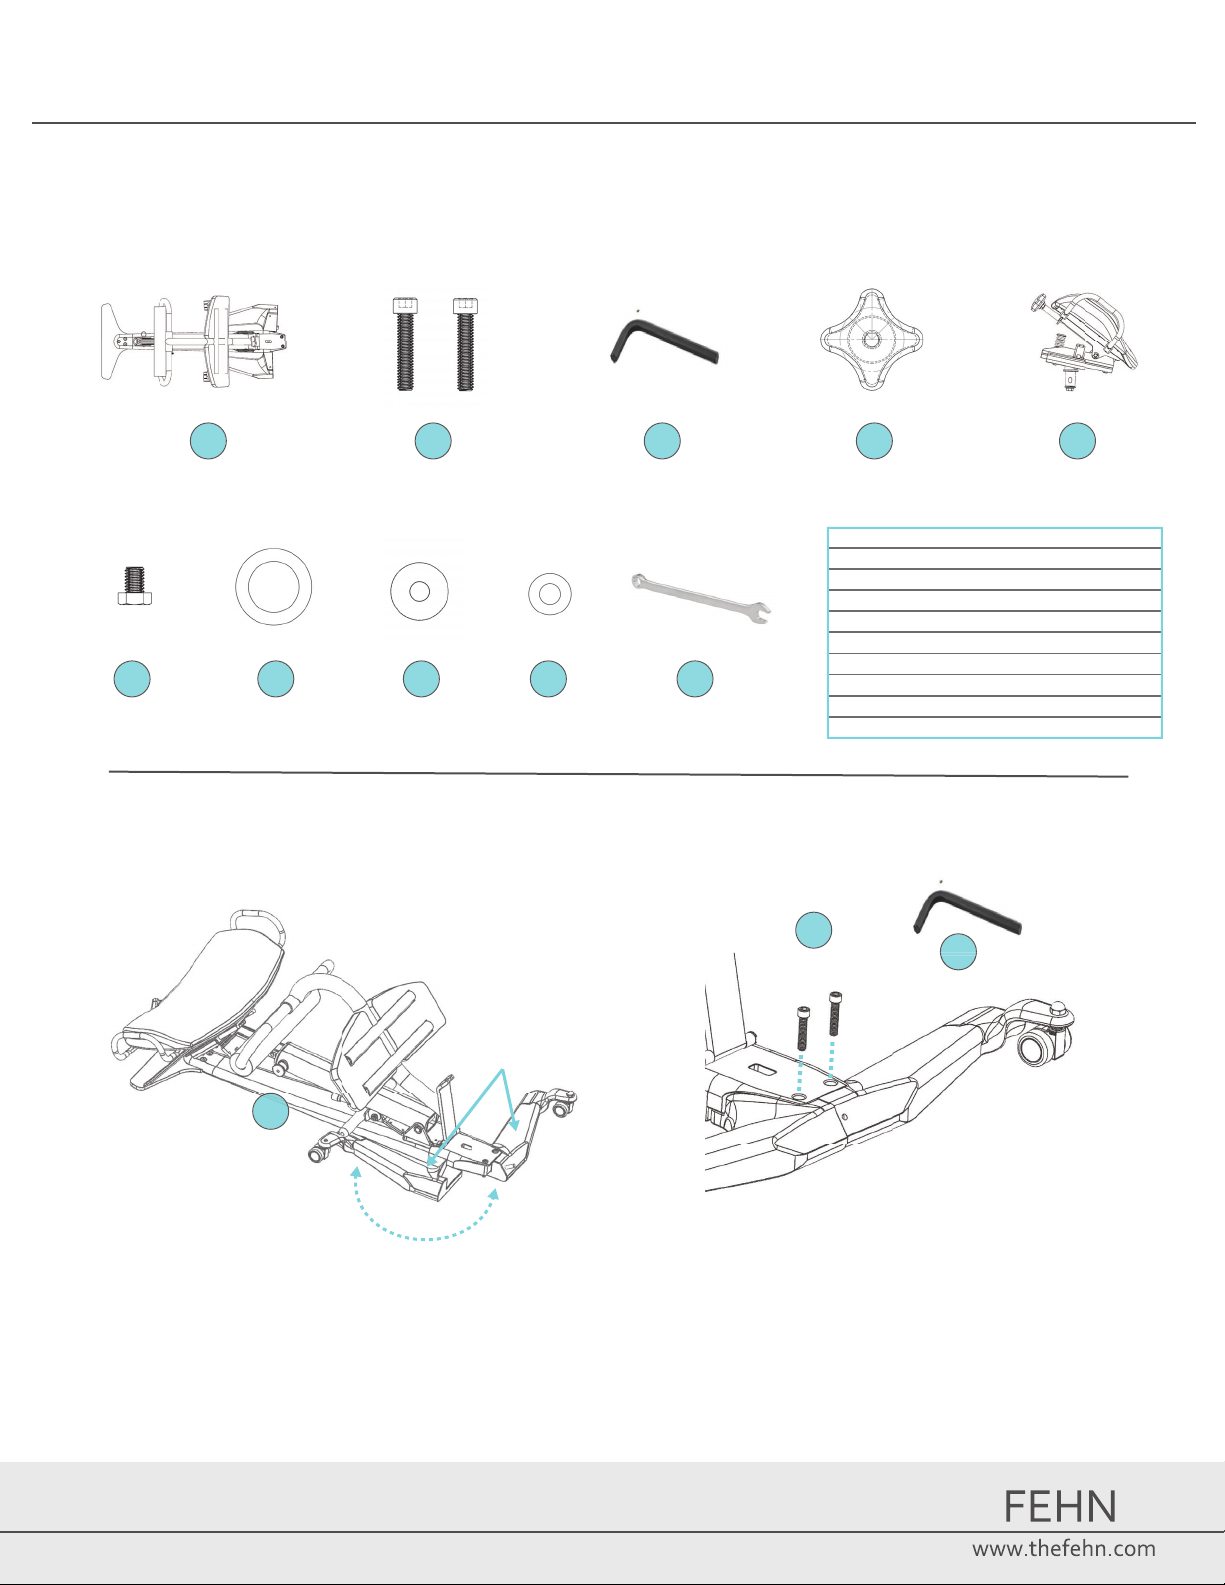
FEHN ASSEMBLY INSTRUCTIONS
In the Box
AB C DE
Step 1:
BC
•Swing open the arms in the Base Assembly (A)
•Using the Allen Wrench C, screw the Socket Head Bolts (B) into the arms to lock
them in place. Make sure the bolts are well tightened and the heads are flush with
the top of the base. If they are secured correctly, the arms should not move at all.
A
arms
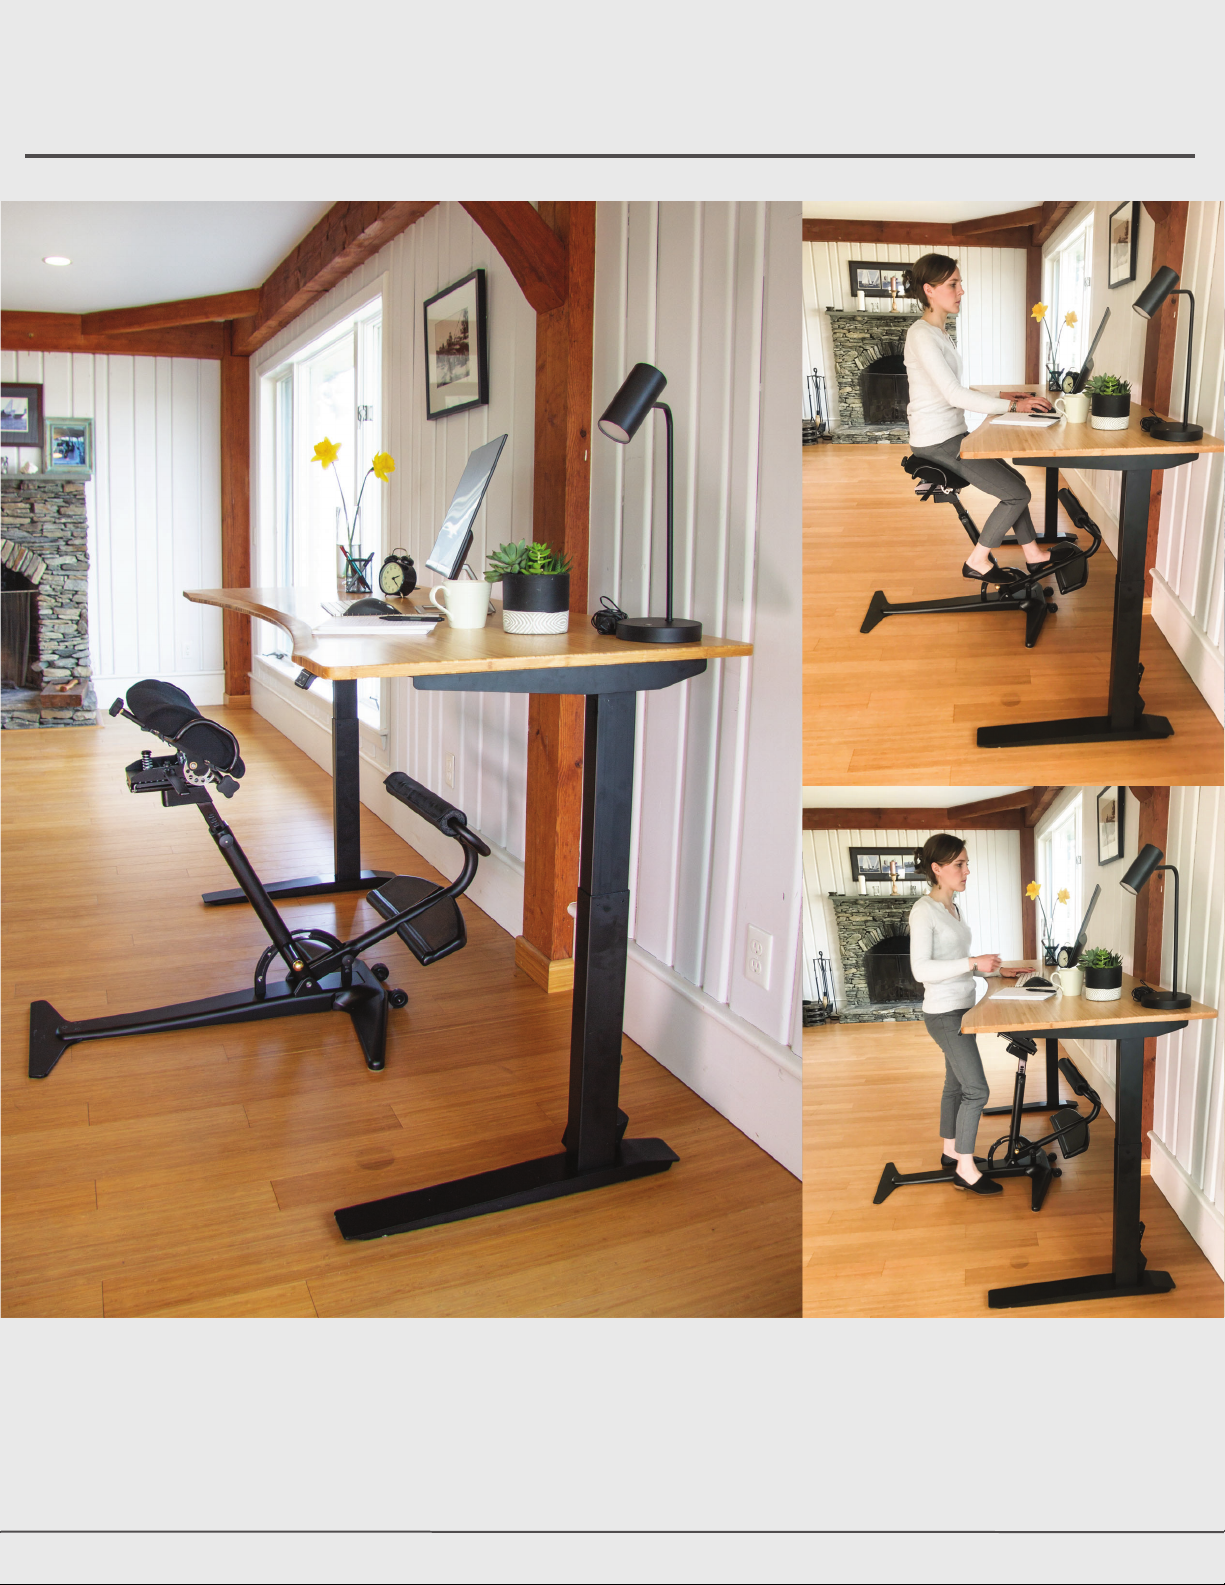
SETTING UP YOUR FEHN
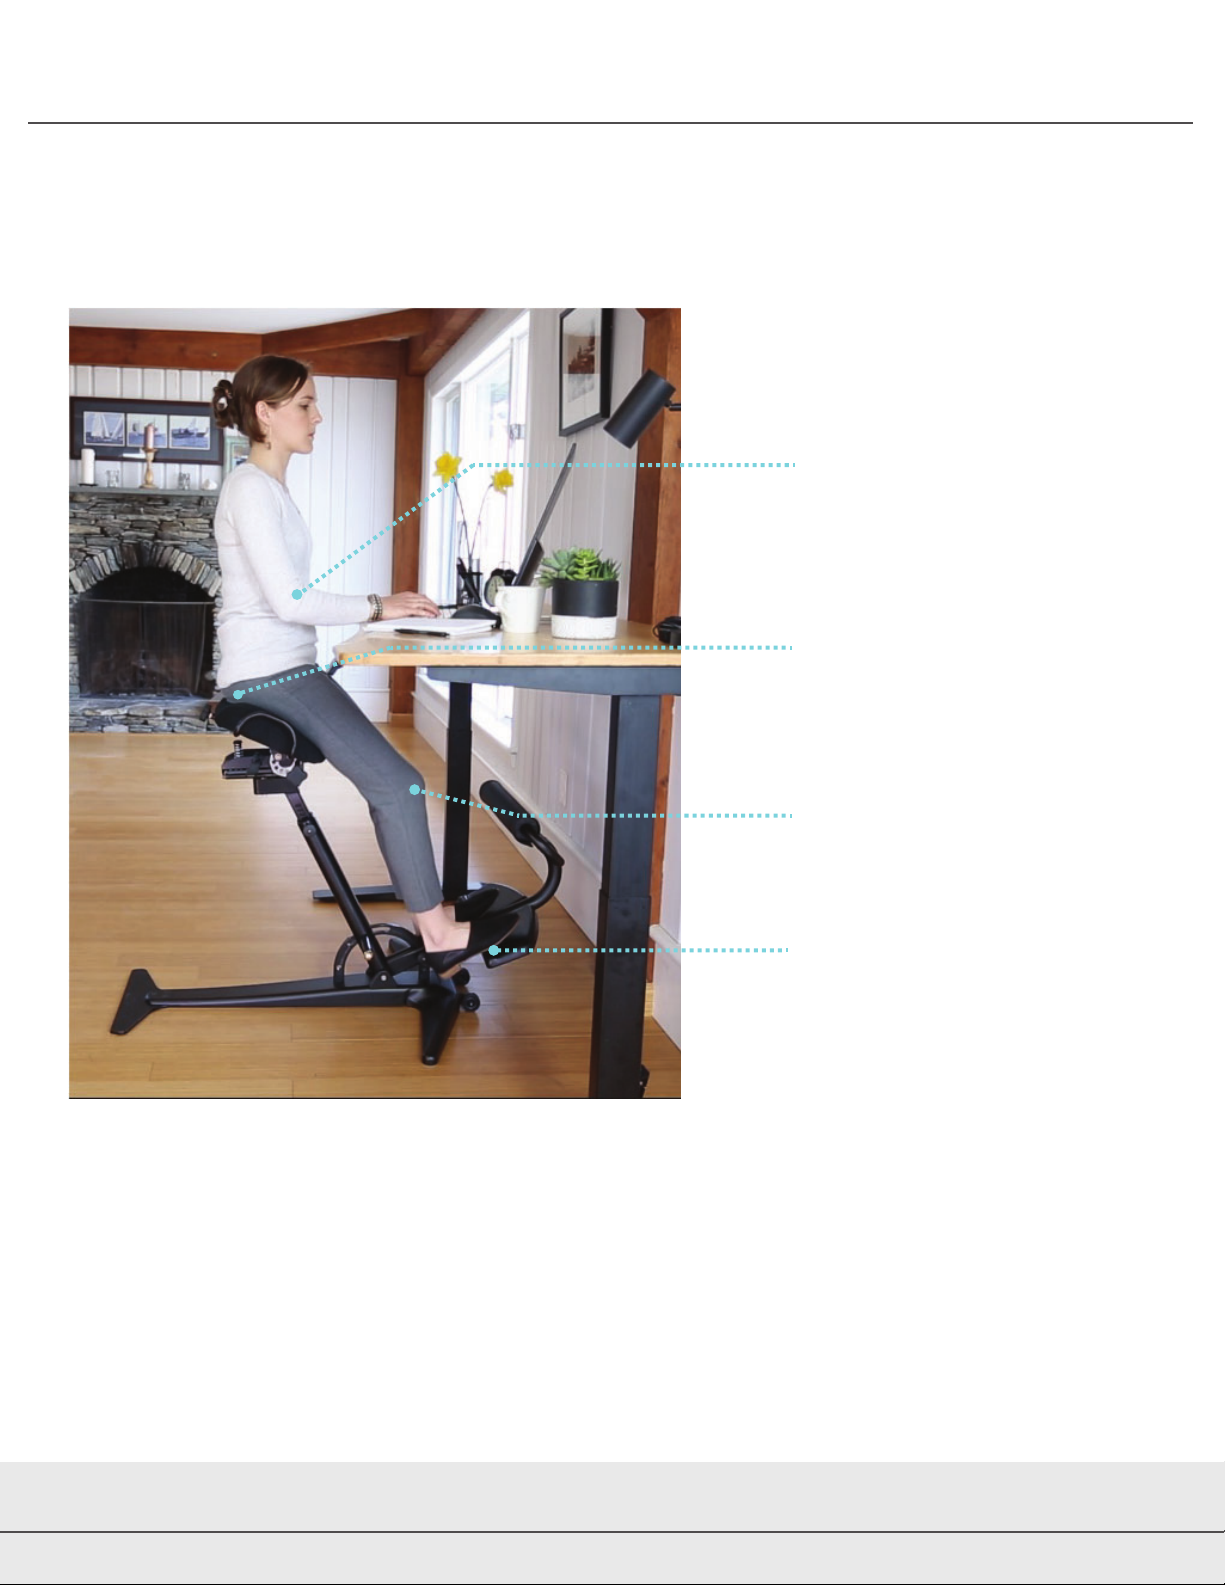
Optimal Setup
Elbows form an angle
that is slightly larger
than 90 degrees.
Back lined up with the
back edge of seat
Knees slightly bent
Feet comfortably reach
bottom foot rest
Follow the instructions on the following pages to
optimize your comfort on the Fehn.
If you prefer watching a video, check out
www.TheFehn.com/setup
2
5
ABase Assembly 1 ea
B5/16" Socket Head Bolt 2 ea
C1/4" Allen Wrench 1 ea
DKnob 1 ea
ESeat 1 ea
F3/8" Bolt 1 ea
GBronze Washer 1 ea
HBelleville Cone Washer 1 ea
IStainless Steel Washer 1 ea
J9/16" Wrench 1 ea
FG H I J
FEHN ASSEMBLY INSTRUCTIONS CONTINUED
D
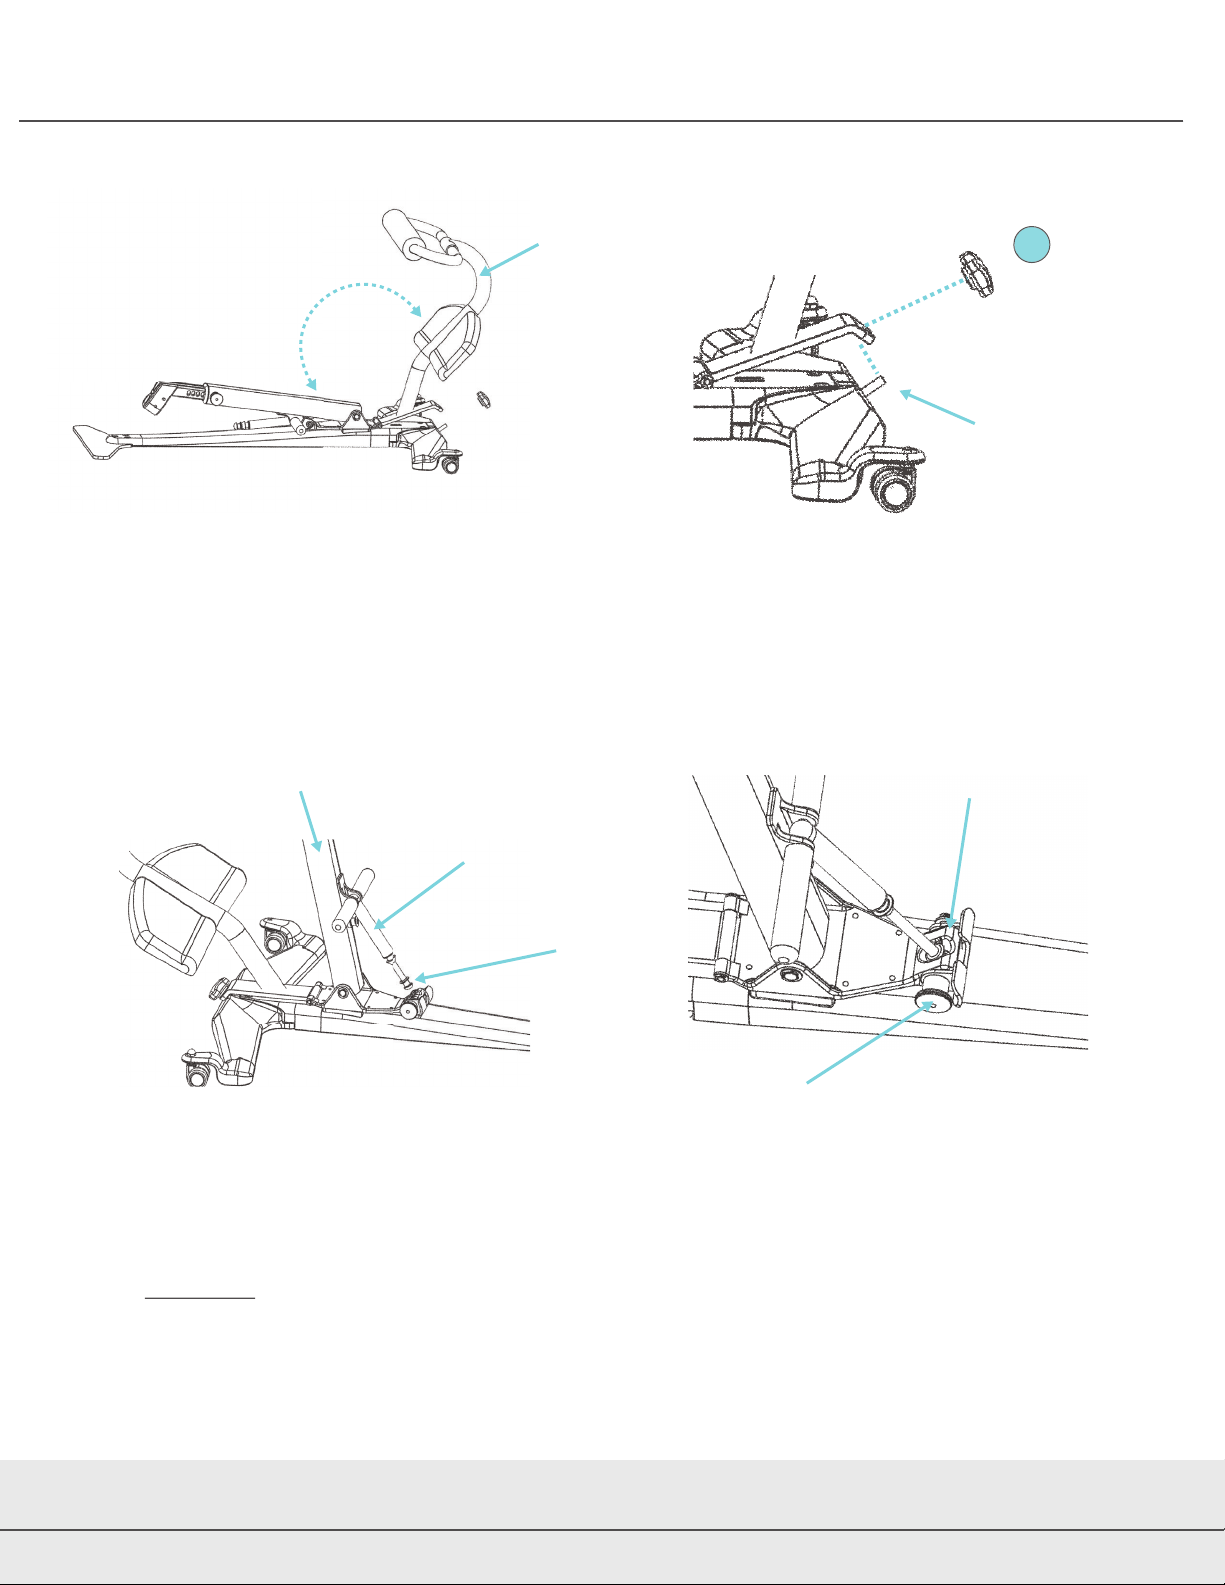
FEHN ASSEMBLY INSTRUCTIONS CONTINUED
Step 3:
Step 2:
brass piston
seat tube
•Unfold the Seat Tube and Brass Piston. Place the Ball End of the Brass Piston into the
Piston Lock Pocket on the base.
•Pull down on the Seat Tube until the Brass Piston Ball End is securely locked into the
Piston Lock Pocket. You will hear a loud click when it locks securely.
•Caution: Do Not sit on the Fehn unless you are certain that the bottom of the Brass
Piston is securely locked into the Piston Lock Pocket.
•(If you later need to fold the Fehn up for transport, use the Pull Pin to release the
Brass Piston from the Piston Lock Pocket)
piston lock pocket
pull pin
foot rest tube
•Unfold the Foot Rest Tube until the slot at bottom fits over the threaded post on the base.
•Screw the Knob (D) onto the post until it is firmly tightened against the base. You should not
be able to fold the Foot Rest Tube when it is installed properly.
threaded post
brass piston
ball end
FEHN ASSEMBLY INSTRUCTIONS CONTINUEDFEHN ASSEMBLY INSTRUCTIONS CONTINUED
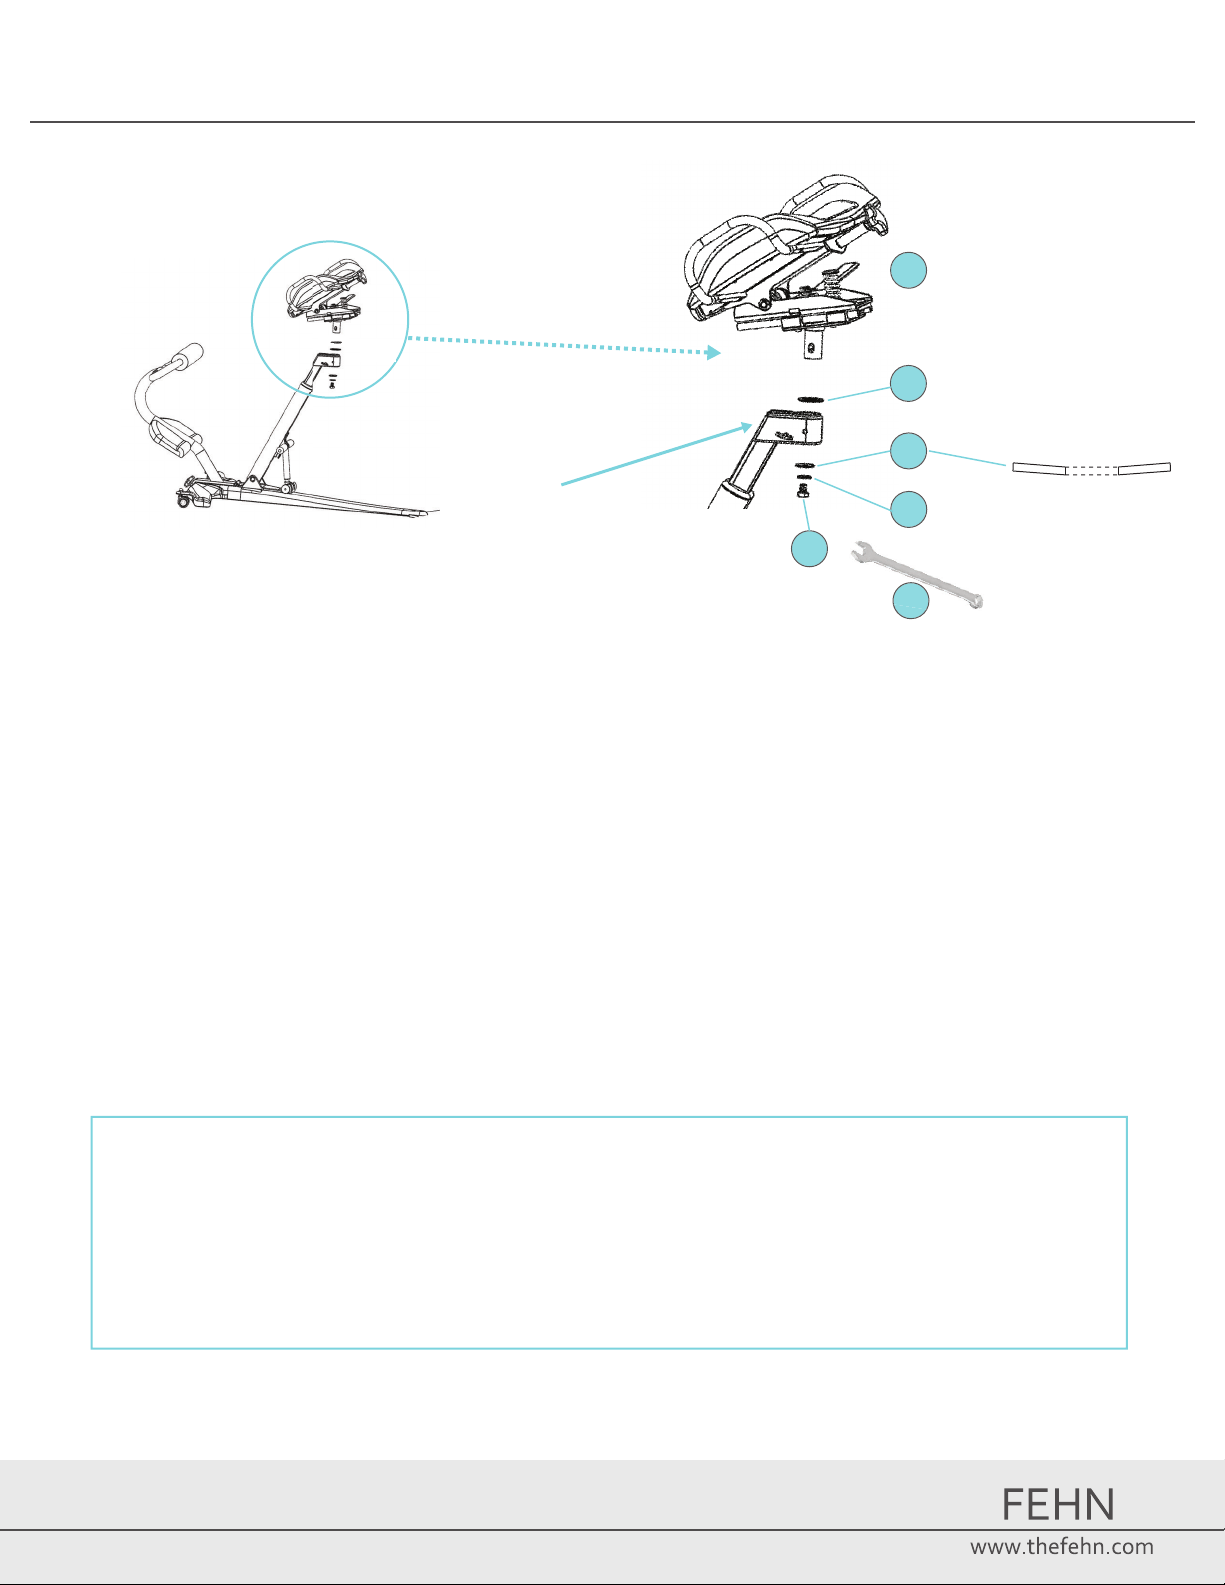
Step 4:
seat mount block
F
G
H
I
J
•Install the Seat (E) into the Seat Mount Block placing the washers in the order dipicted
above. The Bronze Washers (G) should be placed above the Seat Mount Block. The Belleville
Cone Washer (H) should be driectly below the Seat Mount Block with the high point of the
cone facing down. The Stainlees Steel Washer (I) should be placed below the Belleville Cone
Washer.
•Use the 9/16” Wrench (J) to tighten the 3/8” Bolt (F) securely into the hole underneath the
Seat Mount Block.
E
Belleville Washer (H)
installed with cone
facing down
34
Please read the complete Warning on page 1 of
this manual carefully before using the FEHN.
IMPORTANT: Before using the FEHN follow the Setup
Instructions on the following pages or watch the video at
www.TheFehn.com/setup to ensure the chair
is adjusted properly for your comfort and body!
FEHN ASSEMBLY INSTRUCTIONS CONTINUED
D
FEHN ASSEMBLY INSTRUCTIONS CONTINUED
Step 3:
Step 2:
brass piston
seat tube
•Unfold the Seat Tube and Brass Piston. Place the Ball End of the Brass Piston into the
Piston Lock Pocket on the base.
•Pull down on the Seat Tube until the Brass Piston Ball End is securely locked into the
Piston Lock Pocket. You will hear a loud click when it locks securely.
•Caution: Do Not sit on the Fehn unless you are certain that the bottom of the Brass
Piston is securely locked into the Piston Lock Pocket.
•(If you later need to fold the Fehn up for transport, use the Pull Pin to release the
Brass Piston from the Piston Lock Pocket)
piston lock pocket
pull pin
foot rest tube
•Unfold the Foot Rest Tube until the slot at bottom fits over the threaded post on the base.
•Screw the Knob (D) onto the post until it is firmly tightened against the base. You should not
be able to fold the Foot Rest Tube when it is installed properly.
threaded post
brass piston
ball end
FEHN ASSEMBLY INSTRUCTIONS CONTINUEDFEHN ASSEMBLY INSTRUCTIONS CONTINUED
Step 4:
seat mount block
F
G
H
I
J
•Install the Seat (E) into the Seat Mount Block placing the washers in the order dipicted
above. The Bronze Washers (G) should be placed above the Seat Mount Block. The Belleville
Cone Washer (H) should be driectly below the Seat Mount Block with the high point of the
cone facing down. The Stainlees Steel Washer (I) should be placed below the Belleville Cone
Washer.
•Use the 9/16” Wrench (J) to tighten the 3/8” Bolt (F) securely into the hole underneath the
Seat Mount Block.
E
Belleville Washer (H)
installed with cone
facing down
34
Please read the complete Warning on page 1 of
this manual carefully before using the FEHN.
IMPORTANT: Before using the FEHN follow the Setup
Instructions on the following pages or watch the video at
www.TheFehn.com/setup to ensure the chair
is adjusted properly for your comfort and body!
FEHN ASSEMBLY INSTRUCTIONS
In the Box
AB C DE
Step 1:
BC
•Swing open the arms in the Base Assembly (A)
•Using the Allen Wrench C, screw the Socket Head Bolts (B) into the arms to lock
them in place. Make sure the bolts are well tightened and the heads are flush with
the top of the base. If they are secured correctly, the arms should not move at all.
A
arms
SETTING UP YOUR FEHN
Optimal Setup
Elbows form an angle
that is slightly larger
than 90 degrees.
Back lined up with the
back edge of seat
Knees slightly bent
Feet comfortably reach
bottom foot rest
Follow the instructions on the following pages to
optimize your comfort on the Fehn.
If you prefer watching a video, check out
www.TheFehn.com/setup
2
5
ABase Assembly 1 ea
B5/16" Socket Head Bolt 2 ea
C1/4" Allen Wrench 1 ea
DKnob 1 ea
ESeat 1 ea
F3/8" Bolt 1 ea
GBronze Washer 1 ea
HBelleville Cone Washer 1 ea
IStainless Steel Washer 1 ea
J9/16" Wrench 1 ea
FG H I J
WARNING
Please read this warning carefully before using the FEHN.
The FEHN is different than any other chair on the market,
and requires some time and care when using it.
Please read this warning carefully before using the FEHN.
The FEHN is different than any other chair on the market,
and requires some time and care when using it.
SETTING UP YOUR FEHN CONTINUEDSETTING UP YOUR FEHN CONTINUED
16
•The Assembly and Setup Instructions must be strictly followed. The FEHN should
always be used directly on the floor or other solid, level surface.
•The maximum weight limit is 250 pounds. Maximum height limit is 6’4”.
•Children under the age of 14 should not use the FEHN.
•The seat is designed to move freely. It rocks and swivels 360 degrees. You should
use caution getting in and out of the FEHN; use the handles to stabilize
yourself.
•Always have both feet fully supported by the foot rests or the floor when using
the FEHN.
•Wearing pumps or stiletto heels on the FEHN is not recommended.
•Do not lean sideways on the FEHN.
•Do not sit on the foot rest.
•Always adjust the chair position, height and spring tension as described in the
FEHN Setup Instructions.
•The FEHN is for indoor use only. Do not store the FEHN outdoors, near water, or
at high humidity levels.
•You are solely responsible for determining if you are physically fit and capable of
using the FEHN chair. If you have any doubts about your ability to use the FEHN
safely (including, without limitation, vertigo, balance issues or another injury or
impairment) consult a physician before using the FEHN.
Step 2 - Desk Height
•Fold your seat forward under your desk
and out of the way.
•Move the desk up or down until your
elbows form an angle that is slightly
larger than 90 degrees. (g. 5, g. 6)
Step 3 - Seat Height
Step 1 - Chair Placement
•Caution: Before setting up your Fehn,
make sure the bottom of the Brass
Piston is fully locked into the Piston Lock
Pocket of the base. (g. 1)
•Lock the Seat Tube by rolling the Seat
Tube Foot Lock forward onto the brass
tube with your foot. (g. 2, g. 3)
•Using the front wheels, move the chair to
a comfortable working distance from your
desk. Then unlock the Foot Lock (g. 4)
• No need to perfect the placement now.
You will ne-tune this later once you have
made a couple of other key adjustments.
•A simple Pull Pin allows you to adjust the
height. (g. 7) This adjustment has the
biggest impact on comfort.
•Adjust the height so when seated your
elbows are in the same 90+ degree position
as they were while standing in Step 1. Your
knees should only be slightly bent. (g. 8)
•Make sure the Pull Pin is fully engaged
(you will hear a loud click).
•Do not change the desk height that you
set in Step 1.
Setting the Distance to the Desk
90˚-100˚
g. 5 g. 6
g. 7
g. 8
g. 2 - unlocked
g. 3 - locked
g. 4 wheels
seat tube foot lock
piston lock pocket
brass piston
g. 1
seat tube
pull pin
SETTING UP YOUR FEHN CONTINUED CONTENTS
7
WARNING
ASSEMBLY
SETUP
WARRANTY
1
2
5
8
Step 4 - Seat Slider
• To adjust the distance to the footrests
(g. 9), lift the Lever on the right side of
the seat and slide the seat forwards and
backwards. (g. 11)
•Release the Lever to lock it.
•In the correct position, your back should
be aligned with the back edge of the seat
with your feet on the platforms and your
knees slightly bent. (g. 10, g. 12)
Step 5 - Seat Spring Stiness
•The seat spring resistance Knob controls
how easily the seat rocks and how much
support it provides. (g. 13)
•Turn the Knob clockwise to increase the
spring resistance, making it harder to rock
the seat. Turn it counter clockwise to
decrease the resistance. (g. 14)
•Test dierent settings to nd the sweet spot
that gives you the optimal amount of
movement and support.
Conrming and Fine-Tuning Setup
These adjustments should get you started. Spend some time sitting in the chair to conrm that the
seat height, foot rest distance, and spring resistance are set correctly for your comfort needs.
If you have questions about setup or are uncomfortable please contact us at info@thefehn.com or visit
our website for more information.
+
_
How Much Do You Want to Rock?
Setting the Distance to the Footrest
g. 9 g. 10
g. 11 g. 12
g. 13 g. 14
Check Distance to Desk: Now that you
have set your seat height and footrest
distance you may need to readjust the
seat’s distance to the desk. Refer to the
instructions in Step 1.
*

LIMITED WARRANTY
The Fehn Has Your Back
What this Limited Warranty Covers: Fehn LLC (“Fehn”) will replace or repair at its factory or nominated service
facility any Fehn product (“the Product”) found to be defective in material or workmanship for a period of ONE (1)
YEAR from the date of initial shipment of the Product. This Limited Warranty is upgradeable to THREE (3) YEARS by
registering the Product within the first year of purchase. Fehn warrants against any replacement spare part received
from The Fehn or any of its authorized dealers for a period of NINETY (90) DAYS after the date of shipment. This
Limited Warranty applies to the initial purchasers of the Product or spare part and is not transferable to any other party.
This warranty is Fehn’s sole warranty for the Product, and is Fehn’s sole obligation and your sole remedy. Fehn hereby
disclaims all other warranties, express or implied, including but not limited to any implied warranty of merchantability
or fitness for a particular purpose. Some states (countries and provinces) may not allow for these limitations, so the
above limitation may not apply to you.
How Can a Customer Obtain Warranty Service: A customer making a warranty claim is responsible to return the
defective Product or component to Fehn’s factory or its nominated service center, prepaying all postage or other
shipping charges. The customer must first notify Fehn Customer Service of his/her intent to return the Product or
component by email at [email protected] and receive a confirmation from Fehn before the Product is returned.
Claimant’s Responsibilities: A claimant must ensure that the defective Product or components are properly packed to
protect them from damage during shipping. Fehn will not be responsible for any damage that occurs to the Product or
component during shipment.
What Fehn Will Do: Fehn, will review, repair or replace the Product or component, at Fehn’s discretion. Fehn will then
return the repaired or replaced Product or component to the claimant at Fehn’s expense. Fehn will ground/economy
ship all replacement warranty Products or components to claimant. Charges will apply for any alternative shipping
methods requested by claimant. Product shipped outside of its initial purchase country may be subject to additional
shipping costs. Where the product warranty has been deemed void, the costs of repair and any associated shipping
costs shall be borne by the claimant. Fehn will contact the claimant prior to return of the repaired Product or compo-
nent.
How This Limited Warranty Will be Void: This Limited Warranty will be void if the claim has resulted from: (a)
improper assembly of the Product, (b) usage of the Product beyond its design as explained in the Fehn Owner’s
Manual, (c) use of improper cleaning materials, (d) use and/or storage of the Product outdoors, near water or in areas
of high humidity or in a manner inconsistent with use and storage limits set forth in the Owner’s Manual; (e) accident,
abuse, misuse, misapplication or as a result of any modification other than that authorized by Fehn, (f) improper
preventative maintenance steps as described in the Fehn Owner’s Manual and (g) repairs or use of spare parts not
provided or approved by Fehn.
Restriction on Other Damages: Fehn shall not be liable for any direct, consequential, incidental, indirect or special
damages under this Limited Warranty or any implied warranty that may be imposed under your country, province or
state law. Some states (countries and provinces) do not allow the exclusion or limitation of incidental or
consequential damages, so the above limitation or exclusion may not apply to you.
Governing Law; Venue; Waiver of Jury Trial: The terms of this Limited Warranty are governed by the internal laws of
the State of Rhode Island, USA. Any dispute arising from the terms of this Limited Warranty is subject to the exclusive
jurisdiction of the courts of the State of Rhode Island and the Federal courts resident therein. To the extent allowed by
applicable law, by purchasing and using the Product, the Customer agrees to waive the right to trial by jury.
If you try The Fehn and don't agree that it is the
most comfortable way you have ever worked, return it to us
within 30 days, in its original condition, for a full refund.
8
FEHN
FEHN - Sit, Stand, Lean, Stetch, Move!
257 Franklin St, Unit 14 Bristol, RI 02809
| 401-655-1299 | [email protected]
www.thefehn.com
FEHN
www.thefehn.com
User Manual | Assembly Instructions
Thank you for
choosing the
FEHN. Please visit
our website,
www.thefehn.com
or contact us at
info@thefehn.com
if you have any
further questions
or concerns.
Table of contents
Other FEHN Fitness Equipment manuals


