Feider Machines FNHPT240 User manual
TECHNICAL SPECIFICATIONS
ORIGINAL INSTRUCTIONS
GASOLINE PRESSURE WASHER
Instruction manual
FNHPT240
CAUTION - Read the instructions before using the machine.
BUILDER SAS
ZI, 32 rue Aristide Bergès – 31270 Cugnaux - France
MADE IN PRC

PRESSURE WASHER PARTS ASSEMBLY
2
SAFETY RULES
- Read all instructions before using the machine.
- Use this unit as described in this manual. Any
mishandling and any use contrary to instructions for use
shall in no case be the responsibility of the manufacturer.
- Follow all instructions given in this manual regarding
putting into service, safe operation, handling,
transportation and storage of the machine. Always take
into account the weight of the machine.
- Failure to observe the safety and operating instructions
may result in a risk of fire and / or personal injury.
- If you are giving this unit to another person, please also
provide this manual.
- Do not use attachments other than those recommended
by the manufacturer; they can damage the unit and / or
cause injury.
- This machine should not be used by children. Children
should be supervised to ensure that they do not play with
the appliance.
- This machine is not intended for use by persons
(including children) with reduced physical, sensory or
mental capabilities, or lack of experience and knowledge.
- Do not disassemble the device yourself. Any
disassembly, repair or inspection should be carried out
exclusively by a qualified person.
- WARNING: This machine is intended for use with a
cleaning agent supplied or recommended by the
manufacturer. Use of other cleaning or chemical agents
may affect the safety of the machine.
- WARNING: High pressure jets can be dangerous if
misused. The jets should not be directed to people,
electrical equipment or the machine itself.

PRESSURE WASHER PARTS ASSEMBLY
3
- WARNING: Do not use the machine near people unless
they wear protective clothing.
- Do not direct the jet against yourself or others to clean
clothes or footwear.
- WARNING: Risk of explosion. Do not spray flammable
liquids.
- WARNING: High pressure cleaners should not be used
by children or untrained persons.
- WARNING: Pipes, fittings and connectors are important
for the safety of the machine. Only use hoses, fittings and
connectors recommended by the manufacturer.
- WARNING: To ensure the safety of the machine, use only
the original manufacturer's parts or approved by the
manufacturer.
- WARNING: Water that has flowed through the flow
shutters is considered to be unsafe.
- WARNING: The machine must be switched off by putting
the ON/OFF switch on the OFF position during cleaning
or maintenance and when replacing parts or converting
the machine to other functions.
- WARNING: Do not operate the machine if any important
parts are damaged, such as safety devices, high pressure
hoses or the trigger gun.
- WARNING: Do not use combustion engine powered
machines indoors unless adequate ventilation is
assessed by national labor authorities.
- WARNING: Make sure there are no exhaust emissions
near the air intakes.
- WARNING: It is important to provide adequate ventilation
and make sure that the flue gases are properly
discharged.
- WARNING Incorrect fuels shall not be used as they may

PRESSURE WASHER PARTS ASSEMBLY
4
prove hazardous.
- Children, animals and persons not participating in the use
of the machine must remain at a minimum distance of 10
meters from the sprayer.
- The high pressure hose must remain connected to the
compressor as long as the system is under pressure.
- Do not use corrosive or flammable liquids in the machine.
- The appliance must be connected to a water supply using
a new set of hoses; the old pipe set must not be reused.
- When using the machine, wear protective equipment
including safety goggles, safety shoes, safety gloves,
safety helmet with visor and double-insulated hearing
protection.
- In order to move the unit easily, bend the lance.
- Warning: When you activate the machine, the great
pressure of the water coming out of the pipe can create a
kickback; Pay attention to the movement of the lance.
Hold it tight. The force of the kickback is greater than
20N.
- Before assembling, dismantling, repairing, transporting,
servicing and storing, check if the machine switched-off.
- Handle the unit with care, do not drop it.
- Do not use the machine in extreme weather conditions,
when it is very cold. Do not use the machine with ice
water.
- Use the tool in a stable and plane location.
- When transporting the machine, take note of its weight.
Do not overestimate your efforts and get help if
necessary.
- The machine must be transported from one point to
another and switched off and. Always use the transport
handle.

PRESSURE WASHER PARTS ASSEMBLY
5
- Improper transport of the machine may result accidents
and injuries.
- During use, transport, assembly, disassembly, in case of
failure, during foreseeable tests or breakdowns, the tool
must always remain upright.
- Do not use the tool in dangerous situations or when an
accident has occurred. Do not use it indoors, in places
where exhausted gases can be emitted, etc.
- When opening the trigger gun, pay attention to the
kickback force. The power of the gun can cause a
kickback and can produce a loss of control of the gun and
create accidents and injuries. Hold the gun firmly, and
with both hands if possible.
- To avoid dangerous situations in the event of an accident
(e.g. contact with or spill of detergents, fuel or oil) or
equipment failure (such as a puncture or component
failure); please stop to use the machine immediately.
Check the problem. Have the machine inspected by a
qualified technician. In the event of a spill, move the
machine away and clean up spills.
- While using the machine, avoid being under the influence
of alcohol and drugs.
- Never spray electrical cables or sockets.
- It is strictly forbidden to add fuel when using the machine.
- Do not touch hot surfaces or place the pipe in contact
with hot surfaces of the engine.
- Do not use the machine in a confined space, in order to
prevent poisoning by carbon monoxide
- Do not use the unit near fire
- Never operate the machine towards the gasoline.
- Beware of the risk of fire! Do not add fuel while the
engine is running. Do not exceed the amount of fuel

PRESSURE WASHER PARTS ASSEMBLY
6
expected for operation.
- Do not operate the machine if fuel has been spilled;
change location, and wait until the device is dry before
restarting it.
- Use the machine in an open space and avoid contact with
heat generating appliances, such as boilers, water
heaters, etc.
- For more safety, use only original spare parts or
equivalent parts approved by the manufacturer.
- Do not cover the machine while the engine is running.
- Do not use mobile phones or smoke when filling the fuel.
- Store the cleaner in a dry, airy place, with the empty tank.
- To avoid dangerous situations in the event of an accident
(for example, contact with or spill of detergents) or
equipment failure (such as a puncture or a component
failure), stop using the machine immediately. Check the
problem. Have the machine inspected by a qualified
technician. In the event of an overflow, move the machine
away and clean the overflow.
- WARNING Always turn off the main switch when leaving
the machine unattended.
Intended use
Your PRESSURE CLEANER can perform a myriad of tasks
in the house and in the garden. It effectively cleans a wide
variety of surfaces.
Your PRESSURE CLEANER is designed to operate from a
cold water supply.
Your PRESSURE CLEANER has been designed for
outdoor use only on materials such as stone, wood and
plastics. Please check, before use, whether materials can

PRESSURE WASHER PARTS ASSEMBLY
7
be cleaned with your sprayer; the manufacturer cannot be
held responsible for any damage resulting from improper
use.
The main applications of this product are household
cleaning tasks such as:
- Cars, motorcycles, bicycles;
- Patios, fences, garden walls, pathways, garages and
facades of houses;
- To remove algae and mosses from roofs, brick walls and
gutters;
- For cleaning of gardening tools and machinery, furniture
and grills;
- For hygiene and maintenance of kennels, stables, etc.
and their surroundings;
It is especially useful for cleaning muddy sidings.
The sprayer alone is capable of performing most of the
garden cleaning tasks or on buildings. The detergent is
useful for cleaning vehicles and other painted surfaces.

PRESSURE WASHER PARTS ASSEMBLY
8
Symbols
The high-pressure jet must not be directed at persons, animals, live electrical equipment or at the
appliance itself.
The appliance must not be directly connected to the public drinking water network.
Guaranteed sound power level
Read instruction manual
Warning symbol
Warning – hot surfaces
Do not touch hot surfaces
PRESSURE WASHER PARTS ASSEMBLY
9
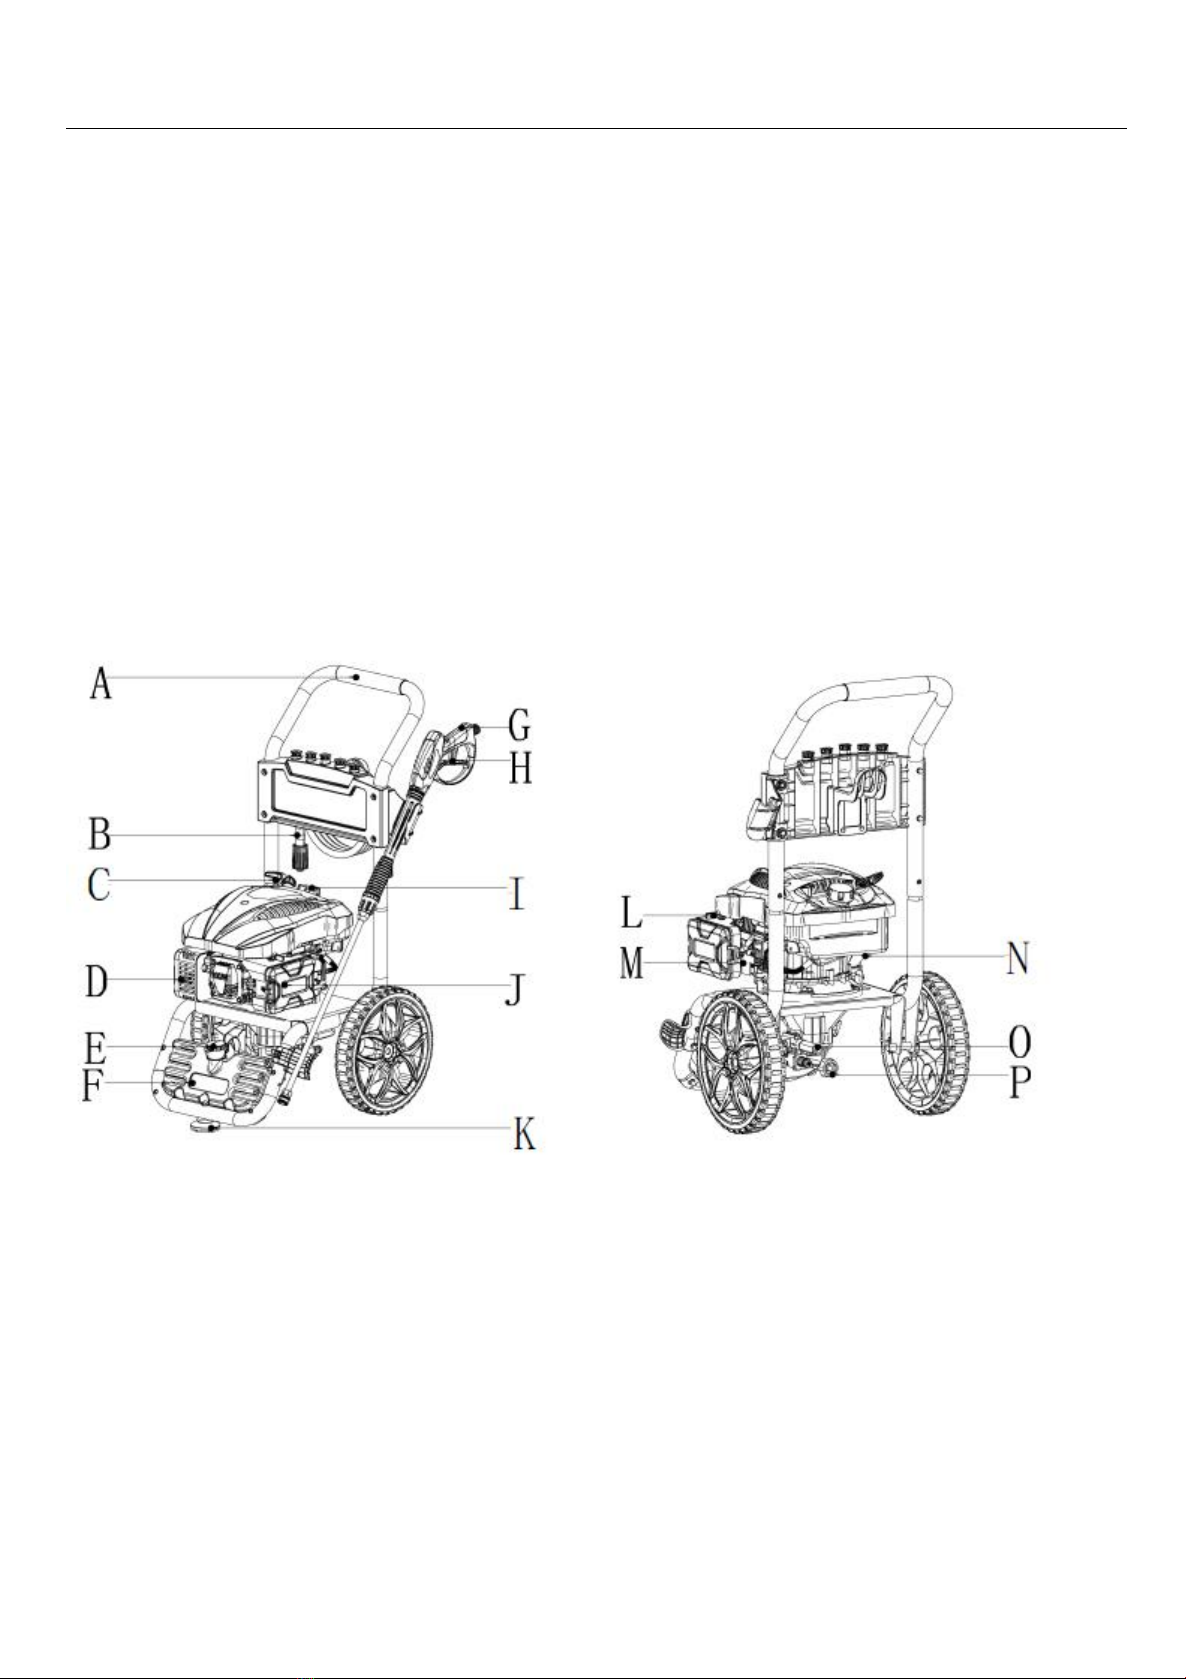
DESCRIPTION
A
Handle
J
Air cleaner
B
HighPressureHose
K
Pad
C
Recoil Starter
L
Choke
D
Muffler
M
Engine ON/OFF Switch
E
Detergent tankcap
N
Dipstick
F
Detergent tank
O
Water outlet
G
SprayGun
P
Water inlet
H
Locking Trigger
I
Fuel tank

PRESSURE WASHER PARTS ASSEMBLY
10
TECHNICAL SPECIFICATIONS
Type
FNHPT240
Rated pressure
20 MPa
Allowable pressure
24 MPa
Rated flow
9,8 l/min
Max. flow
11 l/min
Max. water intake temperature
60°C
Max. inlet water pressure
0.55 MPa
Net weight
30 kg
Water hose diameter
Min. ø12.7mm
Kickback force on lance
28 N
Sound power level and guaranteed sound power level
105 dB(A) K= 3 dB(A)
Sound pressure level
90 dB(A) K= 3 dB(A)
Vibration value
2,72 m/2² K=0,85 m/s²
- Values determined according to noise test code given in Annex CC of EN 60335-2-79:2012, using the basic
standard EN ISO 3744:2010.
- Values determined according to vibration test code given in Annex DD of EN 60335-2-79:2012, using the basic
standard ISO 5349-1:2001.
ASSEMBLY
11
ASSEMBLY
WARNING
!
Do not attempt to assemble or operate this pressure washer until you have readand
understood this entire manual. If you have any problems assembling or operating this
unit
WARNING
!
Do not operate this pressure washer if any of the parts are damaged or missing until
the part is replaced. Using this product with damaged or missing parts can cause
damage to the machine or result in serious injury or death.
Unpacking
1.
Remove the product, parts, and all accessories. Make sure all items listed on the packing list are included
and not damaged.
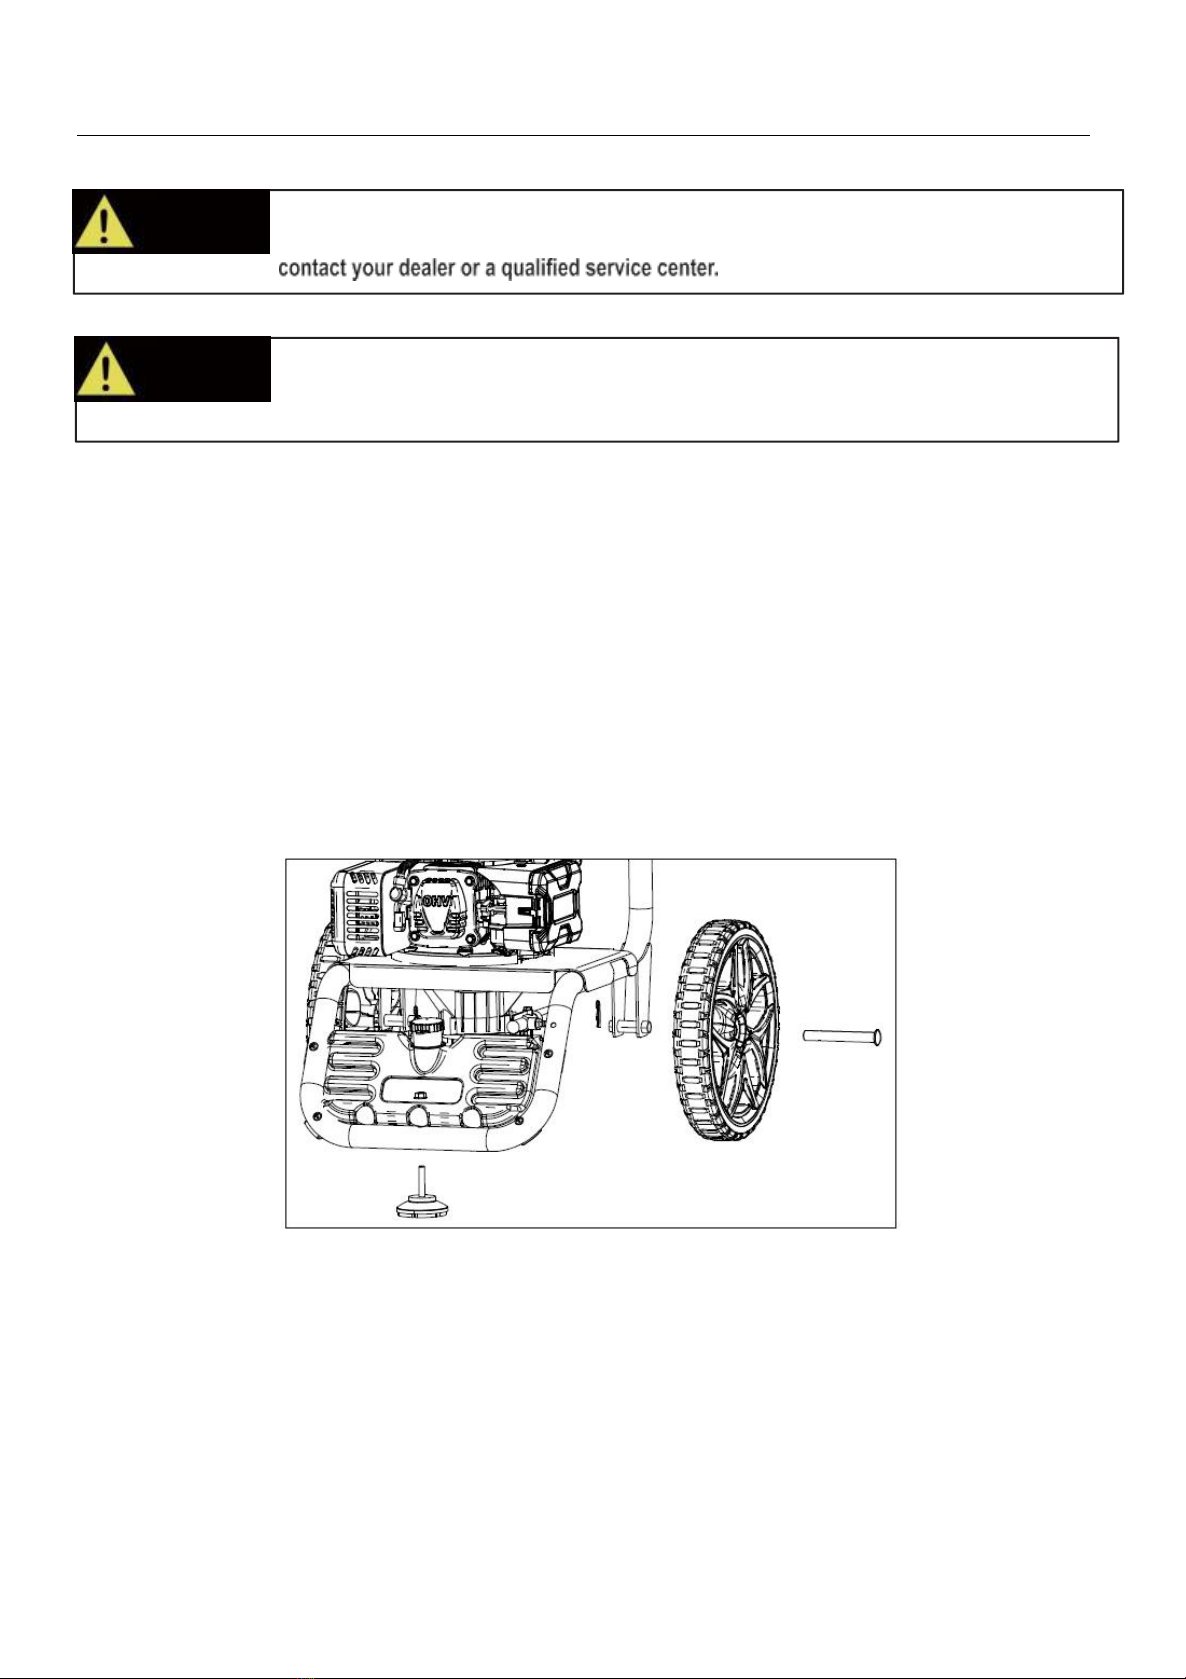
Foot and wheel assembly
-Raise or tilt pressure washer so you can line up foot with the hole located at the center of the frame.
-Align the rubber foot with the hole in the frame where the foot is to be located. Attach foot by inserting the bolt from
the bottom up and install the acorn nut. Wrench tightens until there is a slight crush on the frame tube (Do not over
tighten).
-Pass the axle through the wheel, and then through the wheel bracket. Use the R pin to lock the wheel.
ASSEMBLY
12
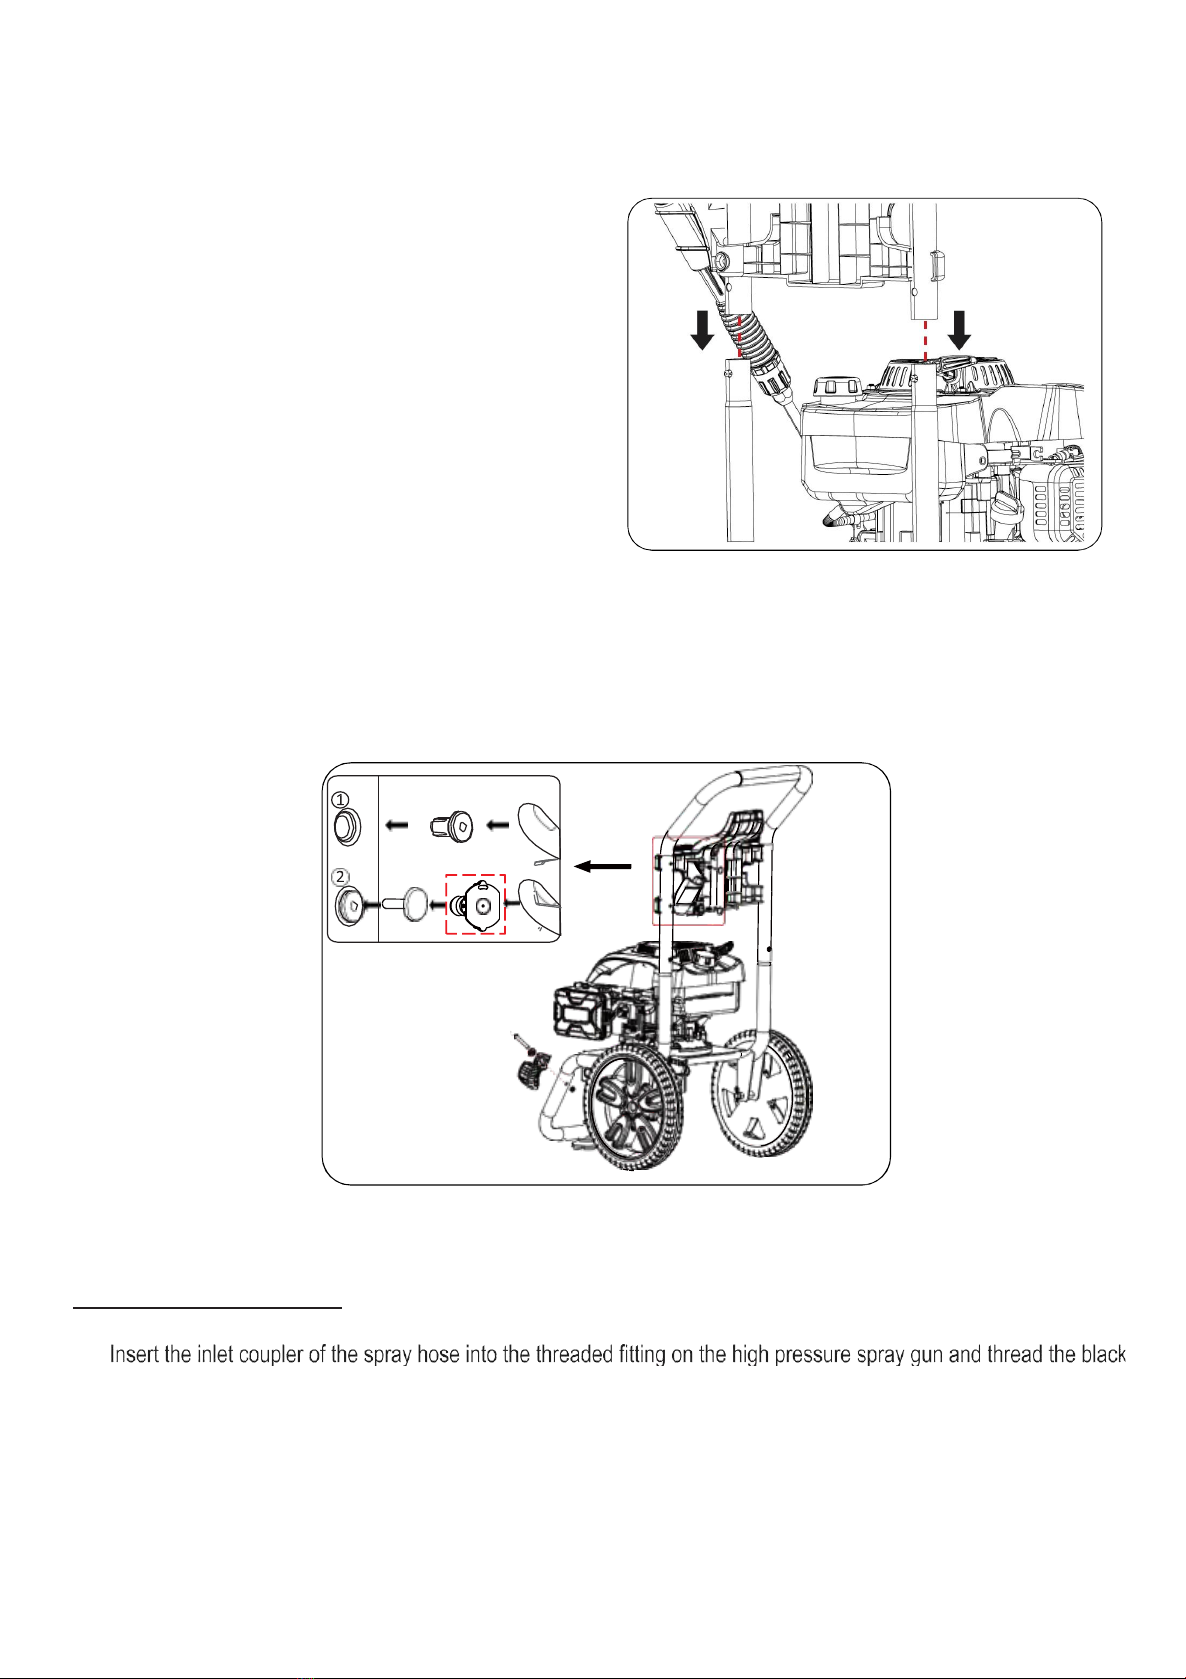
Handle assembly
•
Install upper frame (handle) onto the lower frame by sliding the handle over the two upright tubes on the lower
frame and pressing down firmly until the handle is seated and the two detent pins snap in place.
Attaching Upper and Lower Gun Hooks
Attach the upper gun hook, install two plastic rivets, until the plastic rivets are snug, you may need to tap with a mallet or
small hammer to seat the lock pin.
Attach the lower gun hook, install the M6 screw & lock nut, wrench tighten until the nut is snug, do not over tighten.
Attaching the Spray Gun
•
Screw the spray wand and the trigger handle together until they are secure.
•
nut on by turning clockwise until it is hand tight.

ASSEMBLY
13
Add engine oil
•
Place pressure washer on a level surface.
•
Open the oil tank.
•
Carefully add between 400 ml (13.5 oz) of 4-Cycle engine oil (SAE10W30) in the tank.
•
Close the oil tank.
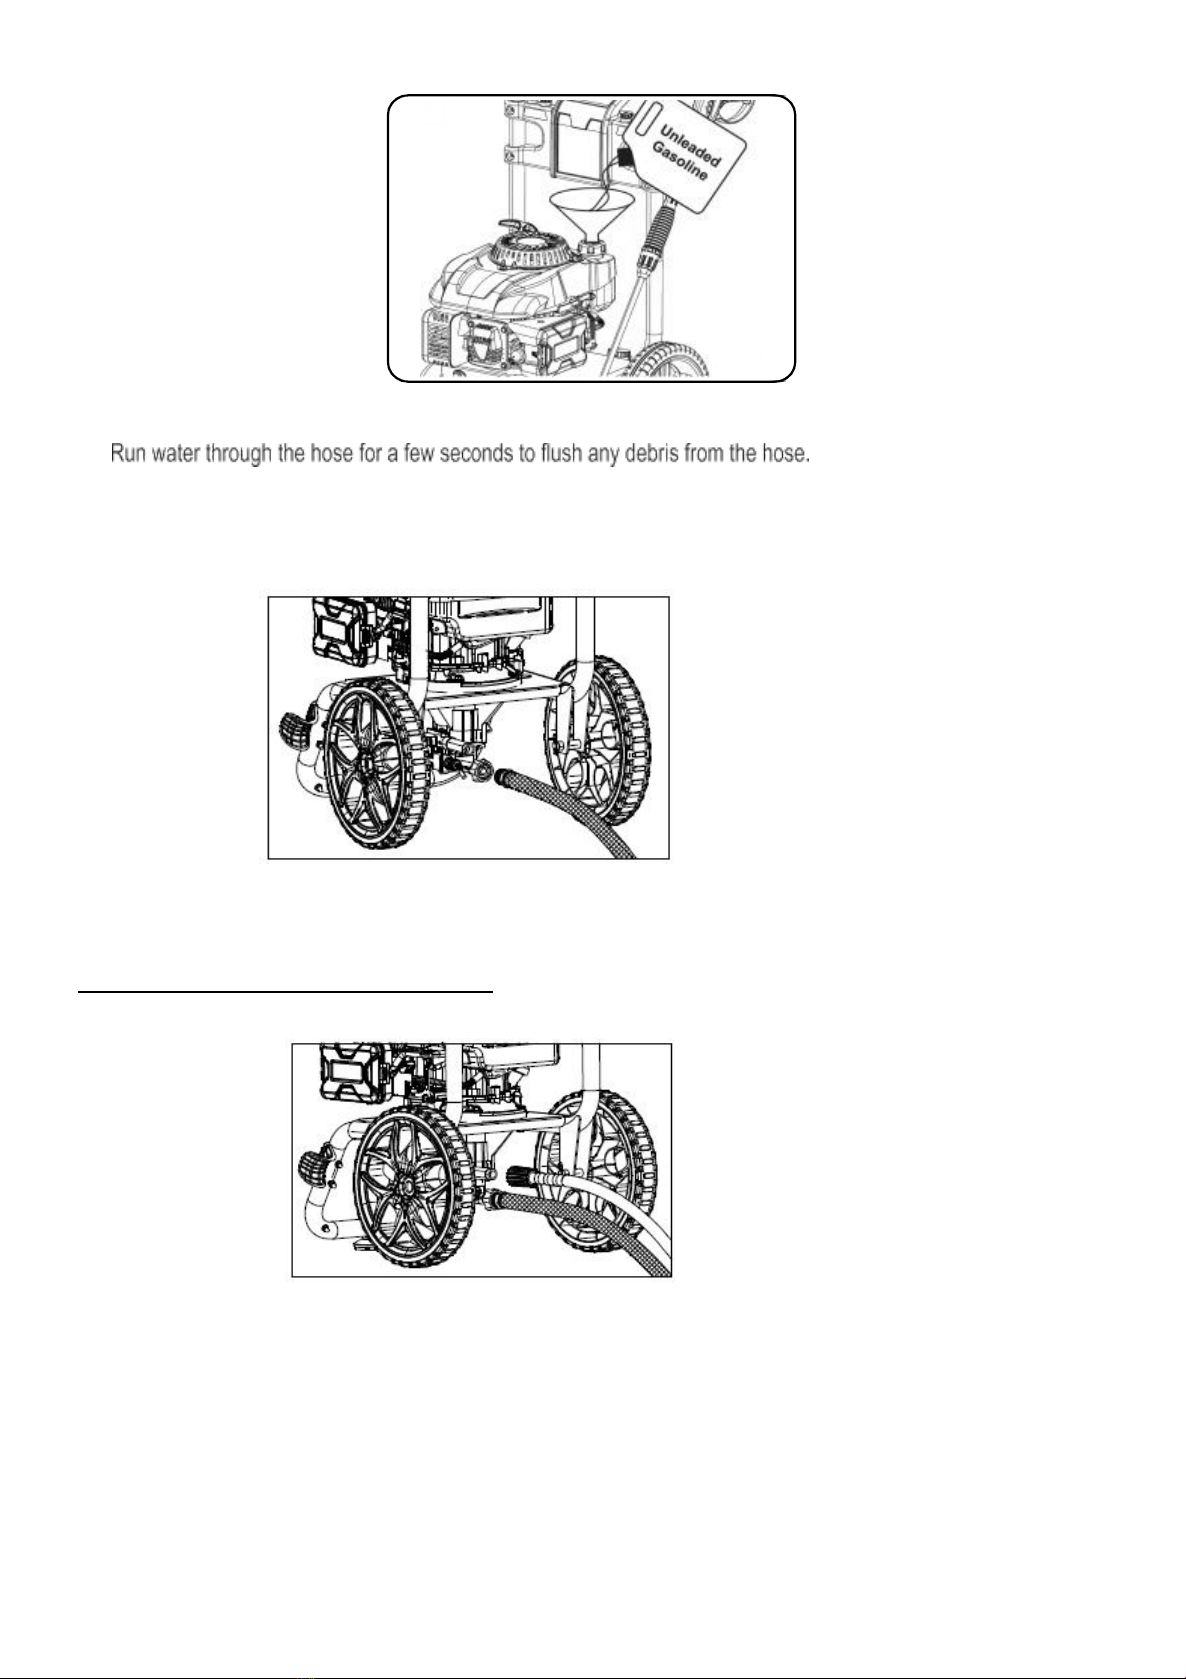
Adding Fuel
•
Set pressure washer on a clean and level surface in an area that is well ventilated.
•
Remove fuel cap.
•
Insert a funnel into the fuel tank and carefully pour gasoline into the tank until fuel level reaches 1 1/2 inches
below the top of the neck.
CAUTION!
CAUTION!
ASSEMBLY
14
Connecting Garden Hose to Pressure Washer
•
•
Inspect inlet screen and remove any debris.
•
Connect hose to water inlet and tighten by hand.
•
Turn on water.
•
Purge the system’s pump of air by releasing the safety and squeezing the trigger of the spray gun.
The minimum recommended length for the water supply pipe is 10 meters (but not more than 25 meters) with a diameter of 12.5 mm to avoid back
pressure and any potential damage to your appliance. Make sure it can withstand water and a maximum pressure of 10bar (0.1Mpa). If you want
to connect your device to other water sources, make sure the maximum water inlet pressure is 10bar (0.1Mpa).
Connect High Pressure Hose to Pump
•
Attach end of high pressure hose to the high pressure outlet on pump.
OPERATION
15
OPERATION
Pre-Operation Check List
•
Check oil level and add oil to the proper level if low.
•
Check fuel level and add fuel if needed.
•
Check connections of handle and all hoses to make sure they are secure.
•
Check all hoses for kinks and damage.
•
Check flow of water supply and make sure it is adequate.
CAUTION!
Do not run pressure washer with a damaged hose. Do not run pressure washer without
result. FAILURE TO FOLLOW THESE INSTRUCTIONS WILL VOID PRODUCT WARRANTY.
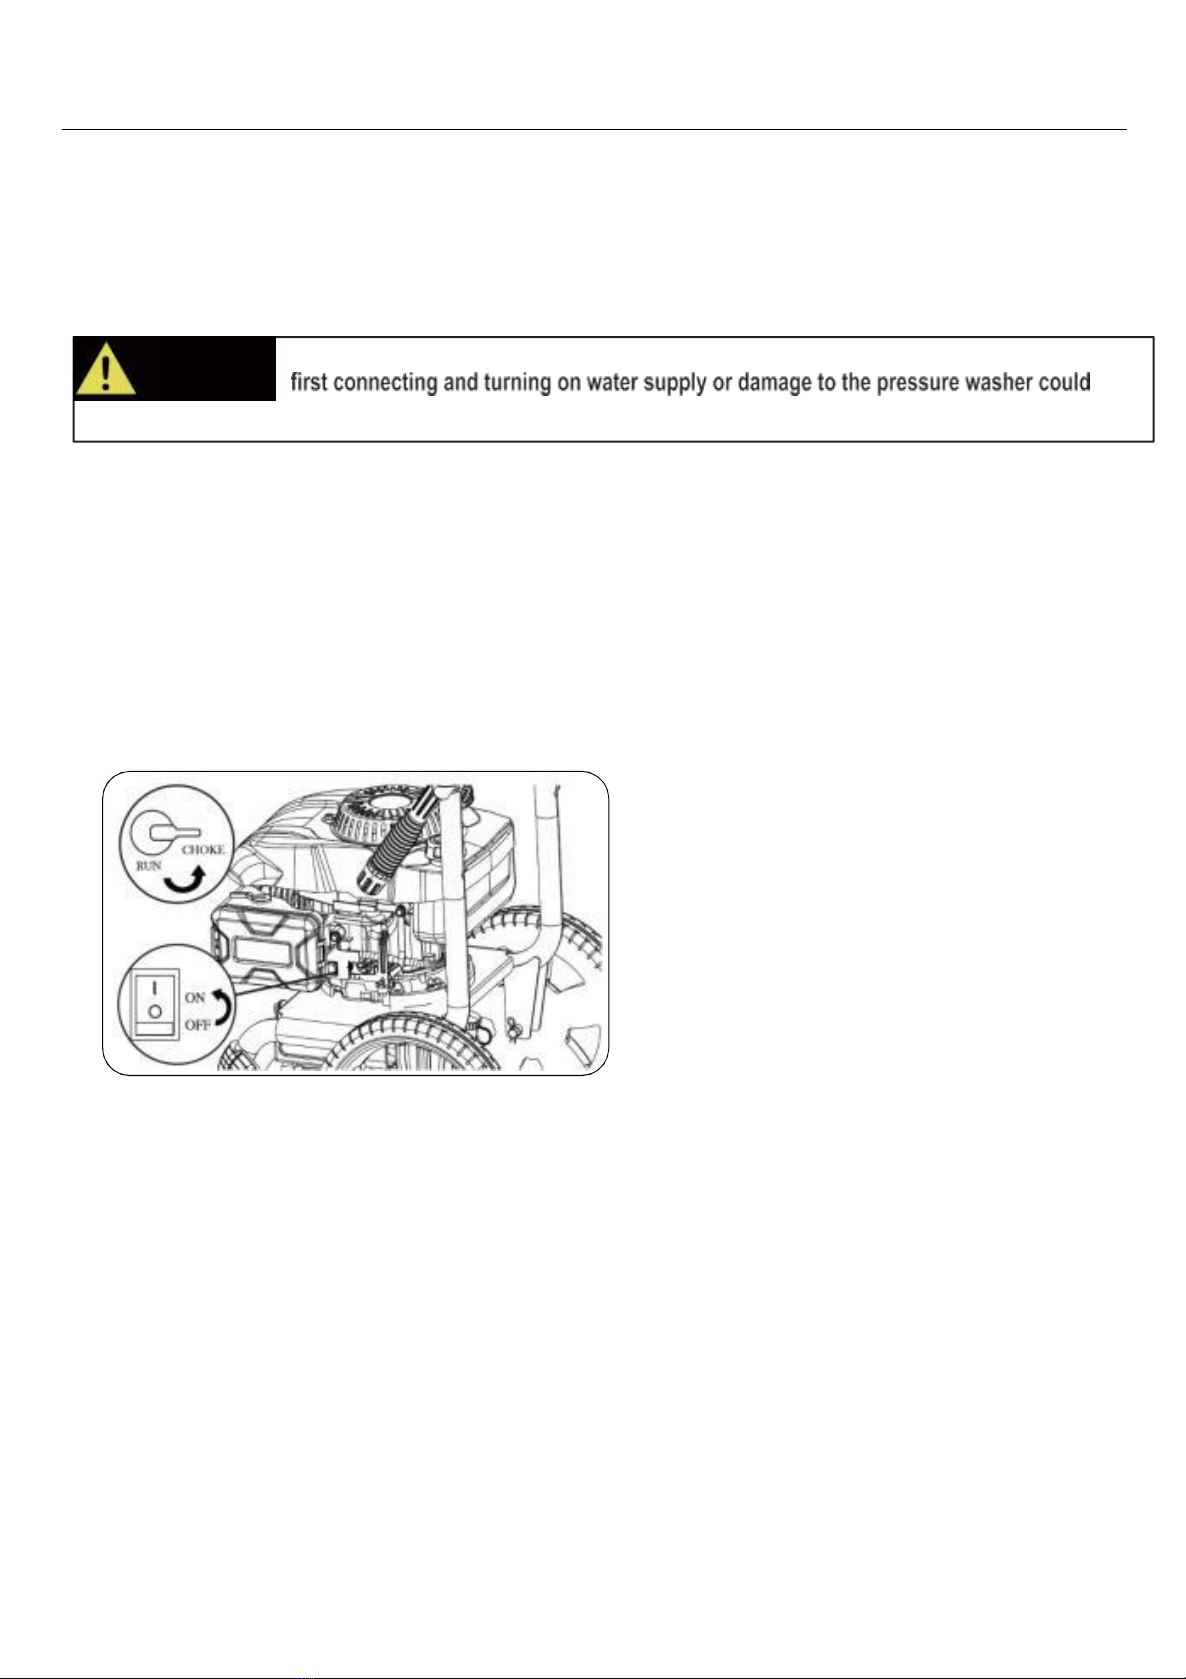
Starting Pressure Washer
•
Place pressure washer on a level surface.
•
Turn on water.
•
Slide the choke lever to the “Choke” position.
•
Turn the engine OFF/ON switch to the “ON” position.
•
Holding the machine with your hand, pull the recoil handle (starter cord) slowly until resistance is felt, then pull
rapidly. Squeeze the Gun trigger and release the pressure after every failed attempt to start the pressure washer
(This will reduce the back pressure).
•
Let engine run for several seconds and then gradually slide the choke lever to the RUN position as the engine
warms up until the choke is fully slid to the RUN position.

OPERATION
16
WARNING
!
Pull cord recoils rapidly and pulls arm towards engine faster than you can let go
which
could result in injury.
•
Always relieve pressure from spray gun before pulling starter cord, including every failed attempt to start
engine.
•
Toavoid recoil, pull starter cord slowly until resistance is felt, then pull rapidly.
Stopping Pressure Washer (See Fig 13)
•
Turn the on/stop switch to the OFF position.
•
Turn off water and squeeze the trigger handle to release all water pressure.
Using the Spray Gun
•
Flip the lock tab behind the trigger up or down until it clicks to apply or remove the safety. Pull back on the
trigger to begin operating pressure washer.
•
To stop water flow, release trigger.
SLOT
LOCK OUT
TRIGGER
WARNING
!
Kickback forces result from pressing the trigger! Therefore, always hold the spray gun
with
both hands! Pay attention to safe posture! Improper handling can lead to injuries!
Using Spray Nozzle
•
To connect or disconnect spray tip, pull back on the quick-connect collar. Insert or remove spray tip then release
collar.
•
When spray tip is connected, pull on the spray tip to make sure it is secured.
•
For general cleaning use the 40° spray tip. This option is for cement walkways.

OPERATION
17
•
For stripping, spot cleaning, blasting, and hard to reach areas use the 25° spray tip. This option is for removing
paint, rust, mildew, or grease stains. This option can be used for the removal of paint, rust, oil stains, tar, gum,
and other stubborn substances. Use extreme caution when using this nozzle.
•
For applying pressure washer safe detergent, use the black soap nozzle.
•
The angle of the nozzles shown indicates the spray “fan shape” projected from the nozzle when the trigger of the
spray gun is pulled and high pressure water is passing through the nozzle. The pressure and flow will not change
significantly due to the various fan patterns (Nozzles).
SPRAY
WAND
NOZZLE
“CLICK”
0°
15°
25°
40°
Soap
Applying Detergent
•
Rinse surface with cool water before applying cleaner.
•
Prepare detergent as required by job. For best results follow detergent directions as supplied from manufacturer.
•
Remove cap from detergent container and fill.
•
Spray detergent on surface. For best results use long, even, and overlapping strokes. Allow detergent to set for
about 3 minutes before rinsing, but do not allow detergent to dry on surface or it may cause streaking or cause
damage to the surface.
•
a bucket of clean water to remove detergent.
WARNING
!
Only use mild, environmentally friendly detergents intended for use in pressurewashers.
Ask at your specialist dealer about these special products. Never use aggressive
chemicals (e.g. bleach), abrasive detergents or similar to avoid damage to your health,
the product and the environment.
WARNING
!
Avoid skin contact with detergents, in particular contact with eyes! If detergents gets
in
your eyes flush your eyes with clean water and seek immediate medical attention!
Rinsing with the Pressure Washer
•
Test a small area first to avoid surface damage.
•
Rinse from top to bottom using long, overlapping strokes.
Moving the Pressure Washer
•
Turn the pressure washer off.
•
Tilt unit towards you until it is balanced on its wheels.
•
Roll machine to desired location.
MAINTENANCE
18
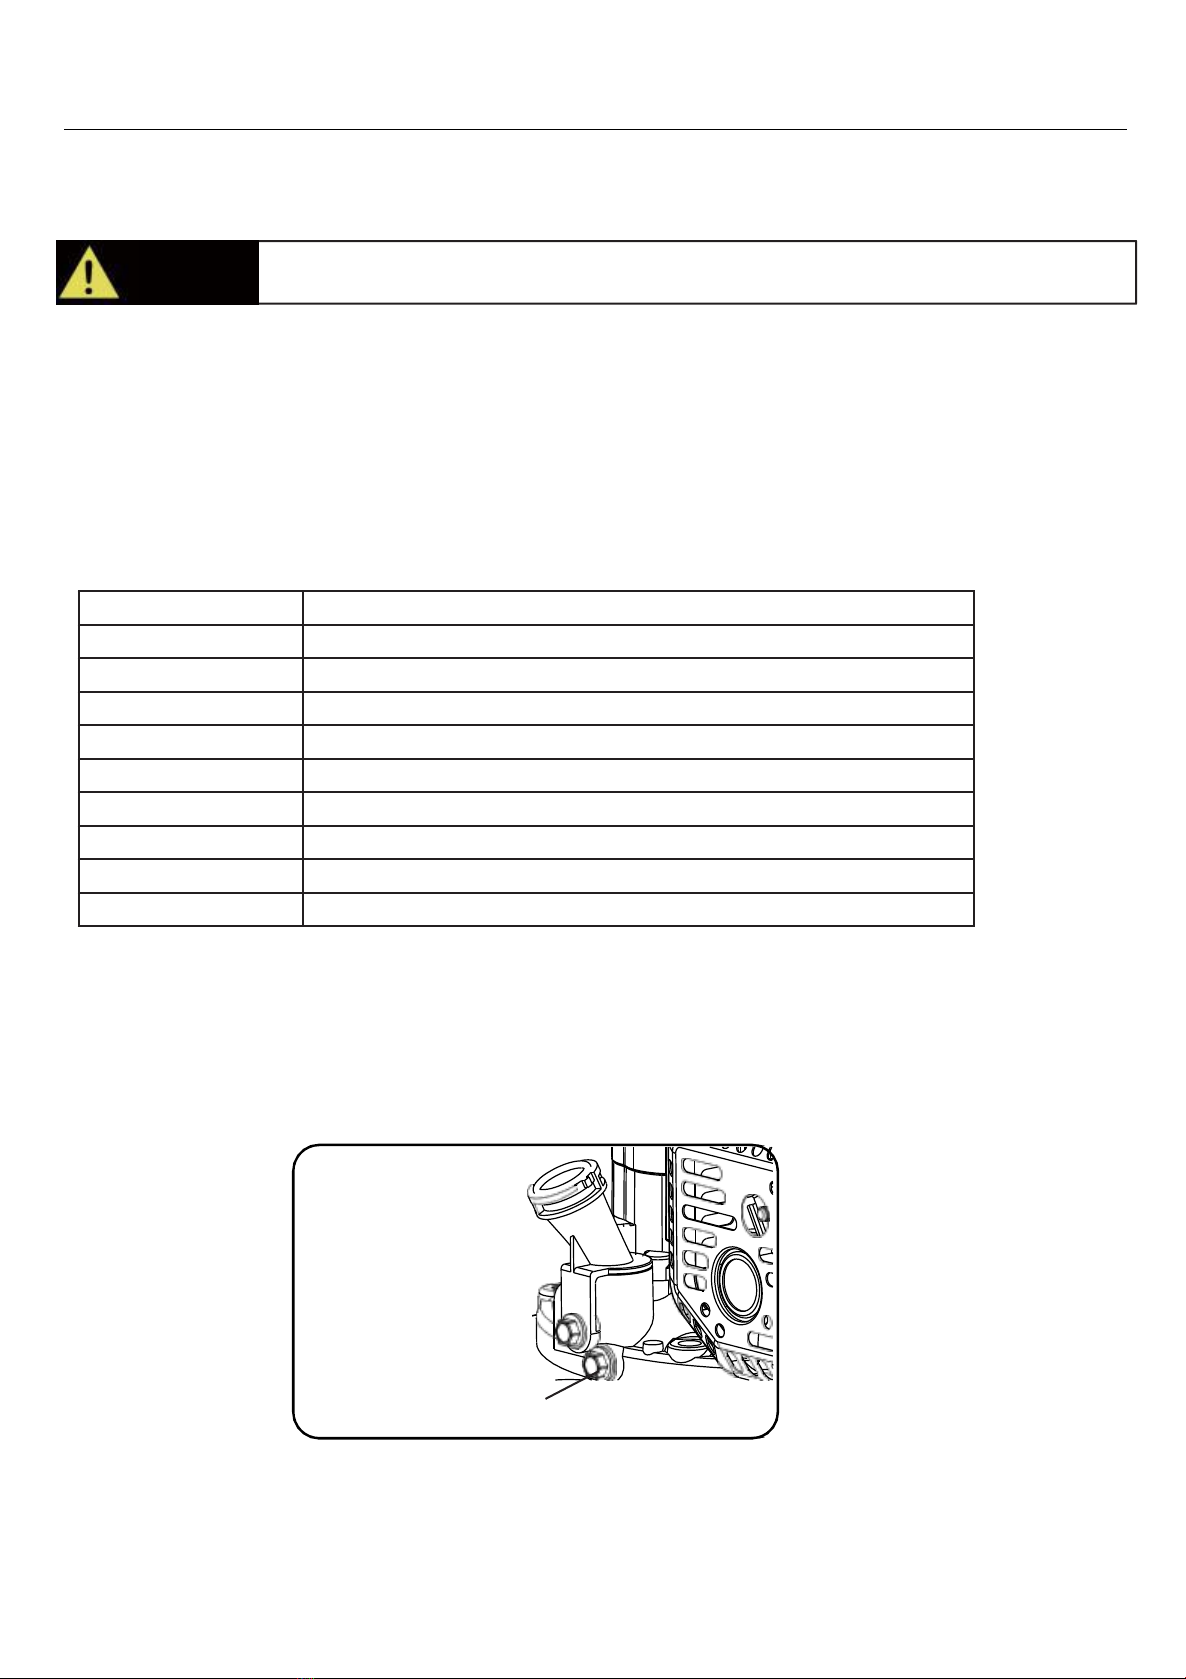
Oil Drain Plug
MAINTENANCE
Regular maintenance will extend the life of this pressure washer and improve its performance. The warranty does
not cover items that result from operator negligence, misuse, or abuse. Toreceive full value from the warranty,
operator must maintain the pressure washer as instructed in this manual, including proper storage.
After Each Use
Follow the following procedure after each use:
•
Shut off engine and turn off water supply. Release water pressure by pointing spray gun in a safe
direction and squeezing the trigger.
•
Disconnect high pressure hose, spray gun, and nozzle. Drain water from items and use a rag to wipe down the
outside of the hose and spray gun.
•
Empty the water from the pump by pulling the recoil starter 6 times.
•
Store unit in a clean and dry area.
Maintenance Schedule
After First 5 Hours
Change Engine Oil
After Each Use
Check and Clean Water Inlet screen
Check High Pressure Hose
Check and Clean Detergent Siphoning Tube
Check Spray Gun for Leaks
Clean Debris
Check Engine Oil Level before starting
Annually (20 hr. Use)
Change Engine Oil (Service more often under dirty or dusty conditions)
Annually (50 hr. Use)
Check and Clean Air Filter
Annually (100 hr. Use)
Service or Replace Spark Plug
Changing Engine Oil
Engine oil will drain better if the engine is still warm, but not hot.
•
Shut off engine.
•
Clean the area around the oil fill cap/dipstick to keep out debris then remove oil fill cap/dipstick.
•
Place an oil pan on the ground to catch oil.
•
Once oil is completely drained, return the pressure washer to a level position. Refill the engine with new oil as
instructed earlier in this manual
WARNING!
Before inspecting or servicing this machine, make sure the engine is off and no partsare
moving. Disconnect the spark plug wire and move it away from the spark plug.

MAINTENANCE
19
Checking Detergent Siphoning Tube
•
Check the detergent siphoning tube for clogs, leaks, or tears.
•
•
Replace siphoning tubes if damaged.
WARNING!
Never repair high pressure hose or use unit if hose is damaged. If hose is damaged replace
with identical BUILDER part.
High Pressure Hose
•
Inspect hose for cuts, bulges, or leaks which can develop from kinking or wear. If damage is found, immediately replace
hose.
•
Inspect couplings for damage. Immediately replace hose if damage is found.
Spray Gun
•
Make sure the spray gun is connected securely.
•
Inspect the spray gun safety and make sure the spray gun trigger springs back upon release.
Spray Nozzle
If a pulsing sensation is felt while squeezing the trigger, the spray nozzle may be dirty or clogged and should be cleaned
immediately.
•
To clean the nozzle, shut off the engine and turn off the water.
•
Remove the nozzle from the spray wand making sure that the nozzle is pointing away from you and in a safe direction.
•
Use the nozzle cleaner or a small paper clip to dislodge any foreign materials which are clogging or restricting the
spray tip.
•
•
Reconnect the nozzle to the spray wand.
•
Turn the water supply back on and start engine.
Nozzle Cleaner
20
Checking Spark Plug
•
Disconnect the spark plug wire from the spark plug.
•
Before removing the spark plug, clean the area around its base to prevent debris from entering the engine.
•
Clean carbon deposits off the electrode with a wire brush.
•
Check the electrode gap and slowly adjust to 0.80mm (0.031in.) if necessary.
•
Reinstall spark plug and tighten to Torque 22.0 – 26.9 Nm (16-20 ft-lb).
•
Reconnect spark plug wire.
•
If spark plug is worn replace only with an equivalent replacement part. Spark plug should be replaced annually.
WARNING!
Water pressure produced by this unit can cut through skin and tissue leading to serious
injury and possible amputation.
•
Never attempt to repair high pressure hose, always replace.
•
Never attempt to repair leaks with sealant, always replace O-ring or seal.
Repairing Leaking Connections
•
Purchase O-Ring / Maintenance kits through the nearest authorized service center and follow instructions provided
with kit.
Air Filter
•
•
•
•
.
WARNING! .
Storing Pressure Washer
If storing pressure washer for 30 days or more follow the procedures below:
•
Add fuel stabilizer to gasoline to keep gasoline from going stale and to prevent gum deposits from forming on
the carburetor. Run engine for a couple of minutes to circulate the fuel stabilizer.
•
Add Pump Saver to protect pump from freezing or damage caused by mineral deposits.
•
•
Disconnect the spark plug wire and clean the spark plug. Leave spark plug wire disconnected.
•
•
Cover unit with a suitable protective cover to keep unit dry.
•
Store unit in a frost-free area.
Table of contents


