Felisatti VCF20/1000 User manual
VCF20/1000
VCF32/1200
VCF45/1400
Пылесос для сухой и влажной уборки
Sauger für Nass- und Trockeneinsatz
Vacuum cleaner for wet and dry applications
Aspirateur eau et poussières
Aspirador de material húmedo y seco
Aspiratore di solidi e liquidi
Aspirador para zonas secas e húmidas
Imuri kuivaan ja märkään käyttöön
IP24 Ls0

2
1
w
5
6
7
1
A B.bbAA.bb
Abb. C
Abb. D Abb. E Abb. F Abb. G
Abb. H Abb. I Abb. J
3
1
3
0
6
7
w
e
r
o
o
i
q
0
9
8
z
t
u
4
2
2
e
d
2a
2c
5
6
1
3
0
6
2a
2
2
2a
4
2a

3
11
1
3
0
6
7
w
e
r
o
o
i
q
0
9
8
z
t
u
4
2
2
e
d
2a
2c
5
6
1
3
0
6
2a
2
2
2a
4
2a
11
VCF 32/1200
VCF 45/1400

4
1
12
5
6
7
119
A B.bbAA.bb
Abb. C
Abb. D Abb. E Abb. F Abb. G
Abb. H Abb. I Abb. J

5
VCF 20/1000
12
13
14
20
20
18
11
10
9
8
16
15
17
1
3
2
3
2e
2a
4
6
10
2a
2a
2b
2a
①
Ⓐ
Ⓐ
Ⓡ
0
①
0
①
①
0
0
6
④
⑲
Abb. K
Abb. L Abb. M

7
DBeschreibung
①Oberteil ③Kühllufteintritt ⑩Faltenlter-Patrone ⑰Lenkrollen
②Funktionsplatte ④Anschlußleitung ⑪Bajonettverschluß ⑱Papierlterbeutel*e
②a Schalter Ein/Aus (Automatik)* ⑤Gehäuse ⑫Behälter ⑲Parkclip*
②b Schalter Manuell/Automatik/ Vibrationsabreinigung* ⑥Prallschutz ⑬Zyklon-Saugöffnung ⑳Saugrohrhalter*
②c Drehknopf* ⑦Motorschutzlter ⑭Rastverschlüsse
②d Volumenstromanzeige* ⑧Schaumstofflter* ⑮Räder * Je nach Modell
②e Steckdose* ⑨Filtersack* ⑯Achsen
GB Description
①Top Section ③Cold air inlet ⑩Folded-lter cartridge ⑰Steering rollers
②Functional Plate ④Connecting line ⑪Bayonet mount ⑱Paper lter bag*
②a ON/OFF switch (Automatic)* ⑤Case ⑫Container ⑲Parking clip*
②b Switch Manual/Automatic/ Vibration cleaning* ⑥Impact protection ⑬Cyclone suction opening ⑳Suction tube holder*
②c Rotary knob* ⑦Motor protection lter ⑭Lock-in closure
②d Volume ow display* ⑧Foam lter* ⑮Wheels * Depending upon the given mo
②e Socket* ⑨Filter sack* ⑯Axles
FDescription
①Partie supérieure ③Entrée d’air de refroidissement ⑩Cartouche de ltre à plis ⑰Rouleaux de guidage
②Plaque de fonction ④Câble de raccordement ⑪Joint à baïonnette ⑱Sachet de ltre en papier*
②a Interrupteur marche/arrêt (Automatique)* ⑤Boîtier ⑫Réservoir ⑲Clip de stationnement*
②b Commutateur manuel/automa tique/nettoyage par vibrations* ⑥Protection contre les chocs ⑬Orice d’aspiration cyclone ⑳Support de tube d’aspiration*
②c Bouton tournant* ⑦Filtre de protection de moteur ⑭Fermeture à crans
②d Indicateur de ux volumique* ⑧Filtre en mousse* ⑮Roues * Suivant le modèle
②e Prise de courant* ⑨Sac de ltre* ⑯Axes
EDescripción
①Parte superior ③Admisión de aire refrigerante ⑩Cartucho de ltro plegado ⑰Ruedas orientables
②Placa de función ④Cable de conexión ⑪Cierre de bayoneta ⑱Bolsa de papel ltrante*
②a Interruptor Conec./Desc. (Automático)* ⑤Carcasa ⑫Depósito ⑲Clip de estacionamiento*
②b Interruptor manual/automático/ limpieza por vibración* ⑥Protección contra el rebote ⑬Abertura de aspiración ciclónica ⑳Soporte de tubo de aspiración*
②c Botón giratorio* ⑦Filtro protector del motor ⑭Cierres de encastre
②d Indicador de la corriente volumétrica* ⑧Filtro de plástico celular* ⑮Ruedas * Según el modelo
②e Caja de enchufe* ⑨Saco ltrante* ⑯Ejes
PDescrição
①Parte superior ③Entrada do ar de arrefecimento ⑩Cartucho de ltro plissado ⑰Rolos dirigíveis
②Placa das funções ④Condutor de alimentação ⑪Fecho de baioneta ⑱Bolsa de ltro de papel*
②a Interruptor ligar/desligar (Automático)* ⑤Caixa ⑫Reservatório ⑲Presilha de repouso*
②b Interruptor manual/automático/ limpeza da vibração* ⑥Protecção de impacto ⑬Orifício de aspirador do ciclone ⑳Suporte do tubo de aspiração*
②c Botão regulador* ⑦Filtro de protecção do motor ⑭Fechos de encaixe
②d Indicador de débito* ⑧Filtro de espuma* ⑮Rodas * Conforme o modelo
②e Tomada ⑨Saco de ltração* ⑯Eixos
IDescrizione
①Parte superiore ③Ingresso aria di raffreddamento ⑩Cartuccia ltro pieghettato ⑰Rotelline pivottanti
②Piastrina di funzione ④Cavo di collegamento ⑪Chiusura a baionetta ⑱Sacchetto di carta*
②a Interruttore ON/OFF (Automatica)* ⑤Involucro ⑫Contenitore ⑲Clip di parcheggio*
②b Interruttore manuale/automatica/ pulizia a vibrazioni* ⑥Protezione antiurto ⑬Apertura di aspirazione a ciclone ⑳Supporto tubo di aspirazione*
②c Manopola* ⑦Filtro salvamotore ⑭Chiusure a scatto
②d Indicatore di usso volumetrico* ⑧Filtro materiale espanso* ⑮Ruote * A seconda del modello
②e Presa* ⑨Sacchetto in tessuto* ⑯Assi
FIN Selostus
①Yläosa ③Jäähdytysilman tuloaukko ⑩Laskossuodattimenpatruuna ⑰Ohjauspyörät
②Toimintolevy ④Liitäntäjohto ⑪Pikasuljin ⑱Paperisuodatinpussi*
②a Kytkin päälle/pois (Automatiika)* ⑤Kotelo ⑫Säiliö ⑲Parkkeerausklipsi*
②b Kytkin Käsi/Automatiika/ Tärytyspuhdistus* ⑥Törmäyssuoja ⑬Sykloni-imuaukko ⑳Imuputkenpidike*
②c Vääntönuppi ⑦Moottorinsuojasuodatin ⑭Lukitussulkimet
②d Tilavuusvirtanäyttö ⑧Solumuovisuodatin* ⑮Pyörät * Mallista riippuen
②e Pistorasia ⑨Suodatinsäkki* ⑯Akselit
RUS Описаниe
①Вeрxняя сeкция ③Пуск охлаждающего воздуха ⑩Складчатый фильтр ⑰Вращающиеся ролики
②Панeль функций ④Кабель ⑪Байонетный замок ⑱Бумажный фильтр*
②a Включатель / Выключатель (автоматический режим)* ⑤Корпус ⑫Контейнер ⑲Держатель трубки*
②b Ручное управление/ Автоматический переключатель/
Очистка фильтра* ⑥Планка на корпусе фильтра для
защиты поверхности фильтра ⑬Отверстие всасывания с принципом
циклона ⑳Место для хранения трубок*
②c Переключатель настройки w* ⑦Защитный фильтр в моторе ⑭Защелки
②d Индикатор объема потока воздуха* ⑧Губчатый фильтр* ⑮Колеса * в зависимости от модели
②e Розетка для электроинструмента* ⑨Фильтр-мешок* ⑯Ось

8 - GB Original operatin instructions in German
English
Product Vacuum cleaner for wet
and dry applications
Type
VCF20/1000
VCF32/1200
VCF45/1400
Read the operating manual carefully before starting to use the vacuum
cleaner. It provides important instructions for the operation, safety, care and
maintenance. Keep the operating manual in a safe place and, in case you
sell the unit, hand it on to the next owner.
The manufacturer reserves the right to carry out modications to the design
and equipment.
Any other work not covered by this operating manual must not be carried out.
Electro-technical tests must be carried out in accordance with the
accident prevention regulations (BGV A3) and in accordance with
DIN VDE 0701 Part 1 and Part 3. These tests are required in accordance with
DIN VDE 0702 at regular intervals and after repair or modication.
A dust-technical check must be carried out at least once a year by the
manufacturer or a trained person, e. g. for damage to the lter, dust-tightness
of the vacuum cleaner, function of the monitoring equipment.
The vacuum cleaners are successfully tested in accordance with IEC/
EN 60335–2–2.
1 Safety advice
The vacuum device is designed for industrial use.
Ideal in combination with an electric tool, on building sites, in
workshops, etc.
1.1 LDanger
●Keep packaging material such as plastic bags away from
children.
▶Never stand or sit upon the vacuum device.
▶Particular caution is advised when ascending stairs. Pay
attention to standing safely.
▶Do not pull the suction hose and connection line over sharp
edges, kink it or shut it.
▶Always lay the suction hose and connection line so that nobody
may trip over them.
▶In case of any leakage of foam or liquid, immediately switch off
the vacuum device.
▶Always keep dry the inside of the lid.
▶Do not start the vacuum device including its accessories if:
●the vacuum device shows detectable damage (ssures/
cracks);
●the power connection line is defective or shows ssuring or
ageing; or
●any invisible defect is suspected (after a fall).
▶Do not allow the rotating brushes to get into contact with the
power connection line.
▶Do not operate the vacuum device where there is danger of
explosions.
▶Keep away the vacuum device from inammable gases and
substances.
▶Do not aspirate any combustible or explosive solvents, materials
soaked in solvents, explosive dusts, liquids such as petrol, oil,
alcohol, diluents or materials hotter then 60 °C (140 °F).
▷Otherwise there will be danger of re and explosions!
▶Use the socket of the vacuum device only for the purposes
dened in the instruction manual.
▶In case of any inappropriate usage, improper operation or repair,
the producer shall be exempt from liability.
▶Do not use any damaged extension lines.
▶If the connector line of the vacuum device has been damaged, it
must be replaced with a special connector line which is available
from the producer or their service.
▶Electric brushes: Do not allow the rotating brushes to get into
contact with the power connection line.
▶The voltage on the type sign must correspond to the grid
voltage.
▶After every use and before any maintenance, switch off the
vacuum device and pull the power plug.
▶Pull on the plug only, not on the line.
▶Never plug or pull the power plug with wet hands.
▶The socket must be secured via a household fuse with a
suitable current rating.
▶Never open the vacuum device outdoors in rain or storm.
▶Have repairs been made only by experts, e. g. the producer’s
service. Use original spare parts only.
▶Improperly repaired devices pose a hazard for the user.
1.2 LWARNING
▶Persons (including children) who are, due to their physical, sen-
sory or intellectual abilities or lack of experience or knowledge,
unable to safely use the vacuum device should not use it without
supervision or instruction by a responsible person.
▶Particular caution is advised with children, elderly or inrm
persons.
▶Do not point nozzle, tube or hose at people or animals
▶ Use only the brushes supplied with the vacuum device or
dened in the instruction manual. Use of any other brushes may
pose a safety hazard.
▶Clean and disinfect the vacuum device immediately after use to
prevent microbial contamination due to long-term failure to clean
it, especially when using the device in food-processing.
▶Do not use any steam jets or high-pressure cleaners for
cleaning.
▶Acids, acetone and solvents may corrode parts of the vacuum
device.
▶Do not leave the device without supervision. In case of longer
interruptions of work, pull the power plug.
▶Do not clean lter cassettes with compressed ai
▶Acids, alkalis and solvents can corrode the vacuum cleaner
parts.
▷Clean the container and accessories with water.

GB - 9
Original operatin instructions in German
▷Wipe the top section with a damp cloth.
▷Allow the container and accessories to dry
2 Before use
▶When unpacking, check that the delivery is complete and that
there is no transport damage.
▶Before using, the operators should be provided with information,
instructions and training for the use of the vacuum cleaner
and the substances that it is to be used for, including the safe
procedure for the removal of the gathered material.
3 Only use original accessories
See enclosed sheet.
Further accessories are given in the special acessories list or
upon request.
4 Fields of application
For wet and dry suction cleaning. Not suitable for vacuuming
health hazardous dusts. The suction cleaner with socket and ON/
OFF automatic switching system is intended for the connection of
electric tools.
5 Assembly
When unpacking, check that the appliance is complete and that
there is no transport damage.
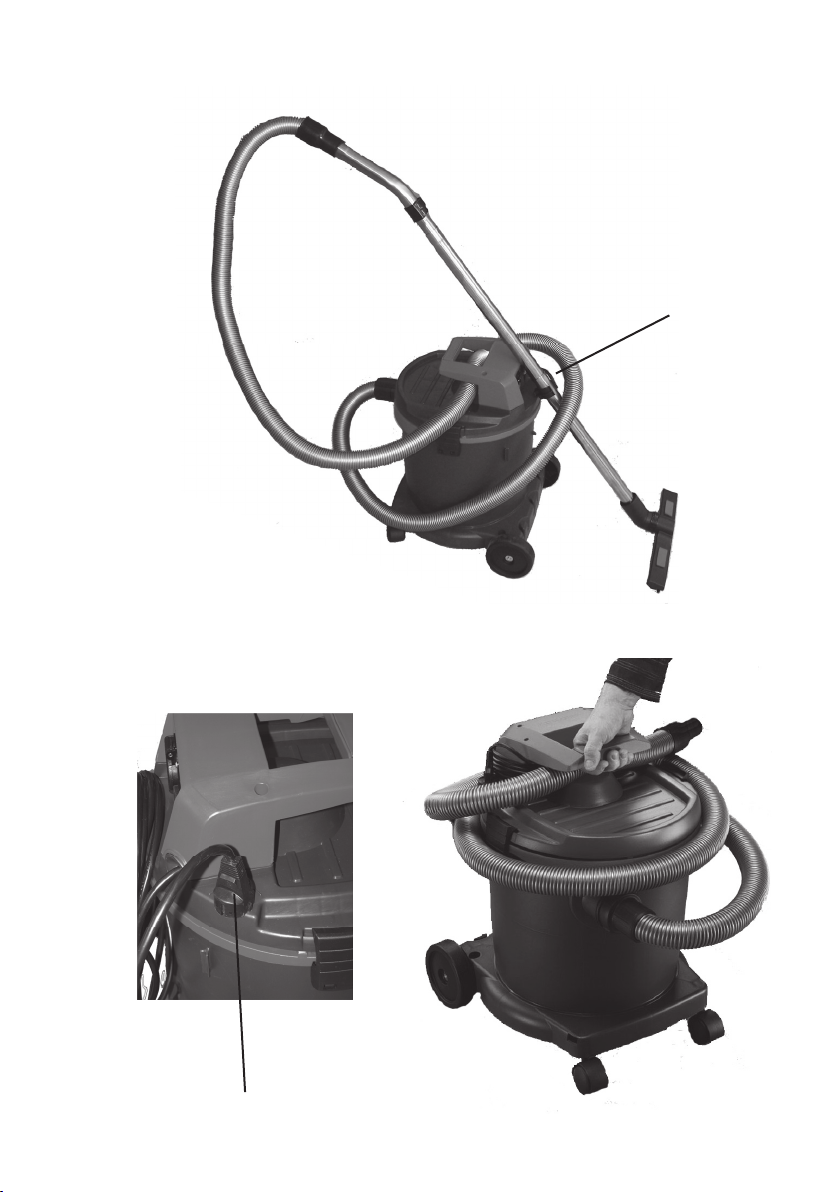
5.1 Container ⑫.
Open the lock-in closures ⑭ of the 20-l and 32-l container, and
lift off the top section ①. Tip over the container and press in the
steering rollers with pivot ⑰ until they lock into place. Screw the
large wheels ⑮ onto the axles ⑯; see g. A.
The supplied steel axle ⑯ for the 45-l container is pushed through
the guide on the container, after which the wheels ⑮ and steering
rollers ⑰ are mounted as indicated in g. B.
The steering rollers ⑰ for appliances with 22-l, 35-l and 55-l
stainless steel containers with chassis crosshead are mounted as
indicated in g. C.
Insert suction tube VCF32/1200; VCF45/1400 ⑲ (when contai-
ned in scope of supply) into the container guide from above and
push down until it engages.
nsert suction tube VCF20/1000 ⑳ (when contained in scope of
supply) into the container guide from above and push down until it
engages.
5.2 Filters ⑧ - ⑪
Fitting the lters, depending upon the given model::
-Push the folded lter cartridge ⑩ in a straight manner over
the case ⑤, right up to the stop point, and lock the bayonet
mount ⑪; see g. D. The folded lter is suitable for wet and dry
suction cleaning.
-Foam lter
To suction the water, rst remove the folded lter; push the foam
lter ⑧ over the casing ⑤, see Fig. E
-Take hold of the paper lter bag ⑱ at the ang and push ver-
tically from above into the guide of the cyclone suction opening
⑬ until the stop point is reached. The bag must rest against the
container wall; see g. F.
For stainless steel containers, push the ange onto the suction
opening at the bottom rst and then at the top, then keep
pushing as far as it will go.
-The bag increases the dust retaining capacity and is
intended for hygienic disposal. Paper lter bags can only
be used for dry suction cleaning.
-Place the lter sack ⑨ in the container ⑫ respectively for
stainless steel containers slip over the edge of the container,
see g. G.
Remove the lter for wet suction cleaning.
5.3 Top section ①
From time to time, or when the suction force decreases, take out
the motor protection lter ⑦ for cleaning; see g. I. Place the top
section ① right-way-round on the container as indicated in g. H.
Observe the anti-rotation protection. The paper lter bag ⑱ must
not be damaged, and the lock-in closure ⑭ must engage securely.
5.4 Socket with ON/OFF automatic switching system
For suction cleaners with socket and ON/OFF automatic switching
system.
The socket ②e is intended for the connection of electrical tools. In
the “0“ switch setting, the socket can be used as an extension line
(e.g. for a light).
Connected load: Suction unit and appliance max. 16 A
WARNING! An electric tool must be switched off when it is connec-
ted. The socket is always live when the plug is inserted in a mains
socket, irrespective of the switch position
The suction openings of electric tools are not standard.
Consequently, an adapter (Rubber sleeve) 547275 is available that
can be shortened to t the given electric tool.
For other suction connections contact your dealer or the manufac-
turer of the given electric tool.
5.5 Filter cleaning
Appliances tted with an electromagnetic cleaning device can
remove the dust adhering to the folded lter ⑩ by vibration. This
ensures optimal use of the folded lter and extends the operating
cycles
VCF20/1000:
If the cleaner loses suction switch off the appliance (switch ②a on
position 0) and hold down the push button ②b for approx. 15 sec.

10 - GB Original operatin instructions in German
6 Setting into operation VCF32/1200; VCF45/1400
6.1 Version with rocker switch
The appliance is switched ON/OFF or switched into automatic
mode with the switch ②a on the top section ①.
Appliances with an electronic suction force control feature a rotary
knob ②c with which the suction force can be adapted to the object
that is being suction cleaned.
6.2 Version with rotary switch
Switch the unit on using the rotary switch ②a, see Fig. 1, on the
upper part ①; (or switch to automatic or vibration mode).
0=Sucker >off<
I min =Sucker >on< (manual mode)
reduced suction performance
I max =Sucker >on< (manual mode)
full suction performance
A = Stand-by mode for automatic ON/OFF switching.
(Sucker is switched on and off by the electr.-tool)
AR = Stand-by mode for automatic ON/OFF switching.
(Sucker is switched on and off by the electr.-tool).
Also, if the suction performance deteriorates, how-
ever at the latest when the volume ow display
lights up, the lter cleaning function is switched on
automatically for approx. 7 seconds. To do this,
the sucker uses the work break, i.e. the electr.-tool
needs to be switched off or be off.
7 Setting into operation VCF20/1000
The appliance is switched ON/OFF or switched into automatic
mode with the switch ②a on the top section ①.
Switch plate
②
Switch
position
Function
10 Vacuum cleaner is switched off
1 Vacuum cleaner is running
2
0 Vacuum cleaner is switched off
Plug socket current-conducting
1 Vacuum cleaner is running
Plug socket current-conducting
3
0 Vacuum cleaner is switched off
Plug socket current-conducting
1 Vacuum cleaner is running
Plug socket current-conducting
AAutomatic operation
Cleaner is switched on and off at
the socket with attached electrical
tool.t
4
0 Vacuum cleaner is switched off
Plug socket current-conducting
1 Vacuum cleaner is running
Plug socket current-conducting
AAutomatic operation
Cleaner is switched on and off at
the socket with attached electrical
tool.
RManual vibrators.
Hold push button down for 15 sec.
to clean the lter.
8 Suction cleaning
The suction force of appliances with a handle tube can be matched
to the object being suction cleaned with the secondary air slide.
8.1 Dry suction cleaning
Dry suction cleaning must only be performed with a dry lter,
appliance and accessories so that the dust cannot adhere and
become encrusted.
If the appliance is used to vacuum soot, cement, gypsum, our and
similar dusts, it is advisable to use a paper lter bag, and an additio-
nal FSP lter sack when larger quantities are involved.
The paper lter bag must always be used in conjunction with
a second lter.
8.2 Wet suction cleaning
Suction cleaning is performed without a paper lter bag and without
a lter sack. The folded lter is suitable for wet suction cleaning.
Use a dry lter for subsequent dry suction cleaning. An FSS
foam lter should be used for larger quantities of water. The oat
valve interrupts suction when the container is full. Turn off the motor
and empty the container and, if necessary the folded lter.
-When taking up water, the supplementary air slide on the handle
should be opened slightly.
-Always lift the suction hose out of the liquid before switching off.
-Due to the high suction force and ow-promoting container
shape, some water may ow out of the hose when the appliance
is switched off.
This manual suits for next models
2
Table of contents
Languages:
Other Felisatti Vacuum Cleaner manuals


