fenix intl ReadyPay User manual

ReadyPay
Power System
User Manual
tm

Table of Contents
i ii
1 Quick Start Guide
The solar panel can be placed on the ground or be
mounted on the roof, and should directly face the sun.
Keep the ReadyPay battery out of direct sun.
Place solar panel
in the sun
1
4
Press button to
start charging
Solar Charging
5
Charge light will turn
on while charging
3
Plug solar panel
into ReadyPay
red to red / black to black
Error Reset
Battery Charge Level
Empty
Using ReadyPay Power
Battery Level Lights
Charge Light
Lock Light
Wakeup Button
Locked Unlocked
ReadyPay Controls
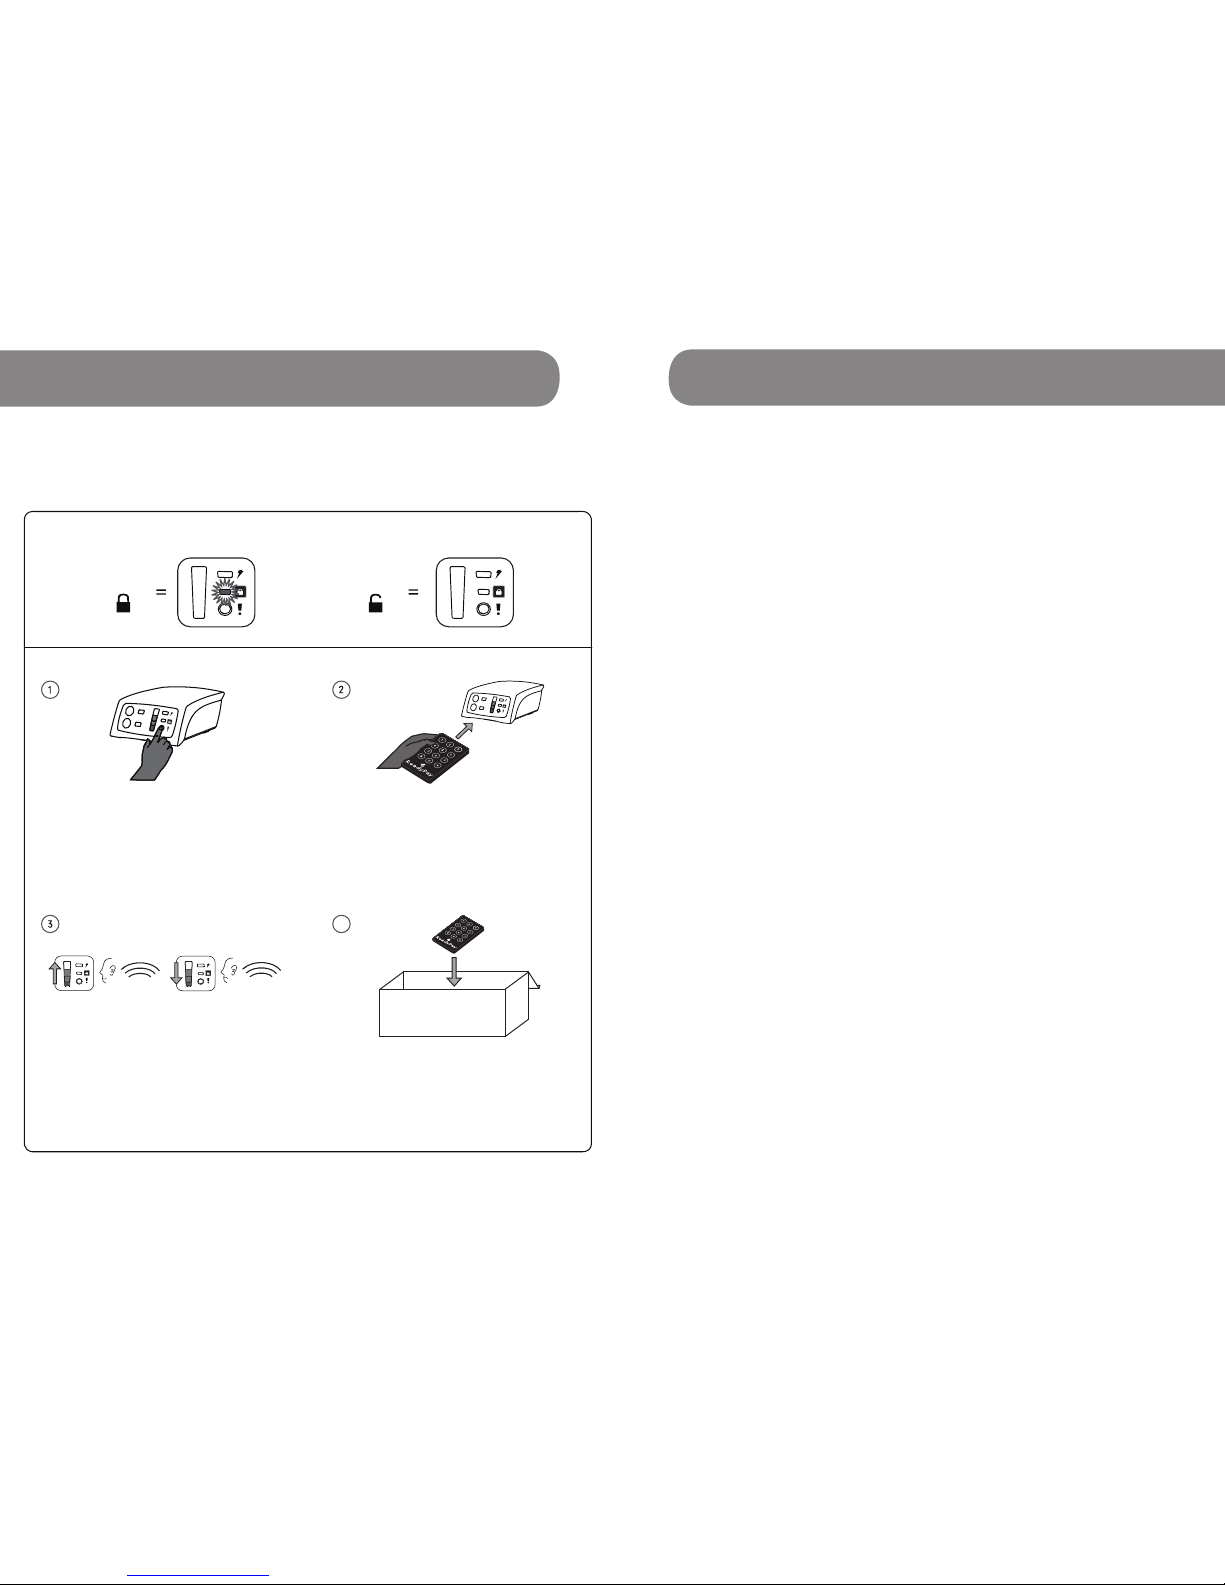
ReadyPay Quickstart Guide
ReadyPay Modes
Locked Unlocked
Safely store the remote.
Accessories
4
Incorrect CodeCorrect Code
Once you have entered the num-
bers correctly, the ReadyPay will
make the ’happy code’ sound. The
lights will ash from the bottom to
the top showing that you have
entered a correct code.
With your remote directly pointed
towards the Power System, press *
followed by the 8 digit ReadyPay
code (from SMS), then #.
For example: *12345678#
Press the power button.
Page
1 Quick Start Guide i
2 Kit Contents 2
2.1 Location of Contents in Box 4
3 Usage Instructions
3.1 ReadyPay Power System 5
3.2 Charging Connections
3.2.1 Using Banana Pins to Charge 8
3.2.2 Using Bare Wires to Charge 10
3.2.3 Multiple Charging Connections 12
3.3 Charging with a Solar Panel 14
3.4 Charging from Grid 16
3.5 Lightbar, Wire & Car Lighter Plug 18
3.6 Big Pin USB Cable 20
3.7 USB Cable 22
3.8 3:1 Switch Hub 24
4 ReadyPay Payments & Codes 26
5 ReadyPay Power System Uses 29
6 Technical Specications 30
7 Common Issues 38
8 Call Customer Service When 42
9 Healthy Power System Tips 44
10 Frequently Asked Questions 46
11 Warranty, Service & Support 51
1
Table of Contents
iii
1 Quick Start Guide
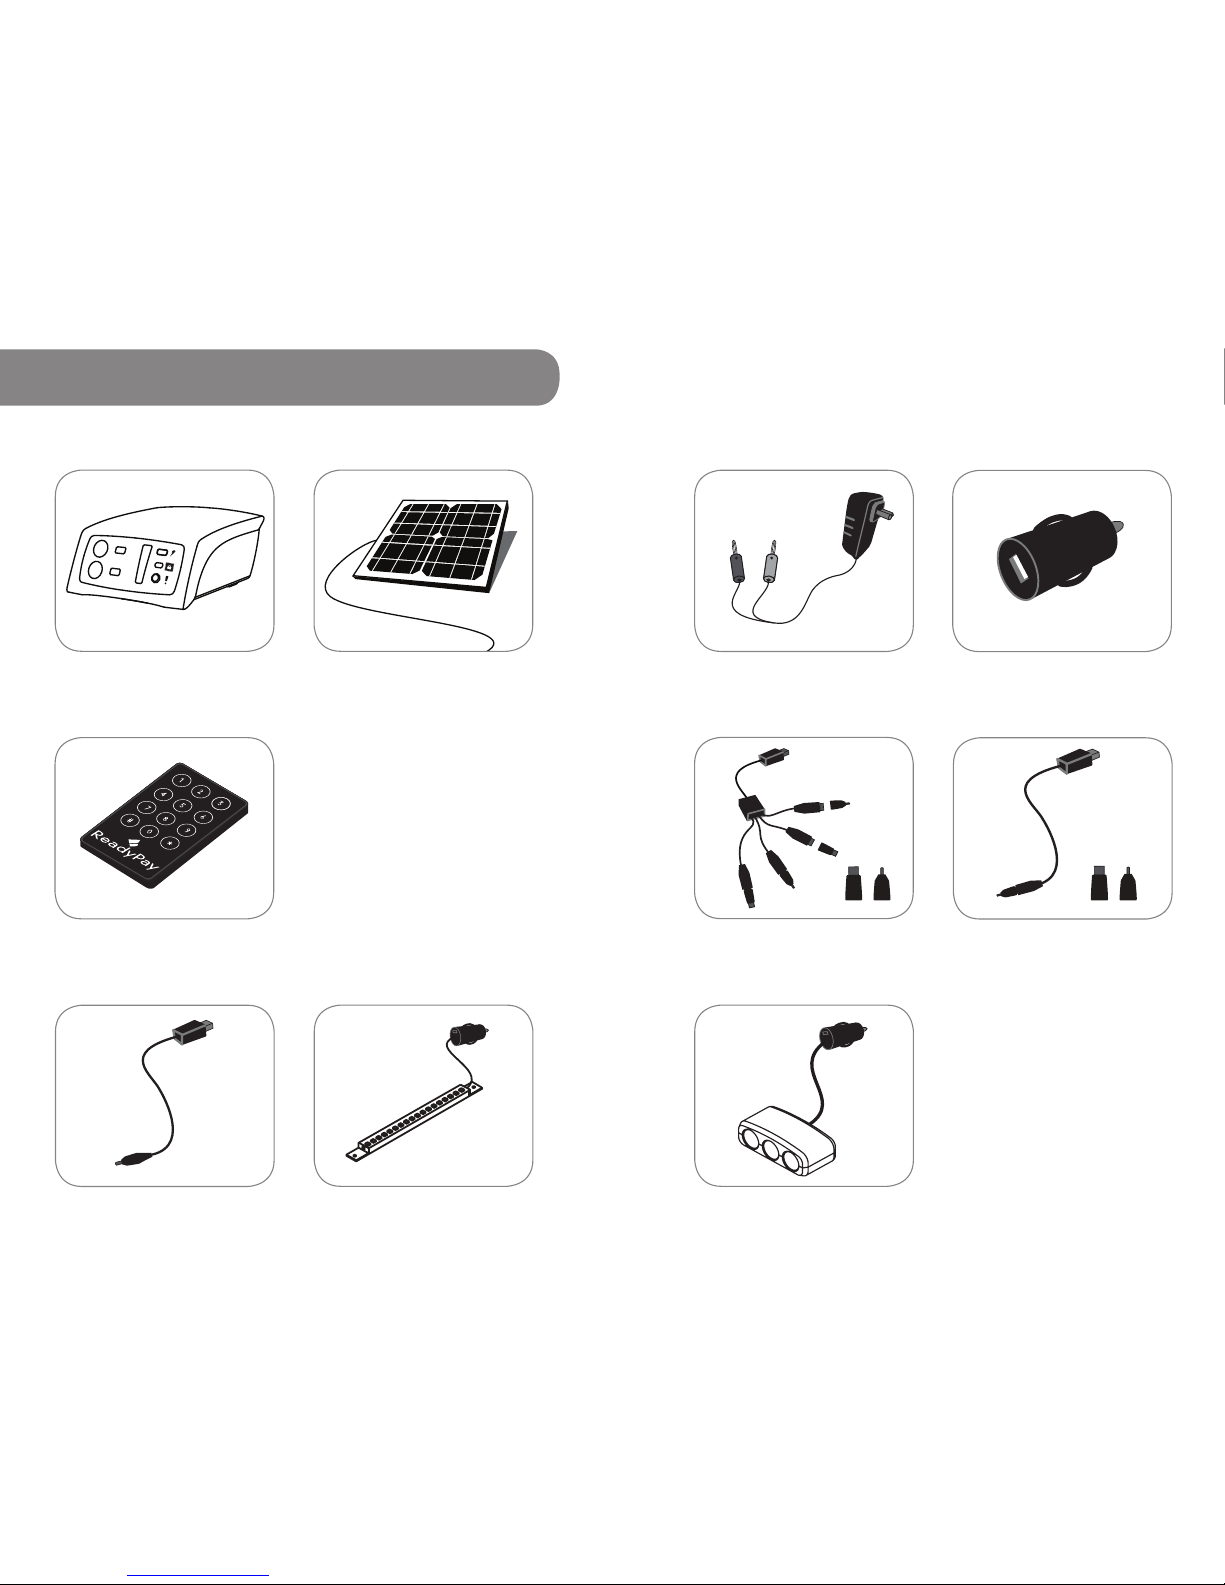
ReadyPay Remote ReadySquid Cable
With Tips
USB Phone Charging
Cable with Tips
Grid Charger
ReadyPay Power System Solar Panel
32
2 Kit Contents
These are included in every ReadyPay Power System kit:
Accessory for making ReadyPay Payments:
Additional contents will depend upon kit purchased.
Car Lighter to
USB Adapter
Additional contents will depend upon kit purchased.
Big Pin Phone
Charging Cable
Lightbar String,
Wire & Switch
3:1 Switch Hub

4
4 5
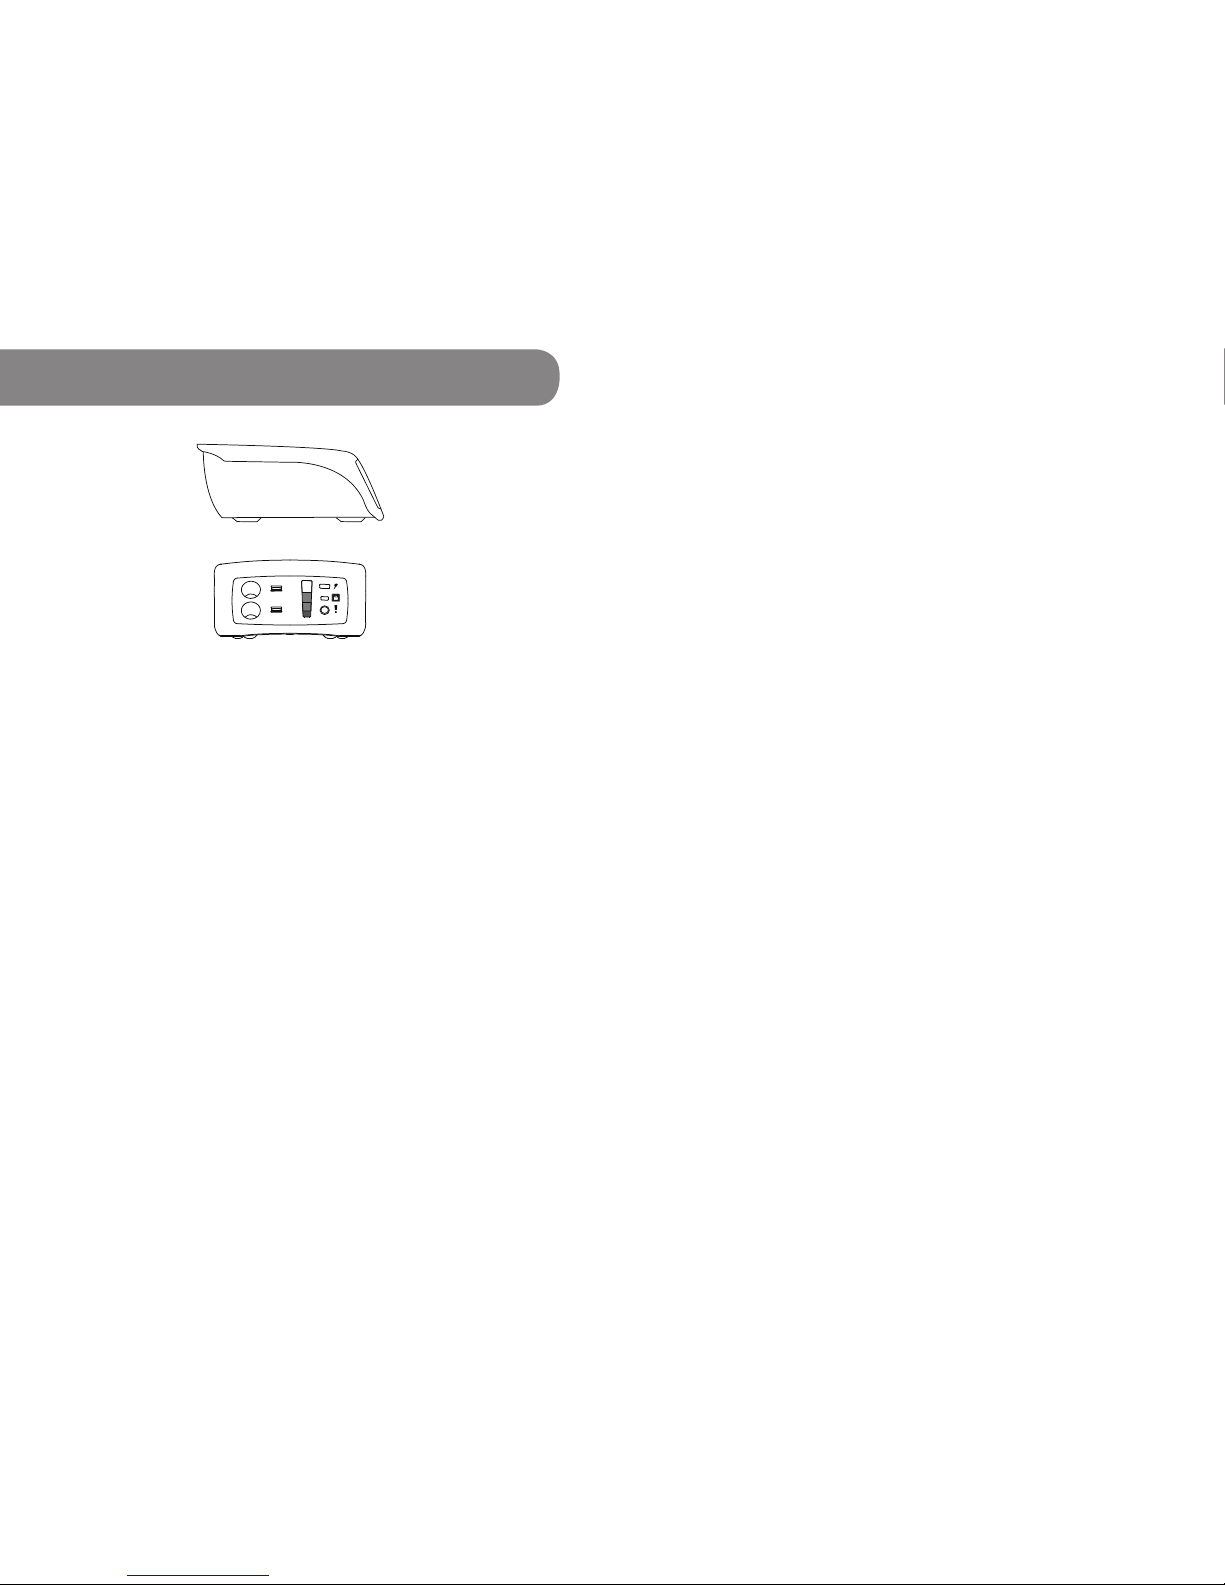
Battery Level Lights
Charging Light
Lock Light
Power Button for wakeup, reset
and checking battery level
USB ports
(x2)
Car Lighter
Ports
2
3
1
2.1 Location of Contents in Box 3.1 ReadyPay Power System
The Power Button wakes up the ReadyPay Power
System when it is in sleep mode. It also resets the
Power System if there is an error. When pressed, the
Battery Level Lights on the Power System will turn on.
Notes
rIf there is an error, all 4 Battery Level Lights will ash.
rIf the device does not respond to a button press, a charge source
should be connected. If it then does not respond to a button press, the
Power System needs service.
The Battery Level Lights show how much energy is in
the battery. Press the Power Button to see how many
lights turn on.
1 light: almost empty
2 lights: more than 1/4 full
3 lights: more than 1/2 full
4 lights: more than 3/4 full
If the bottom light ashes three times then turns off,
the battery is empty and must be recharged.
Note You can start charging at any time. Always try to make the battery
full. Charging the battery with the Solar Panel from empty to full will
take a full day in bright sunlight.
5
6
2
1
C
B
A
Solar Panel included, separately, on top
ReadyPay Power System
Accessories & User Manual
2.1 Location of Contents in Box
A
B
C
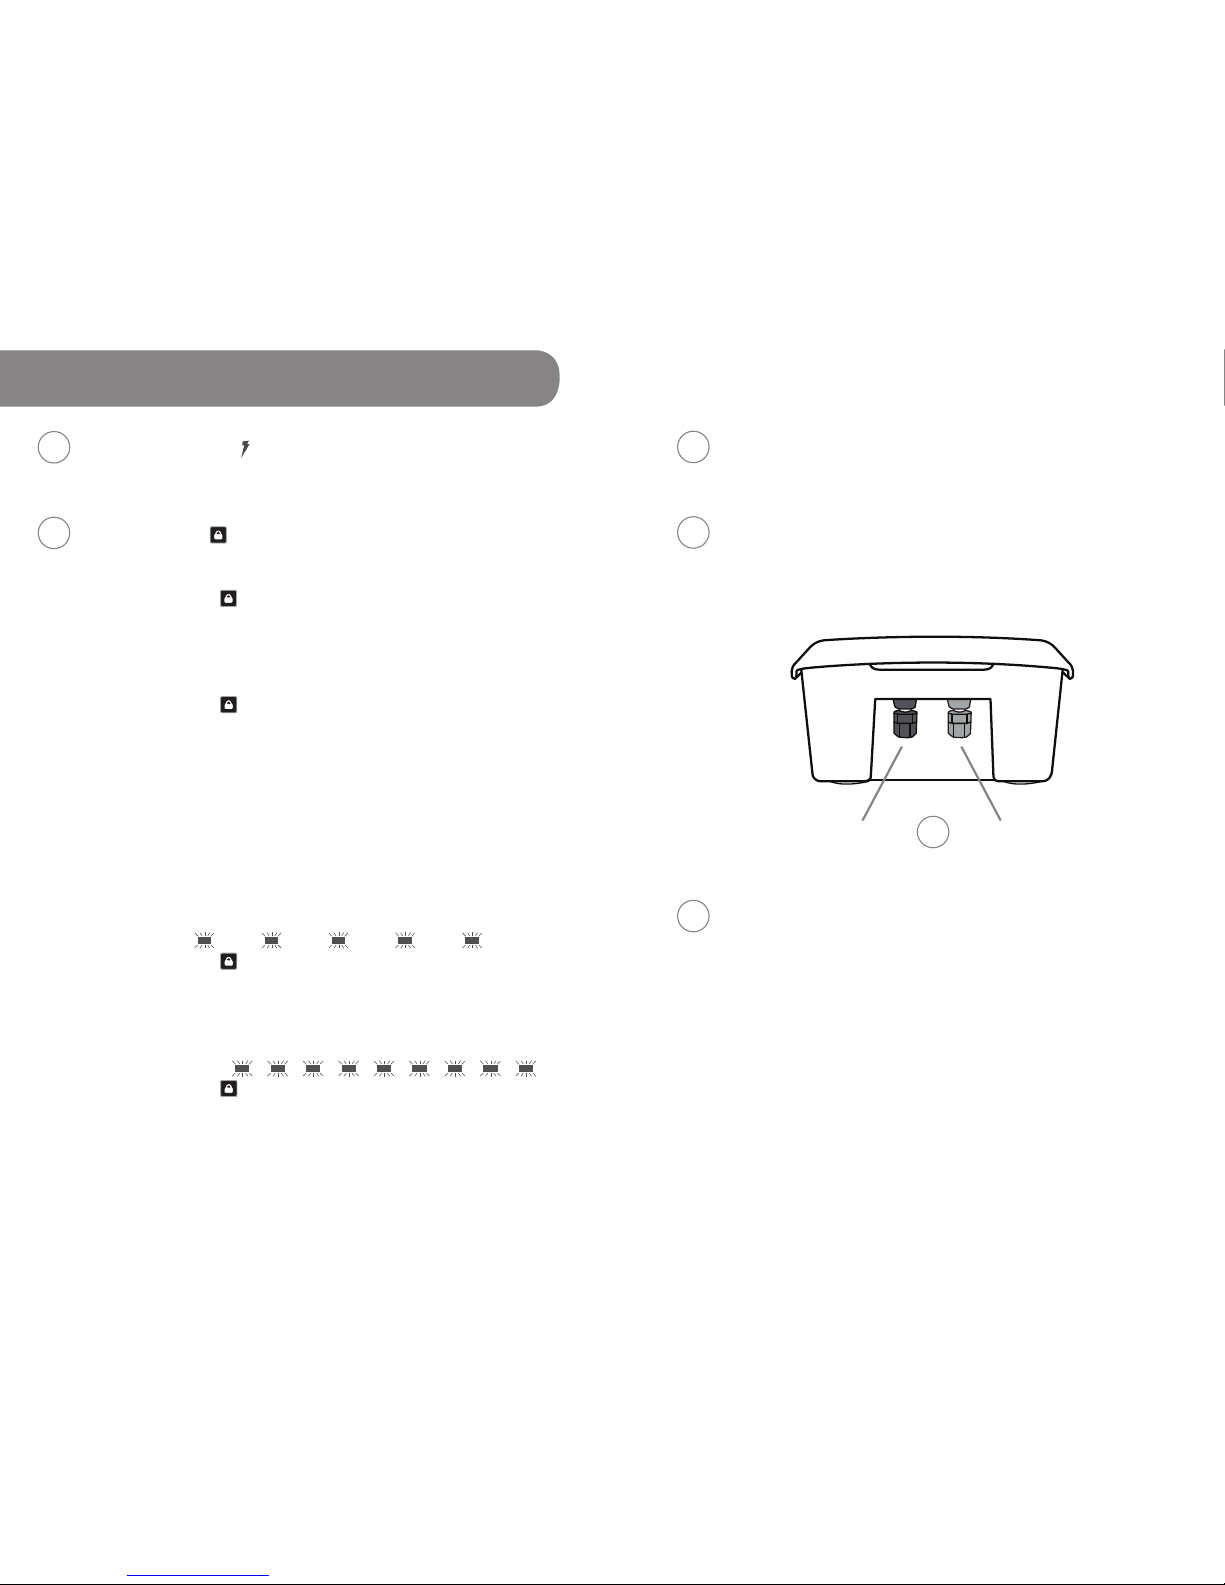
The charging light turns on when the ReadyPay
Power System is receiving power from the Solar
Panel or Grid Charger.
The Lock Light will blink/ash with each press of
the ReadyPay remote when a number is entered.
If the Lock Light turns on when you press
the Power Button, it has a few different modes/
meanings:
Solid On:
If the Lock Light turns on and does not blink, the
Power System is locked. You will need to enter an
unlock code to continue using your Power System.
While locked, you can continue to charge your
Power System for three days. After three days you
will not be able to charge the battery. Also, when
locked, you will not be able to use the USB or Car
Lighter adapter ports to withdraw power. See
section 4 “ReadyPay Payments & Codes” for further
details on obtaining unlock codes.
Blink/Flash:
If the Lock Light is blinking/ashing 1 time per
second, the Power System is too warm for charging.
The Power System will not start charging until it has
cooled down to an acceptable temperature.
Fast Blink/Flash:
If the Lock Light is blinking/ashing very quickly,
the Power System needs to be serviced. Please
contact ReadyPay Customer Service for instructions
on how to return your Power System for service.
6 7
3.1 ReadyPay Power System
4
5
6
The USB ports are for charging phones, phone
batteries, and running 5 volt DC devices with a USB
connection.
The Car Lighter Adapter (CLA) Ports are for operating
the LED Lightbars, car chargers for phones, and other
devices that can be powered by 12V DC car batteries.
The black and red terminals are used for connecting
the Solar Panel or the Grid Charger. Always match red
to red, black to black. When using a non-Fenix charger,
black is negative, red is positive.
Notes
rDo not connect the red and black terminals with anything metal.
Doing so may damage your Power System.
rSerial Number is located on the bottom of the Power System.
rDon't tamper with your battery. This will void your warranty. Call
ReadyPay Customer Service if your Power System needs repair.
Bind terminal (black)
7
7Bind terminal (red)
3
8
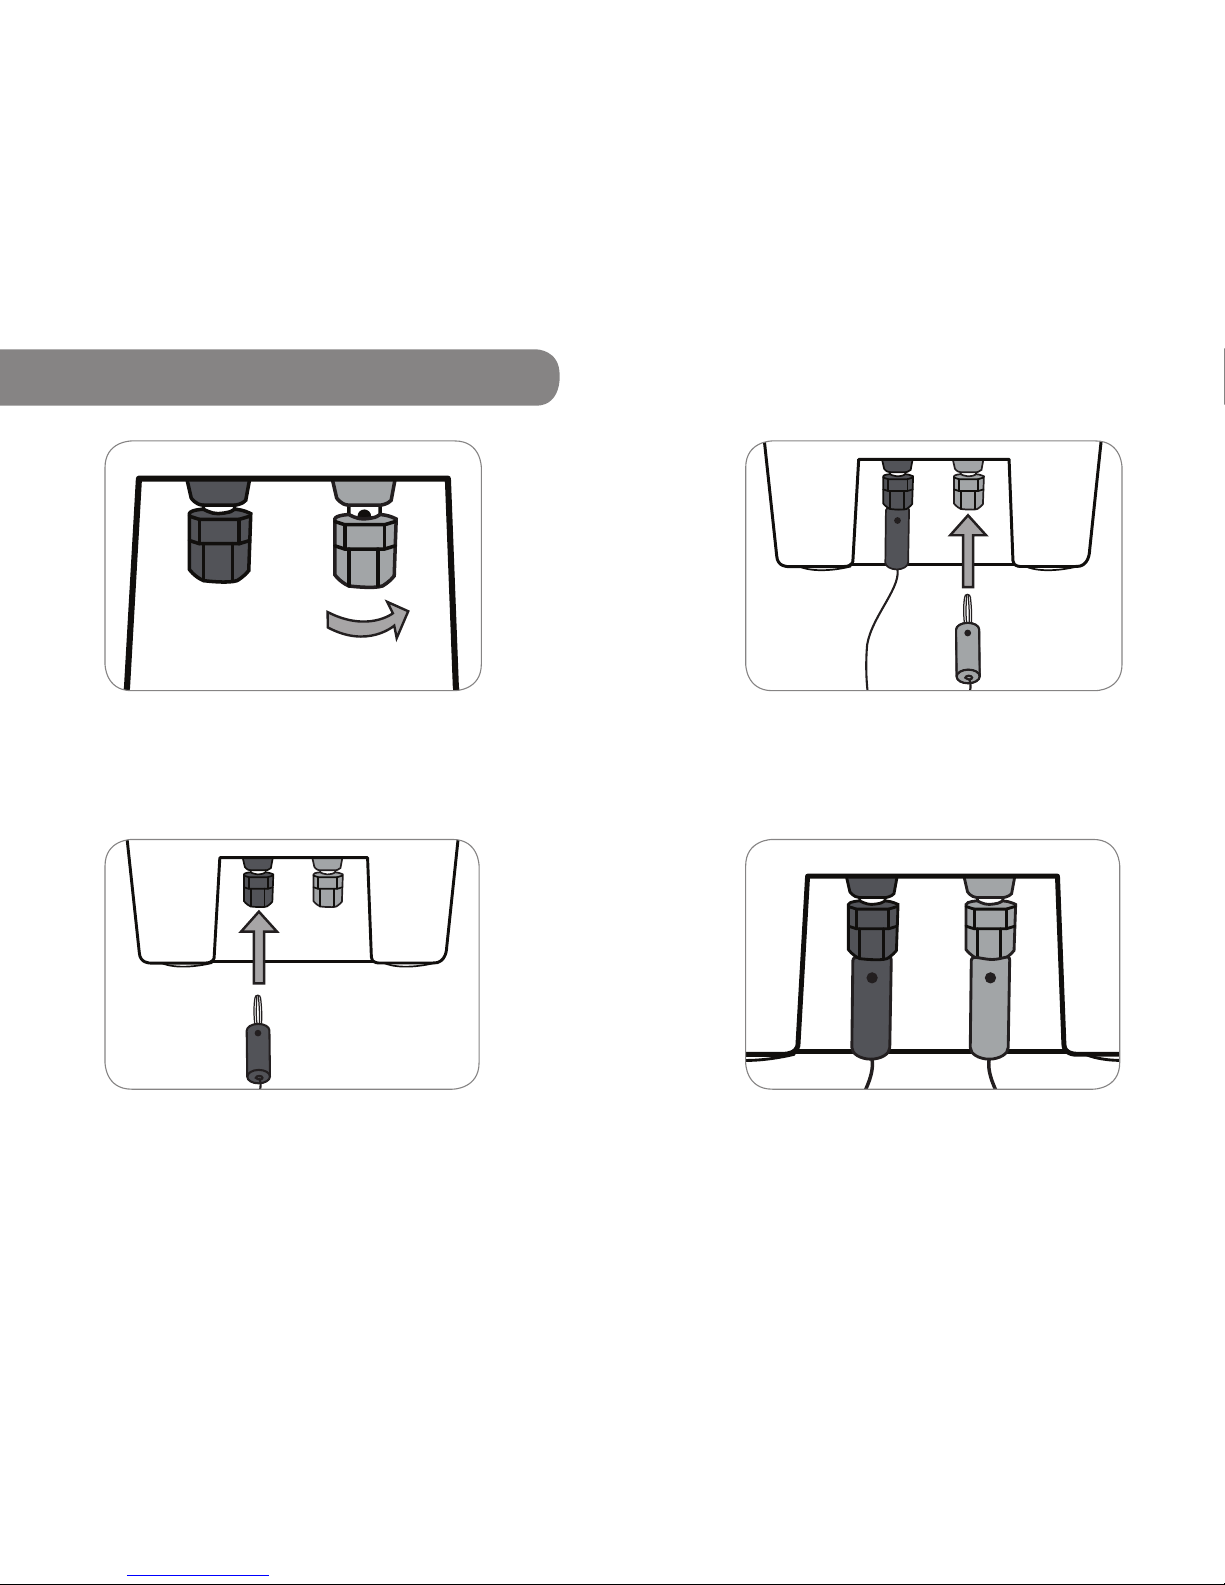
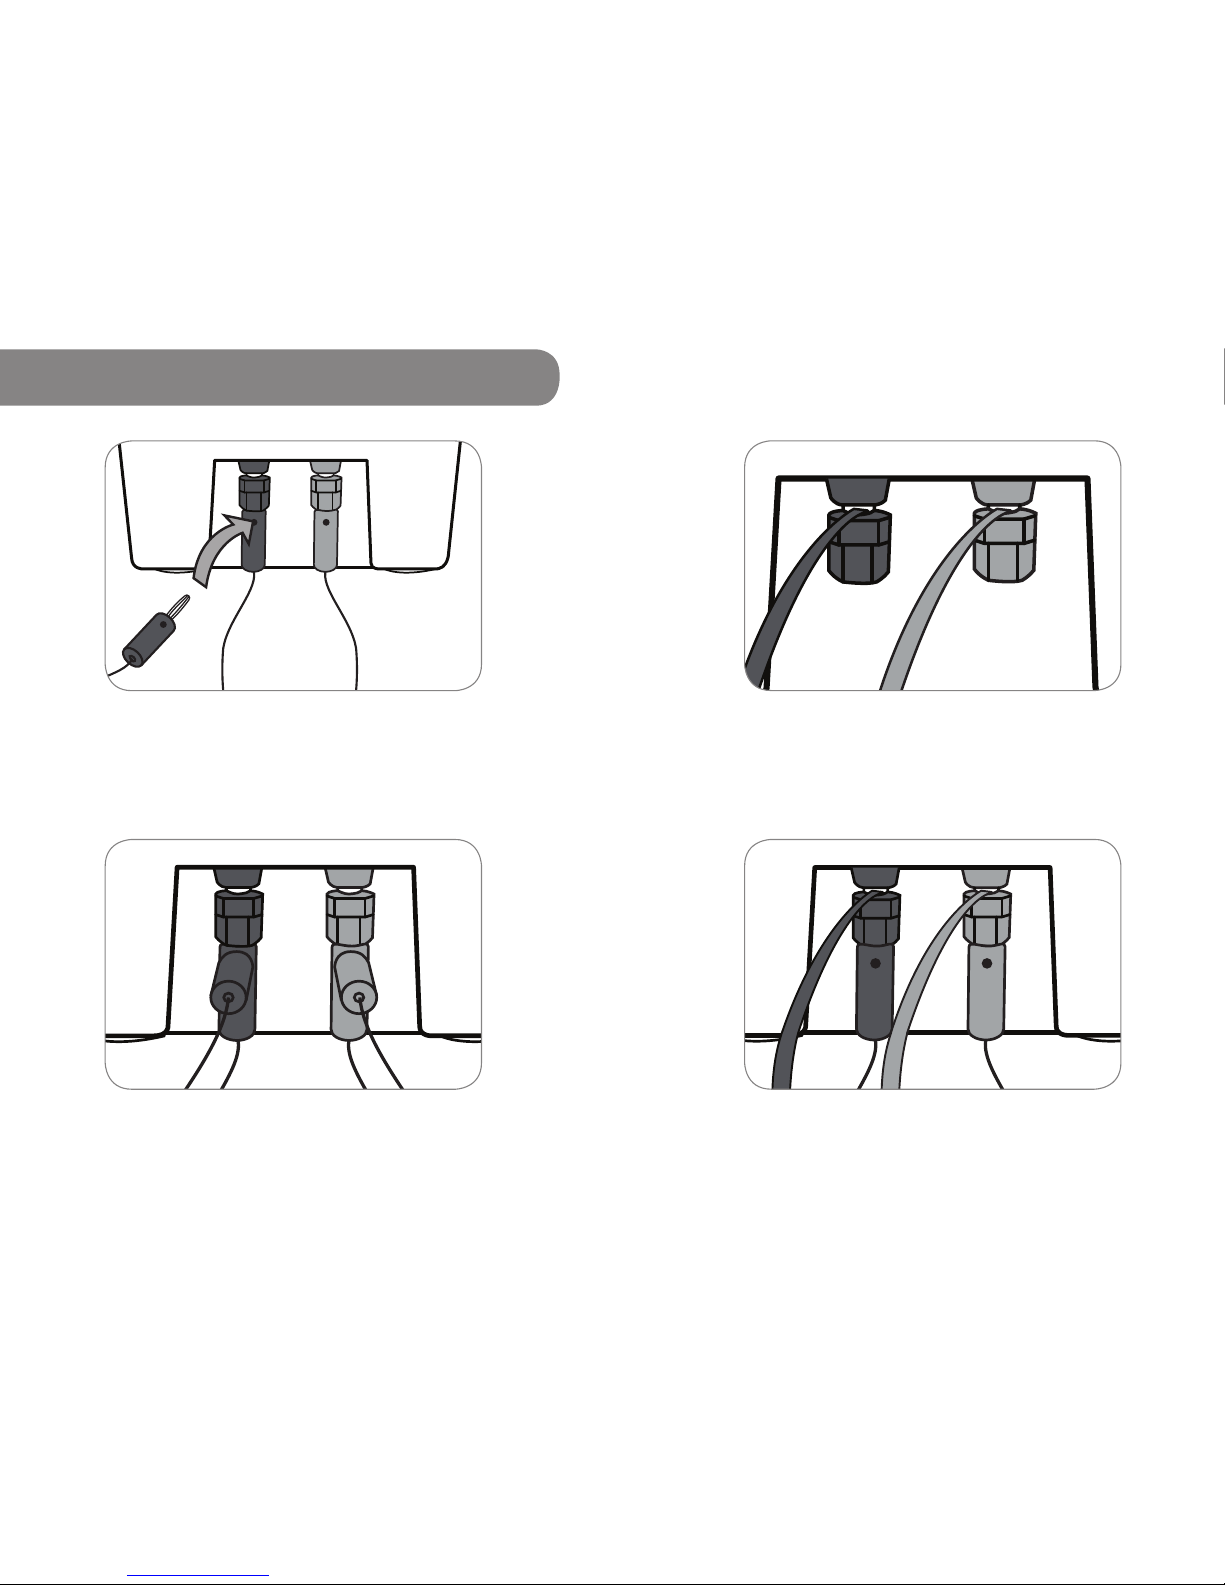
Step 3 Push the red Banana Pin from the Grid Charger or
Solar Panel into the bottom of the red bind terminal.
Note Be sure to connect red to red.
Step 4 This is a good connection.
9
3.2.1 Using Banana Pins to Charge
Step 1 Twist each terminal closed.
Step 2 Push the black Banana Pin from the Grid Charger or
Solar Panel into the bottom of the black bind terminal.
Note Be sure to connect black to black.

1110
Step 4 This is a good connection.
Note You can also wrap the bare wire around the metal portion of the bind
terminal rather than through the hole.
3.2.2 Using Bare Wires to Charge
Step 2 Make sure that the wires from your charger have
at least 1 cm of bare wire exposed. Insert the exposed
portion of the wire into the hole in each bind terminal.
Step 3 Twist each terminal closed onto the wire.
Note Finger tightened is sufcient. Be sure to connect black to black and
red to red. Do not touch metal between the red and black terminals. Doing
so may damage your Power System.
Step 1 Unscrew each bind terminal.
Note You can use this process if the banana pins of your solar panel or Grid
Charger break or get damaged.
3.2.3 Multiple Charging Connections
Step 1 To connect additional Solar Panels using Banana Pins,
push additional Banana Pins through the holes in the rst
Banana Pins.
Note Be sure to connect black to black and red to red. Do not connect the red and
black terminals with anything metal. Doing so may damage your Power System.
Step 2 This is a good connection.
12 13
Step 1 To connect additional Solar Panels using bare wires
or a mix of wires and Banana Pins, rst insert the wires using
the wire wrap method. Then insert the Banana Pins.
Step 2 This is a good connection.
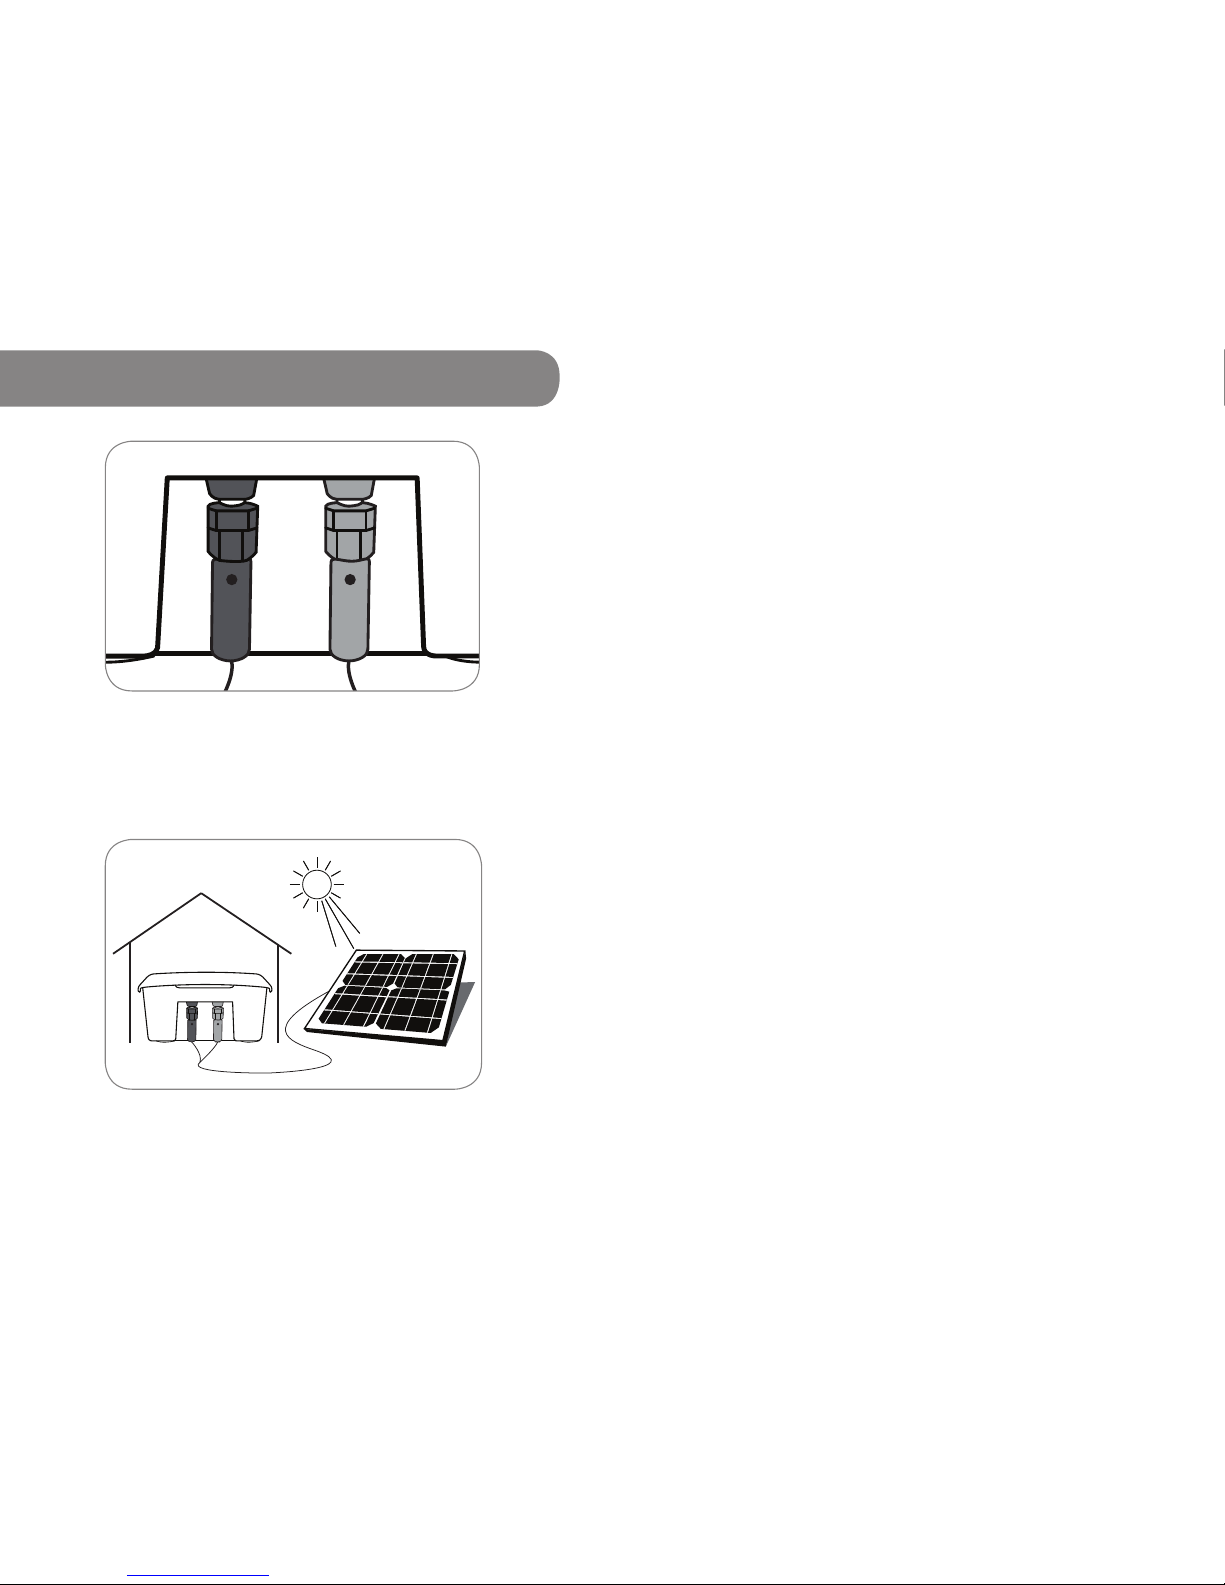
Step 1 Insert the Banana Pins from the Solar Panel cable into
the red and black terminals on the back of the ReadyPay
Power System.
Note Be sure to connect black to black and red to red. Do not touch metal
between the red and black terminals. Doing so may damage your Power System.
Step 2 Place the Solar Panel in direct sunlight, and then
press the Power Button on the ReadyPay Power System
to start charging.
DOs
rIt is okay for the Solar Panel to get wet (from
rain, etc).
rSolar Panels with other kinds of tips on their wires can be
used with your Power System by cutting
the wires and attaching with the ‘bare wire method’ as
shown on page 10.
rSolar Panels can be permanently installed on the roof
(highly recommended), or carried inside
each night.
DON'Ts
rDO NOT place the Power System in direct sunlight. Keep
the Power System cool. The Power System should not get
wet. Keep it dry.
rDO NOT connect the Power System to Solar and Grid
adapters at the same time.
3.3 Charging with a Solar Panel
1514

3.4 Charging from Grid
Step 1 Insert the Banana Pins from the Grid Charger into the
red and black terminals on the back of the ReadyPay Power
System.
Note Be sure to connect black to black and red to red. Do not touch metal
between the red and black terminals. Doing so may damage your Power System.
Step 2 Insert the Grid Charger into the wall socket, and
then press the Power Button on the ReadyPay Power
System to start charging.
16 17
DOs
rKeep the Power System and Grid Charger dry.
rIf you need to use a replacement Grid Charger, call
ReadyPay Customer Service.
DON'Ts
rDO NOT touch the Banana Pins (or ends of wires
together or to your skin when plugged into the wall
socket.
rDO NOT connect the Power System to Solar and Grid
adapters at the same time.
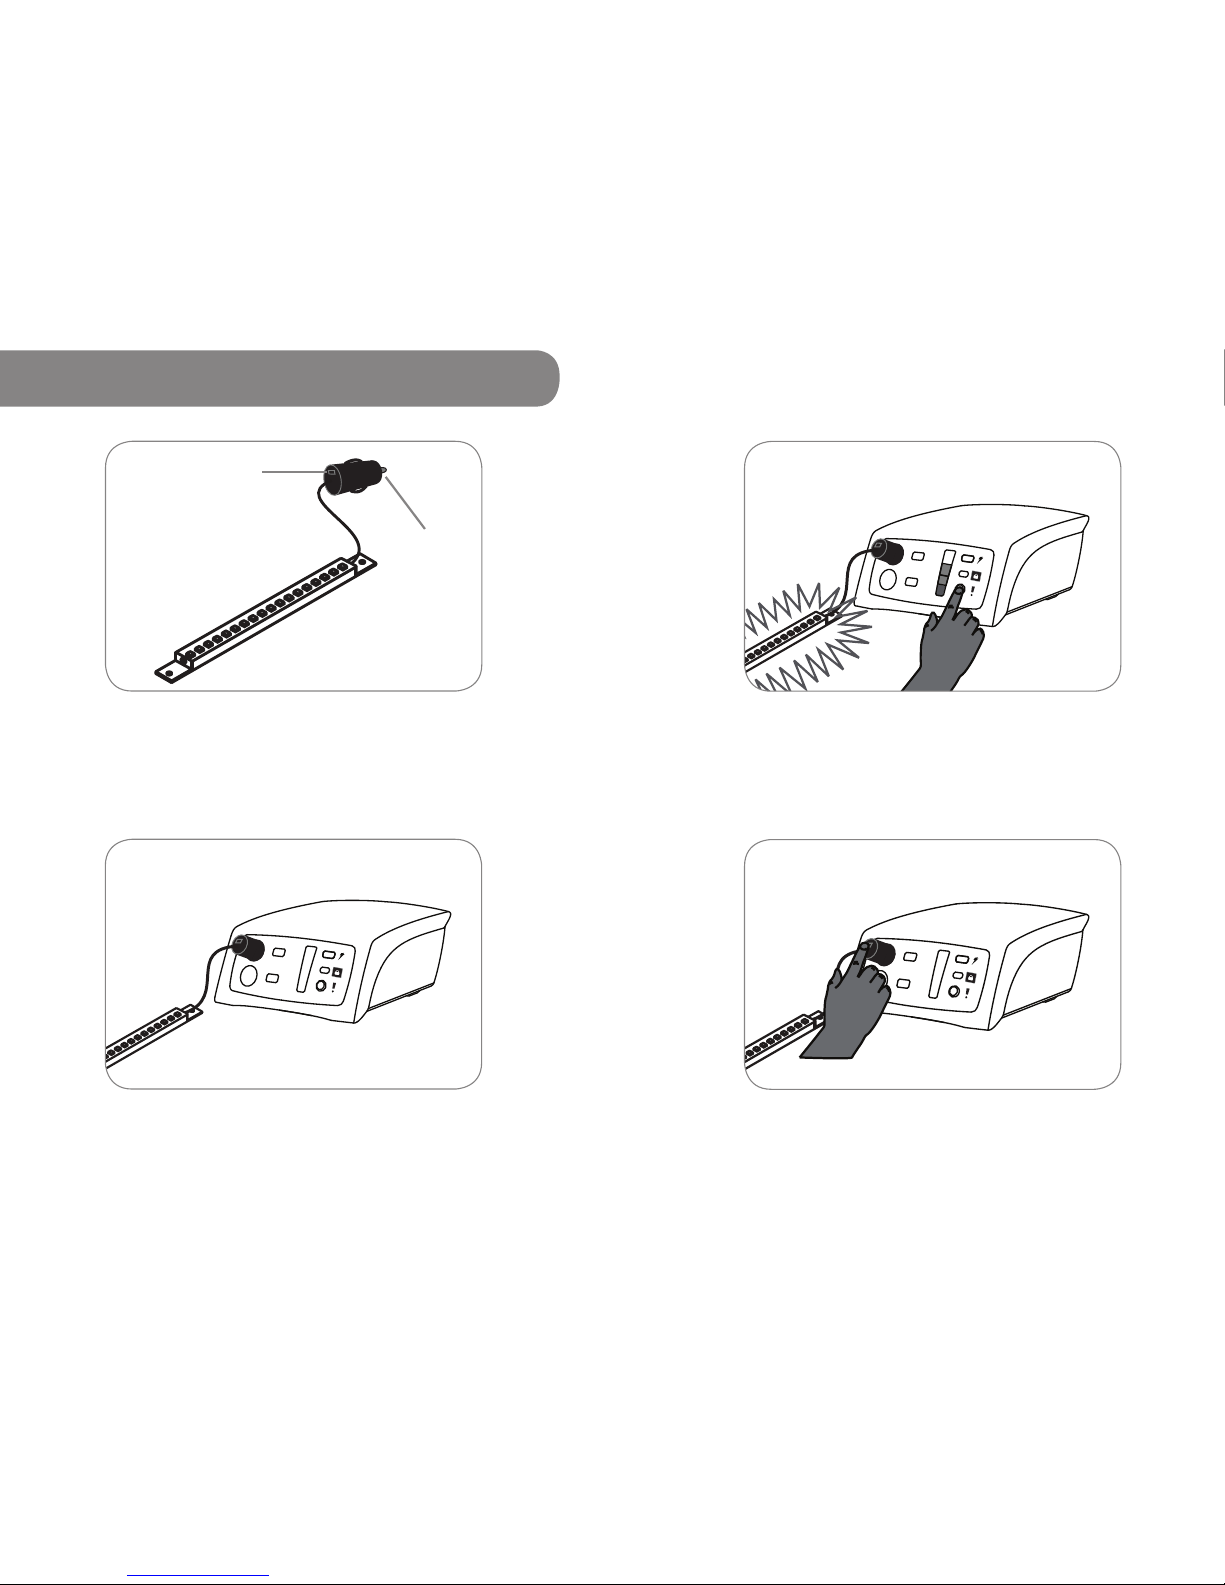
Step 1 Push the Car Lighter Plug into one of the Car
Lighter Adapter Ports.
Step 2 Press the Power Button on the ReadyPay Power
System to wake it up (the ReadyPay Power System
“sleeps” to save energy when not being used for 2
minutes).
Step 3 To turn the lightbar on and off, press the switch on
the Car Lighter Plug.
Note Only use a qualied technician to extend your wires. Incorrectly
connected wires will result in damage to your lights. Also ensure the wires
are safe from damage by animals.
3.5 Lightbar, Wire & Car Lighter Plug*
The LED lightbar comes with a Car Lighter Plug.
18 19
Car Lighter
Plug
Switch
* The type of Lightbar will depend upon the kit purchased.
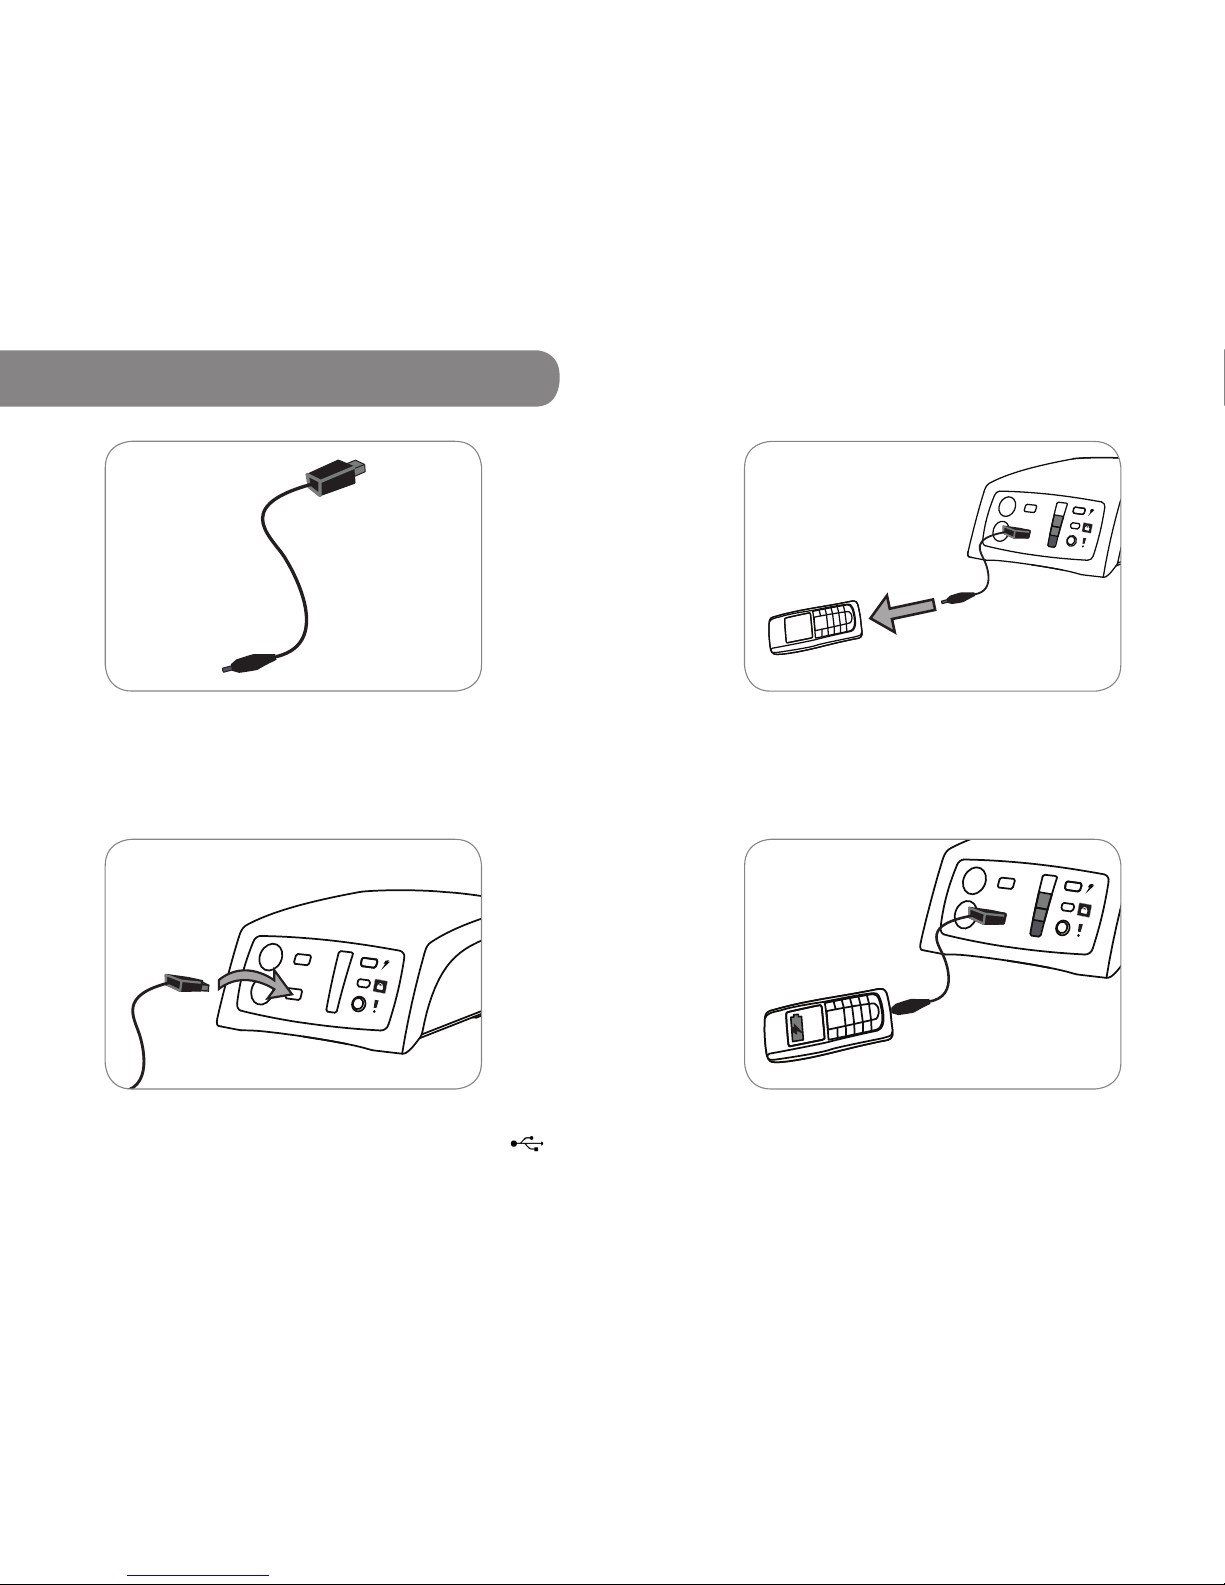
Step 2 Insert USB cable into any of the USB ports.
Note The USB cable only goes in one way (some have the USB symbol
facing up). Insert the cable at a slight angle and push gently when inserting it.
Step 3 Insert the Big Pin into a compatible phone and
press the Power Button to start charging.
Step 4 Check to see if the phone is charging.
Notes
rCharging icons may vary by phone.
rPhone will take normal charging time, usually 1 to 2 hours.
rIf the phone is not charging, press the Power Button on the Power System
to wake it up (the Power System “sleeps” to conserve the battery when
not being used for 2 minutes).
3.6 Big Pin USB Cable*
2120
Step 1 The Big Pin cable provided will only work with
compatible phones.
* May not be included in all kits.
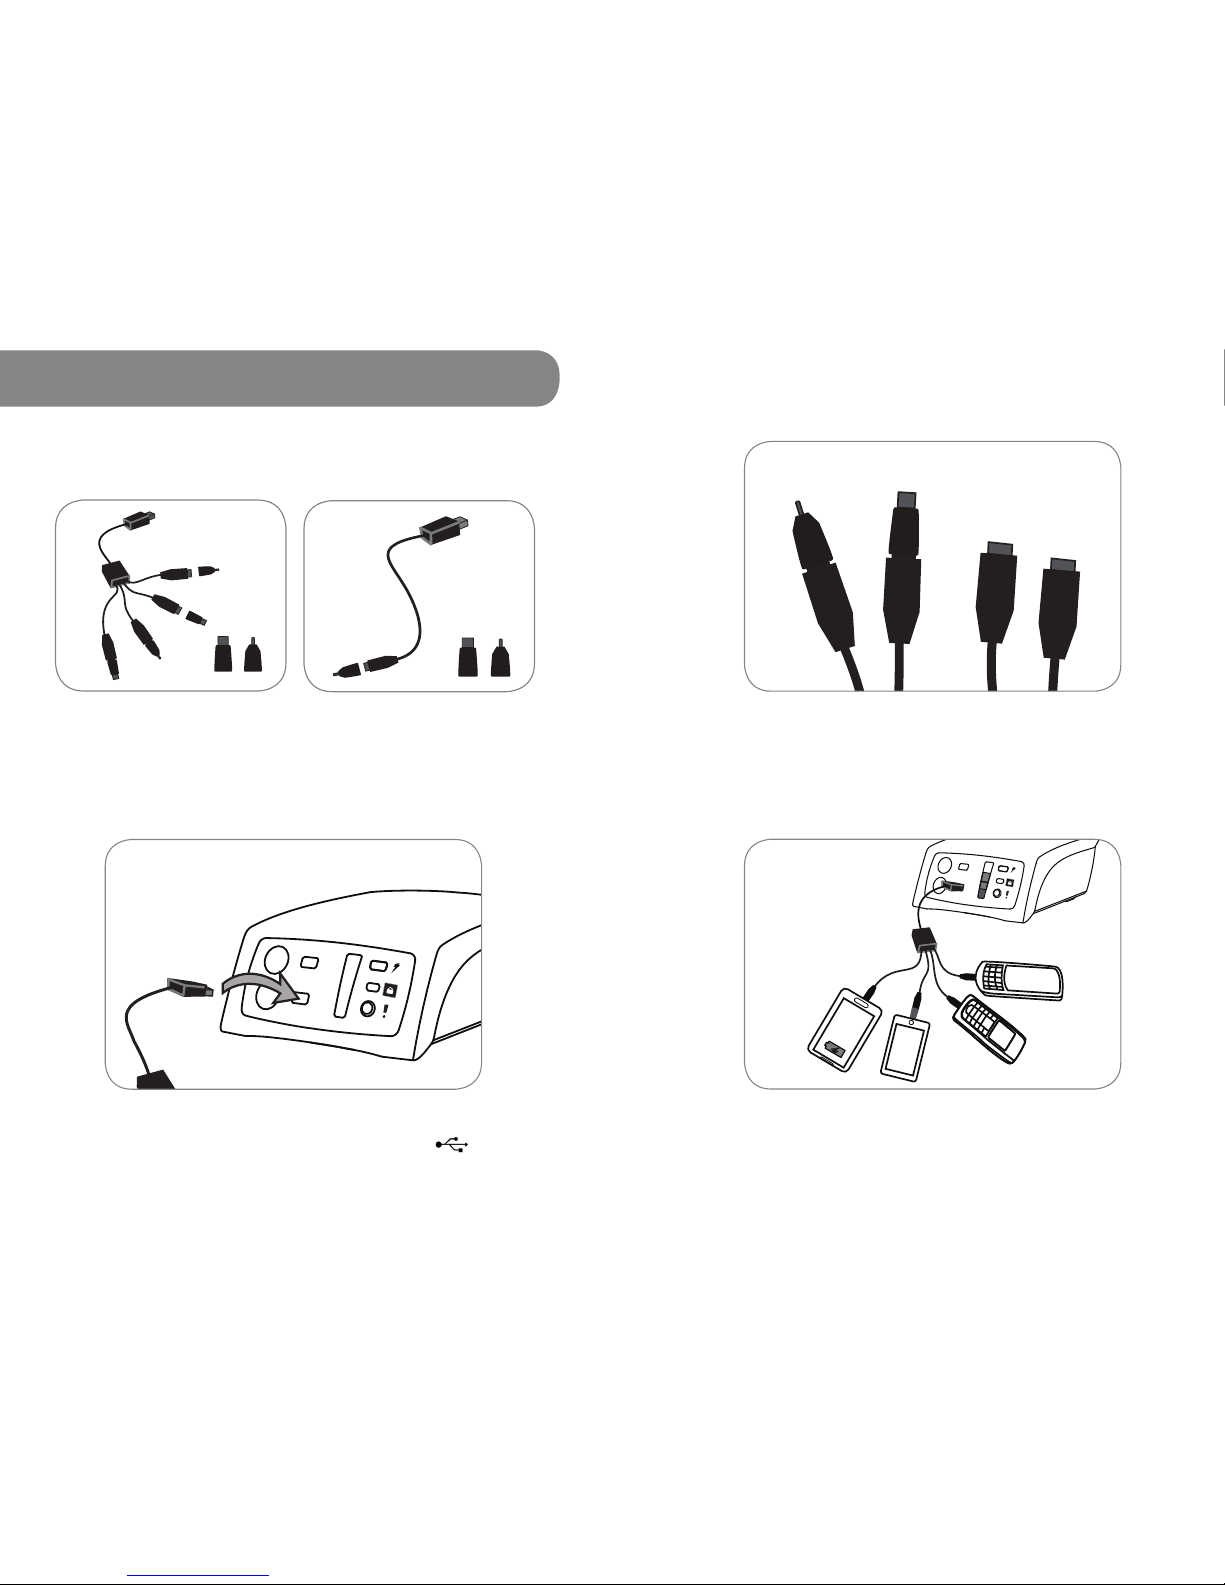
Step 1 Insert the USB cable into any of the USB ports.
Note The USB cable only goes in one way (the USB symbol faces
up). Insert the cable at a slight angle and push gently when inserting it.
Step 2 Attach an adapter tip if needed. Here you can see
the difference between the Small Pin (left) and USB mini
(right) adapter tips. Without adapters the tips are USB Micro.
3.7 USB Cable*
22
Step 3 Insert your phone and check that it is charging.
Notes
rYou can charge up to 4 phones/devices at a time with the ReadySquid
rCharging icons may vary by phone.
rPhone will take normal charging time, usually 1 to 2 hours.
rIf phones/devices are not charging, press the Power Button on the Power
System to wake it up (the Power System “sleeps” to conserve the battery
when not being used for 30 minutes).
23
*The type of cable included will depend upon the kit purchased.
ReadySquid Cable USB-A to Micro USB Cable

24
3.8 3:1 Switch Hub
25
Step 1 Push the Car Lighter Plug into one of the Car
Lighter Adapter Ports.
Step 2 Press the Power Button on the ReadyPay Power
System to wake it up (the ReadyPay Power System
“sleeps” to save energy when not being used for 2
minutes).
Step 3 Plug the LED lightbar into the 3:1 Switch Hub.
Notes
rThe 3:1 Switch Hub has a switch on its Car Lighter Plug which will turn on
and off all devices plugged into it.
rTo turn individual lightbars on and off, press the switch on the Car Lighter
Plug attached to the lightbar.
The 3:1 Switch Hub comes with a Car Lighter Plug.
Car Lighter
Plug
Switch

Step 3 Once you have entered the numbers correctly, the
Power System` will make the ’happy code’ sound. The
lights will ash from the bottom to the top showing that
you have entered a correct code.
Incorrect Code
Correct Code
3
4 ReadyPay Payments & Codes
26 27
The ReadyPay System
ReadyPay technology makes this solar kit affordable; it
allows you to pay in installments. You take home the solar
kit for a small downpayment, then pay consistently over
time until you reach the total purchase price.
Lockout
When you are current with your payments you will be able
to use the Power System normally, and your lock light will
not be turned on.
If you do not pay, your Power System will lock. This means
you will not be able to charge your phone or power other
devices. A locked unit looks like this:
Receiving and Entering Codes
After you successfully make a payment, you will receive an
SMS with a code. You will use your ReadyPay remote to
enter the code and unlock the Power System for the number
of days for which you have paid.
Making Payments
Refer to the ReadyPay instructions for your country.
These are are included in the box. Be sure to enter your
registered ReadyPay phone number when making the
payment.
When you reach the total purchase price, you will receive
a Master Unlock Code which will permanently unlock your
Power System.
Step 1 Press the power
button.
1
Step 2 With your remote
directly pointed towards
the Power System, press
* followed by the 8 digit
ReadyPay code (from
SMS), then #.
For example: *12345678#
2

The ReadyPay Power System provides safe and reliable
electricity for a wide range of applications including
lighting, communications, and entertainment. The open-
standard 12-volt Car Lighter Adapter and 5-volt USB ports
are compatible or adaptable to a large variety of accessory
products. Some examples follow.
Additional accessories for your ReadyPay Power System
will be released in the future. If you’d like to use an
accessory not included in your kit, please call ReadyPay
Customer Service for advice.
28
Lights
Power LEDs to provide clean, bright light in a
school, home, or business.
Light your way with a rechargeable ashlight,
torch or lantern.
Mobile Phone Chargers
Charge a mobile phone via USB at 2x the
efciency over traditional 12v car chargers.
Entertainment
Power radios to deliver essential news, music,
sports, or educational content.
29
4 ReadyPay Payments & Codes 5 ReadyPay Power System Uses
Receiving and Entering Codes continued...
Trouble
If you have problems making a payment or if you
successfully made a payment but did not receive an SMS,
please call ReadyPay Customer Service for assistance.
Cash Purchases
If you have purchased in cash, your device will receive
a Master Unlock Code before you depart the point of
sale. The sales agent will collect the remote since they
are only included for customers using the ReadyPay
Payment system. Your device will function freely. It is still
covered by warranty, and Customer Service is available
to support you in case you have any questions.
Step 5 Store the remote safely.
Accessories
5
30
ReadyPay Power System
Output & Input
USB Output 5 volts, 2 amps max
CLA Output 12 volts, 3.3amps max
Input Voltage 16–30 volts DC
Max Input Wattage 45 watts
Energy storage
Internal Voltage 12.8 volts
Type Lithium Iron Phosphate
Usable Battery Capacity*
22 or 40 watt hours (1.72 amp hrs or 3.13 amp hrs).
Please see box for additional details.
Protection Overcharge and discharge,
overcurrent and short circuit
Physical
Height 95 mm
Width 184 mm
Length 227 mm
Weight 1.0 kg
Operating temp 0-45°C/32-113°F
6 Technical Specications
*Actual performance may vary depending upon usage.
Specications subject to change.
6 Technical Specications
31
Depending on the kit purchased, accessories and
performance will vary. See label on box for list of kit
contents.
Performance Specications (Home Starter Kits)
Runtime/Autonomy
Up to 10 hours with one 1.5W LED lightbar or up to 4
cellphone charges on a full battery.
Charge Times
Approximately 8 hours via 10W Solar Panel.
Approximately 4 hours via Grid Charger.
Charging time will vary if charging phones or
powering lights.
Performance Specications (All other kits)
Runtime/Autonomy
Up to 20 hours with one 1.5W LED lightbar or up to 7
cellphone charges on a full battery.
Charge Times
Approximately 8 hours via 17W Solar Panel.
Approximately 4 hours via Grid Charger.
Charging time will vary if charging phones or
powering lights.
Note Actual performance may vary depending upon usage. Specications
subject to change.

32
ReadyPay Power System+
Output & Input
USB Output 5 volts, 2 amps max
CLA Output 12 volts, 3.3amps max
Input Voltage 16–30 volts DC
Max Input Wattage 45 watts
Energy storage
Internal Voltage 12.8 volts
Type Lithium Iron Phosphate
Usable Battery Capacity*
80 watt hours (6.25 amp hrs)
Protection Overcharge and discharge,
overcurrent and short circuit
Physical
Height 95 mm
Width 184 mm
Length 227 mm
Weight 1.5kg
Operating temp 0-45°C/32-113°F
6 Technical Specications
*Actual performance may vary depending upon usage.
Specications subject to change.
6 Technical Specications
33
Depending on the kit purchased, accessories and
performance will vary. See label on box for list of kit
contents.
Performance Specications
Runtime/Autonomy
Up to 40 hours with one 1.5W LED lightbar or up to 14
cellphone charges on a full battery.
Charge Times
Approximately 8 hours via two 17W Solar Panels.
Approximately 6 hours via Grid Charger.
Charging time will vary if charging phones or
powering lights.
Note Actual performance may vary depending upon usage. Specications
subject to change.
34
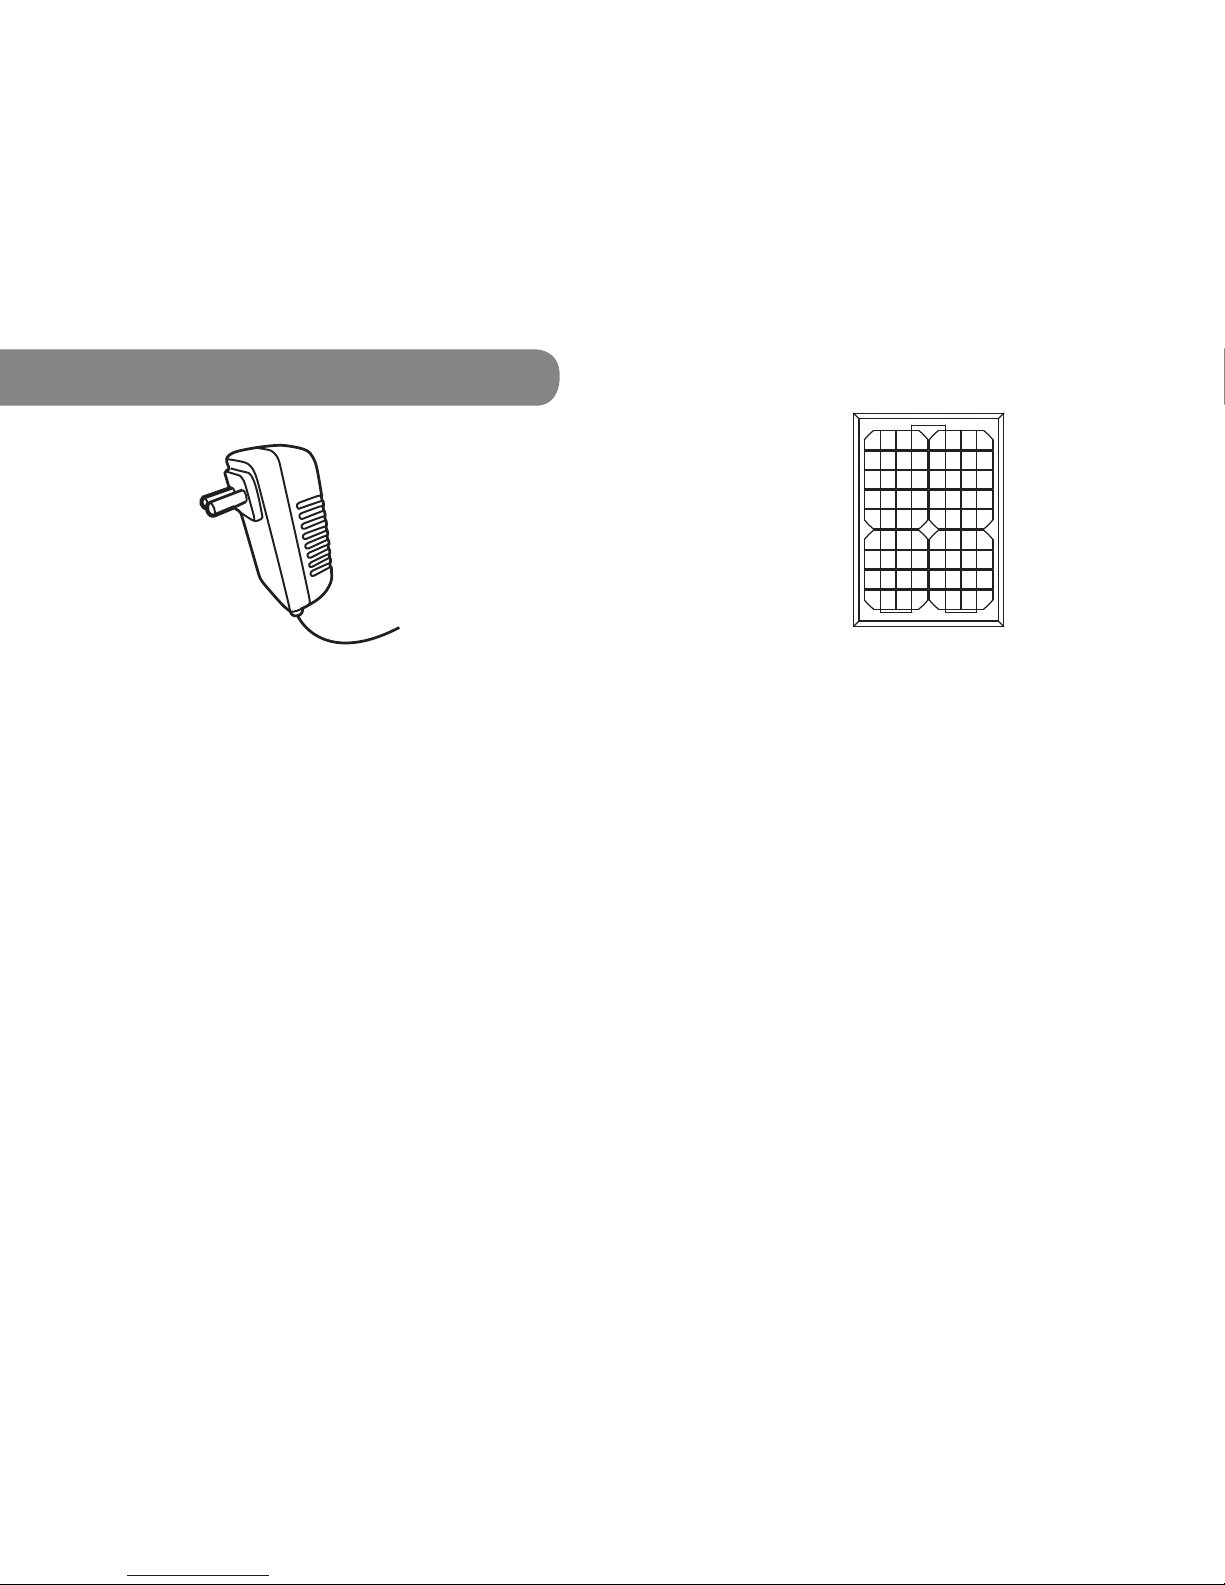
Grid Charger*
Output
18 volts
1.3 amps
Input
100–240 volts
50/60Hz
1 amp max
Physical
Height 88 mm
Width 50 mm
Length 33.6 mm
Weight 144 g
Wire Stripe = positive (+)
Printed with text = negative (-)
Wire Length 1 meter
Wire Gauge 18 AWG
Connectors Red and Black Banana Pins
6 Technical Specications
35
Solar 10
Output
Max Output Power 10 watts
Max Output Voltage 17.56 volts
Max Output Current 0.57 amps
Open Circuit Voltage 22.32 volts
Short Circuit Current 0.68 amps
Power Tolerance 5%
Irradiance & Cell Temp 1000W/m2 AM = 1.5
Physical
Height 25 mm
Width 250 mm
Length 355 mm
Weight 1.45 kg
Wire Red = positive (+)
Black = negative (-)
Wire Length 10 meters
Wire Gauge 20 AWG
Connectors Red and Black Banana Pins
* May not be included in all kits. Plug design may vary by country.
Tc = 25°C/77°F
Table of contents
Popular Inverter manuals by other brands

HQ
HQ HQ-INV4000-12 manual

Tronic
Tronic TSW 300 A1 operating instructions

Thermia
Thermia Diplomat Inverter Mini installation guide

Heiko
Heiko JS050-C2 Service manual

bluetron
bluetron HSI Series Installation and operating instructions

Champion Power Equipment
Champion Power Equipment 100136 installation manual


