Ferguson Regent Cucina User manual
1
Instrukcja obsługi
~~Ferguson Regent Cucina~~
Radio kuchenne FM
z bluetooth, alarmem i minutnikiem

2
1.
Środki bezpieczeństwa
Nie umieszczaj źródeł otwartego ognia (np. świece) przy produkcie.
Nie umieszczaj urządzenia blisko płynów.
Nie używaj ani nie przechowuj tego produktu w miejscu, w którym jest narażony na
bezpośrednie działanie promieni słonecznych, wysokiej temperatury, nadmiernego
zanieczyszczenia lub wibracji.
Nie przechowuj tego produktu w wilgotnym otoczeniu.
Nie czyść urządzenia wodą lub innymi płynami.
Nie zakrywaj otworów wentylacyjnych urządzenia.
Nie wkładaj żadnych przedmiotów do środka urządzenia.
Nie próbuj samodzielnie otwierać tego urządzenia. Wewnątrz nie ma części, które mogą
być serwisowane przez użytkownika.
Ten produkt nie jest przeznaczony do użytku przez dzieci. Dzieci powinny być
odpowiednio nadzorowane.
Ten produkt jest przeznaczony wyłącznie do użytku domowego i nie jest przeznaczony do
użytku komercyjnego ani przemysłowego.
Nie narażaj urządzenia na kapanie lub rozpryskiwanie cieczy.
Upewnij się, że urządzenie jest ustawione w stabilnej pozycji. Uszkodzenia
spowodowane używaniem tego produktu w niestabilnej pozycji lub nieprzestrzeganiem
jakiegokolwiek innego ostrzeżenia lub środka ostrożności zawartego w niniejszej
instrukcji użytkownika nie będą objęte gwarancją.
Nie zdejmuj obudowy tego urządzenia.
Nigdy nie umieszczaj tego urządzenia na innym sprzęcie elektrycznym.
Używaj tylko oryginalnego zasilacza.
Sugerujemy zachowanie opakowania w przypadku przyszłego transportu produktu.
2.
Zastrzeżenie
Aktualizacje oprogramowania układowego i/lub komponentów sprzętowych
są wykonywane regularnie. Dlatego niektóre instrukcje, specyfikacje i zdjęcia w tej
dokumentacji mogą się nieznacznie różnić od konkretnej sytuacji. Wszystkie
elementy opisane w tym przewodniku służą jedynie celom ilustracyjnym i mogą nie
mieć zastosowania w konkretnej sytuacji. Z opisu zamieszczonego w tym
podręczniku nie można uzyskać żadnego prawa ani uprawnień.
3
3.
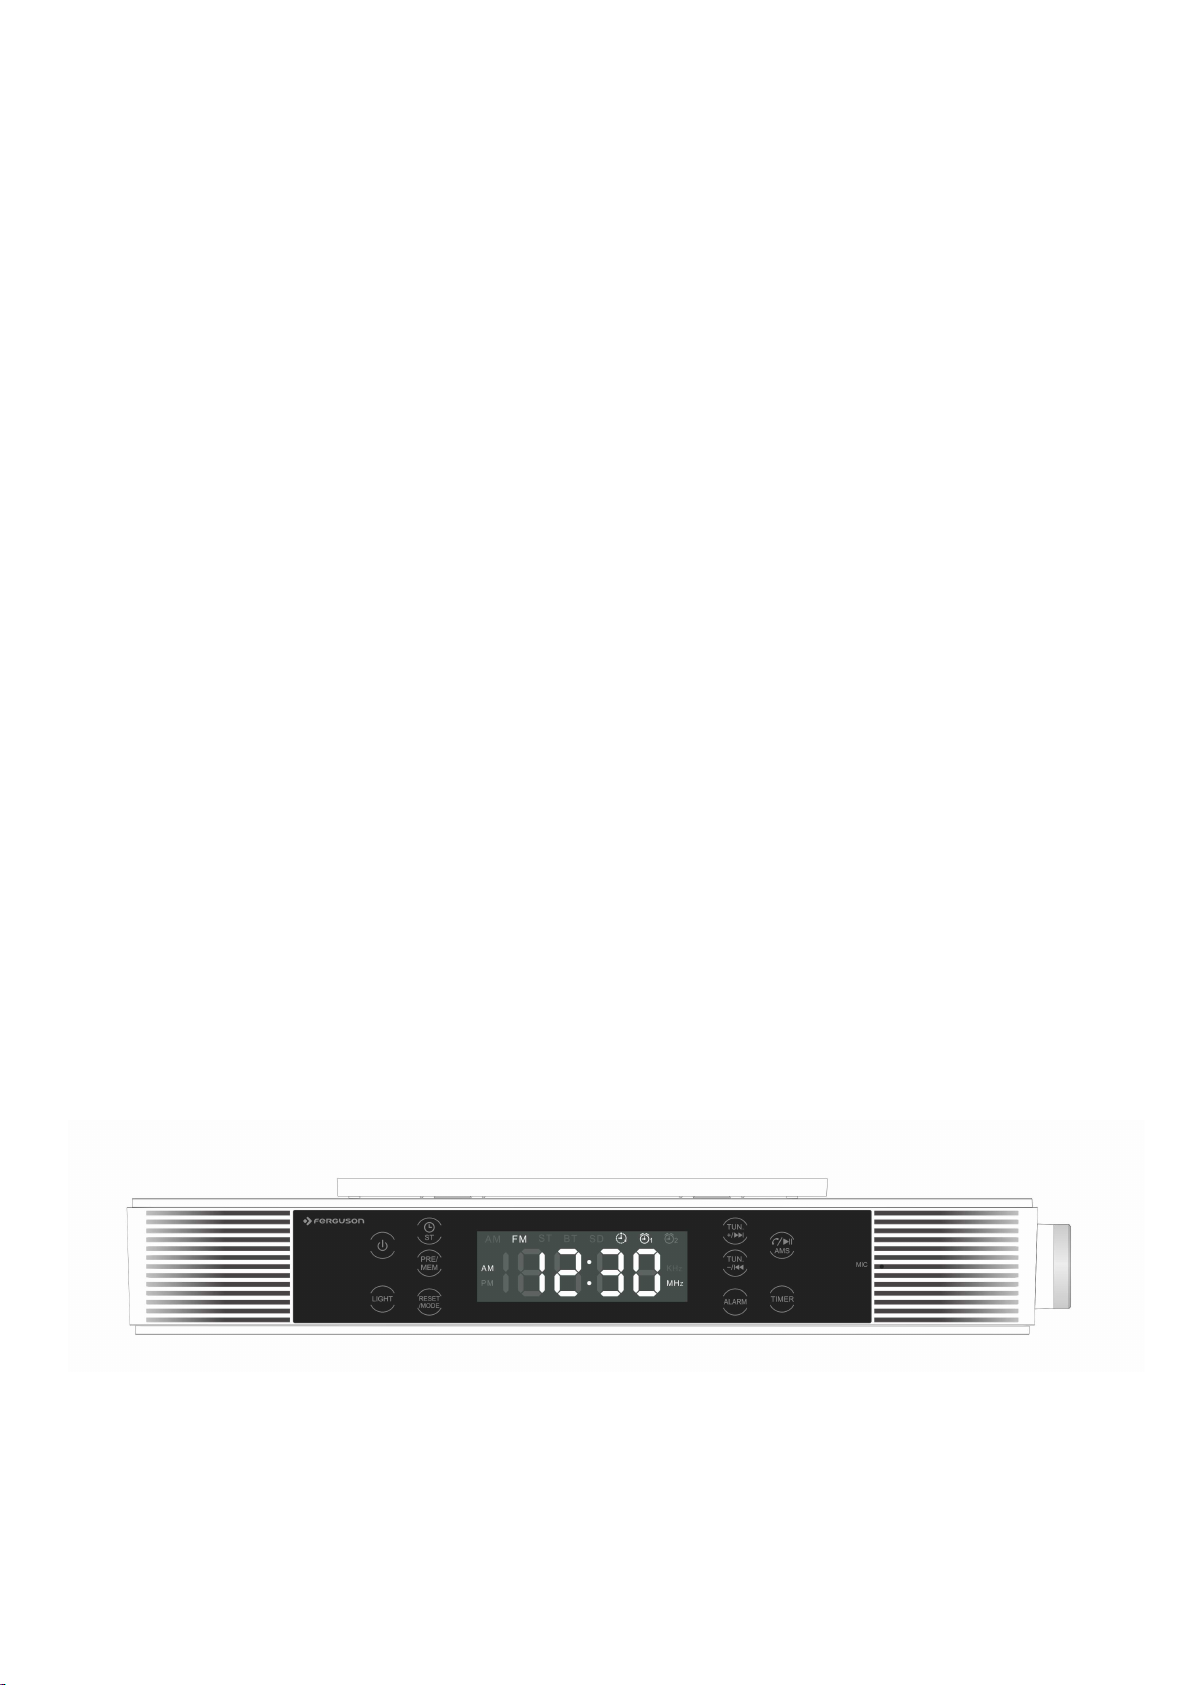
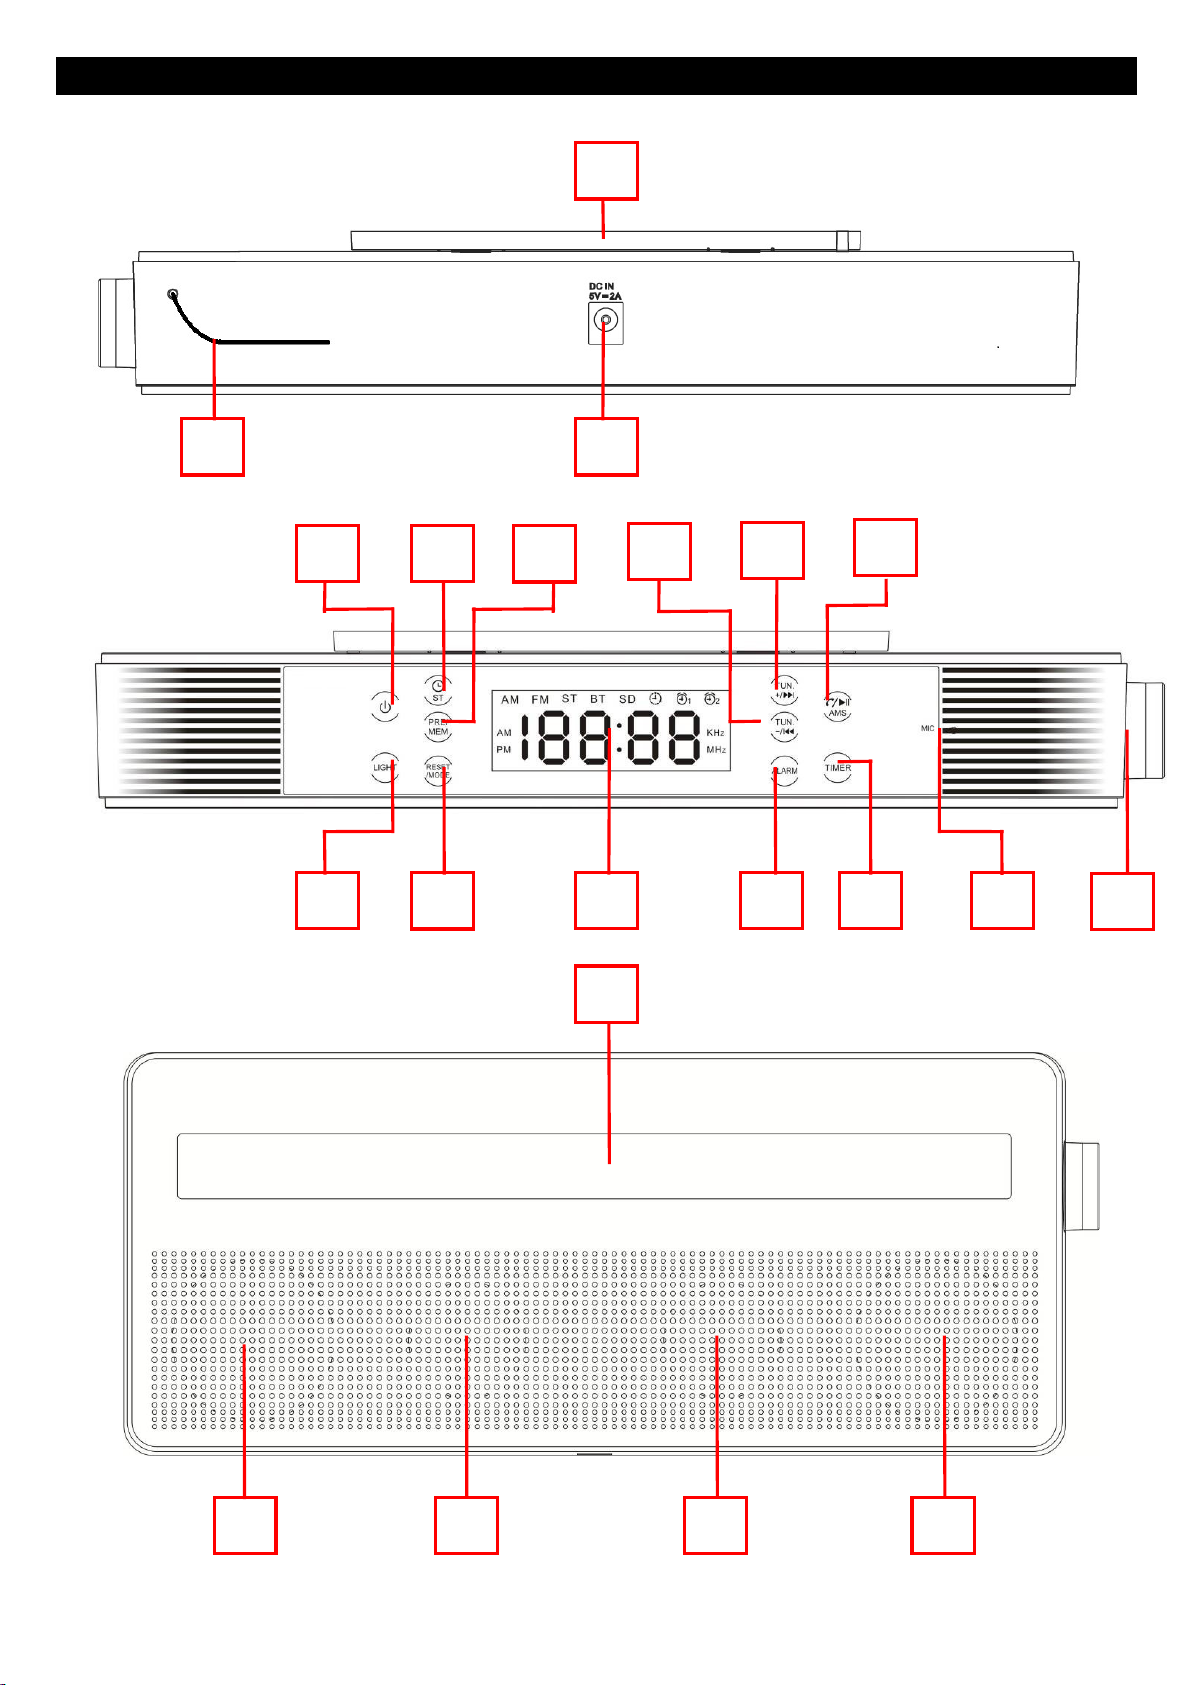
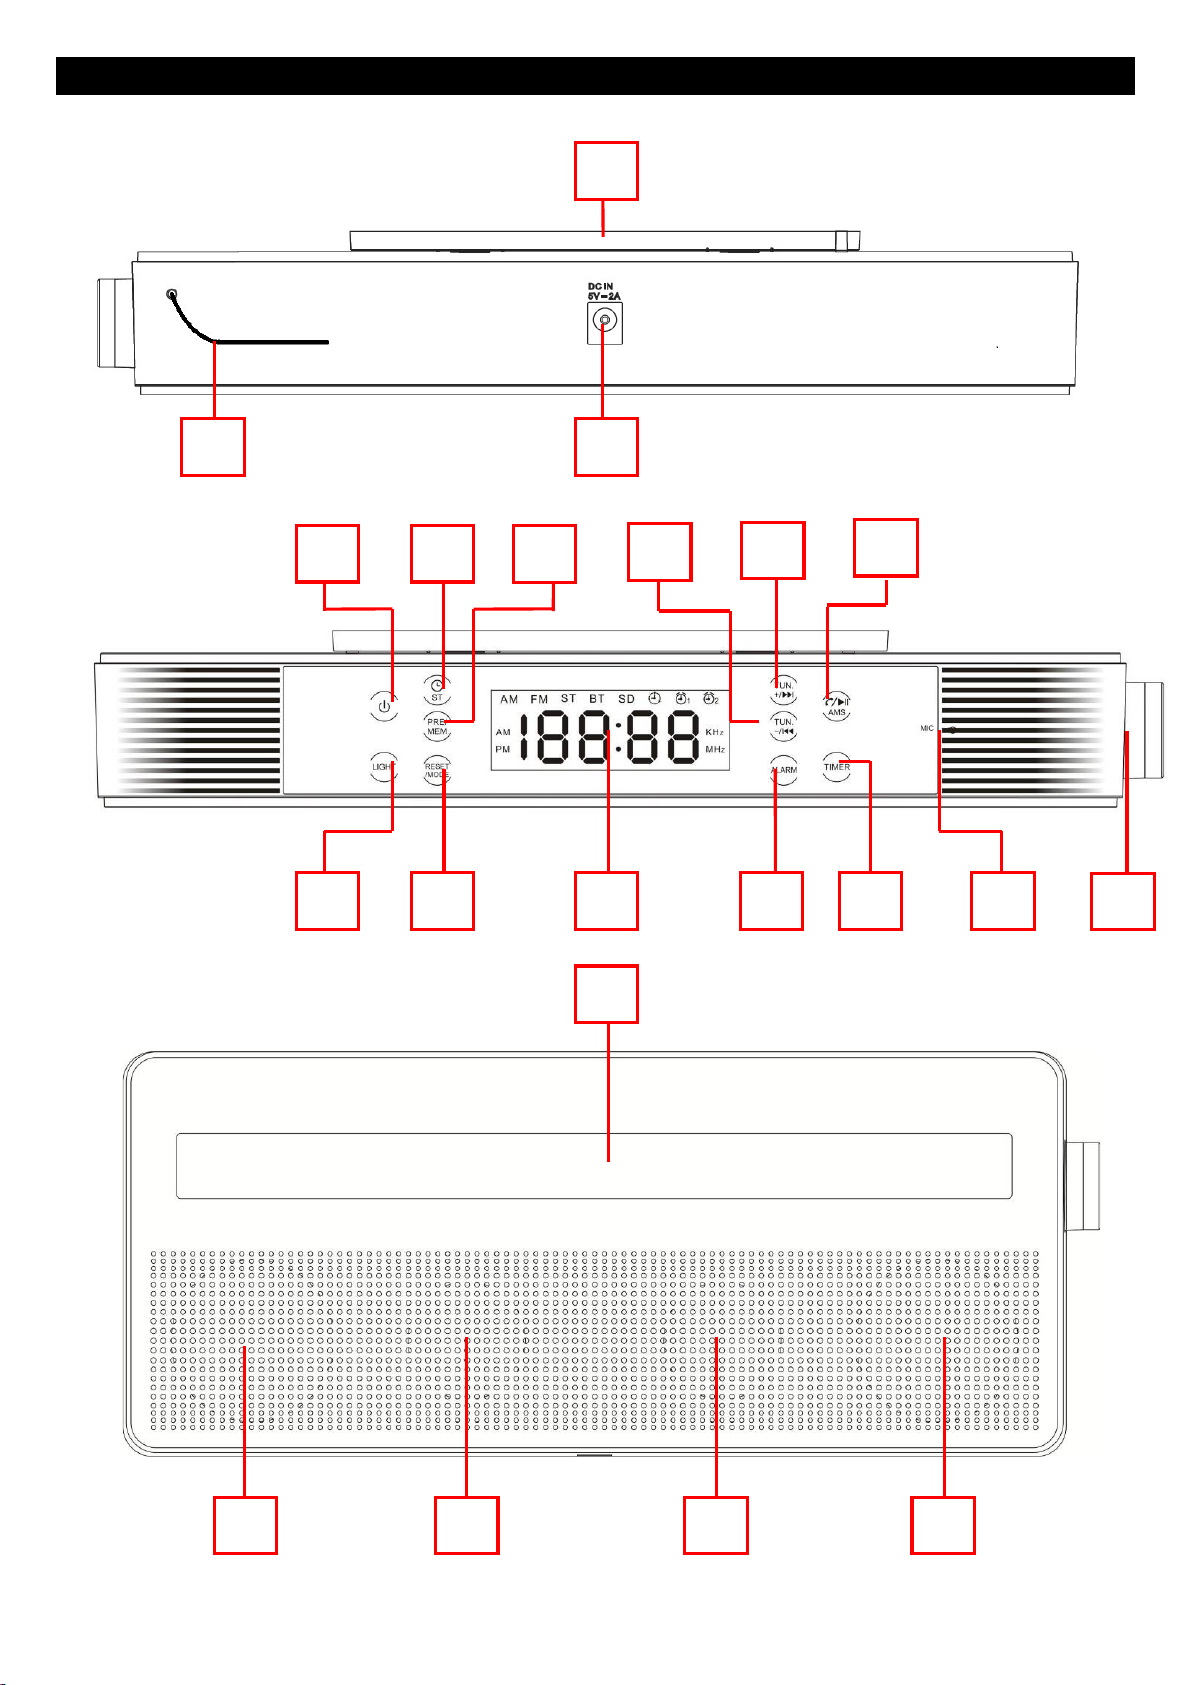
Wygląd i funkcje
2 3
4 5
1
8 7
6
9 13 14 15
10 11 12
18 19 20 21
16
17
4
Numer
Opis
[
1
]
Otwór do mocowania uchwytu
[
2
]
Przewodowa antena FM
[
3
]
Gniazdo zasilania
[
4
]
Przycisk
(włącz/wyłącz)
[
5
]
Przycisk
/ ST
(ustawianie zegara
|
FM Stereo włącz/wyłącz)
[
6
]
Przycisk PRE / MEM
(zapisz/przywołaj stację)
[
7
]
Przycisk LIGHT
(włącz/wyłącz LED)
[
8
]
Przycisk RESET/MODE
(reset
|
zmiana trybu FM
-
Bluetooth)
[
9
]
Wyświetlacz LCD
[
10
]
Przycisk TUN
/
[
11
]
Przycisk TUN
/
[
12
]
P
rzycisk
/
/AMS
(Odbierz-zakończ-ostatnio wybierany | play-pauza | Auto Memory
Stations)
[
13
]
Przycisk ALARM
(dla ustawiania
alarmu
1/2)
[
14
]
Przycisk TIMER
(dla ustawiania minutnika)
[
15
]
Mikrofon
[
16
]
Pokrętło regulacji
(
/
, wybierz
|
drzemka)
[
17
]
Diody LED
(9 białych diod LED)
[
18
]
Lewy głośnik
[
19
]
Pasywny system wzmocnienia niskich tonów
-
lewy
[
20
]
Pasywny system wzmocnienia niskich tonów
-
prawy
[
21
]
Prawy głoś
n
ik
4.
P
ierwsze kroki
a. Używaj tylko dedykowanego zasilacza
K12S050200G (DONGGUAN GUANJIN ELECTRONICS TECHNOLOGY CO., LTD)
b. Pierwsze uruchomienie
Podłącz 5.5 mm wtyczkę do gniazda zasilacza [3] umieszczonego na tyle
urządzenia. Urządzenie jest wyposażone w funkcję automatycznej
synchronizacji czasu na podstawie danych RDS, która zadziała po każdym
podłączeniu go do zasilania. Podczas nie dłuższej niż 3 minuty inicjalizacji na
wyświetlaczu pojawi się:
Jeśli dane RDS są wystarczającej jakości, pojawi się aktualna godzina
w formacie lub
Jeśli nie ma tych danych bądź sygnał jest zbyt słaby, pojawi się “00:00”.
Wówczas należy ustawić czas samodzielnie.

5
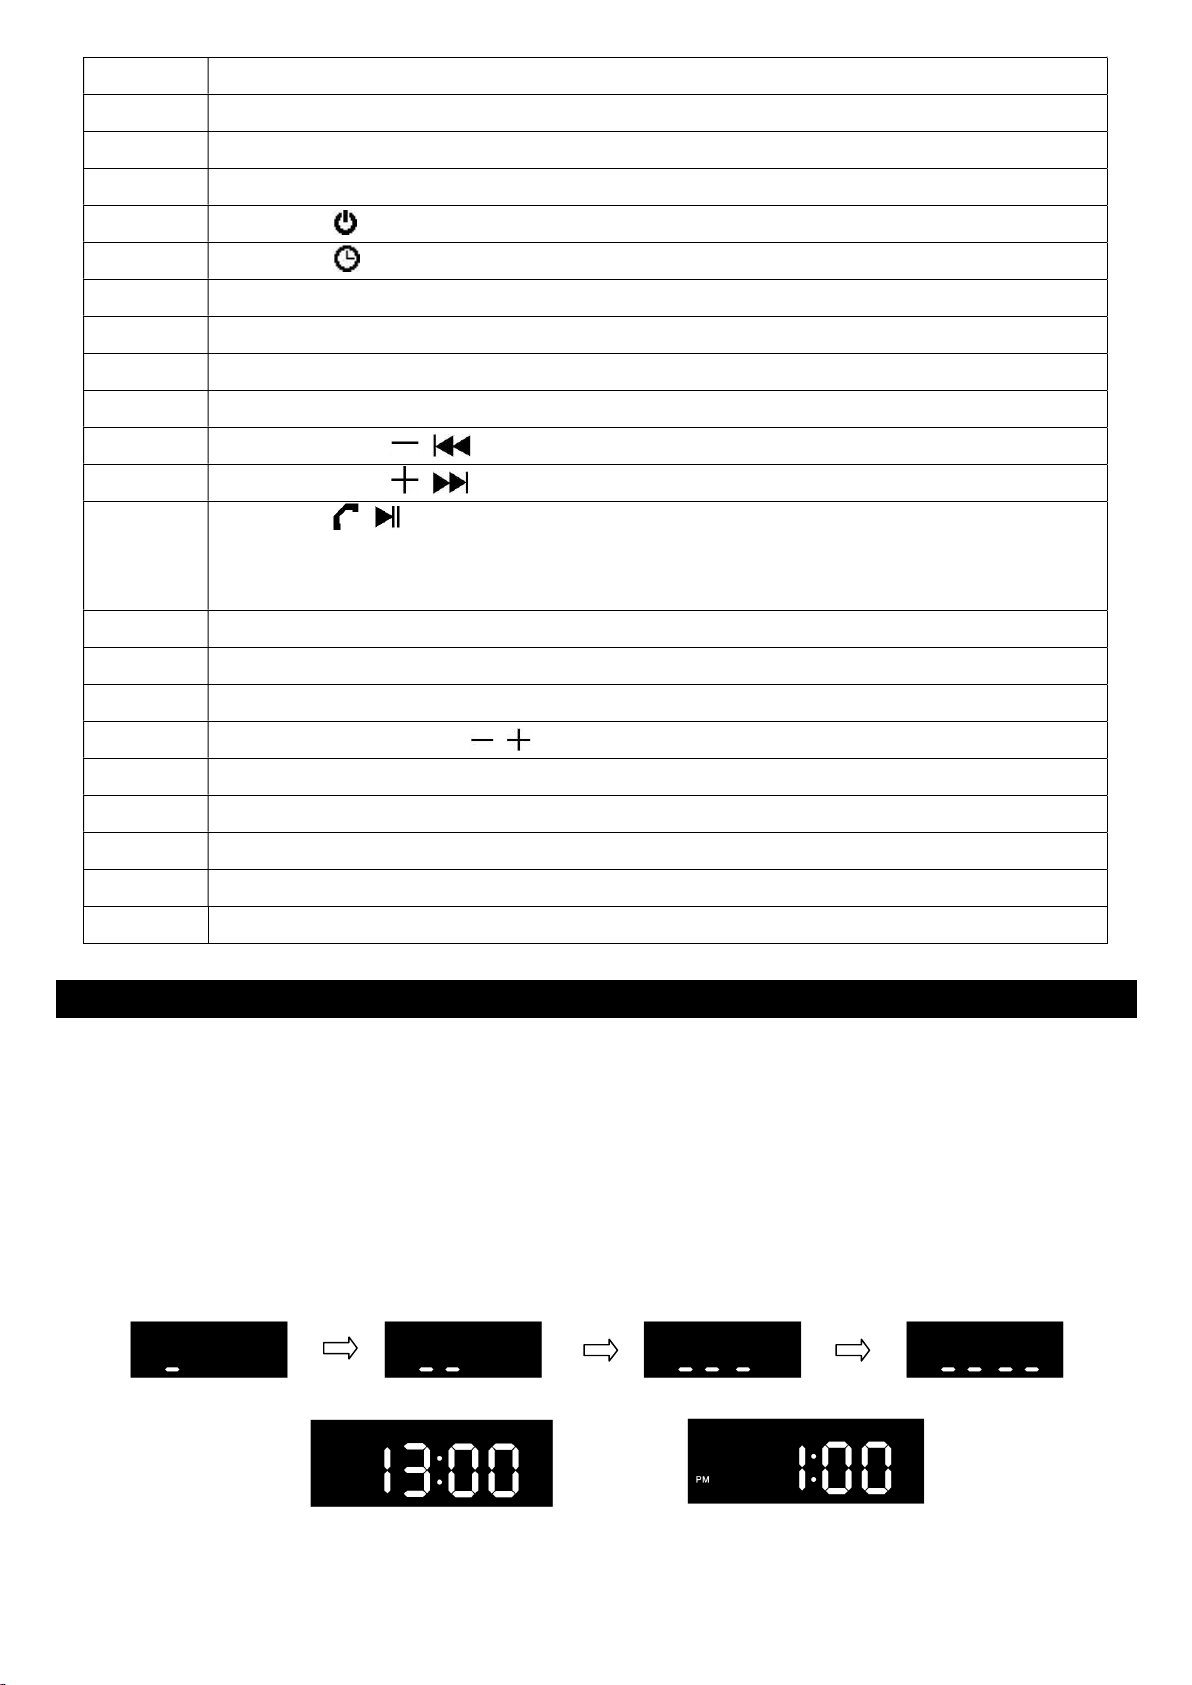
c. Ręczne ustawienia czasu
Po naciśnięciu “ /ST”[5] na wyświetlaczu będzie przez 6 sekund migać
“24H” lub “12H” - pożądany format wybieramy za pomocą pokrętła [16].
Naciśnij pokrętło – zatwierdzisz format i przejdziesz do ustawiania godziny:
obracając pokrętłem ustaw godzinę, którą następnie zatwierdź
naciśnięciem go. Analogicznie postąp z ustawieniem minut.
Po zatwierdzeniu minut (również pokrętłem) włącz lub wyłącz funkcję
automatycznej synchronizacji czasu (“Ct On” - rekomendowana, codzienna
synchronizacja o godzinie 2 w nocy lub “Ct OF”).
Ustawianie czasu jest zakończone, a na wyświetlaczu jest widoczny zegar.
5.
Ustawianie Alarmów
a. Ustawienie czasu Alarmu
Naciśnij “ALARM”[13], by na wyświetlaczu zaczęło migać - ALARM 1.
Ponowne naciśnięcie “ALARM”[13] przełączy na - ALARM 2 (kolejne
będą przełączać między alarmami).
Naciskając pokrętło przejdziesz do ustawienia czasu danego alarmu. W tym
celu postępuj jak przy ustawianiu zegara na wyświetlaczu (patrz punkt 4c)
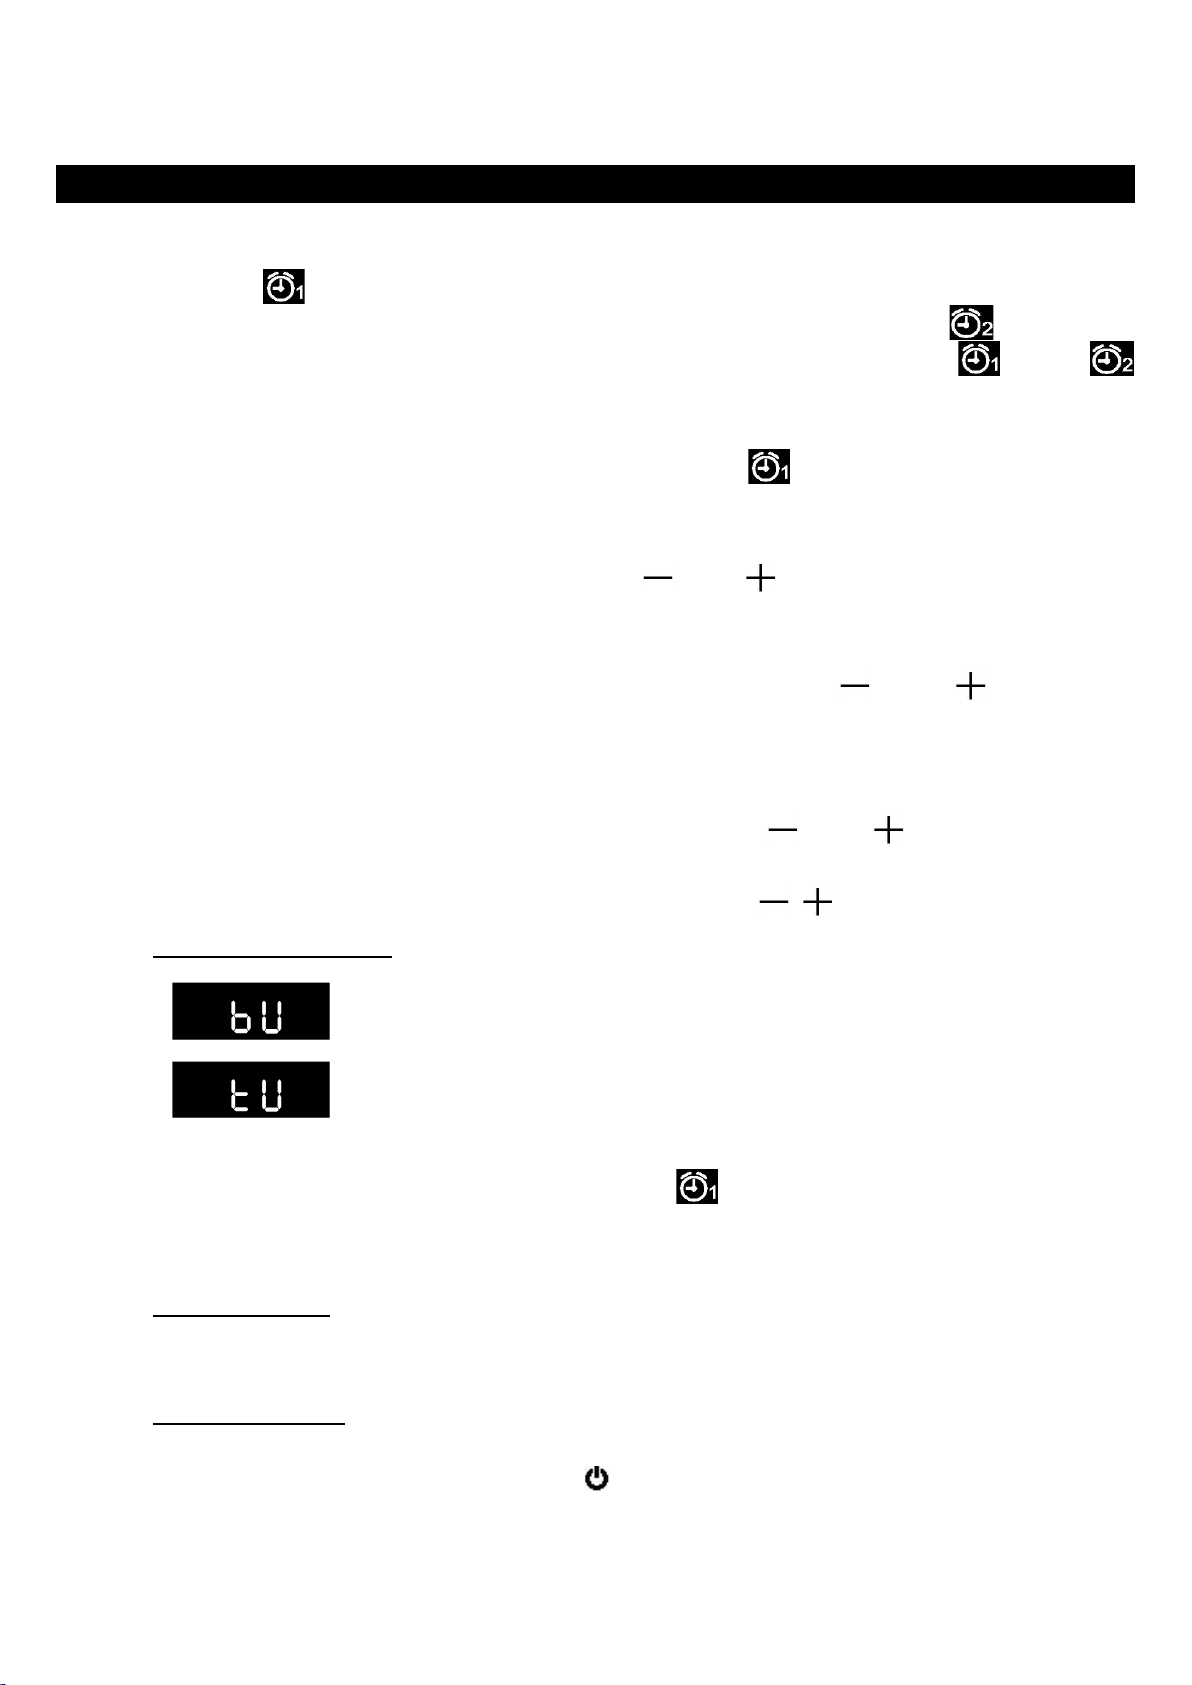
Po zatwierdzeniu czasu danego Alarmu, wybierz pokrętłem źródło dźwięku:
= brzęczyk – będzie działać przez 5 minut, wyłączysz go
naciskając “ALARM”[13]
= tuner – uruchomi ostatnio słuchaną stację radiową,
do wyłączenia użyj “ ”[4]
Po naciśnięciu pokrętła dany Alarm jest ustawiony, czego potwierdzeniem
jest pojawienie się na wyświetlaczu symbolu i/lub .
b. Drzemka
Jeśli podczas alarmu dźwiękowego naciśniesz znajdujące się z boku
pokrętło [16], urządzenie przejdzie w trwającą ok. 9 minut Drzemkę, a na
wyświetlaczu pojawi się ikona "Zz". Z Drzemki można skorzystać 3 razy dla
danego alarmu.
Uwaga: Po włączeniu urządzenia za pomocą przycisku wyłącza się
funkcję Drzemki.
c. Dezaktywacja alarmów
Krótko naciskając “ALARM”[13] wybierz alarm, który chcesz anulować (na
wyświetlaczu miga lub ), a następnie przytrzymaj “ALARM”[13]
dłużej, by dezaktywować wybrany Alarm.
d. Przywrócenie dezaktywowanego alarmu
Krótko naciskając “ALARM”[13] wybierz anulowany alarm, który ponownie
chcesz aktywować (na wyświetlaczu miga lub ), a następnie
przytrzymaj “ALARM”[13] dłużej, by aktywować wybrany Alarm.

6
6.
Minutnik
Po krótkim naciśnięciu “TIMER”[14] na wyświetlaczu zacznie migać symbol
i pojawi się “05” minut (wartość domyślna)
Używając pokrętła [16] ustaw wymagany czas – od 1 do 300 minut.
Zatwierdź naciskając krótko “TIMER”[14] lub pokrętło [16],
na wyświetlaczu pojawi się symbol .
Pozostały czas będzie wyświetlał się w cyklu: aktualny czas -> częstotliwość
radia -> pozostały czas.
Ostatnie 30 sekund ustawionego czasu będzie odliczane na wyświetlaczu
z dodatkową sygnalizacją dźwiękową.
Ustawiony minutnik wyłączysz poprzez przytrzymanie “TIMER”[14],
aż zniknie symbol .
7.
Oświetlenie
Oświetlenie z białych diod LED włączysz/wyłączysz naciskając “LIGHT”[7].
8.
Korzystanie z radia FM
a. Włączanie / wyłączanie urządzenia
Naciśnij krótko przycisk “ ”[4], by włączyć urządzenie i korzystać z radia.
Naciśnij krótko przycisk “ ”[4], by wyłączyć urządzenie (na wyświetlaczu
pojawi się zegar).
b. Używanie Radia FM
Upewnij się, że antena przewodowa FM jest w pozycji zapewniającej
wystarczającą moc sygnału radiowego.
Gdy po raz pierwszy korzystasz z funkcji radia FM, na wyświetlaczu pojawi
się częstotliwość 87,5MHz, a urządzenie jest gotowe do strojenia stacji.
Ostatnio używana częstotliwość kanału radiowego FM jest przywracana,
gdy przełączasz tryb pomiędzy FM i Bluetooth lub ponownie uruchamiasz
urządzenie.
Poziom głośności dopasujesz obracając pokrętłem [16].
Aby natychmiastowo wyciszyć radio, naciśnij “ / ” [12] - dźwięk zostanie
wyciszony, a na wyświetlaczu zacznie migać dotychczas słuchana
częstotliwość radiowa.
Po ponownym naciśnięciu “ / ”[12] radio wróci do wcześniejszego
poziomu głośności.
c. Ręczne strojenie radia
W trybie radia naciśnij krótko “TUN / ”[10], by obniżyć częstotliwość
o 0,1MHz lub “TUN / ”[11], by zwiększyć częstotliwość o 0,1MHz.
Jeśli przytrzymasz przez sekundę “TUN / ”[10] lub “TUN / ”[11]
radio wyszuka najbliższą częstotliwość, na której jest nadawana stacja
radiowa.
d. Ręczne tworzenie listy rozgłośni radiowych
Na częstotliwości stacji radiowej, którą chcesz dodać do swojej listy,
7
przytrzymaj “PRE/MEM”[6], aż na wyświetlaczu zacznie migać "P01".
Za pomocą “TUN / ”[10]/“TUN / ”[11] wybierz żądany numer
porządkowy (P--), pod którym dana częstotliwość zostanie zapisana.
e. Automatyczne zapisywanie stacji (AMS - Auto Memory Stations)
Na dowolnej częstotliwości w trybie radia FM przytrzymaj “AMS”[12].
Radio przejdzie w tryb AMS i zacznie wyszukiwanie od wyświetlanej
częstotliwości do 108Mhz, potem od 87,5MHz do pierwotnej.
Wyszukane częstotliwości zostaną zapisane w pamięci według kolejności
ich odnalezienia.
Użycie funkcji AMS spowoduje wykasowanie wcześniej zapisanych stacji.
Wyszukiwanie AMS zatrzyma się, jeśli wypełni całą listę (40 pozycji).
f. Przywołanie zapisanej stacji/zmiany na liście stacji
Na dowolnej częstotliwości FM naciśnij krótko “PRE/MEM”[6], a następnie
za pomocą “TUN / ”[10] lub “TUN / ”[11] znajdź wcześniej
zapisaną, pożądaną w danej chwili rozgłośnię.
Po wybraniu danej stacji na wyświetlaczu pojawi się częstotliwość, na której
jest nadawana.
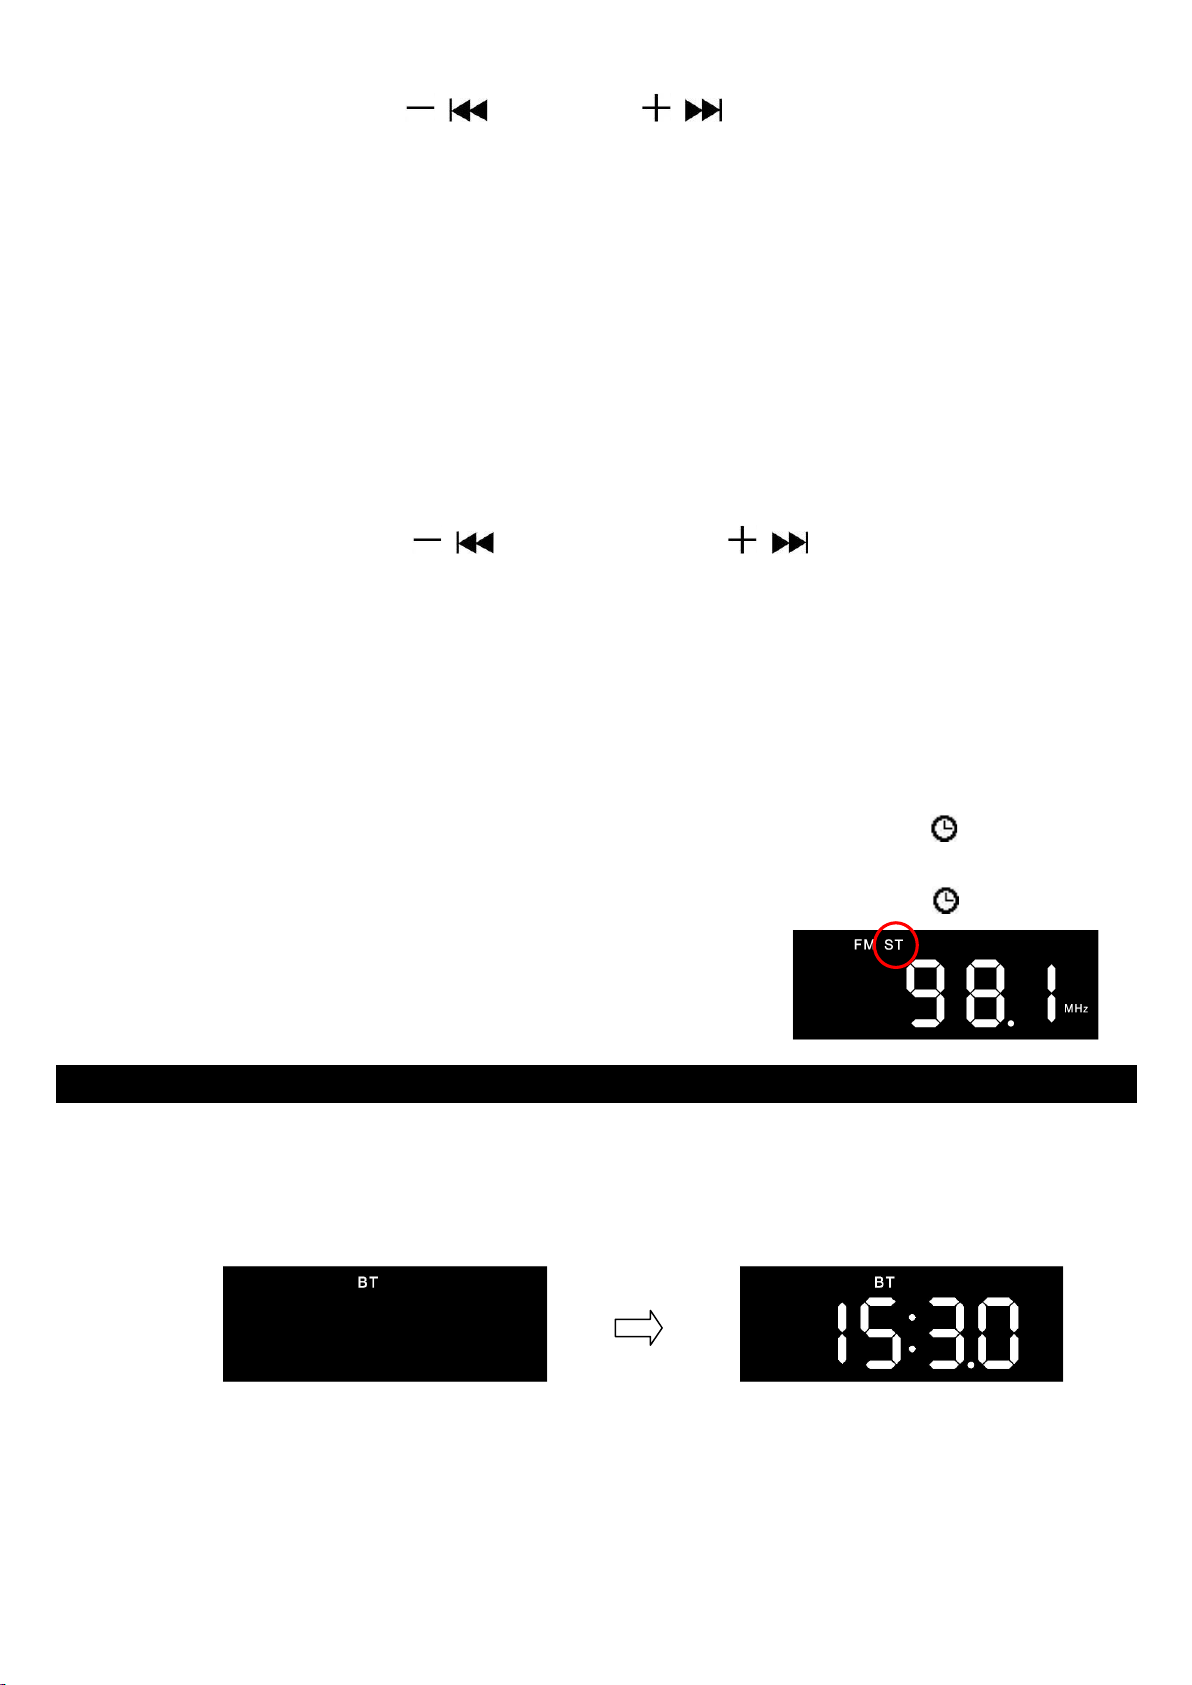
g. FM Stereo
Jeśli na danej częstotliwości otrzymujesz sygnał FM stereo, na wyświetlaczu
widoczne jest “ST”.
W przypadku pojawienia się na danej częstotliwości zakłóceń
stereofonicznych, możesz wyłączyć FM stereo naciskając “ /ST”[5] (“ST”
zniknie z wyświetlacza).
Aby przywrócić FM stereo wystarczy ponownie nacisnąć “ /ST”[5], a na
wyświetlaczu w ciągu 2 sekund pojawi się “ST”
9.
Bluetooth
a. Włącz/wyłącz tryb Bluetooth
Do trybu Bluetooth przejdziesz naciskając krótko “MODE”[8] w trybie FM
(potwierdzeniem będzie pojawienie się “BT” na wyświetlaczu);
Naciśnięcie “MODE”[8] w trybie Bluetooth spowoduje przejście do radia.
b. Parowanie urządzeń
Po włączeniu trybu Bluetooth urządzenie jest gotowe do parowania.
Uruchom Bluetooth w urządzeniu, które chcesz sparować (np. Smartfon)
i wyszukaj na liście dostępnych urządzeń Cucina, po wyborze którego w
ciągu kilku sekund powinno nastąpić prawidłowe sparowanie (jeśli
potrzebujesz PIN, wpisz 0000).

8
Jeśli parowanie zakończyło się sukcesem, radio wyda pojedynczy dźwięk,
a “BT” na wyświetlaczu przestanie migać i będzie stale wyświetlane.
Celem rozłączenia przytrzymaj “ / ”[12] aż do usłyszenia dwóch
dźwięków lub anuluj parowanie w drugim urządzeniu
Po rozłączeniu Cucina automatycznie rozpoczyna wyszukiwanie urządzenia
do sparowania (miga “BT”).
Po każdym uruchomieniu trybu Bluetooth zostanie podjęta próba
połączenia z ostatnio parowanym urządzeniem. Jeśli nie zostanie ono
odnalezione w ciągu kilku sekund, ponownie rozpocznie się proces
parowania.
Działające połączenie Bluetooth można przerwać przytrzymując “ / ”[12]
(potwierdzenie sygnałami dźwiękowymi i migającym “BT”).
c. Kontrola odtwarzania muzyki przez Bluetooth
Aby wstrzymać/wznowić odtwarzanie naciśnij “ / ”[12].
Kręcąc pokrętłem [16] w stronę “ ” zmniejszysz głośność (minimalna
wartość “U00”), zaś kręcąc nim w stronę “ ” zwiększysz ją (maksymalna
wartość “U30”).
Po naciśnięciu “TUN / ”[10] zostanie odtworzony poprzedni utwór, zaś
po naciśnięciu “TUN / ”[11] następny.
Możesz też obsługiwać muzykę w odtwarzaczu Twojego urządzenia
mobilnego.
d. Funkcja zestawu głośnomówiącego.
Jeśli podczas odtwarzania muzyki przez Bluetooth z Twojego smartfona ktoś
do Ciebie zadzwoni, usłyszysz dźwięk dzwoniącego telefonu, a odtwarzana
muzyka automatycznie się zatrzyma;
Krótkie naciśnięcie “ / ”[12] spowoduje odebranie połączenia, zaś długie
jego odrzucenie.
Ponowne krótkie naciśnięcie “ / ”[12] spowoduje zakończenie rozmowy
i wznowienie odtwarzania muzyki.
Wskazówka: Najlepszą jakość uzyskasz mówiąc bezpośrednio do mikrofonu
[15] z odległości 30-60cm.
e. Ostatnio wybierany numer
Aby zadzwonić pod ostatnio wybierany przez Ciebie numer, naciśnij
dwukrotnie “ / ”[12] (ponowne naciśnięcie rozłączy połączenie).
10.
Przywrac
anie Ustawień fabrycznych
Celem przywrócenia ustawień fabrycznych przytrzymaj przez 8 sekund
”RESET/MODE”[8]. Spowoduje to wykasowanie wszystkich danych
z pamięci urządzenia, po czym rozpocznie się proces inicjalizacji (patrz 4b).

9
11.
Instalacja wspornika
do montażu w kuchni
Proszę użyć dostarczonych śrub montażowych (4 sztuki w woreczku) i zainstalować
wspornik i jednostkę główną w następujący sposób:

10
12.
Rozwiązywanie problemów
Brak zasilania
-
Sprawdź, czy wt
yczki są prawidłowo zamontwane (jedna
w gnieździe sieciowym, druga w gnieździe zasilacza w
urządzeniu [3])
-
Sprawdź, czy w gniazdku sieciowym jest prąd.
Brak dźwięku
-
Sprawdź, czy poziom głośności znajduje się w niższej
pozycji na urządzeniu głównym lub urządzeniu mobilnym.
- Sprawdź, czy wybrałeś właściwe źródło sygnału.
- Upewnij się, że Twoje urządzenie Bluetooth znajduje się w
zasięgu efektywnego działania.
- Sprawdź, czy urządzenie Bluetooth jest sparowane z
urządzeniem mobilnym.
Brak stacji FM
Spr
awdź, czy stacja została prawidłowo zaprogramowana
.
Brak reakcji
Wyłącz i ponownie włącz urządzenie.
13.
Specyfikacja techniczna
Wymiary
270mm(
dł.
) x 112mm(
szer.
) x 48mm(
wys.
)
Jednostka główna (ze wspornikiem)
Waga
576g
Zegar
Alarm 1, Alarm 2
Źródło
dźwięku
:
brzęczyk lub radio FM
Minutnik
0 ~ 300 minu
t
Rodzaj a
larm
u
:
Brzęczyk
Bluetooth
Specyfikacja
V2.1
+
EDR
Obsługiwany profil
A2DP, AVRCP, HSP
zasięg pracy
do
10
m
Moc
Klasa
II
Radio FM Radio
Zakres
częstotliwości
87.5MHz
–
108MHz
Stereo
/ Mono
do wyboru
RDS
tylko aktualny czas (
CT
)
Pamięć stacji
maksymalnie
40
Antena
przewodowa
Wejście źródła zasilania
DC Input 5V
2
A
Audio
Moc wyjściowa
2.7W (RMS) x 2 (4 Ohm)
Pasmo przenoszenia
od
80Hz
do
18
k
Hz
Temperatura pracy
0
-
40
˚C

11
User’s Manual
Model: Ferguson Regent Cucina
Bluetooth Kitchen Clock Speaker
with
PLL FM Radio
Dual Alarm
Cooking Timer

12
1.
Cautions
Safety Instructions
Do not place open flames (e.g. candles) near the product.
Do not place objects filled with liquids, such as vases on or near the product.
Do not use or store this product exposed to direct sunlight, heat, excessive dust
or vibration.
Do not keep or store this product in wet conditions for long period.
Do not clean this product with water or other liquids.
Do not expose to dripping or splashing.
Do not block or cover the slots/holes of the product.
Do not place foreign objects into the slots/holes of the product.
Do not attempt to open this product yourself. There are no user serviceable
parts inside.
Do not allow access to children.
Before using this product, read and follow all warnings and instructions.
This product is intended for household use only and not for commercial or
industrial use.
Make sure the unit is adjusted to a stable position. Damage caused by using
this product at unstable position or by failure to follow any other warning or
precaution contained within this user manual will not be covered by warranty.
Use only the AC-DC Power Adapter originally attached to the product.
Never remove the casing of this apparatus.
Never place this apparatus on the other electrical equipment.
We suggest retaining the package in case for future transport of the product.
2.
Disclaimer
Updates to Firmware and/or hardware components are made
regularly. Therefore some of instructions, specifications and pictures in
this documentation may differ slightly from particular situation. All items
described in this guide for illustration purposes only may not apply to
particular situation. No legal right or entitlements may be obtained from
the description made in this manual.
13
3.
Outlook and Controls
2 3
4 5
1
8 7
6
9 13 14 15
10 11 12
18 19 20 21
16
17
14
No.
Description
1
Bracket Mounting Slot
(for s
lide
u
nit
i
nt
o
u
nder
k
itchen
b
racket)
2
FM Wire Antenna
3
DC INPUT Socket
(for DC 5V 2A Power Input)
4
Button
(Power ON/OFF)
5
/ST Button
(Clock Set |
FM Stereo On/Off)
6
PRE
/MEM Button
(Preset Station
|
Memory Station)
7
LIGHT Button
(Light On/Off
)
8
RESET/MODE Button
(
Reset |
FM/Bluetooth)
9
LED Segments Display
10
TUN
/
Button
11
TUN
/
Button
12
/
/AMS
Button
(Pick up/Hang up call/Last dialed |Play/Pause | Auto Memory
Stations)
13
ALARM Button
(Set for Alarm 1/2)
14
TIMER Bu
tton
(Set for Coo
king Timer)
15
MIC Position
(for hand
-
free)
16
Adjustment Button
(
/
, Enter/Snooze)
17
LED Light Bar
(White LED x 9)
18
Left Loud Speaker
19
Left Bass Radiator
20
Right Bass Radiator
21
Right Loud Speaker
4.
First Time
Connect to AC
-
DC Power Adapter
a. Use only original AC to DC power adapter:
Manufacturer: DONGGUAN GUANJIN ELECTRONICS TECHNOLOGY CO., LTD
Model: K12S050200G
INPUT: 100-240 50 / 60Hz 0.35A
OUPUT: 5V 2A
Note: Symbol is AC Voltage and Symbol is DC Voltage.
b. Connect DC power from AC to DC power adaptor:
Plug the 5.5 mm DC plug of provided AC to DC power adapter into “DC
INPUT Socket (3)” which is located on the back of Bluetooth Kitchen clock
device;
c. Device first time initializing (system defaulted):
Since the device has been designed with “Auto Clock Time Sync” function
from received RDS station(s) which included CT signal, when power is
connected to the device each time, the device will start initialization
automatically when you unplug and plug the power adaptor (including AC
power temporary suspend from power supply station).

15
When the device is in initializing stage, then you will see LED segments to
display as animation showed below:
This stage should last for about 2-3 minutes to complete;
Then the clock time will be showed on LED segment display for view (CT
sync and adjust automatically);
or
The clock time may not be adjusted if those background received FM
station(s) have no RDS’s CT signal provided or RDS signal’s strength is too
low (in this case the clock should show “00:00”);
d. Manual clock set adjustment methods:
Shortly press the “ /ST (5)” button to entry time format set;
The LED display will show blinking “24H” or “12H” for 6 seconds (factory
defaulted is “24H”);
Rotate the “Adjustment (16)” button to “ ” or “ ” to select the expected
time format;
Shortly press the “Adjustment (16)” button to confirm the time format set
and go for hour set. Hour will be blinking;
Rotate again the “Adjustment (16)” button to “ ” or “ ” to select hour
time as current time;
Shortly press again the“Adjustment (16)”button to confirm hour time set
and go for Minute set. Minutes will be blinking;
Rotate again the “Adjustment (16)” button to “ ” or “ ” to select the
minute time as current time and shortly press the “Adjustment (16)”
button to confirm the minute time set and go for CT on/off set. The “Ct On”
or “Ct OF” will be blinking;
Rotate again the “Adjustment (16)” button to “ ” or “ ” to select the “Ct
On” or “Ct OF” as you expect;
Shortly press again the“Adjustment (16)”button to confirm;
The clock set adjustment is completed and clock time shows LED display.
Information for CT on/off function:
By design, the Bluetooth Kitchen Clock Speaker will sync once the clock
time at 2:00 (AM) by every midnight. This function is to keep the clock time
up-to-date.
The CT function for clock’s time sync can be turn off and on as you
16
required, however clock’s time cannot be sync and update when it is in
disabled mode.
5.
Set Alarm 1 / Alarm 2 and
Wake
-
U
p
funct
ion
a. Alarm time set:
Shortly press “ALARM (13)” button to entry the alarm set function, Alarm 1
symbol ( ) will be blinking;
Then shortly press “ALARM (13)” button again to switch to when you
want (shortly press this button to switch in between and
repeatedly).
Set Alarm 1:
Shortly press “ALARM (13)” button to choose ;
Then shortly press “Adjustment (16)” button to confirm and go to set
alarm’s hour, which will be blinking;
Rotate “Adjustment (16)” button to “ ” or “ ” to select required hour of
Alarm 1. Shortly press “Adjustment (16)” button to confirm and go to set
minutes of Alarm 1. Minutes will be blinking;
Then again rotate “Adjustment (16)” button to “ ” or “ ” to select
required minute of Alarm 1 and shortly press “Adjustment (16)” button to
confirm and go to choose wake-up source. The “bU” letters will be blinking
on LED segments display;
Rotate “Adjustment (16)” button to position “ ” or “ ” to choose “bU”
or “tU” as you want. The wake-up source could switch from “bU” to “tU”
repeatedly if you continually rotate button to “ / ”;
Wake-up source
= Buzz (Beeps)
= Tuner (Current selected FM Radio station)
Shortly press “Adjustment (16)” button to confirm “bU” or “tU”.
The Alarm 1 settings are completed and icon is shown on LED display.
Use the same methods to set the Alarm 2 function if you required.
b. Wake-Up Function:
Wake to Buzz
At the selected Alarm time, the wake-up beeps will turn on for 5 minutes.
To stop the Alarm, shortly press “Alarm (13)” button.
Wake to Radio
At the selected Alarm time, the FM radio will automatically turn on itself. To
stop the FM radio, shortly press “ (4)” button to turn off the device.
c. Dual Alarm time set:
Repeat the above mentioned set Alarm 1 methods to set Alarm 2 for dual
alarm function if you required.
17
d. Use Snooze:
At the time of wake-up beeps in sound, you can shortly press “Adjustment
(16)” button for approximately 9 minutes extra sleep if you required. The
“Zz” icon will appear to identify.
Snooze function can be repeated 3 times for one Alarm.
Remark: When you turn on the device by button it will disable the snooze
function if snooze is in use.
e. To disable the Alarm 1 and/or Alarm 2 function:
Shortly press “ALARM (13)” button to call alarm function, the Alarm 1
symbol ( ) will blink;
Shortly press “ALARM (13)” button again to choose alarm to disable;
In or blinking status, press long “ALARM (13)” button to disable the
chosen Alarm.
Disable alarm function will work only when the Alarm 1 and/or Alarm 2
have been set and in use.
f. To enable the disabled Alarm 1 and or Alarm 2:
For Alarm 1:
Shortly press “ALARM (13)” button to call alarm function, the symbol
will be blinking and the previous time set will display at the same time;
Then press long the “ALARM (13)” button to enable the Alarm 1 function
which is disabled.
For Alarm 2:
Shortly press “ALARM (13)” button to call alarm function, the symbol
will be blinking;
Then shortly press “ALARM (13)” button again to switch to Alarm 2, the
symbol will be blinking and the previous time set will display at the same
time;
Then press long “ALARM (13)” button to enable the Alarm 2 function which
is disabled.
6.
Set Cooking Timer
Shortly press “Timer (14)” button to entry the countdown timer mode, the
LED display will switch from current mode to timer display mode. The timer
symbol will be blinking and showing “05” minutes on LED display; (5
minutes is system default running time when timer is chosen);
Then rotate “Adjustment (16)” button to “ ” or “ ” to set your required
time for cooking timer (1-300 minutes can be set);
Shortly press “Timer (14)” or “Adjustment (16)” button to confirm and the
display will switch back to previous mode screen. The Timer symbol ( )
appears for indication and the Cooking Timer is activated;
The last 30 seconds of setting time will be countdown on display with beep
every second until time is up;
The remaining time of the timer will be circulating display by “time -> radio

18
frequency -> timer time” repeatedly on LED screen.
To disable the Timer function:
Press long “Timer (14)” button to disable function and the symbol will
disappear of LED screen.
7.
Kitchen Light ON/OFF
Shortly press the “Light (7)” button to turn on the kitchen light bar.
Shortly press the “Light (7)” button again to turn off the kitchen light bar.
Information for Kitchen light function:
- For food demonstration.
- It is not suitable for household room illumination.
8.
Power ON/OFF
a. Power ON and OFF:
Shortly press “ (4)” button to power on the device and use FM radio from
clock display mode (the FM radio mode will start first as system default);
In power on mode, shortly press “ (4)” button to power off.
b. Use FM Stereo Radio:
Make sure that the FM wire antenna is well adjusted and fixed at good
position; it will increase radio reception.
Adjust Volume Level
Rotate “Adjustment (16)” button to “ ” to decrease volume.
Rotate “Adjustment (16)” button to “ ” to increase volume.
FM Mute
In you want to mute the radio sound for a while, shortly press the “ /
(12)” button. The sound will be muted and the FM radio frequency will be
blinking to identify.
Shortly press “ / (12)” button to resume.
FM Station
The first time use the FM radio function; the frequency 87.5MHz will show
on LED segments display and wait for tuning radio stations;
Last used radio channel frequency will be recall for FM radio, when you
switch mode in-between the FM mode and Bluetooth mode, or power off
and on the device.
c. Manual Tune Radio Frequency:
In FM radio mode press “TUN / (10)” or “TUN / (11)” button to
step frequency down or up to receive next station, each press will step
down or up the frequency by 0.1MHz;
Press “TUN / (10)” or “TUN / (11)” button quickly to change radio
frequency of radio station;
Press long “TUN / (10)” or “TUN / (11)” button for 2 seconds to
entry manual searching mode. This mode allows to keep tuning down/up
and stop until next radio station frequency is received.
19
d. Manual Store for Tuned Radio Frequency into Preset Memory:
Press long “PRE/MEM (6)” button, the preset “P01” will appear and will be
blinking on display;
Press shortly “TUN / (10)” or “TUN / (11)” button to choose
preset number (P--) where to store the tuned radio’s frequency;
Choose “P30” for example, then shortly press again the “PRE/MEM (6)”
button to confirm the storage and the screen will switch back to current
radio’s frequency from preset mode.
e. Auto Memory Stations (AMS):
In FM receive mode press longly “AMS (12)” button to entry Auto Memory
Stations function;
The device will start searching up from current radio frequency (e.g.
90.3MHz) to a circle of FM frequency range (e.g. from 90.4MHz to 108MHz
and then from 87.5MHz ~ 90.2MHz), those received FM stations
frequencies will be saved and programmed into preset list;
The current receiving radio frequency (e.g. 90.3MHz) will become preset
“P01”.
Note:
- All previous preset radio frequencies will be erased when you use the AMS
function.
- The AMS function will stop automatically if preset number “P01 ~ P40” are
renew and fully programmed.
f. Recall and Change Preset Number:
In current receiving radio frequency, shortly press “PRE/MEM (6)” button,
preset number will be recalled for 3 seconds;
Shortly press “TUN / (10)” or “TUN / (11)” button to choose your
desired preset number (P01 – P40) for radio listening;
The LED display will switch back from preset screen to chosen radio
frequency screen.
Choose preset number at any time you want by the above steps.
g. Turn FM Stereo Function OFF/ON
The receiving FM radio station may have FM stereo switching noise due to
poor reception or strong interferences. Turn off the FM stereo function to
improve this issue when it happens.
While receiving FM station is in provided FM stereo broadcasting, then the
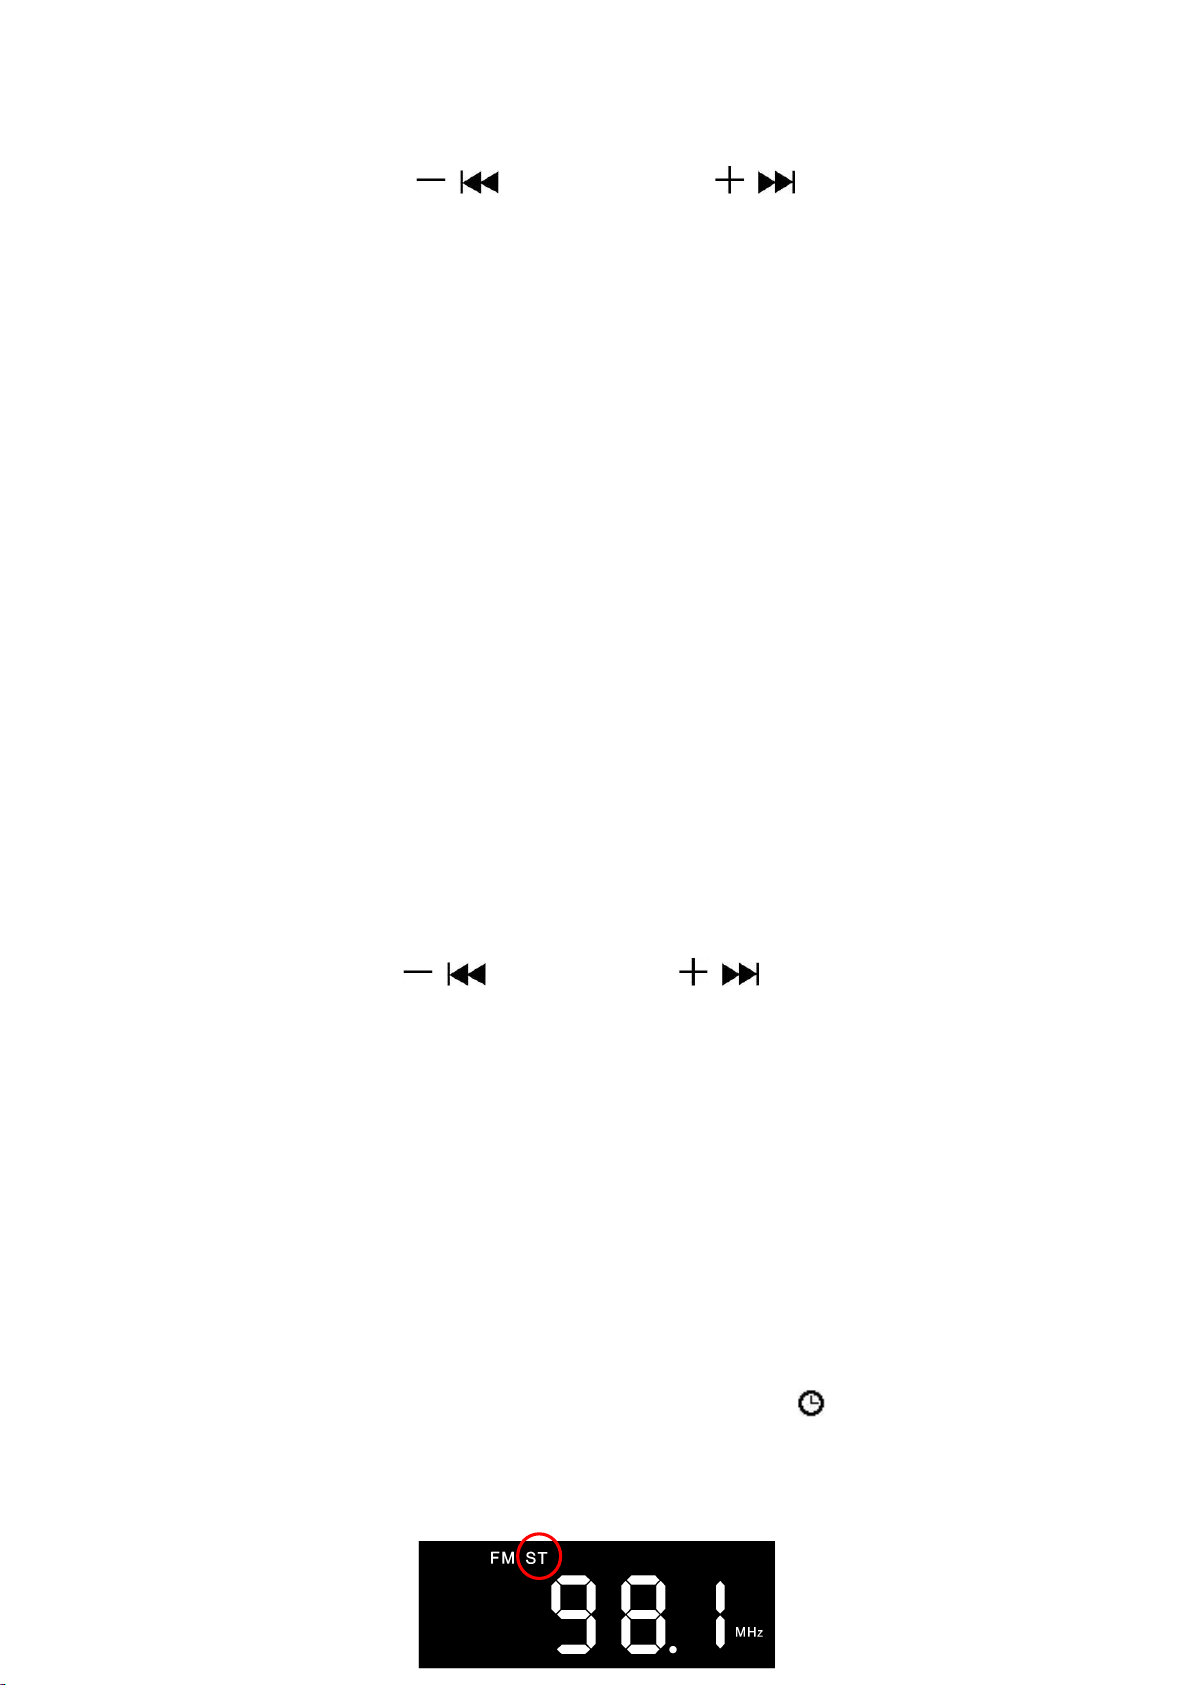
“ST” indicator should appear at the top line of LED segments display (see
below picture);
To turn off the FM stereo function shortly press “ /ST (5)” button and the
“ST” icon will disappear.
Press it again shortly to turn on the FM stereo function, the FM stereo
function will turn on and the “ST” symbol will appear in 2 seconds.

20
9.
Use Bluetooth Mode
a. Switch between Bluetooth and FM mode:
Shortly press “MODE (8)” button to change from FM to Bluetooth mode.
The screen will switch to Bluetooth mode and the “BT” icon appears.
Shortly press “MODE (8)” button to switch in-between Bluetooth and FM
mode.
b. Bluetooth device Pairing:
When switched to Bluetooth mode, the device will try to reconnect/pairing
mode automatically;
Activate the Bluetooth function in your Bluetooth device (such as Mobile
Phone or Personal Computer); the device will enter Bluetooth searching
mode automatically. If not, tap the related selection to manually. Enter
search mode (refer to your device’s manual when necessary).
Your mobile device should show “Cucina” on Bluetooth list, and then
select it for pairing. Wait few seconds to see connected message on your
mobile device. (For some Bluetooth devices you may need to input “0000”
as pairing password).
If pairing is successful, a beep will sound and the “BT” icon light change to
solid. Now you can start playing music from mobile device by it’s music
player program.
To disconnect hold “ / (12)” until you hear two beeps or cancel pairing
in the other device.
After disconnection Cucina will automatically start searching for the device
to be paired with ("BT" will be blinking).
Each time you start Bluetooth mode, Cucina will attempt to connect to the
last paired device. If it is not found within a few seconds, the pairing
process will start again.
The active Bluetooth connection can be interrupted by holding “ / (12)”
(confirmation by sound signals and blinking "BT").
c. Bluetooth Music Playing Controls
On your Mobile Device
Switch to music player menu and choose music to start playing from
playlist or by using “ / ” button/icon. Play/Pause music by using “ /
” button or icon.
Adjust the volume level by using the device’s volume control “Down / Up”
button/icon on your Bluetooth device (refer to your mobile device user’s
manual when necessary).
Table of contents
Languages:
Other Ferguson Speakers manuals


