SE Audiotechnik C6 User manual

中文
EN
D
32
THANK YOU FOR CHOOSING
.
We are happy to be the solution for your sound reinforcement needs with our professional loudspeaker
systems. The system you have purchased is based on more than 20 years of experience as a speaker
manufacturer and more than 40 years as a speaker developer. It is the sum of German precision and
Chinese eciency that guarantees a high-quality and reliable SE AUDIOTECHNIK product.
Please, take the time to carefully read this manual and follow its instructions. It will allow you to get
the most out of your product under safe operating conditions and suggest some care instructions
leading to long-term endurance. Keep this manual in a safe place for further reference!
If you nd any mistakes or have further questions or suggestions, please contact us at
info@se-audiotechnik.de.
For more information about SE AUDIOTECHNIK products, visit our website www.se-audiotechnik.de.
There you will also nd the latest updates to manuals, rmware and technical documents for additional
support.
© Copyright by 2022. All rights reserved.
The content of this document is subject to change without prior
notice to improve reliability, function, design or otherwise.

中文
EN
D
54
IMPORTANT SAFETY INSTRUCTIONS 6
PACKAGE CONTENTS 11
INTRODUCTION 12
Features 12
Intended use 13
C6 elements 13
QUICK START GUIDE 14
Precautions 14
Assembly 15
Minimum audience distance 16
USER INTERFACE 17
Rear Panel 17
Control panel: connectivity 18
Control panel: controls and indicators 19
Wiring 20
BLUETOOTH®22
C6 STEREO SETUP 23
SPECIFICATIONS 24
Technical Specications 24
Mechanical Drawings 25
MANUFACTURER'S DECLARATIONS 26
LIST OF CONTENTS

中文
EN
D
IMPORTANT SAFETY INSTRUCTIONS
76
IMPORTANT SAFETY INSTRUCTIONS
GRAPHICAL SYMBOLS IN THIS MANUAL
Symbol for important safety information related with the risk of electric shock.
Symbol to alert the user about important operating or maintenance instructions.
Symbol for important concepts and information for a better understanding of the
functioning of the product.
Symbol for practical tips and ideas useful to ensure the correct use of the product
and improve its operation.
Symbol for an interdiction, which you must follow.
Symbol for conrmation. Example or guide for secure and correct setup.
Make sure that the result corresponds to what is described in this manual.
The products described in this manual have been engineered and manufactured to ensure your personal
safety. However, IMPROPER USE CAN RESULT IN POTENTIAL ELECTRICAL SHOCK, FIRE HAZARD
AND OTHER HEALTH RISKS. Always follow the basic precautions listed here to avoid the possibility
of serious injury or even death from electrical shock, short-circuiting, damages, re or other hazards.
These precautions include, but are not limited to, the following items in this chapter.
CAUTION
RISK OF ELECTRONIC SHOCK
DO NOT OPEN
GRAPHICAL SYMBOLS IN THE PRODUCT
The lightning bolt triangle is used to alert the user to the risk of electric shock.
The exclamation point triangle is used to alert the user to important operating or
maintenance procedures and instructions.
The CE mark indicates the conformity with the relevant EU directives for safety,
health and environmental protection. See the Manufacturer's Declaration section.
The CCC mark indicates the conformity with the relevant Chinese directives for safety,
health and environmental protection.
The RCM mark indicates the conformity with the relevant Australian and New Zealand
requirements for electrical safety, EMC, EME and telecommunications compliance.
THE SGS certication mark indicates conformity with applicable American and
Canadian standards.
Symbol indicating that the equipment is for indoor use only.
Symbol for conformity with Directive 2002/96/EC and Directive 2003/108/EC of the
European Parliament, on waste electrical and electronic equipment (WEEE).

中文
EN
D
IMPORTANT SAFETY INSTRUCTIONS
98
ELECTRICAL SAFETY PRECAUTIONS
DO NOT EXPOSE ANY OF THIS EQUIPMENT TO RAIN OR MOISTURE, DRIPPING OR
SPLASHING LIQUIDS. OBJECTS FILLED WITH LIQUIDS, SUCH AS VASES, SHOULD
NOT BE PLACED ON THIS APPARATUS.
TO REDUCE THE RISK OF ELECTRIC SHOCK, DO NOT ATTEMPT TO OPEN ANY PART
OF THE UNIT. THERE ARE NO USER-SERVICEABLE PARTS INSIDE. REFER SERVICING
TO QUALIFIED SERVICE PERSONNEL.
EQUIPMENT DESCRIBED IN THIS MANUAL REQUIRE AC POWER SUPPLY. TO COMPLETELY
DISCONNECT THEM FROM THE AC MAINS, DISCONNECT THE POWER SUPPLY CORD PLUG
FROM THE AC RECEPTACLE. THE MAINS PLUG OF THE POWER SUPPLY CORD SHALL
REMAIN READILY OPERABLE.
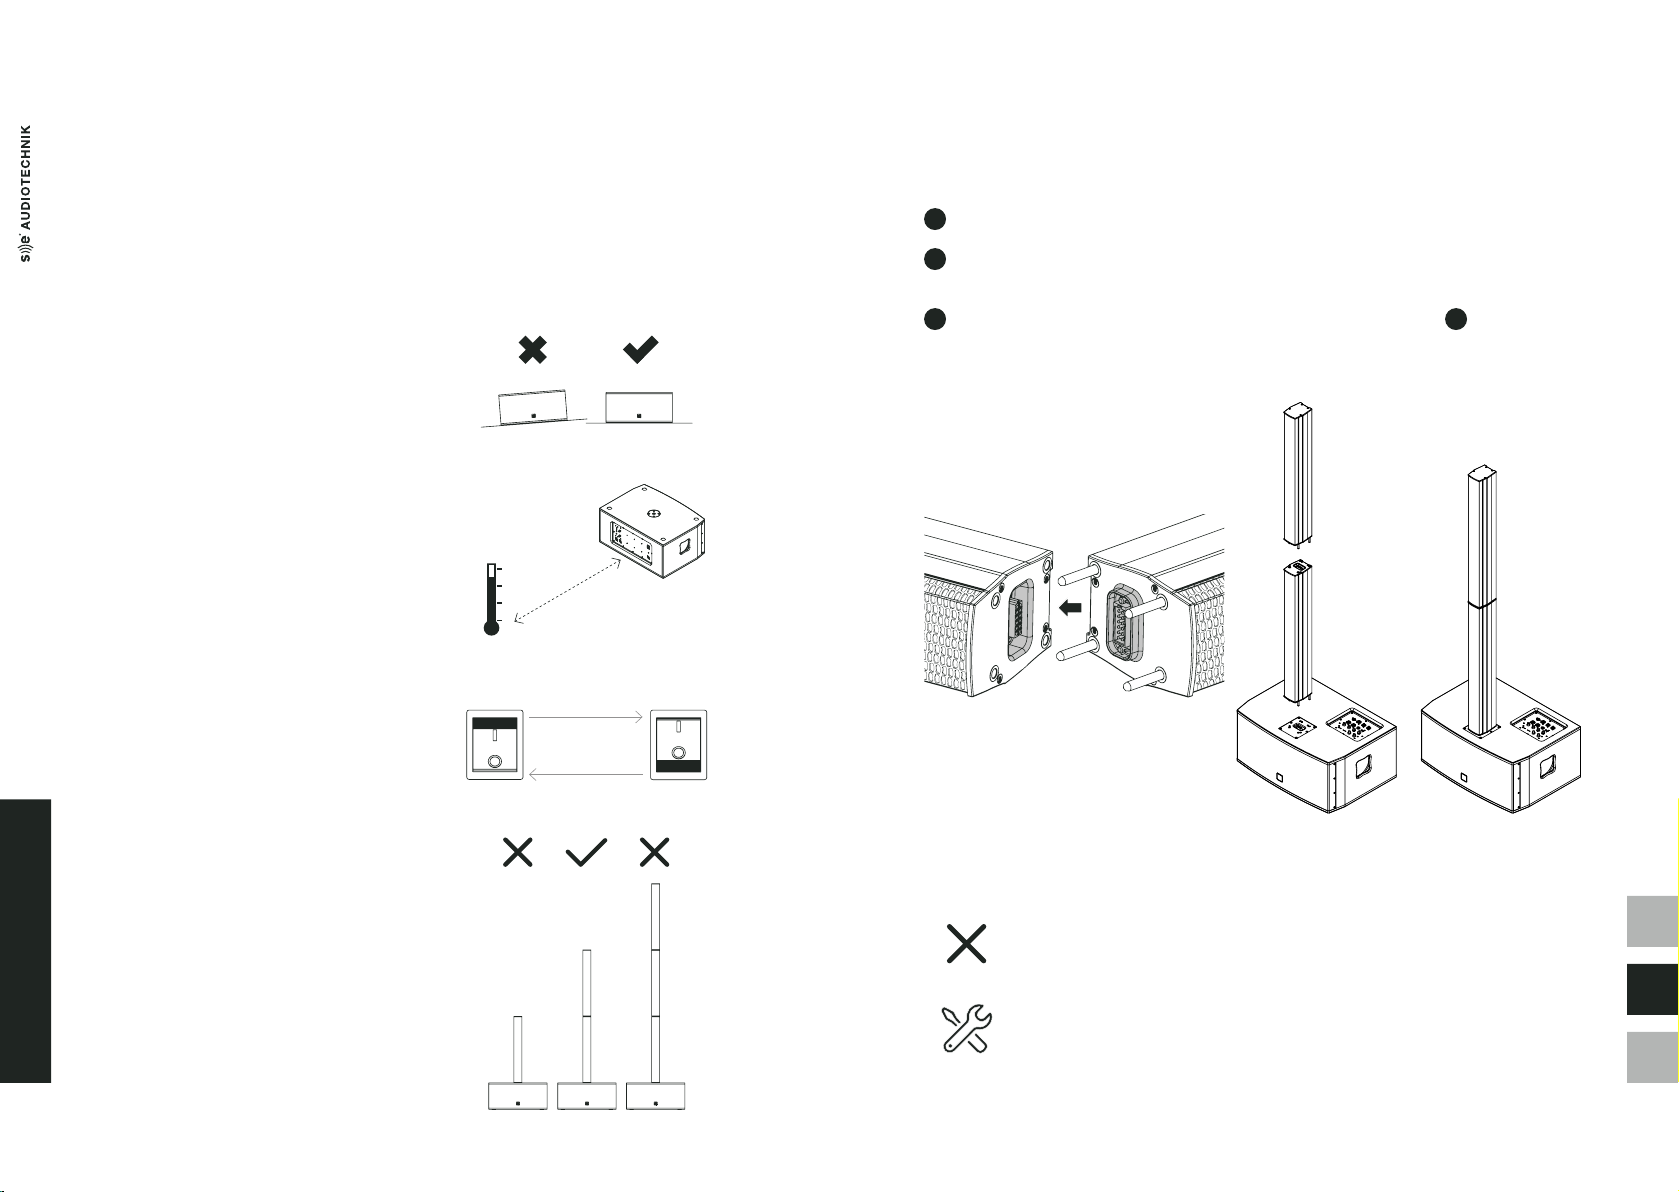
OVERHEATING PRECAUTIONS
DO NOT PLACE THIS PRODUCT IN DIRECT SUNLIGHT OR NEAR ANY HEAT SOURCE TO
PREVENT OVERHEATING. PROTECTION MAY BE APPLIED AND POWER WILL BE REDUCED
UNTIL THE TEMPERATURE RETURNS TO SAFE VALUES. THE SYSTEM MAY SHUT DOWN IF
MAXIMUM OPERATING TEMPERATURE IS PERMANENTLY EXCEEDED. ALWAYS ENSURE
PROPER AIR CIRCULATION AND PROVIDE SUFFICIENT SHADE. OVERHEATING MAY CAUSE
DAMAGES AND LEADS TO POTENTIAL ELECTRICAL SHOCK, FIRE HAZARD AND OTHER
HEALTH RISKS.
NOISE EXPOSURE PRECAUTIONS
PRODUCTS DESCRIBED IN THIS MANUAL CAN RADIATE HIGH SOUND PRESSURE LEVELS
(SPL), WHICH CAN LEAD TO IRREVERSIBLE HEARING DAMAGE. SE AUDIOTECHNIK
RECOMMENDS TO RESPECT THE TIMES OF EXPOSURE TO HIGH SPL.
Noise level (dBA) 85 94 97 112 127
Max. recommended exposure
time per 24 hours 8 hrs. 1 hr. 30 min. 56 sec. 1 sec.
Noise exposure recommendations according to US National Institute for Occupational Safety and Health (NIOSH).
IMPORTANT SAFETY INSTRUCTIONS
1. Keep these instructions and head all warnings.
2. Read and Follow thoroughly all instructions.
3. Use the product only for the purpose intended by the manufacturer.
4. Use the product only if you are familiar with the product and its application.
5. Observe applicable rules and regulations at the place of use.
6. Do not use this apparatus near water.
7. Clean only with a dry cloth. Disconnect the device from the AC outlet before cleaning.
Do not use paint thinners, solvents, cleaning uids, or chemical-impregnated wiping cloths.
8. Do not block any ventilation openings.
9. Install in accordance with the manufacturer's instructions.
10. Do not install near any heat sources such as radiators, heat registers, stoves or other apparatus
(including ampliers) that produce heat.
11. Do not defeat the safety purpose of the grounding-type plug. A grounding-type plug has two blades
and a third grounding prong. The third prong is provided for your safety. If the provided plug does
not t into your outlet, consult an electrician for replacement of the obsolete outlet.
12. Protect the power cord from being walked on or pinched particularly at plugs,
convenience receptacles, and the point where they exit from the apparatus.
13. Unplug this apparatus during lightning storms or when unused for long periods of time.
14. Use the mains plug to disconnect the apparatus from the mains.
15. If the equipment has been exposed to strong uctuations in temperature (for example, after
transport), do not switch it on immediately. Moisture and condensation could damage the
equipment.
16. Keep away from objects which may be impaired by an external magnetic eld. To avoid the
damage of equipment such as computers, video monitors and magnetic data carriers, they
should be located at least 1 meter away.
17. Only use safety pins, attachments, accessories and adapters specied and/or provided by the
manufacturer.
18. Servicing must be done by qualied service personnel only. This is required when the product has
been damaged in any way, such as liquid has been spilled or objects have fallen into the apparatus,
power-supply cord and plug damages, the apparatus has been exposed to rain or moisture, does
not operate as intended, or has been dropped.
19. Do not insert your ngers, hands or any other objects into any gaps or openings of the device.
20. When this product reaches its end of life, take it to a collection point designated by local authorities.
The separate collection and recycling of your product at the time of disposal will help conserve
natural resources and ensure that it is recycled in a manner that protects human health and
environment.

中文
EN
D
PACKAGE CONTENTS
1110
SPECIFIC SETUP & OPERATION SAFETY INSTRUCTIONS
1. This product is NOT intended to be suspended on chains or ropes.
2. Do NOT use handles or other methods to suspend the system, serious injuries can be the result!
3. Make sure that the equipment is installed securely and cannot fall down.
4. Do not cover the metal panel at the rear side of the subwoofer, as it serves as a heat sink for the
system amplier. Keep a minimum distance of 50 cm to any other object for sucient airow.
PACKAGE CONTENTS
The packaging of the C6 SELF-POWERED COLUMN SYSTEM includes:
- 1 Array Column
- 1 Support Column
- 1 Subwoofer
- 1 AC power cord with powerCON® connector
- 1 Manual
- 1 QC PASS card
- 1 Warranty card
Figure 1. C-Line C6
Please inspect your product packaging before
unboxing it. If it has been damaged during shipping,
unbox the product and check for any visual damage
before using it. Notify the shipping company imme-
diately and contact your SE AUDIOTECHNIK dealer
or support center for help and assistance.
Finally, save the shipping carton as evidence for the
possible claim, which can be requested only by you.
We also recommend to keep all the packing materials
and contents for transportation and storage.

中文
EN
D
INTRODUCTION
1312
INTRODUCTION
The C6 self-powered column system is an expandable PA or monitor system with versatile connectivity
and direct control via the built-in mixer. This column speaker system with its elegant and unobtrusive
design delivers a great sound for speech and music reproduction at small and medium-sized venues and
installations with an audience of up to a few hundred listeners. C6 provides a variety of audio inputs, such
as Bluetooth®, Mic, Line and Hi-Z.
The subwoofer enclosure features two 10" woofers and serves as a stable base for the columns.
The column consists of six 3.5" full-range drivers and two co-axial 3.5" speakers with 0.5" compression
drivers. Three ampliers with a total power of 1,500 W and an integrated DSP allow this versatile system
to deliver up to 126 dB SPL. With the carefully selected and crafted speakers, the C6 column system
provides a frequency range from 50 Hz up to 21 kHz.
The C6 column system can be extended with the C6 SE subwoofer and congured as a stereo system
by connecting a second C6 unit.
Figure 2. C-Line C6 and C6 SE
FEATURES
- Self-powered column system
- Plug & Play setup
- Build-in mixer
- Bluetooth® audio streaming
- Mono or Stereo conguration
- Suitable for PA or monitor applications
- Elegant and unobtrusive design
- Digital signal processing
- Expandable with dedicated subwoofer (C6 SE)
The C6 is a professional plug and play column speaker system for indoor use. The modular structure and
the possibility to set up a mono or stereo conguration and to extend the system with additional dedicated
subwoofers, makes the C6 suitable for PA, monitoring and install applications.
C6 ELEMENTS
1
8x 3.5" Midrange speakers
2x 0.5" Compression drivers
coaxially mounted with waveguide on two
of the 3.5" speakers
2
Multi-pin connectors
Quick and easy setup without any additional wiring.
3
Built-in mixer and amplier
Audio inputs and audio outputs with dedicated level
adjustment.
System settings.
Class-D amplication with 48 kHz/24-bit DSP and a
toal of 1,500 W.
4
2x 10" Subwoofers
Symmetric bass-reex design.
INTENDED USE
Figure 3. C-Line C6 elements.
1
2
4
3

中文
EN
D
QUICK START GUIDE
1514
1 Place the subwoofer at the desired location.
2 Slide the support column's metal pins in the four corresponding slots located at the subwoofer's top.
The multi-pin connectors will couple automatically.
3 Plug the array column in the support column similar to the instructions of step 2.
Figure 5.
C-Line C6 pins connectors.
Figure 4a.
C-Line C6 system assembly.
Step 2 and step 3.
Figure 4b.
Assembled
C-Line C6 system.
QUICK START GUIDE
This guide briey describes the main steps of setting up C6 self-powered column system.
PRECAUTIONS
The subwoofer of C6, as well as the subwoofer
extension C6 SE must be placed on level ground,
standing on its rubber feet.
Ensure adequate cooling during operation
with a minimum distance of 50 cm between
the subwoofer's back panel and other objects
such as walls.
Temp.
0.5 m
Always turn on the C6 system last and turn it
o rst to avoid damaging the speakers.
POWER POWER
Turn ON last
Turn OFF rst
Never assemble the system with other than
the intended two C-Line C6 columns.
ASSEMBLY
Do not wobble the columns too strongly during assembly or disassembly, as this may
cause damage to the product.
The metal pins and their slots are precisely tting. You might nd it hard to plug and
unplug the columns at rst, but this will become easier over time.

中文
EN
D
USER INTERFACE
1716
A C
MINIMUM AUDIENCE DISTANCE
3-4 m
1.2 m
Figure 6. C-Line C6 minimum distance to audience.
The ear level height of seated audiences is around 1.2 m in average. In the setup shown
above the recommended min. distance between the C6 system and the listeners should
be no less than 3-4 meters.
USER INTERFACE
REAR PANEL
Figure 7. C-Line C6 rear panel.
A PRODUCT SERIAL NUMBER
This code helps to identify your product. This code is also required for customer support.
B POWER SWITCH
Turns the system on/o.
ON OFF
C powerCON® SOCKET
Plug in the mains cable here. To lock the connector, twist it clockwise.
B

中文
EN
D
USER INTERFACE
1918
CONTROL PANEL: CONNECTIVITY CONTROL PANEL: CONTROLS AND INDICATORS
D BLUETOOTH® 4.0 AUDIO
Enables pairing of Bluetooth® devices.
E MP3
3,5 mm TRS jack
Input for mobile playback devices, like MP3
players, smart phones, tablets.
F HI-Z
6,5 mm TS jack
Input for high impedance sources, like electric
guitars or acoustic guitars with pickups.
G LINE IN RIGHT/LEFT
XLR-3/6,35 mm TRS combo jack
Input for line level signals.
L SUB LEVEL
Adjusts the subwoofer volume relative to the
main volume.
M MAIN LEVEL
Adjusts the total system volume.
N MAIN INDICATORS
ON LED
Green color, indicates that the system is turned on.
SIGNAL LED
Green color, ashes according to the input
signal level.
LIMIT LED
Red color, indicates that the DSP limiter is
working.
PROTECT LED
Indicates that the system has shut down
to protect its components from damage.
The amplier output is muted automatically.
O SYSTEM MODE
MONO LED
Green color, indicates the system is running
in mono mode.
STEREO LED
Green color, indicates the system is set up
in stereo mode.
SYSTEM PUSH BUTTON
Press this button to toggle between mono
and stereo mode.
H MIC IN
XLR-3/6,35 mm TRS combo jack
Input for dynamic microphones.
I TO C6SE
XLR-3
Processed line out to connect a subwoofer
extension.
J SYSTEM OUT
XLR-3
Mode dependent line out. In MONO mode,
L/R signal is summed. In STEREO mode,
only the R signal is output.
K LINE
RCA jacks
Input for unbalanced playback sources.
D E F H L M N O
KJI
G
Figure 8. C-Line C6 control panel connectivity.
Figure 9a. C-Line C6 control panel.

中文
EN
D
USER INTERFACE
2120
P BLUETOOTH®
BLUETOOTH LED
A constant blue color indicates operation.
A ashing blue color indicates active pairing mode.
HOLD TO LINK
Push this button for pairing or cancelling an active
Bluetooth® connection.
S LINE
Adjusts the Line input level.
Q MP3/BT
Adjusts the 3.5 mm jack and Bluetooth® signal
levels at the same time.
R HI-Z
Adjusts the Hi-Z input level.
T MIC
Adjusts the microphone input level/Gain.
Figure 9b. C-Line C6 control panel.
Q R S TP
WIRING
C-Line self-powered systems use powerCON® connectors for the mains power.
Figure 10 shows how to plug-in and connect these wires.
powerCON® IN powerCON IN
L
N LL N
N
powerCON® OUT powerCON OUT
Connection Wiring Scheme
L
N
2
1
2
1
Figure 10. PowerCON® plug-in and wiring scheme.
1 Plug in the powerCON® cable connector into the powerCON® chassis connector.
2 Turn the powerCON® cable connector clockwise until it is locked.
Additionally, they use XLR-3 connectors to input and pass audio signals. They follow the plug-in and
conguration scheme below:
XLR-3 IN
Connection
Click
XLR-3 OUT
Click 2 11 2
3 3
XLR-3 IN XLR-3 OUT
Wiring Scheme_Cable
Shield HotHot Shield
Cold Cold
Figure 11. XLR-3 plug-in and wiring scheme.
C-Line self-powered systems are also equipped with COMBO-connectors for certain signal connections.
These connectors consists of a combination of a TRS connector and a XLR-3 female connector. This
enables you to use either a TRS-type cable or a XLR-type cable to connect to the input of the system.
PUSH
Hot Shield
Cold
Figure 12a. COMBO-Connector (XLR + TRS).
Shield
Cold
Hot
TRS Male TRS Male
Wiring Scheme
Figure 12b. TRS-type cable wiring scheme.
21
3
XLR-3 Female TRS Male
Wiring Scheme
Shield
Cold
Hot
Figure 12c. TRS-type to XLR-type cable wiring scheme.

中文
EN
D
23
BLUETOOTH®
22
BLUETOOTH®
The C6 provides Bluetooth® connectivity for wireless audio streaming. You can follow the outlined steps to
establish a Bluetooth® connection with your compatible device.
1 POWER ON the C6 system. The BLUETOOTH® LED
emits a constant blue light indicating that the module is
operational.
2 Press and hold the pairing button "HOLD TO LINK"
for at least 3 seconds.
As soon as the module is ready for pairing, the
BLUETOOTH® LED starts ashing. The time
frame for pairing is approximately 90 seconds.
3 Check your audio source device's available Bluetooth®
connections for "SE-C6" and initiate pairing. When
successfully paired the BLUETOOTH® LED emits a
constant blue light again.
Each time you power on the C6 column system, it will try to re-establish a connection
with the previous paired device.
Make sure that your device is compatible with Bluetooth® v4. Proles:
A2DP v1.2 & AVRCP v1.4
Figure 13. C-Line C6 Bluetooth® pairing.
C6 STEREO SETUP
The C6 column speaker system can be congured as a stereo system. By using two C6 systems on both
sides of the stage to address the audience, on stage as side-ll for the performers, or in installation
applications such as bars, entertainment venues and museums, you can benet from the audio
sensation that stereo speaker systems are able to achieve.
1 Place both subwoofers at the desired
locations and add the column modules to
each one as described in the assembly chapter.
2 Set both units to STEREO MODE.
3 Decide on one unit being the master and
the other one being the slave. Turn the slave's
MAIN LEVEL to maximum.
4 Use a XLR cable and connect the master's
SYSTEM OUT to the slave's LINE IN.
5 Connect the blue end of a powerCON® cable
into the POWER IN socket on each unit's rear
side panel and connect both cables to the mains
outlet.
6 Connect your audio sources to the mixer.
Make sure MAIN LEVEL of the master unit is fully
turned down. Power on the system. Now you are
ready to adjust all levels to your preference and
to run the show.
Turn down the respective level when you plug in or unplug any audio signal cable.
Always turn down the MAIN LEVEL before powering on or powering o C6 column system.
This helps to prevent sudden loud sound exposure and possible hearing damages.
D E F H KG
Slave R
XLR
power
CON®
power
CON®
Master L
Choose the type of input on the
master C6 Column System you want.
100-240 V~ 50-60 Hz
Max. 2000 W
G J
Figure 14. C-Line C6 stereo setup.

中文
EN
D
SPECIFICATIONS
2524
SPECIFICATIONS
MECHANICAL DRAWINGSTECHNICAL SPECIFICATIONS
ACOUSTICAL
Frequency range (-3 dB) 150 Hz - 21 kHz
Coverage angles (-6 dB) [H x V] 120° x 25°
Maximum Peak SPL 2126 dB
System type 3-way, self-powered
Crossover frequency 250 Hz (LF/MF), 3 kHz (MF/HF)
Transducers 2x 10" woofer with 2.5" voice coil, 6x 3.5" full range driver with 1" voice coil, 2x 3.5" full range driver
with 1" voice coil , 2x 0.5" compression tweeter with 1" voice coil coaxially mounted with waveguide.
Enclosure type Subwoofer: bass reex enclosure; Columns: closed cabinet
AMPLIFICATION
Type Class-D with SMPS (LF, MF); Class-A/B (HF)
Total power 31500 W
Output power per channel 4 LF: 800 W, MF: 600 W, HF: 100 W
Protection Short circuit, Overheating, Overcurrent, Limiter
Indicators Power on, Signal, Limit, Protect, Mono/Stereo
Connectors Microphone input: 1x XLR combo jack;
Line input: 2x XLR combo jack, balanced;
2x RCA jack, unbalanced;
Hi-Z input: 1x TS jack, unbalanced;
MP3 input: 1x 3.5mm TRS jack, stereo unbalanced;
Bluetooth® streaming: BT version 4.0
System Out output: XLR, balanced; mono mode: mono summing L+R; stereo mode: signal right (R)
subwoofer output: XLR female, balanced; processed signal for routing to complementary subwoofer
Power connector: powerCON® 20A
Wiring Pin layout XLR: Pin 2: Signal+; Pin 3: Signal-; Pin 1: Shield | Pin layout TRS: Tip: Signal+; Ring: Signal-;
Shaft: Shield | Pin layout stereo TRS: Tip: Left; Ring: Right; Shaft: Shield
Pin layout powerCON®: Pin N: Neutral; Pin L: Conductor; Pin E: Earth, Ground
Operating voltage range 100 – 240 VAC, 50/60 Hz
Input sensitivity 0 dBu
DSP 48 kHz/24 bit with extended dynamics, Processing latency: 1.1 ms
Connectivity Bluetooth® Version 4.0; A2DP v1.2 (SBC Codec), AVRCP v1.4
Processing Crossover, Limiter, EQ, Level
User controls Power: On/O switch
System Level: Main Level; Subwoofer Level Input Level: Microphone; Line; Bluetooth®/MP3; HI-Z
System Conguration: Bluetooth® Pairing button; Stereo/Mono Mode switch
MECHANICAL
Product dimensions
[H x W x D] (Including rigging)
347 x 750 x 532 mm Subwoofer
855 x 100 x 129 mm Columns
Net weight 35.5 kg Subwoofer, 10.6 kg Columns
Packaging dimensions
[H x W x D]
433 x 830 x 615 mm Subwoofer
980 x 380 x 190 mm Columns
Total weight 38 kg Subwoofer, 13.2 kg Columns
Cabinet Subwoofer: Plywood, Columns: Aluminum
Cabinet nishing Black polyurea coating; powder coating
Grille Powder coated perforated steel
Hardware 2 side handles embedded in cabinet; Rubber feet
Rigging 4-point connector for mounting the lower speaker columns on the subwoofer;
4-point connector for mounting the upper speaker column on the lower speaker column
ACCESSORIES
C6 TD Transport Dolly for C6 or C6 SE
C6 FC Flightcase for C6 or C6 SE
1 Whole space, 1 W / 1m
2 Calculated Max. Peak SPL = Sensitivity + 10log10(output power)
3 Total power value is the sum of all individual channel output power
4 According to EIA-426B Standard
532.00750.00
2,056.00
855.00855.00347.00
Figure 15.
C-Line C6 column system dimensions.

中文
EN
D
MANUFACTURER'S DECLARATIONS
2726
MANUFACTURER'S DECLARATIONS
WARRANTY
SE AUDIOTECHNIK gives a warranty of 4 years on SE AUDIOTECHNIK
products. The warranty period begins with the purchasing date. The
warranty applies to material or production defects that occur. Defective
components or products will be repaired or replaced free of charge by
SE AUDIOTECHNIK at its own sole and exclusive discretion during the
warranty period.
NOTE
SE AUDIOTECHNIK does not guarantee the uninterrupted and fault-free
operation of the products.
The warranty does not apply:
- For wear parts and natural abrasion.
- For damage, defects or malfunctions caused by improper use or use
for other than the intended purpose.
- For damage, defects and malfunctions caused by the use of force or
environmental conditions.
- For unauthorized repair eorts.
REQUESTING WARRANTY SERVICES
The request for warranty service can be submitted to SE AUDIOTECHNIK
or to the dealer from whom the SE AUDIOTECHNIK products were
purchased.
Contact details
SE AUDIOTECHNIK Head oce
Neuenhofer Straße 42-44
42657 Solingen
Germany
Phone +49 212 382 26-0
E-Mail [email protected]
In order to claim warranty service, you must provide proof of purcha-
se and allow SE AUDIOTECHNIK to examine the warranty claim (e.g.
sending in the products, examination at an authorized partner). Without
proof of purchase, the provision of a warranty service can be rejected.
IMPORTANT NOTE
Your statutory warranty rights are not aected by this warranty.
Furthermore, this warranty has no inuence on any agreements you
may have concluded with a dealer.
LIMITATION OF LIABILITIES
SE AUDIOTECHNIK is not liable for personal injury, material damage
or claims resulting from inappropriate, dangerous or incorrect use of
the products.
EU DECLARATION OF CONFORMITY
This device complies with the fundamental requirements and other
relevant specications of the directives of the European Union. The
detailed declaration and the list of these directives and harmonized
standards are provided on the website https://se-audiotechnik.de/.
Included are all product variants, as long as they comply with the
original technical design and have not been subsequently modied
mechanically, electrically or in their original condition.
CORRECT DISPOSAL OF PRODUCTS (ELECTRICAL WASTE)
(Applicable in the European Union and other European countries with
separate waste collection systems).
SE AUDIOTECHNIK products must not be disposed of with other waste
at the end of their service life to avoid possible harm to the environment
or human health.
Private users can contact either the dealer from whom they purchased
the products or the local authority for information on environmentally
friendly disposal. Commercial users can contact their supplier, if they
have any questions about disposal.
DECLARATION ON WEEE POLICY
SE AUDIOTECHNIK products are designed and manufactured with high
quality materials and components that are intended to be recyclable
and/or reusable.
SE AUDIOTECHNIK is WEEE registered in accordance with WEEE policy.
LICENSES AND COPYRIGHT
SE AUDIOTECHNIK products may directly or indirectly contain software
that is necessary or complementary for their use. These software
components may be SE AUDIOTECHNIK own developments or licensed
and open-source products and solutions or a combination of the
mentioned. In the case of open-source licenses, SE AUDIOTECHNIK will
provide a copy of the source code and the full text of the corresponding
license upon request in accordance with the license terms. Excluded from
this and protected by copyright are own and licensed software solutions
and software components .

Designed in Germany
Version 2022/07
HEAD OFFICE
Neuenhofer Strasse 42-44
42657 Solingen, Germany
ASIA-PACIFIC DEVELOPMENT CENTER
No. 8 Development Zone Road
Huimin Sub-district, Jiashan County, Zhejiang, 314112, P.R. China
service@se-audiotechnik.com
www.se-audiotechnik.de
, all rights reserved. The technical data and the functional product characteristics can be subject to modications.
The photocopying, translation, and all other forms of copying of fragments or of the integrality of this user's manual is prohibited.
© 2022 is a registered trademark of Speaker Electronic (Jia Shan) Co. Ltd.
EASE® is a registered trademark of AFMG Technologies GmbH.
Neutrik® and powerCON® are registered trademarks of Neutrik AG.
BLUETOOTH® is a registered trademark of Bluetooth SIG.
Table of contents
Other SE Audiotechnik Speakers manuals