Fermax DUOX PLUS User guide

INTERFAZ CÁMARA IP DUOX PLUS. REF.9454
DUOX PLUS IP CAMERA INTERFACE. REF.9454
INTERFACE DE CAMÉRA IP DUOX PLUS. RÉF. 9454
DUOX PLUS IP KAMERA-SCHNITTSTELLE. REF.9454
INTERFACE DA CÂMARA IP DUOX PLUS. REF.9454
MANUAL DE INSTALADOR
INSTALLER’S MANUAL
MANUEL D’INSTALLATION
INSTALLATIONSHANDBUCH
MANUAL DO INSTALADOR

2 INTERFAZ CAMARA IP DUOX PLUS Cod. 970267 V05_22
¡ENHORABUENA POR DISPONER DE UN PRODUCTO DE CALIDAD!
Fermax electrónica desarrolla y fabrica equipos de prestigio que cumplen los más altos
estándares de diseño y tecnología.
Esperamos disfrute de sus funcionalidades.
www.fermax.com

INTERFAZ CAMARA IP DUOX PLUS 3
ÍNDICE
REF. 9454 INTERFAZ CÁMARA IP DUOX PLUS
1. INTRODUCCIÓN 4
2. REQUISITOS 4
3. CONEXIONES E INDICADORES LUMINOSOS (LEDS) 4
4. INSTALACIÓN Y PUESTA EN MARCHA 5
5. FAQ’s PREGUNTAS MÁS FRECUENTES 8
5.1¿CómocongurolacámaraIPdeFERMAXref.9985? 8
5.2¿Cómopuedosaberquelaconguracióndemicámaraescorrecta? 9
5.3 ¿Cómo resetear el Interfaz a parámetros de fábrica
sinomeacuerdodelacontraseñaoIPquehepuesto? 9
5.4 Me conecto por cable pero no puedo acceder al webserver del Interfaz 9
5.5¿QuéformatodebetenerlacontraseñaqueintroduzcoalInterfaz? 9
5.6¿QuéocurresiintroduzcoerróneamentelacontraseñaalInterfaz? 9
5.7¿Cómopuedosalirdelwebserveroconguración? 9
5.8¿PuedocongurarlaInterfazatravésdemiPC? 9
5.9 ¿Puedo activar en vez de la apertura de puerta de una placa un
dispositivoauxiliarcuandoestévisualizandounacámaraenconcreto?10
5.10¿CómopuedoactualizarelrmwaredelInterfaz? 10
5.11¿CómofuncionaelautoencendidodeDUOXPLUSconInterfazinstalado?10
6. CARACTERÍSTICAS TÉCNICAS 11

4 INTERFAZ CAMARA IP DUOX PLUS
3.CONEXIONES E INDICADORES LUMINOSOS (LEDS)
1BB: Conexión del bus DUOX Plus.
RJ-45: Conexión Ethernet/cámaraIP
SW1: Adaptador de línea integrado.
Derecha: Sin adaptación de línea OFF.
(por defecto)
Izquierda: Adaptación tipo C.
PRG: Pulsador de Programación.
Al pulsar durante 2 segundos se activa el
web server. A los 5 minutos sin actividad
se desactiva.
LED PWR:Enreposoparpadeo1sg(on/of)
LED WIFI: Fijo cuando hay un dispositivo
conectadoalawiquegenera.
Apagago cuando el web server está
desactivado.
2
3
4
5
1. INTRODUCCIÓN
El Interfaz de cámaras IP Duox Plus permite integrar cámaras CCTV IP en una instalación
Duox Plus.
El módulo es capaz de conectarse al streaming de vídeo emitido por cámaras IP en H264
(dentro de unos determinados parámetros), procesarlo y convertirlo en señal DUOX PLUS
que se conecta directamente al bus de Duox Plus.
2. REQUISITOS
Este Interfaz atenderá las peticiones de aquellos monitores que realicen una solicitud de
autoencendido en el bus o a través de la App Blue. El Interfaz se comporta como una
placadecalletantoentopología(instalaciónyadaptación)comoalahoradecongurarel
tipo de placa (Entrada General o Bloque Interior indicando número de bloque). Importante
indicarquenopuedenexistirenlamismainstalacióndosdispositivosconguradosigual
(Ejemplo:Sitenemosunaplacadecalleconguradacomobloque0placa0nopodrétener
unInterfazcondichaconguración).
- Si el interfaz se congura como Entrada General solo permitirá la gestión de una
cámara.
-SielinterfazseconguracomoBloquepermitirágestionarhastadoscámaras.
- Cada cámara deberá alimentarse externamente con su alimentador correspondiente o
a través de un switch POE.
-LacámaradeberácongurarsepreviamentesabiendosuIP,usuarioycontraseña.
- El Interfaz se alimentará directamente del bus Duox Plus.
PRG
PWR
WIFI
BB
BUS
R5
46017 VALENCIA - SPAIN
FERMAX ELECTRONICA, SAU
AV TRES CRUCES, 133
1) SCAN QR
2) fermaxinterface.com
INTERFAZ CAMARA IP/DUOX PLUS
REF. 9454
MADE IN SPAIN
US Patent No. 9.215.410
9.762.852
SW1
C
OFF IP/DUOX PLUS CAMERA INTERFACE
1
2
4
5
3

INTERFAZ CAMARA IP DUOX PLUS 5
4. INSTALACIÓN Y PUESTA EN MARCHA
1º Conectar el bus DUOX PLUS (24Vdc) al Interfaz.
2º Pulsar 2 segundos el botón de programación para activar el web server. El led
blancodewiempezaráaparpadear.
3ºLeerdesdeelmóvilelQRyconectarsealawigeneradaporelInterfaz(Fermax_
interface).
*Si no puede conectarse a través del código QR seleccione la red wi Fermax_
interface e introduzca la contraseña FermaxInterface.
4º Abrir el navegador del movil e ir a la url ‘fermaxinterface.com’

6 INTERFAZ CAMARA IP DUOX PLUS
5º La primera vez se debe crear la contraseña, por lo tanto, introducir contraseña y
repetir contraseña. Si ya tiene una y no se acuerda, ver preguntas más frecuentes
FAQ’salnaldeestedocumento.
Nota: La contraseña debe tener al menos 8 dígitos,
mayúsculas, minúsculas, números y símbolos.
6ºCongurarunacámaraenelInterfaz9454.
6.1. Ir al apartado ‘Conguración Duox’
desplazándose hacia abajo en el menú principal
e indicar con que autoencendido se accederá a la
cámara/s conectada/s al Interfaz:
• Como bloque permitirá congurar hasta dos
cámaras IP Cámara 0 y Cámara 1 (es necesario
indicar el nº de bloque).
• ComoEntradaGeneralsolopermitirácongurar
una cámara IP Cámara 0.
*Recordar que no pueden existir en la misma
instalación dos dispositivos congurados igual.
6.2. Ir al apartado de cámara :
• Congurar URL en protocolo RTSP de la
cámara IP con el siguiente ejemplo de formato.
rtsp://usuario:contraseña@dirección
IP:Puerto rtsp
Ejemplo: Ejemplo cámara IP 192.168.1.205 cuyo
usuario: admin, contraseña: fermax123, puerto 554.
rtsp://admin:[email protected]:554
Nota: revise que ha escrito bien la url y compruebe la aplicación VLC media Player
(ir a Media--> Abrir ubicación de red) y escribir la URL rtsp y comprobar que la
cámara funciona. Dependiendo de la cámara se debe especicar toda la información

INTERFAZ CAMARA IP DUOX PLUS 7
6.7. Conectar cámara IP o switch donde se
encuentra la cámara IP.
6.5.Alnalizarguardeconguraciónycierre.
6.3. Indique el nombre de la cámara para su
identicación(estenombresoloaparecerádentro
del Interfaz).
6.4. Si desea activar una puerta o relé DUOX
seleccione el tipo y número de placa de calle/relé
cuyo abrepuertas/contacto se activará al pulsar
abrepuertas mientras visualiza esa cámara.
• Indicar el tipo de placa/relé DUOX en ‘Puerta
para abrir’.
• Indicar el número de placa/relé en ‘Placa para
abrir’.
*Si en “Conguración DUOX” del Interfaz indicamos
que es de Entrada General solo podrá abrir placas
de Entrada General, nunca de bloque.
6.8.Vericarelcorrectofuncionamientorealizando
un autoencendido desde cualquier monitor
conectado al bus presionando las veces necesarias
al icono de cámara hasta seleccionar la deseada.
(Pulsar botón de cámara
para hace autoencendido
desde monitor)
que requiera para que se pueda conectar el interfaz como cliente RTSP (usuario,
contraseña, IP, puerto, stream…). Esta información depende de cada cámara en
concreto, por lo que se deberá consultar el manual de la propia cámara.
6.6. Desactivar web server pulsando durante 2sg
elbotóndePRGparaqueelledblancodewise
apague por completo.

8 INTERFAZ CAMARA IP DUOX PLUS
5. FAQ’s PREGUNTAS MÁS FRECUENTES
5.1 ¿Cómo conguro la cámara IP de FERMAX ref. 9985?
1. Alimente la cámara con una fuente externa (ref. 9982 con adaptador ref. 9984) o con
un switch POE.
2.ConecteuncableRJ-45delacámaraasuPC(elPCdebeestarconguradodentro
del rango de IP’S del Interfaz 192.168.1.xx).
3. Abra un navegador e introduzca la dirección IP (192.168.1.64) que tiene la cámara
por defecto si quiere cambiar la IP de su cámara y el puerto. La primera vez pedirá que
introduzcacontraseñayconrmarcontraseña,introduzcafermax123olaquedesee.
4. Introducir usuario admin y contraseña fermax123.VamosaConguración Basic
Settings.
Cambiamos la IP a 192.168.1.205 por
ejemplo.
Y vemos el puerto que para el protocolo
RTSP es el 554.
Video:
Resolution 720P, Video Quality Highest,
Frame Rate <30, Video Encoding H264,
ProleHighProle.
Salir.

INTERFAZ CAMARA IP DUOX PLUS 9
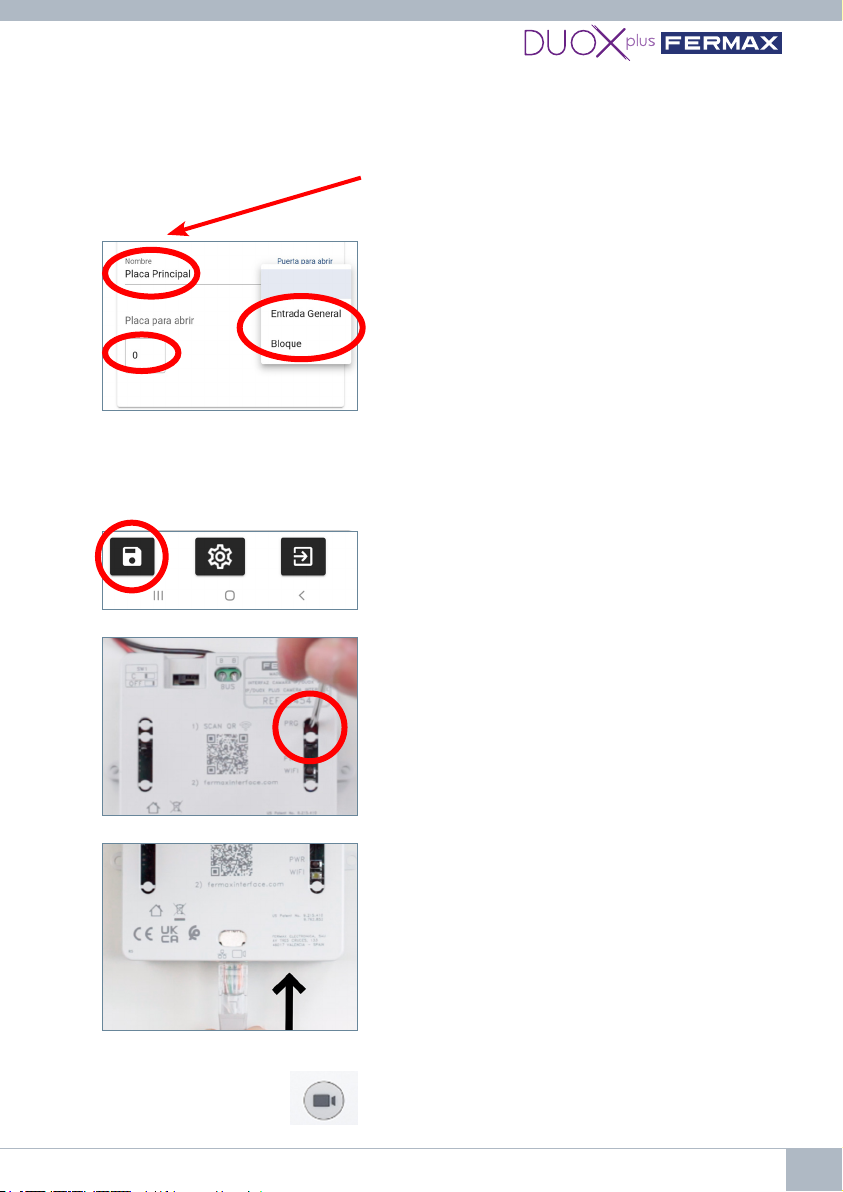
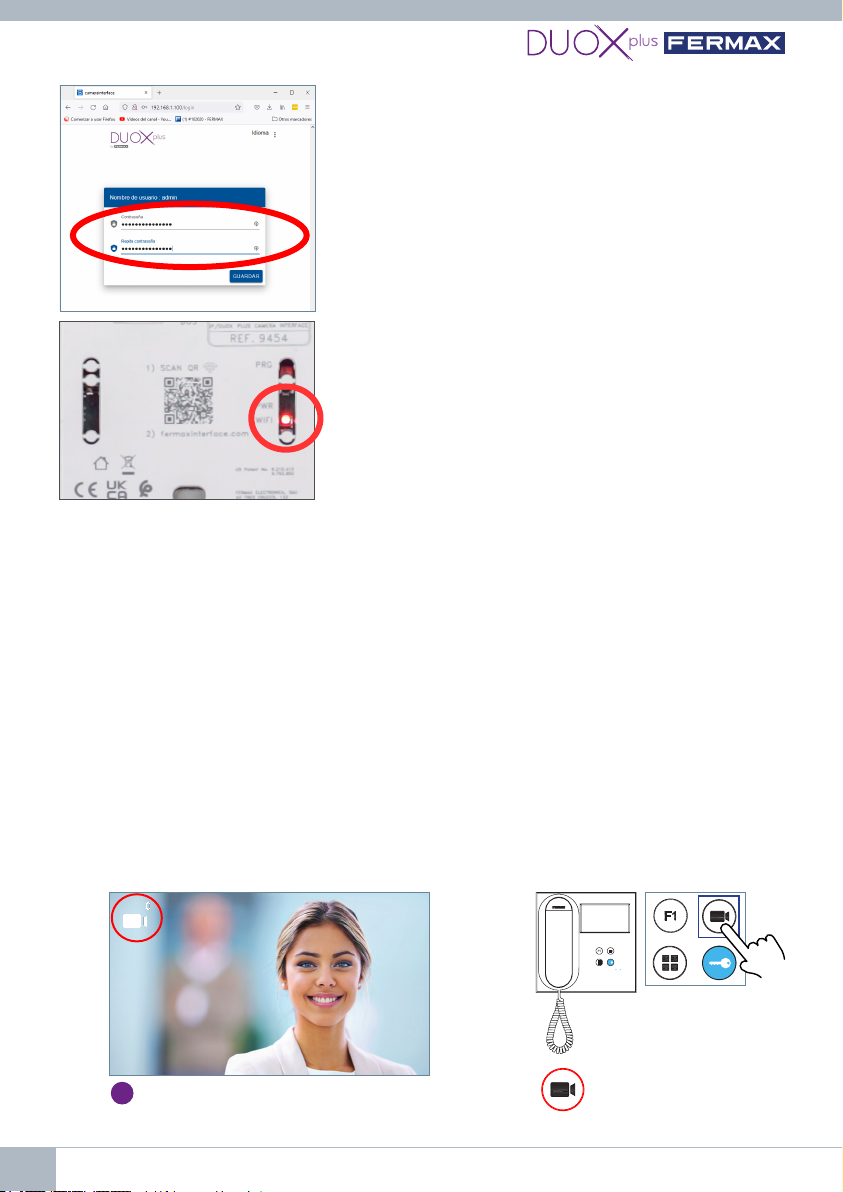
3º Pulsar 2 segundos el botón de programación para
activarelwebserver.Elledblancodewiempezará
a parpadear.
Sí,paraellosuPCdebeestarconguradodentrodel
rango de IP’S del Interfaz (192.168.1.xx):
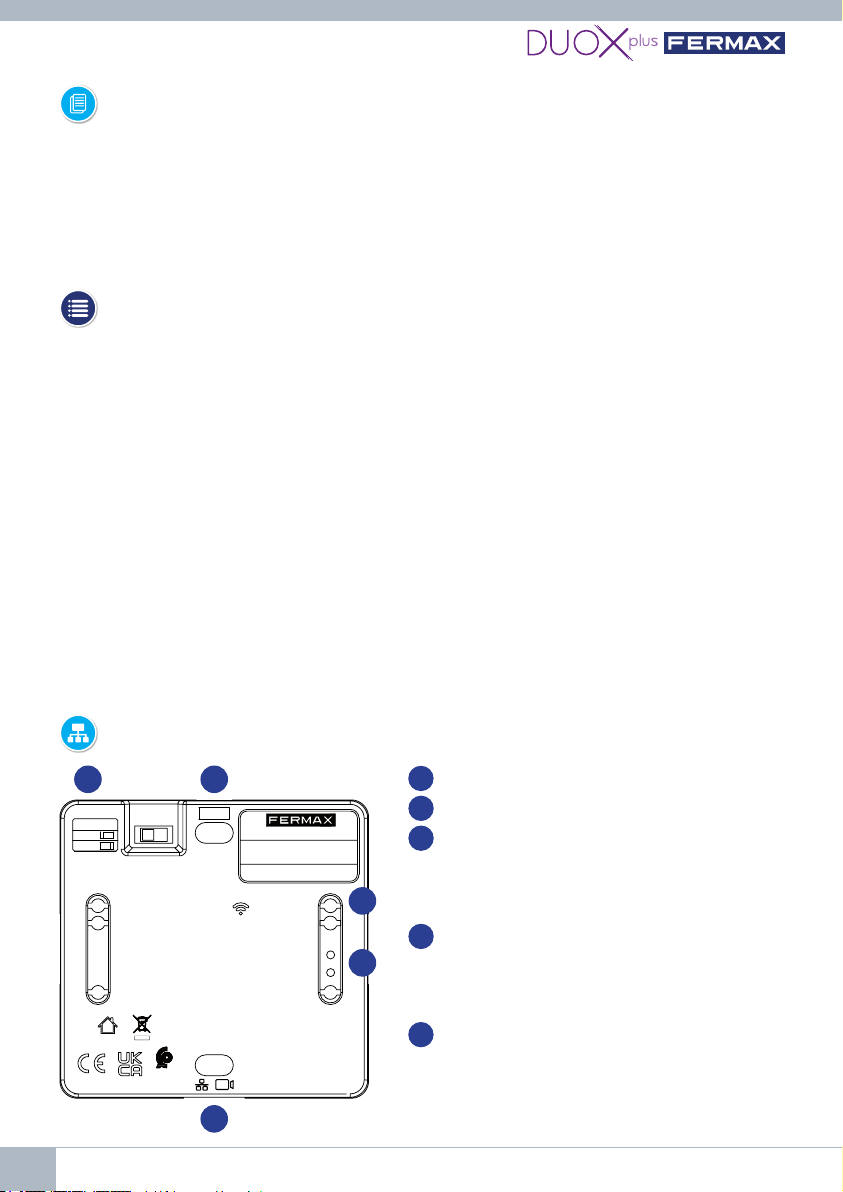
1º Conectar el bus DUOX PLUS (24Vdc) al Interfaz. El
led rojo PWR empezará a parpadear cada segundo.
2º Conectar el cable de ethernet RJ-45 directo
desde el PC al Interfaz o mediante un switch.
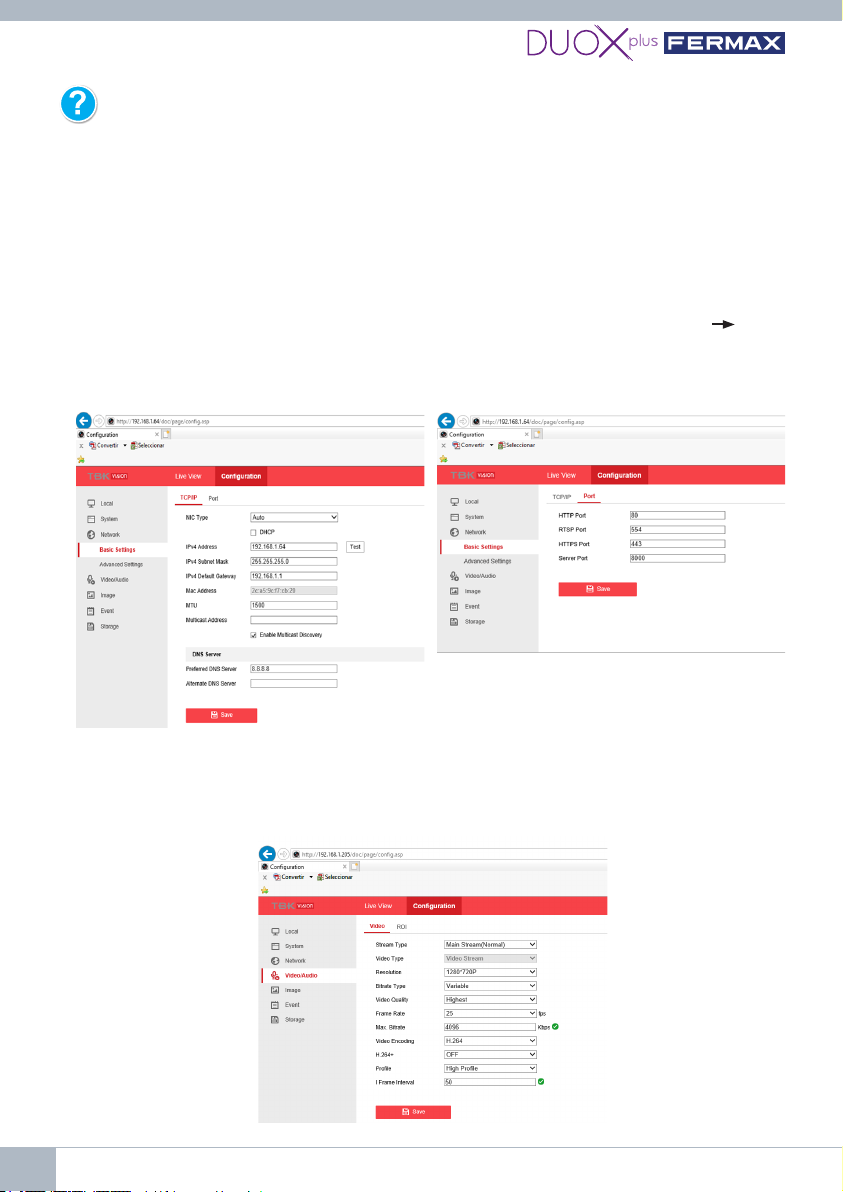
5.2 ¿Cómo puedo saber que la conguración de mi cámara es correcta?
1. Conectar la cámara IP a un switch POE o alimentarlo con una fuente externa
2.ConectarnuestroPCalmismoswitch(elPCdebeestarconguradodentrodelrango
de IP’S del Interfaz (192.168.1.xx).
3. Abrir la aplicación VLC Media Player y en Medio Abrir ubicación de red.
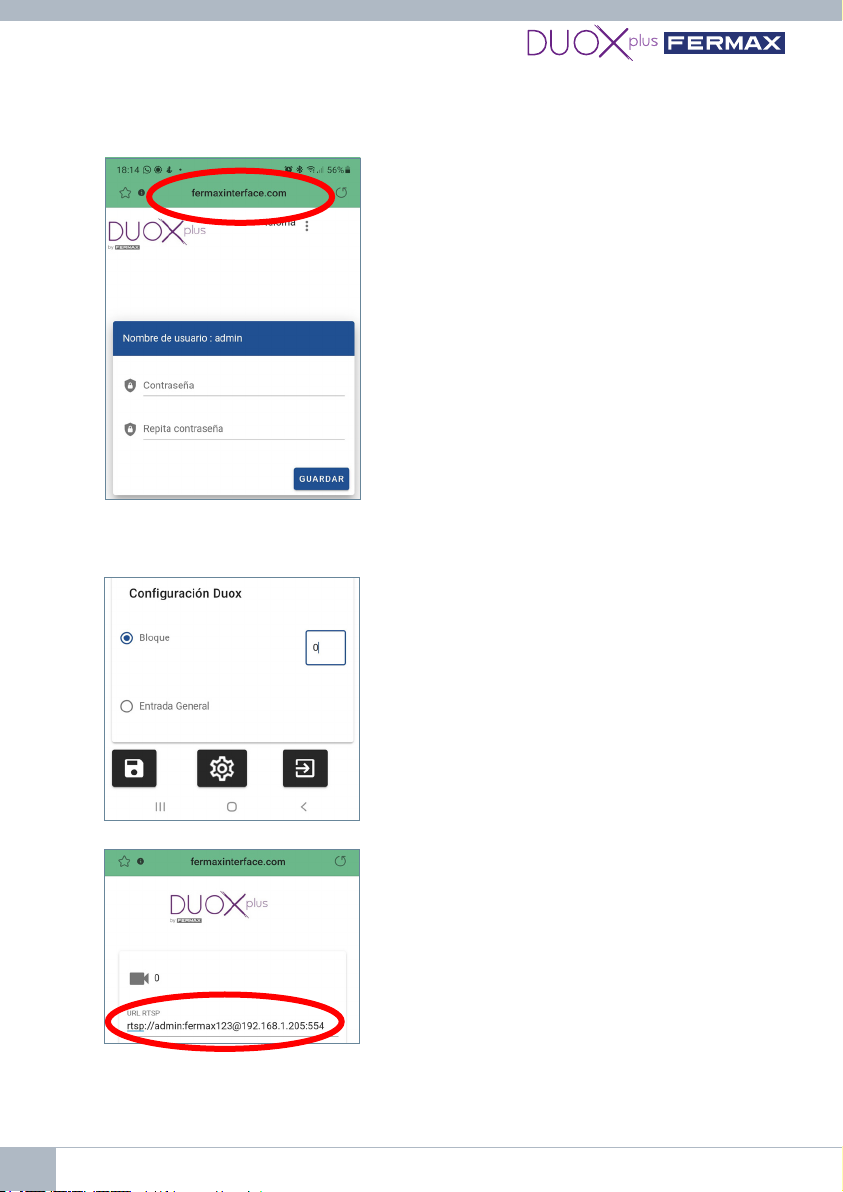
4. Escribir la url rtsp de nuestra cámara ejemplo
rtsp://admin:[email protected]:554
y comprobar que visualizamos correctamente la cámara. Así comprobaremos el correcto
funcionamiento y que la dirección url rtsp es correcta.
5.3 ¿Cómo resetear el Interfaz a parámetros de fábrica si no me acuerdo de
la contraseña o IP que he puesto?
Pulsar PRG durante 10sg hasta que el led rojo parpadee rápido varias veces.
Los parámetros por defecto son:
• Dirección IP: 192.168.1.100
• Máscara: 255.255.255.0
• Usuario: admin(nosepuedemodicar)
• Sin contraseña. La primera vez que nos conectemos nos pedirá crear una nueva.
5.4 Me conecto por cable Ethernet pero no puedo acceder al web server del
Interfaz.
Recordar siempre pulsar PRG durante 2 segundos para activar el servidor web. El led blanco
dewiempezaráaparpadearindicandoquepodemosaccederalaconguracióndeeste.
5.5 ¿Qué formato debe tener la contraseña que introduzco al Interfaz?
La contraseña debe tener al menos 8 dígitos, mayúsculas, minúsculas, números y símbolos.
5.6 ¿Qué ocurre si introduzco erróneamente la contraseña al Interfaz?
Este bloqueará el acceso durante 5 minutos cuando se realicen 3 intentos fallidos.
5.7 ¿Cómo puedo salir del web server o conguración?
El acceso se deshabilitará pasados 5 minutos sin que ningún dispositivo se conecte o
bien a los 20 minutos de la última actividad. También será posible pulsar el botón de
programación durante 2sg para deshabilitarlo manualmente.
5.8 ¿Puedo congurar la Interfaz a través de mi PC?

10 INTERFAZ CAMARA IP DUOX PLUS
Detalle de funcionamiento con autoencendido
Identicador de Placa
o Cámara
Placa 0o Cámara 0del Bloque del monitor
1
5.11 ¿Cómo funciona el autoencendido de DUOX PLUS con Interfaz instalado?
5.9 ¿Puedo activar en vez de la apertura de puerta de una placa un dispositivo
auxiliar cuando esté visualizando una cámara en concreto?
Sí es posible mediante el relé avanzado ref. 3267 ya que este se puede programar con
númerodeplacaybloquequequeramos.Lospasosseríancongurarunadelasplacas
como entrada general o bloque e indicarle el número de placa correspondiente y después
programar el relé con dicha dirección después dejar la placa como debería estar y así los
monitores que hagan autoencendido de dicho bloque activarán el relé.
5.10 ¿Cómo puedo actualizar el rmware del Interfaz?
ParaactualizarelrmwaredelinterfacedecámaraIPDuoxPlusatravésdelwebserveres
necesariosubirelcherodeactualizaciónconelsiguientenombreyextensión:
rmwareUpgrade.tar.bz2
Nota: importante no cambiar el nombre del chero.
4º Abrir un navegador.
• 1. Ir a la IP del interfaz por defecto:
192.168.1.100.
• 2. Introducir/crear contraseña.
Elledblancodewipermanecerájoalconectarse
con el PC.

INTERFAZ CAMARA IP DUOX PLUS 11
Funcionamiento de autoencendido con interfaz instalado
6. CARACTERÍSTICAS TÉCNICAS
Tensión alimentación 18 Vdc 24 Vdc
Consumo en reposo 140 mA (máx.) 104 mA (máx.)
Consumo en activo 153 mA (máx.) 110 mA (máx.)
Temperatura de funcionamiento -10 ºC a +55 ºC
Humedad 5%, 90% sin condensación
En reposo pulsar en el monitor para realizar autoencendido con diferentes placas /
cámaras. Pulsando secuencialmente, la visualización es:
1Placa 0 o Cámara 0 del propio bloque (una o la otra).
2Placa 1 o Cámara 1 del propio bloque (una o la otra).
3Placa 0 o Cámara 0 de la Entrada General (una o la otra).
CAPACIDADES: En total podremos tener 3 vistas que podrán ser de placas o cámaras.
Notas:
- Estando el monitor en reposo, al realizar autoencendido se dispone de 30 segundos para descolgar:
• Si NO se descuelga, pulsando secuencialmente se tiene la posibilidad de cambio de cámara.
• Si se descuelga, se dispone de un tiempo máximo de 90 segundos de visualización, se tiene la
posibilidad de cambio de cámara.
- Si el interfaz se programa como Cámara 0, al descolgar un teléfono de su bloque, el usuario no oirá ni
verá nada (porque el teléfono no muestra vídeo ni el interfaz transmite audio).
Placa 1o Cámara 1del Bloque del monitor
2
Placa 0o Cámara 0de Entrada General (G)
3

2 DUOX PLUS IP CAMERA INTERFACE Code 970267 V05_22
CONGRATULATIONS ON PURCHASING A QUALITY PRODUCT!
Fermax Electrónica develops and manufactures premium equipment that meets the highest
design and technology standards.
We hope you will enjoy all its features.
www.fermax.com

DUOX PLUS IP CAMERA INTERFACE 3
CONTENTS
REF. 9454 DUOX PLUS IP CAMERA INTERFACE
1. INTRODUCTION 4
2. REQUIREMENTS 4
3. CONNECTIONS AND LIGHT-UP INDICATORS (LED) 4
4. INSTALLATION AND COMMISSIONING 5
5. FAQs - FREQUENTLY ASKED QUESTIONS 8
5.1HowdoIconguretheFERMAXIPcamera(ref.9985)? 8
5.2HowdoIknowthatmycamerasettingsarecorrect? 9
5.3 How can I reset the Interface to factory settings
ifIdon'trememberthepasswordorIPIhaveentered? 9
5.4 I am connected by cable but cannot access the Interface web server 9
5.5WhatformatshouldthepasswordIenterintotheInterfacebein? 9
5.6WhathappensifIenterthewrongpasswordintotheInterface? 9
5.7HowcanIexitthewebserverorconguration? 9
5.8CanIconguretheInterfaceviamyPC? 9
5.9 Can I activate an auxiliary device when viewing a particular camera,
insteadofreleasingthedoorviaapanel? 10
5.10HowcanIupdatetheInterfacermware? 10
5.11HowdoestheDUOXPLUSautoswitch-onworkwiththeInterfaceinstalled?10
6. TECHNICAL SPECIFICATIONS 11

4 DUOX PLUS IP CAMERA INTERFACE
3. CONNECTIONS AND LIGHT-UP INDICATORS (LEDS)
1BB: Connection of the DUOX Plus bus.
RJ-45: Ethernet/IP camera connection
SW1: Line adapter included.
Right: Without OFF line adaptation. (by
default)
Left: Type C adaptation.
PRG: Programming pushbutton.
Pressing for 2 seconds activates the web
server. After 5 minutes of inactivity, it is
deactivated.
PWR LED:Standbyblinking1sec(on/o)
WIFI LED: Continuous when there is a
device connected to the WiFi it generates.
Switches o when the web server is
deactivated.
2
3
4
5
1. INTRODUCTION
The Duox Plus IP Camera Interface allows IP CCTV cameras to be integrated into a Duox
Plus installation.
The module is able to connect to the video stream sent by the IP cameras in H264 format
(within certain parameters), process it and convert it into a DUOX PLUS signal that is
connected directly to the Duox Plus bus.
2. REQUIREMENTS
This Interface will handle requests from those monitors (APP BLUE) that request auto
switch-on via the bus or via the Blue App. The Interface behaves like an outdoor panel both
intermsoftopology (installation andadaptation)andwhen conguringthetypeof panel
(General Entrance or Interior Block, indicating the block number). It is important to point out
thatnotwodevicesconguredinthesameinstallationcanbethesame(Example:Ifthere
isanoutdoorpanelconguredasblock0panel0,itwillnotbepossibletohaveanInterface
withthisconguration).
-IftheinterfaceisconguredasGeneralEntranceitshallonlyallowthemanagement
of one camera.
IftheinterfaceisconguredasaBlock,itwillallowthemanagementofuptotwocameras.
- Each camera shall be powered externally with its own power supply or through a POE switch.
-ThecameramustbeconguredbeforehandwithitsIP,userandpassword.
- The Interface shall be powered directly from the Duox Plus bus.
PRG
PWR
WIFI
BB
BUS
R5
46017 VALENCIA - SPAIN
FERMAX ELECTRONICA, SAU
AV TRES CRUCES, 133
1) SCAN QR
2) fermaxinterface.com
INTERFAZ CAMARA IP/DUOX PLUS
REF. 9454
MADE IN SPAIN
US Patent No. 9.215.410
9.762.852
SW1
C
OFF IP/DUOX PLUS CAMERA INTERFACE
1
2
4
5
3

DUOX PLUS IP CAMERA INTERFACE 5
4. INSTALLATION AND COMMISSIONING
1st Connect the DUOX PLUS bus (24Vdc) to the Interface.
2nd Press the programming button for 2 seconds to activate the web server. The white
WiFi LED on the monitor will start blinking.
3rd Read the QR from the mobile telephone and connect to the WiFi generated by the
Interface (Fermax_interface).
*If you cannot connect via the QR code, select the WiFi network Fermax_interface
and enter the password FermaxInterface.

6 DUOX PLUS IP CAMERA INTERFACE
5thThersttimewillcreatethepassword,soenterthepasswordthenrepeatit.Ifyou
already have one and do not remember it, see the FAQs at the end of this document.
Note: The password must have at least 8 digits
and include uppercase letters, lowercase letters,
numbers and symbols.
6thCongureacameraonthe9454Interface.
6.1. Go to the 'Duox Conguration' section by
scrolling down in the main menu and indicate which
auto switch-on will be used to access the camera(s)
connectedtotheInterface:
• Asablockitwillallowcongurationofuptotwo
IP cameras, Camera 0 and Camera 1 (the block
number must be indicated).
• As a General Entrance, it will only allow one IP
Cameratobecongured(Camera0).
*Remember that two identically-congured devices
cannot coexist in the same installation.
6.2.Gotothecamerasection:
• ConguretheURLintheRTSPprotocoloftheIP
camera, following this format example.
rtsp://user:password@IP address:rtsp Port
Example: Example IP camera 192.168.1.205 with
user:admin,password:fermax123,port554.
rtsp://admin:[email protected]:554
Note: check that you have typed the URL correctly and check the VLC Media Player
application (go to Media→ Open network location) and type the RTSP URL and check
that the camera works. Depending on the camera, all the information required for the
interface to connect as an RTSP client (user, password, IP, port, stream, etc.) must be

DUOX PLUS IP CAMERA INTERFACE 7
6.7. Connect the IP camera or switch where the IP
camera is located.
6.5. When nished, save the conguration and
close.
6.3.Enterthenameofthecameraforidentication
(this name will only appear within the Interface).
6.4. To activate a DUOX door or relay, select the
type and number of the outdoor panel / relay of
which the door opener / contact will be activated by
pressing the door lock release button while viewing
that camera.
• Indicate the type of DUOX panel/relay in 'Door
to open'.
• Indicate the panel/relay number in 'Panel to
open'.
*If the "DUOX Conguration" facility of the Interface
is used to indicate that it is General Entry, it will only
be able to open General Entry panels, never block
panels.
6.8. Verify correct operation by performing an auto
switch-on from any monitor connected to the bus
by pressing the camera icon as many times as
necessary until the desired camera is selected.
(Press camera button
for auto switch-on from
monitor)
specied. This information depends on the individual camera, so please refer to the
manual of the camera itself.
6.6. Deactivate the web server by pressing the PRG
button for 2 seconds so that the white WiFi LED
turnsocompletely.

8 DUOX PLUS IP CAMERA INTERFACE
5. FAQs — FREQUENTLY ASKED QUESTIONS
5.1 How do I congure the FERMAX IP camera (ref. 9985)?
1. Power the camera with an external power supply (ref. 9982 with adapter ref. 9984) or
with a POE switch.
2.ConnectanRJ-45cablefromthecameratoyourPC(thePCmustbeconguredwithin
the IP range of the 192.168.1.xx Interface).
3. Open a browser and enter the IP address (192.168.1.64) that the camera has by default
ifyouwanttochangeyourcamera'sIPandport.Thersttimeyouarepromptedtoenter
apasswordandconrmit,enterfermax123oryourchoiceofpassword.
4. Enter user admin and password fermax123. Go to Basic Settings.
Change the IP to 192.168.1.205, for
example.
The port tab will show 554 for the RTSP
protocol.
Video:
Resolution 720P, Video Quality Highest,
Frame Rate <30, Video Encoding H264,
ProleHighProle.
Exit.

DUOX PLUS IP CAMERA INTERFACE 9
3rd Press the programming button for 2 seconds to
activate the web server. The white WiFi LED on the
monitor will start blinking.
Yes,yourPCmustbeconguredwithintheIPrangeof
theInterface(192.168.1.xx):
1st Connect the DUOX PLUS bus (24Vdc) to the
Interface. The red PWR LED will start blinking every
second.
2nd Connect the RJ-45 Ethernet cable directly from
the PC to the Interface or via switch.
5.2 How do I know that my camera settings are correct?
1. Connect the IP camera to a POE switch or power it with an external power supply
2.ConnectthePCtothesameswitch(thePCmustbeconguredwithintheIPrangeof
the Interface (192.168.1.xx).
3. Open the VLC Media Player application and under Media Open Network Location.
4. Write the RTSP URL of the camera example
rtsp://admin:[email protected]:554
and check that the camera is displayed correctly. This allows you to conrm correct
functioning and that the RTSP URL address is correct.
5.3 How can I reset the Interface to factory settings if I don't remember the
password or IP I have entered?
Press PRG for 10 seconds until the red LED blinks rapidly several times.
Thedefaultsettingsare:
• IPAddress:192.168.1.100
• Mask: 255.255.255.0
• User: admin(cannotbemodied)
• Nopassword.Thersttimeyoulogin,youwillbeaskedtocreateanewone.
5.4 I am connected by cable but cannot access the Interface web server.
Always remember to press PRG for 2 seconds to activate the web server. The white WiFi
LEDwillstartblinkingindicatingthatyoumayaccesstheWiFiconguration.
5.5 What format should the password I enter into the Interface be in?
The password must have at least 8 digits and include uppercase letters, lowercase letters,
numbers and symbols.
5.6 What happens if I enter the wrong password into the Interface?
It will block access for 5 minutes after 3 unsuccessful attempts.
5.7 How can I exit the web server or conguration?
Access will be disabled after 5 minutes without any device connecting or 20 minutes after
the last activity. It shall also be possible to press the programming button for 2 seconds to
disable it manually.
5.8 Can I congure the Interface via my PC?

10 DUOX PLUS IP CAMERA INTERFACE
Close-up of auto switch-on operation
Panel or Camera
Identier
Panel 0or Camera 0of the Monitor block
1
5.11 How does the DUOX PLUS auto switch-on work with the Interface installed?
5.9 Can I activate an auxiliary device when viewing a particular camera,
instead of releasing the door via a panel?
Yes, it is possible by means of the advanced relay (ref. 3267), as this can be programmed
withthepanelandblocknumberofyourchoice.Thestepswouldbetocongureoneof
the panels as a General Entrance or block and indicate the corresponding panel number
and then programme the relay with that address, then leave the panel as it should be and
so the monitors that automatically switch on that block will activate the relay.
5.10 How can I update the Interface rmware?
ToupdatethermwareoftheDuoxPlusIPcamerainterfacethroughthewebserveritis
necessarytouploadtheupdatelewiththefollowingnameandextension:
rmwareUpgrade.tar.bz2
Note: it is important not to change the le name.
4th Open a browser.
• 1.GototheIPofthedefaultinterface:
192.168.1.100.
• 2. Enter/create password.
The white WiFi LED will stay on continuously when
connecting to the PC.
Other manuals for DUOX PLUS
6
This manual suits for next models
1
Table of contents
Languages:
Other Fermax Recording Equipment manuals