Ferrari ZEUS User manual

“ZEUS” CORKER
OPERATION AND MAINTENANCE MANUAL
PATENTED

2
PRESENTATION / TABLE OF CONTENTS
Presentation
Dear Customer,
Thank you for choosing FERRARI GROUP SRL.
Please read the instructions in this manual carefully. The proper use and
maintenance of this corker will help to ensure that it reaches its maximum
life expectancy as well as keep the warranty valid.
Please store this manual in a safe place and consult it before proceeding
with any operation, format change, or cleaning task.
Table of contents
Introduction _
Warranty _ 3
Usage conditions and limitations _____ _4
Technical specifications and Kit ________5
Preliminary operations _ 7
Configuration for 8 -12 liter bottles ________________ 8
Configuration for 5 liter bottles ________ 10
How to restore initial configuration 10
How to adjust the pin for standard corks __ 12
Operation ______ _______ 13
Maintenance 14
Storage and demolition _______ 15
Overview table 1 _______ 16
Overview table 2 17
Exploded view drawing 18

All the rights are reserved, inclusive those of translation. It is forbidden to reproduce completely or
in part this publication without the authorization of the FERRARI GROUP s.r.l.
3
INTRODUCTION
WARRANTY
Introduction
Please read this manual carefully before using the corker.
To get the maximum performance, reliability, and durability of the corker, it is
important that you follow these instructions carefully.
This manual is an integral part of the corker and must be carefully stored by the
user.
This manual must accompany the corker if it is sold to a new user.
Notwithstanding the main technical and safety features of this product, in a
continuing effort to improve production, the manufacturer reserves the right to make
changes without notice in order to improve its products.
IMPORTANT! Follow all instructions marked with this symbol very carefully
as they include information on important safety regulations.
Warranty
FERRARI GROUP SRL warrants the corker described in this manual for a period of
5 YEARS starting from the date of delivery. Within this period, the manufacturer
agrees to repair or replace faulty parts, provided that the corker has been properly
used in compliance with the instructions included in this operation and maintenance
manual.
The warranty will be voided for the following:
1. Poor maintenance and misuse of the corker
2. The use of non-original spare parts;
3. Tampering by persons not authorized by FERRARI GROUP SRL.
The spare parts replaced under warranty must be returned (on request)
The warranty does not cover parts of the corker that are subject to wear.
FERRARI GROUP SRL shall not be held liable for general malfunctions or
failures caused by improper use or interventions and/or modifications
performed by unauthorized external persons.

4
USAGE CONDITIONS AND LIMITATIONS
Usage conditions and limitations
The Zeus corker is a manual corking machine and has been designed to
cork bottles only with corks made of cork or synthetic material. The
maximum dimensions of both corks and bottles are specified in the
“Overview table 1” on page 16.
FERRARI GROUP s.r.l. shall not be held liable for injuries to persons/animals, or
damages to property or the corker arising from improper use.
DO NOT REMOVE TEMPORARY GUARDS ON MOVING PARTS
This symbol indicates that it is forbidden to remove safety guards
and devices except if set-up adjustments are necessary.
SAFETY GLOVES MUST BE WORN This symbol indicates
that safety gloves must be worn when corking or during any
other maintenance or handling operation.

All the rights are reserved, inclusive those of translation. It is forbidden to reproduce completely or
in part this publication without the authorization of the FERRARI GROUP s.r.l.
5
Technical specifications and Kit
The overview table below provides an overview of the technical data specifications
for the “Zeus” corker.
The corker is furnished with the following equipment:
N.3 numbered bottle mouth adaptors;
N.1 cork pushing pin ø15 mm, h 55 mm;
N.1 cork pushing pin ø15 mm, h 40 mm for mushroom corks;
N.1 kit for large bottles (see picture on the right) consisting of:
N.2 5 mm spacers (A photo)
N.1 centering plate (B photo)
N.1 eccentric cork pushing pin, ø19 mm h 55mm (C photo)
N.1 eccentric cork pushing pin, ø19 mm, h 40 mm,
for mushroom corks (D photo)
N.1 extension rod for bottle height adjustments (E photo)
N.1 Prism lock pin (F photo)
The “overview table 1” includes bottle and cork measurements for the correct
use of the parts included with the corker.
The “preliminary operations” section covers the procedures for assembling the
parts listed above.
Weight Material Length
Width
Height
Volume
(kg) (mm) (mm) (mm) (m3)
43 -Stainless Steel
-Hardened Steel 550 700 1400 0,54
TECHNICAL SPECIFICATIONS AND KIT
(foto A)
(foto C) (foto E)
(foto F)

6
TECHNICAL SPECIFICATIONS AND KIT
Technical specifications and Kit
The base of the “Zeus” corker consists of 4 adjustable feet with non-slip rubber which
are also suitable for uneven floors.
The machine can be transported manually as has 2 wheels and a handle for pulling it.
Watch out for bumps, holes, objects, and material when moving the machine to
prevent it from tipping over.

All the rights are reserved, inclusive those of translation. It is forbidden to reproduce completely or
in part this publication without the authorization of the FERRARI GROUP s.r.l.
7
PRELIMINARY OPERATIONS
Preliminary operations
When you receive the corker, check that the machine and its accessories match
the list on page 5. Make sure that the product has not been damaged during
transport.
The machine is delivered ready to cork 3 liter bottles with 55 mm
long and ø15 mm plunger and the n.2 bottle mouth adaptor (for
cork measurement see “overview table 1”.
If specifically requested, the corker can also be calibrated for a different sized bottle.
For all other types of bottles follow the operations listed below.
To adjust the height of the platform simply screw or unscrew the black
adjustment knob located on the lower front right hand side. If necessary, mount
the extension rod provided with the machine (see “overview table 2”).
Adjustment
knob
Extension rod
for platform
extender

8
PRELIMINARY OPERATIONS
Preliminary operations
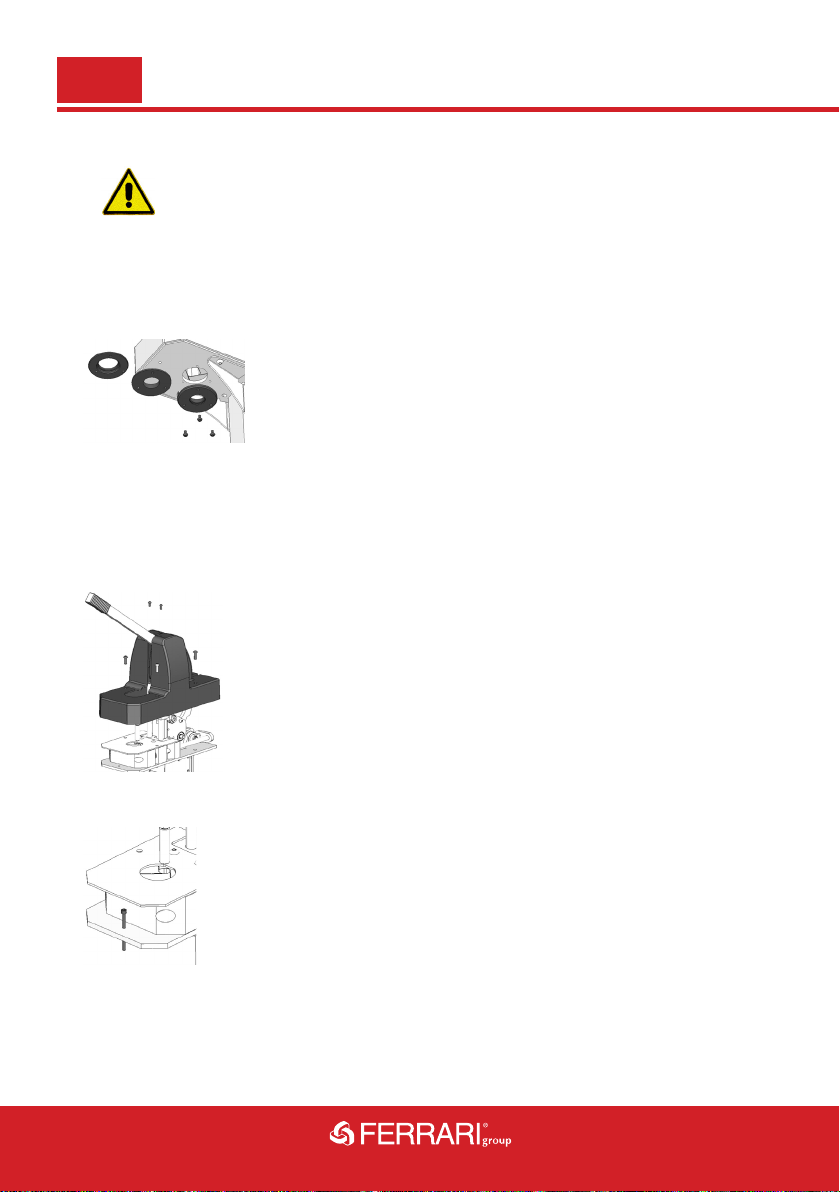
Configuration for 8 -12 liter bottles
Follow the instructions below to assemble the kit for large bottles:
1) Remove the end part of the corking lever.
2) Unscrew the 6 setscrews of the clear safety guard
3) Now remove the safety guard
4) Insert the prism lock pin.
5) Loosen the 2 screws (see picture)
6) Insert the 2 5mm spacers included in the kit for large bottles

All the rights are reserved, inclusive those of translation. It is forbidden to reproduce completely or
in part this publication without the authorization of the FERRARI GROUP s.r.l.
9
PRELIMINARY OPERATIONS
Preliminary operations
7) Replace the screws and firmly tighten them
8) Unscrew the 2 nuts and remove the 15 mm diameter
plunger (see picture)
9) Insert and screw in the 19 mm diameter plunger (for
champagne corks use the 40 mm long pin, otherwise select
the 55 mm long plunger) with the centering template
included in the kit for big bottles (see picture)
10) Once adjustments are complete, tighten the 2 nuts
11) Check that the plunger is centered on the centering
hole when it goes down.
Position the cork in the bottle by screwing or unscrewing the
plunger (see picture)
12) Remove the centering template
13) Remove the prism lock pin.
14) Put the safety guard back on
10
PRELIMINARY OPERATIONS
Preliminary operations
CAUTION The 19 mm eccentric plunger must always be mounted
with the kit, in order not to damage the 4 prisms
Configuration for 5 liter bottles
Follow the same procedure explained in the previous
paragraph. In addition, mount adaptor n. 3 on the machine
(as indicated in table n.1)
How to restore the initial configuration (0.75 –1.5 –3 liter bottles)
Follow the procedure below to restore the machine to the standard version:
1) Remove the end part of the corking lever.
2) Unscrew the 6 setscrews of the safety guard (see picture)
3) Now remove the safety guard
4) Insert the prism lock pin as shown in the picture

All the rights are reserved, inclusive those of translation. It is forbidden to reproduce completely or
in part this publication without the authorization of the FERRARI GROUP s.r.l.
11
PRELIMINARY OPERATIONS
Preliminary operations
5) Loosen the 2 screws shown in the picture
6) Remove the 2 5mm spacers shown in the picture
7) Put the 2 screws back in
8) Unscrew the 2 nuts and remove the 19 mm diameter plunger
9) Screw the 15 mm diameter pin back in (for champagne
head corks use the 40mm long pin, otherwise select the 55mm
long pin) with the 2 lock nuts, adjusting the height desired for the
cork.
10) Mount adaptor n.1 or n.2 depending on the mouth of the
bottle that you would like to cork (see overview table n.1)
IMPORTANT: The 3 adaptors are suitable for most mouth sizes of off-the-
shelf bottles. However, check that the adaptor is the appropriate size before
proceeding to corking operations (if it is not compatible, please contact the
technical office of FERRARI GROUP SRL and they will be able to produce a
part to meet your requirements)
The 15 mm diameter plunger does not require the centering
template
12
PRELIMINARY OPERATIONS
Preliminary operations
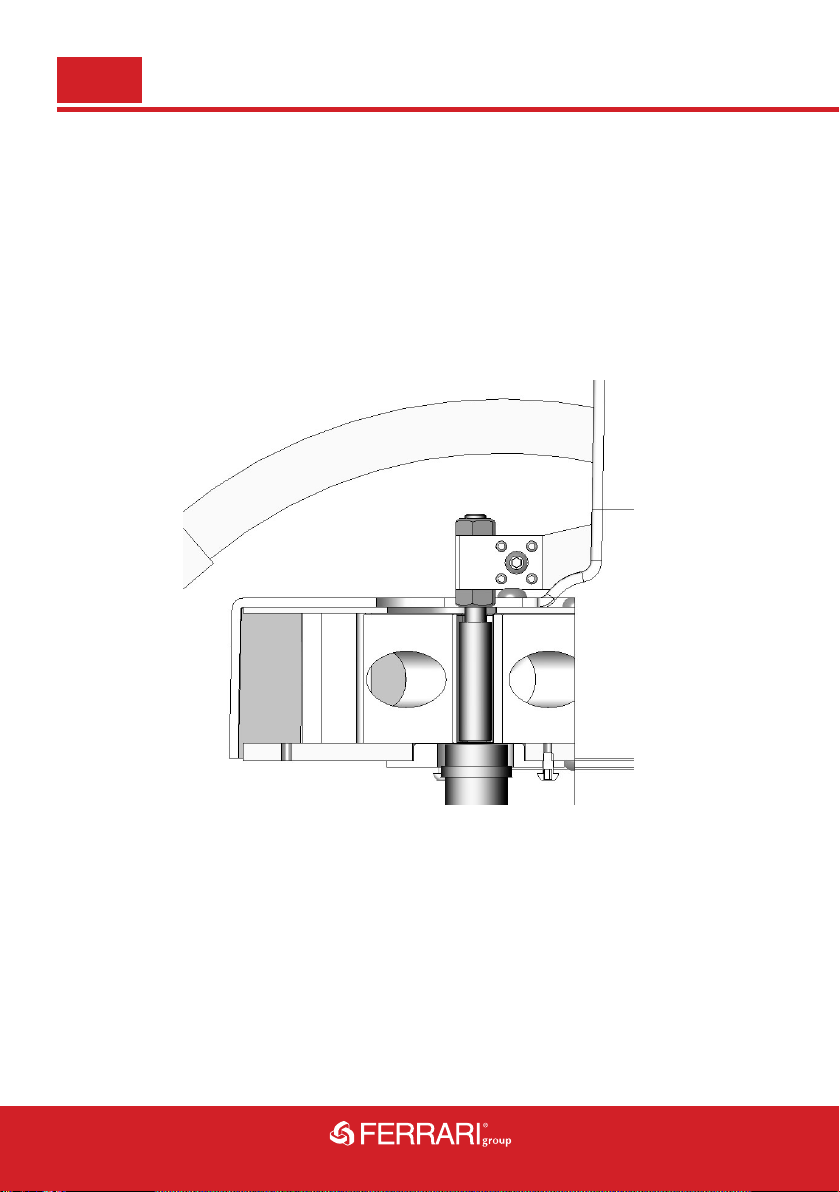
How to adjust the pin for standard corks
For successful bottle corking, i.e. so that the cork is flush with the bottle, you
must adjust the 55 mm long pin (ø19 or ø15 as required) so that when the
lever is in the horizontal corking position, the pin is flush with the lower end of
the prisms (see the illustration below).

All the rights are reserved, inclusive those of translation. It is forbidden to reproduce completely or
in part this publication without the authorization of the FERRARI GROUP s.r.l.
13
OPERATION
NO
Operation
1. Position the corking lever in a vertical position
2. Press the pedal with your foot to lift and lower the
platform
3. Place the bottle on the platform
4. Release the pedal carefully until the upper mouth of
the bottle reaches the mouth adaptor of the machine
(see picture)
5. Put a cork in the opening at the top
6. Pull down on the corking lever and cork the bottle
7. Make sure that the cork is completely inserted in the bottle and
complete the cycle
8. Bring the corking lever back to the initial position
9. Press the up-down pedal with your foot
10. Remove the bottle
11. Release the pedal
CAUTION: Press the up-down pedal only when the lever is in the
vertical position; failure to do so may cause permanent damage to
the locking clutch.
YES NO
YES

14
MAINTENANCE
Maintenance
•To keep the machine in perfect working condition it is very important that you
clean off any dust on the cork,
•Use a brush or compressed air to remove any cork residue that may
accumulate in the moving seat of the prisms,
•Keep the work area clean and free of any material that could obstruct
corking operations,
•Keep the surrounding area clean; in particular, make sure that the area is
free from oil and grease or other materials that could make the floor slippery,
•Use lithium grease to lubricate the gear shafts,
•Use grease or neutral food grade Teflon solids or spray to lubricate internal
head movements (prisms, gibs) coming into contact with corks.
Check that:
-All safety guards have been properly mounted and closed.
Once a year:
-Check that all screws and bolts are properly tightened on the machine.

All the rights are reserved, inclusive those of translation. It is forbidden to reproduce completely or
in part this publication without the authorization of the FERRARI GROUP s.r.l.
15
STORAGE AND DEMOLITION
Storage and Demolition
If the machine is kept in storage for an extended period of time, store it in an area
protected from rain and wind and, if possible, in a dry area.
Do not expose the machine to temperatures that are less than -10°C or greater than
+ 60°C.
It is forbidden to leave the machine or parts of the machine on
structures that have not been especially designed for it.
Do not leave material or tools on the machine.
Machine Disposal
Any waste resulting from dismantling the machine must be disposed of in an eco-
friendly manner, thus avoiding ground, air, and water pollution.
In any case, you must comply with all local laws in force on waste disposal.
We would like to remind you that waste is defined as any type of substance or
object which the holder disposes of or is required to dispose of (Legislative Decree
n.22 of 5 February 1997 and Legislative Decree n. 389 of 8 November 1997).
Waste resulting from the dismantling of the machine is classified as special waste.
Demolition Materials
These are non-hazardous special waste that can be recovered, in accordance
Ministerial Decree 5 February 1998
•Ferrous materials, aluminum, stainless steel, copper;
•Plastic materials;
•Electronic cards;
•Electric conductors.
Information on proper waste management
Ferrous materials: As this type of material can be recycled (secondary raw
materials) it should be delivered to the appropriate authorized collection center.
Plastic materials; Recycling is permitted, if provided.
This type of material should be disposed of in urban waste type landfills.
Incineration is permitted in facilities equipped with post combustion and dust control
systems before release into the environment

16
OVERVIEW TABLE 1

All the rights are reserved, inclusive those of translation. It is forbidden to reproduce completely or
in part this publication without the authorization of the FERRARI GROUP s.r.l.
17
OVERVIEW TABLE 2

18
EXPLODED VIEW DRAWING

All the rights are reserved, inclusive those of translation. It is forbidden to reproduce completely or
in part this publication without the authorization of the FERRARI GROUP s.r.l.
19
EXPLODED VIEW DRAWING

Via Europa, 11 - 43022 Basilicagoiano - Parma (Italy)
Tel. + 39.0521.687125 - Fax +39.0521.687101
E-mail: info@ferrarigroup.com Web: www.ferrarigroup.com
Table of contents


