FERREX PSI30 User manual

User Manual
701256
30W WOOD BURNING KIT
Product
Info
Read all safety warnings and all instructions
thoroughly before operating this product.
Ensure you keep your manual in a
safe place for future reference.
IM ed 5; 05/2020

MODEL No.: TGT2001, PRODUCT No.: 700069
QR codes take you where you want to go
quicky and easily
Whether you require product information, spare parts or accessories,
details on warranties or after sales service, or if you want to watch
a product demonstration video, our QR codes will take you there in
no time at all.
What is a QR code?
A QR-code (QR=Quick Response) is a type of matrix that can be read
with a smartphone camera and that contains a link to a website or
contact details, for example.
Advantage: You are not required to manually enter a website address
or contact details.
How it works
To scan the QR code, all you need is a smartphone with QR codes reader
software and an Internet connection*. This type of software can be
downloaded for free from your smartphone’s app store.
Try it out now
Just scan the QR code with your smartphone and
nd out more about the Aldi product you have
purchased*.
* Depending on your tari you may be charged
for the connection.
Product
Info

REGISTER YOUR PURCHASE AT www.aldi.com.au/en/about-aldi/product-registration/ TO KEEP UP-TO-DATE WITH IMPORTANT PRODUCT INFORMATION.
The product is guaranteed to be free from defects in workmanship and parts for a period of 36 months from the
date of purchase. Defects that occur within this warranty period, under normal use and care, will be repaired,
replaced or refunded at our discretion. T conferred by this warranty are in addition to all rights and remedies in
respect of the product that the consumer has under the Competition and Consumer Act 2010 and similar state
and territory laws.
Our goods come with guarantees that cannot be excluded under the Australian Consumer Law. You are entitled
to a replacement or refund for a major failure and for compensation for any other reasonably foreseeable loss or
damage. You are also entitled to have the goods repaired or replaced if the goods fail to be of acceptable quality
and the failure does not amount to a major failure.
30W Wood burning kit
Warranty details

MODEL No.: TGT2001, PRODUCT No.: 700069
Contents
Pack contents / parts 2
Description of symbols 3
General Safety Warnings 4
Additional Safety Rules for your Wood Burning Kit 4
Parts List 6
Assembly 7
Operation 8
Storage 11
Maintenance 11
Warranty 12
Environmental Protection 13
What your 3 year warranty means 13
Service Support 13
Specications 14

MODEL No.: TGT2001, PRODUCT No.: 70096
Congratulations on the purchase of your FERREX® 30W Wood Burning Kit when
you open your packaging, rst remove all items and check there are no parts
damaged or missing. If you nd anything wrong, do not operate the product
until the parts have been replaced or the fault has been rectied. Failure to do so
could result in serious personal injury.
Application
First time users or inexperienced operators pay particular attention to the
operation of the 30W Wood Burning Kit, including details of starting and
stopping and correct use of the 30W Wood Burning Kit on page 8, as well as the
maintenance instructions on page 11.
Intended use of the 30W Wood Burning Kit
It is exclusively intended for home use. It is not designed for trade or commercial
use.
This 30W Wood Burning Kit, hereafter refered to as device, can be used to quickly
and permanently brand decorative and markings onto wood, leather, cork, paper
mache, smooth fabrics, thin plastic materials, candle wax and other materials or
to remove parts of their surfaces. The comprehensive range of tips and stamps
supplied can also be used for soldering when tted with the corresponding
tip. Any other use or change to the appliance is deemed improper and poses a
signicant risk of accidents.
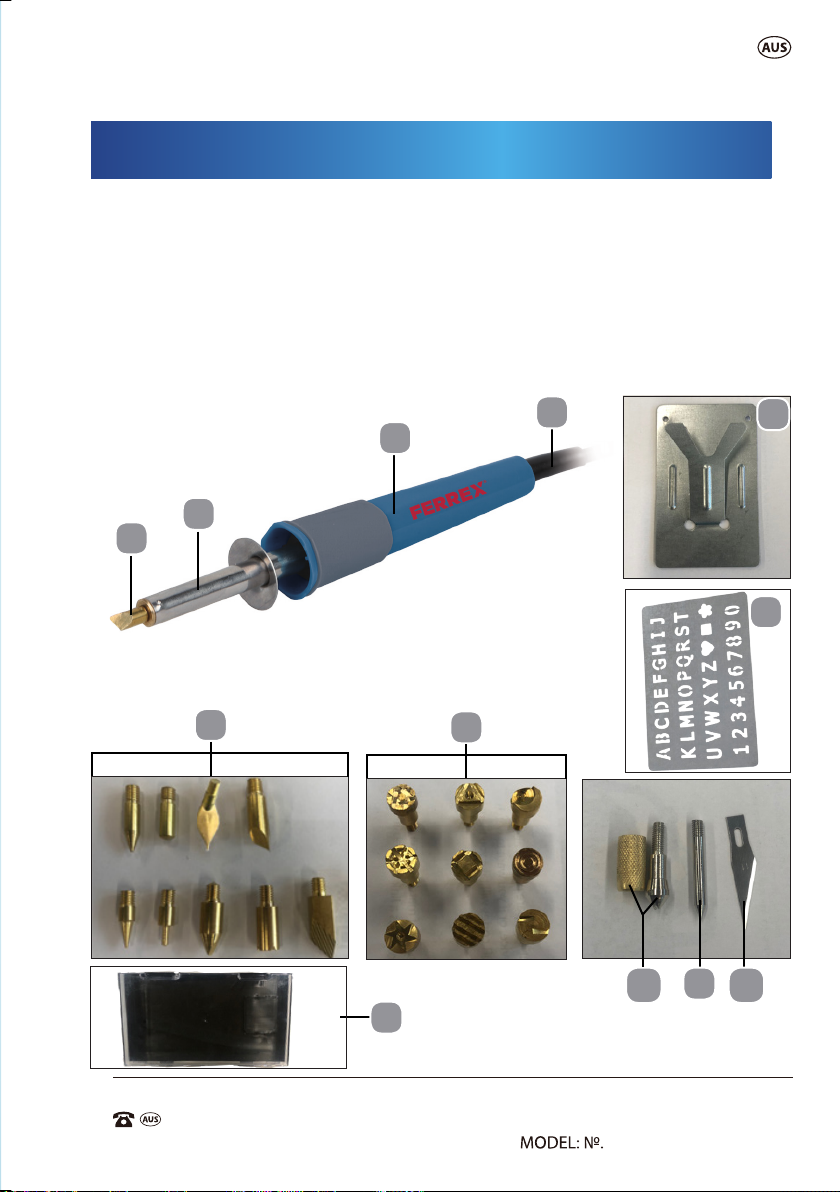
Contents of carton
1 x 30W Wood Burner
10 x Wood Burning Drawing Tips
9 x Wood Burning Stamping Patterns
1 x Solder Tip
1 x Hot Knife Blade
1 x Hot Knife Collet
1 x Safety Stand
1 x ABC/123 Template
1 x Carry Case
1 x Instruction Manual
1 x Warranty Card & details
Pack contents / parts
2
MODEL No.: TGT2001, PRODUCT No.: 700069
Description of symbols
The instruction manual, rating plate, or on the product itself, may show
these symbols. These represent important information about the product or
instructions on its use.
Conforms to relevant standards for electrical safety
and electromagnetic compatibility.
Read operator’s manual
Wear hearing protection. Wear eye protection.
Wear breathing protection.
Warning.
36 Months Warranty
The lm is not recyclable at kerbside, and should be placed in the
general waste bin.
36
Film
3

MODEL No.: TGT2001, PRODUCT No.: 70096
General safety warnings
WARNING! Read all safety warnings and all instructions.
Failure to follow the warnings and instructions may result in electric
shock, re and/or serious injury.
Save all warnings and instructions for future reference.
- This appliance is not intended for use by persons (including children) with
reduced physical, sensory or mental capabilities, or lack of experience and
knowledge, unless they have been given supervision or instruction concern-
ing use of the appliance by a person responsible for their safety.
- Children should be supervised to ensure that they do not play with the ap-
pliance.
If the supply cord is damaged, it must be replaced by the manufacturer, its
service agent or similarly qualied persons in order to avoid a hazard.
Additional safety warnings for your soldering gun
1. Before connecting the device to the mains - ensure the unit is switched
OFF because it will achieve maximum heat in a little time.
2. Always place the device on its stand after use and allow it to cool down
before storage and never touch the heat deector.
3. Never attempt to use the device to dry animals, clothing or hair.
4. Never use this device as a hair dryer.
5. Be aware that heat may be conducted to combustible materials that are
out of sight.
6. Be careful when using this device in places where there are combusti-
ble materials or gases; extreme caution must be taken to prevent re or
explosion.
4

7. Do not apply to the same place for a long period of time.
8. Do not use in presence of an explosive atmosphere. Always use it in ven-
tilated areas.
9. Do not leave the device unattended when it is switched on.
10. The device is not to be stored or left outdoors.
11. This device is designed for light domestic use only, it is not designed for
industrial purposes and every care has been taken to make the device
safe, accidents can happen. By following the simple safety guide, you can
avoid serious accidents.
5
AFTER SALES SUPPORT
(toll free)
30W Wood Burning Kit
PSI30 • 05/2020 • 701256
05/2020
6
1. 10 pcs Wood Burning drawing
tips (drawing patterns)
2. Branding rod
3. Handle
4. Mains cable with plug
5. Soldering tip
6. Hot Knife Collet
7. Hot Knife Blade
8. 9 pcs Wood Burning Stamping
Patterns (stamping tips)
9. Safety Stand
10. ABC/123 template
11. Carry case
Parts List
1
6
8
9
10
7
5
11
1
2
3
4

30W Wood Burning Kit
AFTER SALES SUPPORT
MODEL: PSI30 • 05/2020 • 701256 (toll free)
05/2020
7
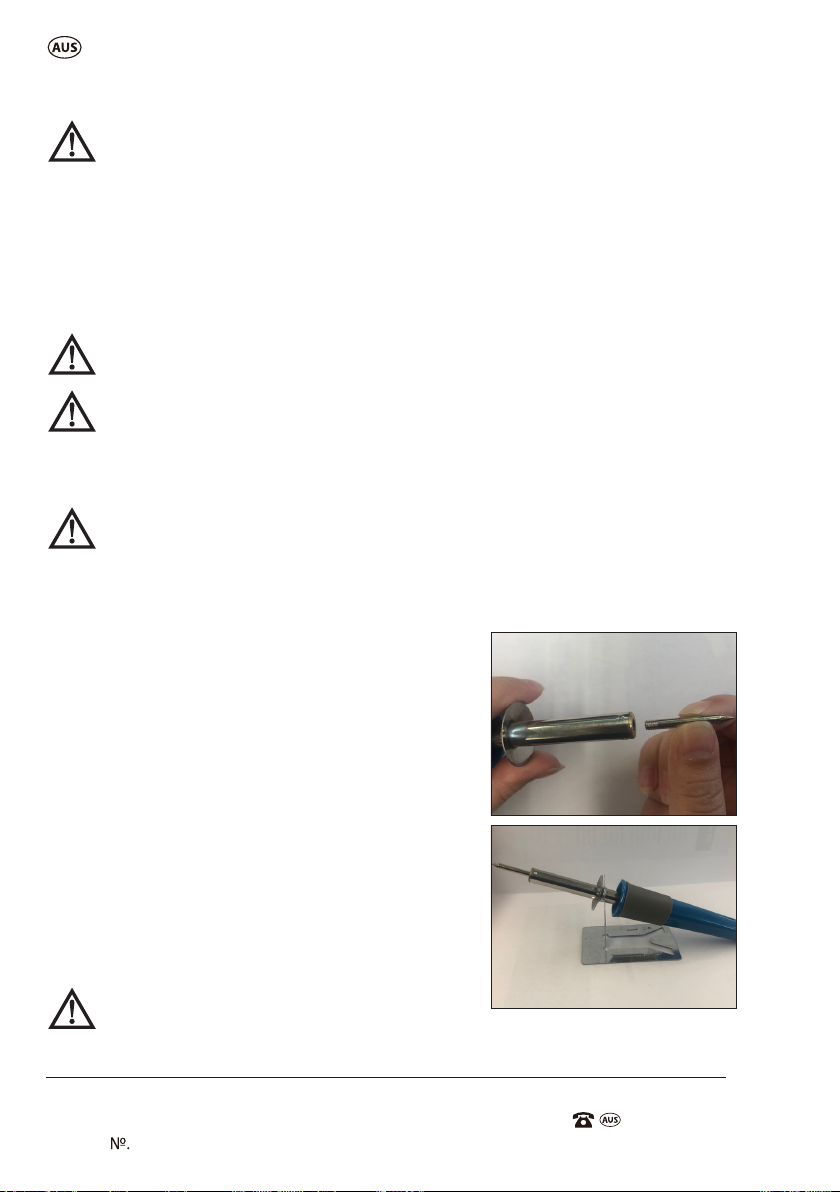
Assembly
1. Fitting the soldering tip and the branding
accessories (Fig A)
1) Use a small pair of pliers or tweezers to
loosen the soldering tip (5) or the branding
accessories (1/8).
2) Install the soldering tip or the branding
accessories, then turn in a clockwise direction
to secure.
3) Do not overtighten the soldering tip or branding accessories otherwise
they will be hard to remove or could become deformed.
4) Make sure the soldering tip or branding
accessories is screwed ush to the branding
rod.
WARNING: The soldering tip and the
branding accessories may only be
replaced when the device has been switched o
and the soldering tip or the branding accessories
have cooled down.
2. Installing the knife blade (Fig B1-B3)
1) Assemble the knife collet (6) as shown in Fig
B1.
2) Insert the knife collet into the branding rod
(2) and turn in a clockwise direction. Do not
tighten the knife collet at this time (Fig B2).
3) Insert the knife blade (7) into the knife collet
and then tighten the knife collet by turning it
clockwise (Fig B3).
WARNING: Wear heavy gloves when
installing the knife blade to avoid injury.
A.
B1.
B2.
B3.

AFTER SALES SUPPORT
(toll free)
30W Wood Burning Kit
PSI30 • 05/2020 • 701256
05/2020
8
Operation
WARNING: Before using your device, be sure to read the
instruction manual carefully.
1. ON/OFF switch
To start the device, connect the power plug to the mains socket and turn
on the mains power switch. To turn o it, turn the mains power switch o,
then remove the power plug from the mains socket.
WARNING: Never heat up the device without a tip or accessory tted to
the device. Never leave the device unattended while heating up.
2. Safety stand (Fig C)
The safety stand is closed upon purchase, inside
the case. Open the safety stand by ipping up
the middle section as shown in Fig C before
operation. The stand is handy for resting the
device or assisting with operation.
3. Branding (Fig D1-D2)
1) Screw the desired branding accessories
(1/8) onto the branding rod (2) as described
in "Fitting the soldering tip and the branding
accessories" (Fig D1).
2) Place the branding rod onto the stand (9) so
that the Y-shaped mount on the stand supports
the branding and soldering iron between the
sleeve and the handle (Fig D2).
3) Connect the power plug into a mains power
socket, and then turn the mains power switch
on. The device is now heating up.
4) Wait for approx.10 minutes until the branding
accessory has heated up fully.
C.
D1.
D2.
30W Wood Burning Kit
AFTER SALES SUPPORT
MODEL: PSI30 • 05/2020 • 701256 (toll free)
05/2020
9
WARNING: Do not leave the device unattended during the heating
process.
5) You can use the supplied template (10) to brand letters and numbers.
6) Hold the device on the handle like a pen while working.
7) Test the branding eect initially on a sample piece of material.
8) Turn o the mains power switch, and disconnect the plug from the
mains socket after nishing your work and allow the device to cool down
for at least 30 minutes.
WARNING: Do not leave the device unattended during the cool down
process.
WARNING: Exert as little pressure as possible on the hot branding
accessories. They are made out of brass and could become deformed if
too much pressure is applied. The branding eect should mainly be created
by the heat.
WARNING: Larger branding accessories may cool down a little during
the branding process. In this case, wait a few minutes until the
branding accessories has heated up again fully.
4. Soldering (Fig E1-E2)
1) Screw the desired soldering tip (5) onto the
branding rod (2) as described in "Fitting the
soldering tip and the branding accessories" (Fig
E1).
2) Place the branding rod onto the stand (9) so
that the Y-shaped mount on the stand supports
the branding and soldering iron between the
sleeve and the handle (Fig E2).
3) Connect the power plug into a mains power
socket, and then turn the mains power switch
on. The device is now heating up.
4) Wait for approx. 10 minutes until the
soldering tip has heated up fully.
WARNING: Do not leave the device
unattended during the cool down process.
5) Hold the device on the handle like a pen while working.
E1.
E2.

AFTER SALES SUPPORT
(toll free)
30W Wood Burning Kit
PSI30 • 05/2020 • 701256
05/2020
10
6) Hold the soldering tin (not supplied) against the hot tip until the metal
is liquied and ows onto the point to be soldered. Melt the soldering tin
(with soldering ux) (not supplied) between the soldering point and the
soldering tip. Add further soldering tin until the entire soldering point has
been wetted.
7) Allow the solder to solidify and avoid any vibrations.
8) Clean the soldering tip with a clean, damp sponge. After cleaning, the
soldering tip must be tinned: Tin the hot soldering tip by melting the
soldering tin.
9) Turn o the mains power switch, and disconnect the plug from the
mains socket after nishing your work and allow the device to cool down
for at least 30 minutes.
NOTE: The soldering and branding iron has a nominal power rating of 30
Watts and is thus ideal for soldering electronics. It is particularly suitable for
hard to reach areas and ne soldering work due to its design.
The best results are achieved with electric solder with a diameter of 1.0 or
1.5 mm, 60% Sn, 40% Pb.
We recommend using a contact paste as a soldering ux (not soldering ux
greases or soldering ux liquid). The soldering ux is either contained in
the solder or is applied separately.
5. Cutting tip (Fig F)
1) Screw the cutting tip onto the branding rod
(2) as described in "Fitting the soldering tip and
the branding accessories".
2) Place the branding rod onto the stand (9) so
that the Y-shaped mount on the stand supports
the branding and soldering iron between the
sleeve and the handle.
3) Connect the power plug into a mains power socket, and then turn the
mains power switch on. Ensure that the power supply is suitable. The
device is now heating up.
4) Wait for approx.10 minutes until the branding accessory has heated up
fully.
5) You can use the cutting tip to cut the plastic or soft materials.
6) Hold the device on the handle like a pen while working.
F.
30W Wood Burning Kit
AFTER SALES SUPPORT
MODEL: PSI30 • 05/2020 • 701256 (toll free)
05/2020
11
Cleaning and Storage
• Make sure you have read the safety instructions before cleaning.
• Clean the device and all of its accessories using a lint-free cloth. If
necessary, slightly moisten the cloth and use a mild soap solution where
required. Make sure that no water penetrates inside the housing.
WARNING: Never use alcohol, acetone, benzene or any other
aggressive cleaning agents, hard brushes, metal objects or similar
to clean the device.
• Dry all parts thoroughly before using the device again or store it. Always
keep the openings clean and dry.
• Store the device and its accessories inside the carry case, and in a
location that is protected from dust, moisture and direct sunlight and
that is also out of the reach of unauthorised persons.
Ensure the device is disconnected from the mains power supply before
attempting any maintenance.
Keep the outer case of the device clean and free from grease. Do not wash
with water or use solvents or abrasive. Use only mild soap and damp cloth
to clean the gun. Never let any liquid get inside the device. Never immerse
any part of the device into a liquid.
Clean the soldering tip after use.
If the supply cord is damaged, it must be replaced by a qualied electrician
or service agent.
Maintenance
7) Turn o the mains power switch, and disconnect the plug from the
mains socket after nishing your work and allow the device to cool down
for at least 30 minutes.
WARNING: Wear heavy gloves when installing the knife
blade.
WARNING: Do not leave the device unattended during the cool
down process.

AFTER SALES SUPPORT
(toll free)
30W Wood Burning Kit
PSI30 • 05/2020 • 701256
05/2020
12
Warranty
Your new FERREX® 30W Wood Burning Kit will more than satisfy your
expectations.
It has been manufactured under stringent FERREX® Quality Standards to
meet superior performance criteria.
You will nd your new 30W Wood Burning Kit easy and safe to operate, and,
with proper care, it will give you many years of dependable service.
CAUTION. Carefully read through this entire instruction manual before
using your new FERREX® 30W Wood Burning Kit.
Take special care to heed the Cautions and Warnings.
Your FERREX® 30W Wood Burning Kit has many features that will make your
job faster and easier. Safety, performance, and dependability have been
given top priority in the development of this 30W Wood Burning Kit, making
it easy to maintain and operate.
Use only FERREX® replacement parts for your product.
Non-conforming parts or modications made to parts will void your
warranty.

30W Wood Burning Kit
AFTER SALES SUPPORT
MODEL: PSI30 • 05/2020 • 701256 (toll free)
05/2020
13
Recycle unwanted materials instead of disposing of them as waste. All
tools, hoses and packaging should be sorted, taken to the local recycling
centre and disposed of in an environmentally safe way. Dispose of used
motor oil in a manner that is compatible with the environment. We suggest you
take it in a sealed container to your local service station for reclamation. Do not
throw it in the trash or pour it into the earth.
Great care has gone into the manufacture of this product and it should
therefore provide you with years of good service when used properly. In the
event of product failure within its intended use over the course of the rst
3 years after the date of purchase, we will remedy the problem as quickly
as possible once it has been brought to our attention. In the unlikely event
of such an occurrence, or if you require any information about the product
please contact us via our after sales support services, details of which can be
found in this manual and on the product itself.
After Sales Support TEL: 1300 889 028
If you have any issues with the operation of your product, please call us 1300
889 028 for advice.
Environmental protection
What your 3 year warranty means?
Service Support

AFTER SALES SUPPORT
(toll free)
30W Wood Burning Kit
PSI30 • 05/2020 • 701256
05/2020
14
Rated Voltage: 220-240V ~ 50Hz
Rated power: 30W
Protection degree: Class I
Net weight: 0.48kg
Product Dimensions: 240*135*50 mm
This product complies with:
Safety: AS/NZS 60335-1
AS/NZS 60335-2-45
IEC 60335.1
IEC 60335.2.45
EMC: EN 55014-1
EN 55014-2
EN 61000-3-2
EN 61000-3-3
Specications

This is a blank page

This is a blank page
MODEL No.: XG-KF2000, PRODUCT No.: 700096
1300 889 028 (toll free)
e-mail: info.aldi@positecgroup.com
ALDI guarantees that our exclusive brand products are developed to
product, please return it to your nearest ALDI store, within 60 days from
the date of purchase, for a full refund or replacement, or take advantage of
our after sales support by calling the supplier’s Customer Service Hotline.
Made in China
Ferrex® is a registered trademark of ALDI Stores
DISTRIBUTED BY:
ALDI STORES
1 SARGENTS ROAD
MINCHINBURY NSW 277
701256
05/2020
www.aldi.com.au
3
This manual suits for next models
1
Table of contents


