ferroamp EnergyHub User manual
Commissioning
guide
EnergyHub system
Rev A01


1
SVENSKA........................................................................................................................................................................................................................................ 2
Introduktion.................................................................................................................................................................................................................................. 2
1EnergyHub........................................................................................................................................................................................................................... 2
2EnergyHub + SSO ............................................................................................................................................................................................................. 4
3EnergyHub + Batteri ........................................................................................................................................................................................................ 5
4EnergyHub + SSO + Batteri........................................................................................................................................................................................... 5
ENGLISH......................................................................................................................................................................................................................................... 6
Introduction .................................................................................................................................................................................................................................. 6
1EnergyHub........................................................................................................................................................................................................................... 6
2EnergyHub + SSO ............................................................................................................................................................................................................. 8
3EnergyHub + Battery ....................................................................................................................................................................................................... 9
4EnergyHub + SSO + Battery .......................................................................................................................................................................................... 9
Revision history
Date
Revision
2020.11.03
A01–English & Swedish
PN: PD01295, Copyright Ferroamp Elektronik AB 2020. Document subject to change without prior notice.
Verify that you have the latest version of this manual on our website. www.ferroamp.com/downloads

2
SVENSKA
Introduktion
I detta häfte går vi igenom driftsättningen av ert EnergyHub-
system. Gå till det avsnitt som beskriver er systemtopologi bäst och
följ instruktionerna noggrant. Läs igenom samtliga instruktioner
innan du påbörjar driftsättningen.
1EnergyHub
NOTERA! Displayenhetens touchskärm funkar inte med handskar.
1. Gå igenom samtliga kontrollpunkter innan driftsättning i
installationsprotokollet som skickas med din EnergyHub. Skriv
under innan du går vidare med driftsättning
(installationsprotokoll går det att ladda ner från
www.ferroamp.com/downloads, Installer verification.pdf).
2. Starta EnergyHub:
a. EnergyHub Wall & Single XL: Slå på arbetsbrytaren
som kopplar ifrån ditt system från byggnadens AC-
nät.
b. EnergyHub XL Cabinet: I skåpets distributionsblock
slå på enfasbrytaren för displayen. Kontrollera att
alla säkringshållare är stängda, slå sedan på alla AC-
brytare för XL-modulerna.
3. Vänta i 1 minut. Under tiden systemet startar upp visas tre
vyer:
a. Ferroamps logga med underliggande framstegsfält
b. Booting…
c. Please wait… loading system settings
Tiden för de olika vyerna kan variera beroende på systemtyp.
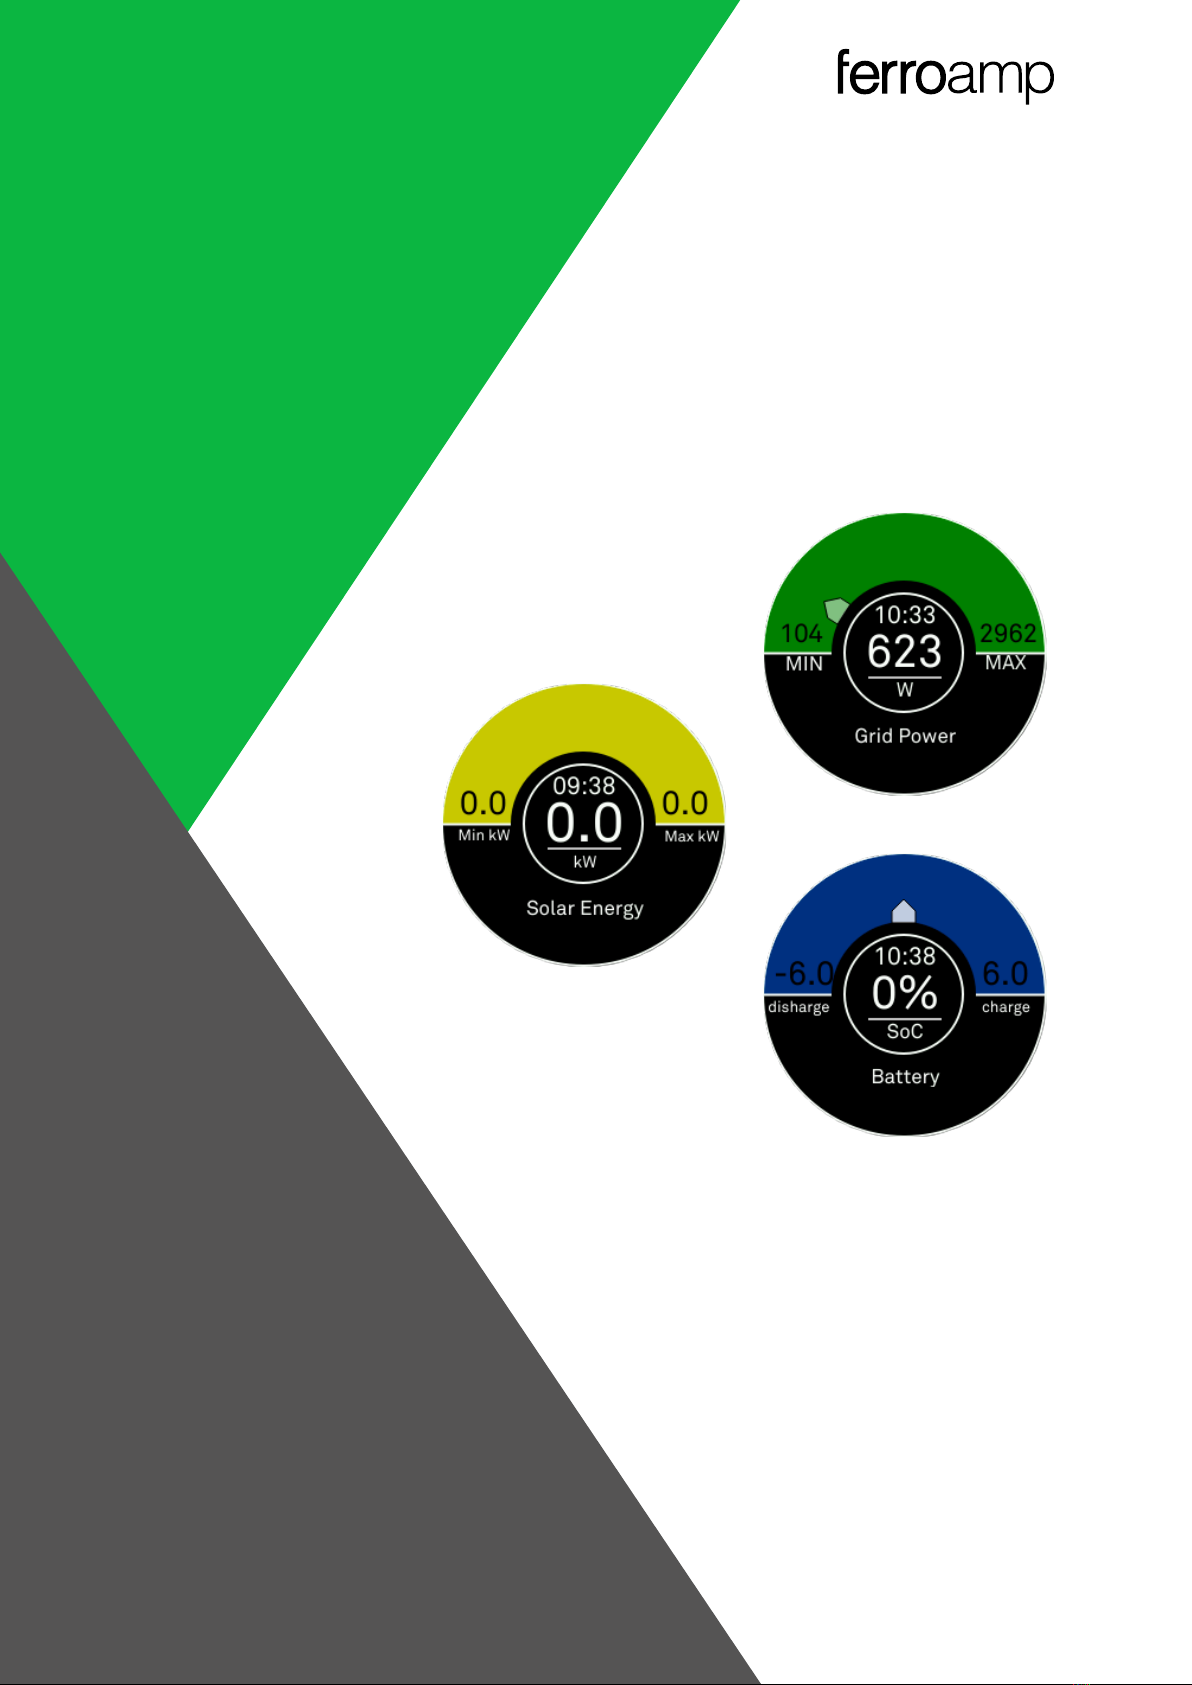
Din EnergyHub är igång när touchdisplayen på framsidan
visar:
4. Med ett finger, tryck i mitten av displayen i 5 sekunder tills
texten ”Service menu enabled” visas.
5. Du kan svepa höger och vänster med fingret på skärmen för
att byta vyer.
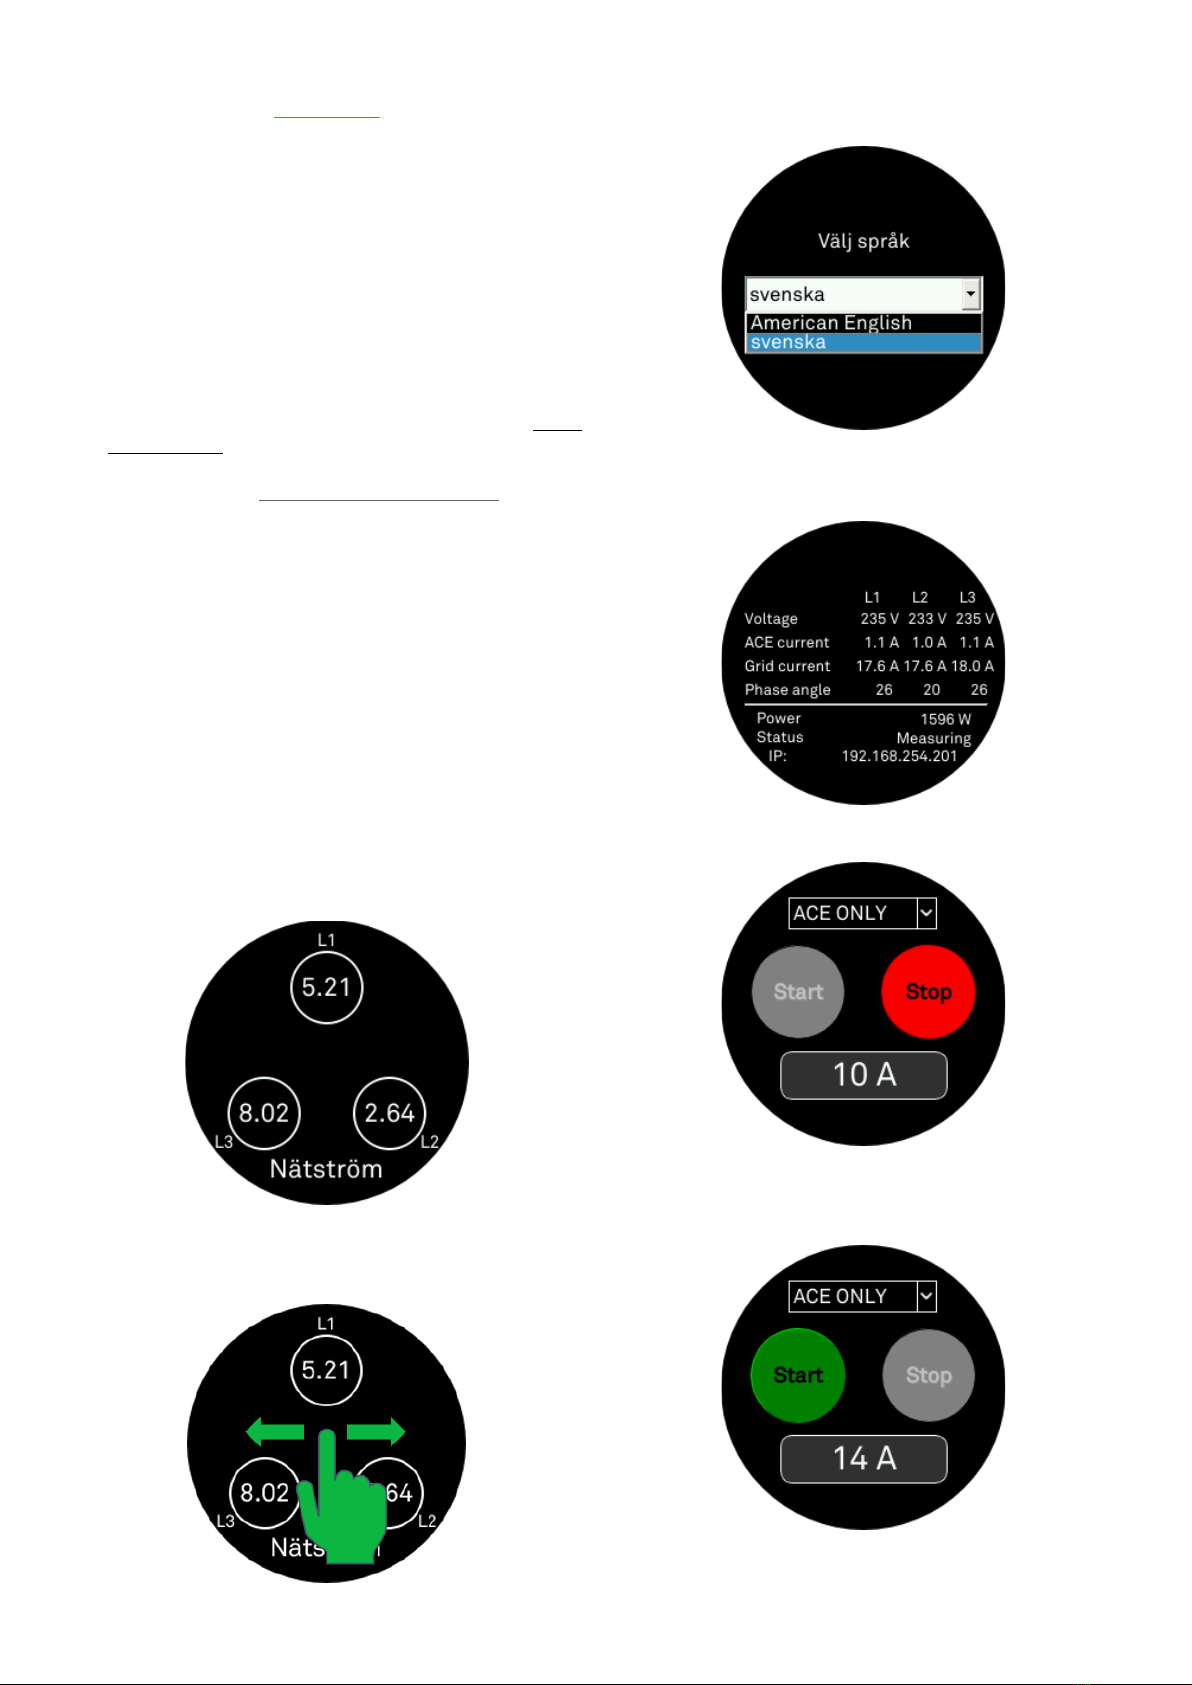
6. För att byta språk svep till följande vy där du kan välja
mellan svenska och engelska.
7. Svep tills du kommer till tabellvyn nedan, kontrollera att
status är satt till ”Measuring”innan du går vidare till steg 9.
Om inte fortsätt med steg 8.
8. Om inte, svep höger till följande vy och tryck på den röda
stoppknappen.
En grå ruta med texten ”Activating settings. Please wait…”
dyker upp. Därefter ska skärmen se ut på följande sätt:
3
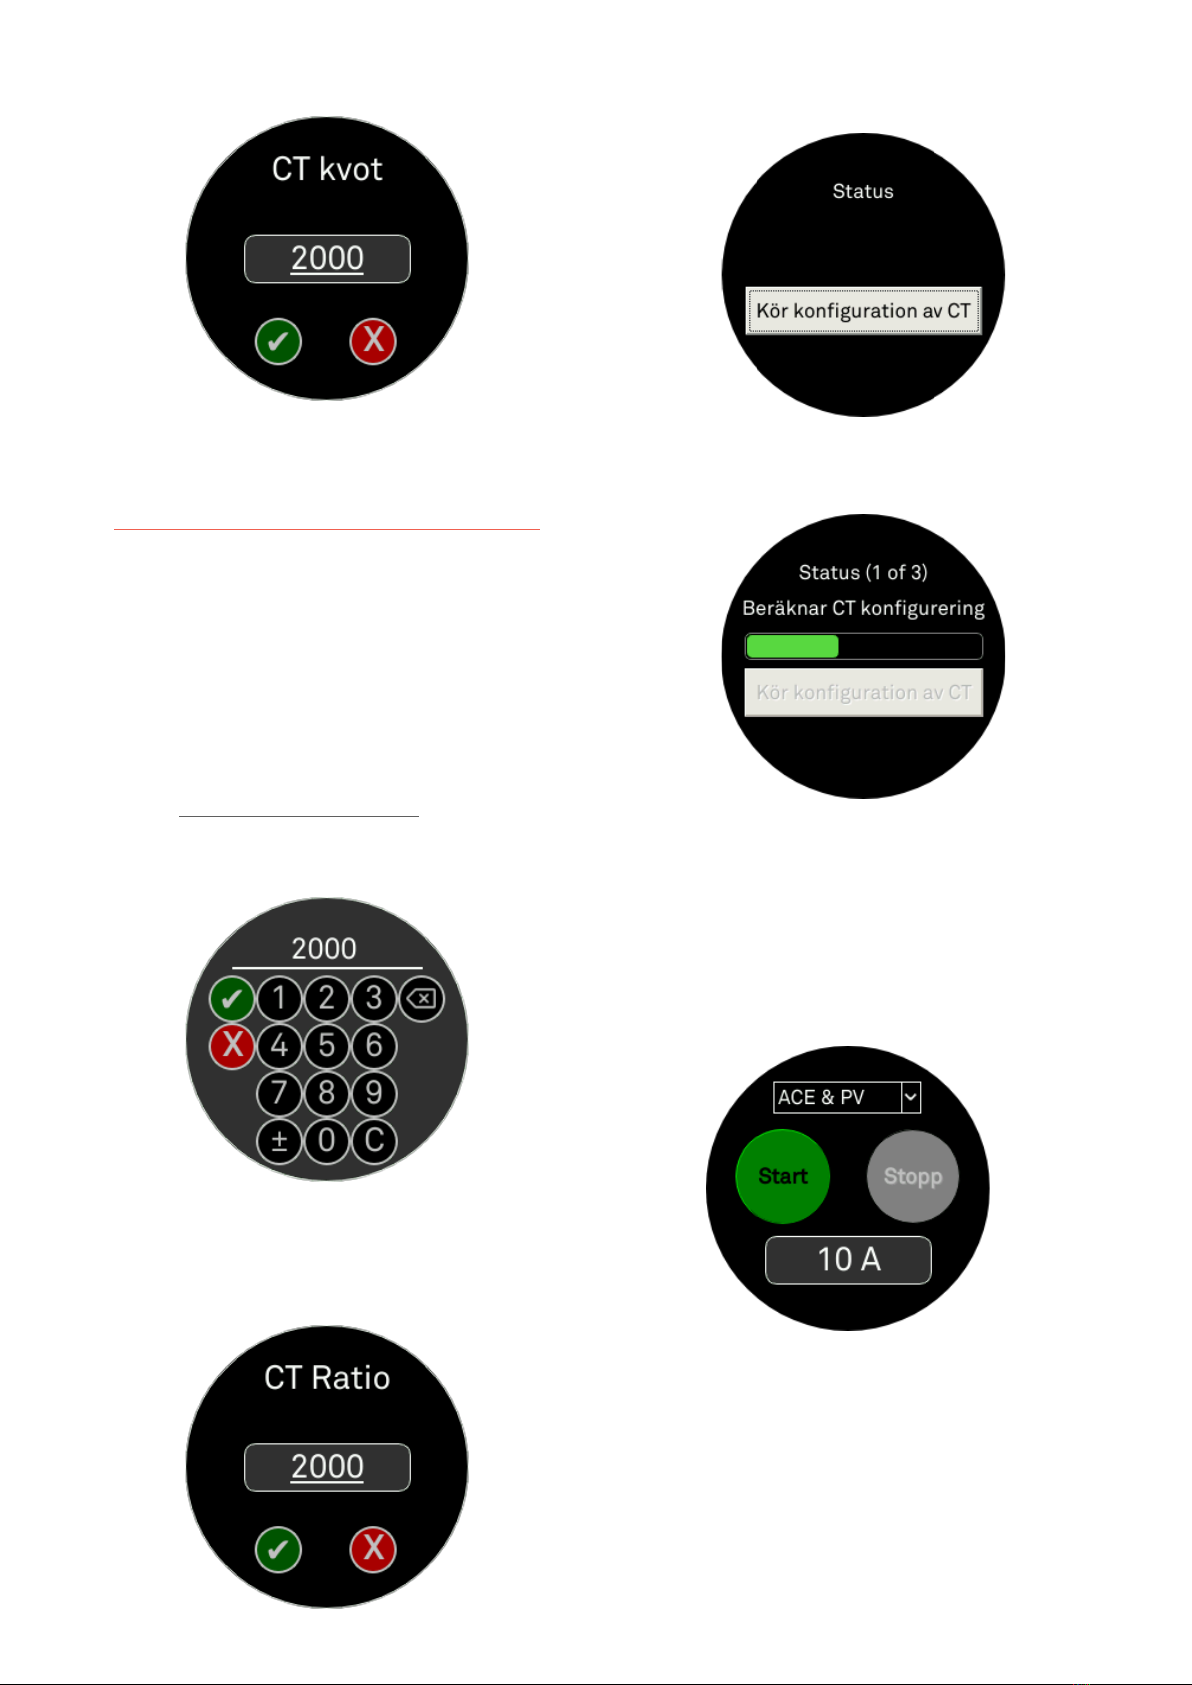
9. Svep till följande vy för att ställa in rätt CT-kvot:
10. CT-kvoten är strömtransformatorernas omvandlingstal. Olika
strömtransformatorer har olika CT-kvot. Se följande tabell för
att välja rätt CT kvot:
Strömtransformatorer (CT-klämmor)
CT kvot
CT 100A, PA00294, Blå klämma (22x32x58)
2000
CT 160A, PA00295, Svart klämma (33x31x45)
4000
CT 300A, PA00296, Svart klämma (42x66x92)
6000
Rog 600A, PA00965, Spole
12000
Rog 1200A, PA00966, Spole
24000
Rog 1800A, PA00967, Spole
36000
NOTERA! För mer information om de olika
strömtransformatorerna kan du läsa Current Sensor Overview.pdf
tillgänglig på www.ferroamp.com/downloads
11. För att kunna ändra CT kvoten, tryck på omvandlingstalet.
Följande vy dyker då upp:
12. Skriv in rätt CT kvot för ditt system och tryck den gröna
check-knappen.
13. Följande vy visas, tryck åter på den gröna check-knappen för
att bekräfta din valda CT-kvot.
14. För att starta konfigurationen av systemet svep till följande
vy:
15. Starta konfigurationsrutinen genom att trycka på ”Kör
konfiguration av CT”, status ändras till “Beräknar CT
konfigurering”.
16. Konfigurationen tar upp till 3 minuter per EnergyHub-modul,
under tiden visas ett framstegsfält. När kalibreringen är klar
visas meddelandet “Konfigureringen lyckad”. Om displayen
visar ”Konfigureringen misslyckades” så ska ni köra
konfigurationen en gång till. Om detta inte lyckas beror det på
att strömtransformatorerna inte är rätt inkopplade. För att
felsöka kontrollera att ni följt instruktionerna i
installationsmanualen.
17. För att aktivera fasbalansering (ACE) gå till följande vy:

4
18. Öppna rullgardinsmenyn och välj ACE.
19. Tryck sedan på strömvärdet, under start- och stopp-
knapparna, för att ställa in tröskelvärde för fasbalanseringen.
Ferroamp rekommenderar att du väljer ett värde som
motsvarar 75% av din huvudsäkring.
20. Skriv in önskad nivå och tryck den gröna check-knappen.
21. Tryck sedan på start. Vänta på att konfigurationen går igenom.
22. När skärmen ser ut på följande sätt är konfigurationen klar.
Fasbalansering är nu aktiverat.
23. För att lämna servicemenyn tryck i mitten av displayen i 5
sekunder tills texten ”Service menu disabled”visas.
24. Gå igenom samtliga kontrollpunkter efter driftsättning i
installationsprotokollet. Skriv under innan du går vidare.
25. Driftsättningen är nu klar! För att registrera systemet i
Ferroamp EnergyCloud följ instruktionerna i EnergyCloud
registration häftet.
NOTERA! En lyckad konfigurationen är nödvändigt för att systemet
ska fungera. Om den misslyckas kommer mätvärdena att bli
felaktiga.
2EnergyHub + SSO
NOTERA! Ferroamp rekommenderar att installatören skapar en
ritning eller schema över SSO installationen som beskriver var de
olika SSO:erna är placerade utefter deras unika serienummer som
är märkt på sidan av varje SSO.
1. Se till att samtliga DC-brytare som kopplar bort dina SSO:er
från likspänningsnätet är öppna (t.ex. via en Power
Distribution 5/8/15).
2. Följ sedan steg 1 till 16 i avsnitt 1 EnergyHub, därefter
fortsätter du med följande steg.
3. Mät DC-spänningen vid DC-brytaren som kopplar bort dina
SSO:er, detta måste göras för alla fördelningslådor som
ansluter enheter till likspänningsnätet:
a. Kontrollera att polariteten är korrekt (L + och L-) och
att spänningen ligger i intervallet 585–780 VDC.
4. Om polaritet och spänning är korrekt kan du slå på DC-
brytarna.
5. Gå tillbaka till EnergyHub och tryck på reset-knappen (detta
initierar SSO-detektering):
a. EnergyHub Wall & XL Single: reset-knappen finns
längst ner på EnergyHub bredvid anslutningarna.
b. EnergyHub XL Cabinet: Tryck på reset-knappen på
baksidan av masterenheten, den nedresta enheten
som levereras inuti skåpet (om du inte vet vilken
enhet som är master kan du återställa alla XL-
modulerna).
6. Vänta på att displayenheten har startat upp.
7. Öppna servicemenyn och svep till SSO-statusvyn.

5
8. Det kan ta upp till 2 minuter innan de dyker upp i listan.
9. När samtliga SSO:er har detekterats, gå vidare med att aktivera
solelproduktion (PV) och fasbalansering (ACE). Följ steg 17 till
23 i avsnitt 1 EnergyHub men välj istället ACE & PV.
NOTERA! Från att SSO:erna har blivit detekterade och aktiverade
kan det ta upp till 10 minuter innan de börjar producera.
10. Kontrollera status för samtliga SSO:er. Detta kan göras på
något av följande sätt:
a. Gå till SSO:erna och titta på LED-indikatorns status.
b. Tryck på serienumret i SSO status vyn, kontrollera att
det är rätt strängspänning och att SSO:n levererar
effekt.
c. Om systemet redan är registrerat i EnergyCloud kan
du gå in på systemet och kontrollera att alla SSO:er
producerar.
11. När du har verifierat att alla SSO:er är i drift gå då igenom
kontrollpunkterna i installationsprotokollet under avsnittet
efter driftsättning. Signera av dokumentet innan du fortsätter.
12. Driftsättningen är nu klar! För att registrera systemet i
Ferroamp EnergyCloud följ instruktionerna i EnergyCloud
registration häftet.
3EnergyHub + Batteri
1. Se till att DC-brytarna som kopplar bort batterier från
likspänningsnätet är öppna (t.ex. via en Power Distribution
5/8/15).
2. Följ sedan steg 1 till 23 i avsnitt 1 EnergyHub, därefter
fortsätter du men följande steg.
3. Mät DC-spänningen vid DC-brytaren som kopplar bort
batteriet från likspänningsnätet:
a. Kontrollera att polariteten är korrekt (L + och L-) och
att spänningen ligger i intervallet 585–780 VDC.
4. Om polaritet och spänning är korrekt kan du slå på DC-
brytarna.
5. Registrera systemet i Ferroamp EnergyCloud genom att följa
instruktionerna i EnergyCloud registration-häftet.
6. För att aktivera och konfigurera ditt batteri måste du kontakta
information:
a. Anläggnings ID
b. Installerad PV
c. Storlek på huvudsäkring
d. Laddningströsklar och gränser av nominell kapacitet
e. Önskad batteriinställning
i. Maximera egenförbrukningen av solceller
ii. Skydda huvudsäkringen
iii. Öka effekten för EV-laddning
iv. Kapa effekttoppar
7. Gå igenom kontrollpunkterna i installationsprotokollet under
avsnittet efter driftsättning. Signera av dokumentet innan du
fortsätter.
8. Driftsättning är nu klar!
4EnergyHub + SSO + Batteri
1. Se till att samtliga DC-brytare som kopplar bort SSO: er och
batterier från likspänningsnätet är öppna (t.ex. via en Power
Distribution 5/8/15).
2. Följ steg 1 till 16 i avsnitt 1 EnergyHub, därefter fortsätter du
men följande steg.
3. Följ steg 3 till 10 i avsnitt 2 EnergyHub + SSO , därefter
fortsätter du med följande steg.
4. Följ steg 3 till 6 i avsnitt 3 EnergyHub + Batteri.
5. Gå igenom kontrollpunkterna i installationsprotokollet under
avsnittet efter driftsättning. Signera av dokumentet innan du
fortsätter.
6. Driftsättning är nu klar!
6
ENGLISH
Introduction
This booklet will take you through the commissioning process for
your EnergyHub system. Go to the section that best describes your
system topology and follow the instructions. Read through all the
instructions before proceeding with the commissioning.
1EnergyHub
NOTE! The touch screen of the display unit does not work with
gloves.
1. Make sure to perform all check points in the installer
verification, sent with the EnergyHub, under the section before
commissioning. Sign the installer verification and continue
with the commissioning (the installer verification can be
downloaded from www.ferroamp.com/downloads , Installer
verification.pdf).
2. To start-up:
a. EnergyHub Wall & Single XL: Start by switching on
the AC-breaker that disconnects your system from
the facility AC-grid.
b. EnergyHub XL Cabinet: In the cabinet distribution
block, switch on the single-phase AC display breaker.
Make sure that all the fuse holders are closed, then
switch on all XL AC breakers.
3. Wait 1 min for the system to start up. During the start-up the
display will show three views:
a. Ferroamp logo with progress bar
b. Booting…
c. Please wait… loading system settings
The time for the different views may vary depending on
system type. When your EnergyHub has finished booting the
following view is displayed:
4. To change the language, you must enter the service menu.
This is done by pressing the middle of the screen for 5 seconds
until the text “Service menu enabled” is displayed.
5. Use your finger to swipe between the different views.
6. To change language swipe till you find the following view
and select English.
7. Swipe to the following view and verify that the status is set
to “Measuring”, continue to step 9. If not do step 8.
8. Swipe to the following view and press the red stop button.
A text box will appear with the text ”Activating settings.
Please wait…” Then the following view will be displayed:

7
9. Now swipe to the following view to set correct CT Ratio:
10. The CT ratio depends on which current transformers (CT-
clamps) you are using. Se the table below for the correct CT
Ratio for your model:
Current transformer model
CT ratio
CT 100A, PA00294, Blue clamp (22x32x58)
2000
CT 160A, PA00295, Black clamp (33x31x45)
4000
CT 300A, PA00296, Black clamp (42x66x92)
6000
Rogowski 600A, PA00965, Coil
12000
Rogowski 1200A, PA00966, Coil
24000
Rogowski 1800A, PA00967, Coil
36000
NOTE! For more information regarding the current transformers
read the Current Sensors Overview.pdf available at
www.ferroamp.com/downloads
11. To change the CT-ratio press the number and the following
view appears:
12. Type in the correct CT Ratio for your system and press the
green check mark.
13. The following view is shown, press the green check mark to
confirm your CT-ratio.
14. To start the CT configuration swipe to the following view:
15. Press “Run CT configuration”, the status will change, and the
following view will be on display:
16. The configuration takes up to 3 minutes per EnergyHub
module, during the configuration a progress bar is shown.
When calibration is completed a textbox with the text
“Configuration successful” will appear on the screen. If the
text “Configuration fail” appears, redo the configuration. If it
continues to fail check that the current transformers are
installed properly according to the installation manual.
17. To activate adaptive current equalisation (ACE) navigate to the
following view:

8
18. Open the drop-down menu and select ACE.
19. Select the box with the ampere level, underneath the start and
stop buttons, to set your ACE threshold. Ferroamp
recommends setting this value to 75% of your main fuse.
20. Enter your threshold value and press the green check mark.
21. Press the green start button to start the configuration.
22. When configuration is done the following view is shown. ACE
functionality is now activated.
23. Exit the service menu by pressing the middle of the screen for
5 seconds until the text “Service menu disabled” is displayed.
24. Go through all check points in the installer verification under
the section after commissioning. Sign the document before
proceeding.
25. Commissioning is now completed! To register the system in
the Ferroamp EnergyCloud follow the instructions in the
EnergyCloud registration booklet.
NOTE! A successful CT-configuration is necessary for the system to
function properly. If the configuration has not succeeded the
measured values that are reported to the system will be unreliable.
2EnergyHub + SSO
NOTE! Ferroamp recommends that the installer creates a
schematic document over the SSO installation that describes the
location of each SSO using the unique serial number marked on the
side of the SSO.
1. Make sure that the DC breaker that disconnects your SSOs
from the DC nanogrid are open (for ex. a Power Distribution
5/8/15).
2. Follow steps 1 to 17 in section 1 EnergyHub. When done
proceed with the following instructions.
3. Measure the DC voltage by the DC breaker that disconnects
your SSOs, this must be done on all your DC distribution boxes
that connect units to the DC nanogrid:
a. Check that the polarity is correct (L+ and L-) and the
voltage is in the range 585–780 VDC.
4. If polarity and voltage is correct go ahead and turn on the DC
breakers.
5. Go back to the EnergyHub and press the reset button, this
initiates the SSO detection:
a. EnergyHub Wall & XL Single: The reset button is
located at the bottom of the EnergyHub next to the
connections.
b. EnergyHub XL Cabinet: Press the reset button at the
back of the master unit, by default the bottom unit
shipped inside the cabinet (if you don’t know which
unit is the master you can reset all the XL modules).
6. Wait for the display to boot up.
7. Enter the service menu and swipe to the SSO status view.

9
8. It can take up to 2 minutes for the SSOs to show up in the
status list.
9. When all SSOs have been detected, go ahead and activate PV
production and ACE functionality. Follow steps 17 to 23 in
section 1 EnergyHub, select ACE & PV instead.
NOTE! It can take up to 10 minutes for the SSOs to start producing
after being detected and activated.
10. check the status of each SSO by one of the following methods:
a. Go to the SSOs and look at the LED indicator status.
b. Press serial number in SSO status view, check for
correct string voltage and that the SSO is delivering
power.
c. If the system is registered in the EnergyCloud, log
look to see that all SSOs are delivering power.
11. When you have verified that the SSOs are up and running go
through all check points in the installer verification under the
section after commissioning. Sign the document before
proceeding.
12. Commissioning is now completed! To register the system in
the Ferroamp EnergyCloud follow the instructions in the
EnergyCloud registration booklet.
3EnergyHub + Battery
1. Make sure that the DC breakers that disconnect your batteries
from the DC nanogrid are open (for ex. a Power Distribution
5/8/15).
2. Follow steps 1 to 23 in section 1 EnergyHub. When complete
proceed with the following instructions.
3. Measure the DC voltage by the DC breaker that disconnects
your battery, this must be done on all your DC distribution
boxes that connect units to the DC nanogrid:
a. Check that the polarity is correct (L+ and L-) and the
voltage is in the range 585–780 VDC.
4. If the polarity and voltages are correct go ahead and turn on
the DC breakers.
5. Register the system in the Ferroamp EnergyCloud, follow the
instructions in the EnergyCloud registration booklet.
6. To activate and configure your battery you must contact
following information:
a. Facility ID
b. Installed PV
c. Size of main fuse
d. Battery configuration:
i. Maximize self-consumption of PV
ii. Protect your main fuse
iii. Increase power for EV charging
iv. Peak shaving
7. Go through all check points in the installer verification under
the section after commissioning. Sign the document before
proceeding.
8. Commissioning is now completed!
4EnergyHub + SSO + Battery
1. Make sure that the DC breakers that disconnect your batteries
and SSOs from the DC nanogrid are open (for ex. a Power
Distribution 5/8/15).
2. Follow steps 1 to 16 in section 1 EnergyHub.
3. Follow steps 3 to 10 in section 2 EnergyHub + SSO.
4. Follow steps 3 to 6 in section 3 EnergyHub + Battery.
5. Go through all check points in the installer verification under
the section after commissioning. Sign the document before
proceeding.
6. Commissioning is now completed!

Electricity.
Reinvented.
Other manuals for EnergyHub
1
Table of contents
Languages:
Other ferroamp Power Distribution Unit manuals

ferroamp
ferroamp Power Distribution 15 User manual

ferroamp
ferroamp EnergyHub XL Single 21 kW User manual

ferroamp
ferroamp Power Distribution 8 User manual

ferroamp
ferroamp ESS Power Case User manual

ferroamp
ferroamp EnergyHub XL User manual

ferroamp
ferroamp SSO User manual

ferroamp
ferroamp Power Distribution 5 User manual
Popular Power Distribution Unit manuals by other brands


ADC
ADC PowerWorx Power Distribution Products user manual

Littelfuse
Littelfuse MiniFlec Series Installation sheet

Beckhoff
Beckhoff EP9224-0037 Documentation

Vertiv
Vertiv VP9571A instruction manual

MGE UPS Systems
MGE UPS Systems Switched PDU Installation and user manual

CTR Electronics
CTR Electronics PDP user guide


