ferrum HYPSOS User manual
HYPSOS by Ferrum
user’s manual

HYPSOS by Ferrum
user’s manual
user’s manual
HYPSOS by Ferrum

INTRODUCTION
1
user’s manual
HYPSOS by Ferrum
Thank you for choosing HYPSOS by Ferrum!
HYPSOS is a hybrid power system and combines the best features of both linear and switching power supplies.
HYPSOS can power many brands with a simple revolution of a knob. This software based operation is unique
to HYPSOS and an industry first! Apart from the ease of operation HYPSOS makes use of a smart combination
of existing power sensing techniques, which again sets it apart from the pack. With the HYPSOS power supply
your audio system will be taken to the next level!
Owner's Manual Ver. 1.2 / January 2021
© 2021

CONTENTS
Important Safety Info
Box Content
Device Features
Getting Started
Menu
Firmware Update
Fuse Replacement
Front Panel Overwiev
Back Panel Overwiev
1.
2.
3.
4.
4.1
4.2
5.
5.1
6.
7.
3
4
4
5
5
6
10
10
14
15
Main Screen
4.3 7
Connecting the HYPSOS
4.4 8
Turning on your HYPSOS for the first time
4.5 8
Navigation
5.2 11
Menu Structure
Technical Spec
Warranty
8.
9.
16
16
Contact Ferrum
10. 17
Warninig
Information On Disposal
11.
12.
17
18
2
user’s manual
HYPSOS by Ferrum

1. IMPORTANT SAFETY INFO
3
user’s manual
HYPSOS by Ferrum
WARNING: To reduce the risk of fire, electric shock or enclosure discoloration, be sure that the apparatus shall
not be exposed to dripping or splashing and that no objects filled with liquids, such as vases, shall be placed
near or on the apparatus.
supply.
Do not allow any objects to get into the enclosure. If the unit is exposed to moisture, or a foreign object gets
into the enclosure, immediately disconnect the power cord from the wall outlet. Take the unit to a qualified
service person for inspection and necessary repairs.
Read all the instructions before connecting or operating the component. Keep this manual so you can refer to
these safety instructions. Heed all warnings and safety information in these instructions. Follow all operating
instructions.
Unplug this product from the wall outlet before cleaning. Do not use liquid cleaners or aerosol cleaners. Use a
damp cloth for cleaning.
When a cart is used, use caution when moving the cart/apparatus combination to avoid injury from tip-over.
Do not place the unit on a bed, sofa, rug, carpet, or similar surface that could block the heatsink airflow. If the
component is placed in a bookcase or cabinet, there must be ventilation of the cabinet to allow proper cool-
ing. Keep the HYPSOS away from radiators, kettles, heat registers, stoves, or any other appliance that produces
heat.
Connect the HYPSOS to the power outlet only with an earthed IEC power supply cable or an exact equivalent
in a mains socket with protected earthing connection.
The safest and primary method of isolating the device from the mains supply is to disconnect the mains plug.
Ensure that the mains plug remains accessible at all times.
Unplug HYPSOS during lightning storms or when unused for long periods of time.
Do not attempt to defeat grounding and/or polarization provisions. Do not route the power cord where it will
be crushed, pinched, bent at severe angles, exposed to heat, or damaged in any way. Pay particular attention
to the power cord at the plug and where it exits the back of the unit.
Immediately unplug and stop using the component and have it inspected and/or serviced by a qualified
service agency if:
- The power supply cord or plugs have been damaged.
- Objects have fallen or liquid has been spilled into the unit.
- The unit has been exposed to rain.
- The unit shows signs of improper operation.

2. BOX CONTENT
- HYPSOS hybrid PSU
- Power cord
- DC cord with 5.5/2.5 mm or 5.5/2.1 mm DC jack
- Spare fuse (see paragraph “7. Fuse replacement”)
- Quick Guide
3. DEVICE FEATURES
- Regulated output voltage level in 5-30V range, current up to 6A, power up to 80W
- Hybrid Power System (HyPSos) Design - linear/switching hybrid design to get the advantages from both
- Volume adjustment (Sweet Spot Tuning) - Possibility to fine tune the output voltage for the best sound.
- 4T Sensing Design (4TSD) - ensuring the exact voltage level precisely at the point of the powered device DC
input terminal - special cable design and feedback to ensure flat voltage at every moment
- Easy setup procedure - using pre-configured settings from the list of supported devices or setting custom
parameters manually
- Advanced Automation - Compatibility with Apple TV, Trigger in/out connector; possibility to automate
power-up of the devices with standby mode even without dedicated trigger connection
- Custom made audio grade power transformer with double shielding
- Double input AC filter
- Automatic Transformer Voltage Adjust (ATVA) and Electronic Output Voltage Polarity Switch
- Tamper-safe design - impossible to accidentally change the electrical settings (voltage, etc.)
- Overvoltage, current limit and short protection
- Compatibility and the best performance with all worldwide mains voltage parameters
- Each unit is unique thanks to corten plate on the front
4
user’s manual
HYPSOS by Ferrum
- The unit has been dropped or damaged in any way.
- When the product exhibits a distinct change in performance. This indicates a need for service.
When replacement parts are required after the warranty period, be sure the service technician has used
replacement parts specified by the manufacturer or have the same specification as the original part. Unau-
thorized substitutions may result in fire, electric shock, or other hazards. Upon completion of any service or
repairs to this product, ask the service technician to perform safety checks to determine that the product is
in proper operating condition.
In households with small children, an adult should provide supervision until the child is capable of following
all the rules essential for the safe operation of the unit.
Only use DC cables specified by the manufacturer.
A.
B.
C.
4. GETTING STARTED
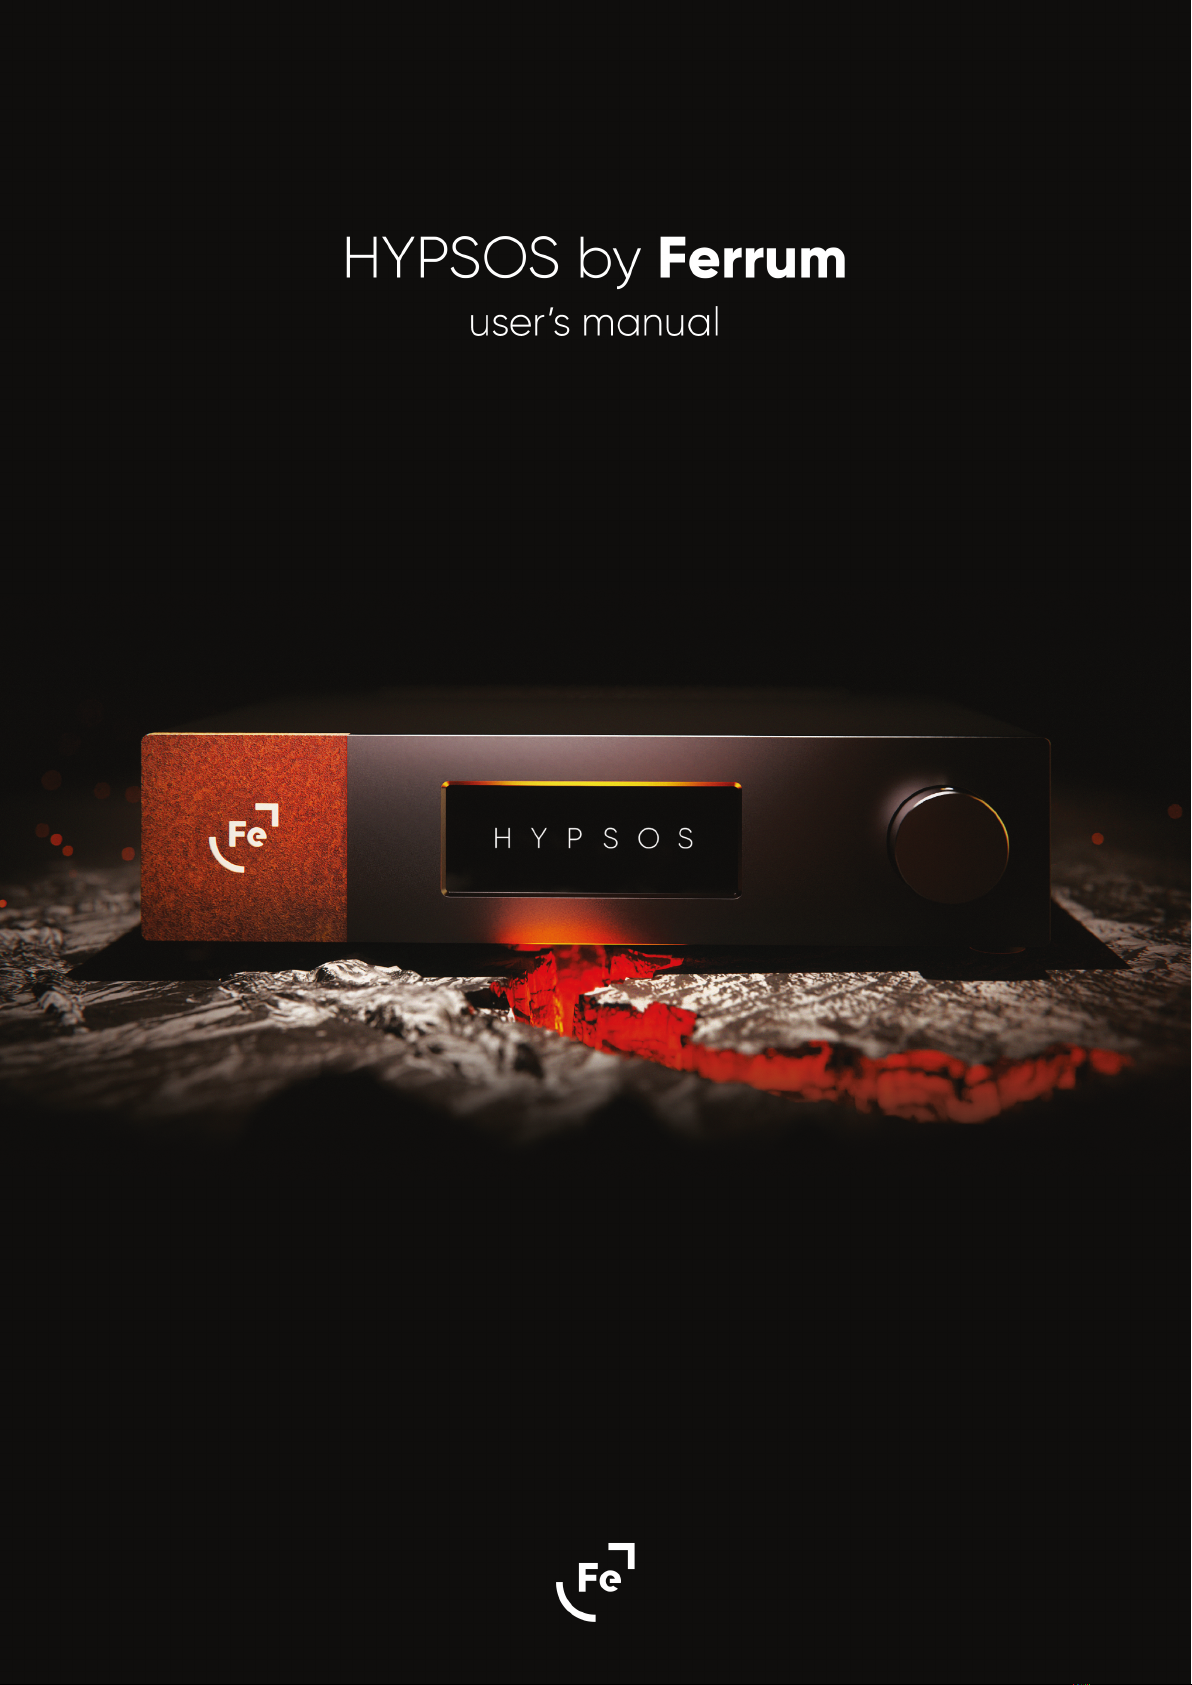
4.1. Front Panel Overview
A B C
5
user’s manual
HYPSOS by Ferrum
Ferrum logo - brightness and logo can be changed in the menu.
Encoder knob - this encoder is both a knob and a button. Works as an on/o switch in standby mode
and allows you to navigate in the Hypsos menu.
OLED displays.
Figure 1.
A D F
B C E
user’s man
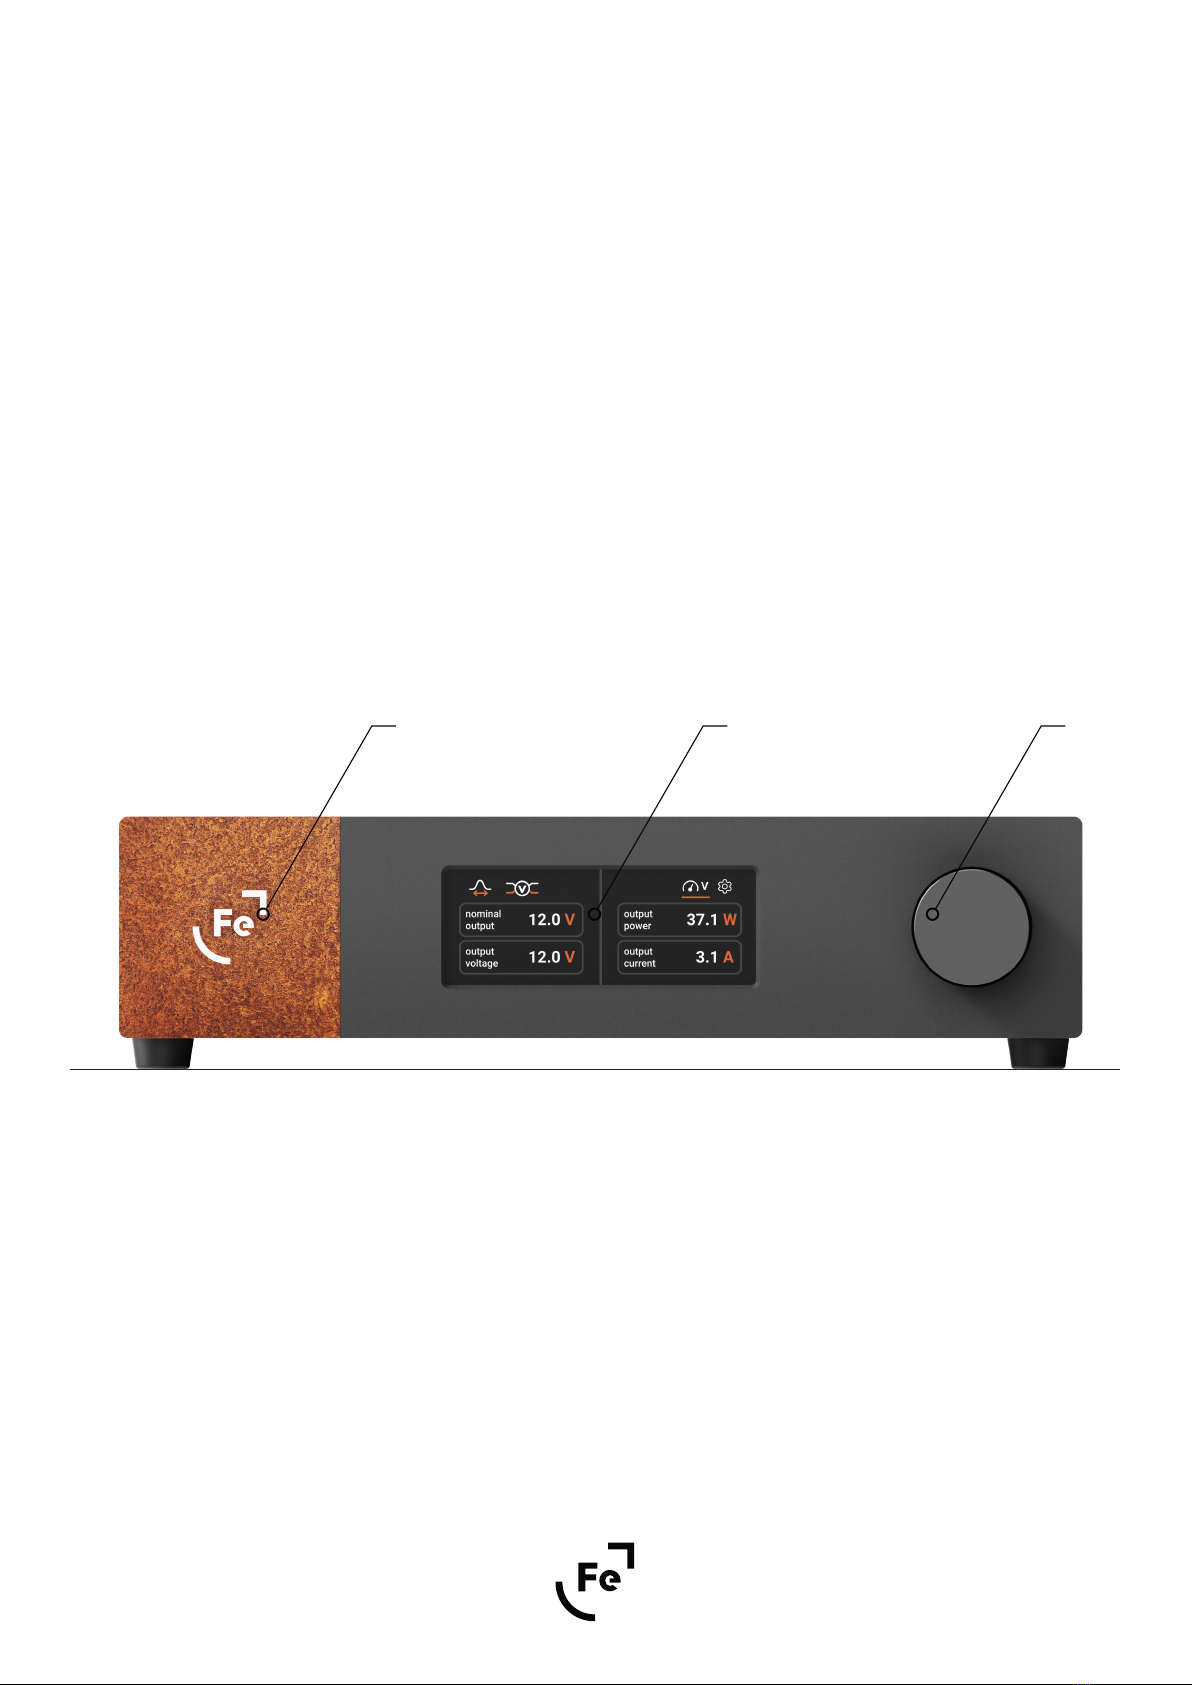
4.2. Back Panel Overview
ual
HYPSOS by Ferrum
DC output - here you connect the DC cable. The DC output socket is marked with a red dot. The same
dot is also marked on DC cable. To connect the cable properly both dots must be aligned. To discon-
nect the DC cable, pull the metal ring on the plug in the opposite direction to the device and then pull the
cable out of the socket.
Trigger I/O socket.
Micro-USB port.
Main power switch.
Fuse.
Mains IEC connector. Place mains power cord at this connector.
D.
C.
B.
E.
6
F.
A.
user’s manual
HYPSOS by Ferrum
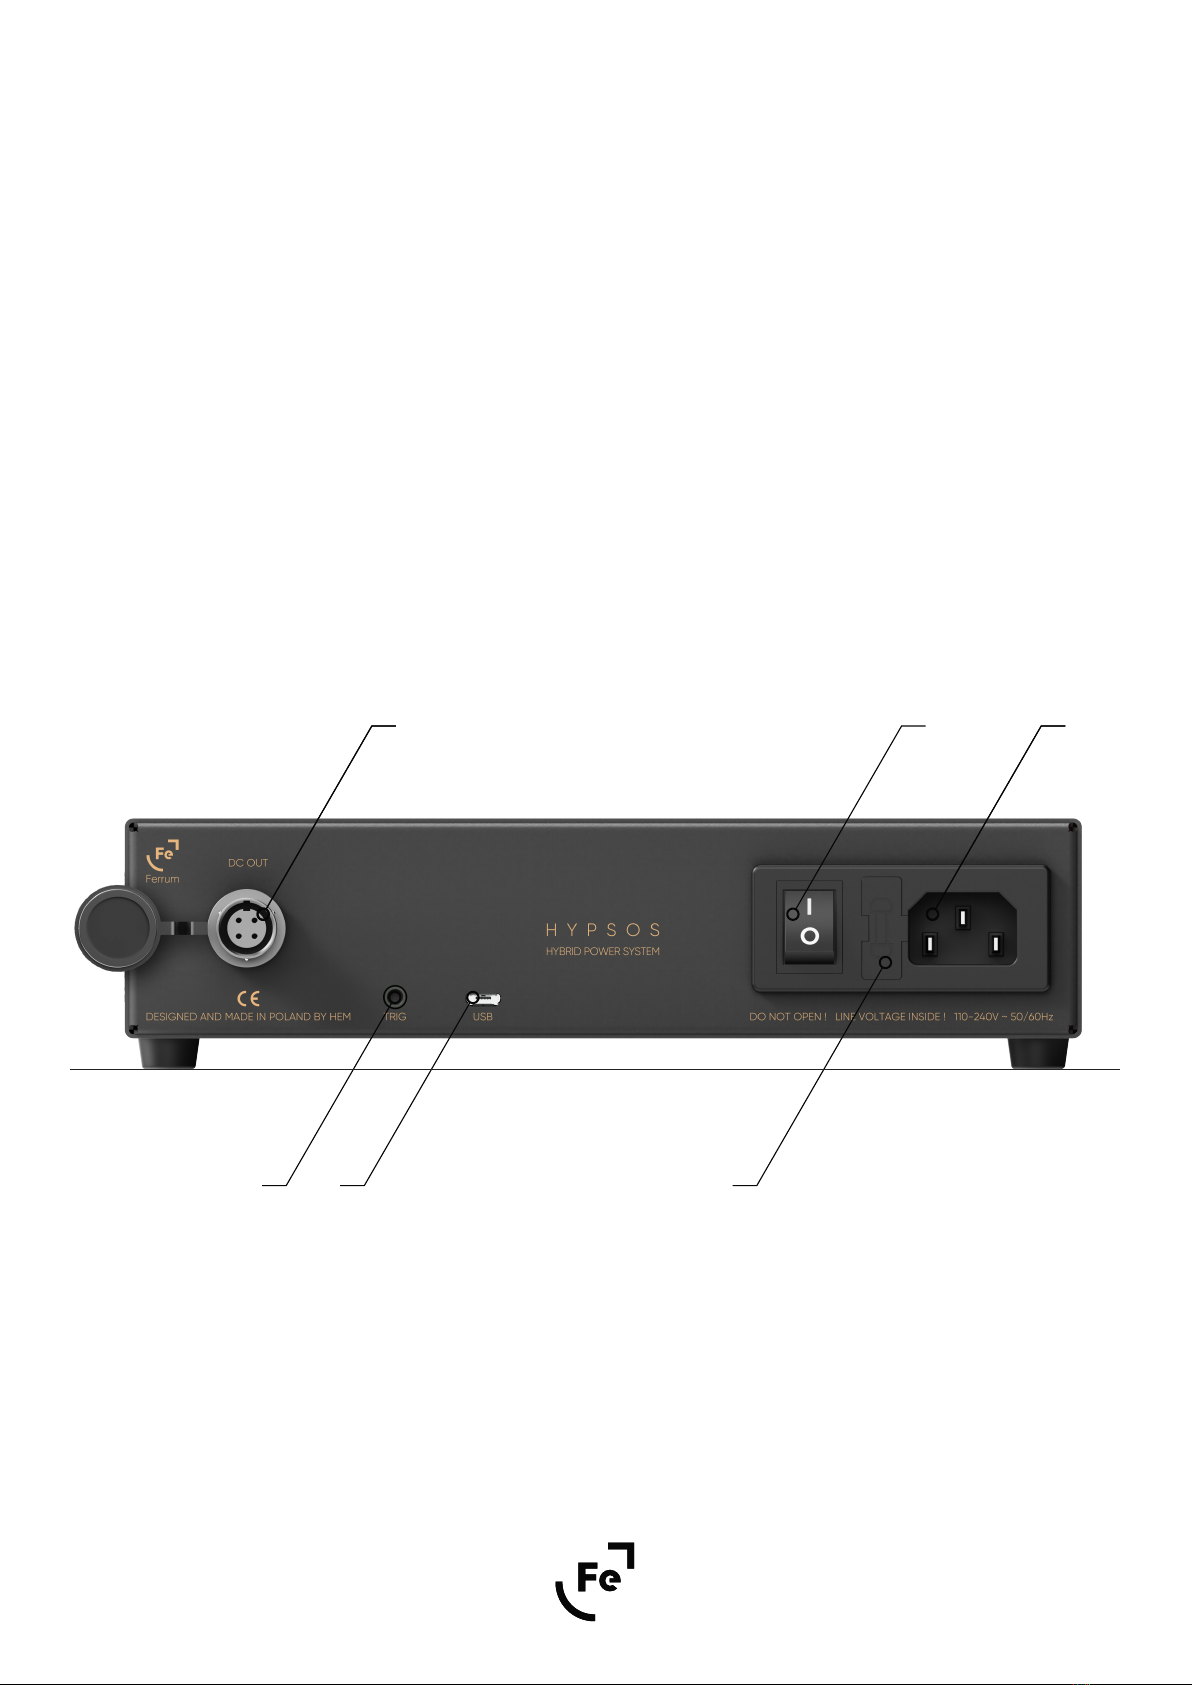
Figure 2.
nominal
output 12.0 V
output
voltage 12.0 V
output
power 37.1 W
output
current 3.1 A
B D
user’s man
4.3. Main Screen
ual
HYPSOS by Ferrum
D.
C.
B.
E.
7
F.
A.
C E F
G H
user’s manual
HYPSOS by Ferrum
A
Nominal voltage value set during the process of selecting a device from the list or during manual
configuration.
Measured voltage at the DC HYPSOS output.
Current power consumption of the device powered by the HYPSOS.
Currently measured output current on the DC HYPSOS output.
Voltage adjustment (Sweet Spot Tuning) - this feature can also be set up in the menu.
Menu.
G.
H.
Spread Spectrum Mode icon - when grayed out SSM is not active.
4T Sensing Design icon - when grayed out 4TSD is not active.
Figure 3.
4.4. Connecting the HYPSOS
4.5. Turning on your HYPSOS for the first time
8
user’s manual
HYPSOS by Ferrum
The first time you start the HYPSOS, it needs to be configured to properly power other devices.
After start-up press the knob and HYPSOS will display a list of devices, which have already configured presets.
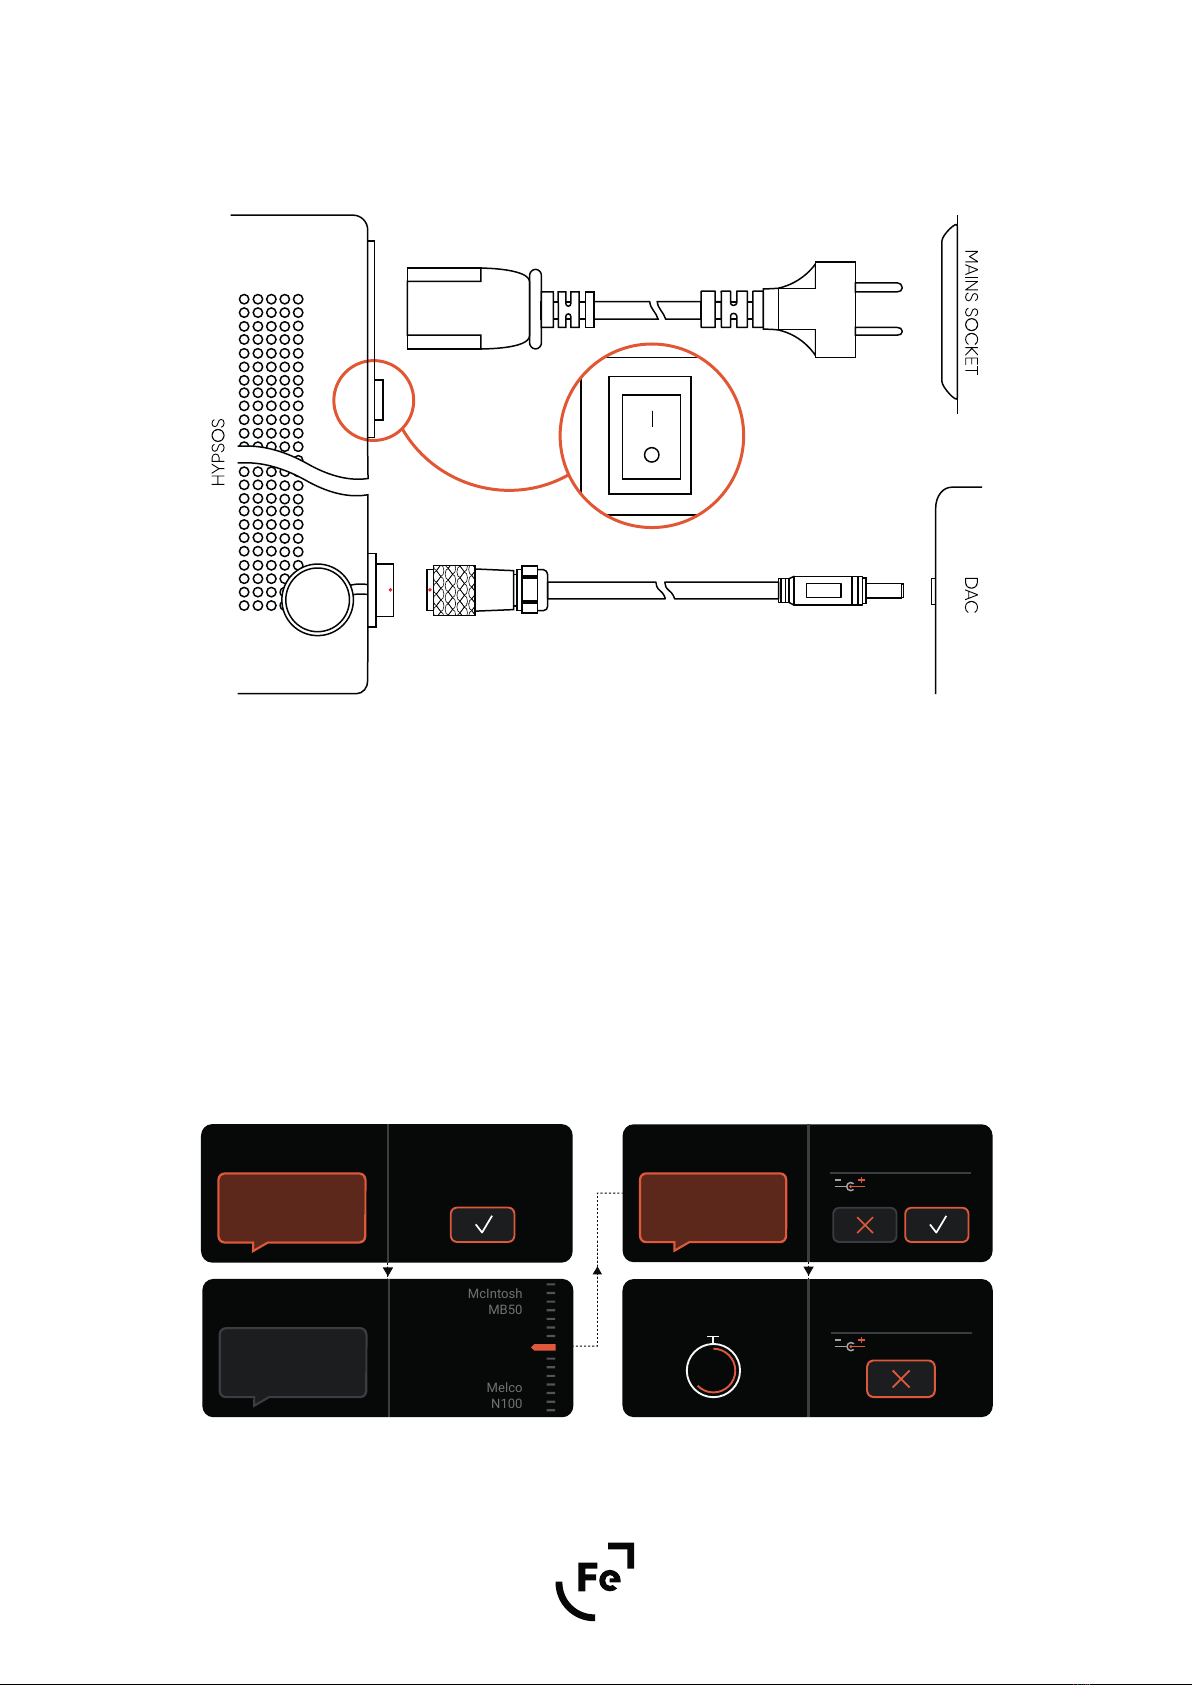
DC output location and connecting DC and AC mains cable.
Make sure that all cables are correctly connected to the HYPSOS and powered device (Fig. 4). Then use the
main switch to start the HYPSOS (Fig.2D) .
DC
AC
SWITCH
Selecting a device from the list
Figure 4.
Thank you for
choosing Ferrum!
Welcome! Press knob to
start the configuration
Attention: Please
ensure that the proper
device is selected!
Submit Selection
12.0 V
McIntosh
MS500
Powering Up in:
6
12.0 V
McIntosh
MS500
If you do not find
your device on the list,
please choose manual
configuration.
Choose the Device
McIntosh
MB50
Melco
N100
McIntosh
MS500

9
user’s manual
HYPSOS by Ferrum
If the device you want to power is not in the list, select "Manual configuration" and confirm by pressing the dial.
The first window allows you to select the appropriate polarity for your device. You can choose between two
options: the middle pin of the power plug is the positive pole or the middle pin of the power plug is the negative
pole.
After selecting the appropriate polarity, confirm your choice by pressing the dial.
In the next window, select the voltage appropriate for powering your device. You can choose between 5V and
30V. Confirm your choice of voltage by pressing the dial.
Above parameters should be set according to the recommendations of the manufacturer of the device you
want to power! Ferrum refuses every liability for damage to equipment due to an incorrect connected DC
output voltage.
If you see your device in the list, select it and confirm by pressing the dial. HYPSOS will show you a summary of
the preset and ask you to approve the settings. It is a good idea to check if the voltage and polarity that
HYPSOS proposes are correct for the device you want to power.
Once the settings have been approved, a timer will appear on the screen counting down the time to apply the
voltage to the HYPSOS output - you still have 9 seconds to change the settings if necessary. To stop the count-
down and return to the settings, press the knob.
After 9 seconds, the previously set voltage is applied to the DC HYPSOS output.
Done!
Note: The list of available devices can be updated by updating the firmware. Let us know if you want us to add
a device that is not on the list.
Manual configuration
Thank you for
choosing Ferrum!
Welcome! Press knob to
start the configuration
If you do not find
your device on the list,
please choose manual
configuration.
Choose the Device
YULONG
U18
Manual
Configuration
Set polarity accordingly
to the device’s
specification.
Set Polarity
Center
Positive
Center
Negative
Set voltage accordingly
to the device’s
specification.
Set Voltage
5V
30V
18.0 V
Attention: Wrong
voltage level and
polarity may destroy
your device!
Apply Parameters
18.0 V
Polarity
Voltage
Powering Up in:
6
18.0 V
Custom
device
Select proper trigger
direction for your setup.
Please read user manual
for more information.
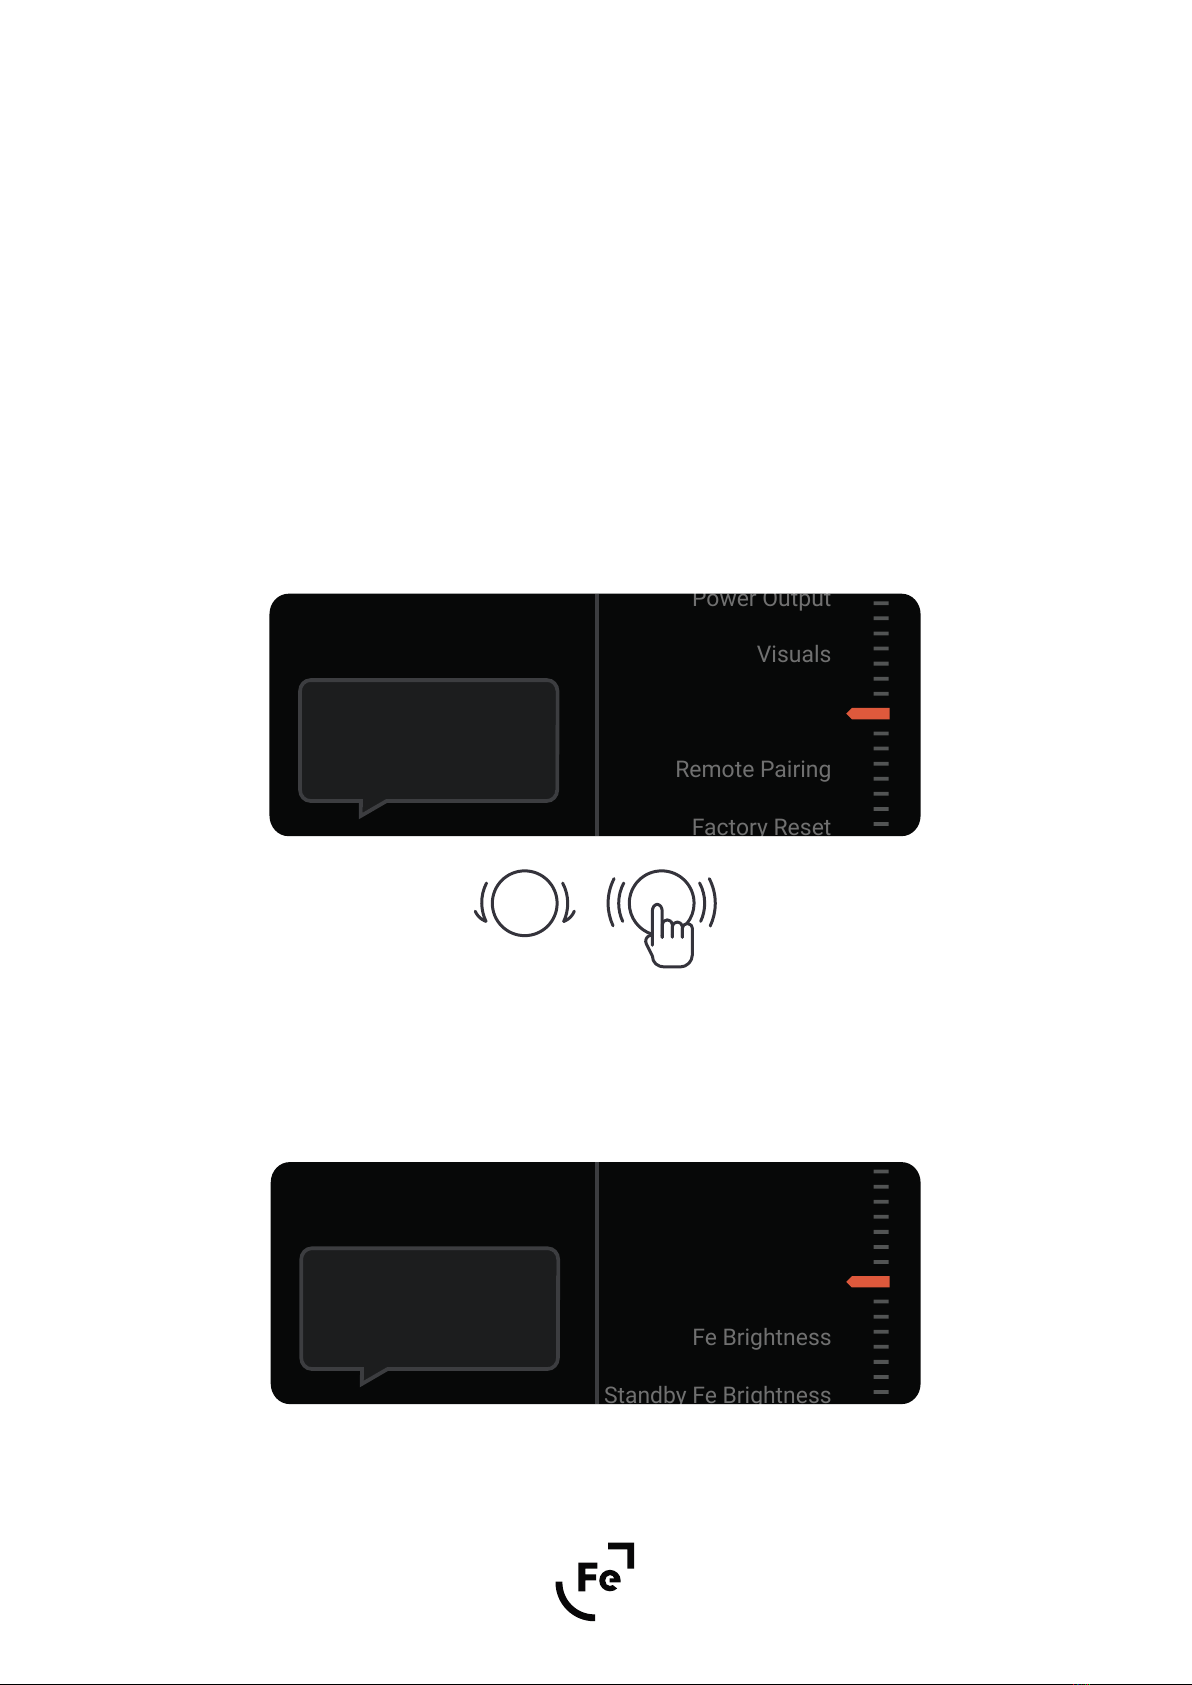
Menu
Visuals
Power Output
Remote Pairing
Factory Reset
Trigger
To open the menu select Menu icon (Fig. 3F) on the main screen and confirm by pushing a knob.
Use the knob to navigate through the menu.
To go back to the previous screen select “Back…”.
Figure 5.
Figure 6.
5. MENU
10
user’s manual
HYPSOS by Ferrum
5.1. Navigation
The HYPSOS will now show a summary of the settings and ask you to confirm them.
Once the settings have been approved, a timer will appear on the screen counting down the time to apply the
voltage to the HYPSOS output - you still have 9 seconds to change the settings if necessary. To stop the count-
down and return to the settings, press the knob.
After 9 seconds, the previously set voltage is applied to the DC HYPSOS output.
Done!
Select Confirm
Choose the brightness
of Fe logo.
Visuals
Fe Brightness
Standby Fe Brightness
Back...
Adjust output voltage
or select the same value
to exit without saving.
Press knob to apply.
Voltage Adjustment
6.0
nominal: 12.0
14.0
12.0 V
11
user’s manual
HYPSOS by Ferrum
5.2. Menu Structure
1. Power Output
1.1. Reconfigure
This feature allows you to go through the initial setup process of selecting a HYPSOS powered device from the
list or manual configuration.
1.2. Adjust Voltage
This function can also be set from the home screen (check Fig. 3E).
Allows you to fine-tune the output voltage to get the best sound on a device powered by HYPSOS. The range
in which the voltage can be adjusted will be dierent for dierent devices. Some allow you to use a larger
range. The standard "Adjust volume" range is 95% to 105% of nominal voltage for safety reasons.
WARNING!
Please use this function with caution!
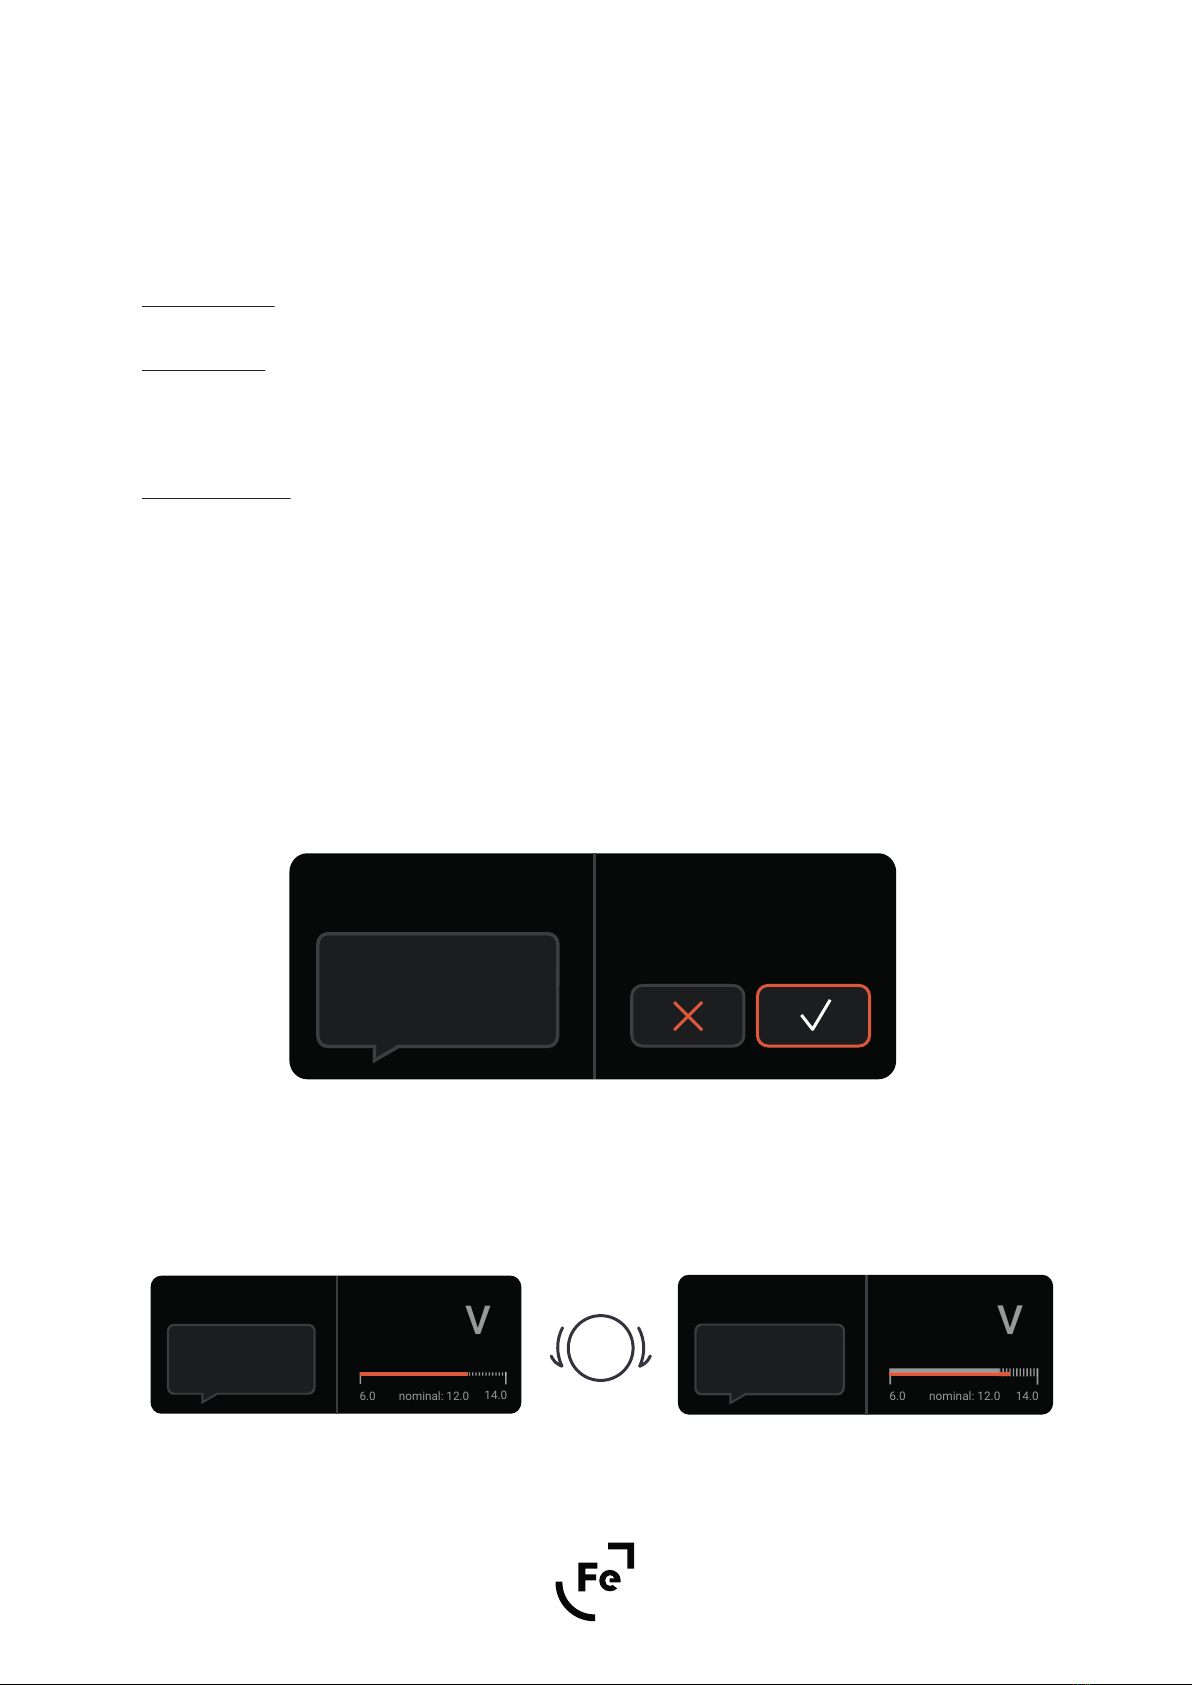
Once you have decided to find your sweet spot, you must confirm the start of the procedure.
In the next step you can modify the voltage level. Now you have the option to increase or decrease the DC
voltage.
Figure 7.
The orange arrow always shows the current setting, e.g. when entering the Trigger, if the arrow points to the
"Output" option, then this option is active.
Find your sweetspot!
Adjust output voltage
and find your desired
sound.
Voltage Adjustment
Do you want to start?
Figure 8. Figure 9.
Adjust output voltage
or select the same value
to exit without saving.
Press knob to apply.
Voltage Adjustment
6.0
nominal: 12.0
14.0
12.5 V
currently set voltage 12.0

12
user’s manual
HYPSOS by Ferrum
Confirm the voltage level by pressing the knob. After 4 seconds, the newly set voltage will appear on the DC
output.
You can interrupt the countdown by pressing the knob.
When the timer has finished the countdown simply push the knob to go back to the main screen.
Note: Ferrum will not be held liable for damage to the device being powered when the voltage level you set
will damage it.
1.3. Power in Standby Enable/Disable
When enabled, the HYPSOS will continue to provide DC, even if it is in Standby mode.
1.4. 4 Terminal Sensing Enable/Disable
Possibility to enable or disable 4TSD (4 Terminal Sensing Design) - this technology results in more clarity and
resolution, where without the sound will be more weighted.
1.5. Spread Spectrum Mode Enable/Disable
When enabled, switching frequency modulation is activated in the HYPSOS power switching circuit. This might
influence the reproduction of high frequencies in some devices.
2. Visuals
2.1. Fe Brightness
Allows you to change the light intensity of the Ferrum logo when the HYPSOS is turned on. There are 10 bright-
ness levels to choose from or you can turn o the backlit completely.
2.2. Standby Fe Brightness
Allows you to change the light intensity of the Ferrum logo when the HYPSOS is in standby. There are 10 bright-
ness levels to choose from or you can turn o the backlit completely.
2.3. Display Brightness
Allows you to change the display luminosity. There are 10 brightness levels to choose from.
Figure 10.
Applying Voltage in:
3
12.5 V
12.0 V
Current voltage
New voltage

13
user’s manual
HYPSOS by Ferrum
2.4. Display Auto O
Allows you to select the time after which the display will be switched o. You can select from: disabled, 3s, 5s, 10s,
15s, 30s, 45s, 60s, 90s.
2.5. Auto Return
Allows you to select the return time after which the display will go back to the main screen. You can select from:
disabled, 3s, 5s, 10s, 15s, 30s, 45s, 60s, 90s. The defoult is 60s.
3. Trigger
3.1. Input
When selected, the Trigger input wakes up HYPSOS. This option might be selected when you want to turn on
your system by external device like amplifier.
3.2. Output
When this option is selected, the Trigger output wakes up the external device. This option can be used when you
want to wake up an external device, such as DAC, by turning on the HYPSOS.
4. Remote Pairing
Pairing procedure - Apple remote
Procedure can be done in two ways:
1. The Apple remote can be paired exclusively with HYPSOS.
2. The Apple remote can be paired with currently paired devices and with HYPSOS.
If you want to pair the Apple remote exclusively with HYPSOS - Enter the “Remote pairing” procedure, then press
and hold Menu and Select buttons over 5 seconds while pointing the remote control towards HYPSOS.
If you simply want to pair your Apple HYPSOS remote control, but want it to remember another device you've
paired earlier - Enter the “Remote pairing” procedure, then press and hold the Menu and Next buttons over 5
seconds while pointing the remote control towards the HYPSOS.
If you want to interrupt the remote pairing process, press the knob.
Select
Next
Menu
Figure 11.

Please check our website to check if there is a new firmware version available.
You can check your currently installed firmware in the Ferrum HYPSOS Firmware Loader app.
Windows
Please download the Ferrum HYPSOS Firmware Loader app from this website: www.ferrum.audio/support
and install it on your computer.
Turn o the HYPSOS by using the main ON/OFF switch (Fig. 2D) then disconnect HYPSOS DC output
cable.
Connect HYPSOS via USB cable to your computer.
Press the knob and when holding turn on HYPSOS using the main ON/OFF switch.
Open Ferrum Firmware Updater app and open firmware file for HYPSOS - firmware file is available on our
website here: www.ferrum.audio/support
Click on the “Flash device” button - the process of update will begin.
When the update process is complete, turn o the HYPSOS using the main ON/OFF switch (Fig. 2D), wait
5 seconds and you're done. You can use the HYPSOS again.
14
user’s manual
HYPSOS by Ferrum
6. FIRMWARE UPDATE
1.
2.
3.
4.
5.
6.
7.
15
user’s manual
HYPSOS by Ferrum
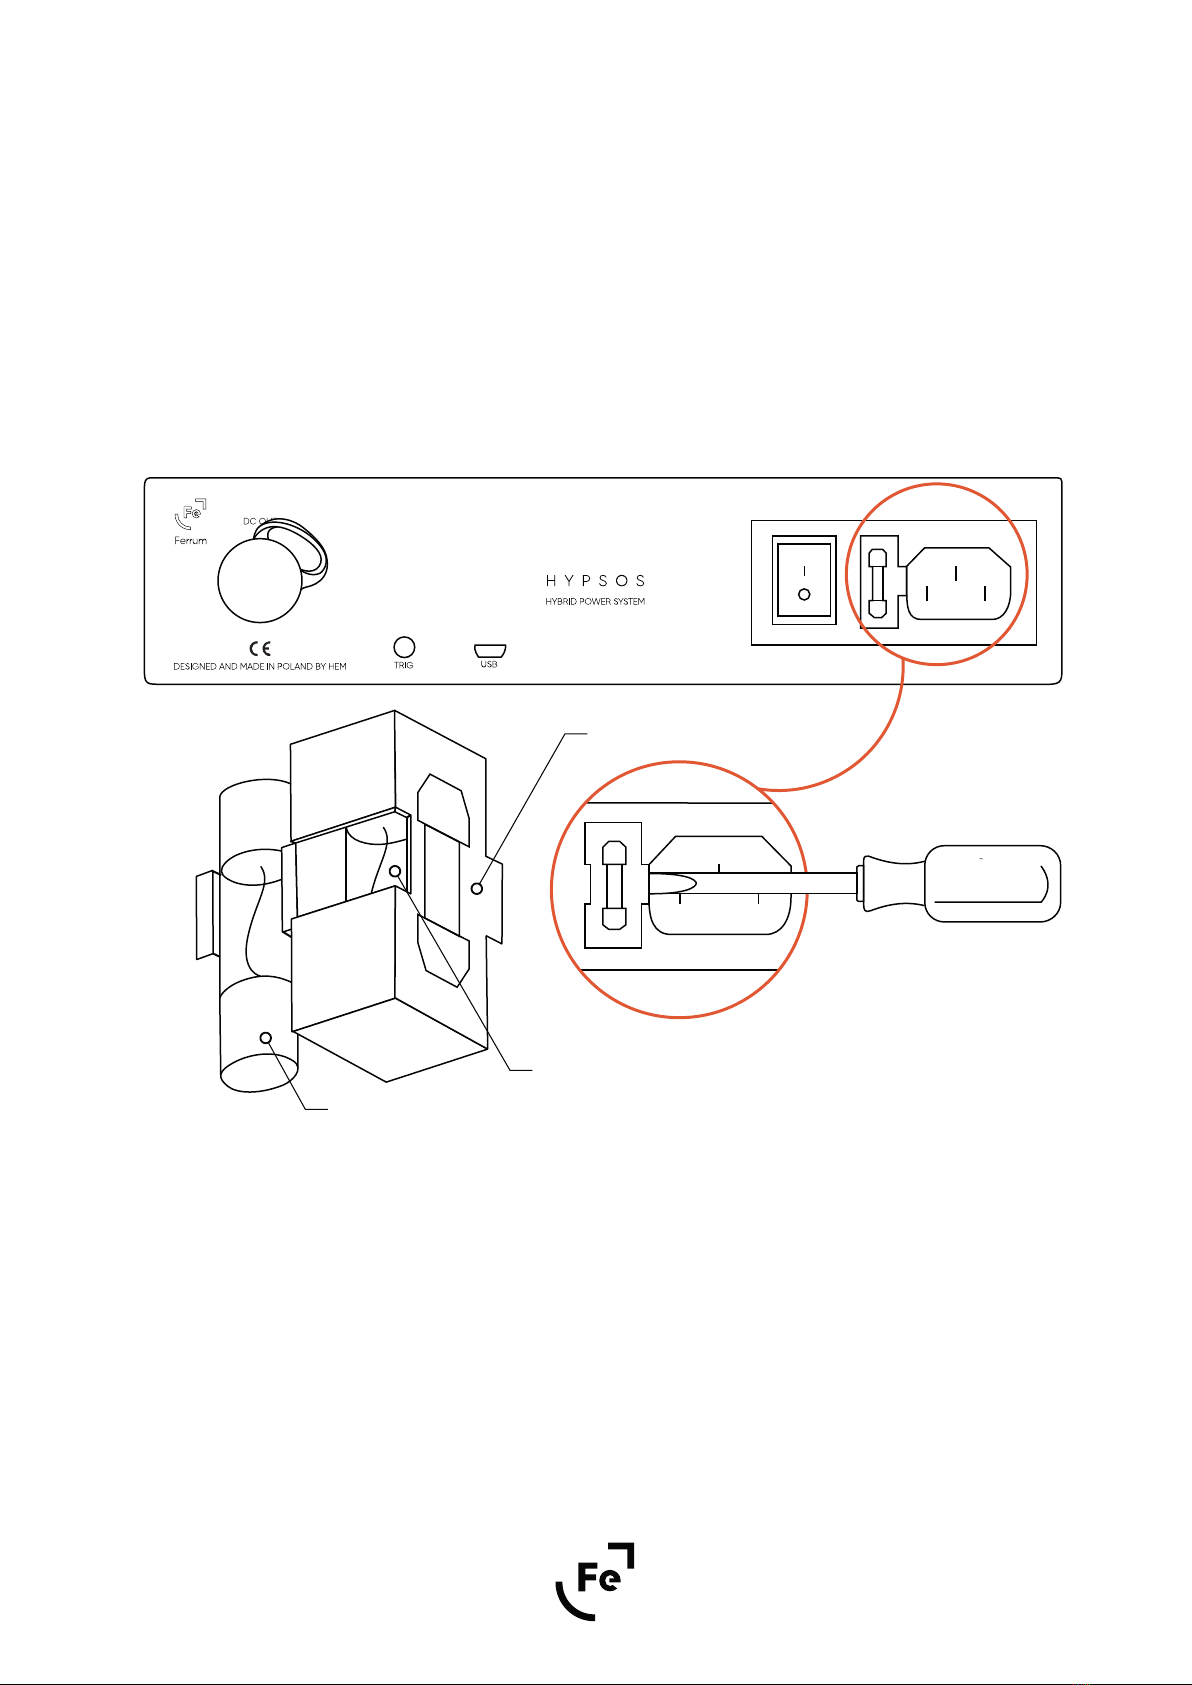
Fuse is located in the neighbourhood of AC mains socket (Fig. 2E).
To replace the fuse you can use a flat screwdriver to remove the plastic enclosure where fuse is hidden.
Check if the thin wire inside the fuse is intact. If it’s not intact, use a spare fuse for replacement. Spare fuse is
hidden inside the fuse enclosure (Fig. 12).
7. FUSE REPLACEMENT
Figure 12.
fuse
spare fuse
fuse enclosure
DO NOT OPEN ! LINE VOLTAGE INSIDE ! 110-240V 50/60Hz

16
user’s manual
HYPSOS by Ferrum
Power Input: Factory configured 110-240Vac/50-60Hz (EU/US Version) or 90-110Vac/50-60Hz (JP Version)
Output Voltage Range: 5-30V
Max Continuous Output Current (for Vout below 13,3V): 6A
Max Continuous Output Current (for Vout higher than 13,3V): Iout= 80[W] / DCout[V]
Maximum Impulse Current: 9A
Maximum Impulse Power: DC Vout*9A (270W for 30V)
Max Continuous Output Power (for Vout below 13,3V): Pout = Vout[V] * 6[A]
Max Continuous Output Power (for Vout higher than 13,3V): 80W
Dimensions (without knob, feet and connectors): W217,50 mm x L206,50 mm x H50 mm
Net weight: 2,89 kg
Primary winding fuse (external): 5x20mm - 250V 3.15A, slown-blown for Japan version / 250V 2A, slown-blown for
Europe, US version
Secondary winding fuse (internal): Littelfuse 154004T, 4A
Power consumption: 230VAC, 50Hz 12VDCout
- Idle - 6VA
- 15W load - 30,7VA
- 60W load - 98VA
- 80W load - 133,9VA
8. TECHNICAL SPEC
Each individual HYPSOS undergoes comprehensive quality control and a complete test before shipping.
This PSU is warranted by Ferrum to the owner against defects in workmanship and materials used in manufac-
ture for a period of three years from the date of purchase.
If you suspect that your product is faulty, please contact the place of purchase or you contact Ferrum support.
Prior to shipping for warranty services the customer or dealer must obtain an RMA number from Ferrum for
warranty services. Units sent without an RMA number will not be accepted.
Proof of purchase in the form of a bill of sale or received invoice, which is evidence that this product is within the
warranty period, must be presented to obtain warranty service. This warranty is void and inapplicable if the
factory applied Serial Number has been altered or defaced from this product. Faults due to customer misuse,
unauthorized modifications or accidents are not covered by this warranty.
Please pack the product very carefully, preferable in the original packing, to be sure no damage can be done
during shipment.
Ferrum is not responsible for accessories, items left in the packaging and the box in which the device has arrived
for service. Ferrum reserves the right to use a replacement box if necessary.
9. WARRANTY

17
user’s manual
HYPSOS by Ferrum
In case of questions or suggestions regarding its form or contents, please contact us via our support system
available on our website: www.ferrum.audio/support
10. CONTACT FERRUM
Excessive sound pressure from speakers and headphones can cause hearing loss. In order to use this product
safely, avoid prolonged listening at excessive sound pressure levels.
For the customers in the U.S.A.
This equipment has been tested and found to comply with the limits for a Class A digital device, pursuant to Part
15 of the FCC Rules. These limits are designed to provide reasonable protection against harmful interference
when the equipment is operated in a commercial environment.
This equipment generates, uses, and can radiate radio frequency energy and, if not installed and used in
accordance with the instruction manual, may cause harmful interference to radio communications.
You are cautioned that any changes or modifications not expressly approved in this manual could void your
authority to operate this equipment.
All interface cables used to connect peripherals must be shielded in order to comply with the limits for a digital
device pursuant to Subpart B of Part 15 of FCC Rules.
This device complies with Part 15 of the FCC Rules. Operation is subject to the following two conditions:
(1) this device may not cause harmful interference, and (2) this device must accept any interference received,
including interference that may cause undesired operation.
This product with the CE marking complies with the EMC Directive issued by the Commission of the
European Community. Compliance with this directive implies conformity to the following European
standards:
• EN55103-1 : Electromagnetic Interference (Emission)
• EN55103-2 : Electromagnetic Susceptibility (Immunity)
This product is intended for use in the following Electromagnetic Environments: E1 (residential), E2 (commercial
and light industrial), E3 (urban outdoors), E4 (controlled EMC environment, ex. TV studio).
11. WARNING
18
user’s manual
HYPSOS by Ferrum
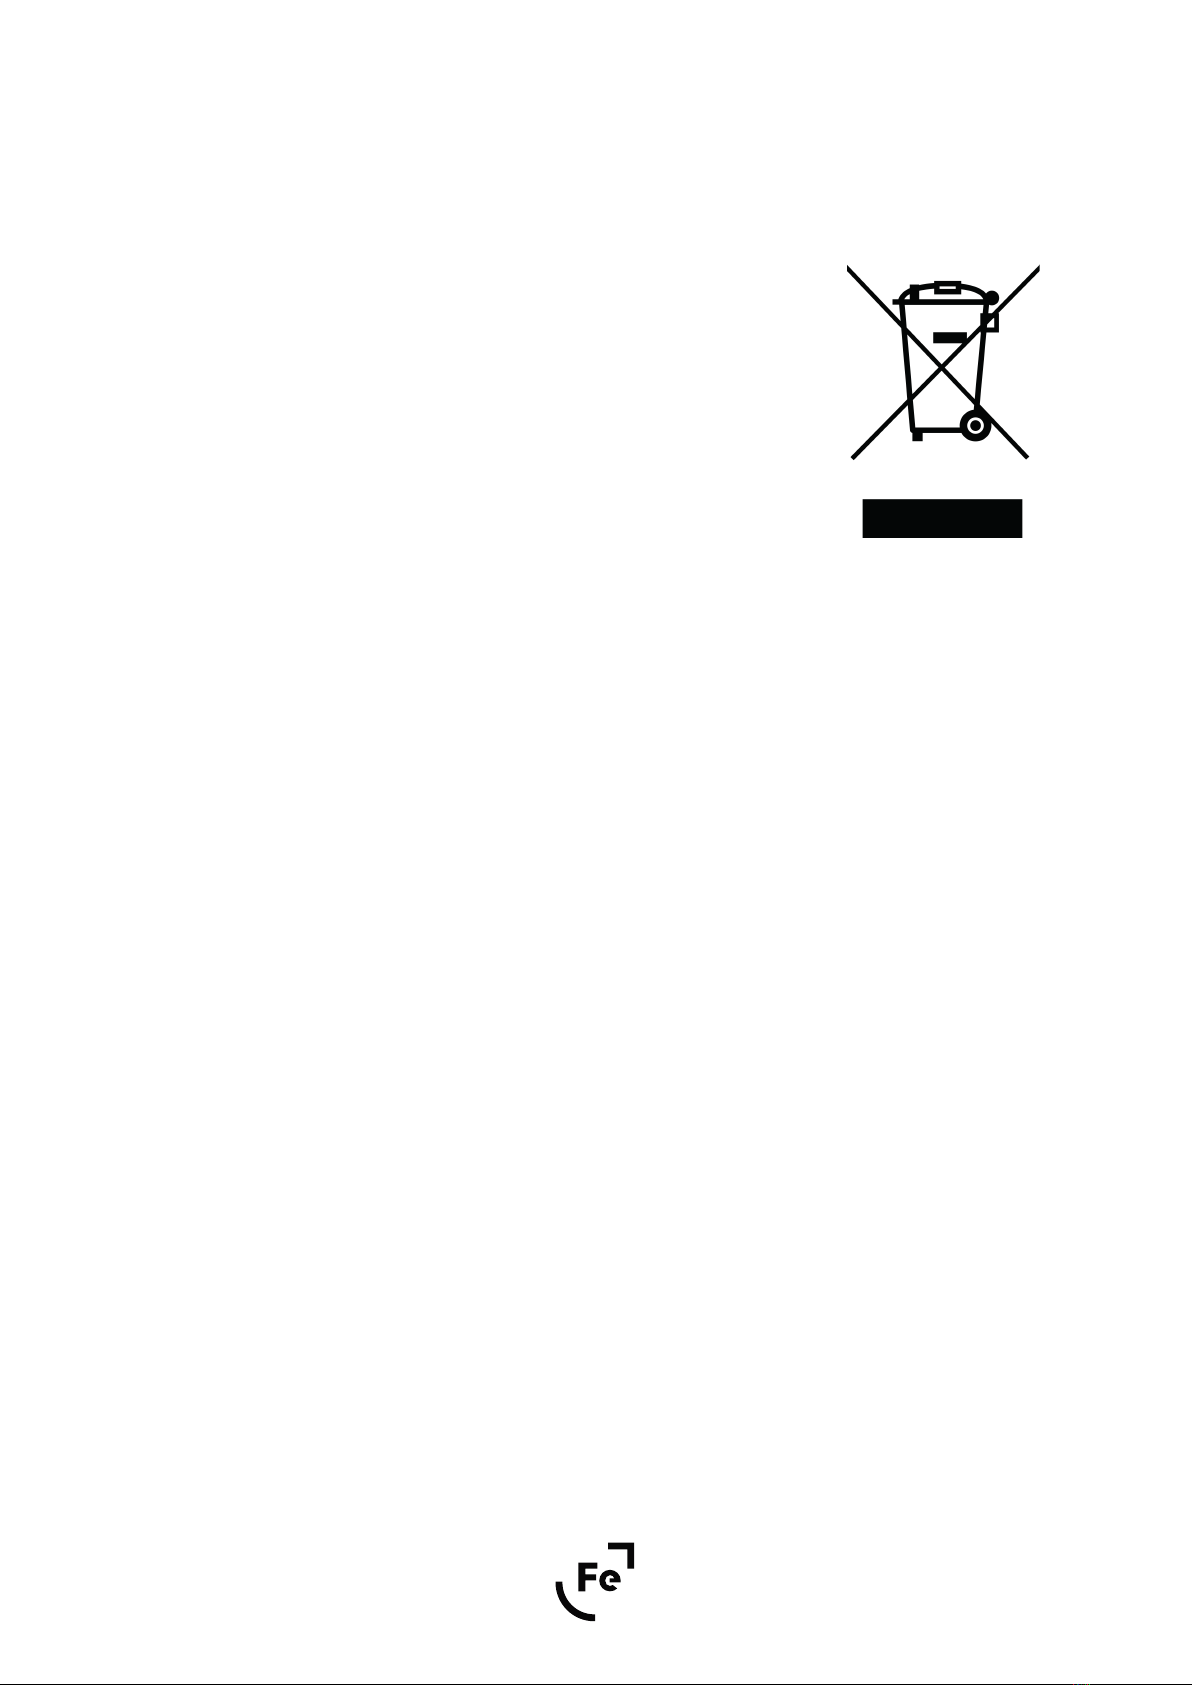
12. INFORMATION ON DISPOSAL FOR USERS OF
WASTE ELECTRICAL & ELECTRONIC EQUIPMMENT
(PRIVATE HOUSEHOLDS).
The Wheelie Bin symbol on the products and/or accompanying documents
means that used electrical and electronic products should not be mixed
with general household waste. Disposing of this product correctly will help
save valuable resources and prevent any potential negative eects on
human health and the environment.
To properly dispose harmful substances and recycle the product, the
user is obliged to return it at the point of collection of electrical and
electronic equipment waste. For more information please contact your
local authorities, waste disposal units or retailer.
Other manuals for HYPSOS
1
Table of contents
Other ferrum Power Supply manuals


Popular Power Supply manuals by other brands


IDEC
IDEC PS5R-V Series manual

Mitsubishi Electric
Mitsubishi Electric PAC-SC50KUA installation manual

Keithley
Keithley 2260B Series manual

Exogal
Exogal Comet Disassembly manual

INNOVATIVE CIRCUIT TECHNOLOGY
INNOVATIVE CIRCUIT TECHNOLOGY ICT24012-20CM instruction manual

Atomos
Atomos SHOGUN quick start guide