FEZEN ZM1515 User manual

USER MANUAL
MODEL:ZM1515
Contents
Chapter 1: Safety Precautions ............................................................................................................ 2
Chapter 2: Parts and Functions .......................................................................................................... 3
Chapter 3: Directions for Use ..............................................................................................................4
Chapter 4: Maintenance ......................................................................................................................6
Chapter 5: Safety Indexes .................................................................................................................. 7

Chapter 1: Safety Precautions
1. The input voltage of the appliance is AC220-240V~50Hz. Please confirm your socket voltage before
connecting the power supply.
2. Disconnect the power supply before dismantling, assembling or adjusting any part of the appliance.
3. The appliance comes equipped with a“Y connection”, If the power cord is damaged, please contact our
customer service or have it directly replaced at your nearest authorized service center. Do not attempt to dismantle
and repair it by yourself to avoid injuries or damages.
4. Before operating the appliance, please check if the power cord, the plug, the juice strainer, the spiral pusher
and any other part is damaged. If any of the said part is damaged, do not operate the appliance and contact our
customer service immediately. Do not attempt to dismantle and repair it by yourself to avoid injuries or damages.
5. For repair and servicing, please contact our customer service or have it directly repaired at your nearest
authorized service center. Do not attempt to dismantle and repair it by yourself to avoid injuries or damages.
6. Please ensure that the juicing body, spiral pusher, juicing body cap and all other dismountable parts are
properly installed before connecting the power supply.
7. Do not insert hands or sharp objects into the feed port and avoid touching the spiral pusher when the appliance
is running to prevent injuries and damages; never replace the spiral pusher with any other objects and observe a
safe distance between your eyes and the feed port to avoid accidents.
8. Prepare food ingredients in sizes smaller than the feed port for ease of entry. Do not process any vegetables or
fruits with pits, hard seeds, thick skin or shells until they are completely removed.
9. When feeding a food ingredient into the feed port, do not exert excessive force but just enough to cut the food
ingredient.
10. Discoloration of juice strainer, juicing body cap, spiral pusher and other accessories after juicing of certain
vegetables or fruits is normal, and will neither affect food quality nor harm your health.
11. Equipped with an intelligent protective chip, the appliance will shut down automatically after 20 minutes of
continuous running. In the event, wait for 20-30 minutes until the motor has cooled down before resuming operation
to prolong the service life of the appliance.
12. The appliance has a current limiting design. Hence, the motor would be locked and the current would rise when
hard food ingredients are processed. When the current is higher than 1.3A, the motor would be alerted and pause
for 2 seconds before reversing automatically for 5 seconds and finally shutting down (food causing obstruction in
the appliance would be discharged when the motor reverses). At this point, hit the “ON” button to resume normal
operation of the appliance.
13. In the event of activation of current limiting, locking of motor or failure of auto reverse, hit the “OFF” button to
shut down the appliance, followed by the “REV” button to discharge any obstruction, and finally hit the “ON” button
again to resume normal operation of the appliance. If the motor is still locked, it is recommended that any
obstruction in the spiral pusher should be removed before resuming operation of the appliance. This action serves
to protect the motor.
14. Do not dismantle the dismountable parts of the appliance immediately after use. Make sure both the motor and
spiral pusher have come to a complete stop with the power supply disconnected before dismantling.
15. Do not sterilize any parts in hot water with a temperature higher than 80℃or in a microwave oven. It would
lead to permanent deformation and damage. All parts coming in direct contact with food ingredients should comply
with food hygiene standards and be cleaned thoroughly before use.
16. Do not immerse the main body or rinse it under running water or any liquid to prevent damages.
17. Do not clean the appliance with steel wool, abrasive cleaning agents or corrosive liquids (such as gasoline or

acetone).
18. Store this appliance out of reach of children. This appliance is not intended for use by persons (including
children) with reduced physical, sensory or mental capabilities. It is also not intended for use by persons lacking
experience and knowledge unless under professional guidance and close supervision.
19. The appliance is intended for use by individuals or families only.
20. Do not leave children unsupervised with this appliance.
21. Parts, other than those supplied with the appliance, include safety instructions.
22. Do not clean surfaces or parts that come in direct contact with food ingredients when the appliance is connected
to the power supply.
23. Do not replace or touch moving parts before the appliance is completely shut down and disconnected from
power.
24. This portable appliance is designed for domestic and indoor use only.
25. If the power cord is damaged, it must be replaced by the manufacturer, at an authorized service center or by an
authorized service representative to avoid hazards.
26. Warning: potential dangers may arise if appliance is misused.
27. Always disconnect the power if it is left unattended and before assembling, dismantling or cleaning.
28. Appliances can be used by persons with reduced physical, sensory or mental capabilities or lack of experience
and knowledge if they have been given supervision or instruction concerning use of the appliance in a safe way and
if they understand the hazards involved.
Chapter 2: Parts and Functions
No.
Parts
Functions
1
Power cord
It is used for connecting the power supply to provide power.
2
Main body
As a main part and the power source of the appliance,
3
Power switch
It controls the operating statuses (Rev, O, Soft, Hard) of the appliance.
4
Button
It is used for locking the juicing body to prevent it from detaching from the
main body during operation.
5
Juicing body
It is the main part for juicing. Food ingredients are first fed via the feed port at
the top of the juicing body and then discharged in forms of juice and pulp via
the juice outlet and the pulp outlet respectively.
6
Spiral pusher
As a main part for juicing, it is used for grinding food ingredients by breaking

and conveying them to the juice strainer or the squeezer.
7
Juice strainer
Using Squeezing with the spiral pusher, it used for grinding and filtering the
extracted food ingredients to obtain the juice.
8
Squeezer
It is used for grinding food ingredients by Squeezing with the spiral pusher
(for fruits and vegetables).
9
Juice cup
It is used for juice collection.
10
Residue cup
It is used for residue collection.
11
Food tray
It is mainly used for placing food ingredients.
12
Pushing rod
It is used for guiding food ingredients from the feed port to the spiral pusher
for higher juice extraction efficiency.
13
Removal wrench
For disassembly of parts 8
Chapter 3: Directions for Use
Before operating the appliance for the first time, clean the parts that come into direct contact with
food ingredients thoroughly (please refer to “Chapter 4: Maintenance”).
Switch operating instructions:
“Rev”: Activates reverse motion to discharge blockage or
when the motor is locked
“O”: Shuts down appliance
“Soft”: For soft ingredients
“Hard”: For hard ingredients
I. Installation Guide
Please install the appliance by following the steps below:
1
Connect the juicing body to the main body:
1. Align the “triangular aligning mark” “▼”on the main body to
latch the juicing body onto the main body (the 3 clips on the
juicing body will realize alignment).
2. Turn the juicing body in an anticlockwise direction. When a
click is sounded, it suggests that the connection is
completed.
2
Align the hexagonal shaft of the spiral pusher with the hole on
the main body and push it horizontally until it reaches the
bottom (when alignment fails, turn / adjust the spiral pusher
slightly).
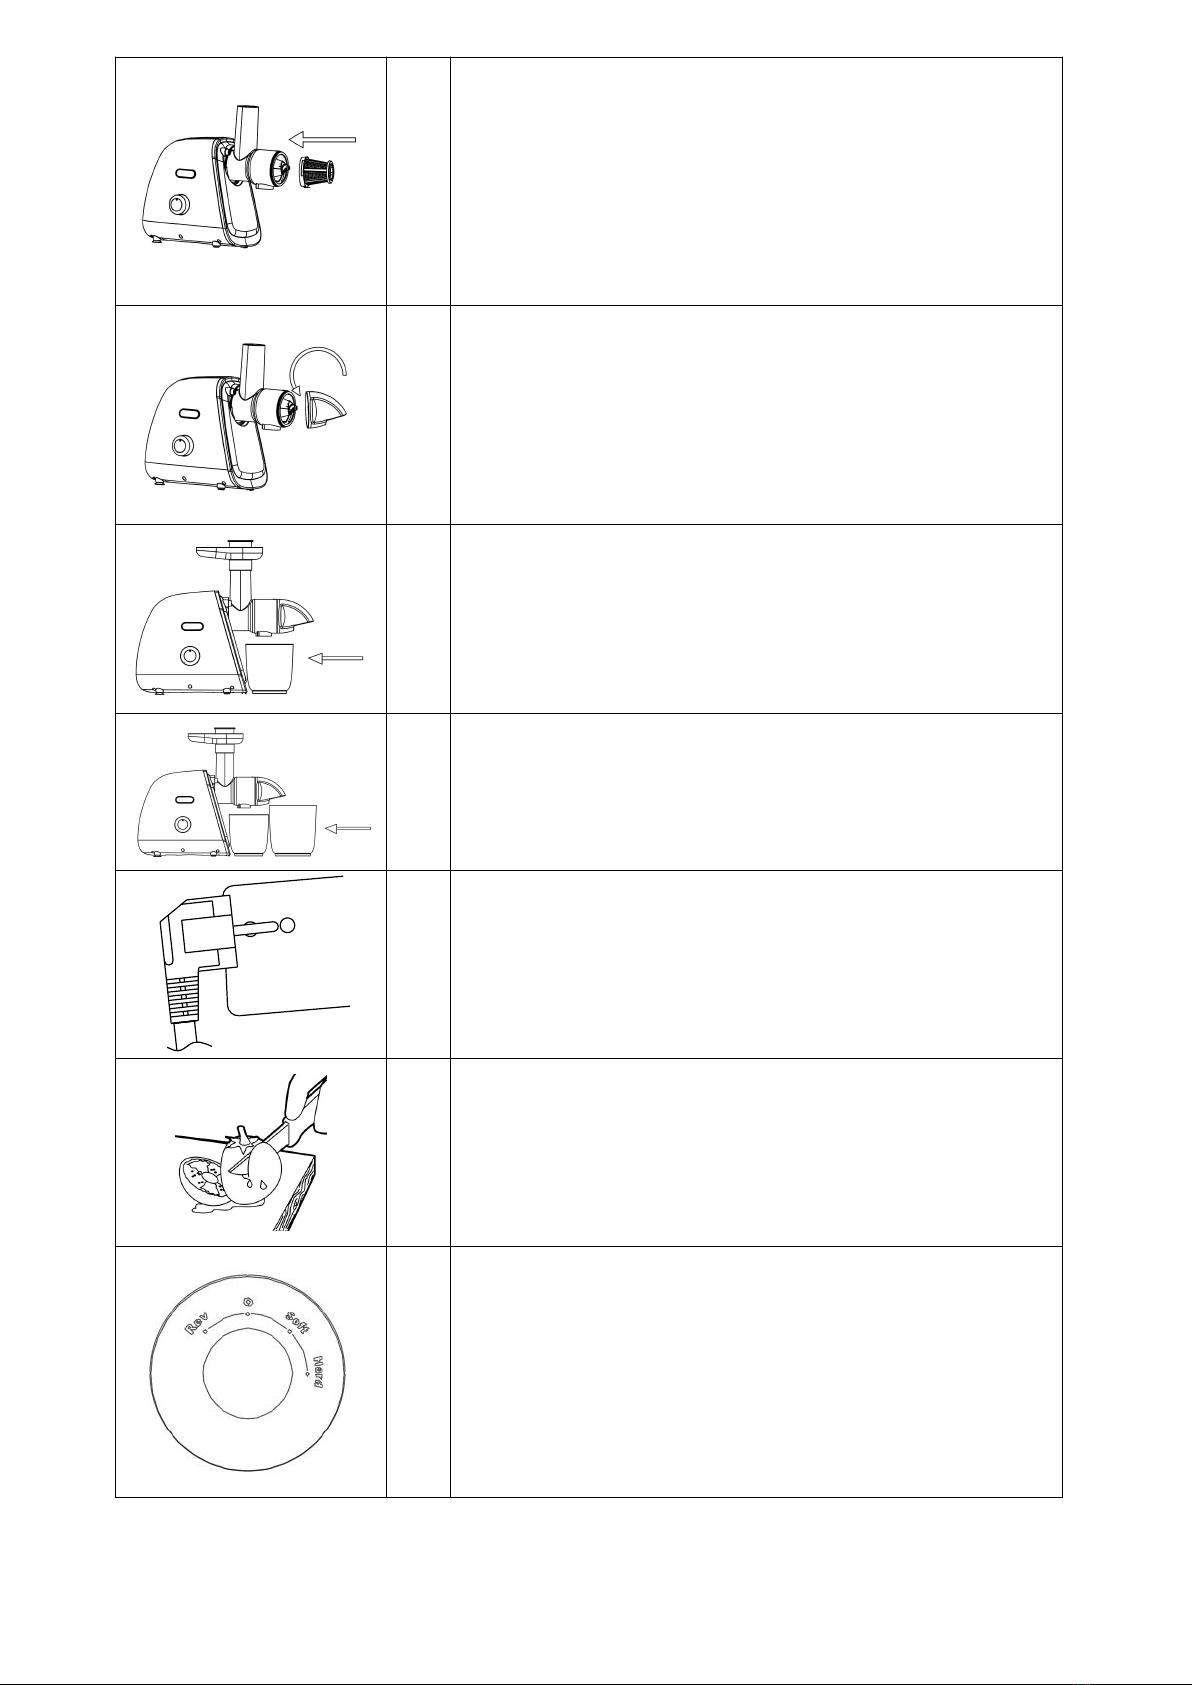
3
Fit the larger end of the juicer strainer into the tail of the spiral
pusher and push it when the 3 clips of the juicer strainer align
with the 3 clamping slots in the juicing body. (the juice strainer is
used with the juicing button in the rear only. this function is used
for juicing.)
4
The “triangular alignment mark” on the squeezer should
meet with the arrow on the juicing body followed by an
anticlockwise turn to align with the “unlock triangular mark”
on the juicing body.
5
Position the juice cup in the corresponding groove on the main
body and align its opening below the juice outlet of the juicing
body.
6
Position the residue cup below the residue outlet of the juicing
body close to the juice cup.
7
Connect to the power supply to begin operating the appliance
(make sure the power switch is at the “OFF” position before the
power supply is connected).
8
Wash vegetables and fruits, cut them into sizes fitting the inlet
of the feed port and place them on the food tray.
9
Once the “Soft/Hard” button is pressed, operate the
appliance for no longer than 10 minutes per usage.

10
Feed food ingredients into the feed port and guide the food
ingredients downwards with the help of the pushing rod.
Chapter 4: Maintenance
1. Before cleaning the appliance, make sure the power switch is at the“ON” position and disconnect the power
supply.
2. Clean the appliance immediately after each use.
3. Do not rinse the main body under running water but wipe away any stains with a damp cloth.
4. Before storing the appliance, make sure it is clean and dry.
5. Clean the appliance after dismantling by following the steps below.
1
Extract the pushing rod.
2
Press the button on the side of the juicing body and
simultaneously turn the juicing body clockwise to
dismount the juicing body. The juicing body cannot be
dismantled if the button is not pressed.
3
After dismounting the juicing body, take down the
juicing button, the juicing body cap, the juice strainer
(or the squeezer) and the spiral pusher in this order.
The dismountable parts may be rinsed with clean
water.

Chapter 5: Safety Indexes
Notes:
The analysis and elimination methods illustrated in this manual are merely indications of
common faults. For any other faults, please contact our customer service or have the
appliance directly repaired at your nearest authorized service center. Do not attempt to
dismantle and repair it by yourself to avoid hazards.
Rated voltage
120V~
Rated power
150W
Rated frequency
50Hz
Continuous operating time
≤10 min.
Operation intervals
≥10 min.
Table of contents
Popular Juicer manuals by other brands


Russell Hobbs
Russell Hobbs RHJM02 Instructions and warranty

Vitality 4 Life
Vitality 4 Life Oscar Neo Plus user manual

OBH Nordica
OBH Nordica Citrus Pres ELIXIR Instructions of use

BLUE STONE
BLUE STONE SJB-6568 user manual

BLACK DECKER
BLACK DECKER BXCJ30E instructions

gourmetmaxx
gourmetmaxx D-8012B operating instructions


