07
How to trim the ingredients / Use by strainer types
It is for making Smoothie, slush and Ice Cream with frozen fruits.
Do not extract large amount of ingredients at once or put the large chunk of the
ingredients. The juice can be out to pulp outlet or outside of the strainer when use
a little bit defrost fruits. It is natural phenomenon and not a product failure. Do not
use water freezes, ice cube.
Juice fruits like pear, kiwi, oriental melon, etc. put them with seeds and peels.
However, apple seeds contain toxicity, so it better to remove them.
Separate each grape from the cluster.
Peel the pomegranate and use flesh only.
Peel off the skin of watermelon, melon, orange, grapefruit, lemon and cut them into
right size.
Fruits like mango, cherry, peach, lemon or plum, etc. have hard seeds which are
hard to swallow. Those seeds might cause stoppage or parts damage, so they must
be removed before using it.
Cut fibrous ingredients into small sized less than 3~4 cm. Put a handful of wheat or
chives in not to be scattered.
Dice frozen fruits as 2cm to make ice cream. When use the testaceous fruits, please
peel and freeze to use. Fruits with hard seeds such as persimmon, Japanese apricot,
lemon, plum, peach etc. that are hard to chew with our teeth should be taken out
before freeze. Please use seedless grapes.
When extracting juice from ingredients with many fibers, including ginger, slice
thinly and insert slowly. When extracting juice from root vegetables, including
ginger (carrot, dandelion, potato, deodeok, etc.), non-food materials such as dirt on
the surface may damage the parts. Please remove peels before using the product.
When extracting a large amount of juice, repeat the process of "disassembling and
cleaning after extracting juice from 1kg of ingredients”.
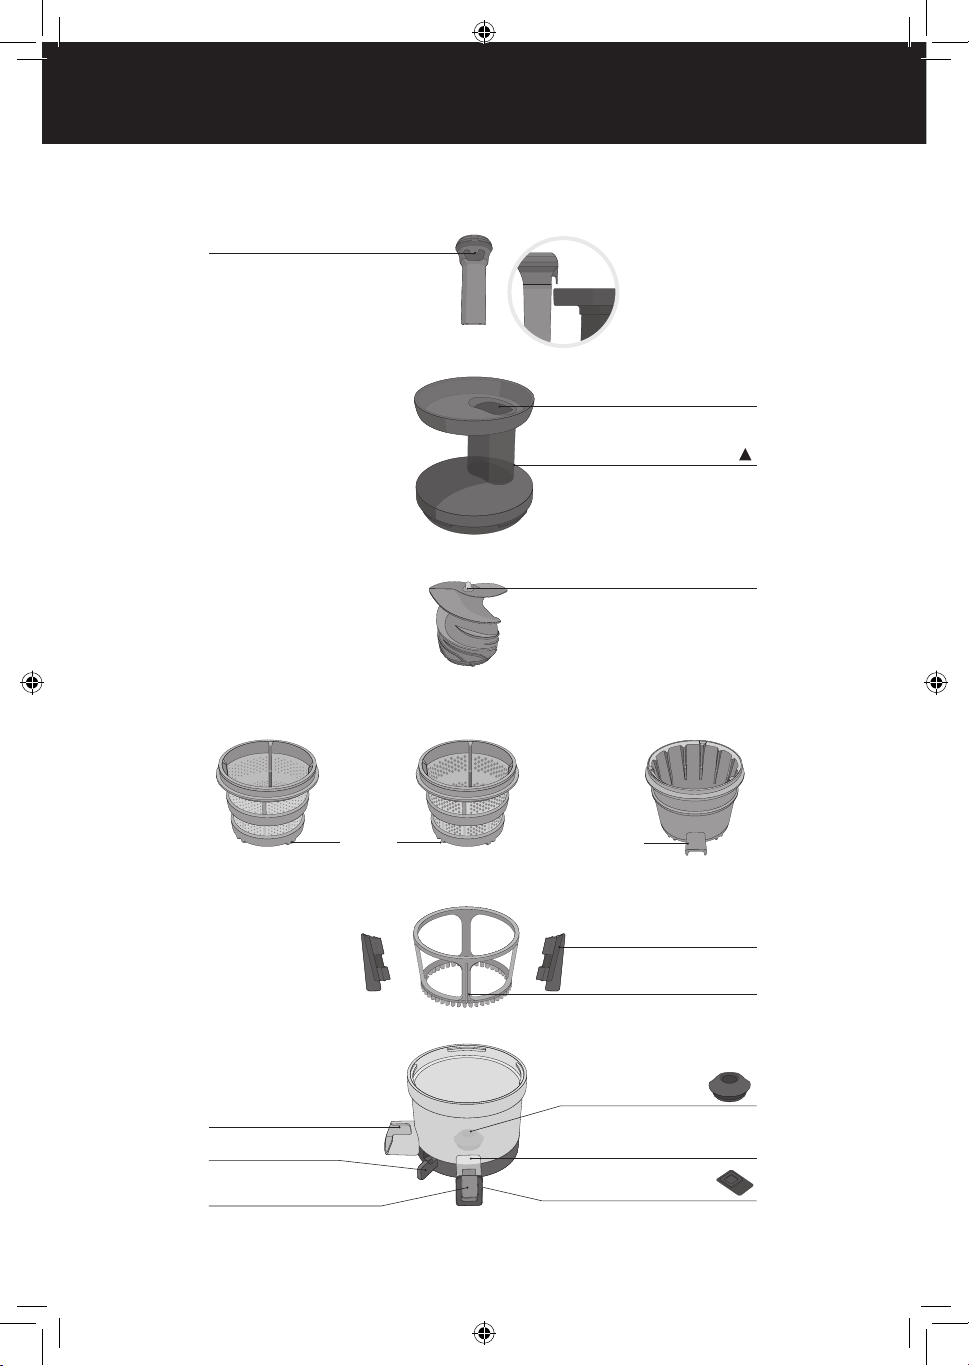
Use by strainer types
►This is a reference about how to trim the ingredients,
so if you have allergy please choose your own proper ingredients which agrees with you.
►Please refer to the recipe book for the product usage of each ingredient.
Fine strainer has tiny and fine holes good to make clean juice.
Apple · Pear · Kiwi ·
Oriental Melon
Watermelon ·
Melon · Orange ·
Grapefruit · Lemon
Mango · Cherry ·
Peach · Lemon
Wheat · Chives ·
Water Parsleys ·
Angelica · Celery
· Kale
Fine
Strainer
Coarse
Strainer
Ice Cream
Strainer
Flesh
Ginger · Garlic
Pomegranate ·
Grapes
How to trim the ingredients For juicing
How to trim the ingredients For making Ice Cream
This ice cream strainer is only for frozen fruits.
Do not use for crushing ice and grinding.
Note
Coarse strainer has larger holes so is good to make thick juice with flesh in it.
It is to make juice with soft fruits and thick juice like banana, strawberry, and also
useful for smoothie, latte, or soup.