Fieldmann FZV 6050 B User manual

FZV 6050 B

EN 2
FZV 6050 B
English.................................................................................................................................................................................................... 1-20
Czech ...................................................................................................................................................................................................21-38
Slovak ...................................................................................................................................................................................................39-56
Hungarian............................................................................................................................................................................................57-74
Polish ...................................................................................................................................................................................................75-98

EN
GAS LAWN CULTIVATOR USER MANUAL
3
Gas lawn cultivator
INSTRUCTIONS FOR USE
Thank you for purchasing this petrol cultivator. Before you start using it, please, carefully
read this user's manual and save it for possible future use.
TABLE OF CONTENTS
Table of Contents
1. GENERAL SAFETY REGULATIONS..........................................................................................................................4
Important safety notice ...........................................................................................................................................4
Packaging ......................................................................................................................................................................4
User manual...................................................................................................................................................................4
2. EXPLANATION OF THE INSTRUCTION LABELS ON THE MACHINE.........................................................5
3. INSTRUCTIONS FOR CORRECT USE .....................................................................................................................7
4. CULTIVATOR DESCRIPTION.....................................................................................................................................7
5. ASSEMBLY/PREPARATION........................................................................................................................................7
Taking the lawnmower out of the cardboard packaging..................................................................8
6. ASSEMBLY OF THE CULTIVATOR ...........................................................................................................................8
1. ASSEMBLY OF THE HANDLE................................................................................................................................8
2. Fitting the catcher .................................................................................................................................................8
7. BEFORE STARTING THE CULTIVATOR ..................................................................................................................9
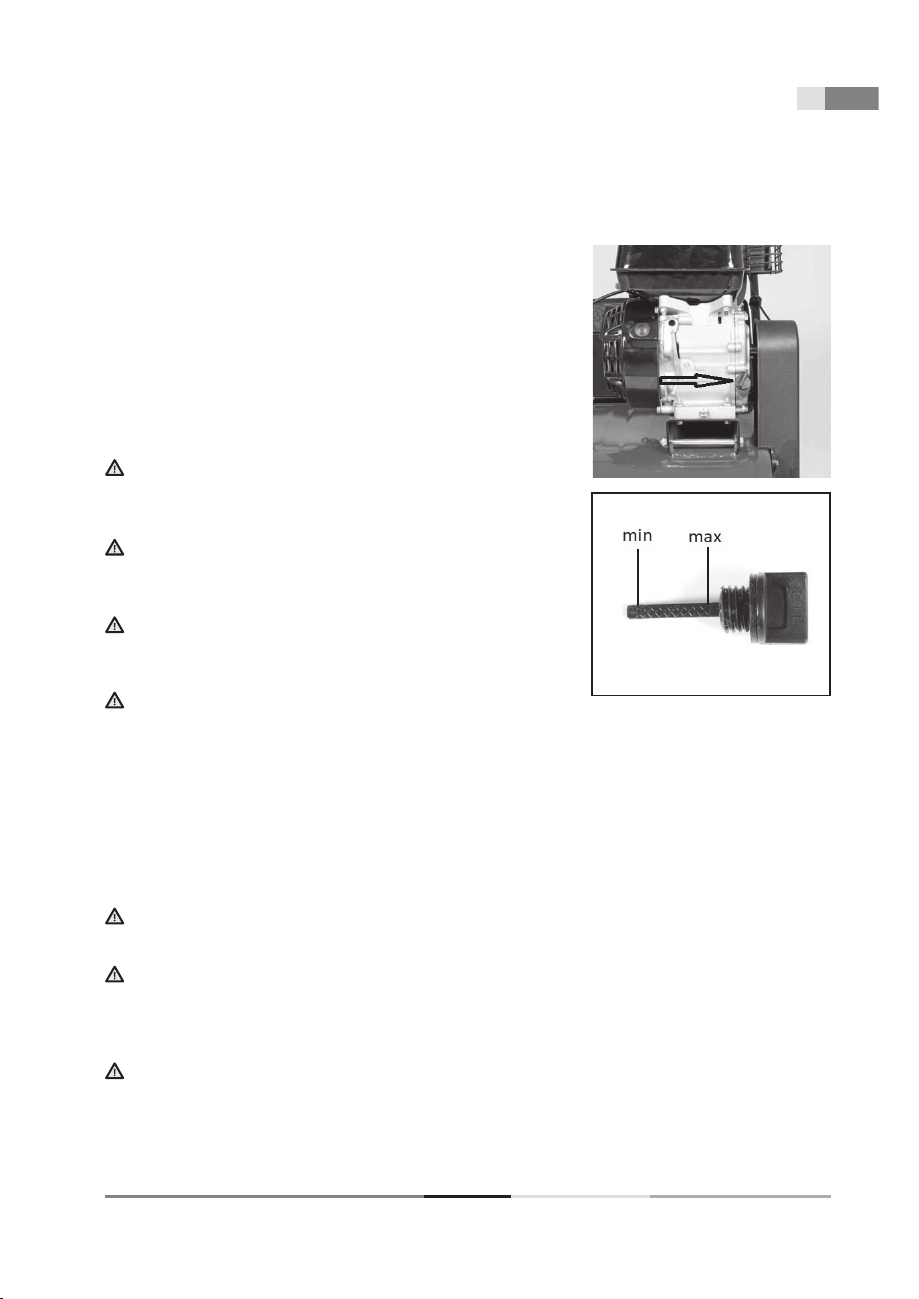
ADDING OIL....................................................................................................................................................................9
Adding fuel.....................................................................................................................................................................9
8. CONTROLLING AND OPERATING
THE CULTIVATOR ...................................................................................................................................................... 10
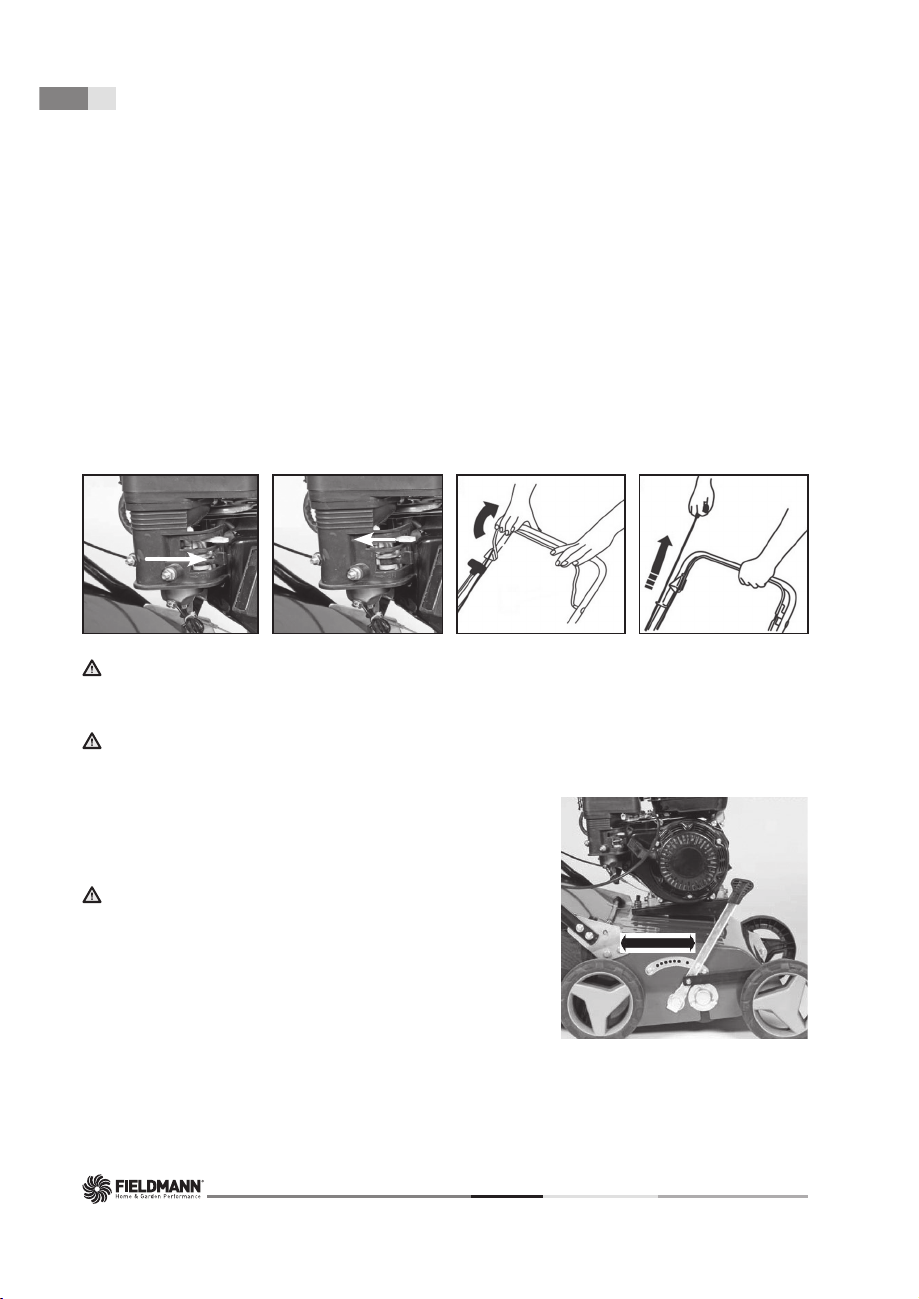
Starting the cultivator ............................................................................................................................................ 10
WORKING DEPTH setting ..................................................................................................................................... 10
Tips for correct cultivating .................................................................................................................................. 11
9. SAFETY INSTRUCTIONS............................................................................................................................................ 11
General safety instructions ................................................................................................................................. 11
10. CLEANING, MAINTENANCE, STORAGE, TRANSPORTATION................................................................ 13
Cleaning....................................................................................................................................................................... 13
Checking the oil level............................................................................................................................................ 13
Changing the oil ...................................................................................................................................................... 13
Care and adjustment of cables...................................................................................................................... 13
Servicing the air filter.............................................................................................................................................. 14
Preparing the equipment for transport........................................................................................................ 14
11. TECHNICAL SPECIFICATIONS.............................................................................................................................. 15
12. SERVICING INTERVAL.............................................................................................................................................. 16
13. DETECTION AND TROUBLESHOOTING .......................................................................................................... 17
14. DECLARATION OF CONFORMITY..................................................................................................................... 19
15. DISPOSAL...................................................................................................................................................................... 20

EN 4
FZV 6050 B
General safety regulations
1. GENERAL SAFETY REGULATIONS
IMPORTANT SAFETY NOTICE
Unpack the product carefully and do not throw away any of the packaging until you have found all the parts
of the product.
Store the machine in a dry place out of children’s reach.
Read all the warnings and instructions. Failure to comply with the warnings and instructions may lead to
electric shock, fire and/or serious injuries.
PACKAGING
The product’s packaging prevents damage during transport. This packaging is a resource and can be recycled.
USER MANUAL
Before starting to work with the machine, please read the following safety regulations and instructions for use.
Get familiar with the controls and correct use of the equipment. Keep the user’s manual in a safe place for easy
future reference. Save the original packaging, including the internal packing material, guarantee card and proof
of purchase receipt for at least the time of the guarantee.
If you need to ship this machine, pack it in the original cardboard box to ensure maximum protection during
shipping or transport (e.g. when moving or when you need to send this product for repair).
Note: If you hand over the appliance to somebody else, do so together with this user's manual. Make sure
you use the appliance properly by following the instructions in the included User manual. The user’s manual
also contains operating, maintenance, and repair instructions.
The manufacturer assumes no responsibility for accidents or damages arising from
failure to comply with these instructions.
IMPORTANT: If you find any defect after purchasing the product, please contact the service department.
When using the product, follow the instructions contained in the included user's manual. A complaint will
not be accepted if you modified the product or if you did not follow the instructions in the user's manual.

EN
GAS LAWN CULTIVATOR USER MANUAL
5
Explanation of instruction labels on the machine
2. EXPLANATION OF THE INSTRUCTION LA-
BELS ON THE MACHINE
Before putting into operation, please carefully read
the user's manual.
Keep other persons away from the work area.
Attention, rotating blades! Protect yourself against
the danger of injury to limbs.
Emission of toxic gasses. Do not use the petrol
cultivator in enclosed or unventilated areas.
Hot surfaces, risk of burns!
Before carrying out maintenance, turn off the
engine and disconnect the spark plug.
Never add fuel while the engine is running.

EN 6
FZV 6050 B
Instructions for correct use
Indicates that there is a risk of injury to persons,
death or damage to the machine if instructions are
not followed.
Use ear protection.
Use eye protection.
Use breathing protection.
Choke lever
Fuel tank cap
Conforms to all relevant European directives.

EN
GAS LAWN CULTIVATOR USER MANUAL
7
Instructions for correct use | Cultivator description | Assembly/preparation
3. INSTRUCTIONS FOR CORRECT USE
The device is designed exclusively for cultivating of grassy areas. The device is not intended for cultivating flower
beds, for levelling soil elevations such as molehills or for removing lawns, shredding branches or trimming
hedges and the like. For safety reasons, this equipment must not be used as a power unit for other work tools
or tool sets of any kind. The device may only be used for its intended use. Any other use will be considered to be
incorrect use. Any damage or injury incurred by improper use will be the responsibility of the user / operator and
not the manufacturer.
Please note that our equipment is not intended for commercial, business or industrial use. This warranty be-
comes void if the device has been used for commercial, business or industrial or other similar purposes.
IMPORTANT: If you find any defect after purchasing the product, please contact the service department.
When using the product, follow the instructions contained in the included user's manual. A complaint will
not be accepted if you modified the product or if you did not follow the instructions in the user's manual.
4. CULTIVATOR DESCRIPTION
1. Start lever
2. Top part of the handle
3. Bottom part of the handle
4. Screws with wing nuts
5. Air filter cover
6. Fuel tank cap
7. Cap with oil dipstick
8. Working depth adjustment lever
9. Grass catcher
10. Fuel tank cap
11. Choke lever
12. Pull cord
Fig. 1
5. ASSEMBLY/PREPARATION
Before assembling and starting the petrol cultivator, first carefully read the entire user's manual and the instruc-
tions contained in it.
IMPORTANT INFORMATION: The cultivator is supplied WITHOUT FUEL AND OIL in the engine.
Your new cultivator was tested at the production plant meaning that a small amount of residual oil may be
in the engine.

EN 8
FZV 6050 B
Assembly of the cultivator
TAKING THE LAWNMOWER OUT OF THE CARDBOARD PACKAGING
Take the cultivator out of the cardboard packaging and check that no loose parts are left in the packaging.
6. ASSEMBLY OF THE CULTIVATOR
IMPORTANT INFORMATION: Carefully unfold the cultivator handle, being careful not to pinch or
damage the cultivator's control cables.
1. ASSEMBLY OF THE HANDLE
1. Attach the lower handrail to the cultivator with 2 nuts bolts on each side (Fig. 2a)
2. Attach the top part of the handle to the bottom part of the handle using the included screws with quick coupler
and wing nuts (Fig. 2b)
3. Attach the switch lever cable to the handle using the enclosed plastic clip
Fig. 2a Fig. 2b Fig. 2c
2. FITTING THE CATCHER
Lift the basket rear cover and attach the basket to the cover axis using the hooks.
Fig. 3

EN
GAS LAWN CULTIVATOR USER MANUAL
9
7. BEFORE STARTING THE CULTIVATOR
ADDING OIL
The cultivator is supplied without motor oil.
Before first start up, add motor oil SAE30 or 15W-40
(approx 600 ml) according to the following
instructions.
1. When pouring in the oil, place the cultivator on a level surface.
2. Pull the cap with the oil dipstick out of the oil refill hole (Fig. 4a)
3. After adding oil, put the dipstick back into the hole and tighten it.
4. The oil level must be between the upper (MAX) and lower (MIN)
limit (Fig. 4b).
Caution! DO NOT OVERFILL the oil tank, otherwise a large
amount of smoke will come out of the exhaust when the cultivator
is started up.
Caution! DO NOT OVERFILL the oil tank, otherwise a large
amount of smoke will come out of the exhaust when the cultivator
is started up.
IMPORTANT INFORMATION: Check the oil level before every
use of the cultivator. Add oil if necessary. Add oil up to the MAX level
mark on the oil dipstick.
IMPORTANT INFORMATION: Replace the oil after the first
5 hours of operation and subsequently after every 25 hours of
operation.
Fig. 4a
Fig. 4b
ADDING FUEL
The suitable type of fuel for this engine is NATURAL 95
After unscrewing the fuel tank cap, add the fuel, pouring it in all the way up to the collar of the fuel tank but do not
overfill it.
Always add fresh, clean and approved lead-free petrol with an octane rating of at least 95.
Caution! In the event that you spill any oil or fuel on the cultivator when refilling, wipe it away immediately.
Do not store or add fuel or handle it in any way in the vicinity of an open fire
Caution! Fuels mixed with alcohol or fuels with ethanol or methane additives may bind moisture to
themselves, which may result in separation during storage and the formation of acids. Subsequently during
storage the acid vapours may damage the fuel system of the engine. These fuels must not be used in the
cultivator.
IMPORTANT INFORMATION: When not using the cultivator for longer than 30 days, drain the fuel tank,
start the engine and let it run until the fuel lines and the carburettor are empty (the engine will stop on its
own). This will prevent future engine problems.
Before using it again, add fresh fuel into the fuel tank.
Before starting the cultivator

EN 10
FZV 6050 B
8. CONTROLLING AND OPERATING
THE CULTIVATOR
STARTING THE CULTIVATOR
1. Open the fuel supply by setting the lever to the ON position (Fig. 5a).
2. When the motor is not warm, set the choke control lever to the CHOKE position (Fig. 5b).
Return the choke lever to the RUN position after starting.
If the engine is warm, do not use the choke and leave the lever in the RUN position.
3. Pull the switch/brake lever to the handle and hold it (Fig. 5c), then pull the starter cable (Fig. 5d).
The engine should start after 3-4 pulls at the most.
4. The engine is turned off by releasing the start/brake lever.
Fig. 5a Fig. 5b Fig. 5c Fig. 5d
Caution! A small amount of smoke may be emitted when the engine is started up for the first time as the
protective layers in the engine are burnt off. This is completely normal and does not constitute a problem.
Caution! The cultivator roller starts to rotate as soon as the engine is running.
WORKING DEPTH SETTING
To adjust the working depth, gently pull the depth adjustment lever
(Fig. 6) away from the machine and set the depth (max. 3mm) and
then lock the lever back into position.
Important! Move the lever to the highest position for
transporting.
Fig. 6
Controlling and operating the cultivator

EN
GAS LAWN CULTIVATOR USER MANUAL
11
Controlling and operating the cultivator | Safety instructions
TIPS FOR CORRECT CULTIVATING
Try to cultivate in straight lines for better results. The rows should overlap by a few centimetres to avoid gaps
in the rows. Once grass remains behind the cultivator, it is time to empty the grass catcher. It is recommended
that the cultivator is carried out at least twice a year, in the spring months and early autumn. The maximum
depth of the cultivation should not exceed 3mm, otherwise the lawn may be damaged. Do not
cultivate if the lawn is too wet or if the soil is too hard.
Important! Before removing the grass catcher, turn off the motor and wait until the cylinder comes to
a stop.
Important! Always cultivate horizontally along the slope (not up and down).
Important! Before performing any inspection of the rotary cylinder, stop the engine.
Important! The cylinder rotates for a few seconds after the engine is switched off. Never attempt to stop
the rotating cylinder.
Important! If the rotary cylinder strikes an object, switch off the machine immediately
and wait until the cylinder has come to a complete stop. Then check the condition of the cylinder. It there are
damaged parts,
replace them.
9. SAFETY INSTRUCTIONS
GENERAL SAFETY INSTRUCTIONS
This product is used exclusively for cultivating. Do not use it for any other purposes than those intended.
Otherwise, there is a risk of damaging it or an injury.
Never allow children or persons who are not acquainted with the contents of this user's manual to work with
the machine.
The person operating the cultivator is responsible for the safety of persons in the work area.
Never operate the cultivator in the near vicinity of other people, children or freely roaming animals.
Before starting work, check the terrain where the cultivator will be used and remove stones, wires, sticks,
splinters, bones and other foreign objects, which could become caught in it or deflected or cause injuries.
All nuts, pins and bolts must be properly tightened so that the machine is in a safe and operational condition.
Never use the cultivator without the grass catcher or protective cover.
Never use the cultivator with loose knife blades. Always check in advance that all respective bolts are securely
tightened.
Damaged blades must be replaced.
When working with the cultivator, wear long pants and solid footwear.
Never start the cultivator in enclosed or poorly ventilated areas where fumes could accumulate.
Emissions from the engine contain carbon monoxide, which is life threatening.
Work only during sufficient light conditions (in daylight or sufficient artificial lighting).

EN 12
FZV 6050 B
Safety Instructions
Do not use the cultivator when it is raining or if the grass is wet.
Proceed especially carefully when working in elevated terrain (on a slope). Always work perpendicular to the
slope, parallel to the contour, and not directly up/down.
Under no condition leave the cultivator running without supervision; if you leave the cultivator, turn off the
engine.
Never lift the rear part of the cultivator when starting it and always keep your limbs away from the chassis or
rear ejection hole when the engine is running.
Never modify the engine's speed setting.
Never transport the cultivator while its engine is running.
Stop the engine and disconnect the spark plug in the following cases:
- when performing any task whatsoever around the cylander or in the rear grass ejection chute.
- when performing maintenance, repairs or inspecting the machine.
- before carrying, lifting or transporting it.
- if you leave the cultivator unattended or are about to adjust the cultivation depth setting.
- when an impact with a foreign object occurs, stop the engine and carefully inspect to ensure that there is
no damage. In the event of damage, take the cultivator.to a specialised service centre for repairs.
ATTENTION: When the engine is switched off, the blades continue to rotate for a few seconds.
- if the cultivator is vibrating abnormally (immediately identify and remedy the cause of the vibration).
- for the purpose of ensuring safe operation, regularly check that the pins, bolts and nuts on the cultivator
are securely tightened.
ATTENTION: FUEL IS A VERY FLAMMABLE LIQUID.
Store fuel in a suitable container.
Only add fuel in an open and well ventilated location. When handling fuel, do not smoke or use a mobile
phone.
Only add fuel when the engine is turned off. Never open the fuel tank or add fuel if the engine is hot or if it is
running.
If fuel is spilled, do not start the engine. Take the cultivator away from the location where the fuel was spilled
and take care to avoid possible ignition. Continue with work only after the spilled fuel has evaporated and the
fuel fumes have dissipated.
After adding fuel, securely tighten the fuel tank cap and the cap on the fuel canister.
ATTENTION: Before carrying out maintenance or repairs, stop the engine and disconnect the spark plug.

EN
GAS LAWN CULTIVATOR USER MANUAL
13
Cleaning, maintenance, storage, transportation
10. CLEANING, MAINTENANCE, STORAGE,
TRANSPORTATION
Important! Never operate or touch the controls on the ignition unit while the engine is running. Always
unplug the spark plug before starting any care or maintenance work. Never carry out any work on the
machine while it is running. Any work not described in these operating instructions must be carried out by
an authorized service workshop only.
CLEANING
The cultivator should be carefully cleaned after each use. This applies in particular to its lower parts and blades.
To clean, tilt the scarifier slightly to one side and remove the debris.
Important! Before tilting the device, the petrol tank must be emptied to prevent leakage. For this purpose,
the FZR 9050 gas extractor is ideal.
CHECKING THE OIL LEVEL
Put the machine on a flat, even surface. Unscrew the oil dipstick by turning it counterclockwise. The oil level must
be as shown in Fig. 4b
Important! Check the oil level each time before starting work. Never start the machine without or with too
little oil. This could cause serious engine damage.
CHANGING THE OIL
Change the engine oil each year before starting the season while the
engine is warm. With a new machine, change the oil after the first
5 hours of work. Use only recommended engine oil (SAE30, 15W-40).
1. Place a suitable drip tray under the oil drain plug (Fig. 7 - Point 1)
2. Remove the oil filler bolt (Fig. 7 - Point 2)
3. Unscrew the oil drain plug (Fig. 7 - Point 1) and drain the oil into
a suitable container.
4. When all oil is drained, close the drain plug again.
5. Pour motor oil into the engine as shown in Figure 4b.
6. Dispose of used oil according to applicable regulations
CARE AND ADJUSTMENT OF CABLES
Lubricate the cables regularly and check that they are moving easily.

EN 14
FZV 6050 B
SERVICING THE AIR FILTER
Dirty air filters reduce engine performance by supplying the carburetor with too little air. Therefore, regular checks
are very important. The air filter should be inspected every 20 operating hours and cleaned if necessary. If there is
a lot of dust in the air, the air filter should be checked more often.
1. Loosen the wing nut and remove the air filter cover (Fig. 8a)
2. remove the filter (Fig. 8b)
3. Clean the air filter only with compressed air or by shaking it
4. Place the filter in place and secure the cover with the wing nut
Important! Never clean the air filter with petrol or other flammable solutions.
PREPARING THE EQUIPMENT FOR TRANSPORT
1. Empty the petrol tank using the FZR 9050 suction pump.
2. Always allow the engine to run until it uses up the remaining fuel from the tank.
3. Pour the motor oil out of a warm engine.
4. Remove the spark plug base from the spark plug.
5. Clean the drum cooling fins and cover.
6. If necessary, remove the cultivator handles. Make sure the cables are not broken.
Cleaning, maintenance, storage, transportation

EN
GAS LAWN CULTIVATOR USER MANUAL
15
11. TECHNICAL SPECIFICATIONS
Engine DUCAR DH212
Engine type OHV, air cooled, 4-stroke
Rated power 4.3 kW
Working engine speed 2/800 rpm/min
Displacement 208 cm3
Starting Pull cord
Fuel tank volume 3.6 litres
Recommended fuel Petrol - lead-free, at least 95 octane
Oil tank volume 0,6 l
Recommended oil SAE30, 15W-40
Adjusting the cultivation depth Central, 6 positions
Adjustable cultivation depth range -15 - +5 mm
Number of blades 18
Working width 400 mm
Wheel size Front 175 mm, rear 175 mm
Grass catcher capacity 45 l
Chassis steel
Declared noise level 98 dB (A)
Maximum vibration level 35.6 m/s (K=1.5)
Weight 34 kg
Amendments to text and technical parameters are reserved.
The text, design and technical specifications can be changed without prior notice and we reserve the right to
make these changes
Technical specifications

EN 16
FZV 6050 B
12. SERVICING INTERVAL
Periodic maintenance interval,
always perform at a monthly or hourly
interval, whichever comes first
Before each
use
After 5 hours
of operation
with a new
machine
Every 6 months
or after 25
hours of
operation
Each
year
Cleaning the machine, tightening the
connecting screws X
Engine oil
Level check X
Replacement XX
Air filter
Inspection X
Cleaning X
Replacement X
Spark plug
Inspection &
Cleaning X
Replacement X
Idle Check & Adjust X(*)
Valve movement Check & Adjust X(*)
Combustion
chamber Cleaning X(*)
Fuel lines Inspection &
Cleaning X(*)
Total preventive check X(*)
Servicing interval

EN
GAS LAWN CULTIVATOR USER MANUAL
17
Detection and troubleshooting
13. DETECTION AND TROUBLESHOOTING
Problem Probable cause Measures
The motor cannot be
started
Choke damper in wrong position Move the choke lever to the correct posi-
tion
The fuel tank is empty Fill the fuel tank with fuel
The air filter is dirty Clean the air filter
Loose spark plug Tighten the spark plug to 25-30 Nm
The ignition cable is loose or discon-
nected from the spark plug
Connect the ignition cable to the spark
plug
Incorrect gap between spark plug
electrodes
Install a new spark plug with the correct
gap between the electrodes
Faulty ignition module Contact the service
The engine is difficult to
start or loses power
Dirt, water or old fuel in the tank Drain the fuel and clean the tank. Fill the
tank with fresh clean fuel
Clogged air vent in fuel tank cap Clean or replace the fuel filler cap
The air filter is dirty Clean the air filter
Dirt, water or old fuel in the tank Drain the fuel and clean the tank. Fill the
tank with fresh clean fuel
Clogged air vent in fuel tank cap Clean or replace the fuel filler cap
The air filter is dirty Clean the air filter
The engine runs ir-
regularly
Faulty spark plug Install a new spark plug with the correct
gap between the electrodes
Incorrect gap between the electrodes Set the gap between the electrodes at 0.7
to 0.8 mm
The air filter is dirty Clean the air filter
Engine idling poorly,
engine stops at high
speed
The air filter is dirty Clean the air filter
The air gaps in the engine cover are
clogged Remove dirt from the gaps
The cooling fins and air passages
below the engine fan are clogged
Remove debris from cooling fins and air
passages
Too small of a gap between the elec-
trodes on the spark plug Set a gap of 0.7 to 0.8 mm

EN 18
FZV 6050 B
Problem Probable cause Measures
The motor overheats
Limited airflow Remove any debris from the gaps on the
engine cover, fan cover, and air passages
Unsuitable spark plug Install a new spark plug with the correct
gap between the electrodes
The cultivator vibrates
excessively
The cutting unit is loose Tighten the cutting unit
The cutting unit is damaged replace the cutting unit
Bent crankshaft Contact the service
Detection and troubleshooting

EN
GAS LAWN CULTIVATOR USER MANUAL
19
ĞĐůĂƌĂƚŝŽŶŽĨŽŶĨŽƌŵŝƚLJ
WƌŽĚƵĐƚďƌĂŶĚ'ĂƐŽůŝŶĞƉŽǁĞƌĞĚƐĐĂƌŝĨŝĞƌ&/>DEE
dLJƉĞŵŽĚĞů&sϲϬϱϬͲĂƐĨĂĐƚŽƌLJŵŽĚĞůZϰϬ
ϮϭϮ ĐŵϯϰϯŬtϯϲϬϬŵŝŶͲϭ ƵƚƚŝŶŐǁŝĚƚŚϰϬϬŵŵ>ƉĂϴϭϳĚ;Ϳ>ǁĂ ϵϴĚ;Ϳ
DĂŶƵĨĂĐƚƵƌĞƌ&^dZĂƐ
ĞƌŶŽŬŽƐƚĞůĞĐŬĄϮϭϭϭϭϬϬϬϬWƌĂŚĂϭϬnjĞĐŚZĞƉƵďůŝĐ
sdŶŽϮϲϳϮϲϱϰϴ
dŚŝƐĚĞĐůĂƌĂƚŝŽŶŽĨĐŽŶĨŽƌŵŝƚLJŝƐŝƐƐƵĞĚƵŶĚĞƌƚŚĞƐŽůĞƌĞƐƉŽŶƐŝďŝůŝƚLJŽĨƚŚĞŵĂŶƵĨĂĐƚƵƌĞƌ
dŚĞŽďũĞĐƚŽĨƚŚĞĚĞĐůĂƌĂƚŝŽŶĚĞƐĐƌŝďĞĚĂďŽǀĞŝƐŝŶĐŽŶĨŽƌŵŝƚLJǁŝƚŚ ƚŚĞ ƌĞůĞǀĂŶƚ hŶŝŽŶ ŚĂƌŵŽŶŝƐĂƚŝŽŶ
ůĞŐŝƐůĂƚŝŽŶ
ŝƌĞĐƚŝǀĞDĂĐŚŝŶĞƌLJϮϬϬϲϰϮ
ŝƌĞĐƚŝǀĞDϮϬϭϰϯϬh
ŝƌĞĐƚŝǀĞEŽŝƐĞϮϬϬϬϭϰ нϮϬϬϱϴϴ
ŝƌĞĐƚŝǀĞŵŝƐƐŝŽŶŽĨŐĂƐĞŽƵƐϮϬϭϲϭϲϮϴh
ŝƌĞĐƚŝǀĞZŽ,^ϮϬϭϱϴϲϯh
dŚĞƌĞůĞǀĂŶƚŚĂƌŵŽŶŝƐĞĚƐƚĂŶĚĂƌĚƐĂŶĚƚŚĞŽƚŚĞƌƚĞĐŚŶŝĐĂůƐƉĞĐŝĨŝĐĂƚŝŽŶƐ
EϭϯϲϴϰϮϬϭϴ
E/^KϭϰϵϴϮϮϬϬϵ
E/^KϯϳϰϰϮϬϭϬ
WůĂĐĞŽĨŝƐƐƵĂŶĐĞWƌĂŐƵĞ EĂŵĞ/ŶŐĚĞŶĢŬWĞĐŚ
ŚĂŝƌŵĂŶŽĨƚŚĞŽĂƌĚ
ĂƚĞŽĨŝƐƐƵĂŶĐĞ Ϯϭ ϴϮϬϭϵ ^ŝŐŶĂƚƵƌĞ
Declaration of conformity

EN 20
FZV 6050 B
15. DISPOSAL
INSTRUCTIONS AND INFORMATION ON DISPOSING OF USED PACKAGING
MATERIALS
Dispose of used packaging material at a site designated for waste in your municipality.
The appliance and its accessories are manufactured from various materials, e.g. metal and
plastic.
Take damaged parts to a recycling centre. Inquire at the relevant government department.
This appliance meets all the basic requirements of the EU directives.
Changes in the text, design and technical specifications may be made without prior notice and we reserve
the right to make these changes.
Translation of the original user’s manual.
Disposal
Other manuals for FZV 6050 B
2
Table of contents
Other Fieldmann Tiller manuals

Fieldmann
Fieldmann FZK 6015 B User manual

Fieldmann
Fieldmann FZK 2002 E User manual

Fieldmann
Fieldmann FZK 2004 E User manual

Fieldmann
Fieldmann FZK 6010 B User manual

Fieldmann
Fieldmann FZK 6015 B User manual

Fieldmann
Fieldmann FZK 2004 E User manual

Fieldmann
Fieldmann FZK 2115-E User manual

Fieldmann
Fieldmann FZK 70305-0 User manual

Fieldmann
Fieldmann FZK 2115-E User manual

Fieldmann
Fieldmann FZK 2005 E User manual