Fiem MG50 Junior Special Instruction manual

MANUALE D’USO PER LE INCUBATRICI
MOD. MG50 Junior Special
MOD. MG70/100 Family
MOD. MG100/150 B.Family
MANUAL FOR USE OF INCUBATORS
MOD. MG50 Junior Special
MOD. MG70/100 Family
MOD. MG100/150 B.Family
MANUEL D’UTILISATION DES INCUBATEURS
MOD. MG50 Junior Special
MOD. MG70/100 Family
MOD. MG100/150 B.Family
MANUAL DE USO PARA INCUBADORAS
MOD. MG50 Junior Special
MOD. MG70/100 Family
MOD. MG100/150 B.Family
BETRIEBSHANDBUCH DER BRUTMASCHINEN
MOD. MG50 Junior Special
MOD. MG70/100 Family
MOD. MG100/150 B.Family
I
GB
F
E
D
IMPORTANTE: questo manuale é parte integrante della macchina e deve essere conservato dal cliente della macchina integro in ogni sua parte
IMPORTANT: this manual is an integral part of the machine and it must be kept complete in each own part by the customer of the machine
IMPORTANT: ce manuel est partie intégrant de la machine et doit etre conservé, par le client de la machine, intègre dans chacune de ses parties
IMPORTANTE: este manual es parte integrante de la máquina y tiene que ser conservado por el cliente de la máquina íntegro en todas sus parte
WICHTIG: das vorliegende Handbuch ist integraler Bestandteil der Maschine und muss vom Kunden vollständig aufbewahrt werden
22070 Guanzate - (Como) Italy - Via Galileo Galilei, 3
Tel. +39.031.976.672 - Fax +39.031.899.163
Costruita da:
Produced by:
Construit par:
Construida por:
Hergestellt von:

MANUALE D’USO PER LE INCUBATRICI MOD. MG 50+70+100
PRIMA DELL’USO: Prima di dedicarsi alla vera e propria operatività è consigliabile considerare gli aspetti e le caratteristiche tecniche e di
sicurezza garantite dal prodotto, valutandone le componenti e aiutandosi con il manuale per scoprirne gradualmente le potenzialità.
ATTENZIONE: L’apparecchio può essere utilizzato da bambini di età non inferiore a 8 anni e da persone con ridotte capacità fisiche, sen-
soriali o mentali, o prive di esperienza o della necessaria conoscenza, purché sotto sorveglianza oppure dopo che le stesse abbiano ricevuto
istruzioni relative all’uso sicuro dell’apparecchio e alla comprensione dei pericoli ad esso inerenti. I bambini non devono giocare con l’appa-
recchio. La pulizia e la manutenzione destinata ad essere effettuata dall’utilizzatore non deve essere effettuata da bambini senza sorveglianza.
Se il cavo di alimentazione è danneggiato, esso deve essere sostituito dal costruttore o dal suo servizio assistenza tecnica o comunque da una
persona con qualifica similare, inmodo da prevenire ogni rischio.
INFORMAZIONI PER L’UTENTE: Corretto smaltimento del prodotto (applicabile nei paesi dell’Unione Europea e in quelli con sistema
di raccolta differenziata). Il marchio riportato sul prodotto o sulla sua documentazione indica che il prodotto non deve essere smaltito con
altri rifiuti domestici al termine del ciclo di vita. Per evitare eventuali danni all’ambiente o alla salute causati dall’inopportuno smaltimento dei
rifiuti, si invita l’utente a separare questo prodotto da altri tipi di rifiuti e di riciclarlo in maniera responsabile per favorire il riutilizzo sostenibile
delle risorse materiali. Gli utenti domestici sono invitati a contattare il rivenditore presso il quale è stato acquistato il prodotto o l’ufficio locale
preposto per tutte le informazioni relative alla raccolta differenziata e al riciclaggio per questo tipo di prodotto.
Gli utenti aziendali sono invitati a contattare il proprio fornitore a verificare i termini e le condizioni del contratto di acquisto. Questo prodotto
non deve essere smaltito unitamente ad altri rifiuti commerciali.
L’incubatrice è dotata inoltre di un cavo elettrico monofase (lungo circa 2 mt.) con spina per l’allacciamento a corrente 220/230V, 50-60 Hz.
Affissa posteriormente la targhetta dati, informa circa l’assorbimento, la potenza dell’incubatrice, data di produzione, numero di matricola.
AVVERTENZE: Attenzione!
L’apparecchio deve essere collegato ad un impianto a norme dotato di terra di protezione.
Staccare l’apparecchio dalla presa prima di effettuare le operazioni di pulizia.
- Non sottoporre il cavo di alimentazione a sollecitazioni meccaniche quando si sposta l’unità.
- Non immagazzinare sostanze esplosive o bombolette spray nella macchina, né generatori aerosol contenenti propellenti infiammabile.
- Questa macchina è stata progetta per l’uso in stanze non soggette a regolamentazione anti- esplosione; il suo uso è ammesso solo in locali
che assentono ad atmosfera normale.
- Il cordone di alimentazione non deve essere accessibile agli animali.
- Svuotare le vaschette d’acqua prima di spostare l’apparecchio.
- Non usare l’apparecchiatura se danneggiata.
- L’apparecchio non è appropriato per un’ installazione in un’area dove potrebbe essere usato un getto di acqua.
- È vietato lavare la macchina con getto d’acqua pressurizzata.
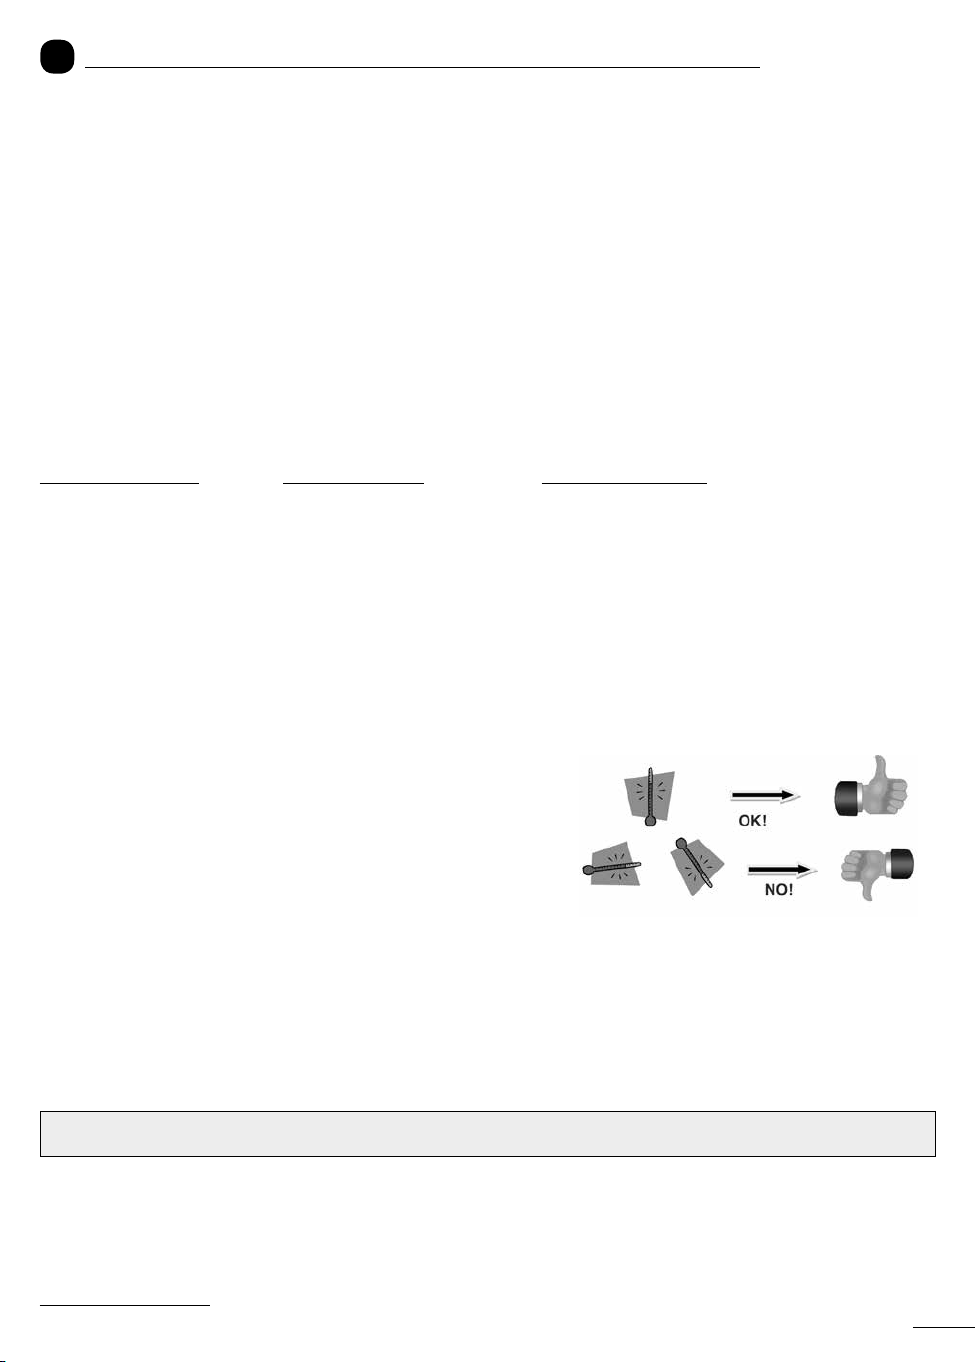
IMPORTANTE: Si ricorda di verificare la corretta funzionalità del termometro, controllando che non presenti spezzettature sulla colonnina
dell’alcool.
POSIZIONAMENTO ALLACCIAMENTO E PREPARAZIONE: Il locale ove verrà posta l’unità, dovrà essere sufficientemente aera-
to, asciutto e con temperatura costante tra i 17-23 °C. Collocare l’incubatrice su di un piano stabile non inclinato e possibilmente accanto ad
una presa di corrente facilmente accessibile. Per l’alimentazione a rete utilizzare unicamente prese dotate di collegamento a terra.
AVVISO: Il costruttore declina ogni responsabilità nel caso di uso improprio, di collocazione impropria, di collegamento ad apparecchiature
non autorizzate o di manomissione da parte di personale non autorizzato.
Per un corretto montaggio del termometro, onde evitare facili rotture dello stesso, occorre prima di tutto inserirlo nell’apposita sede e poi suc-
cessivamente inserire la custodia sopra lo stesso assicurandosi di ancorarla sulla relativa base.
COMUNICAZIONE IMPORTANTE: A seguito direttiva CE rif. Sostanze rite-
nute pericolose per la salute contenute in apparecchiature elettriche e non, ci siamo
visti costretti ad intercambiare il mercurio contenuto nei nostri termometri/igrometri
con alcool colorato, essendo fisicamente l’alcool più leggero è più soggetto a fram-
mentazioni in alcuni casi anche poco visibili per via della decolorazioni, i termometri
ad alcool risultano meno affidabile. Chiediamo dunque ai ns. clienti di prestare la
massima attenzione prima dell’utilizzo verificando la corretta funzionalità, control-
lando dunque che non presentino spezzettature sulla colonnina dell’alcool e durante
i periodi di inutilizzo dell’incubatrice, chiediamo di stoccare gli stessi in posizione
verticale con temperatura ambientale tra i 10-30° C.
Rif. Modello MG50 Junior Special
• n. 1 termometro a alcool (°F)
+ custodia di protezione;
• n. 1 bacinella per umidificazione
con livello acqua automatico
+ 1 serbatoio esterno 5 lt
• n. 1 cassetto portauova
di incubazione + schiusa;
• n. 1 fusibile di scorta 2 A.
• n. 1 manuale d’uso
Rif. modello MG70/100 Family
• n. 1 termometro a alcool (°F)
+ custodia di protezione;
• n. 2 cestelli portauova in metallo
tropicalizzato;
• n. 1 cassetto portauova di schiusa;
• n. 4 molle fermauova;
• n. 1 fusibile di scorta 2 A.
• n. 1 bacinella per umidificazione
con livello acqua automatico
+ 1 serbatoio esterno 5 lt
• n. 1 manuale d’uso
Rif. modello MG100/150 B.Family
• n. 3 cestelli portauova in metallo tropicalizzato;
• n. 1 cassetto portauova di schiusa;
• n. 1 termometro a alcool (°F) + custodia di protezione;
• n. 6 molle fermauova;
• n. 1 fusibile di scorta 2 A.
• n. 1 bacinella per umidificazione
con livello acqua automatico + 1 serbatoio esterno 5 lt
• n. 1 manuale d’uso
1Si evidenzia che, per garantire lo sviluppo embrionale, le uova dovranno essere posizionate obbligatoriamente con la camera d’aria rivolta verso l’alto o in posizione orizzontale.
I
2
(Fig. 1)
ATTIVAZIONE AUTOMATISMO VOLTAUOVA DISATTIVAZIONE AUTOMATISMO VOLTAUOVA
Prima di dedicarsi all’utilizzo dell’unità, ricordarsi di effettuare un’accurata pulizia interna ed esterna della stessa, come meglio indicato avanti
nel relativo paragrafo.
Per i modelli MG70 e MG100, estrarre i cestelli portauova e posizionare gradualmente le uova pronte per l’incubazione, ricordandosi di collocarle
nelle apposite culle con la punta rivolta verso il basso1, al fine di bloccare le uova qualora rimanga dello spazio vuoto non utilizzato
all’interno della culla in dotazione vi sono delle molle da posizionare sugli stessi. Solo quando la macchina avrà raggiunto la temperatura di
lavoro inserire i cestelli negli alloggiamenti.
Per il modello MG50 J.S., posizionare le uova in posizione orizzontale (sdraiate) negli interspazi della griglia voltauova.
ATTENZIONE: temperatura di lavoro per il modello MG70/100 B.FAMILY e MG50 deve essere 101°F
(38,3), per il mod. MG100/150 B.FAMILY deve essere 99,7°F(37,7°C).
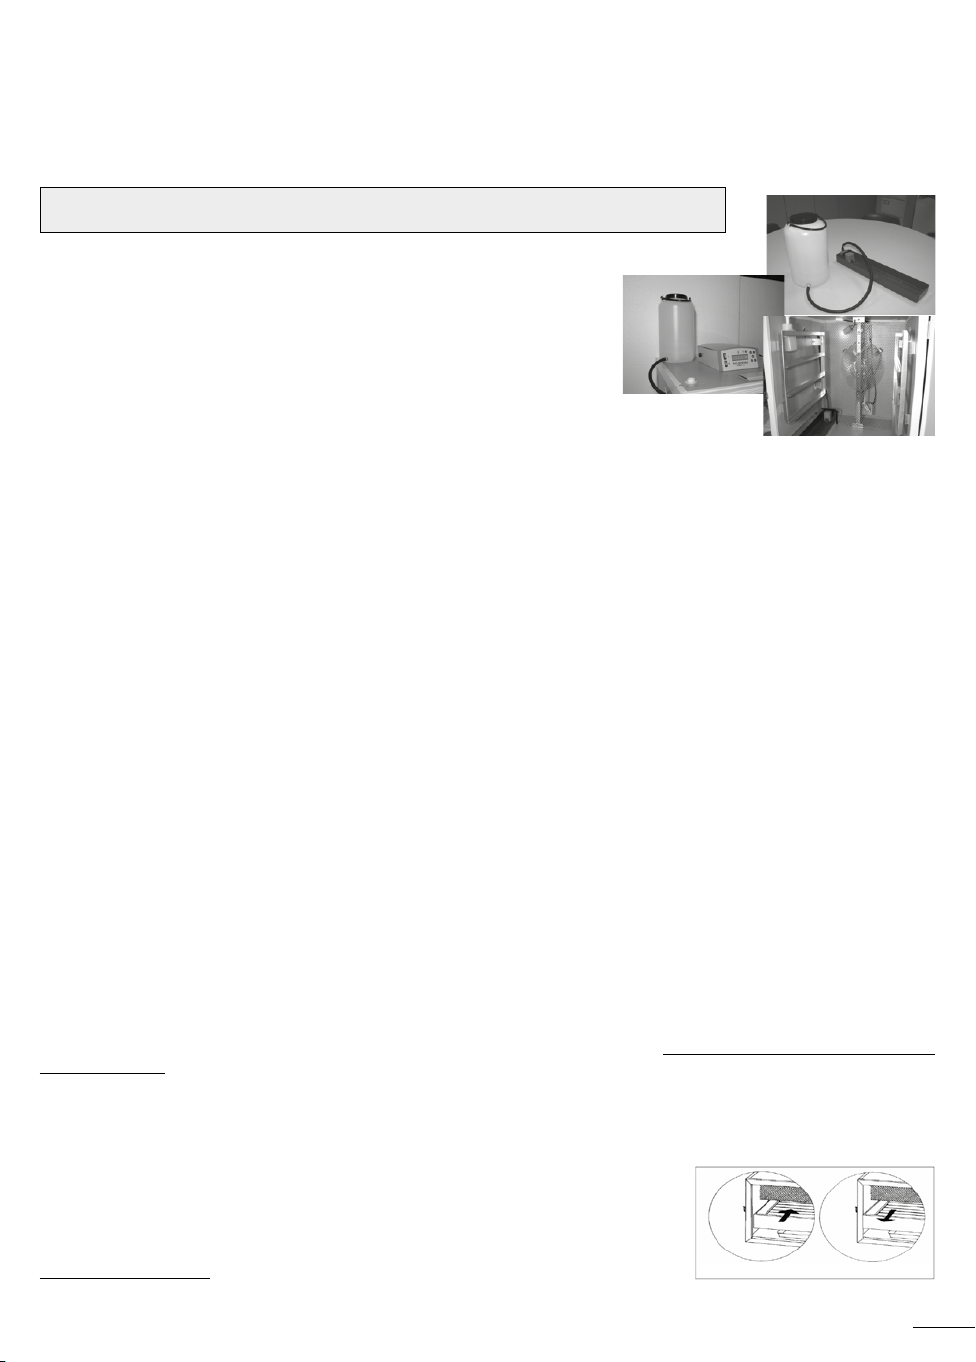
UMIDIFICAZIONE: MONTAGGIO IMPIANTO UMIDIFICAZIONE NATURALE A SUPERFICIE
La nostra gamma Mg – Astrale è equipaggiata del nuovo sistema di umidificazione naturale a
superficie con livello acqua costante ed autonoma grazie al serbatoio di riserva esterno (fig.1).
• Posizionare il serbatoio di riserva che si trova impacchettato all’interno, sopra l’incubatrice
• Collegare il tubo di gomma interno che fuoriesce lateralmente al serbatoio esterno (fig.2)
• Riempire il serbatoio esterno, l’acqua scenderà nella vasca interna per caduta
• La vasca interna è equipaggiata di galleggiante che manterrà il livello dell’acqua costante
• Per diminuire o aumentare il tasso di umidità, utilizzare il coperchio in dotazione alla vasca
MANUTENZIONE ORDINARIA IMPORTANTE:
E’ necessario controllare periodicamente il galleggiante interno della vasca impianto umidificazione per non incorrere in perdite d’acqua improv-
vise che possono essere provocate da un cattivo funzionamento dello stesso, mantenere dunque il galleggiante pulito e privo d’incrostazioni.
Dopo ogni ciclo d’incubazione inserire nella vasca una soluzione di acqua + un 30% di aceto bianco per circa 2-3 ore, al termine dell’operazione
smontare il galleggiante e sciacquarlo, quindi rimontarlo assicurandosi del corretto funzionamento prima di un nuovo utilizzo.
MONTAGGIO UMIDIFICATORE E CONNESSIONE UMIDITA’ AUTOMATICA PER MODELLI FORNITI DI UMIDIFICAZIONE AUTOMATICA
OPZIONE 1 - UMIDIFICAZIONE AD ULTRASUONI:
L’umidificazione dell’aria all’interno dell’incubatrice viene effettuata da uno strumento (umi-
dificatore/nebulizzatore ad ultrasuoni) che, per mezzo di vibrazioni ad alta frequenza scompone le molecole d’acqua, producendo vapore freddo.
MONTAGGIO E PREPARAZIONE DEL NEBULIZZATORE AD ULTRASUONI: Togliere il nebulizzatore dalla scatola, posizionarlo su di una superficie
piana a fianco dell’incubatrice. Rimuovere il serbatoio, riempirlo con acqua e riposizionarlo sopra la relativa base dell’umidificatore. Montare
il tubo immissione vapore sull’umidificatore inserendo la parte con il supporto plastico sulla colonna di uscita del vapore dell’umidificatore e
introducendo, per almeno 2-3 cm, la parte opposta del tubo nella rispettiva serranda dedicata sull’incubatrice.
MESSA IN FUNZIONE: Innestare la spina di alimentazione dell’umidificatore alla relativa presa che esce posteriormente dal quadro comando e
accendere l’umidificatore dall’apposito interruttore ON/OFF posto sul retro dello stesso. Regolare l’intensità del flusso immissione vapore tramite
la relativa manopola posta sul frontale comando dell’umidificatore; generalmente è sufficiente mantenere regolata la manopola al 60/70% dell’e-
scursione totale, qualora non si dovesse raggiungere la percentuale di umidità desiderata, portare la manopola al massimo. Il nebulizzatore è
pilotato dalla centralina LCD di comando dell’incubatrice, quindi dopo aver eseguito tutte le operazioni sopraindicate di connessione, impostare
sul display il valore di umidità desiderato così che alla richiesta di umidificazione dell’aria, il nebulizzatore si attiverà automaticamente.
IMPORTANTE:
- L’umidificatore deve essere scollegato da qualunque presa di corrente in fase di riempimento del serbatoio, di spostamento e in fase di pulizia
- L’umidificatore non va utilizzato senza acqua, se sprovvisto di acqua spegnetelo
- Non immettere nel serbatoio nessun altro liquido al di fuori dell’acqua, non aggiungete medicinali e non coprire nessuna apertura
- Non utilizzare all’esterno.
OPZIONE 2 - UMIDIFICAZIONE INTERNA AD ACQUA CALDA:
Con l’opzione dell’umidificazione interna ad acqua calda, l’incubatrice viene equi-
paggiata di n.1 resistenza ad immersione da posizionare nella vaschetta acqua; connettere poi il cavo elettrico della resistenza attraverso l’ap-
posita spina alla presa posteriore del quadro di comando dell’incubatrice. L’accensione della resistenza sarà pilotata dalla centralina elettronica.
UTILIZZO E CALIBRAZIONE: Per l’accensione della macchina collegare la spina all’alimentazione, attivare la macchina agendo sull’in-
terruttore generale 0/I e prima di inserire le uova attendere che l’incubatrice abbia raggiunto la temperatura di lavoro. Nell’alloggiamento posto
sopra l’unità trova collocazione il termostato elettronico digitale che è impostato dalla fabbrica.
Raccomandiamo di fare sempre attenzione al termometro ad alcool, che dovrà segnare in modo preciso 101°F per i mod. MG50 e MG70 e
99,7°F per l’MG100, se non dovesse raggiungere la temperatura di lavoro sopra indicata, si dovrà tarare il termostato come indicato nel para-
grafo successivo (riferimento termostato miniled).
L’illuminazione interna della macchina è garantita da una lampadina a led attivabile dall’interruttore posto sul quadro di comando; ricordarsi
però di spegnere sempre la luce durante il funzionamento. Raggiunta la temperatura corretta con rif. al modello MG70 e MG100, inserire i
cestelli con le uova già posizionate correttamente2, durante l’inserimento dei cestelli porre particolare attenzione al fine di innestare le chiavette
nelle apposite fessurazioni della barra voltauova, il dispositivo per il voltaggio delle uova si attiverà
automaticamente con l’accensione della macchina3;Con rif. al modello MG50, per attivare il voltaggio
automatico delle uova, attivare il dispositivo per il voltaggio delle uova spingendo il cassetto stesso ben
a fondo (vedi fig. 1) si rammenta che due giorni prima della schiusa si dovrà disattivare il sistema di
automatismo sopra detto, ciò è possibile arretrando leggermente il cassetto per circa 1cm, portandolo
a filo dello sportello.
2In dotazioni vi sono delle molle fermauova da posizionare sulla singola culla del cestello per bloccare le uova in caso non venga terminata l’intera fila
3 Si precisa che qualora la macchina venisse fornita con i cestelli dotati di voltauova manuale, ricordarsi una volta al mattino e una volta alla sera di ruotarli manualmente agendo
sulle apposite levette.
Fig. 1
Fig. 2
Fig. 3
3
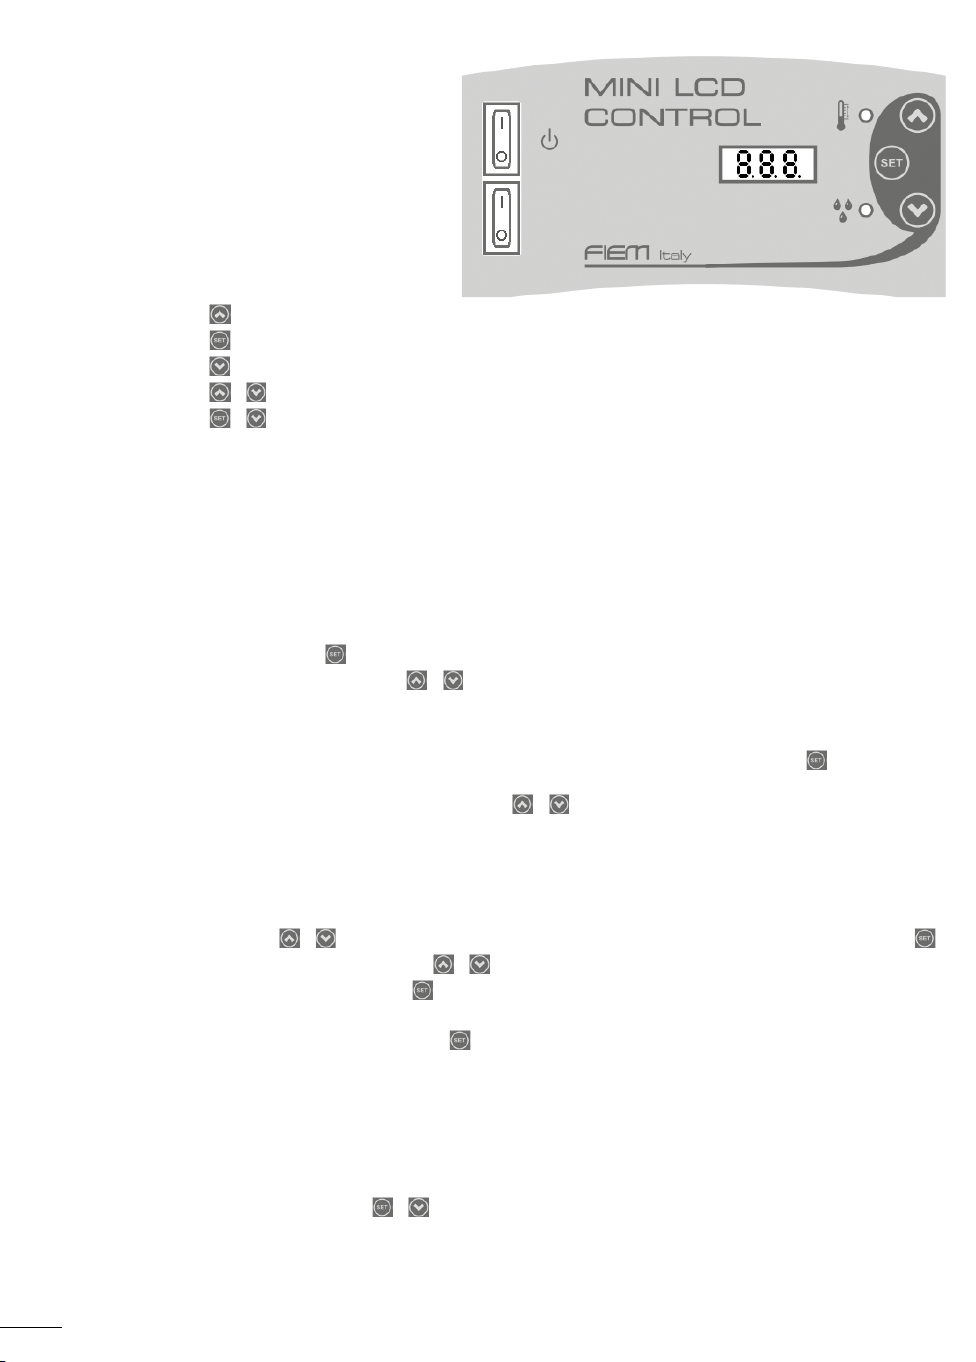
2. Funzione tasti Visualizzazione temperatura interna
Impostazione valori di riferimento temperatura e umidità
Visualizzazione umidità interna
+ Menù tecnico per i parametri di calibrazione, unità di misura
+ In fase di accensione, Menù test per l’impostazione del tipo di controllo di temperatura
3. Descrizione del funzionamento
Il MiniLCD è in grado di controllare con algoritmo ON-OFF o PID la temperatura e in modalità ON-OFF l’umidità di incubazione. All’accensione,
apparirà per qualche istante sul display un messaggio di benvenuto seguito dalla versione firmware della scheda. MiniLCD proporrà quindi la visua-
lizzazione della temperatura e premendo un tasto SU o GIU’ l’umidità relativa corrente.
Premendo il tasto SET si accede ai valori di riferimento di temperatura e umidità impostati.
In caso di guasto ai sensori di umidità o di temperatura, o nel caso uno di essi non sia collegato, nella relativa modalità di visualizzazione verrà
visualizzato il messaggio ERR e il relativo pilotaggio viene inibito.
MiniLCD ha inoltre due menù di configurazione, uno per l’utente dove è possibile personalizzare le funzioni basilari, e uno tecnico che permette la
configurazione e la taratura della lettura delle sonde.
4. Impostazioni utente
Dopo aver acceso MiniLCD premendo il tasto comincia a lampeggiare il LED ROSSO vicino all’icona della temperatura ed il display mostra la
temperatura di riferimento. A questo punto premendo i tasti o è possibile modificare la temperatura di lavoro.
• T. incubazione [5 .. 75] (default 30.0) - Questo parametro determina la temperatura che lo strumento deve mantenere durante il periodo di incuba-
zione. Il range di valori impostabili è compreso tra 5 e 75 °C o equivalenti.
Per salvare il valore di temperatura impostata e passare quindi alla visualizzazione dell’umidità premere nuovamente il tasto . A questo punto
comincia a lampeggiare il LED VERDE vicino all’icona dell’umidità e viene visualizzata la percentuale di umidità da mantenere durante il periodo di
incubazione. Per modificare il parametro dell’umidità procedere tramite i tasti o .
• Umidità incubazione [10 .. 99] (default 40) - Questo parametro permette di impostare l’umidità relativa da mantenere durante il periodo di incuba-
zione. Il range di valori impostabili in questo campo è compreso tra 10% e 99%. Al termine della modifica dei valori MiniLCD uscirà automaticamente
dal menù dimodifica se non si premono tasti per 15 secondi salvando il valore mostrato sul display.
5. Impostazioni menù tecnico
Premendo contemporaneamente i tasti + si accede al menù tecnico. E’ possibile scorrere in sequenza tutti i parametri premendo il tasto
, la modifica del parametro visualizzato avviene attraverso i tasti e .
Per confermare la variazione del parametro, premere il tasto . MiniLCD uscirà automaticamente dal menù di programmazione,se non vengono
premuti tasti per un tempo superiore a 15 secondi.
Elenco dei parametri che è possibile visualizzare premendo il tasto .
• Unit [C,F] (default °C) Impostazione unità di misura gradi Celsius o Fahrenheit
• t.CAL [-3,0 .. +3,0 °C] (default 0,0 – step di 0,1 °C)
t.CAL [-5,4 .. +5,4 F] (default 0,0 – step di 0,1 F)
Permette di calibrare il valore di temperatura letto dalla sonda, in gradi Celsius o Fahrenheit in base all’impostazione dell’unità di misura assegnata
al punto precedente.
• H.Cal [-5 .. +5] (default 0 – step di 1%) Permette di calibrare il valore di umidità letto dal sensore
6. Selezione modalità di controllo temperatura
Premendo all’accensione contemporaneamente i tasti e è possibile accedere al menù di modifica dei parametri di selezione della modalità
di controllo della temperatura.
• Controllo [PID,v ON-OFF] (default PID) permette di selezionare il tipo di controllo della temperatura.
• PID = Controllo PID
• ON-OFF= Controllo ON-OFF
A. Interruttore di accensione
B. Interruttore della luce
C. Display 3 cifre con punti di separazione decimali
D. Indicatore visualizzazione temperatura
E. Indicatore visualizzazione umidità
F. Tasto di selezione <freccia su> (visualizzazione temperatura)
G. Tasto di impostazione
H. Tasto di selezione <freccia giù> (visualizzazione umidità)
A
B
G
E
F
D
C
H
TERMOSTATO MINILED FIEM
1. Panoramica prodotto
4
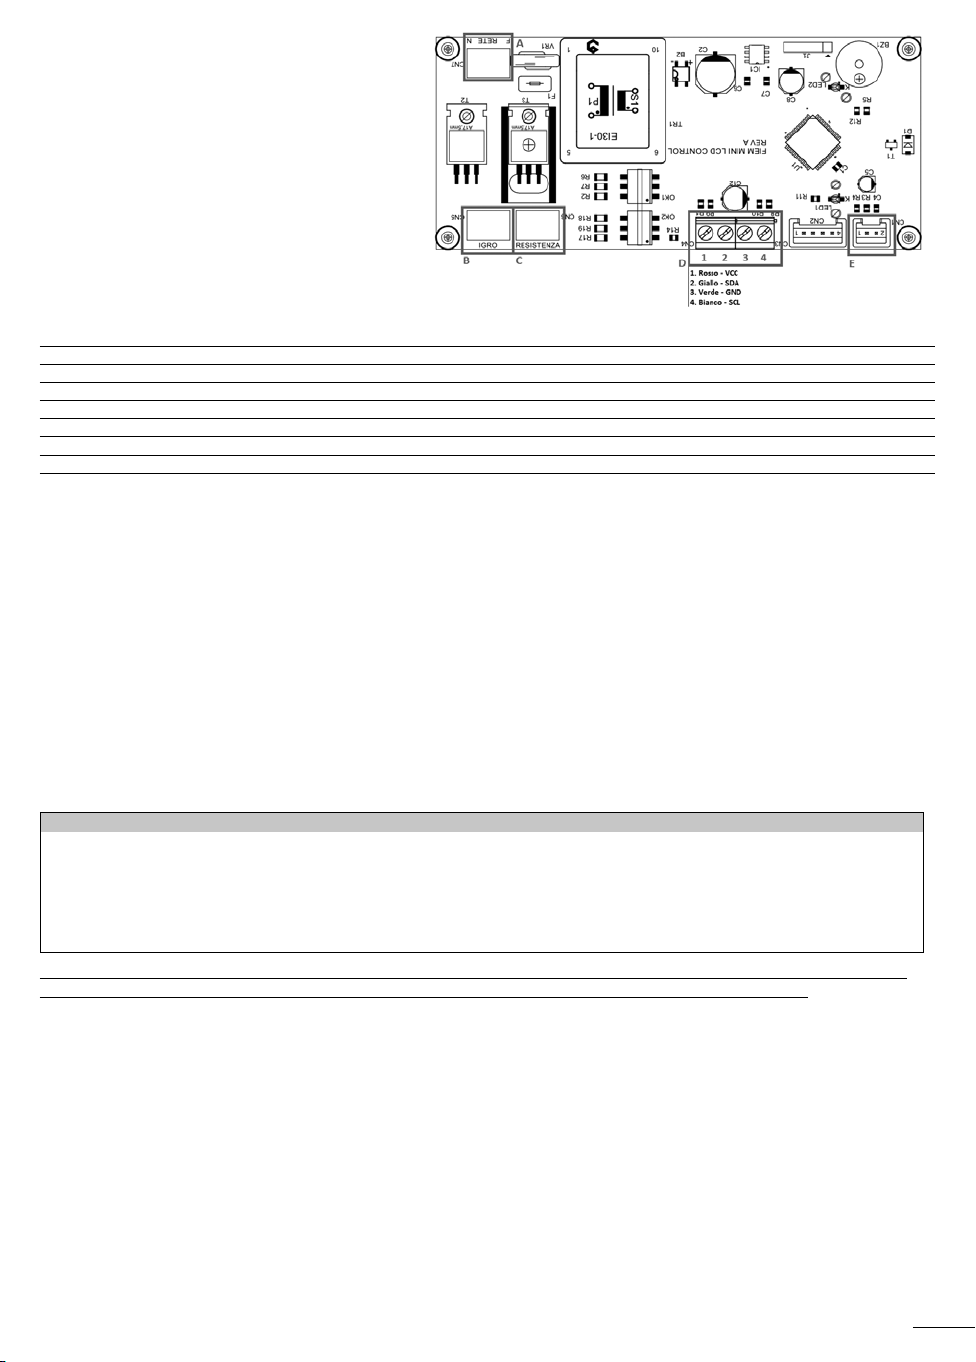
7. Schema di connessione
Descrizione dei collegamenti:
A = Morsetto di alimentazione (_ ATTENZIONE _)
B = Morsetto di pilotaggio umidificatore (_ ATTENZIONE _)
C = Morsetto di pilotaggio resistenza di riscaldamento
(_ ATTENZIONE _)
D = Sonda dell’igrometro
E = Sonda del termometro
TABELLA PRATICA DI CONVERSIONE DELLA TEMPERATURA DAI GRADI FAHRENHEIT (°F) AI GRADI CELSIUS (°C)
°F °C °F °C °F °C °F °C °F °C
80 26,7 86 30,0 92 33,3 97 36,1 101 38,3
81 27,2 87 30,6 93 33,9 98 36,7 102 38,9
82 27,8 88 31,1 94 34,4 98,6 37,0 102,2 39,0
83 28,3 89 31,7 95 35,0 99 37,2 103 39,4
84 28,9 90 32,2 96 35,6 100 37,8 104 40,0
85 29,4 91 32,8 96,8 36,0 100,4 38,0 105 40,6
Facciamo osservare che 1° è uguale a 0,56 °C, mentre 1°C è uguale a 1,8 °F
UMIDIFICAZIONE NATURALE A SUPERFICIE
E’ molto importante comprendere che non ci può essere alcuna regola precisa e tassativa riguardo la quantità d’acqua da immettere all’interno
dell’incubatrice in quanto le variabili a seguito illustrate possono influenzare il livello di umidità:
• Umidità ambientale all’interno della camera d’incubazione (condizionata dalle condizioni climatiche e dall’ambiente locale);
• La specie incubata;
• La porosità del guscio dell’uovo (può variare a seconda dei diversi tipi di uova);
• La stagione (un clima caldo comporta abitualmente un’alta umidità ambientale e le uova deposte alla fine della stagione hanno la tendenza
ad essere più porose).
La necessità d’acqua all’interno dell’incubatrice può essere controllata pesando le uova (un uovo dovrà perdere il 13-15% del suo peso durante
l’incubazione) od effettuando la speratura (il calo della camera d’aria dovrà corrispondere a circa 1/3 dell’uovo). Per le schiuse susseguenti
potrete altresì gestire l’umidificazione e quindi aumentare o diminuire la quantità d’acqua a seconda dei risultati ottenuti per la vostra prima
schiusa. Se avete delle incertezze, la scelta migliore è senza dubbio l’aggiunta di poca acqua piuttosto che di troppa – la maggior parte delle
schiuse mal riuscite é dovuta all’eccesso di umidità (l’eccesso di umidità è una tra le cause più rilevanti che determinano degli esiti negativi o
comunque non soddisfacenti nelle schiuse). Bisogna ricordare che la profondità dell’acqua all’interno della vaschetta non fa alcuna differenza
ai fini dell’umidificazione all’interno dell’incubatrice; é la superficie che conta!
TABELLA INDICATIVA DEI VALORI MEDI DI UMIDITÀ
SPECIE INCUBAZIONE SCHIUSA
GALLINA RAZZA LEGGERA 82°F = 47% 88°F = 62%
GALLINA RAZZA PESANTE (BROILER) 84°F = 52% 88°F = 62%
FAGIANA - STARNA - QUAGLIA PERNICE ROSSA 78-80°F = 38-43% 86-88°F = 56-62%
TACCHINA - FARAONA 82-84°F = 47-52% 88°F = 62%
OCA - ANATRA (MUTA/SELVATICA PEKINO KAKI KAMPBELL) 78-80°F = 38-43% 88°F = 62%
Per regolare il tasso di umidità all’interno dell’incubatrice occorre variare la superficie delle bacinelle, aumentando lo specchio d’acqua si
incrementa l’umidificazione, inversamente diminuendo la superficie delle bacinelle, si avrà un abbassamento dell’umidità.
UMIDIFICAZIONE AUTOMATICA AD ULTRASUONI (Opzionale su richiesta)
Per attivare l’umidificazione automatica, dopo aver montato e connesso umidificatore esterno, (come spiegato precedentemente) impostare
sul display minilcd il valore di lavoro e la centralina attiverà automaticamente l’umidificatore mantenendo il valore costante all’interno dell’in-
cubatrice.
VENTILAZIONE:
Il modello MG100/150 è dotato di un dispositivo per la regolazione dell’aerazione, che agisce sul motoventilatore diminuendo o
aumentandone la velocità di funzionamento, che durante la fase di incubazione dovrà essere ai massimi regimi (posizionare sulla tacca “incuba-
zione”). Il variatore dovrà essere utilizzato durante il periodo di schiusa, agendo in senso antiorario sull’apposita manopola posizionandola sulla
fase “schiusa”. Si annota che in caso di carico settimanale della macchina, non dovrà essere diminuita totalmente la resa della ventola, al fine di
non danneggiare le uova che sono in fase di incubazione. Durante il periodo di incubazione deve essere garantito sempre un corretto ricambio
d’aria, esso è strettamente legato al carico uova effettivo della macchina, infatti per un carico totale occorre fornire un notevole ossigenazione;
per un carico minimo di uova invece un maggiore afflusso di aria potrebbe essere superfluo, quindi,per il mod.MG100/150,regolando il diametro
del foro di aerazione, posto sul pannello superiore, agendo sull’apposita saracinesca, si riesce a raggiungere un ottimale grado di ventilazione.
Per il modello MG50 regolare contemporaneamente allo stesso modo il diametro dei due fori di aerazione posti rispettivamente sul pannello
superiore nella parte retrostante (espulsione aria viziata) e sulla porta (immissione aria pulita); il modello MG70 è fornita di due fori posti sul
pannello superiore che dovranno essere regolati sempre contemporaneamente allo stesso modo.
Avvertenza:
assicurarsi di aver tolto l’alimentazione
prima di effettuare qualsiasi operazione
di collegamento.
5
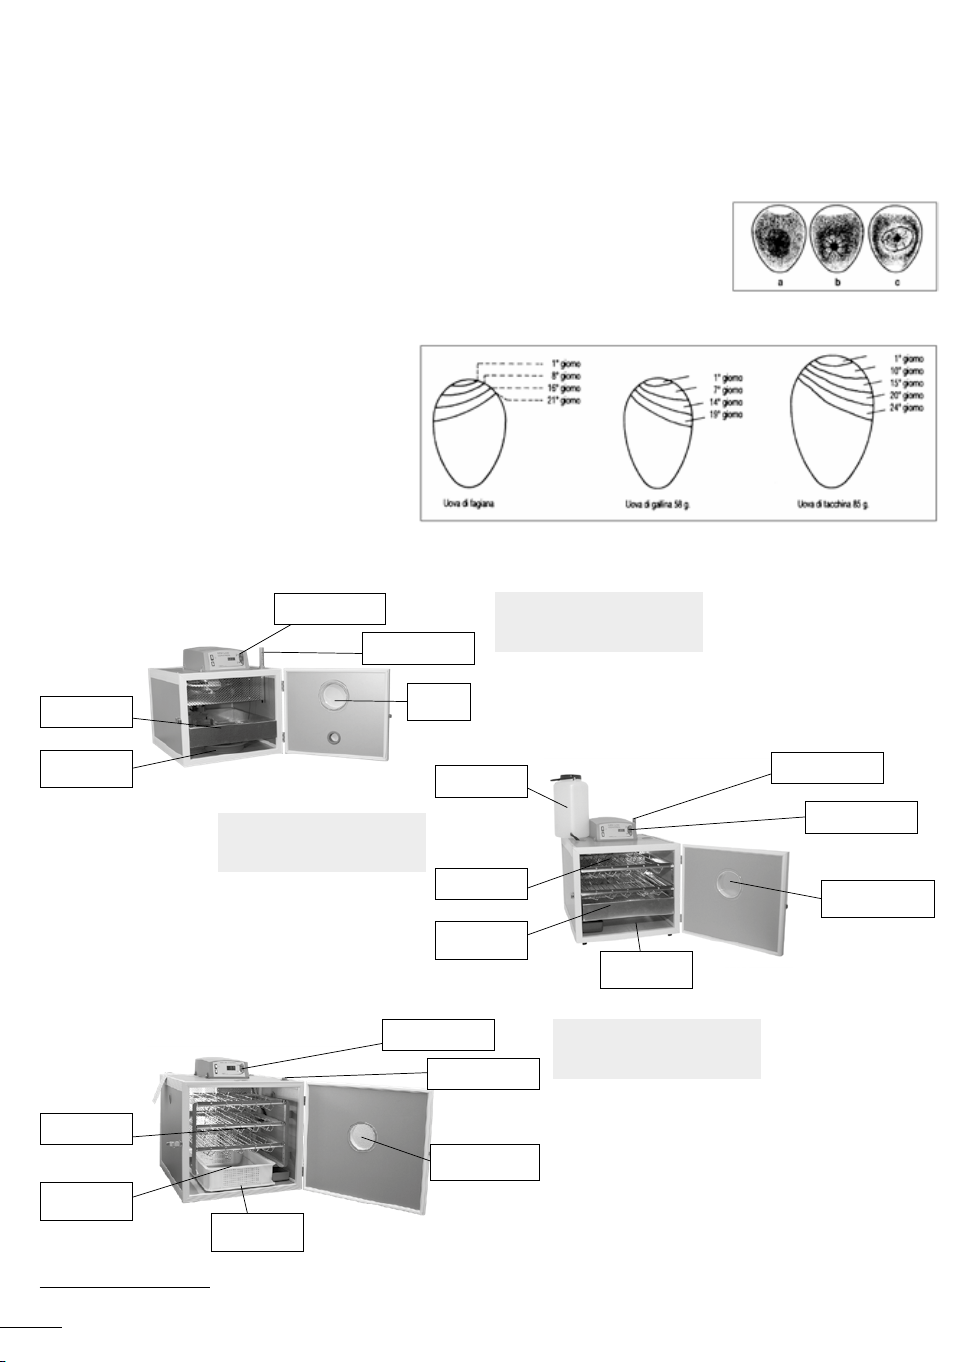
SPERATURA
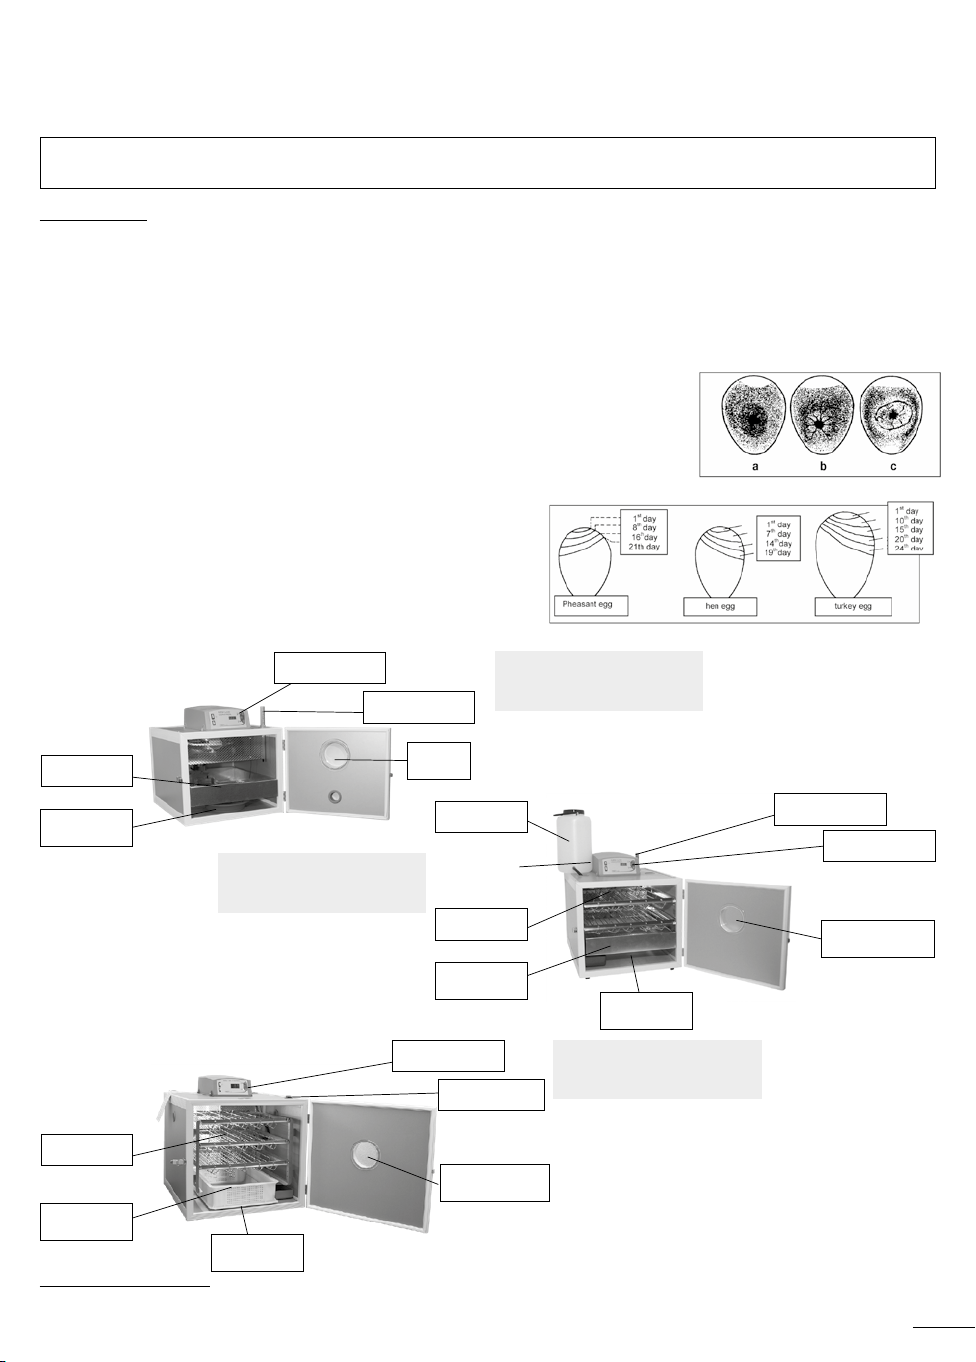
Dopo l’ottavo-decimo giorno di incubazione, è opportuno effettuare la speratura al fine di individuare ed eliminare le eventuali uova non fecon-
date. Posizionandosi in un locale oscuro ed osservando l’interno dell’uovo fecondato mediante uno sperauova, si intravede l’embrione in sviluppo
avente la forma di piccolo ragno rossiccio, costituito dal cuore e dalle piccole arterie che vi si dipartono (b); se si imprimesse all’uovo un leggero
scuotimento si noterebbero chiaramente delle oscillazioni ritmiche dell’embrione.
Al contrario un uovo non fecondato si presenta perfettamente trasparente, con un lieve oscuramento in corrispondenza del tuorlo (a).
Potrebbero rivelarsi dalla speratura di alcune uova macchie rossicce incollate alle pareti, oppure una macchia centrale circondata da un o più
cerchi concentrici; in tal caso trattandosi di embrioni “falsi” o morti, destinati comunque alla putrefazione, si dovranno rigorosamente estrarre
tali uova dall’incubatrice onde evitare pericolose infezioni a tutto il carico di incubazione.
a) Uovo non fecondato
b) Uovo con embrione in sviluppo
c) Uovo con embrione morto al 5°- 6° giorno di incubazione
Un controllo periodico delle uova in fase di sviluppo embrionale risulta necessario per garantire ottimali risultati di schiusa.
Infatti usando uno sperauova con sufficiente potenza,
è possibile effettuare il controllo del calo della camera
d’aria.
I disegni di seguito riportati illustrano i dati relativi alle
uova di gallina, tacchina e di fagiana; se le misurazioni di
speratura corrispondono alle linee di disegno, lo sviluppo
embrionale è corretto, quindi il grado di umidità fornito
all’incubatrice risulta esatto.
Qualora il calo della camera d’aria risultasse invece dif-
ferente dagli esempi riportati nel disegno illustrativo, oc-
corre variare i valori di umidità relativi alla macchina.4
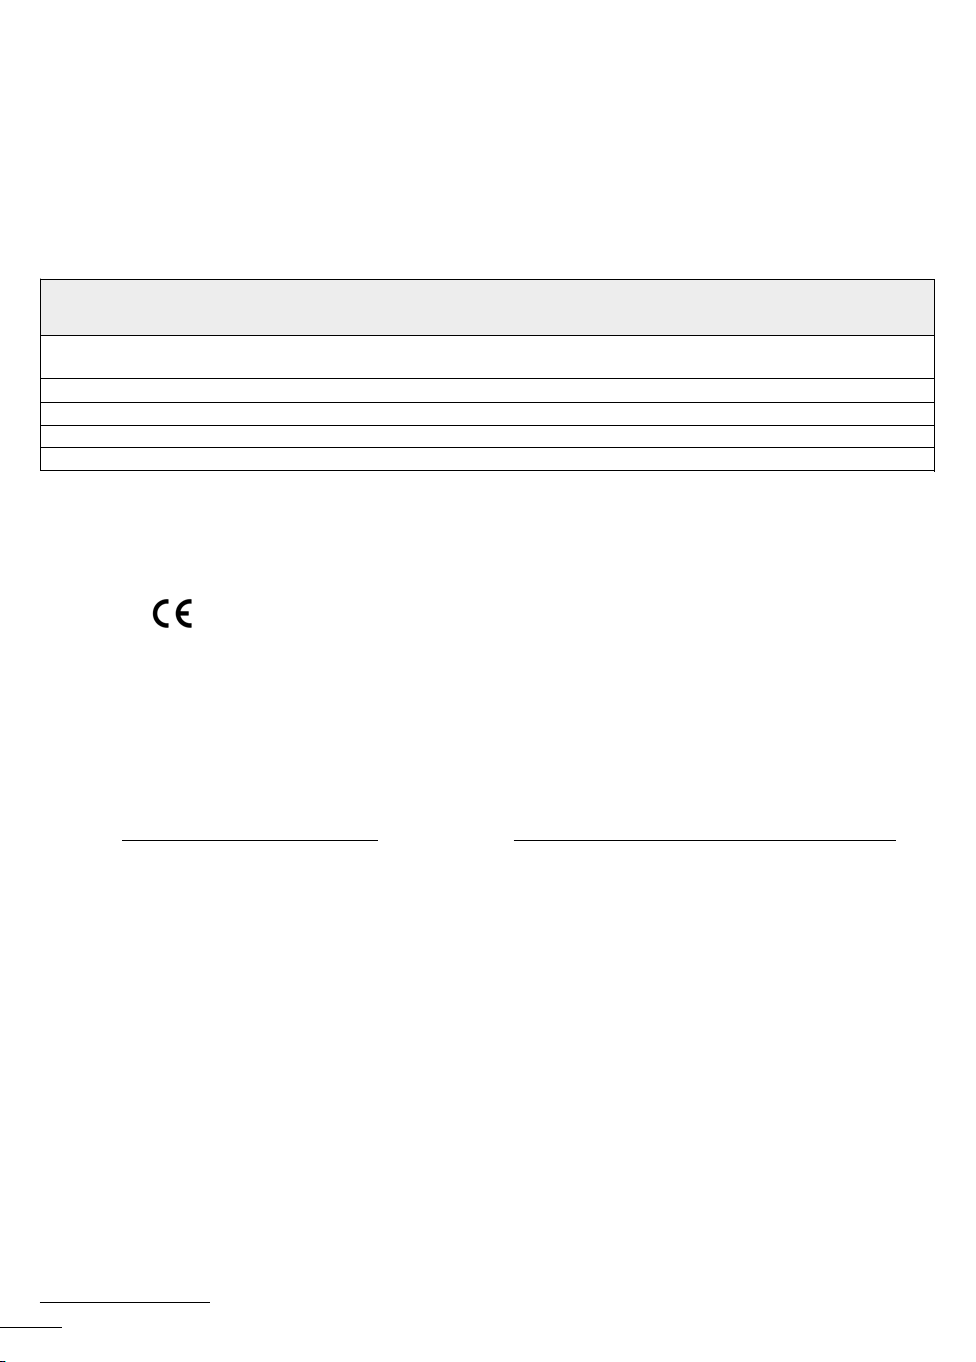
DESCRIZIONE
4Si precisa che se il calo della camera d’aria risultasse maggiore dei riferimenti del disegno occorrerà aumentare il grado di umidità, al contrario se risultasse minore sarà necessario
diminuire l’umidità.
6
•INCUBATRICE MOD.
MG50 JUNIOR SPECIAL
TERMOSTATO ELETTRONICO
REGOLAZIONE TEMPERATURA
TERMOMETRO IN °F LETTURA
TEMPERATURA + CUSTODIA
OBLO’ PER
ISPEZIONE
INTERNA
VANO PER
POSIZIONAMENTO
BACINELLA ACQUA
CESTELLO INCUBAZIONE
+ SCHIUSA
SERBATOIO
DI RISERVA ACQUA
CESTELLO DI
SCHIUSA
CESTELLO
INCUBAZIONE
TERMOSTATO ELETTRONICO
REGOLAZIONE TEMPERATURA
TERMOMETRO IN °F LETTURA
TEMPERATURA + CUSTODIA
OBLO’ PER ISPEZIONE INTERNA
VANO PER
POSIZIONAMENTO
BACINELLA ACQUA
•INCUBATRICE MOD.
MG70/100 FAMILY
CESTELLO DI
SCHIUSA
CESTELLO
INCUBAZIONE
VANO PER
POSIZIONAMENTO
BACINELLA ACQUA
TERMOSTATO ELETTRONICO
REGOLAZIONE TEMPERATURA
TERMOMETRO IN °F LETTURA
TEMPERATURA + CUSTODIA
OBLO’ PER ISPEZIONE
INTERNA
•INCUBATRICE MOD.
MG100/150 FAMILY

CONSIGLI UTILI
• In mancanza di corrente elettrica per alcune ore durante il periodo di incubazione, inserire nella macchina una o più borse ermetiche di acqua
calda e mantenere lo sportello chiuso5.
• Per le uova di palmipede, dopo 15 giorni di incubazione,si consiglia di bagnare le uova con acqua tiepida nebulizzata (utilizzare appositi
spruzzini igienizzati) e lasciarle raffreddare fuori dall’incubatrice per circa 15 minuti.
Questa operazione dovrà essere ripetuta ogni due giorni, fino al penultimo giorno di incubazione.
• Si consiglia per l’incubazione con frammentazione a ciclo settimanale, onde evitare dannose interferenze tra le diverse fasi, di procedere come
segue:
a) durante il periodo di schiusa relativamente ad ogni ciclo, aggiungere una seconda vaschetta di umidificazione;
b) completato il periodo di schiusa estrarre entrambe le vaschette effettuando un’accurata pulizia delle stesse, ed inserirne una colma d’ac-
qua solo dopo due giorni al fine di regolarizzare il tasso di umidità nella macchina.
• Il locale dove verrà posizionata la macchina al fine di ovviare a problemi di infezioni batteriologiche, si dovrà presentare rigorosamente in
perfette condizioni igienico sanitarie e privo di condizioni di insalubrità.
• Riteniamo opportuno precisare che durante le operazioni di incubazione e soprattutto durante la schiusa si presentano rischi relativi all’espo-
sizione ad agenti biologici, si consiglia di effettuare tutte le operazioni relative all’incubazione ed alla schiusa utilizzando idonei accorgimenti
quali:
- dispositivi di protezione individuale specifici (guanti in lattice usa e getta, mascherine di protezione vie respiratorie, camici usa e getta con
relativi calzari);
- pulizia e disinfezione periodica dei locali adibiti ad incubazione;
- lavaggio accurato delle mani prima e dopo il contatto con parti organiche con saponegel ad ampio spettro di azione biocida;
- evitare di somministrarsi cibi e bevande negli incubatoi o durante le operazioni di assistenza alla macchina.
• Sanità ed igiene dell’uovo: per garantire la fecondità ed evitare contaminazioni in incubazione si consiglia durante la raccolta delle
uova, di seguire le indicazioni di seguito riportate:
- Raccogliere le uova giornalmente per evitare la loro contaminazione, le perdite per rottura e i danni da calore nei periodi estivi o da congela-
mento durante l’inverno.
- Prima di inserire le uova nell’incubatrice premurarsi di lavarle con cura utilizzando un panno morbido ed inumidito con acqua tiepida;
- Lavare accuratamente le mani prima e dopo la raccolta delle uova con un saponegel ad ampio spettro di azione biocida.
- Conservare le uova in locali freschi con temperatura 14 – 16 °C; le uova devono essere incubate a partire dal terzo giorno dalla deposizione
e non dopo l’ottavo giorno.
- Per contrassegnare le uova usare solo matite, non utilizzare penne o pennarelli in quanto sono altamente tossici per l’embrione.
• MODELLO MG50 JUNIOR SPECIAL
ALIMENTAZIONE ELETTRICA V/Hz 220 - 60 230 - 50/60
ASSORBIMENTO TOTALE Watt. 215 215
DIMENSIONI mm 420 x 520 x 360
PESO Kg 19
CAPACITÀ UOVA Gallina - Anatra - Germano 50-55
Fagiana 60-65
Starna - Quaglia 100-110
Tacchina - Anatra 35-40
Oca 15-20
• MODELLO MG70/100 FAMILY
ALIMENTAZIONE ELETTRICA V/Hz 220 - 60 230 - 50/60
ASSORBIMENTO TOTALE Watt. 215 215
DIMENSIONI mm 450 x 580 x 430
PESO Kg 22,5
CAPACITÀ UOVA Gallina - Anatra - Germano 70 35
Fagiana 80 45
Starna - Quaglia 300 150
Tacchina - Anatra comune 60 40
Oca 18 9
• MODELLO 100/150 B.FAMILY
ALIMENTAZIONE ELETTRICA V/Hz 220 - 60 230 - 50/60
ASSORBIMENTO TOTALE Watt. 215 215
DIMENSIONI mm 560 x 600 x 550
PESO Kg 23 (cabina in acciaio)
30 (cabina in legno)
CAPACITÀ UOVA Gallina - Anatra - Germano 105 45
Fagiana 120 50
Starna - Quaglia e Colino 450 125
Tacchina - Anatra comune 90 38
Oca 27 12
Si precisa che le capacità sopra riportate sono riferite a valori standardizzati di uova di medie dimensioni ed in riferimento a cassetti universali di incubazione.
Per la schiusa occorre considerare la necessità di garantire lo spazio necessario ai pulcini e favorire il circolo dell’aria.
Si consiglia di utilizzare per queste specie di animali il cestello specifico che ottimizza le operazioni di voltaggio giornaliero nonché favorisce l’aerazione
7
5La mancanza di corrente per tempi prolungati provoca seri danni alle uova in incubazione da pochi giorni, mentre si è osservato che a stadi di crescita più avanzati dell’embrione,
la sopportazione è maggiore.

DURATA DI INCUBAZIONE DEI VARI SOGGETTI
SPECIE GIORNI SPECIE GIORNI
GALLINA 21 ANATRA COMUNE 27-28
QUAGLIA 16-17 ANATRA SELVATICA 25-26
TACCHINA 28 ANATRA MUTA 34-35
FARAONA 26 PERNICE 23-24
STARNA 23-24 FAGIANA 24-25
OCA 30 COLINO 22-23
CURA E MANUTENZIONE:
Per garantire un perfetto e duraturo funzionamento dell’apparecchio preoccuparsi di seguire le seguenti disposizioni:
• non esporre l’unità ad agenti atmosferici;
• non utilizzare la macchina in ambienti particolarmente caldi, umidi o freddi;
• effettuare lo spostamento e l’immagazzinamento evitando alla macchina urti o cadute, che risulterebbero deleteri per un sicuro funziona-
mento della stessa;
• prima delle operazioni di pulizia staccare la spina dalla presa di alimentazione alla rete;
• non sottoporre il cavo di alimentazione a tensione quando si sposta l’unità;
IMPORTANTE: staccare la spina dalla presa agendo sulla spina stessa e non sul cavo di alimentazione; inoltre non utilizzare prolunghe
inadatte e non a norma;
• per le operazioni di pulizia e disinfezione seguire attentamente le istruzioni riportate qui di seguito.
COME PULIRE L’INCUBATRICE: Per garantire una essenziale igiene durante l’incubazione si consiglia di pulire la macchina prima e
dopo l’utilizzo;passare quindi sull’apparecchio un panno inumidito e non usare sostanze volatili che possano danneggiare la superficie dell’u-
nità, ed igienizzare l’unità utilizzando disinfettanti leggeri come alcool.
Effettuare la pulizia anche sul fondo e lavare le vaschette con una spugna e del normale detergente di uso domestico.
AVVISO: dopo ogni operazione di pulizia e disinfezione mantenere in funzione la macchina (lasciare lo sportello semichiuso) per circa due
ore senza alcuna bacinella d’acqua, al fine di eliminare l’umidità accumulata durante l’incubazione e la pulizia, si assicurerà il corretto funzio-
namento al successivo utilizzo.
ISTRUZIONI OPERATIVE PER LA SOSTITUZIONE DELLA LAMPADINA:
Per la sostituzione della lampadina operare come segue:
a) Acquistare solo lampadine piccole a pera da 15 W con attacco E14 oppure lampadine a led da 4w-220V (consigliata);
b) Ricordarsi sempre di spegnere la macchina e staccare il cavo di alimentazione dalla presa di corrente, e lasciare raffreddare la lampadina
onde evitare pericoli di ustioni se si utilizzano lampadine ad incandescenza;
c) Utilizzando un cacciavite a stella, svitare le quattro viti di ancoraggio laterali;
d) Sfilare la rete dagli incastri e piegandola sufficientemente toglierla dalla macchina;
e) Svitare in senso antiorario la lampadina guasta (fare attenzione alle lampadine scoppiate e/o rotte, che potrebbero provocare tagli o abra-
sioni);
f) Inserire quindi la lampadina nuova, avvitandola con cura in senso orario;
g) Riposizionare poi la rete di protezione, avvitando con cura le viti di cui sopra
GARANZIA
La macchina è stata collaudata funzionalmente dal costruttore in ogni sua parte prima della consegna o della spedizione
La garanzia del costruttore non comprende perciò danni causati da un trasporto della macchina effettuato non correttamente, inoltre la garanzia
non comprende eventuali danni agli impianti elettrici ed elettronici causati da un non corretto allacciamento alla rete di alimentazione.
La garanzia comprende la sistemazione o la sostituzione di tutte le parti difettose riscontrate nei 24 mesi (12 a carico del produttore, 12 a carico
del venditore) successivi alla consegna della macchina al cliente, ed ha validità avvisando il costruttore non oltre l’ottavo giorno dal riscontro
del malfunzionamento.
Dietro nostra richiesta e salvo eventuali diretti interventi, egli dovrà effettuare la spedizione in porto franco e nell’imballo originale della merce
ritenuta difettosa.
Tale garanzia è riferita ad eventuali difetti di fabbricazione ed è esclusa nel caso che i prodotti non siano stati usati secondo le nostre prescri-
zioni e, in ogni caso, qualora siano stati manomessi, riparati o comunque non correttamente utilizzati.
Nella garanzia è compresa tutta la consulenza tecnica telefonica; restando a carico del cliente tutte le spese di spedizione alla F.I.E.M. S.r.l.
delle parti da sostituire e quelle relative ad ogni intervento tecnico presso il cliente.
Non sono comunque mai compresi risarcimenti dovuti al fermo della macchina, o dei danni riportati alla produzione.
Le riparazioni in garanzia dovranno essere effettuate da personale autorizzato dal costruttore, la non ottemperanza a que-
sta clausola comporta la cessazione della garanzia stessa.
NORMATIVA DI RIFERIMENTO
Questo prodotto soddisfa i requisiti essenziali di Compatibilità Elettromagnetica e di Sicurezza previsti dalle Direttive:
• 2014/30/UE direttiva EMC • 2014/35/UE direttiva Bassa Tensione
in quanto progettato in conformità alle prescrizioni delle seguenti Norme Armonizzate:
• EN 55014-1:2006 + A1:2009 + A2:2011 • EN 61000-3-3:2013
• EN 55014-2: 2015 • EN 61000-3-2:2014
8

La conformità ai suddetti requisiti essenziali viene attestata mediante l’apposizione della Marcatura su prodotto
La marcatura è stata introdotta nell’anno 1995.
Si richiama l’attenzione sulle seguenti azioni che possono compromettere la conformità oltre, naturalmente, le caratteristiche del prodotto:
• errata alimentazione elettrica;
• errata installazione o uso errato o improprio o comunque difforme dalle avvertenze riportate sul manuale d’uso fornito col prodotto;
• sostituzione di componenti o accessori originali con altri di tipo non approvato dal costruttore, o effettuata da personale non autorizzato.
WARNING: THIS EQUIPMENT MUST BE EARTHED.
ATTENZIONE: QUESTA UNITÀ DEVE ESSERE CONNESSA A TERRA.
ATTENTION: CETTE UNITE DOIT ETRE MISE A LA TERRE.
ACHTUNG: DIESES GERAT MUSS EINEN ERDUNGSANSCHLUSS HABEN.
ATENCION: ESTE EQUIPO DEBE ESTAR CONECTADO A UNA TOMA DE TIERRA.
APPARATET MA KUN TILKOPLES JORDET STIKKONTACT. APPARATEN SKALL ANSLUTAS TILL JORDAT NATUKKAT. LAITE ON LITTETTAVA
SUKO-RASIAAN.
La targhetta metallica con il marchio applicata alla macchina è parte integrante della stessa; sulla targa
sono riportate le informazioni specifiche nella Direttiva Macchine
LE SEGUENTI NORME ARMONIZZATE SONO STATE UTILIZZATE PER LA CORRETTA IMPLEMENTAZIONE DEI REQUISITI ESSENZIALI DI
SICUREZZA E SALUTE DELL’ALLEGATO I
• EN 55014-1:2006 + A1:2009 + A2:2011 • EN 55014-2: 2015 • EN 61000-3-3:2014 • EN 61000-3-3:2013
Guanzate , il Dichiarante
DICHIARAZIONE DI CONFORMITÀ
Ai sensi dell’Allegato I, del D.Lgs.17/2010
IL FABBRICANTE
Incubatrici F.I.E.M. S.r.l.
Via G. Galilei, 3 - 22070 Guanzate (Como) - Italy
DICHIARA CHE
LA MACCHINA
Incubatrice
MODELLI
m MG50 J.S. - m MG 70/100 Family - m MG100/150 B.Family
MATRICOLA
È PROGETTATA E REALIZZATA IN CONFORMITÀ AI REQUISITI ESSENZIALI DI SICUREZZA E SALUTE
DEL D.M. 17 of 27 January 2010 – Attachement I (implementation of the Machinery Directive 2006/42/EC)
9

6Il funzionamento della ventola dovrà essere controllato visivamente, il malfunzionamento della stessa potrebbe compromettere i risultati ottenibili dall’incubazione.
Colonnina di alcool del termometro Urti, cadute accidentali Provare ad esporre il termometro
o igrometro frammentata per alcuni minuti a basse temperature
(nel freezer) e poi sotto l’acqua calda,
altrimenti sostituire il termometro
*Rif.mod.MG100/150 B.F Il variatore della ventola non funziona Contattare il costruttore
Impossibilità di variare
la velocità della ventola
Sistema umidificazione naturale Mancanza d’acqua nel serbatoio esterno Inserire acqua
a superfice Sistema di umidificazione mal funzionante Controllare discesa acqua dal
Umidità insufficiente serbatoio alla vasca interna
Galleggiante difettoso Controllare il galleggiante
Perdite di acqua Galleggiante mal funzionante Controllare il galleggiante
Galleggiante inceppato causa calcare Disincrostare il galleggiante con
acqua e aceto o detergente apposito
Umidificazione non corretta Malfunzionamento impianto automatico: Per i punti 1. e 4. contattare il costruttore;
*Con impianto di umidità automatico 1. umidificatore ad ultrasuoni non funzionante per il punto 2. connettere il cavo di
2. spinotto di alimentazione dello stesso sconnesso alimentazione alla presa posteriore
3. igrostato scalibrato dell’incubatrice, per il punto 3.
4. sonda umidità guasta Si rimanda al paragrafo set-up
5. mancanza di acqua nell’umidificatore. centralina multifunzioni;
per il punto 5. verificare il corretto
allacciamento umidificatore alla
macchina, o se manca acqua, riempire il
serbatoio dello stesso
È severamente vietato ogni tentativo di riparazione della macchina, che non sia tra quelli indicati nella tabella sopra riportata, contattare sempre il centro di
assistenza presso il costruttore o presso il più vicino rivenditore autorizzato al tel. 031 / 97 66 72 isdn, fax. 031 / 89 91 63, e-mail: [email protected] - www.fiem.it
10
PRIMA DI RIVOLGERSI AL SERVIZIO ASSISTENZA
Prima di richiedere l’intervento dell’assistenza tecnica, è opportuno controllare i seguenti guasti più comuni ed intervenire conformemente.
PROBLEMA CAUSA SOLUZIONE
L’unità non funziona. Manca corrente. Controllare la spina.
Spina staccata. Inserire la spina
Interruttore generale “0/I” su posizione “0” Posizionare l’interruttore su “I”
Fusibile di sicurezza bruciato Sostituire fusibile
Nessuno dei punti sopra indicati Contattare il servizio assistenza
Temperatura di esercizio insufficiente Elemento riscaldante malfunzionante Contattare il costruttore
Termostato scalibrato Vedere istruzioni per la taratura
Termostato inattivo o malfunzionante Contattare il costruttore
Sportello aperto Chiudere lo sportello
Locale freddo al disotto dei 17/18°C
Collocare l’incubatrice in un locale più caldo
Dispositivo voltauova malfunzionante Motoriduttore guasto Contattare il costruttore
Aerazione forzata insufficiente Ventola non funzionante 6Contattare il costruttore
Illuminazione interna non funzionante Interruttore su posizione “0” Posizionare l’interruttore su “I”
Lampadina bruciata Sostituire la lampadina come indicato
nel relativo paragrafo
MANUAL FOR USE OF INCUBATORS MOD. MG 50+70+100
BEFORE USE: Before using the incubator, it is recommended to study the Instruction Manual, especially the technical and safety data
aspects, in order to gain an understanding of the components and the potential operation of the machine.
WARNING: This appliance can be used by children aged from 8 years and above and persons with reduced physical, sensory or mental
capabilities or lack of experience and knowledge if they have been given supervision or instruction concerning use of the appliance in a safe
way and understand the hazards involved. Children shall not play with the appliance. Cleaning and user maintenance shall not be made by
children without supervision. If the supply cord is damaged, it must be replaced by the manufacturer, its service agent or similarly qualified
persons in order to avoid a hazard.
INFORMATION TO THE USERS: Under Legislative Decree 25 September 2007, no.185 and art. 13, Legislative Decree 25 July 2005,
no.151 “Implementation of Directives 2002/95/EC, 2002/96/EC and 2003/108/EC, regarding the reduction of use of hazardous substances in
electrical and electronic equipment as well as waste disposal”. The barred waste container symbol on the equipment means that the product,
at the end of its service life, must be disposed of separately from the other types of waste. The user must therefore convey the equipment,
at the end of its service life, to the appropriate separate collection centres for electronic/electro technical waste products or return it to the
dealer when purchasing a new equivalent equipment. The appropriate separate collection and the following sending of the used equipment
to recycling, treatment and eco-friendly disposal will help avoid negative effects on the environment as well as on health along with an easier
recycling of the materials forming the equipment. Any unauthorized disposal of the product by the user will imply the enforcement of the admi-
nistrative sanctions as set out in Legislative Decree no. 22/1997 (article 50 and following articles, Legislative Decree no. 22/1997).
MACHINE UNPACKING:
Take the incubator out of its cardboard box and remove the internal components which are secured by the adhesive
tape and check that they are intact. Check the following components are included:
The incubator is supplied with a single phase electric cable (approx. 2 mt.) with a plug for the electric connection 220/230V, 50/60 HZ. On the
back of the machine, the data plate gives full details regarding the voltage, power requirements, registration number and production date.
IMPORTANT: Remember to check thermometer is working correctly, examining that there are no breaks in the line of alcohol.
IMPORTANT NOTICE: In order to comply with the latest CE specifications in
terms of human safety from dangerous materials contained on electric and non
electric equipments we have been thermometers/hygrometers to the actual rules via
the replacement of the now forbidden mercury with colored alcohol.
Being this last one physically more volatile and subject to fragmentations, sometimes
invisible because of his discoloration, the result is that the new thermometers are
less reliable.
Consequently we ask our esteem customers & distributors to pay the maximum
attention before using our thermometers, examining that there are no gaps visible in
the alcohol/liquid to be positioned vertically.
The adequate room temperature for storing our thermometers is comprised between 10°C to 30°C.
Before using the machine, remember to clean it carefully inside and outside, as shown in the relative paragraph.
With reference to the models MG70 & MG 100 take out the metal setting trays and place the eggs into them with the points downwards1; in
case of empty space between the eggs use the springs supplied in order to keep the eggs blocked.
Once the machine has reached the working temperature introduce the trays into the machine. Regarding the model MG 50 place the eggs lying
on the wire mesh in horizontal position, between the rods of the egg-turning grid.
ATTENTION: the correct working temperature for models MG 50 J.Special & MG 70/100 Family is fixed to 101°F (corresponding to
38,3°C). Regarding our model MG 100/150 B.Family the correct working temperature is 99,7°F (corresponding to 37,7°C)
GB
Re. MG 50 Junior Special
•
1 no. Instruction Book
•
1 no. thermometer + plastic case
(secured on the floor)
•
1 no. basin with automatic
constant level water flow and
external accumulation tank
•
1 no. metal setting & hatching
basket
•
1 no. safety fuse type 2A.
Re. MG 70/100 Family
•
1 no. Instruction Book
•
1 no. thermometer + plastic case
(secured on the floor)
•
2 no. metal egg-trays for incubation
•
1 no. basin with automatic
constant level water flow
and external accumulation tank
•
1 no. metal hatching basket
•
4 no. metals springs
•
1 no. safety fuse type 2A.
Re. MG 100/150 B. Family
• 1 no. Instruction Book
• 1 no. thermometer + plastic case (secured on the floor)
•
3 no. metal egg-trays for incubation
• 1 no. metal hatching basket
•
1 no. basin with automatic constant level water flow
and external accumulation tank
• 6 no. metals springs
• 1 no. safety fuse type 2A.
1It is noted that in order to guarantee the embryonic development, the eggs must be placed with the air space towards the top.
11

INSTRUCTIONS FOR EASY ASSEMBLING AND CONNECTING NATURAL SURFACE HUMIDIFICATION SYSTEM
We are providing our MG & Astral series of a new practical humidification system delivered as a standard feature.
Humidification will be performed through a specially conceived basin with automatic constant level water flow
and external accumulation tank (fig. 1).
• Place the plastic reserve tank (packed inside the machine), on top of the machine
• Connecting the water inlet pipe (fig. 2)
• Fill with water the outside reserve tank, the water will go down into
the inside basin where the level will remain automatic by the float valve
• The inside water basin is equipped with automatic float valve to maintain
a constant water level
• In order to regulate the humidity value, utilize the metal cover included
VERY IMPORTANT (ORDINARY MAINTENANCE):
In order not to incur in any sudden water loss by the internal water tank please make sure that the floating does not present any malfunction that
may obstruct its movement. so keep the float perfecly clean and free of any lime deposit. after each incubation cycle put a solution of water 70%
+ white vinegar 30% inside the humidification tank for 2/3 hours. then disassemble the float, rinses it and reassemble it making sure of its correct
operation before a new use.
INSTRUCTIONS FOR EASY ASSEMBLING AND CONNECTION OF AUTOMATIC HUMIDITY FOR MODELS (optional)
OPTION 1: HUMIDIFICATION BY ULTRASOUND: The air humidification inside the incubator is performed by a special humidifier (ultrasound nebuli-
zer) which uses ultrasound technology to atomize water & create a smoke effect without changing the operating temperature.
ULTRASOUND NEBULIZER ASSEMBLING AND PREPARATION: Remove the ultrasound nebulizer by its carton box and place it on a flat level surface
next to the incubator. Remove the humidifier plastic tank and fill it with water and then place it again up to plastic base. Connect the air injection pipe
to the humidifier inserting the aluminum disk fitted part on the humidifier column exit steam introducing then the opposite part of the same pipe for at
least 2-3 cm inside the special dedicated intake predisposed on the incubator.
OPERATION: Plug the humidifier power socket to the power outlet socket positioned on the control panel back side and switch on the humidifier by
selecting the option “ON” on the main switch ON/OFF. Adjust the steam injection flow intensity by the control knob on the frontal part of the humi-
difier. Generally it’s enough to keep the dial set to 60-70% but in case the settled humidity percentage is not reached than we suggest to turn the
knob to maximum position. A red light on the humidifier will warn about water shortage on the tank. The ultrasound nebulizer is driven by the LCD
control panel. After the above mentioned steps for connecting the instrument it’s necessary to set up the required humidity value in order to allow the
nebulizer automatic activation at each request of air humidification coming from the LCD thermostat.
IMPORTANT: - The humidifier should be disconnected from any power outlet when filling the tank, during displacement and during cleaning
- The humidifier should not be used without water, if there is no water in the tank switch the humidifier off.
- Do not fill the humidifier tank with any other liquid than water, do not add medicines and do not cover any opening
- Do not use it outdoors
OPTION 2: INTERNAL HUMIDIFICATION BY HOT WATER: By the option “Internal humidification by hot water” we have equipped the incubator with
an immersion resistance to be positioned inside the water tank; then connect the resistance, via the special plug, to the socket placed on the rear
of the control panel. The activation of the resistance will be piloted by the electronic control unit.
USE AND CALIBRATION:Plug the incubator into the electric power and allow the machine to run at the correct temperature before
setting the eggs.
The thermostat, placed on the unit top, has been set-up by the factory see the information to the following paragraph “digital thermostat”.
Check that the set temperature on the thermostat dial agrees with the reading on the alcohol thermometer inside the incubator. 101°F for models
MG50 & MG 70 and 99,7°F for model MG 100. It’s important to check the temperature on the thermometer in the incubator.
The inside lighting of the machine is by a lamp activated by the switch placed on the control panel; remember to switch off the light while the
machine is in operation.
Once the temperature has reached the correct set-point, with ref. to the models MG70 and MG100
insert the trays with the eggs positioned correctly2; pay particular attention to connect in a proper
way the terminal part of the setting trays into the splits of the egg-turner bar; the egg turning device
will be activated automatically with the machine switching3.
Regarding the MG 50 it’s important to press the metal basket as shown in the picture 1 in order to
activate the egg-turning device. Remind that on the hatching period (last 2 days) it will be necessary
to stop the automatic turning simply bringing the tray back of about 1 cm (see picture 1).
Fig. 1
Fig. 2
Fig. 3
(Fig. 1)
ON EGG-TOURNING SWITCHING OFF EGG-TOURNING SWITCHING
12

Version with digital thermostat
MINILED THERMOSTAT
1. Product overview
2. Key functions Shows the inside temperature
Setting temperature and humidity reference values
Shows the inside humidity
+ Technical menu for the calibration parameters, measurement units
+ During start-up, menu for setting the type of temperature control
3. Functionality description
MiniLCD is able to control with ON-OFF method or PID algorithm the temperature (see paragraph 7) and with mode ON-OFF the incubation humidity.
At power on, a welcome message will appear briefly followed by firmware version of the board.
MiniLCD will prompt the current temperature and by pressing the arrow UP or DOWN the relative humidity.
By pressing the SET button you can modify the temperature and humidity value already set.
In case temperature or humidity probe fail, or in case one of them isn’t connected, in the relative visual mode will prompt ERR and the output will
not controlled. MiniLCD has in addition two different menus, one for the user, where you can customize the basic functions, and one technical that
permit to setup the machine and adjust the probe.
During start-up, menu for setting the type of temperature control.
4. User setup
After you turn-on MiniLCD by pressing the button, RED LED close to temperature icon start blinking and display show the reference temperature.
Now by pressing or you can change the set temperature.
• T. incubazione [5 .. 75] (default 30.0) - This parameter define the temperature that the machine must be maintened during the incubation period.
The range of values you can set is between 5 and 75 °C or equivalent in F.
You can save the value by pressing the button, display will show the humidity value.
Now the GREEN LED close to humidity icon start blinking and display show the humidity percentage to be observed For modify the humidity
parameter pressing or button.
• Umidità incubazione [10 .. 99] (default 40) - This parameter allows you to set the relative humidity to be maintained during the incubation period.
The range of values that can be set in this field is between 10% and 99%.
After editing the values MiniLCD automatically exits the edit menu if no buttons are pressed for 15 seconds by saving the value shown.
5. Technical setup
By simultaneously pressing and you enter the technical menu. Its possible to read all parameters in sequence by pressing , button, the
modify of the parameter occur by pressing and . To confirm the modify of the value press again .
MiniLCD will exit automatically after 15 seconds if no keys are pressed by saving the value shown.
List of parameters showed by pressing button
• Unit [C,F] (default °C) - Setting the temperature units Celsius or Fahrenheit
• t.CAL [-3,0 .. +3,0 °C] (default 0,0 – step di 0,1 °C)
t.CAL [-5,4 .. +5,4 F] (default 0,0 – step di 0,1 F) - It allows to calibrate the temperature read by the probe, in Celsius or Fahrenheit depending on
the setting assigned at the previus point.
• H.Cal [-5 .. +5] (default 0 – step di 1%) - It allows to calibrate the humidity value read by the probe.
6. Control mode temperature
By pressing simultaneously and you can access a special menu for change the mode of control temperature.
• Controllo [PID,v ON-OFF] (default PID) Allow you to select the type of temperature control.
• PID = Control PID
• ON-OFF= Control ON-OFF
A. Power switch
B. Light switch
C. 3 digits display with dot separation value
D. temperature LED
E. humidity LED
F. selection button <arrow up> (temperature display)
G. setting button
H. selection button <arrow down> (humidity display)
A
B
G
E
F
D
C
H
13

7. CONNECTION DIAGRAM
Descrizione dei collegamenti:
A = Power supply terminal block ( ELECTRIC SHOCK )
B = Power output humidifier terminal block ( ELECTRIC SHOCK )
C = Power output heater ( ELECTRIC SHOCK )
D = Hygrometer probe
E = Temperature probe
Warning: disconnect power supply before attempting and performing any conn.
INDICATIVE CONVERSION TABLE FROM FAHRENHEIT DEGREES (°F) TO CELSIUS (°C).
°F °C °F °C °F °C °F °C °F °C
80 26,7 86 30,0 92 33,3 97 36,1 101 38,3
81 27,2 87 30,6 93 33,9 98 36,7 102 38,9
82 27,8 88 31,1 94 34,4 98,6 37,0 102,2 39,0
83 28,3 89 31,7 95 35,0 99 37,2 103 39,4
84 28,9 90 32,2 96 35,6 100 37,8 104 40,0
85 29,4 91 32,8 96,8 36,0 100,4 38,0 105 40,6
Take note that 1°F is equal to 0,56 °C, while 1°C is equal to 1,8 °F.
HUMIDITY
It is important to understand that there can be no hard and fast rule for the amount of water required in an incubator as the following variables
come into play:
• Ambient humidity in the room (affected by the weather and your local environment).
• The species of the eggs
• The porosity of the eggshells (can vary from egg to egg)
• The time of year (warm weather usually means high ambient humidity and eggs laid towards the end of the season tend to be more porous)
Requirement for water in the incubator can be monitored by either weighing the eggs (an egg should loose 13-15% of its weight during incu-
bation) or by candling (the air space should be approx. 1/3 of the egg by the time it is due to hatch).
On subsequent hatches you may wish to increase or decrease the amount of water, depending on your findings with your first hatch.
If in
doubt, it is better to add too little water than too much – more eggs are lost through too high humidity than any other single
factor!
Remember, the depth of water makes no difference to the humidity levels in the incubator; it’s the surface area which counts!
Generally for manual humidity by natural surface , as already mentioned, it is enough to assemble the water system and fill the reserve
water tank with tepid water and wait for 2/3 hours in order to see the value indicated by the thermostat minilcd.
If the value is too low, it will be necessary to take away the cover on the internal water basin; if the humidity reading is too high, it will be
necessary to reduce the water surface, by using the metal cover of the basin.
It should be remembered that it is the surface area of the water which affects humidity, not the depth of the container or the volume of water.
For manual humidification, during the hatching period, if it is not enough the total surface on internal water basin, introduce under the hatching
basket another small water basin.
For the automatic humidity by ultrasounds, as already mentioned, after the connecting of the humidifier it’s necessary to set up the required
humidity value in order to allow the nebulizer automatic activation at each request of air humidification coming from the MINILCD thermostat.
LOAD EGGS STORED NOT MORE THAN 7- 8 DAYS AND NOT LESS THAN 3 DAYS FROM LYING.
BEFORE INCUBATION, THE EGGS MUST BE STORED IN A LOCATION WITH TEMPERATURE BETWEEN 14 – 16 °C.
APPROX. HUMIDITY VALUES WHEN OPERATING AT 37.7°C (100°F) DRY BULB TEMPERATURE
TYPE INCUBATION HATCHING
HEN LIGHT BREED (LAYER) 82°F = 47% 88°F = 62%
HEN HEAVY BREED (BROILER) 84°F = 52% 88°F = 62%
PHEASANT - PARTRIDGE – QUAIL- RED LEG PARTRIDGE 78-80°F = 38-43% 86-88°F = 56-62%
TURKEY – GUINEA FOWL 82-84°F = 47-52% 88°F = 62%
GOOSE - DUCK (MALLARD,PEKIN, KHAKI CAMPBELL, WILD) 78-80°F = 38-43% 88°F = 62%
In order to regulate the humidity level inside the machine it is necessary to modify the basin’s surface:
enlarging the surface water increases the humidity, reducing the surface area decreases it.
VENTILATION (OPTIONAL)
For the control of ventilation, the incubator model MG 100/150 B. Family is supplied with a fan speed regulator which should be switched to
maximum position during the incubation period (put it on “incubation” position).
The fan speed must be decreased during the hatching period, changing the position of the regulator knob in an anti-clockwise direction to
“hatching” position.
When batch hatching, the fan speed should not be totally decreased for the hatching period, in order not to damage the eggs which are in
incubation phase.
During the incubation period, it is necessary to ensure the optimum oxygenation level, which will vary according to the number of eggs loaded.
2The springs in endowment allow to stop the eggs placed upon the single cradle if the row is not completely filled with eggs
3Remember to turn the eggs twice per days, morning and evening, by the key on setting trays, if the machine were supplied with manual egg-turner
14
The correct ventilation for a full load of eggs will, necessarily, be too much for only a partial load of eggs. The level of oxygenation can be con-
trolled by adjusting the diameter of the ventilation control placed on the upper panel (ref. MG 100/150). For the model MG50 adjust at the same
time and simultaneously the diameter of the two ventilation holes placed respectively on the superior panel (expulsion of carbon dioxide-outlet
dirty air) and on the door (air oxigened immission-inlet clean air); instead the model MG70 has two ventilation holes placed on the superior
panel which should be adjusted always at the same time.
ATTENTION:
Never completely close the ventilation control because it would change all the values of temperature/humidity and aeration,
thus compromising the incubation results.
EGG-CANDLING
- At 8th - 10th day of incubation, it is advisable to candle the eggs in order to eliminate those which are infertile; this operation
must be done in a dark room. By observing the inside of a developing, fertile egg, using a suitable candling lamp, it is possible to determine
the embryo development which looks like a small reddish shape, composed of the heart and small arteries which are radiating from it (Fig. b).
If the egg is moved lightly, it is possible to see clearly the rhythmic oscillations of the embryo.
On the contrary, an infertile egg appears completely transparent (clear), with a slight darkening where the yolk is. (a).
If during the candling operation, you find some eggs with a reddish spot stuck or attached to the shell, or a central spot surrounded by one or
more concentric hoops, or something nebulous crossing the inside; then in this case, the embryos are either false or dead, and must be taken
out of the incubator to prevent them contaminating other eggs with bacteria by infection or explosion
a) Infertile egg
b) Egg with normally developing embryo
c) Egg with dead embryo at 5th - 6th day of incubation
Periodic candling during embryonic development is necessary to ensure the best hatching results.
Using a good candling lamp, it is possible to check the growth of the air-space.
The pictures shown herewith show the air-space growth as related to hen,
turkey, and pheasant eggs. If the air space measurements appear similar to
those shown in the picture, it means that the embryo is developing correctly,
and that the amount of humidity supplied in the machine is right.
If the air space is not developing correctly, it means that it is necessary to
change the level of humidity supplied to the machine4.
4It must be noted that when the air-space is smaller than shown in the table, it is necessary to decrease the humidity value; when the air-space is larger than shown in the
table, the humidity must be increased.
15
•INCUBATRICE MOD.
MG50 JUNIOR SPECIAL
ELETRONIC
THERMOSTAT
READING
THERMOMETER °F + CASE
COMPLETE
PLASTIC PORT
HOLE
WATER BASIN
PLACE
SETTING & HATCHING
BASKET
PLASTIC RESERVE
TANK
HATCHING
BASKET
SETTING
TRAY
ELETRONIC
THERMOSTAT
READING
THERMOMETER ° F + CASE
COMPLETE PLASTIC
PORT HOLE
WATER BASIN
PLACE
•INCUBATOR MOD.
MG70/100 FAMILY
HATCHING
BASKET
SETTING TRAY
WATER BASIN
PLACE
ELECTRONIC
THERMOSTAT
READING
THERMOMETER °F + CASE
COMPLETE PLASTIC
PORT HOLE
•INCUBATOR MOD.
MG100/150 FAMILY

HELPFUL SUGGESTIONS
• In case of power failure for some hours during the incubation time, place one hot water bottle or similar container into the machine and
keep the door closed5.
• For waterfowl eggs, after 15 days of incubation, it is suggested that the eggs should be taken out of the incubator and sprayed with tepid
water (using a suitable hygienic sprayer) and leave them to cool for about 15 minutes outside the machine. This operation should be repe-
ated every two days, till the penultimate day of incubation.
• When batch setting, in order to avoid conflict between the different requirements of each batch, it is suggested to proceed as it follows:
a) During the hatching period for each cycle, add one more water basin for humidity;
b) At the end of each hatching period, take out both the basins and clean them, then re-insert one only, full of water, two days later in order to
regulate the humidity inside the machine.
• It’s recommended that the incubator room should be clean and hygienic, in order to obviate any bacteriological infection.
• It should be remembered that during incubation and hatching there is a constant risk of bacterial contamination and the following precau-
tions are therefore recommended:
- Use of personal protective clothing (i.e.: disposable plastic gloves, protective respiratory mask);
- Regular cleaning and disinfection of incubation rooms;
- Careful cleaning of hands before and after the contact with organic parts using anti-bacterial gel soap.
- Avoid eating or serving food and drink in the incubation room or during the operation of the machine.
(These suggestions are extremely important in order to afford maximum protection to both eggs and operator)
Egg health and hygiene
To maximise fertility and to avoid contamination during the incubation period, please follow the directions below when collecting eggs:
- Collect the eggs daily to avoid contamination or loss from breakage or damage, caused by hot or cold temperatures (winter and summer
periods).
- Clean hands before and after egg collection with anti-bacterial soap.
- LOAD EGGS STORED NOT MORE THAN 7- 8 DAYS AND NOT LESS THAN 3 DAYS FROM LYING.
- BEFORE INCUBATION, THE EGGS MUST BE STORED IN A SPECIFIC EGG-BASKET (IN VERTICAL POSITION WITH THE AIR-SPACE FACED
UPWARDS) WITH TEMPERATURE BETWEEN 14 – 16 °C.
- Do not mark the eggs with felt-tip pens – use only pencil
• MODEL MG50 JUNIOR SPECIAL
POWER SUPPLY V/Hz 220 / 60 230 - 50/60
POWER CONSUMPTION Watt. 215 215
DIMENSIONS mm 420 x 520 x 360
NET WEIGHT Kg 19
EGGS CAPACITY Hen - Mallard 50-55
Pheasant 60-65
Partridge - Quail 100-110
Turkey - Duck 35-40
Goose 15-20
• MODELLO MG70/100 FAMILY
POWER SUPPLY V/Hz 220 / 60 230 - 50/60
POWER CONSUMPTION Watt. 215 215
DIMENSIONS mm 450 x 580 x 430
WEIGHT Kg 22.5
EGGS CAPACITY Setter Hatcher
Hen- Duck 70 35
Pheasant 80 45
Partridge – Quail – Red leg 300 150
Turkey – Wild duck 60 40
Goose 18 9
• MODELLO 100/150 B.FAMILY
POWER SUPPLY V/Hz 220 / 60 230 - 50/60
POWER CONSUMPTION Watt. 215 215
DIMENSIONS mm 560 x 600 x 550
WEIGHT Kg 30 23
EGGS CAPACITY Setter Hatcher
Hen- Duck 105 45
Pheasant 120 50
Partridge – Quail – Red leg 450 125
Turkey – Wild duck 90 38
Goose 27 12
The above capacities are referred to the loading of each standard eggs species on the universal setting tray supplied. During the hatching
phase it’s necesary to guarantee to the chicks enough space for moving and good air circulation.
16
5The lack of power for an extended time causes more serious damage to eggs which are only a few days into incubation than to those which are more advanced, when the embryo
is stronger and more resilient

INCUBATION PERIOD OF THE DIFFERENT SPECIES
SPECIE DAYS SPECIE DAYS
HEN 21 PEKIN DUCK 27-28
QUAIL 16-17 WILD DUCK 25-26
TURKEY 28 BARBARY DUCK 34-35
GUINEA FOWL 26 RED LEG 23-24
PARTRIDGE 23-24 PHEASANT 24-25
GOOSE 30 BOB WHITE 22-23
CARE AND MAINTENANCE
In order to achieve the best operation and longest life of the machine, follow the following precautions:
• do not expose the machine to outdoor elements
• do not place machine in hot, wet or cold rooms;
• avoid bad handling during moving that can cause breakages inside the machine and affect its working;
• disconnect the power plug before cleaning the machine;
• do not accidentally pull out the power cable when moving the machine.
IMPORTANT: take out the plug from the socket by holding the plug and not the power cable; use only a mains power socket or surge-protected
extension lead.
• for cleaning and disinfection please follow the advice as follows:
HOW TO CLEAN THE INCUBATOR:
For a good hygiene during the incubation, it is recommended to clean the machine before and after its use;
use a wet cloth on the machine with a light disinfectant; do not use solvents that can damage the machine cabinet;clean the base of the
machine and the water basins with a normal domestic detergent.
ADVICE: after cleaning the machine, please keep it working without eggs and basins for at least two hours (with the door semi-closed), in
order to dry the humidity which has accumulated during the incubation period... This will ensure the correct machine operation for the next use.
INSTRUCTIONS FOR LIGHT BULB REPLACEMENT:
a) buy small bulb only (pear shape) of 15W with an E14 screw fitting or led lamp of 4w-220V (suggested);
b) Remember to switch off the machine and disconnect the power cable from the current socket and leave the
lamp cooling in order to avoid any scalding for incandescent lamps;
c) Use a star screwdriver and unscrew the screws;
d) Take out the wire mesh on the bottom of the machine;
e) Unscrew the broken lamp in anti-clockwise direction ( be careful with those exploded or broken);
f) insert the new lamp, screwing it carefully in clockwise direction;
g) Put the mesh back again inside, screwing carefully the screws.
WARRANTY
Each part of the machine has been fully tested by the manufacturer before delivery or shipping.
The manufacturer’s guarantee does not include damage caused by improper transport and does not include damage to the electrical and
electronic systems caused by incorrect connection to the power supply.
The guarantee includes repairs or replacement of all the parts that are found to be defective in the 24 months (12 months by the manufacturer
+ 12 months by the seller) following the delivery of the machine to the customer and applies when the customer informs the manufacturer, no
later than the eighth day from when the fault occurred.
This Guarantee refers to possible defects in workmanship and it is excluded in any case of improper use, improper placement and connection
or in any case of tampering from unauthorized personnel.
The guarantee includes all technical telephone support, but the customer is liable for all shipping costs for sending all defective parts to be
replaced to FIEM and all technical call-out costs.
The guarantee does not include any compensation for any downtime of the machine or damages incurred during use.
Only staff authorised by the manufacturer must be allowed to carry out repairs under the guarantee; if this clause is not adhered to, the gua-
rantee will cease to apply.
STANDARDS OF REFERENCE
This product conforms to the essential Electromagnetic and safety requirements foreseen by the following directives:
• 2014/30/UE (EMC) • 2014/35/UE (LVD)
as projected in conformity to the prescriptions of the following Harmonized Rules:
• EN 55014-1:2006 + A1:2009 + A2:2011 • EN 61000-3-3:2013
• EN 55014-2: 2015 • EN 61000-3-2:2014
Conformity to the above requirements is attested by marking on the product;
The mark was introduced in 1995.
17
It is opportune to underline the following actions that can prejudge the conformity and moreover the product characteristics:
• incorrect electricity supply;
• incorrect installation or incorrect /improper use or not conforming to the instructions reported in the instruction book supplied with machine;
• replacement of its components with those not approved or adopted by the manufacturer, or replacement effected by unauthorized technical
service.
• WARNING: THIS EQUIPMENT MUST BE EARTHED
• ATTENZIONE: QUESTA UNITA’ DEVE ESSERE CONNESSA A TERRA
• ATTENTION: CETTE UNITE’ DOIT ETRE MISE’ A LA TERRE
• ACHTUNG: DIESES GERAT MUSS EINEN ERDUNGSANSCHLUSS HABEN.
• ATENCION: ESTE EQUIPO DEBE ESTAR CONECTADO A UNA TOMA DE TIERRA.
• APPARATET MA KUN TILKOPLES JORDET STIKKONTACT. APPARATEN SKALL
ANSLUTAS TILL JORDAT NATUKKAT. LAITE ON LITTETAVA SUKO-RASIAAN.
DECLARATION OF CONFORMITY
to senses of the attachment I, D.Lgs.17/2010/CE
Manufactured in the EU for: Incubatrici F.I.E.M. S.r.l.
Via G. Galilei, 3 - 22070 Guanzate (Como) - Italy
DECLARES THAT
THE MACHINE Incubator
MODELS m MG50 J.S. - m MG 70/100 Family - m MG100/150 B.Family
SERIAL NUMBER
IS MANUFACTURED AND SOLD IN CONFORMITY TO THE ESSENTIAL
REQUIREMENTS OF HEALTH AND SAFETY OF D.P.R. D.M. 17 of 27 January 2010
Attachement I (implementation of the Machinery Directive 2006/42/EC)
The metallic plate fixed on the machine is an integral part of the same;
all serial numbers, and product specifications are detailed on the plate.
THE FOLLOWING HARMONIZED RULES HAVE BEEN UTILIZED FOR THE CORRECT IMPLEMENTATION OF THE ESSENTIAL REQUIREMENTS OF
HEALTH AND SAFETY OF THE ATTACHED I.
• EN 55014-1:2006 + A1:2009 + A2:2011 • EN 55014-2: 2015 • EN 61000-3-3:2014 • EN 61000-3-3:2013
Guanzate , The Declarator
18
6Correct working of the fan should be checked visually, faulty operation of the fan could compromise incubation results.

Thermometer alcohol Accidental drops or jarring of the thermometer Try to put the thermometer at low
column interrupted temperature (in a freezer) for few
minutes, and then allow to return
to room temperature.
Otherwise replace the thermometer
Ref. model MG 100/150 B.F
Not possible to regulate the fan speed The fan speed regulator does not work Contact the manufacturer
Automatic humidity system does Automatic humidity does not work Regarding the point 1.4. contact
not work correctly properly: the builder;
1. broken humidifier for the point 2. Insert the plug;
2. plug not inserted for the point 3. see the paragraph
3. hygrostat out of calibration lcd unit control hygrostat set-up;
4. faulty humidity probe for the point 5. check the correct
5. no water into humidifier water system lacing or the
possible lack of water;
Semiautomatic humidity system: -Empty external tank -Fill water
Low humidity value -Natural surface humidification -Check the fall down water from
system does not work correctly external water to the internal basin
-Water float damaged - check the water level setted
from the float
Water loss -Float does not work correctly -Check the float
-Float blocked because limestone -Clean the float putting a solution of
water 70% + white vinegar 30% inside
the water basin for 2/3 hours.
Whichever reparation attempt not included on above mentioned form is severely forbidden. Contact always the manufacturer or the authorized tech-
nical assistance in your country. Fiem s.r.l. - Ph : 0039 (0)31 976672 - Fax : 0039 (0)31 899163 - [email protected] - www.fiem.it
19
TROUBLE SHOOTING CHECK LIST
Before asking for a technical assistance service, please follow this list to try to solve most common problems:
PROBLEM CAUSE SOLUTION
The machine does not work Lack of power Check the plug
Plug disconnected Put the plug into the socket
Master switch “0/I” on position “0” Position the switch on “I”
Safety fuse burnt Replace the fuse
Any of the above points Contact the assistance service
Working temperature not sufficient Heating element not correctly working Contact the manufacturer
Thermostat not calibrated See instruction for calibration
Thermostat faulty or not working Contact the manufacturer
Door open Close the door
Cold room under 17/18°C Place the incubator into a warmer room
Egg-turner device not working properly Egg-turner motor broken Contact the manufacturer
Forced ventilation not sufficient Fan not working6Contact the manufacturer
Interior lighting not working Switch on “0” position Place the switch on “I” position
Lamp burnt Replace the lamp as shown
in the instructions
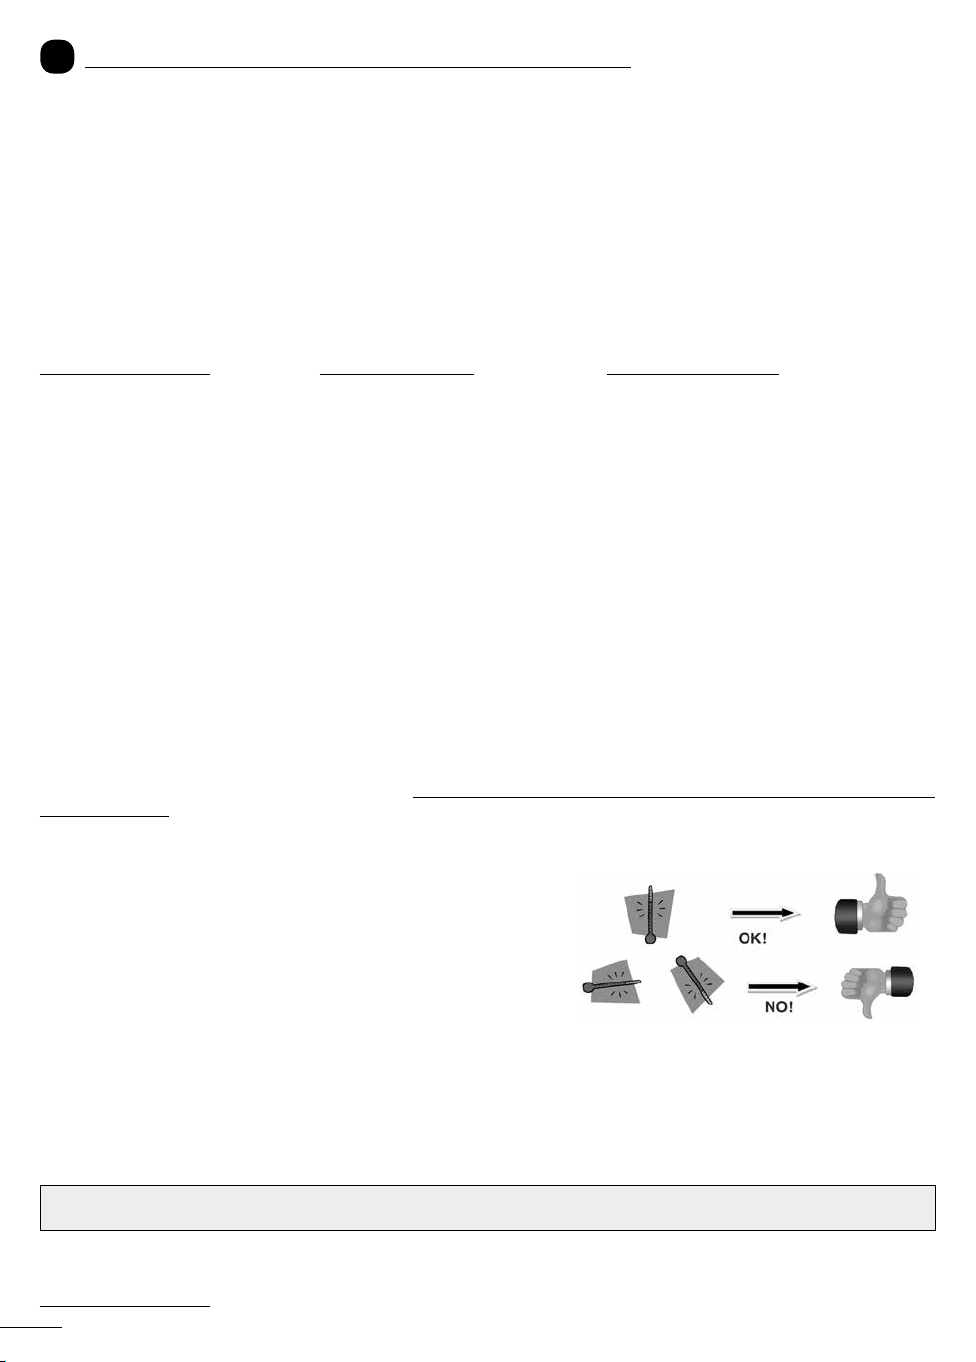
MANUEL D’UTILISATION DES INCUBATEURS MG 50-70-100
NOTIONS SUR L’UTILISATION: Avant de se consacrer à la mise en route de la couveuse, il est conseillé d’étudier attentivement le manuel afin de découvrir et d’évaluer au
fur et à mesure les caractéristiques techniques, les fonctions de chaque élément et le niveau de sécurité garantie par le produit.
ATTENTION: Le dispositif peut être utilisé par des enfants de pas moins de 8 ans et par personnes ayant des réduites capacités physiques, sensorielles ou mentales, ou avec
manque d’expérience ou connaissance nécessaire, à condition que les mêmes soient surveillés ou éduqués à une utilisation correcte de l’appareil et à la compréhension des dan-
gers liés à ce dernier. Les enfants ne devraient pas jouer avec l’appareil. Le nettoyage et l’entretien, destinés à être effectués par l’utilisateur, ne devront pas être effectués par des
enfants sans surveillance. Si le cordon d’alimentation est endommagé, il doit être remplacé par le fabricant ou son agent de service ou en tous cas par une personne qualifiée afin
d’éviter tous dangers.
INFORMATION DE L’UTILISATEUR: Elimination correcte de ce produit (Applicable dans les Pays faisant partie de l’Union Européenne et dans ceux avec système de recycla-
ge). Le marquage sur le produit ou sur sa documentation indique que le produit ne doit pas être jeté avec les autres déchets ménagers à la fin de sa vie. Pour éviter des éventuels
dommages à l’environnement ou la santé humaine provoqués par une élimination incontrôlée des déchets, l’utilisateur est invité à séparer ce produit par des autres types de déchets
et de recycler ce produit de façon responsable pour promouvoir la réutilisation durable des ressources matérielles. Les utilisateurs sont invités à contacter le magasin où le produit
a été acheté ou le bureau local responsable de toutes les informations relatives à la collecte et recyclage de ce type de produit. Les utilisateurs professionnels devront contacter le
fournisseur pour bien vérifier les termes et conditions du contrat d’achat. Ce produit ne doit pas être mélangé avec d’autres déchets commerciaux.
L’incubateur est en outre équipé d’un câble électrique (long environ 2 m) avec fiche avec terre pour le branchement au courant
220/230V monophasé, 50-60 Hz.
La plaque signalétique, située à l’arrière, mentionne la capacité d’absorption, la puissance électrique de l’incubateur, le numéro de matricule et la date de production.
ATTENTION: L’appareil doit être branché au réseau, conforme aux normes européennes, n’utilisant que des prises munies de mise à la terre. Avant les opérations de nettoyage,
débrancher la fiche de la prise de courant; Si le câble d’alimentation présente des dommages, le remplacement du même devra être effectué par le fabricant ou par un personnel
autorisé par le fabricant afin d’éviter tous risques. Ne pas soumettre le câble d’alimentation aux sollicitations mécaniques quand il se déplace l’unité. Le câble d’alimentation ne doit
pas être accessible aux animaux. Avant de déplacer et emmagasiner la machine il faut vider les cuvettes en dotation. N’utilisez pas l’appareil s’il présente des dommages. Ne stockez
pas de substances explosives ou de bombes de peinture dans la machine, ni de générateurs d’aérosol contenant des propulseurs inflammables. Cet appareil a été conçu pour être
utilisé dans des locaux non soumis à la réglementation anti-explosion; son utilisation n’est autorisée que dans des locaux dans une atmosphère normale. L’appareil n’est pas adapté
à une installation dans une zone où un jet d’eau pourrait être utilisé. Il est interdit de nettoyer j’unité avec un jet d’eau à haute pression.
NOTE: Vérifier que la colonne du thermomètre ne soit pas séparée.
POSITIONNEMENT, RACCORDEMENT ET PREPARATION: Le local, où l’appareil sera installé, devra être suffisamment aéré, sec et avec une température constante
comprise entre 17-23° C. vibrations, et si possible à proximité d’une prise de courant facilement accessible. Pour le branchement au réseau n’utiliser que des prises munies de
mise à la terre.
AVIS: Le fabricant décline toute responsabilité en cas d’usage impropre, d’emplacement impropre, de raccordement à des appareils non autorisés ou de modification par un
personnel non autorisé.
Insérer le thermomètre en position verticale dans le logement situé sur le côté droit de la couveuse et enfiler
ensuite la boite plastique de protection.
AVIS IMPORTANT: en conformité aux dernières normes européennes, directive CE en matière de
substances dangereuses contenues dans les équipements électriques et non électriques, nous avons été
obligés à remplacer le mercure contenu dans nos thermomètres / hygromètres avec de l’alcool coloré.En
étant ce dernier physiquement plus léger et par conséquence plus sujet à des fragmentations, parfois pas
visibles à cause desdécolorations, les thermomètres par alcool résultent être moins fiables. Nous deman-
dons par conséquence à nos clients et distributeursde poser beaucoup d’attention avant l’utilisation et
surtout pendant le stockage, périodes dans lesquels les thermomètres devront être maintenus en position verticale et avec une température ambiante comprise entre 10°C / 30°C.
Avant de passer à l’utilisation de l’unité, il faut effectuer un nettoyage soigné intérieur et extérieur de celle-ci, comme indiqué plus précisément ci-après dans le relatif paragraphe.
Pour les modèles MG 70 et MG 100, extraire les tiroirs métalliques et placer graduellement les oeufs en incubation avec la pointe tournée vers le bas1. Dans le cas on reste
de la place inutilisée à l’intérieur des berceaux porte-oeufs utiliser les ressorts spéciaux en dotation en les positionnant sur les mêmes. Quand la couveuse atteigne la température
de travail insérer les tiroirs dans les relatifs logements.
Pour le modèle MG 50 il faudra placer les oeufs en position horizontale entre les barres de la grille tourne oeufs.
ATTENTION: la température de travail pour le model MG70/100 Family et MG50 J. Special doit être 101°F (38,3),
et pour le model MG100/150 B. Family doit être 99,7°F (37,7°C).
Réf: modèle MG 50 Junior Special
• 1 manuel d’utilisation
• 1 thermomètre à alcool (° F) + boite
• 1 cuvette humidification à niveau constant
et un réservoir extérieur de 5 litres
• 1 casier métallique d’incubation
et d’éclosion
• 1 fusible de rechange 2 A
Réf: modèle MG 70/100 Family
• 1 manuel d’utilisation
• 1 thermomètre à alcool (° F) + boite
• 1 cuvette humidification à niveau constant et
un réservoir extérieur de 5 litres
• 2 plateaux d’incubation en métal
• 1 casier d’éclosion en métal
• 4 ressorts presse oeufs
• 1 fusible de rechange 2 A.
Réf. modèle MG 100/150 B.Family
• 1 manuel d’utilisation
• 1 thermomètre à alcool (°F) + boite
• 1 cuvette humidification à niveau constant
et un réservoir extérieur de 5 litres
• 3 plateaux d’incubation en métal
• 1 casier d’éclosion en métal
• 6 ressorts presse oeufs
• 1 fusibles de rechange 2 A.
1Il est signalé que, pour assurer le développement embryonnaire, les oeufs devront être positionnés obligatoirement avec la chambre à air (arrondi de l’oeuf) tournée vers le haut.
F
20
This manual suits for next models
4
Table of contents
Languages:
Popular Farm Equipment manuals by other brands


horsch
horsch Partner 2000 FT operating instructions

DuraTech Industries
DuraTech Industries HAYBUSTER CMF-710 operating instructions

Jacto
Jacto ADVANCE 3000 AM-18 Operator's manual

Pottinger
Pottinger NOVACAT 262 Operator's manual

Major
Major SYNERGY MJ62-170 Operator's manual and parts list

horsch
horsch Joker RT Series owner's manual


