GrainPro TRANSAFELINER User manual

GRAINPRO®TRANSAFELINER™ BULK
INSTRUCTION MANUAL
MA4045RAD1114-5

2/26
GrainPro® TranSafeliner™ Bulk Instruction Manual
MA4045RAD1114-5
GrainPro®, Inc.
200 Baker Ave., Suite 309 Concord, MA 01742 USA
Phone: +1 978 371 7118 Fax: +1 978 371 7411 Website: www.grainpro.com
Email: sales@grainpro.com
GrainPro®Philippines, Inc.
Lot 46 Efficiency Avenue, Subic Bay Gateway Park I, Subic Bay Freeport Zone 2222 Philippines
Phone: +63 47 252 7884 Fax: +63 47 252 7885 Website: www.grainpro.com
Email: salesasia@grainpro.com
GrainPro®Kenya
Shop A2, Space Apartments Mai Mahiu Road, Near T Mall Nairobi, KENYA
Phone: +254 710 933 717 Website: www.grainpro.com
GrainPro®Mexico
Cto. Garona No. 903, Sección Tres, Col. Amberes, 37237, León, Gto. Mexico
Phone (Mobile): +52 1 (477) 392-0851 Website: www.grainpro.com
GrainPro®Costa Rica
Paseo Colón, Centro Colón, en Bufete Robles Oreamuno District Merced, San José, Costa Rica
Phone: +506 4701-1173 Website: www.grainpro.com
GrainPro®India Postharvest Technology Pvt Ltd
B305, Grande View 7 Hsg. Soc. Ltd., Phase - I, Near Ashok Leyland, Ambegaon BK, PUNE,
Pune, Maharashtra, India, 411046
Phone (Mobile): +91 9970157263 Website: www.grainpro.com
Email: avinash@grainpro.com
GrainPro®Inc., 200 Baker Ave., Suite 309 Concord, MA 01742 USA
Copyright 2019 GrainPro®, Inc.

3/26
GrainPro® TranSafeliner™ Bulk Instruction Manual
MA4045RAD1114-5
TABLE OF CONTENTS
1. INTRODUCTION......................................................................................................................... 4
2. CHECKLIST................................................................................................................................ 5
3. COMPONENTS .......................................................................................................................... 7
4. SPECIFICATIONS...................................................................................................................... 7
5. INSTALLATION........................................................................................................................... 8
Preparation ............................................................................................................................ 8
Bulkhead Installation............................................................................................................11
TSL Blower Installation........................................................................................................ 11
TSL Blower (Not Included) Components and Specifications………...……………….………….....…11
Loading ................................................................................................................................ 12
Use of Desiccants/Dry Bags (Required)..............................................................................14
Plastic Valve Installation for Pressure Decay Test and CO2or O2Reading………..……………14
Sealing.................................................................................................................................15
Pressure (Vacuum) Decay Test...........................................................................................17
Installing the Flexible Adapter Hose for CO2or O2Reading ............................................... 18
Using Oxygen Analyzer for Monitoring (Without CO2Flushing) - Optional ........................19
Using Carbon Dioxide Analyzer for Monitoring (Without CO2Flushing) - Optional.............19
Carbon Dioxide (CO2) Safety...............................................................................................20
Procedure for Purging with Carbon Dioxide (CO2) …………………………………………...………….20
Using Oxygen Analyzer for Monitoring (With CO2Flushing) - Optional .............................23
Using Carbon Dioxide Analyzer for Monitoring (With CO2Flushing) - Optional.................. 24
Closing and Opening the Container Van.............................................................................24
6. MAINTENANCE AND CARE .................................................................................................... 25
Repairing Punctures and Other Damages...........................................................................25
Recycling ............................................................................................................................. 25
7. FREQUENTLY ASKED QUESTIONS ...................................................................................... 25
8. WARRANTY CLAUSE..............................................................................................................26

4/26
GrainPro® TranSafeliner™ Bulk Instruction Manual
MA4045RAD1114-5
1. INTRODUCTION
The GrainPro®TranSafelinerTM Bulk (TSL Bulk) is designed to protect dry agricultural commodities
shipped in bulk inside an ISO shipping container. It is made of Ultra Hermetic PE with barrier layer. It
has superior gas and moisture resistant properties to restrict the entry of moist ambient which reduces
risks due to condensation, mold growth, and insect infestation. As a result, the TSL Bulk preserves the
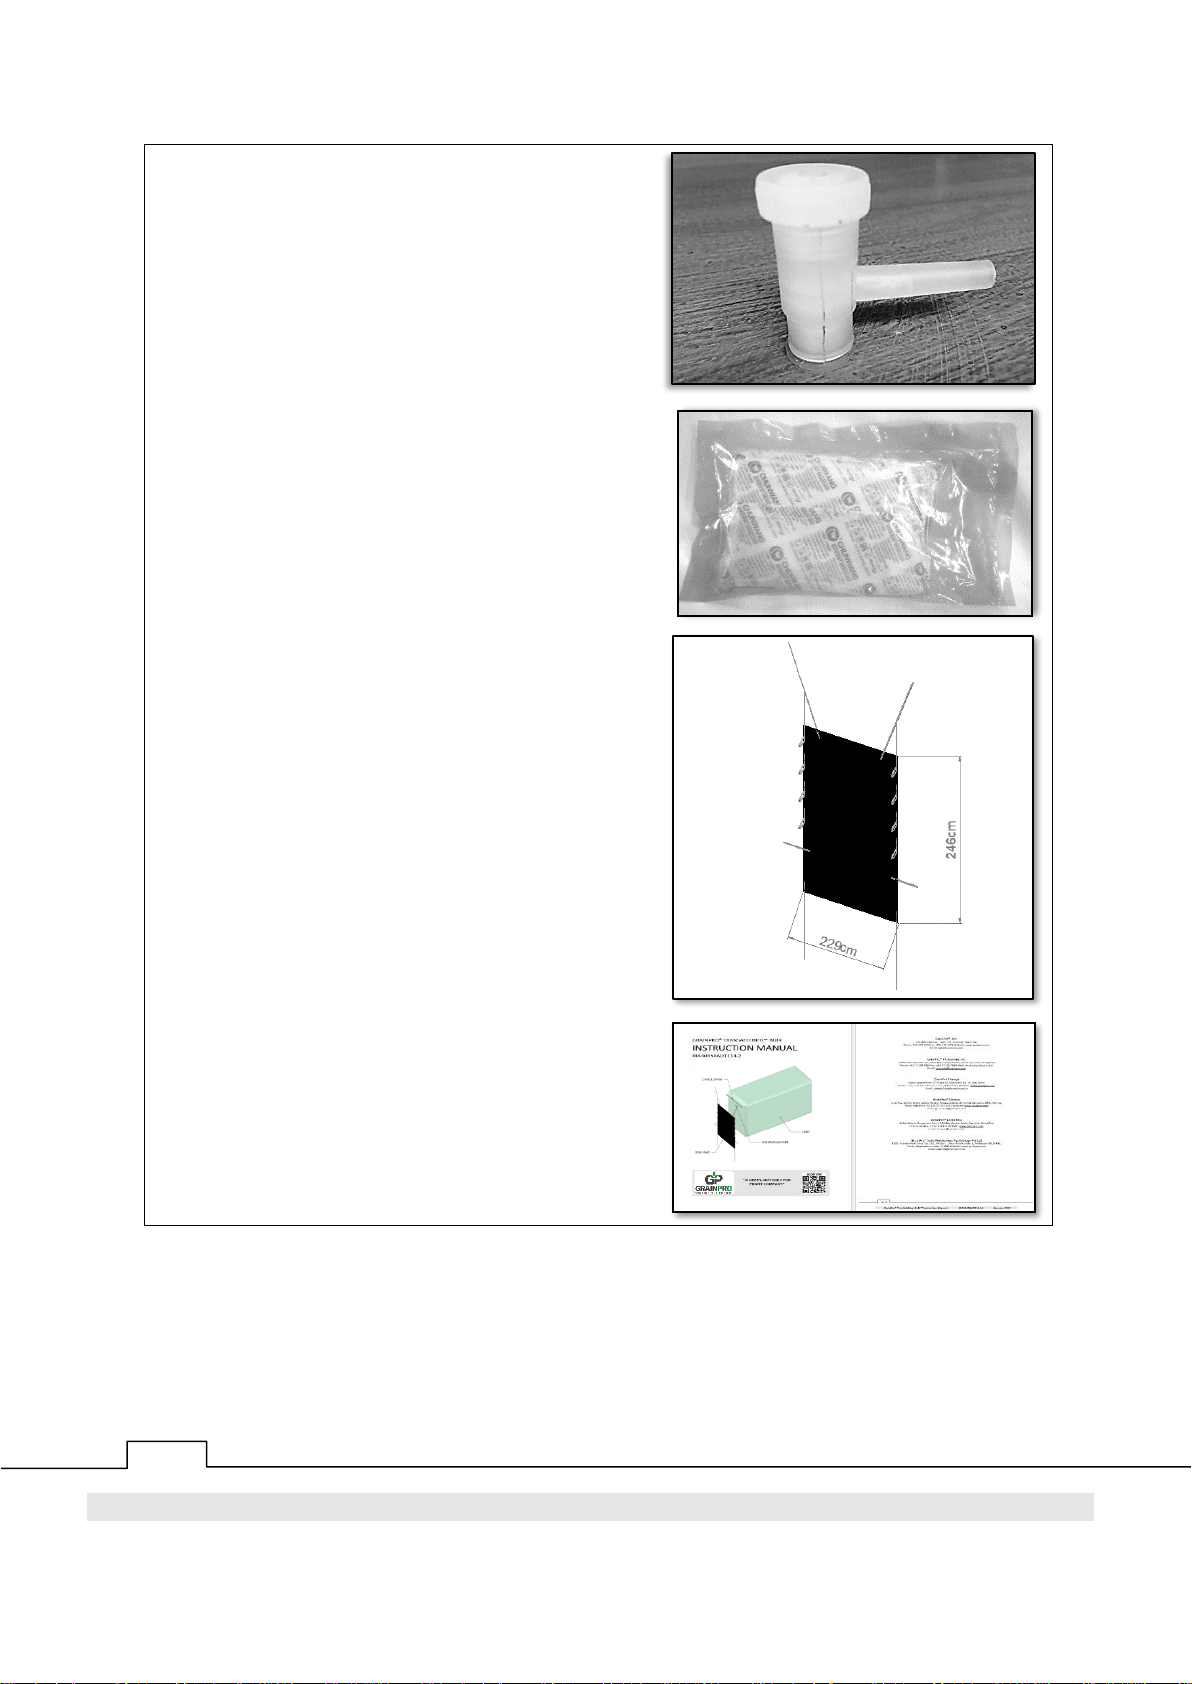
quality of dried agricultural commodities and prevents postharvest losses while in transit. It also has a
GHF inlet port for fumigation. The TSL Bulk consists of Ultra-Hermetic liner and bulkhead. Using nylon
rope and pre-installed tape, the liner can be easily hung inside the container. To support the commodity’s
lateral force, a strong woven polyethylene bulkhead is fitted into the container’s doorway using straps
and 1.5” steel tubes positioned horizontally and anchored into the groove of the container’s wall. Loading
the single trip TSL Bulk can be done using grain augers or screw conveyors (with TSL blower) which
can be fitted in the liner’s resealable loading port. Unloading of the TSL Bulk is best done by self-
discharging or by tilt-trailer where unloading can be done by slitting the bottom portion of the TSL Bulk
and tilting the shipping container.
1.1. FEATURES:
1.1.1. “Green” fumigation technology acknowledged as organic fumigation using CO2
1.1.2. Preserves quality and minimizes damage to dry agricultural commodities in transit
1.1.3. A “green” technology for the transport and organic preservation of dry agricultural commodities
(certified safe for organic grain storage)
1.1.4. Minimizes condensation, inhibits/control mold growth and infestation
1.1.5. Easy to install in a container van using nylon ropes
1.1.6. Two options in installing the bulkhead (straps or rigid bars)
1.1.7. Maximizes the volumetric capacity of shipping container
1.1.8. Reduces packaging cost vs. bagged commodities
1.1.9. Reduces labor cost.
1.1.10. Prevents grain contamination
1.2. PRODUCT GUARANTEE:
1.2.1. In accordance with the terms and conditions herewith, GrainPro, Inc. fully guarantees the quality
of this product if the product is used according to the instructions in this operator’s manual.
1.2.2. Please read and understand the manual thoroughly before using the TSL Bulk.
1.3. COMMENTS, COMPLAINTS, AND/OR CLARIFICATIONS:
1.3.1. Please contact customercare@grainpro.com,
we shall be glad to answer any of your questions.

5/26
GrainPro® TranSafeliner™ Bulk Instruction Manual
MA4045RAD1114-5
2. CHECKLIST
Please inspect your GrainPro TSL Bulk package to ensure it includes the following items:
PART NAME
DESCRIPTION
IMAGE
2.1. TSL BULK BODY
2.1.1. Ultra-Hermetic
Polyethylene with
barrier layer
2.2. ZIPPER SLIDER
2.2.1. For zipper closing.
Two (2) pieces
2.3. PRE-INSTALLED
TAPE
2.3.1. TSL BULK
15pcs
2.4. NYLON ROPE
2.4.1. For container
mounting installation
(Pulling rope)
TSL Bulk
17 m x 1 rope

6/26
GrainPro® TranSafeliner™ Bulk Instruction Manual
MA4045RAD1114-5
2.5. PLASTIC VALVE
2.5.1. For PDT (Pressure
Decay Test) or CO2
or O2reading
1 piece
2.6. DESICCANTS
2.6.1. TSL Bulk
2 packs x 3pcs/pack
2.7. BULKHEAD
2.7.1. Woven Polyethylene
(WPE)
Dimension:
229cm x 246cm
2.8. INSTRUCTION
MANUAL
2.8.1. Installation
instructions.
2.8.2. Maintenance
instructions.
2.8.3. Frequently asked
questions and
answers.
2.8.4. Warranty clause.

7/26
GrainPro® TranSafeliner™ Bulk Instruction Manual
MA4045RAD1114-5
3. COMPONENTS
4. SPECIFICATIONS
4.1 LINER
PARAMETERS
TSL BULK
Material
High Strength PE with Barrier Layer
Thickness, microns
100±5%
Color
Green (Pantone 3385)
Material Weight, g/m2
97.5
Oxygen Transmission Rate (OTR), cc/m2
<9
Water Vapor Transmission Rate (WVTR), g/m2/day
<4
Product Life, years
2
Warranty, year
1
Sealing Mechanism
2-Track PE Zipper
Capacity, kg (lbs) based on wheat
21,600 (47620)
Dimension (AxBxC), cm (inch)
230x230x604 (91x91x238)
Product Weight (per piece), kg (lbs)
14 (31)
Packed Dimension, cm (inch)
110x55x8 (43x22x3)
Packed Volume, m3(ft3)
0.05 (1.8)
Packed Weight for Liner and Bulkhead (without pallet),
kg (lbs)
17 (37.5)
Pre-installed Tape
Bulkhead
Two-track zipper
Body

8/26
GrainPro® TranSafeliner™ Bulk Instruction Manual
MA4045RAD1114-5
4.2 BULKHEAD
PARAMETERS
BULKHEAD
Material
Woven Coated Polyethylene
Thickness, microns
508±10%
Color
Black
Material Weight, g/m2
320
Product Life, years
2
Warranty, year
1
Dimension (DxE), cm (inch)
229X246 (90x97)
5. INSTALLATION
5.1. PREPARATION
5.1.1.Workers should not wear shoes with spikes
that might cause damage to the TSL.
5.1.2. The TSL Bulk is designed for a standard
20-foot container van.
5.1.3. Check the moisture content of the
commodity using Moisture Meter to ensure
the MC is at a safe level for storage.
Recommended Moisture Content:
Coffee –11.5 - 12%
Cocoa –6-7%
Maize –14%
Wheat –13%

9/26
GrainPro® TranSafeliner™ Bulk Instruction Manual
MA4045RAD1114-5
5.1.4. Ensure that container floor and wall are
free of any sharp objects that may damage
the liner.
5.1.5. Place a mat or thick cardboard on the floor
as an additional protection for the TSL
Bulk.
5.1.6.Carefully unfold the TSL Bulk. Lay TSL Bulk
with the pre-installed tape facing upward.
5.1.7.Pull the top portion to unfold.
5.1.8. Secure one end of the nylon rope (flexible
nylon cord) into the hook located on the
side wall of the container van.

10/26
GrainPro® TranSafeliner™ Bulk Instruction Manual
MA4045RAD1114-5
5.1.9. Pull and insert the rope to the next hook.
5.1.10. Insert the free end of the nylon rope into
the first pre-installed tape. The pre-
installed tapes in the TSL should be
positioned in-between the hooks (except
for the first pre-installed tape near the
TSL zipper).
Note: Do not insert nylon rope into the
pre-installed tapes aligned with
container’s hooks.
5.1.11. Hanging of liner should be done by
completing one side of the container first
starting from the door, then going around
the ceiling of the container by following
the steps in 5.1.9. and 5.1.10.
5.1.12. One person should hold and pull the rope
while the other person continues to hang
the liner and complete the setup.
5.1.13. Insert the rope into the pre-installed
tapes and hooks in uniform direction to
easily retrieve the rope after loading.
5.1.14. Apply proper tension and secure the
nylon rope to minimize sagging of liner
for ease of loading.

11/26
GrainPro® TranSafeliner™ Bulk Instruction Manual
MA4045RAD1114-5
5.2. BULKHEAD INSTALLATION
5.2.1. Install the top and outside portion of the
Bulkhead using the straps into the container
door. Secure the straps into the first hooks of
the container ceiling.
5.2.2. Insert the excess portion of the WPE bulkhead
under the TSL Bulk liner.
5.2.3. Position 1.5” GI pipes of approximately 235 cm
length horizontally into the container’s door
starting from bottom to top. Insert the pipes in
the installed loops of WPE bulkhead. Anchor
pipes to the groove of container’s wall.
5.2.4 Install four (4) GI pipes (NOT INCLUDED in the
TSL Bulk Package) for support, 0.4 m apart.
Material –1 1/2" G.I. Pipe Schedule 40
Size (Diameter) = 38 mm (1 ½ in.)
Wall Thickness = 3.68 mm (0.145 in.)
Length –Approximately 235 cm (92.52 inch)
Quantity –4 pieces
5.3. TSL BLOWER INSTALLATION
5.3.1. Blower is utilized for ease in loading operations
when using auger or conveyor. The blower is
installed at the top portion of the container door
using bracket or holder prior to loading. The
following specifications are required for blower
fabrication:
A-Clamp
B- Angle Bar (1 1/2” x 1 1/2” x 1/16”)
C- Angle Bar (1” x 1” x 1/16”)
D-Blower
5.4 TSL BLOWER (NOT INCLUDED) COMPONENTS AND SPECIFICATIONS
5.4.1. Bracket for Blower
Material-Steel
Bar/F Clamp,
A-30 cm (12 inch)

12/26
GrainPro® TranSafeliner™ Bulk Instruction Manual
MA4045RAD1114-5
5.4.2 Angle Bar (1 1/2” x 1 1/2” x 1/16”) – cm (inch)
B-50 (20)
C-1.9 (0.8)
D-1.2 (0.5)
E-0.5 (0.2)
5.4.3 Angle Bar (1” x 1” x 1/16”) – cm (inch)
F-20 (7.9)
G-1.2 (0.5)
H-1.2 (0.5)
I- 9.5 (3.7)
J-1.2 (0.5)
K-1.2 (0.5)
L-0.5 (0.2)
5.4.4 Blower
M - 25.4 cm (10 in.)
N - 8.9 (3.5 in.)
Type- Axial Flow Fan
Rated Speed, rpm-2200/2100 ± 10%
Maximum Air Flow-1165 m3/hour
(686 ft3/min)
Rated Voltage, Voltage Rating for AC-
110-120/220-240
5.5. LOADING
5.5.1. Secure the bulkhead by closing one side
of the container door during loading.

13/26
GrainPro® TranSafeliner™ Bulk Instruction Manual
MA4045RAD1114-5
5.5.2. Install blower clamp into the container
ceiling.
5.5.3. Load commodity into the bulk loading port.
5.5.4.Use screw conveyor or grain auger that
can be inserted through the loading port of
the TSL Bulk positioned at the upper end
of the liner. Use of blower is recommended
for easy loading.
5.5.5. Make sure to leave at least 20 cm space
between the roof of the container and the
top of the commodity to prevent
condensation.
Bulk Loading Port

14/26
GrainPro® TranSafeliner™ Bulk Instruction Manual
MA4045RAD1114-5
5.6. USE OF DESICCANTS/DRY BAGS (REQUIRED)
Hygroscopic commodities, such as cocoa, coffee,
and various nuts and grains, are particularly
susceptible to mold and rot when exposed to
condensation and humidity. But desiccant bags
inside the TSL will protect goods against
condensation and moisture damage.
5.6.1. Usage requirement:
a. One-thousand two-hundred (1200) grams of GrainPro Dry Bags per 20-footer.
Note: 1 GrainPro Dry Bag contains 200 grams of calcium chloride.
5.6.2. Place the GrainPro Dry Bags in perforated bags or sacks to prevent direct contact with
commodity. Position the Dry Bags on top of the loaded commodity.
5.7. PLASTIC VALVE INSTALLATION FOR PRESSURE DECAY TEST (PDT)
AND CO2OR O2READING USING AN ANALYZER
Install plastic valve before sealing or zipping the liner. Conduct PDT after sealing. CO2or O2reading
(optional) is taken upon arrival of the container to verify the integrity of the TSL’s hermeticity. After
use, close the plastic valve.
5.7.1. Plastic valve components:
Cap –To open and close the valve
Body –Where tube or hose is inserted for
PDT and CO2or O2reading
Base –Use for piercing the liner
5.7.2. Disassemble the plastic valve by
unscrewing the base.
Body
Base
Cap

15/26
GrainPro® TranSafeliner™ Bulk Instruction Manual
MA4045RAD1114-5
5.7.3. Pierce the TSL Bulk using the plastic valve
base. Piercing is done from the inner side
of the TSL (approximately 20 cm from the
zipper).
5.7.4. Screw the plastic valve body. The cap of
the plastic valve should be positioned
outside the loaded TSL Bulk.
5.8. SEALING
5.8.1. Untie the nylon rope from the side wall of
container van.
5.8.2. Pull the rope out of the container to provide
space between roof and liner for air
circulation.

16/26
GrainPro® TranSafeliner™ Bulk Instruction Manual
MA4045RAD1114-5
5.8.3. Pull the ends of the TSL Bulk zipper for
sealing.
5.8.4. Positioning of zipper slider:
a) Manually zip a few centimeters enough
to initially engage the slider.
b) Position the slider on the manually
zipped portion of the zip lock.
5.8.5. Two persons are required for ease in
zipping the TSL Bulk.
a) One person will do the zipping and the
other person holds the other end
steadily making both sections of the
zipper in a straight line to avoid the
zipper length being misaligned.
b) Moving the slider while the zipper or
slider is not straight forces one of the
zipper section to elongate.
c) If uneven zipper ends are observed,
both ends of the zipper should be
slightly stretched and do the zipping
from end to end.
Zipper
slider

17/26
GrainPro® TranSafeliner™ Bulk Instruction Manual
MA4045RAD1114-5
5.9. PRESSURE (VACUUM) DECAY TEST
5.9.1. After zipping, perform a pressure
(vacuum) decay test (PDT) to ensure gas-
tightness:
a. Use digital manometer.
b. Either, a commercially available or
improvised U-tube manometer can be
used to monitor the pressure.
5.9.2. Connect the manometer hose to the
flexible adapter hose previously installed
in the TSL.
5.9.3 Twist the plastic valve cap to open.
5.9.4 Use a vacuum pump (at least 2.3-cubic
meters per minute:
a) Create at least -250 Pascals (Pa) or -25
millimeters’ water (mm H2O) vacuum.
Partially open portion of the zipper and
insert the vacuum pump.

18/26
GrainPro® TranSafeliner™ Bulk Instruction Manual
MA4045RAD1114-5
b) For it to be considered sufficiently
airtight, the initial vacuum should not be
decreased by more than one-half (½) of
the final vacuum (created by the
vacuum pump) within five (5) minutes.
c) If the PDT test failed, check for
holes/tears and poorly sealed zippers
then repeat the PDT procedures. Failed
PDT test indicates a non-gastight
installation.
5.9.5 After conducting PDT, twist the plastic
valve to close.
5.10. INSTALLING THE FLEXIBLE ADAPTER HOSE FOR CO2OR O2READING
To ensure gas-tightness, the container with TSL can be checked using the CO2 analyzer or O2
analyzer
5.10.1. The flexible adapter hose is included in the GrainPro Carbon Dioxide Analyzer or the user
can find equivalent flexible hose from local hardware using the specifications as shown:
Inner Diameter
4 mm (0.16 in.)
Length
>5 cm (2 in.)
5.10.2. This mixing of the CO2with the remaining air, and absorption of CO2by the commodity,
takes 12-24 hours depending on temperature. Measure O2or CO2at least 24 hours after
sealing.
5.10.3. When taking the carbon dioxide or
oxygen reading, install the flexible
adapter hose into the plastic valve.

19/26
GrainPro® TranSafeliner™ Bulk Instruction Manual
MA4045RAD1114-5
5.10.4. Twist the plastic valve cap to open.
Connect the O2or CO2analyzer to the
flexible adapter hose and the reading.
5.10.5. After taking the oxygen or carbon dioxide
reading, twist the plastic valve cap to
close.
5.11. USING OXYGEN ANALYZER FOR MONITORING (WITHOUT CO2 FLUSHING) - OPTIONAL
5.11.1. Use of an oxygen analyzer:
a. Oxygen level can be checked upon
arrival of the container with TSL Bulk.
b. Using the analyzer, the oxygen level
can be checked through the plastic
valve with flexible adapter hose
before unloading. Decreased oxygen
level indicates absence of any source
of leaks from punctures, holes or
damages. Oxygen level of ambient air
is 20.9%.
c. Close plastic valve after testing.
5.12. USING CARBON DIOXIDE ANALYZER FOR MONITORING (WITHOUT CO2FLUSHING) -
OPTIONAL
The GrainPro CO2analyzer uses a non-dispersive infrared radiation (NDIR) sensor for the detection
of carbon dioxide. When a sensor encounters a target gas, voltage signal is generated in proportion
to the gas concentration. This voltage signal is amplified, digitized and displayed on the instrument’s
OLED display.

20/26
GrainPro® TranSafeliner™ Bulk Instruction Manual
MA4045RAD1114-5
5.12.1. Using the carbon dioxide analyzer:
a. Upon arrival, the container with TSL
can be checked using the CO2
analyzer.
b. Using the analyzer, carbon dioxide
level can be checked through the
plastic valve with flexible adapter hose
before unloading. Increased carbon
dioxide level indicates absence of any
source of leaks from punctures, holes
or damages. CO2level of ambient air is
0.04%.
5.12.2. Monitoring of carbon dioxide level is recommended to ensure control of insect infestation.
Details of using CO2analyzer are discussed in the analyzer’s instruction manual.
5.13. CARBON DIOXIDE (CO2) SAFETY
5.13.1. Carbon dioxide does not support life. It can act as a simple asphyxiant by diluting the
concentration of oxygen in air below the levels necessary to support life. As it is heavier than
air it will tend to concentrate at lower levels.
5.13.2. Avoid breathing in CO2. Do not get in eyes, on skin, or on clothing. Wear leather safety gloves
and safety shoes when handling cylinders.
5.13.3. Protect cylinders from physical damage. Do not drag, roll, slide or drop. While moving
cylinder, always keep the removable valve cover in place. Never attempt to lift a cylinder by
its cap; the cap is intended solely to protect the valve. When moving cylinders, even for short
distances, use a cart (trolley, hand truck, etc.) designed to transport cylinders.
5.13.4. Never insert an object (e.g., wrench, screwdriver, and pry bar) into cap openings; doing so
may damage the valve and cause a leak. Use an adjustable strap wrench to remove over-
tight or rusted caps. Slowly open the valve. If the valve is hard to open, discontinue use and
contact your supplier.
5.13.5. Close the container valve after each use; keep closed even when empty.
5.13.6. Never apply flame or localized heat directly to any part of the container. High temperatures
may damage the container and could cause the pressure relief device to fail.
5.14. PROCEDURE FOR PURGING WITH CARBON DIOXIDE (CO2)
5.14.1. Calculation:
a) Total Volume – Volume Occupied by the Commodity.
b) For every 2.0 kg CO2, 1 cubic meter of gas is being released.
c) Formula: (1 minus bulk density) x Volume (in m3) x 2
Recommendations:
•If commodity temperature is at 15 deg Celsius or below, there is no need for TSL.
•If commodity temperature is 15-20 deg Celsius, use TSL without carbon dioxide flushing but
fumigation should be conducted upon arrival.
•If commodity temperature is above 20 deg Celsius, use TSL with carbon dioxide flushing.
Other manuals for TRANSAFELINER
2
Table of contents
Other GrainPro Farm Equipment manuals

GrainPro
GrainPro TRANSAFELINER MA3001RR0208-21 User manual

GrainPro
GrainPro TRANSAFELINER BULK User manual

GrainPro
GrainPro TRANSAFELINER MA4081RAD1219-01 User manual

GrainPro
GrainPro COLLAPSIBLE DRYER CASE II User manual

GrainPro
GrainPro GRAINSAFE 1.0/GHF User manual

GrainPro
GrainPro TRANSAFELINER User manual

GrainPro
GrainPro GRAINSAFE BAG-1.0 User manual