FILLON TECHNOLOGIES PROSHAKER User manual

PROSHAKER
E00490D
171/4 in
440mm
16
410mm
44
1120mm
TM
7.87 in.
(200mm)
3
1
2
3
1
2
3
4
2.1
6.88 in.
(175 mm)
6.88 in.
(175 mm)
7.87 in.
(200mm)
2
4
30°
4.1
4.3
oil
4.2
Kit 1
Kit 2
30°
Kit 3
TM

I - IMPORTANT
Read and follow t ese instructions carefully to ensure proper
operation of your New Paint S aker. T e limited warranty does not cover
damage caused by incorrect pressure, neglect, abuse, or lack of lubrication.
II WARNING
1. DO NOT USE THIS MACHINE in damp or poorly lit conditions.
2 . KEEP CHILDREN AWAY. C ildren must never be allowed in t e
work area.
3 . STORE IDLE EQUIPMENT. W en not in use, t is tool must be locked
up in a dry location to in ibit rust.
4 . DO NOT PUSH THIS MACHINE beyond its specified capacity or use
for a purpose for w ic it is not intended.
5 . DRESS APPROPRIATELY. Do not wear loose clot ing or jewelery.
Long air must be attac ed and non- anging.
6 . USE LOCALLY APPROVED PROTECTION EQUIPMENT. Always use
c emical splas impact goggles and respirator adapted to t e type of paint
being used.
7 . DO NOT REACH OVER OR ACROSS RUNNING MACHINES.
8 . NEVER UNPLUG THIS MACHINE by pulling on t e power cord from
a distance. Always use t e back side of t e plug w ic is intended for t is
purpose.
9 . ALWAYS RESPECT THIS MACHINE MAINTENANCE PLAN indicated
in section V.
10 . REMOVE ALL AJUSTING KEYS AND WRENCHES FROM THE
MACHINE or mac ine work surface before starting or attac ing t e air line.
11 . AVOID UNINTENTIONAL STARTING.
12 . STAY ALERT do not operate t is mac ine if you are tired or under t e
influence of alco ol or drugs. Read warning labels on prescriptions to
determine if your judgment or reflexes are impaired w ile taking medication,
if t ere is a doubt, do not operate t e mac ine.
13 . CHECK DAMAGED PARTS carefully to determine t at it will perform
its intended function. Verify t e alignment and binding of moving parts.
Damaged parts s ould be repaired or replaced by a qualified tec nician.
14 . USE ONLY accessories and replacement parts intended for use wit
t is mac ine. Use of any ot er parts will void t e warranty. Replacement
parts are available from FILLON TECHNOLOGIES.
15 . DRAIN THE COMPRESSOR EVERY DAY. Do not allow moisture to
build up inside of t e compressor. Do not allow compressor to sit pressurized
for longer t an one our.
16 . MAKE SURE ALL THE EQUIPMENT IS RATED TO THE
APPROPRIATE CAPACITY. Make sure t at regulator is set at least 100
PSI (7 bars) lower t an t e lowest rated piece of equipment you are using.
17 . MAKE SURE THE LID IS SECURELY CLOSED before positionning
can on t e on t e PROSHAKER.
- NEVER USE SILICON OILS OR GREASES IN PAINT SHOP !
- DO NOT OPERATE ON COMPRESSED NITROGEN OR OTHER INERT
GASES WITHOUT POSITIVE VENTILATION IN THE WORK AREA !
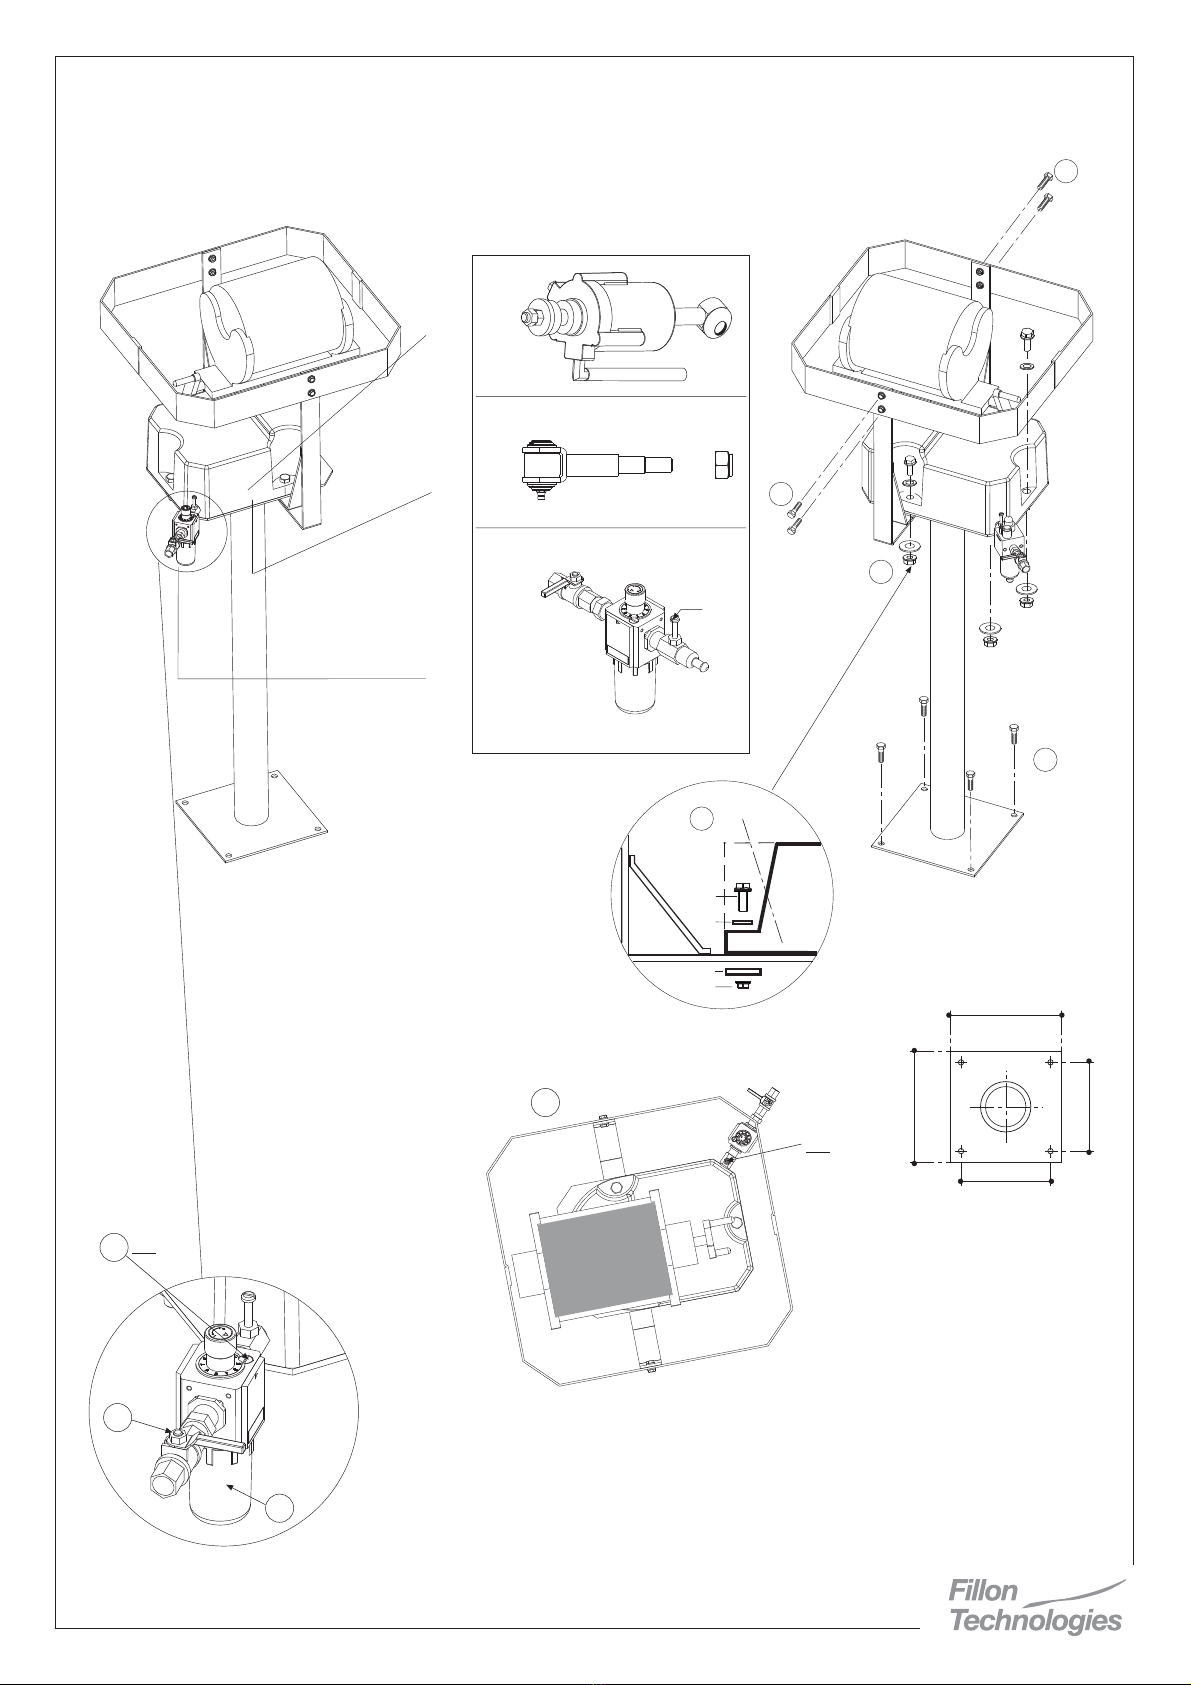
III - INSTALLATION
1-Bolt pedestal securely to t e floor. 4 provided screws and bolts wit
expansion to a concrete floor fig.1
2- Screw t e PROSHAKER and t e brackets on t e pedestal
fig.2 and fig.2.1 and mount t e protection belt and its brakets fig.3
-Make sure all bolts are secure.
3- Mount air lubricator fig.4 to t e PROSHAKER using a flexible air pipe
of 1.20m leng maximum, according to t e pressure of utilisation.
If t e air feed system is over loaded wit water or dirty, it is recommanded
to install a separator filter. Make sure t at t e air lubricator is mounted in
t e rig t direction (air flow in t e direction of t e arrow). All air connections
ave to be equipped wit a sealing gasket. T e seal must be securely
fitted, t en screw down t e tank again manually.
4- Unscrew t e tank manually and fill it wit oil to 3/4 full.
T e device is equipped wit an air lubricator wit tank w ic must be filled
to 3/4 full wit oil before starting. T e upper part of t e (clear plastic) may
be damaged by certain solvents or synt etic oils. Use oil w ic is
recommended for pneumatic tools,wit low viscosity classified 150VG15
or level 2 at 122°F (50°C) on t e Engler viscosity table.
5- Connect your PROSHAKER to t e air inlet 70 to 120 PSI (5 to 8 bars)
if air input is superior to 120 PSI (8 bars) add a reducing value upstream
of air pipe.
IV - OPERATION
After filling t e tank and connecting t e air source to t e PROSHAKER,
put in one (1) drop of lubricating oil, by turning t e screw fig.4.2 counter.
clockwise (s aker running).Do t is for eac usage.
CLAMP can firmly, but avoid crus ing can. Tig ten cans and aerosol wit
lids towards clamp andle. Clamp square gallons lid up, long sides against
clamp jaws, corners resting on jaw cradles. Tig ten square gallons securely
wit can straig t up.
WATCH SQUARE GALLONS AND AEROSOL CANS WHILE SHAKING
to make sure t ey don't leak or come loose.
DO NOT SHAKE AEROSOLS FOR MORE THAN ONE (1) MINUTE.
DO NOT SHAKE AEROSOLS IF CAN TEMPERATURE IS OVER 104°F
(40°C).
START AND STOP s aker by opening and closing control
valve fig. 4.3 quickly, about 1/4 turn. If s aker stops exactly at center position
or is not getting enoug oil, it may not start automatically. Pull can clamp
quickly to one side and let go to start or close control valve, cock can clamp
to one side and re-start.
NOTE :
DO NOT FORCE the adjustment knob or screw. It sto s when fully o en
or closed.
CHECK OIL LEVEL once a week; Unscrew lubricator bowl and dum
watery/milky oil out. Refill to level mark with air tool oil and carefully
reinstall. Make sure bowl gasket ring is in lace and screw bowl on straight.
Recommanded Sha e Time : 2 minutes more for severely settled roducts
or low air ressure.
V MAINTENANCE
Before starting any maintenance operations make sure t at t e
PROSHAKER is disconnected.
If t e s aking angle is incorrect (difference of about 30°) regulate it wit
t e adjusting screw.
Lubrication of mechanical parts.
Every t ree (3) mont s ( more often in severe service, dusty atmosp ere)
lubricate clamps adjusting screw manually and t e
two lubricators wit a grease pump. T e cap lubricator is under t e ousing
and t e adjusting clamps ave to be pus ed to t e left, in order to seet roug
t e air ole.
Periodical visual control of air pipes and t eir fittings. T ey ave to be
c anged in case of deterioration.
C eck t e air lubcatior tank oil level. Fill it to 3/4 full if necessary.
Periodical control of t e w ole installation, to make sure t at it is securely
anc ored.
VI- SPECIFICATIONS
Air Pressure : 70 to 120 PSI (5 to 8 bars). W en Line pressure is over
120PSI (8 bars) add a reducing value upstream of air pipe.
Air Consumption : Approximately 4.3 CFM(7m / ) free air wit 4 liter
can (0.88 gal.) at 30° s ake angle. Speed : Up to 700 cycles/minute at
30° s ake angle. Adjustable at control valve, automatically compensates
for can size.
S ake Angle : If operating at over 120 PSI (6 bars) pressure, adjust s ake
angle to 30° wit full gallon(4 liter) can.
Capacity : 0.5 L t roug 5 liter round cans, including gallons, most aerosols
(wit caps) and square cans. Up to 15.45 lbs.
(7 kg) gross can weig t.
Recommended Oil : use oil wic is especially recommended for pneumatic
tools,wit low viscosity classified ISO VG15 or level 2 at 50°C on t e Engler
viscosity table. Do not use motor oil.
Grease : Multipurpose calcium or lit ium-based c assis grease.
Weig t : S aker, 9 kg(19.84 lbs.); Pedestal 4,5 kg(9.92 lbs.)
VII TROUBLESHOOTING
1°) EXCESSIVE VIBRATION:
- Can over 7 kg (15.4 lbs.), or catalyzed solid
- readjust s ake angle (too large)
2°) RUNS TOO SLOW OR STOPS :
- Starved for oil, or fouled wit motor oil
- Air pressure low
- Air supply restricted
- Inlet Fitting or Control Valve blocked
-Your network Final filter element clogged
- Relief valve stuck open
- Valve discs dirty
- Or piston seals damaged
3°) HARD STARTING
- Not enoug air oil, improper oil
- Angle adjusting screw turned in too far
- S aker turned off too slowly, dead centering
- Broken wear ring / bad piston seal (oil starvation)
- Air contamination (residue, excess winter)
4°) LUBRICATOR WON'T WORK :
- Out of oil
- Clogged drip passage (remove bowl and blow air t roug tube)
- Excess vibration preventing drip visibility
- Air leak in oiler body or bowl
- Missing bowl gasket or fill screw "0" ring
- Knob turned closed
- Bowl t reads damaged
- Installed backwards
5°) NOISY OPERATION
- Can Clamp loose
- Can lids flexing
- Bad bearing
- Damaged/broken parts
- Bottom of s aker ousing open to room
6°) USES AIR EXCESSIVELY:
- S ake angle too large
- Relief valve stuck or broken
- Bad piston seal or rod seal
(oil starvation)
7°) LEAKS OIL :
- Housing not sealed to
pedestal. Reseal, apply
sealant all around bolt oles.
- More t an one drop of oil
for eac use.
USER MANUAL PROSHAKER
For professional use only
3
W
NO.
REF.
TYPE
Lmax
BEIJING FILLON PICHON PR CHINA
FILLON PICHON
to ord r spar part :
Mention all t e information
provided on t e manufacturers
identification plate, t e part item
number given on t e manual,
and t e quantity.
This manual suits for next models
1
Other FILLON TECHNOLOGIES Paint Sprayer manuals


