FILLON TECHNOLOGIES Fill-One User manual

Fill-One
E09630A Fill-One

2
Fill-One by Fillon Technologies
ES -
ÍNDICE
INSTALACIÓN DE LA MÁQUINA p4
CONEXIÓN A LA RED NEUMÁTICA p10
UTILIZACIÓN DE LA MÁQUINA p11
LIMPIEZA DE LA MÁQUINA EN CASO DE SALPICADURA DE PINTURA p22
CONSIGNAS DE SEGURIDAD p31
DECLARACIÓN DE CONFORMIDAD CE p33
LISTA DE LAS PIEZAS DE RECAMBIO p34
PARA PEDIR UNA PIEZA DE RECAMBIO A LOS DISTRIBUIDORES p35
ANÁLISIS DE RIESGOS p44
DISFUNCIONES/ SOLUCIONES p46
FR -
TABLE DES MATIÈRES
INSTALLATION DE LA MACHINE p4
CONNEXION AU RÉSEAU PNEUMATIQUE p10
UTILISATION DE LA MACHINE p11
NETTOYAGE DE LA MACHINE EN CAS DE PROJECTION DE PEINTURE p22
CONSIGNES DE SÉCURITÉ p31
DÉCLARATION DE CONFORMITÉ CE p32
LISTE DES PIÈCES DÉTACHÉES p34
COMMANDER UNE PIÈCE DÉTACHÉE p35
ANALYSE DE RISQUE p40
DYSFONCTIONNEMENTS/ SOLUTIONS p42
EN -
TABLE OF CONTENTS
MACHINE INSTALLATION p4
CONNECTION TO THE PNEUMATIC NETWORK p10
MACHINE USE p11
CLEANING THE MACHINE IN THE EVENT OF PAINT SPLATTERS p22
SAFETY INSTRUCTIONS p31
EC DECLARATION OF CONFORMITY p32
SPARE PARTS LIST p34
TO ORDER A SPARE PART FROM DISTRIBUTORS p35
RISK ANALYSIS p36
MALFUNCTION/ SOLUTIONS p38

3
Fill-One by Fillon Technologies
FR
- 1 perçeuse
- 1 clé Allen de 4 mm (5/32 inch)
- 1 clé plate de 17 mm (11/16 inch)
- 1 foret de 10 mm (13/32 inch)
- 1 mètre
- 1 crayon
- 1 raccord pneumatique mâle ¼ gaz,
compatible avec votre réseau
pneumatique
MACHINE INSTALLATION
INSTALLATION DE LA MACHINE
INSTALACIÓN DE LA MÁQUINA
Before using the Fill-One machine, read the following
carefully:
• Machine instructions
• Safety Instructions,
• Risk Analysis,
• List of material required and not provided.
EN -
FR -
ES -
EN
- 1 drill
- 1 4mm (5/32 inch) Allen key
- 1 17mm (11/16 inch) open-end
wrench
- 1 10mm (13/32 inch) diameter
drill bit
- 1 tape measure
- 1 pencil
- 1 ¼ gas male pneumatic
connection compatible with your
pneumatic network
EN : Translation of the original version - FR : «Original version».
Avant la mise en service de la machine, lire
attentivement :
• La notice,
• Les consignes de sécurité,
• L’analyse de risque,
• Le matériel requis et non fourni.
Antes de poner en marcha la máquina Fill-One lea
atentamente:
• Las instrucciones de uso de la máquina,
• Las consignas de seguridad,
• El análisis de riesgos,
• El material necesario que no se suministra
con el aparato.
FR : Version originale.
ES : Traducción de la versión original - FR : «Versión original».
ES
- 1 taladro
- 1 llave Allen de 4 mm (5/32 inch)
- 1 llave plana de 17 mm (11/16
inch)
- 1 broca de 10 mm de diámetro
(13/32 inch)
- 1 metro
- 1 lápiz
- 1 empalme neumático macho
¼ gas compatible con otra red
neumática

4
Fill-One by Fillon Technologies
Contents of the package:
1 - a Fill-One machine
2 - a cup support
3 - a tube + a ¼ gas female pneumatic connection
4 - a screw and a washer
5 - a set of instructions
EN - 1)
FR - 1)
ES - 1)
Contenu du colis :
1 - une machine Fill-One
2 - un support godet
3 - un tuyau + un raccord pneumatique femelle ¼ gaz
4 - une vis et une rondelle
5 - une notice
Contenido del paquete:
1 - una máquina Fill-One
2 - un soporte del recipiente
3 - un tubo + un empalme neumático hembra ¼ gas
4 - un tornillo y una arandela
5 - unas instrucciones de uso

5
Fill-One by Fillon Technologies
Mark and drill two holes to fix the machine to the work surface.
EN - 2) & 3)
FR - 2) & 3)
ES - 2) & 3)
Marquer et percer deux trous pour implanter la machine sur le plan de travail.
Marcar y hacer dos agujeros para instalar la máquina en la superficie de trabajo.

6
Fill-One by Fillon Technologies
- Turn the machine over
- Remove the pneumatic tube by pushing
the connector locking ring down
- Hold the position and pull the tube up.
- Turn the machine the right way up.
- Pass the pipe up through hole 1(previously
drilled in the work surface).
EN - 4)
EN - 5)
- Retourner la machine.
- Retirer le tuyau pneumatique en poussant
l’anneau de blocage du raccord vers le
bas.
- Maintenir la position et tirer le tuyau vers
le haut.
FR - 4)
- Darle la vuelta a la máquina
- Retirar el tubo neumático desplazando
el anillo de bloqueo del empalme hacia
abajo.
- Mantener la posición y tirar del tubo hacia
arriba.
ES - 4)
- Reposer la machine à l’endroit.
- Passer le tuyau du bas vers le haut dans
le trou 1(préalablement percé dans le plan
de travail).
FR - 5)
- Colocar la máquina en su sitio
- Pasar el tubo de abajo hacia arriba por
el orificio 1(previamente realizado en la
superficie de trabajo).
ES - 5)

7
Fill-One by Fillon Technologies
Insert the tube in through the hole
underneath and to the rear of the machine
base, then fit into the connection.
EN - 6) & 7)
FR - 6) & 7)
ES - 6) & 7)
Passer le tuyau de l’extérieur vers l’intérieur
par le trou situé au dessous et à l’arrière
de la base machine puis l’insérer dans le
raccord.
Pasar el tubo de afuera hacia adentro por
el orificio situado por debajo y por detrás
de la base de la máquina y a continuación
insertarlo en el empalme.

8
Fill-One by Fillon Technologies
EN - 8)
FR - 8)
ES - 8)
- Passer la vis fournie par le trou 2
- Visser en butée pour bloquer la machine sur le plan de travail.
Ne pas pincer le tuyau pneumatique.
- Pasar el tornillo suministrado por el orificio 2
- Atornillar a tope para sujetar la máquina a la superficie de trabajo.
Procure no pinzar el tubo neumático.
- Insert the screw provided through the hole 2
- Screw as far as it will go to lock the machine on to the work surface.
Make sure that you do not pinch the pneumatic tube.

9
Fill-One by Fillon Technologies
The pneumatic network must deliver dry, filtered air.
Quick connection not provided.
- Connect the machine to the pneumatic feed: the pipe is fitted with the ¼ gas female
connector.
- Find a male connector which is compatible with your installation.
- The network must deliver pneumatic pressure between 7 and 9 bar / 100 and 130 psi.
CONNECTION TO THE PNEUMATIC NETWORK
CONNEXION AU RESEAU PNEUMATIQUE
CONEXIÓN A LA RED NEUMÁTICA
Quick connection not provided
Raccord rapide non fourni
Empalme rápido no suministrado
EN - 9)
FR - 9)
ES - 9)
Le réseau pneumatique doit délivrer de l’air filtré sec. (Raccord rapide non fourni).
- Connecter la machine à l’alimentation pneumatique : le tuyau est équipé d’un raccord
femelle ¼ gaz.
- Se munir d’un raccord mâle, compatible avec votre installation.
- Le réseau doit délivrer une pression pneumatique entre 7 et 9 bars / 100 et 130 psi.
La red neumática debe liberar aire filtrado seco. Empalme rápido no suministrado.
- Conectar la máquina a la alimentación neumática: el tubo está equipado con un empalme
hembra ¼ gas.
- Consiga un empalme macho compatible con su instalación.
- La red debe liberar una presión neumática de entre 7 y 9 bares / 100 y 130 psi.

10
Fill-One by Fillon Technologies
MACHINE USE
UTILISATION DE LA MACHINE
UTILIZACIÓN DE LA MÁQUINA
- Safety glasses mandatory
- Port des lunettes obligatoire
- Uso obligatorio de gafas
- Naked flame prohibited
- Flamme nue interdite
- Prohibidas las llamas desnudas
- Do not smoke
- Ne pas fumer
- No fumar
Remove the cap from the aerosol and
remove the diffuser.
EN - 10)
FR - 10)
ES - 10)
Retirer le capuchon de l’aérosol puis enlever
le diffuseur.
Retirar el capuchón del aerosol y a
continuación extraer el difusor.

11
Fill-One by Fillon Technologies
- Place the cup support on the aerosol valve
and press hard downwards.
- Lower the platform.
- Insert the empty “aerosol/cup support”
assembly into the machine.
- Adjust the platform so that the cup
support is on the lower flange (view A) and
the aerosol slightly resting on the platform
(view B).
- Remove the “aerosol/cup support”
assembly.
EN - 11)
FR - 11)
ES - 11)
EN - 12)
FR - 12)
ES - 12)
- Placer le support godet sur la valve de
l’aérosol en exerçant une forte pression
vers le bas.
- Abaisser la plateforme.
- Insérer dans la machine, l’ensemble
« aérosol/support gobet » vide.
- Colocar el soporte del recipiente sobre la
válvula del aerosol presionando con fuerza
hacia abajo.
- Bajar la plataforma.
- Introducir en la máquina el conjunto de
“aerosol/ soporte de recipiente” vacío.
- Ajuster la plateforme afin que le support
godet soit en appui inférieur (vue A) et
l’aérosol en léger appui sur la plateforme
(vue B).
- Retirer l’ensemble « aérosol/ support
godet ».
- Ajustar la plataforma para que el soporte
del recipiente se apoye en la parte inferior
(vista A) y el aerosol ligeramente sobre la
plataforma (vista B).
- Retirar el conjunto de “aerosol / soporte
del recipiente”.

12
Fill-One by Fillon Technologies
- Remove the disk from the aerosol cap.
- Place the disk on the piston head.
Press hard upwards.
EN - 13 & 14)
FR - 13 & 14)
ES - 13 & 14)
- Retirer le disque du capuchon de l’aérosol.
- Placer le disque sur la tête du piston.
Appuyer fortement vers le haut.
- Retirar el disco del capuchón del aerosol.
- Colocar el disco sobre la cabeza del pistón.
Presionar con fuerza hacia arriba.

13
Fill-One by Fillon Technologies
- Remove the cap from the aerosol and lift the diffuser out of the aerosol.
- Place the cup support on the aerosol valve and press hard downwards.
- Insert the cap in the cup support.
EN - 15, 16 & 17)
FR - 15, 16 & 17)
ES - 15, 16 & 17)
- Retirer le capuchon de l’aérosol puis enlever le diffuseur de l’aérosol.
- Placer le support godet sur la valve de l’aérosol en exerçant une forte pression vers le
bas.
- Insérer le capuchon dans le support godet.
- Retirar el capuchón del aerosol y a continuación extraer el difusor.
- Colocar el soporte del recipiente sobre la válvula del aerosol presionando con fuerza
hacia abajo.
- Insertar el capuchón en el soporte del recipiente.
14
Fill-One by Fillon Technologies
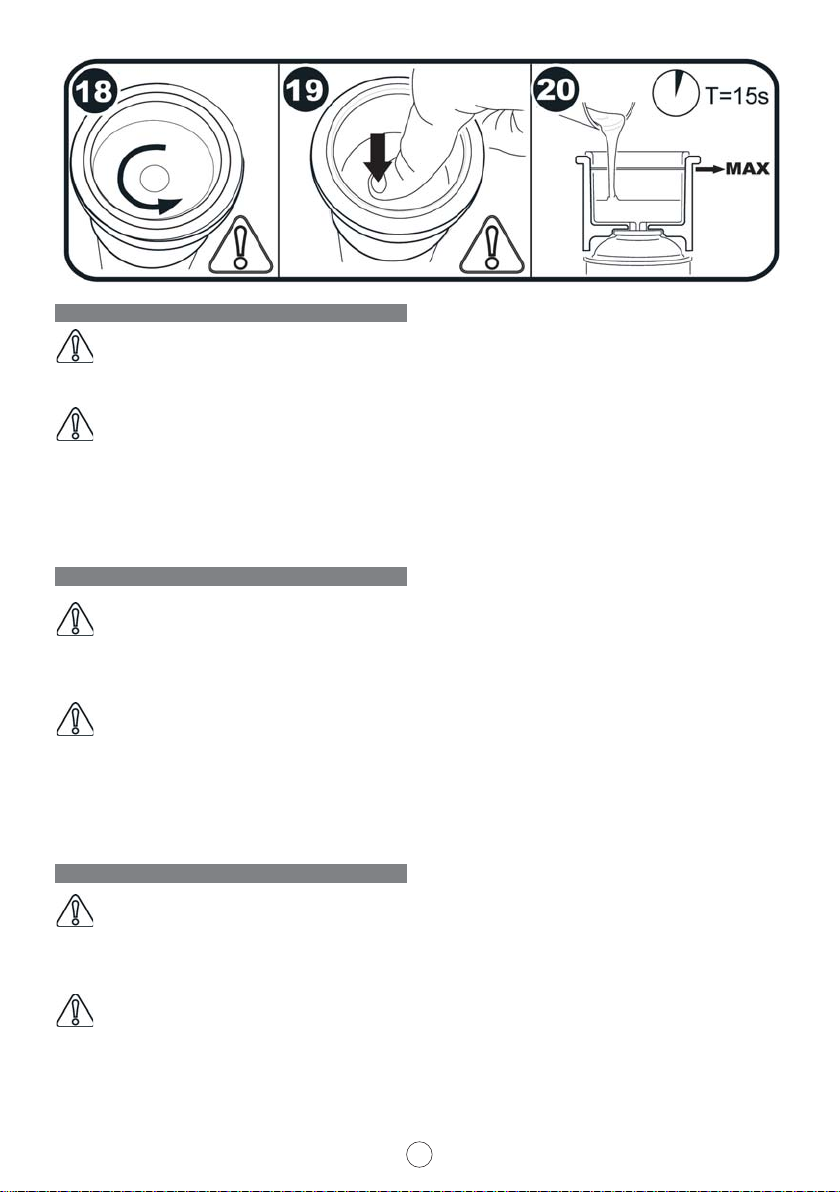
The cap is indexed:
- Rotate the cap on the base of the cup support to fit it in its housing.
- The filling needle must penetrate the aerosol valve: press hard in the middle of the
cup.
- Fill the cap with paint, without exceeding the level indicated through the transparent
cap on the inside of the cup support.
EN - 18, 19 & 20)
FR - 18, 19 & 20)
ES - 18, 19 & 20)
Le capuchon est indexé :
- Effectuer une rotation du capuchon en fond de support godet pour le placer dans son
logement.
- L’aiguille de remplissage doit pénétrer la valve de l’aérosol : exercer une pression
au milieu du godet.
- Remplir le capuchon avec la peinture, sans dépasser le niveau indiqué en transparence,
à l’intérieur du support godet.
El capuchón está indexado:
- Rotar el capuchón en el fondo del soporte del recipiente para situarlo en su
alojamiento.
- La aguja de rellenado debe penetrar en la válvula del aerosol: presionar en el centro
del recipiente.
- Rellenar el capuchón con la pintura sin superar el nivel indicado en la zona transparente,
en el interior del soporte del recipiente.

15
Fill-One by Fillon Technologies
- Insert the “aerosol/cup support/cap/paint” assembly as far as it will go into the
machine.
- Adjust the platform to the assembly if necessary.
EN - 21)
FR - 21)
ES - 21)
- Insérer l’ensemble «aérosol/ support godet/ capuchon/ peinture» en butée dans la
machine.
- Ajuster, si besoin, la plateforme à l’ensemble.
- Introducir el conjunto de “aerosol/ soporte de recipiente/ capuchón/ pintura” a tope
en la máquina.
- Ajustar eventualmente la plataforma al conjunto.

16
Fill-One by Fillon Technologies
DO NOT FORGET THE DISK.
If the disk was not fitted beforehand: a retractable stopper will block the full insertion of
the assembly.
In this case, position the disk on the piston head (see View 14) and start inserting the
assembly again.
EN - 22)
FR - 22)
ES - 22)
NE PAS OUBLIER LE DISQUE.
Si le disque n’a pas été préalablement mis en place : une butée escamotable bloquera la
mise en place de l’ensemble.
Dans ce cas, positionner le disque sur la tête du piston (voir Vue 14) et recommencer
l’insertion de l’ensemble.
NO OLVIDAR EL DISCO.
En caso de que el disco no se haya colocado previamente: un tope plegable bloqueará la
instalación del conjunto.
En este caso, colocar el disco sobre la cabeza del pistón (véanse Vista 14) y repetir la
inserción del conjunto.

17
Fill-One by Fillon Technologies
To activate filling the aerosol, close the door in a single movement, as far as the stopper.
The filling time can vary. Minimum recommended time: 10 seconds.
EN - 23)
FR - 23)
ES - 23)
Pour activer le remplissage de l’aérosol, fermer la porte d’un seul mouvement, en butée.
Le temps de remplissage peut varier. Temps préconisé minimal : 10 secondes.
Para activar el rellenado del aerosol, cerrar la puerta a tope, con un solo movimiento.
El tiempo de rellenado puede variar. Tiempo mínimo recomendado: 10 segundos.

18
Fill-One by Fillon Technologies
Open the door to the stopper and remove
the assembly from its housing.
Remove the cup support from the aerosol.
EN - 24)
FR - 24)
ES - 24)
Ouvrirlaporteenbutéeetretirerl’ensemble
de son logement.
Abrir la puerta a tope y retirar el conjunto
de su alojamiento.
EN - 25)
FR - 25)
ES - 25)
Retirer le support godet de l’aérosol.
Retirar el soporte del recipiente del
aerosol.

19
Fill-One by Fillon Technologies
Press the cup support on to the work surface
to extract the cap.
Remove the cap from the cup support.
EN - 26)
FR - 26)
ES - 26)
Appuyer le support godet sur le plan de
travail pour en extraire le capuchon.
Presionar el soporte del recipiente contra
la superficie de trabajo para retirar el
capuchón.
EN - 27)
FR - 27)
ES - 27)
Retirer le capuchon du support godet.
Retirar el capuchón del soporte del
recipiente.

20
Fill-One by Fillon Technologies
Risk of paint splatters.
Replace the diffuser on the aerosol valve
carefully.
Snap the cap on to the aerosol.
Your product is ready.
EN - 28)
FR - 28)
ES - 28)
EN - 30)
FR - 30)
ES - 30)
Encliqueter le capuchon sur l’aérosol.
Encajar el capuchón sobre el aerosol.
EN - 29)
FR - 29)
ES - 29)
Votre produit est prêt.
Su producto está listo.
Riesgos de salpicaduras de pintura.
Volver a colocar con precaución el difusor
sobre la válvula del aerosol.
Risques de projections de peinture.
Remettre avec précaution le diffuseur sur
la valve de l’aérosol.
Other manuals for Fill-One
1
Table of contents
Other FILLON TECHNOLOGIES Paint Sprayer manuals


