Final Sound 400i User manual

FINAL SOUND 400i Loudspeaker Manual vs. 1.4 -US- c FS 2007RJ 1
.
Final 400i loudspeaker User Manual
release 1.4 –US-
Final Sound B.V. Eisenhowerweg 8D 5466AC Veghel The Netherlands http://www.finalsound.com
Final Sound, L.L.C. 500 West Cummings Park, Suite 2500 Woburn, MA 01801 T:(781) 938-6416 F:(781) 938-6415

FINAL SOUND 400i Loudspeaker Manual vs. 1.4 -US- c FS 2007RJ 2
.
TABLE OF CONTENTS
1.
Safety Instructions.................................................................................................................... 3
2.
Panel Safety .............................................................................................................................. 4
3.
Congratulations ........................................................................................................................ 5
4.
Final Sound Model F400i floor standing loudspeakers........................................................... 6
5.
Final Sound 400i center loudspeaker..................................................................................... 12
6.
Final Sound subwoofer........................................................................................................... 15
7.
Frequently asked questions ................................................................................................... 20
8.
Specifications 400i.................................................................................................................. 24
9.
Warranty .................................................................................................................................. 25
10. Limited Warranty Registration Card ...................................................................................... 27

FINAL SOUND 400i Loudspeaker Manual vs. 1.4 -US- c FS 2007RJ 3
.
1. Safety Instructions
WARNING:
Do not exposure to rain, moisture or high humidity.
Do not open - High voltage inside
Do not cover the speaker. (e.g. with curtains)
Use only a mains-adaptor approved for the country of use.
Refer servicing to a qualified Final Sound dealer.
Important Safety Instructions:
1) Read these instructions.
2) Keep these instructions.
3) Heed all warnings.
4) Follow all instructions.
5) Do not use this apparatus near water.
6) Clean only with dry cloth.
7) Do not block any ventilations openings. Install in accordance with the manufacturer’s instructions.
8) Do not install near any heat sources such as radiators, heat registers, stoves, or other apparatus
(including amplifiers) that produce heat.
9) Do not defeat the safety purpose of the polarized or grounding-type plug. A polarized plug has two
blades with one wider than the other. A grounding type plug has two blades and a third grounding
prong. The wide blade or the third prong is provided for your safety. If the provided plug does not fit
into your outlet, consult an electrician for replacement of the obsolete outlet
10) Protect the 12V DC power adaptor cord from being walked on or pinched particularly at plugs,
convenience receptacles, and the point where they exit from the apparatus.
11) Use only with the cart, stand, tripod, bracket, or table specified by the manufacturer, or
sold with the apparatus. When a cart is used, use caution when moving the
cart/apparatus combination to avoid injury from tip-over.
12) Unplug this apparatus during thunderstorms or when unused for long periods of time.
13) Refer all servicing to qualified service personnel. Servicing is required when the apparatus has
been damaged in any way, for instance when the power-supply cord or plug is damaged, liquid has
been spilled or objects are fallen into the apparatus, the apparatus has been exposed to rain or
moisture, does not operate normally, or has been dropped.
14) Do not open the apparatus.
15) To reduce the risk of electric shock, do not remove the back panel of the subwoofer. There are no
user-serviceable parts inside. Refer servicing to a qualified Final Sound dealer.
Warning: High Voltage Inside. To reduce the risk of fire or electric shock, do not expose this
apparatus to rain or moisture.
Warning: The apparatus shall not be exposed to dripping or splashing and no objects filled with
liquids, such as vases, shall be placed on the apparatus.
Explanation of used symbols:
This flash symbol indicates that the outlet carrying this symbol is carrying a
dangerous voltage.

FINAL SOUND 400i Loudspeaker Manual vs. 1.4 -US- c FS 2007RJ 4
.
The double insulation symbol indicates a double insulated product. In a
double-insulated product, two systems of insulation are provided instead of
grounding.
The exclamation mark indicates that special attention has to be given to the
indicated remark.
2. Panel Safety
Listening to electrostatic loudspeakers is an unique experience, well known by music friends
dedicated to inner detail, neutrality, soundstage and reality. Music lovers, addicted towards
electrostatic transducers, don’t select their panels because of sheer sound pressure level
output or the ability to shake the rafters. They like the inner qualities of electrostatic
performance and what the panels can tell you about the music and the qualities of the
recording. Although the Final electrostatic loudspeakers can reach respectable sound
pressure levels and will easily exceed levels used during normal listening practice, we do not
recommend to use these panels for PA applications or to overwhelm the audience during
parties. Final panels are protected against accidental overload, but every protection circuit in
a loudspeaker is a deliberately chosen compromise. Protecting against every possible fault
condition is, from a music reproduction point of view, a serious trade off.

FINAL SOUND 400i Loudspeaker Manual vs. 1.4 -US- c FS 2007RJ 5
.
3. Congratulations
Congratulations on your purchase of a Final Sound flat-panel loudspeaker system.
You have invested in the finest instrument for audio reproduction available. The Final Sound product
line consists of front- and rear flat-panel loudspeakers, center loudspeakers and subwoofers.
The product line is based on a unique modular system. Final Sound offers you the possibility to start
buying a stereo system and easily extend this at any convenient time into a complete Final Sound
Home Theatre system. You can do this just by adding a center loudspeaker and/or another set of Final
Sound flat-panel loudspeakers.
The Final product line is designed to surpass the performance of other existing loudspeakers and
contains some of the most elegant and sophisticated designs ever used for music reproduction.
Our flat-panel loudspeakers are capable of producing very pure and accurate sound due to their ultra
low mass diaphragm. The Final Sound technology has evolved through many years of research and
development.
The Final Sound subwoofers are designed to match perfectly with the characteristics of the Final
Sound loudspeaker panels.
The Model F400i loudspeakers are designed for the use in a stereo setting, a virtual surround system
or a so-called 5.1 home theatre configuration.
The Model F400i flat-panel loudspeakers are floor-standing loudspeakers.
400i-based stereo system
The Final Sound Model F400i stereo system consists of the following components:
2 F400i Final Sound flat-panel loudspeakers (left and right channel).
The F400i does not reproduce frequencies below 65Hz. Therefore it is very important
that a subwoofer, such as our S110 or S220 (purchased separately), that can
reproduce the lower frequencies be used.
400i-based home theatre system
It is simple to build a 400i-based home theatre system with the following components:
4 F400i Final Sound flat-panel loudspeakers (left, right and surround channels).
A Final Sound center panel (400i).
A subwoofer (S110 or S220).
400i-based virtual surround system
2 F400i Final Sound flat-panel loudspeakers (left and right).
A Final Sound virtual surround receiver or a receiver with virtual surround capability
(Dolby Virtual or SRS).
A subwoofer (S110 or S220).
Manual contents
This manual includes the instructions for the Final 400i and basic information about the Final
subwoofer.
Please read and follow these instructions carefully before you connect your Final Sound system to
your amplifier. These instructions are very important and will prevent you from experiencing any delay
or system damage, which might occur in a trial and error situation.
The Final Sound loudspeaker system consists of separate products, which can function individually or
perform as a complete system.

FINAL SOUND 400i Loudspeaker Manual vs. 1.4 -US- c FS 2007RJ 6
.
4. Final Sound Model F400i floor standing loudspeakers
How to unpack the Final Sound F400i stereo system
The Final Sound Model F400i stereo system consists of two separate packaging units. The Model
F400i flat-panel loudspeakers and the optional Final Sound subwoofer are packed separately.
(the 400i panels for the rear channels in home theatre applications are basically the same panels as
the front loudspeakers. All unpackaging and assembling instructions for the rear panels are identical to
those for the stereo front panels)
The Model F400i Stereo flat-panel loudspeaker packaging contains:
-2 Model F400i flat-panel loudspeakers (left and right)
-2 power supplies 12VDC
-2 footplate assemblies
-assembly materials including screws to fix the flat-panels on the footplates
-1 manual
Both footplates are packed inside the upper carton!
Each individual component is packed in its own carton. The easiest way to unpack is to open the
upper side of the box (check the labels), take out the separate units and carefully remove the cartons
and plastic bags. Take care to avoid putting pressure on the black loudspeaker’s stator plates.
If your packaging is not complete, do not operate the system but contact your dealer.
We recommend you to save all packaging materials for possible later use.
If any unit appears to be damaged when unpacking, do not operate the damaged unit. Repack the unit
in its original carton and notify your authorized Final Sound dealer immediately.
Assembling Model 400i
Assembling the Model400i floor standing panels is straightforward. The kit should contain:
Two foot plates
6 aluminum spacers
8 spikes or feet
6 hexagon screws
1 Allen key

FINAL SOUND 400i Loudspeaker Manual vs. 1.4 -US- c FS 2007RJ 7
.
Just follow the pictures for assembling the 400i models.
What´s in the 400i package?
Position the footplate, the hexagon screws and
the spacers like this. First start with one screw and
one spacer. The spacer should be positioned
between the loudspeaker’s electronic housing and
the footplate. After mounting one screw and one
spacer, mount the other two.
Fix the screws firmly, using the Allen key
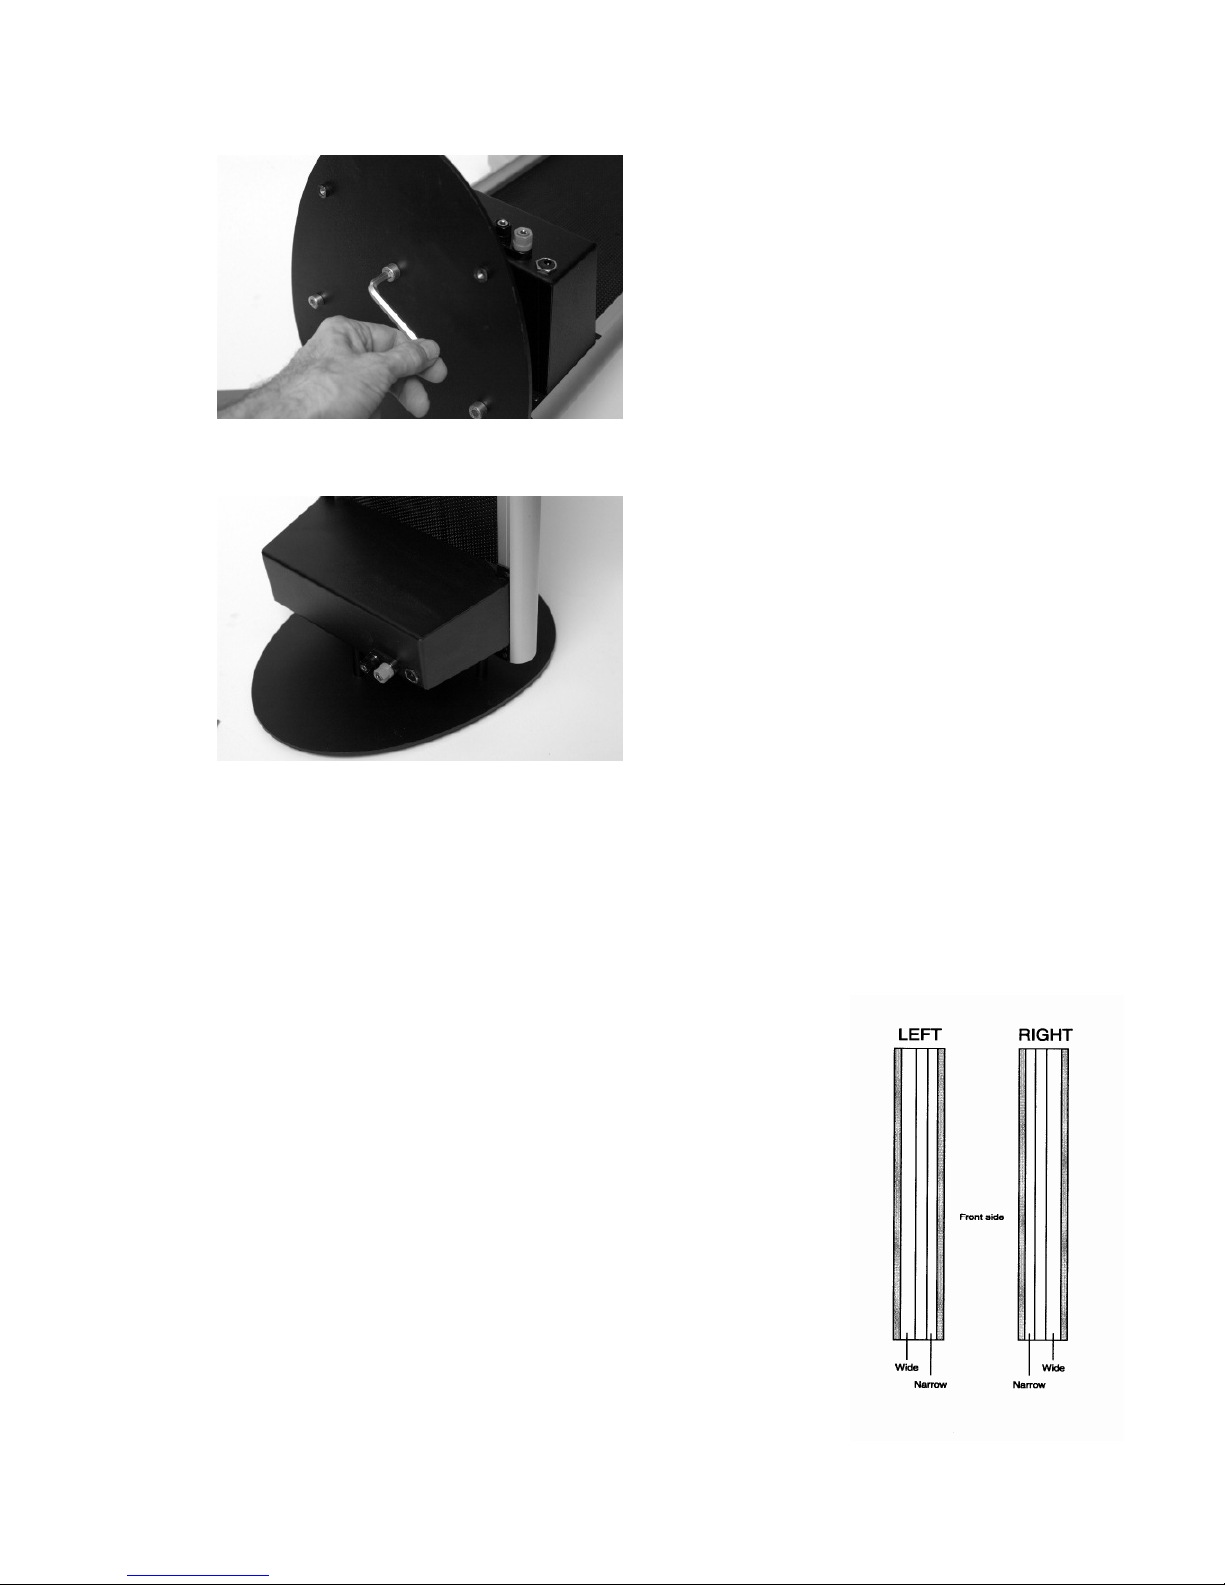
FINAL SOUND 400i Loudspeaker Manual vs. 1.4 -US- c FS 2007RJ 8
.
Fix the three screws really tight and mount the
spikes or feet in the holes.
The end result should be like this.
What is the function of the Final Sound front and rear loudspeaker panels?
The Final Sound flat-panel front loudspeakers are the main channels in a stereo setting or a virtual
surround system and have a dual role in a home theatre system. The front and rear loudspeakers are
used to create ambient effects. In a home cinema setting even actions occurring at the back of the
listener will be reproduced. Both in a stereo configuration and a home theater configuration, the flat-
panel loudspeakers function in close harmony with the Final Sound
subwoofer.

FINAL SOUND 400i Loudspeaker Manual vs. 1.4 -US- c FS 2007RJ 9
.
Where do I place the Final Sound loudspeaker panels?
There is a difference between a left (front/rear) and a right (front/rear) Final Sound loudspeaker panel.
Each Final Sound loudspeaker panel is divided with two vertical spacers in three segments. The
narrow strips have to be oriented to the inside. The difference is shown in the figure on this page.
To illustrate the best position for the loudspeaker panels we have to differentiate between Final Sound
Stereo and Final Sound Home Theatre configurations. Please note that electrostatics are dipoles, i.e.
the loudspeakers produce sound from both sides of the panels. This means an electrostatic
loudspeaker should always be placed away from the wall and turned under a slight angle with the wall
(not parallel with the wall).
Typical room layout
The figure represents a typical room set up for stereo and/or home theatre. The figure shows:
•The subwoofer’s preferred positions, depending on the panels you choose.
•The base line between the front loudspeakers.
•The stereo loudspeaker’s position.
•The full home theatre loudspeaker placement.
•The preferred position for the center loudspeaker.
•A preferred unequal distance between the side walls and the panels (a, b, c and d).

FINAL SOUND 400i Loudspeaker Manual vs. 1.4 -US- c FS 2007RJ 10
.
Application 1: The Final Sound home theatre configuration:
The Final Sound home theatre configuration consists of two front-loudspeakers, two rear/surround
loudspeakers, a center loudspeaker and preferably our S110/S220 subwoofer. We recommend a
symmetric positioning of the loudspeakers with respect to the screen, as to enhance the “home
cinema experience”. Center loudspeaker and front loudspeaker panels should be located on the same
horizontal axis. Sometimes it’s even better to place the center loudspeaker slightly further away than
the front loudspeakers.
The surround or rear loudspeakers should be positioned adjacent to and slightly behind the primary
listening area, on the rear wall or floor to provide a sense of spaciousness and ambience for all
surround sound formats.
For the subwoofer’s instructions and placement, you can read more in the chapter ‘Final Sound
subwoofer’.
Audio/Video receiver settings
The loudspeakers in the Final Sound home theatre system are designed to function in perfect harmony
as a full range system together with the subwoofer. For an optimum performance your audio/video
receiver settings are very important.
In terms of your audio/video receiver settings, the front-, rear- and center loudspeaker channels have
to be set as SMALL satellites, when using the Model F400i flat-panel loudspeakers. How to install the
optimal channel settings differs with the brands of the audio/video receivers and therefore we
recommend reading the audio/video receiver manual or contact your dealer how to get the best
settings in order to get the Real Final Sound out of your system.
Application 2: Final Sound stereo configuration:
The panels in a stereo setting (two front panels) are preferably located in a symmetrical way and away
from the walls for optimum imaging. The panels need to point slightly towards the favorite listening
position as you can see in the figure above. The other loudspeaker panels shown are not applicable in
a stereo setting. For most of the Final panels you need a subwoofer.
Application 3: Final Sound virtual surround configuration:
For virtual surround, you only need two front panels, a subwoofer and a (stereo) receiver with some
virtual surround mode. This mode, together with two loudspeakers, will present a kind of five channel
emulation which will give you a very broad stereo stage just as in a movie theatre. Virtual surround is
based on SRS True surround or Dolby Virtual.
How do I connect the Final Sound loudspeaker panels safely?
The loudspeaker panels are labeled with an L (Left) and R (Right) code.
Each flat-panel loudspeaker panel comes with a 12VDC power supply, which has to be connected to
the mains. It is necessary to connect the flat-panel loudspeakers to the mains; otherwise they won’t
function. The flat-panel loudspeakers are designed to stay on the mains permanently, however it is
better to disconnect them during thunderstorms and when they will be not used for a long time.
The front and rear flat-panel loudspeakers are equipped with loudspeaker terminals, which are suited
for spades or common loudspeaker wires. The red loudspeaker terminal has to be connected to the
red terminal (+) on the audio/video receiver and the black terminal has to be connected to the black
terminal (-) on the audio/video receiver.
Before connecting the front and rear loudspeaker panels, all sound system equipment should be
disconnected from the mains. This will avoid the risk of damage to your system while connections are
made or broken. If you experience any problems installing the flat-panel loudspeakers please contact
your authorized Final Sound dealer.

FINAL SOUND 400i Loudspeaker Manual vs. 1.4 -US- c FS 2007RJ 11
.
How to clean and maintain the Final Sound loudspeaker panels?
Always unplug the Final Sound flat-panel loudspeakers from the mains and shut off all sound
equipment before you start cleaning.
Dry clothe cleaning
Dry clothe cleaning is a weekly recommendation to wipe off dust. Cleaning on a regular base will
prevent the insides of the panels to collect too much dust. To prevent fire or shock hazard, clean only
with a DRY clothe and prevent pushing the black(sound producing) parts of the loudspeaker panels.
Never use cleansers or chemicals or any liquids, which risk dripping into the loudspeaker panels.
Using chemicals can harm the stator´s protective cover. In that case, the panel does not approve to
the safety regulations any more.
Vacuum cleaning
It’s important to vacuum clean the panels once in two months. Switch off the panel’s power and wait at
least 15 minutes to start cleaning. Use a soft brush and don’t apply too much air pressure to the
panels. If the vacuum cleaner is very strong, keep some distance between the vacuum cleaner´s
brush and the panels. Vacuum clean both black panels (every electrostatic panel does have two black
stator plates).

FINAL SOUND 400i Loudspeaker Manual vs. 1.4 -US- c FS 2007RJ 12
.
5. Final Sound 400i center loudspeaker
For building a home theatre based on 400i using floor standing models, Final recommends a 400i
center panel. Center panels can be wall mountable or fit to a table top stand.
How to unpack a Final Sound center panel?
A Final Sound center panel comes in one packaging unit.
A Final Sound center panel package contains:
-1 center panel
-1 power supply 12VDC
-assembly materials including screws to fix the flat-panels to the wall
-wall bracket assembly
-1 manual
-a table top stand (included in the 400i package)
Each individual component is packed in its own carton. The easiest way to unpack is to open the
upper side of the box(check the labels), take out the separate units and carefully remove the cartons
and plastic bags. Take care to avoid putting pressure on the black loudspeaker’s stator plates.
If your packaging is not complete, do not operate the system but contact your dealer.
We recommend you to save all packaging materials for possible later use.
If any unit appears to be damaged when unpacking, do not operate the damaged unit. Repack the unit
in its original carton and notify your authorized Final Sound dealer immediately.
Assembling center panels
Assembling a center panel is straightforward. The kit should contain:
wall bracket kit (the wall bracket is also used to fix the center panel to the table top stand)
1 Allen key

FINAL SOUND 400i Loudspeaker Manual vs. 1.4 -US- c FS 2007RJ 13
.
Just follow the pictures for assembling center panels.
The bracket´s wall plate can be used to mount the
loudspeaker to the wall or to fix the loudspeaker
to the table top stand
Install the wall plate to the bracket
Install the bracket to the foot plate
Insert the ball-bar into the cover plate and screw the ball-bar
into the loudspeaker. The hole in the ball-bar will support you
to apply force. Use a small Allen key or metal bar to stick into
the hole.
Attach the panel to the set top stand
Adjust the speaker’s position and firmly attach both screws
Attach the rubber pads to the footplate

FINAL SOUND 400i Loudspeaker Manual vs. 1.4 -US- c FS 2007RJ 14
.
@
What is the function of a center loudspeaker?
The center channel in a home theatre system is responsible to keep the voices and some special
effects locked on-screen. The Final Sound flat-panel center loudspeaker is a true line source, with a
single loudspeaker element to deliver precise localization. The Final Sound flat-panel center
loudspeaker is designed to function in harmony with the Final Sound subwoofer and the front and rear
flat panels.
Application 1: Center panel in a Final Sound home theatre configuration:
The Final Sound home theatre configuration consists of two front-loudspeakers, two rear/surround
loudspeakers, a center loudspeaker and a Final S110/S220 subwoofer. We recommend a symmetric
positioning of the loudspeakers with respect to the screen, as to enhance the “home cinema
experience”. Center loudspeaker and front loudspeaker panels should be located on the same
horizontal axis. Sometimes it’s even better to place the center loudspeaker slightly further away than
the front loudspeakers.
How do I connect the Final Sound center loudspeaker panels safely?
The center panel connects identically to the other panels in the system.

FINAL SOUND 400i Loudspeaker Manual vs. 1.4 -US- c FS 2007RJ 15
.
6. Final Sound subwoofer
How do I unpack the Final Sound subwoofer safely?
This package includes:
One AC-power cord
One Final Sound subwoofer
One user manual for the subwoofer
If your package is not complete, do not operate the system but contact your Final Sound Dealer.
The easiest way to unpack is the following. Put the box on a flat surface on the ground. Open one side
by cutting the tape carefully without damaging the contents of the box. You find the subwoofer in a
plastic foil, with shock absorbing buffers positioned around the corners. Now carefully take out the
subwoofer, please avoid touching the woofer unit positioned at the downside of the cabinet. We
recommend saving all packaging materials for possible later use. Avoid touching the drive units.
If any unit appears to be damaged when unpacking, do not operate the damaged unit. Repack the unit
in its original carton and notify your authorized Final Sound dealer immediately.
For further details please look at the manual supplied with the subwoofer.
Assembling subwoofers
The Final subwoofers arrive ´complete´ assembled out of the box.
What is the function of the Final Sound subwoofer?
Both Final Sound subwoofers (S110/S220) are capable to reproduce music signals up to 200 Hz. The
Final Sound subwoofers are designed to match perfectly with the characteristics of the Final Sound
Model F400i flat-panel loudspeakers and belongs with the electronics and its perfect driver to the upper
end of the subwoofer range. The Final Sound S110 subwoofer cabinet is provided with a down-firing
driver and a build-in amplifier. The S220 subwoofer is provided with a front-firing driver and a build-in
amplifier.

FINAL SOUND 400i Loudspeaker Manual vs. 1.4 -US- c FS 2007RJ 16
.
Where do I place the Final Sound subwoofer?
(For placement suggestions: see the figure in chapter ’ Final Sound Model 400i front and rear loudspeakers’)
Coloration, due to resonance, is strongest at bass frequencies between 20 and 200 Hertz. It’s much
easier to obtain high absorption at higher frequencies. So, the placement of a subwoofer is critical.
Theoretically, the smoothest low-frequency response is obtained when the subwoofer is as close as
possible to the listener’s ears. The received sound from the subwoofer is then dominated by the direct
radiation rather than by room resonances. Practically the subwoofer should be placed on the base line
between the front panels. That’s also advisable from a phase perspective and if the subwoofer outputs
frequencies higher than 100Hz. You cannot locate frequencies below 100Hertz. If the output is above
100Hz, it’s easy to locate the sound coming from the subwoofer. Then, it’s common wisdom to keep
the sub near the front panels and not along the wall or in the corner.
If you don’t want to put the sub between the front panels and if the output is below 100Hz, the second
best location is nearby the corner of the room, consistent with the acoustic theory that all the room
modes will be excited evenly from this location. But, useful lessons learned from the real world tells us
that the best approach in coping with subwoofers is to use your ears and play around a little bit.
How do I perform a safe subwoofer connection?
IMPORTANT: Before connecting the subwoofer, all sound system equipment should be disconnected
from the mains until you have gone through all steps below. This will avoid the risk of damage to your
system while connections are made or broken.
Warning: High voltage inside. To reduce the risk of fire or electric shock, do not
expose this apparatus to rain or moisture.
The following connection schemes are the MOST COMMON for connecting subwoofers to the Final
panels. The DEDICATED Final subwoofers will bring ADDITIONAL opportunities which are fully
explained in the subwoofer’s manual. We recommend to add a Final subwoofer to your panels and to
apply the high pass filtering.
CONNECTING FOR STEREO
(Figure 1) If you use an integrated stereo amplifier or stereo receiver.
•Connect the subwoofer’s HI-LEVEL IN terminals to the amplifier’s loudspeaker
terminals (together with the electrostatic panels).
•You cannot use the subwoofer’s special high pass filter facilities for driving the
electrostatic panels.

FINAL SOUND 400i Loudspeaker Manual vs. 1.4 -US- c FS 2007RJ 17
.
CONNECTING FOR HOME THEATRE
(Figure 2) If you have an AV-receiver for five, six or seven channel Dolby Digital/DTS
surround sound, you can use the ‘standard’ LFE connection method for subwoofers.
•Connect the AV-receiver’s LFE output to the subwoofer’s left OR right LINE IN RCA
terminal.
•Connect the five (six or seven) electrostatic panels to the five (six or seven) AV-
receiver’s loudspeaker output terminals.
•Adjust the ‘loudspeaker size’ in the receiver’s menu to SMALL. This will activate the
receiver’s LFE output and activate the receiver’s internal high pass filters.
•If possible, adjust the crossover frequency between the panels and the subwoofer in
the menu. Choose the panel’s lowest frequency to start.
•You cannot use the subwoofer’s special high pass filter facilities for driving the
electrostatic panels.

FINAL SOUND 400i Loudspeaker Manual vs. 1.4 -US- c FS 2007RJ 18
.
Figure 2
How to adjust a subwoofer
This procedure is valid for most subwoofers on the market and also for using the Final Sound subwoofer
in ´standard mode´. For adjusting the Final Sound subwoofers in the special high pass mode, we refer to
the dedicated subwoofer manuals.
•Position the subwoofer in the desired location.
•Connect the subwoofer according to this manual’s instructions.
•Set the sub’s volume control to a minimum and the phase switch (as a starting point)
to 0 degrees.
•Adjust the Variable Phase control to ‘minimum’ (not every subwoofer in the market is
equipped with a variable phase control).
•Adjust the sub’s Low Pass control (crossover frequency) to the panel’s lowest
frequency (see Table 1).
•Keep the Variable Bass Equalizer at ‘Min’ (only for Final models).
•Play some music you are familiar with.
•Turn up the subwoofer volume to a level that matches the main loudspeaker’s level.
•Now listen to modern music with some kind of strong bass rhythm.

FINAL SOUND 400i Loudspeaker Manual vs. 1.4 -US- c FS 2007RJ 19
.
•Adjust the Variable Phase control now. This is only necessary if the subwoofer’s
position is not on the baseline between the loudspeakers or left to the left loudspeaker
and right to the right loudspeaker. If the subwoofer is before or behind the baseline, or
somewhere else in the room, adjustment of the phase might be necessary. The Phase
control is in the right position, if you’re not aware of a time difference between the
mid/high frequencies and the lower frequencies on the listening position. The system
is definitely out of phase when the bass frequencies lag behind the rest of the
spectrum or there’s a time difference anyway. If it’s not possible to get the right timing,
reverse the Phase Switch from ‘0’ to ‘180’ and try again. If this is not helpful, diminish
the distance between the subwoofer and the electrostatic panels.
•Readjust the volume control after adjusting the phase.
•You can slightly adjust the crossover frequency. You should be unaware that there’s a
crossover ‘area’. There should be a seamless transition from the subwoofer to the
panels. Use, as an example, piano music to make the right adjustment.
•Readjust the volume control again.
•If you have a dedicated stereo/surround setup guide/disc, refer to the directions
included in it.
•Note that you may need to try more than one location for the subwoofer to reach
optimum results.
TABLE 1 Recommended Crossover Settings
Important information about dedicated Final subwoofers
The Final Sound subwoofers, are specially designed to match the requirements of the Final
electrostatic loudspeaker. The crossover frequencies to several models Final electrostatic panels are
programmed inside the subwoofer just as the time and phase behavior. So, contrary to common
subwoofer’s technology, the Final subwoofer is equipped with additional high pass filters for driving the
electrostatic panels. Aside of this added feature, it’s also possible to use these subwoofers in any other
non Final stereo or home theatre system.
Using these subwoofers together with the Final electrostatic panels of your choice, needs a different
approach when connecting your system.
Cross over frequency
The Final Sound Subwoofers covers the low frequency range up to 200Hz. While the F400i covers the
frequency range from 65Hz up to 20Khz, it is important to define carefully the crossover frequency
between the subwoofer and the electrostatic panels, which is influenced by the acoustic properties of
the room and the placement of the subwoofer.
The dedicated subwoofer manual, included in the subwoofer packaging, will provide
you with all the information about setting up and configuring the Final Sound
subwoofers.
How to clean and maintain the Final Sound subwoofer
After switching the Final Sound subwoofer off, always unplug the subwoofer from the amplifier and
disconnect the power cord before you start cleaning. To prevent fire or shock hazard, clean only with a
damp cloth. Never use cleansers or chemicals. Never leave a wet cloth on the surface of the cabinet.
Model: 90i 150i 300i 400i 600i 1000i
Crossover setting:
150Hz
130Hz
95Hz
65Hz
45Hz
38Hz

FINAL SOUND 400i Loudspeaker Manual vs. 1.4 -US- c FS 2007RJ 20
.
7. Frequently asked questions
Which is better, electrostatic or cone drivers?
You don’t have to be a rocket scientist or a physicist to see that electrostatic drivers are very light and
fast. In fact, the moving mass of an electrostatic panel is 1/30 the weight of a typical cone driver. For
instance, the moving mass of the entire sounding surface of a model 90i is approx. 1 gram. This makes
electrostatic drivers very fast in comparison with a lot of conventional designs. The result is obvious to
all who listen to them. If a driver is light and fast, it can easy follow the so called musical signal’s
‘envelope’. So the rise time (attack) of percussive signals and the decay are very fast and natural. As a
result, an electrostatic driver will provide you with fast transients, greater clarity, detail, low level
resolution and a marvellous stereo imaging.
How does the Final system work?
In a Final electrostatic driver, a thin conductive film (diaphragm) is suspended between two perforated
“stator” assemblies. Spacers – the thin black lines that run down the surface – separate the film from
the metal stators. The stators are insulated with a special paint and power is supplied to them by a DC
(low power) source followed by a high voltage generator. The amplifier sends the audio signal via a
transformer to the diaphragm, which it makes move to the front plate when the audio signal is positive
and to the rear plate when it is negative. The moving diaphragm is coupled to the air and sound waves
will reach our ears.
Because all the sound emerges from one single diaphragm, the sound keeps it phase relationship,
resulting in a more realistic sound. A proper phase behaviour and the diaphragm’s ability to follow the
music’s waveform very accurate (due to the diaphragm’s minimal weight), adds to the impression of
startling clarity, realism and a holographic imaging. Final electrostatic panels are also dipolar line
arrays. The sound is radiating to the front and to the back, but basically out of phase. The advantage is
that, due to noise cancellation, the panels do not radiate much sound to the sides. A dipole is less
influenced by room acoustics and sounds more like the original recording did. The line array character
also adds to the ‘less room interaction behaviour’. Usually, line arrays do not enforce floor and ceiling
reflexions.
What about the Inverter?
The Final electrostatic drivers are based on our patented Inverter technology. As most great ideas in
history, the underlying principles are basically simple. A traditional electrostatic driver will put the high
voltage to the membrane and the musical signal to the stators. In an Inverter based electrostatic driver,
this is vice versa. The main advantage is that we can separate the diaphragm in pre defined radiating
areas for high, mid and low frequencies. When you can size radiating areas, you can also size the
driver’s radiating patterns. That’s the main reason that our electrostatic loudspeakers do not have a
‘hotspot’. They present a wide stereo image from nearly every listening position in the room.
What happened to the loudspeaker’s enclosure?
There is an inherent relationship between dynamic drivers and enclosures. The enclosure’ s shape,
volume and size are important supporting parameters to accomplish a specified performance level
from dynamic systems. So between dynamic drivers and enclosures are almost mathematical
dependencies. Basically, a dynamic driver is designed to operate in an enclosure.
Electrostatic drivers don’t need enclosures. The only reason for finding enclosed electrostatic
loudspeakers has to do with electrical safety. Due to our patented Inverter technology, Final
electrostatic panels don’t need enclosures for electrical safety reasons. Getting rid of enclosures is
pretty cost effective and it translates into a reasonable consumer price. Since the speaker cabinet is
the most expensive part in most of the dynamic systems (woofers, tweeters, and crossovers are
usually less than 30% of the materials cost of a typical box speaker). Because there is no cabinet,
Final electrostatic loudspeakers do not have any cabinet induced coloration and sound very neutral.
How much power do you need?
The simplicity of the Final Inverter Technology enables the loudsspeaker´s impedance to remain well
above 4 ohms across the entire frequency spectrum. This allows the use of smaller amplifiers - as low
as 35 watts - to drive the loudspeakers. Most high-performance electrostatic loudspeakers required
Table of contents
Other Final Sound Speakers manuals


