FINE FIELD Harvy200 User manual

Harvy200 Version 2.1 - 2019 Page 1 of 18
Harvy200
Instruction manual
Version: 2.1 - 2019
Original instruction manual

Harvy200 Version 2.1 - 2019 Page 2 of 18
© opyright Fine Field B.V. Melderslo, the Netherlands.
No part of this publication may be reproduced and/or published in any form or by any means,
without prior written permission from Fine Field B.V.
Fine Field B.V.
Vlasvenstraat 41
5962 A Melderslo
The Netherlands
Tel: +31 (0)6 542 479 80
Fax: +31 (0)77 398 81 85

Harvy200 Version 2.1 - 2019 Page 3 of 18
Index
1 General description ................................................................................................... 4
1.1 Parts Harvy200 ....................................................................................................... 4
1.2 Type plate .............................................................................................................. 5
2 Technical specifications ............................................................................................ 5
3 Safety .......................................................................................................................
3.1 Obligation and liability ............................................................................................. 6
3.2 Use according to the intended purpose ....................................................................... 6
3.3 Warning symbols ..................................................................................................... 6
3.4 Organisational measures .......................................................................................... 6
3.5 Informal safety measures ......................................................................................... 7
3.6 Extremely hazardous places ...................................................................................... 7
3.7 Alterations in the construction ................................................................................... 7
3.8 leaning of the installation ....................................................................................... 7
4 Assembly ................................................................................................................... 8
5 Catch sheet ............................................................................................................... 9
5.1 Adjust the width ................................................................................................... 15
5.2 Adjust the height of the collection tray ..................................................................... 15
5.3 Adjust the angle of the brushes ............................................................................... 15
5.4 Adjust the end position of the collection tray ............................................................. 16
Harvesting .............................................................................................................. 17
7 Maintenance ............................................................................................................ 17
8 Declaration of conformity ........................................................................................ 18
Harvy200 Version 2.1 - 2019 Page 4 of 18
1General description
The Harvy200 has been developed as a tool for harvesting (blue) berries. The Harvy200 is adjustable
in width and is driven between the rows of berry bushes, in such a manner that one row of berry
bushes is situated between the collection trays of the Harvy200. The collection trays are equipped
with a brush at the front in between which the berry bushes are able to move. By means of shaking
the berry bushes, all berries of the bush will fall into the collection trays and into the crates that are
situated at the bottom of the collection trays. Once all berries have been shaken from the bush, the
Harvy200 can proceed to the next bushes. As soon as the crates are full, the collection tray can be
pulled backwards in order to replace the full crates by empty crates. The Harvy200 contains racks at
the back that can be used to stock piles of empty crates.
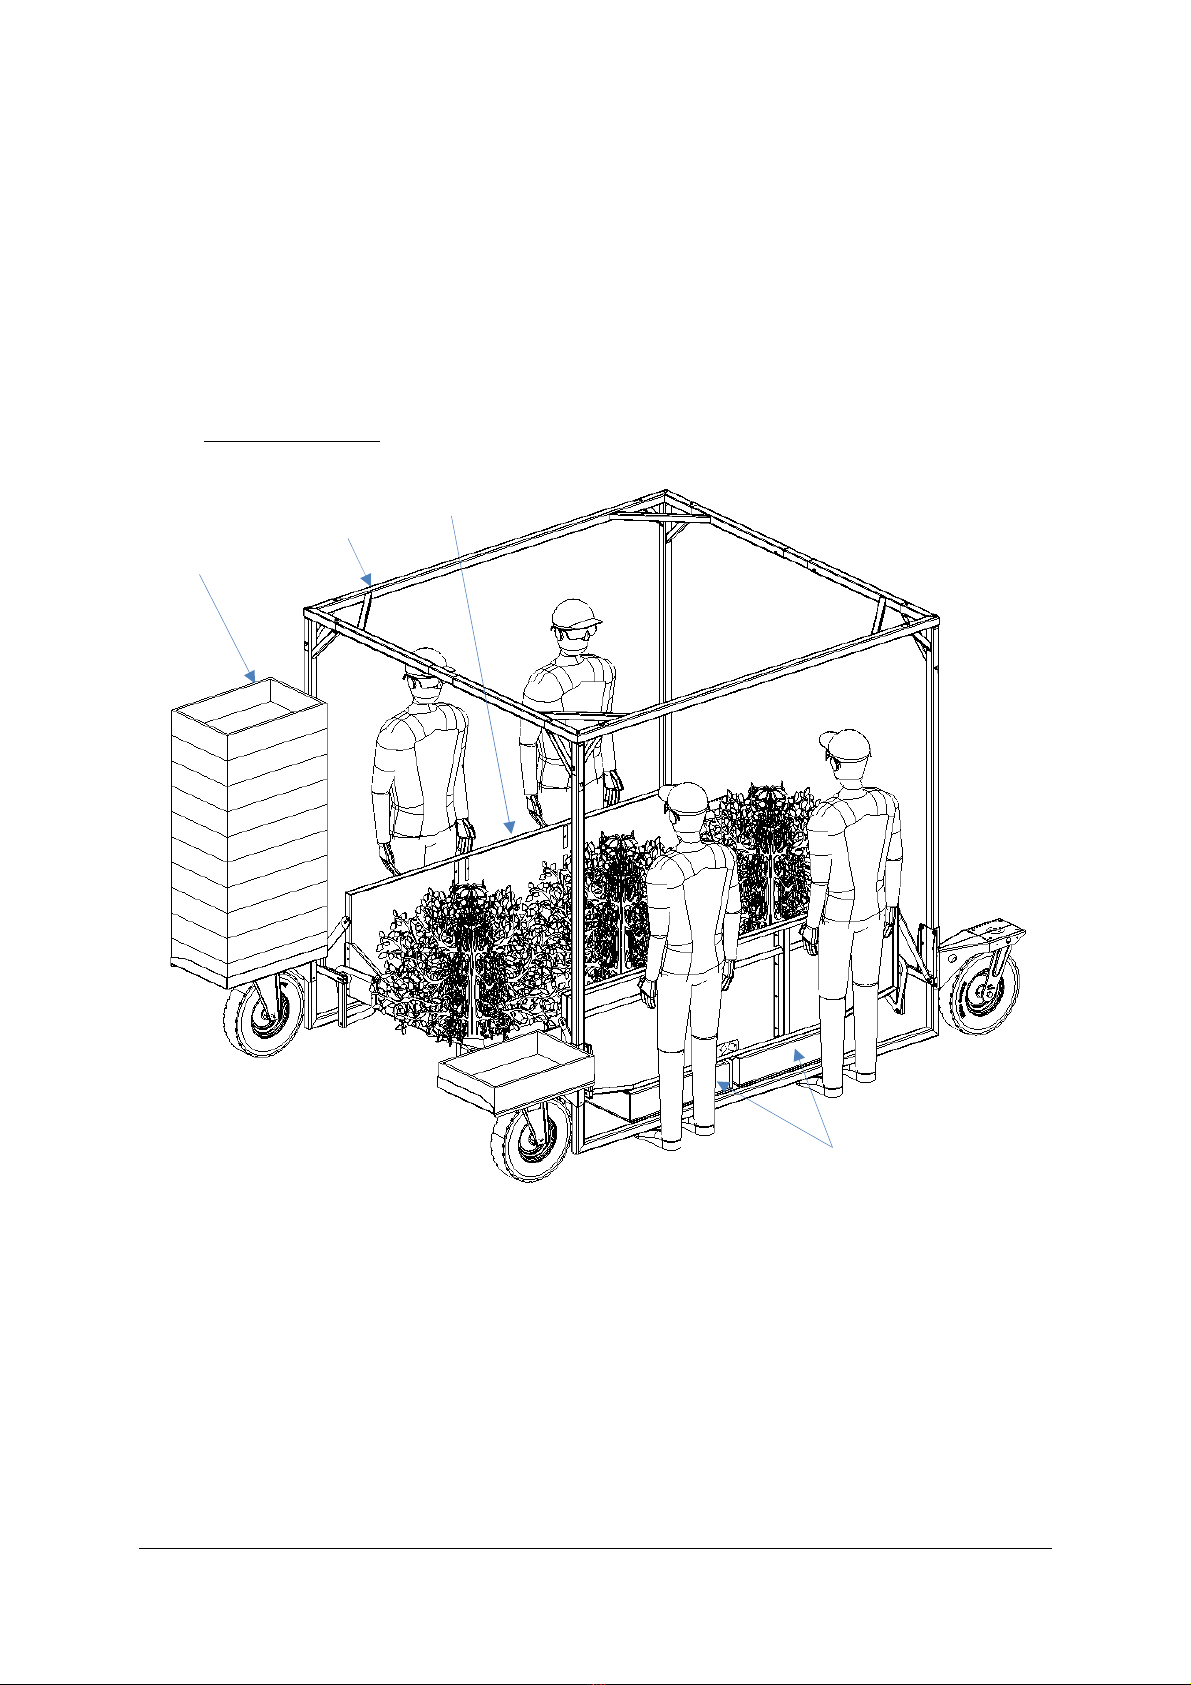
1.1 Parts Harvy200
Figure 1.1 Harvy200
1. Stock of empty crates 3. ollection tray
2. Base frame 4. rates filling position
1.
4.
2.
3.

Harvy200 Version 2.1 - 2019 Page 5 of 18
1.2 Type plate
The type plate is located on the rear suspension of the Harvy200. This plate displays a few details of
the Harvy200.
Figure 1.2 Type plate
2Technical specifications
DVP
-
EH
-
01
Length 3300 [mm]
Minimum width 2150 [mm]
Maximum width 3000 [mm]
Height 2160 [mm]
Total mass 180 [kg]
Mass collection tray 22 [kg]

Harvy200 Version 2.1 - 2019 Page 6 of 18
3Safety
Attention: Read this instruction manual carefully. Familiarise yourself with the instruction
manual and the correct use of the Harvy200, prior to operating the Harvy200.
3.1 Obligation and liability
The Harvy200 has been developed and produced according to the latest state of technology. This
means the Harvy200 complies with the applicable European Directives regarding safety and health
and is therefore provided with the E-marking. Nevertheless, hazards to the life and the goods of the
user or third parties or damages to the Harvy200 and/or other matters may arise during the
operation.
The Harvy200 should only be used:
•for use according to the regulations,
•in a perfect condition of safety.
Defects that could impair the safety have to be repaired immediately.
3.2 Use according to the intended purpose
The Harvy200 is intended as a tool for harvesting (blue) berries, during which harvest all berries
from the bush end up through the collection trays into the empty crates by shaking the berry bushes.
Usage according to the intended purpose also includes observing this instruction manual.
Any usage beyond the description given above, does not comply with the intended purpose. Usage
not complying with the intended purpose mainly includes overload and the incorrect rectification of
defects.
The manufacturer is not responsible for damage arisen from usage that does not correspond with the
intended purpose – this is at the risk of the user.
3.3 Warning symbols
Some warning symbols have been applied to this instruction manual and to the Harvy200. The
meaning of the warning symbols is as follows:
When this symbol is displayed, information is provided in order to prevent damage and
incorrect use of the Harvy200.
When this symbol is displayed, information is provided in order to prevent injury or
damage.
Parts displaying this pictogram may cause a danger of crushing. Do not place body
parts below and/or between these parts in order to prevent injuries.
3.4 Organisational measures
The required, personal protective equipment has to be provided by the operator. The ARBO-
legislation (Health & Safety), Occupational Safety and Health Administration (OSHA) and nationwide
safety and health regulations must be observed.

Harvy200 Version 2.1 - 2019 Page 7 of 18
3.5 Informal safety measures
In addition to the instruction manual, the generally applicable and local regulations for the
prevention of accidents and for the protection of the environment also have to be provided and
observed. All safety instructions and instructions with regard to hazards relating to the Harvy200
have to be kept in a readable condition and replaced if necessary.
3.6 Extremely hazardous places
The collection trays are suspended to the frame in a hinged manner using some sheet metal strips. If
the user grabs the sheet metal strip and uses it to try pulling the collection tray closer, there is a
risk of entrapment of the hand between the sheet metal strip and the collection tray. In order to
prevent this, a warning symbol has been applied to the back of the collection tray, near the sheet
metal strip.
3.7 Alterations in the construction
Alterations to the product by third parties require permission from the manufacturer. This also
includes the application of replacement parts other than the ones prescribed.
3.8 leaning of the installation
The proper functioning of the Harvy200 can only be guaranteed during a longer period of time if the
Harvy200 is cleaned regularly.
Harvy200 Version 2.1 - 2019 Page 8 of 18
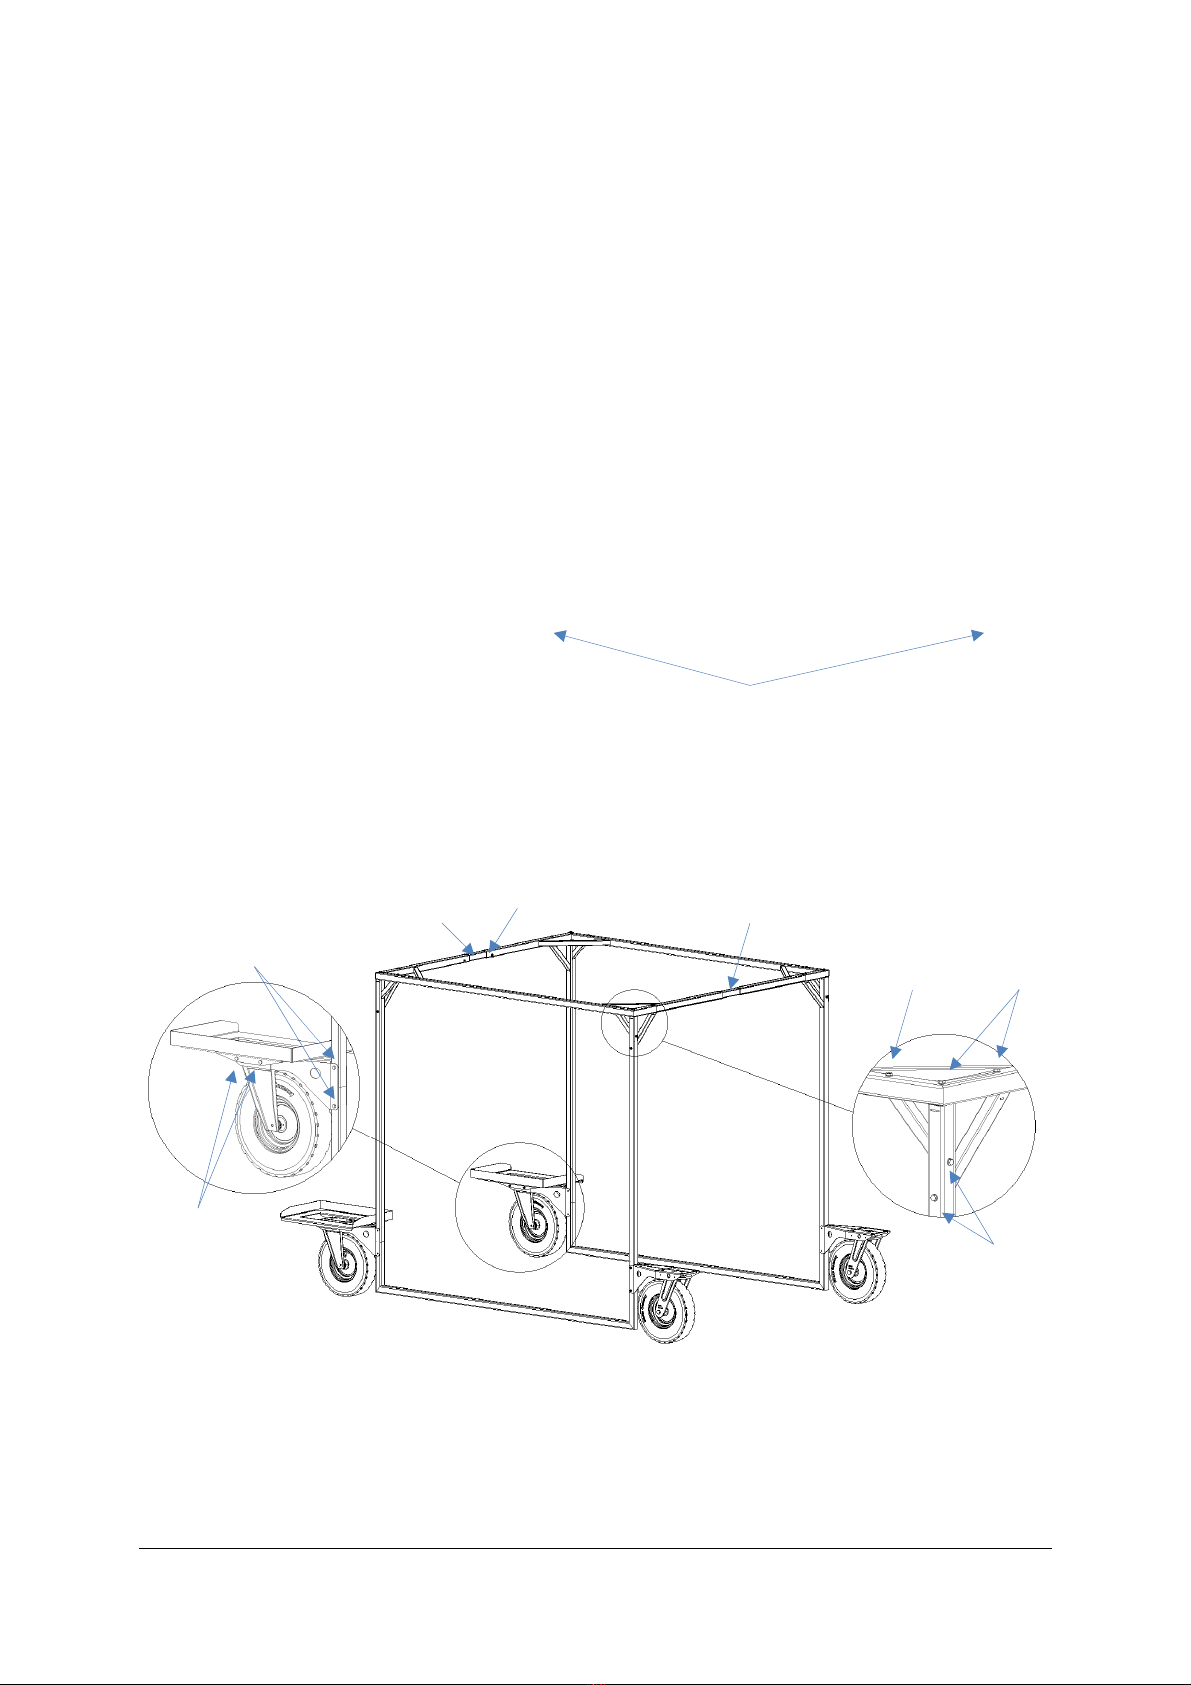
4Assembly
1. The base frame consists of two sub-frames. Assemble both sub-frames using the supplied fixing
materials, as displayed in the images below.
Figure 4.1 Assemble sub-frames
2. onnect both frames by means of two connecting tubes. Both tubes are fastened using 4 bolts.
3. Mount the crate racks onto the rear suspension.
Figure 4.2 onnect sub-frames together
Fixing materials:
A Hex bolt M8x16 + washer Hex bolt M8x60 + washer
B Hex bolt M8x20 + washer D Hex bolt M8x60 + locknut + 2 washers
Swivel castors
onnecting tube
onnecting tube
B
B
D
A
A (4x)

Harvy200 Version 2.1 - 2019 Page 9 of 18
4. Place the collection trays between the frames and fasten them using the clamping brackets (2 for
each collection tray) to the base frame.
Figure 4.3 Place collection trays
5atch sheet
If You ordered a atch sheet you will find the mounting instructions down here.
Step 1: check the content of your delivery you should have 2 sets of hooks and the 2 sheets.
lamping brackets

Harvy200 Version 2.1 - 2019 Page 10 of 18
Step 2: mount the hooks on all four of the lower corners at the adjustment knob for the brush angle.
Step 3: hold the catch sheet over the collect tray.
Step 4: pull the side sleeves over the tray upper corners.
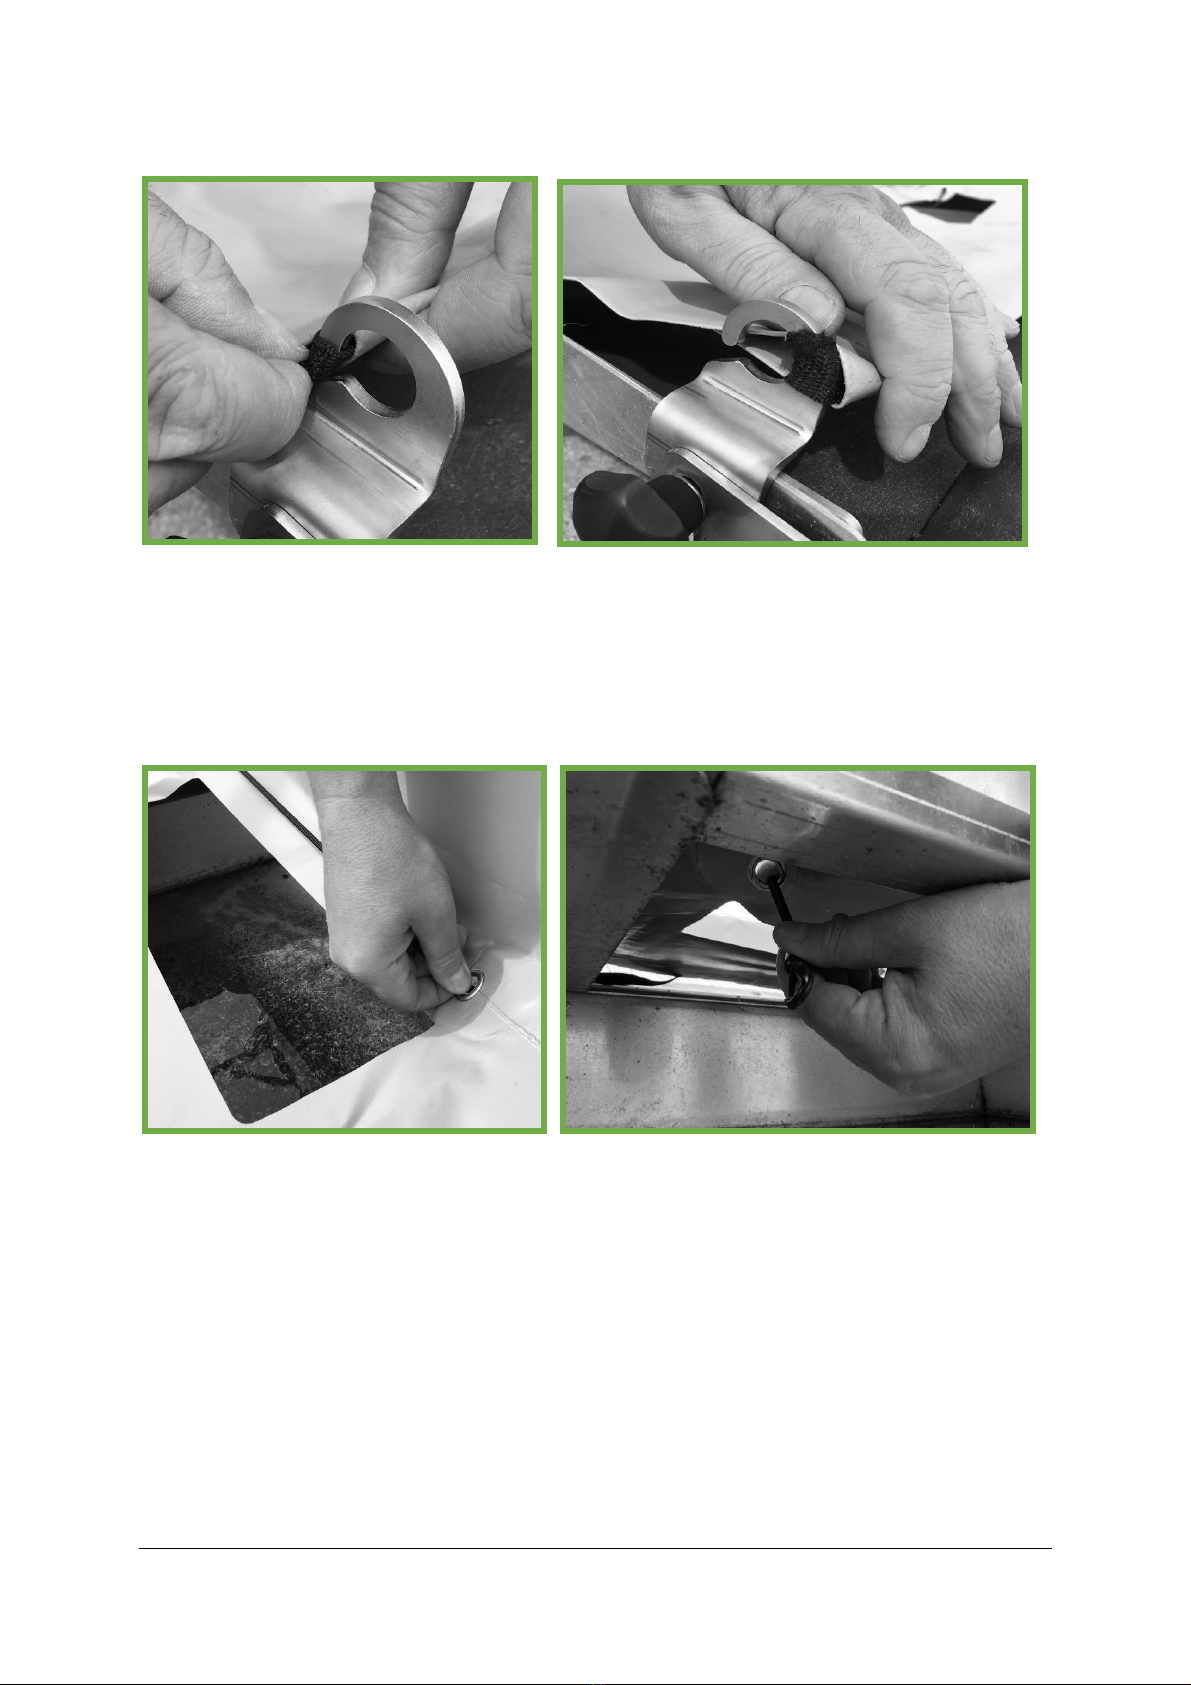
Harvy200 Version 2.1 - 2019 Page 11 of 18
Step 5: slide the loop of the tightening belt over the hooks.
Step 6: push the plastic hook down with one hand and grab it trough the crate holder with the other
hand.

Harvy200 Version 2.1 - 2019 Page 12 of 18
Step 7: hook the plastic hook to the upper side walls of the crate holder.
Step 8: tightening the strap.

Harvy200 Version 2.1 - 2019 Page 13 of 18
Step 9: push the remaining strap back in the sleeve.

Harvy200 Version 2.1 - 2019 Page 14 of 18
Ready!
Harvy200 Version 2.1 - 2019 Page 15 of 18
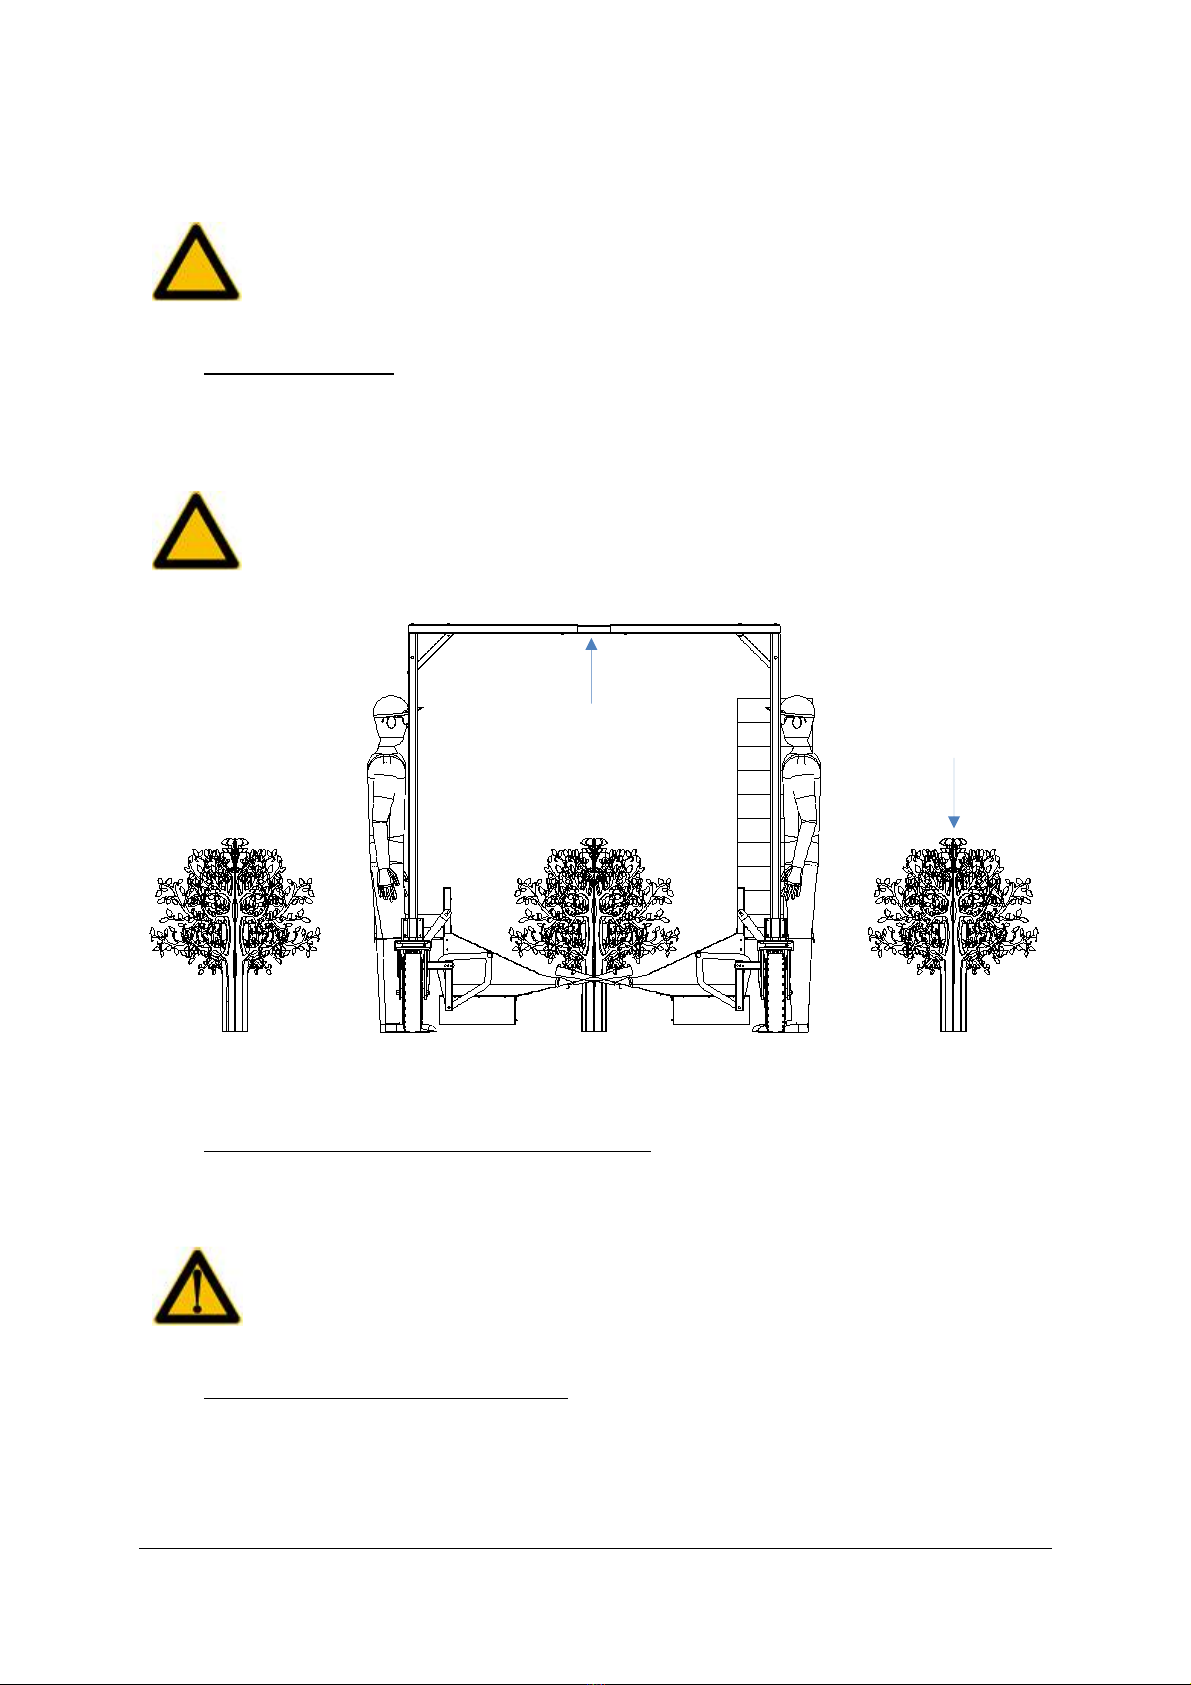
Adjustment
In order to ensure that no berries are lost during the harvest, the brushes mounted onto the
collection trays have to enclose the brushes below the lower braches, such as displayed in Figure
5.2. The Harvy200 is adjustable at several points.
After a setting has been altered, always check whether all fastening screws have been
tightened securely.
5.1 Adjust the width
The left part and the right part of the base frame are connected with each other by means of a
connecting tube. As a result, the width of the Harvy200 can be easily adjusted to the distance
between the rows of berry bushes on the field. By loosening the bolts for the width adjustment (see
Figure 5.1) and moving one side of the Harvy200, the width can be adjusted.
Never make the base frame wider than 3 metres. The connecting tube contains a
marking indicating the middle of the connecting tube.
Figure 5.1 Setup Harvy200
5.2 Adjust the height of the collection tray
The position of the collection tray is adjustable in height. Both collection trays are attached on both
sides to the base frame by means of a clamping bracket (see Figure 5.2). By loosening the bolts of
both clamps, the collection tray can be adjusted in height.
Make sure the collection tray is supported and cannot fall down, prior to loosening the
bolts of the clamps!
5.3 Adjust the angle of the brushes
The angle of the brushes is adjustable. By loosening the star-knob (see Figure 5.2) on both sides of
the collection tray, the angle of the brushes can be adjusted manually.
Width adjustment
Be
rry bushes

Harvy200 Version 2.1 - 2019 Page 16 of 18
5.4 Adjust the end position of the collection tray
The collection tray can be moved forwards and backwards. A positioning block is located on both
sides of the collection tray which determines the end positions of the collection tray. If desired, the
positioning block can be placed further forwards or backwards by unscrewing the star-knob from the
positioning block.
Make sure the collection tray is supported and the hinge bracket does not touch the
positioning block, prior to unscrewing the star-knob from the positioning block!
Figure 5.2 Adjustment collection tray
lamp
Positi
oning block
Angle adjustment brushes

Harvy200 Version 2.1 - 2019 Page 17 of 18
6Harvesting
Place the Harvy200 between the rows of berry bushes, in such a manner that one row of berry
bushes is situated between the collection trays of the Harvy200 (Figure 5.1).
Place a stock of empty crates on the crate racks and place two empty crates at the bottom of every
collection tray.
Make sure the empty crates on the crate racks are stacked neatly in order to prevent
the pile from tipping over.
Push the collection trays towards the berry bushes so the brushes enclose the bushes.
Shake the berry bushes so that all berries of the bush fall into the collection trays and end up in the
empty crates that are located at the bottom of the collection trays.
It is not allowed to stand on or to sit down on the collection trays.
Move the Harvy200 to the next bushes once all berries have been removed from the bush.
As soon as the crates at the bottom of the collection tray are full, the collection tray can be pulled
backwards in order to easily replace the full crates by empty crates.
Move the collection trays forwards or backwards by grabbing the upper edge of the collection tray.
Never pull the collection trays backwards by grabbing the sheet metal strips used to
fasten the collection trays in a hinged manner.
7Maintenance
Regularly check whether the fastening screws of the base frame and the collection trays are
tightened securely.
lean the Harvy200 regularly.

Harvy200 Version 2.1 - 2019 Page 18 of 18
8Declaration of conformity
EC-declaration of conformity
according to annex II A of Machinery Directive 2006/42/E
Fine Field B.V.
Vlasvenstraat 41
5962 A Melderslo
The Netherlands
herewith declares, entirely under its sole responsibility, that product:
Name: Harvy200
Type: DVP-EH-01
Function: Harvest cart for harvesting (blue) berries
complies with the provisions of Machinery Directive 2006/42/E
The Netherlands, Melderslo
29 May 2013
L. Driessen
Director
Table of contents
Popular Farm Equipment manuals by other brands


MK Martin
MK Martin MK Series Operator's manual

MASCHIO GASPARDO
MASCHIO GASPARDO ADMIRAL Use and maintenance

Lifetime
Lifetime 60058 Assembly instructions

AgTerra
AgTerra SprayLogger E3 Installation & quick start guide

Pottinger
Pottinger NOVACAT V 9200 Original operating instructions

Raven
Raven RS1 installation manual

Degelman
Degelman PRO-TILL 41 quick start guide

Agriweld
Agriweld Prevent 4-Leg Operator's manual

Raven
Raven SmarTrax installation manual

Anderson
Anderson GB series Operation guide

Redexim
Redexim OVERSEEDER 3D Series User manual and parts book

Kongskilde
Kongskilde 300FL Assembly Instructions & Operating Guide