FineDigital CR-200HD User manual

FULL HD
BLACK BOX
CR-200HD
HD Mobile Video Recording Device
Quick Guide
1
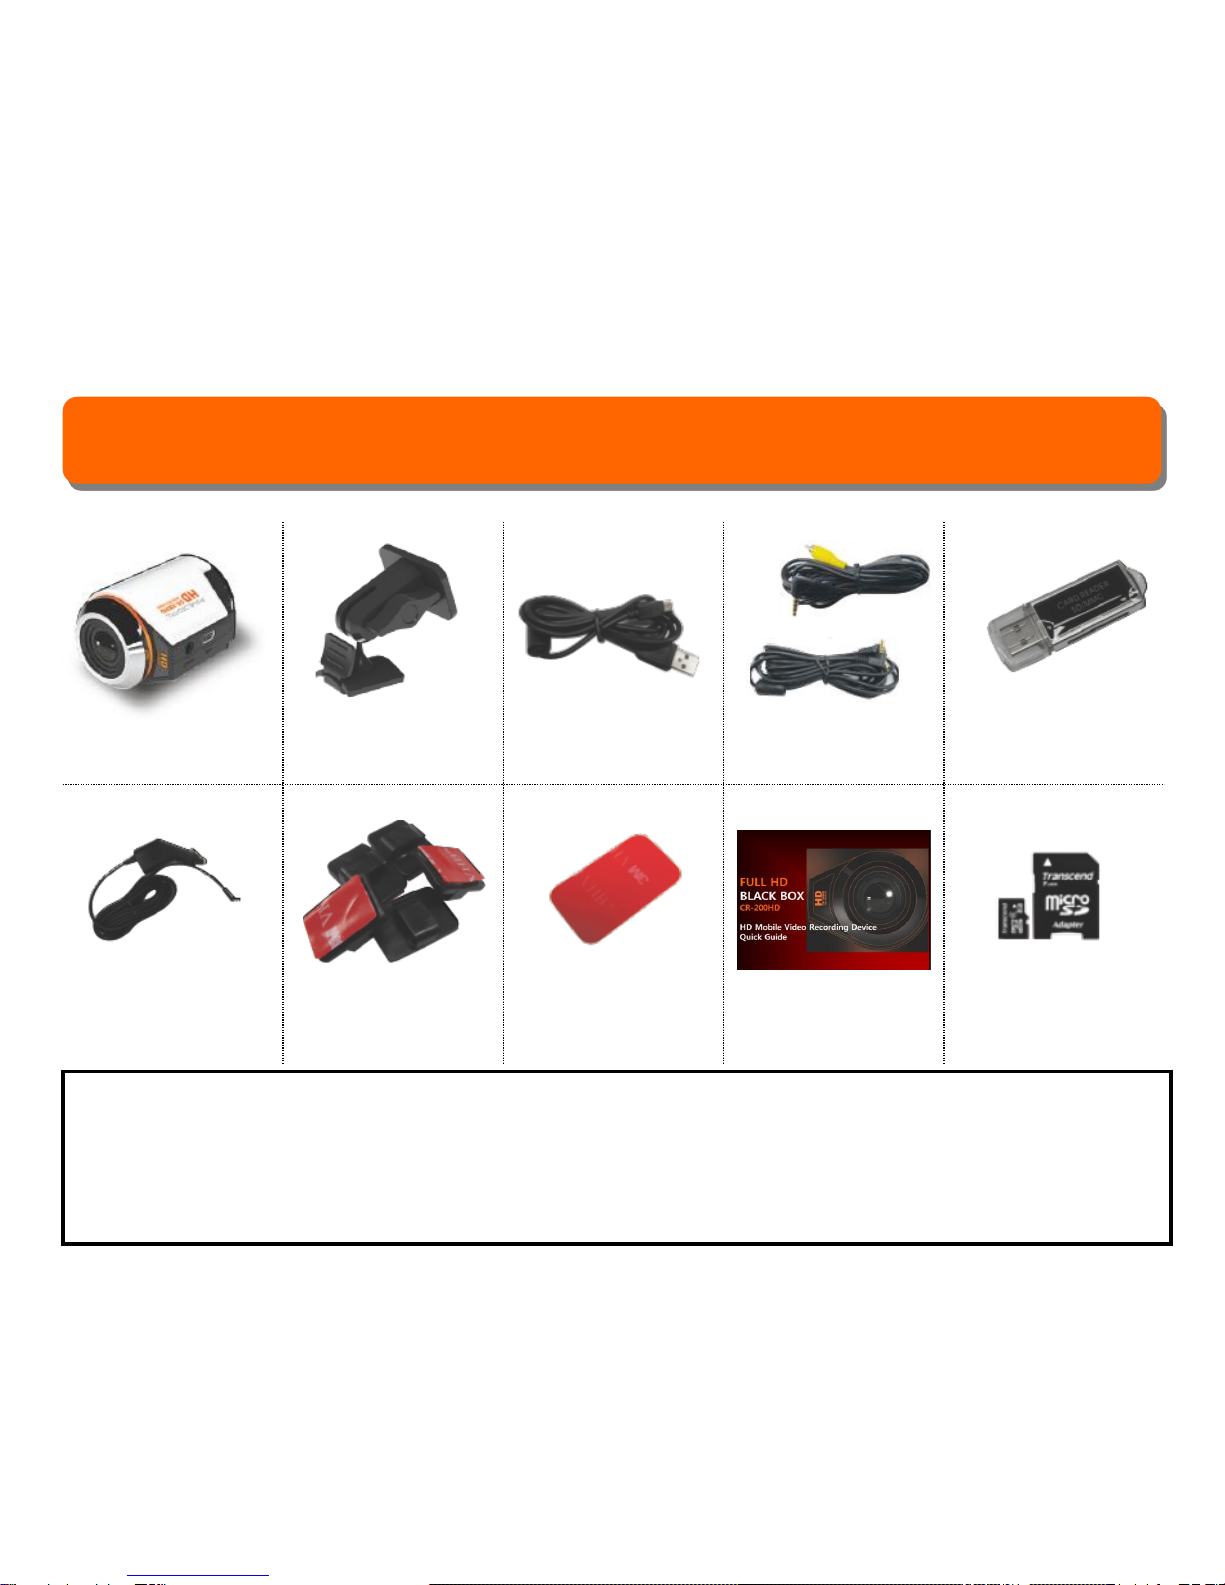
Package Contents
Main body Mount USB cable 2 types of video
output cable
USB SD card
reader
Cigar cord Clip 5ea Mounting tape Quick guide Micro SDHC Card
& Adaptor
ⓐ
ⓑ
ⓐVideo output cable[4pole to RCA]-refer to manual for more description
ⓑVideo input/output cable[4pole to 4pole]-refer to manual for more description
※Package Contents is changeable for function upgrade, and additional requests should be
purchased separately 2
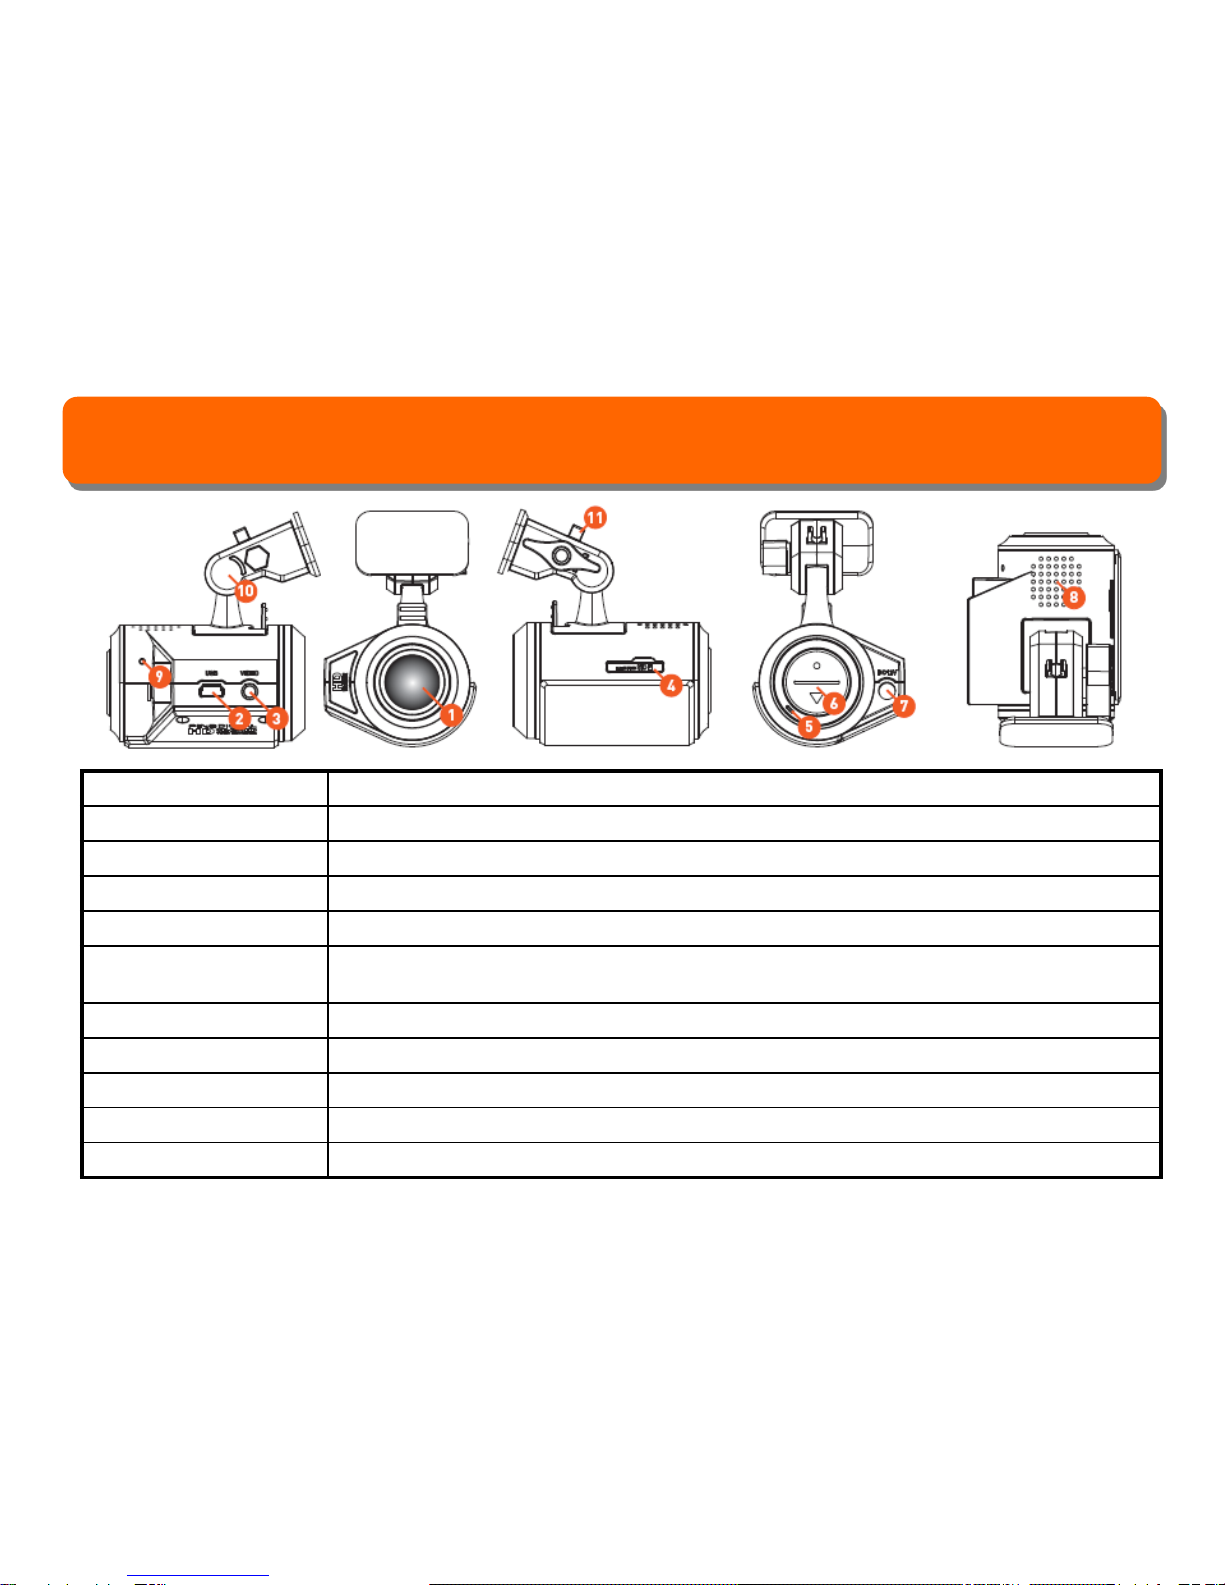
Names of parts
①Camera Lens Video recording and picture shooting of front view
②USB port Power input, playback, move to storage device by connecting PC
③external output port Real-time check of recording image (Composite (NTSC) output)
④Memory card insert Inserting Micro SDHC memory card
⑤Mic Voice recording
⑥Pic/Power/Rec button ●: Picture shooting. Power on/off (when built-in battery runs) ▼: Video recording. Mode
switchable (parking/USB connection)
⑦Power connection Connect power cable (vehicle cigar cord)
⑧Speaker Announce device’ running status by alarm or voice (power. Recording, picture, shock etc)
⑨RESET Re-boot when device stops and function does not run (when LED solid on)
⑩Mount Use when install the device into car
⑪Mount Hold Use for fixing or setting the cigar cord cable
3

Installation
Socket
Click!
Remove
protection
vinyl Left Right
Open memory card
cover. Make memory
card contact terminal
facing upward and
insert it into socket.
Put mount in the
direction of the arrow
and bond completely
until you hear “clicks”
Remove protection
vinyl of double-side
tape
Stick mount on left
or right side of the
room mirror. Lens
facing outward
Memory card insert and combine body with mount Installed in vehicle
4
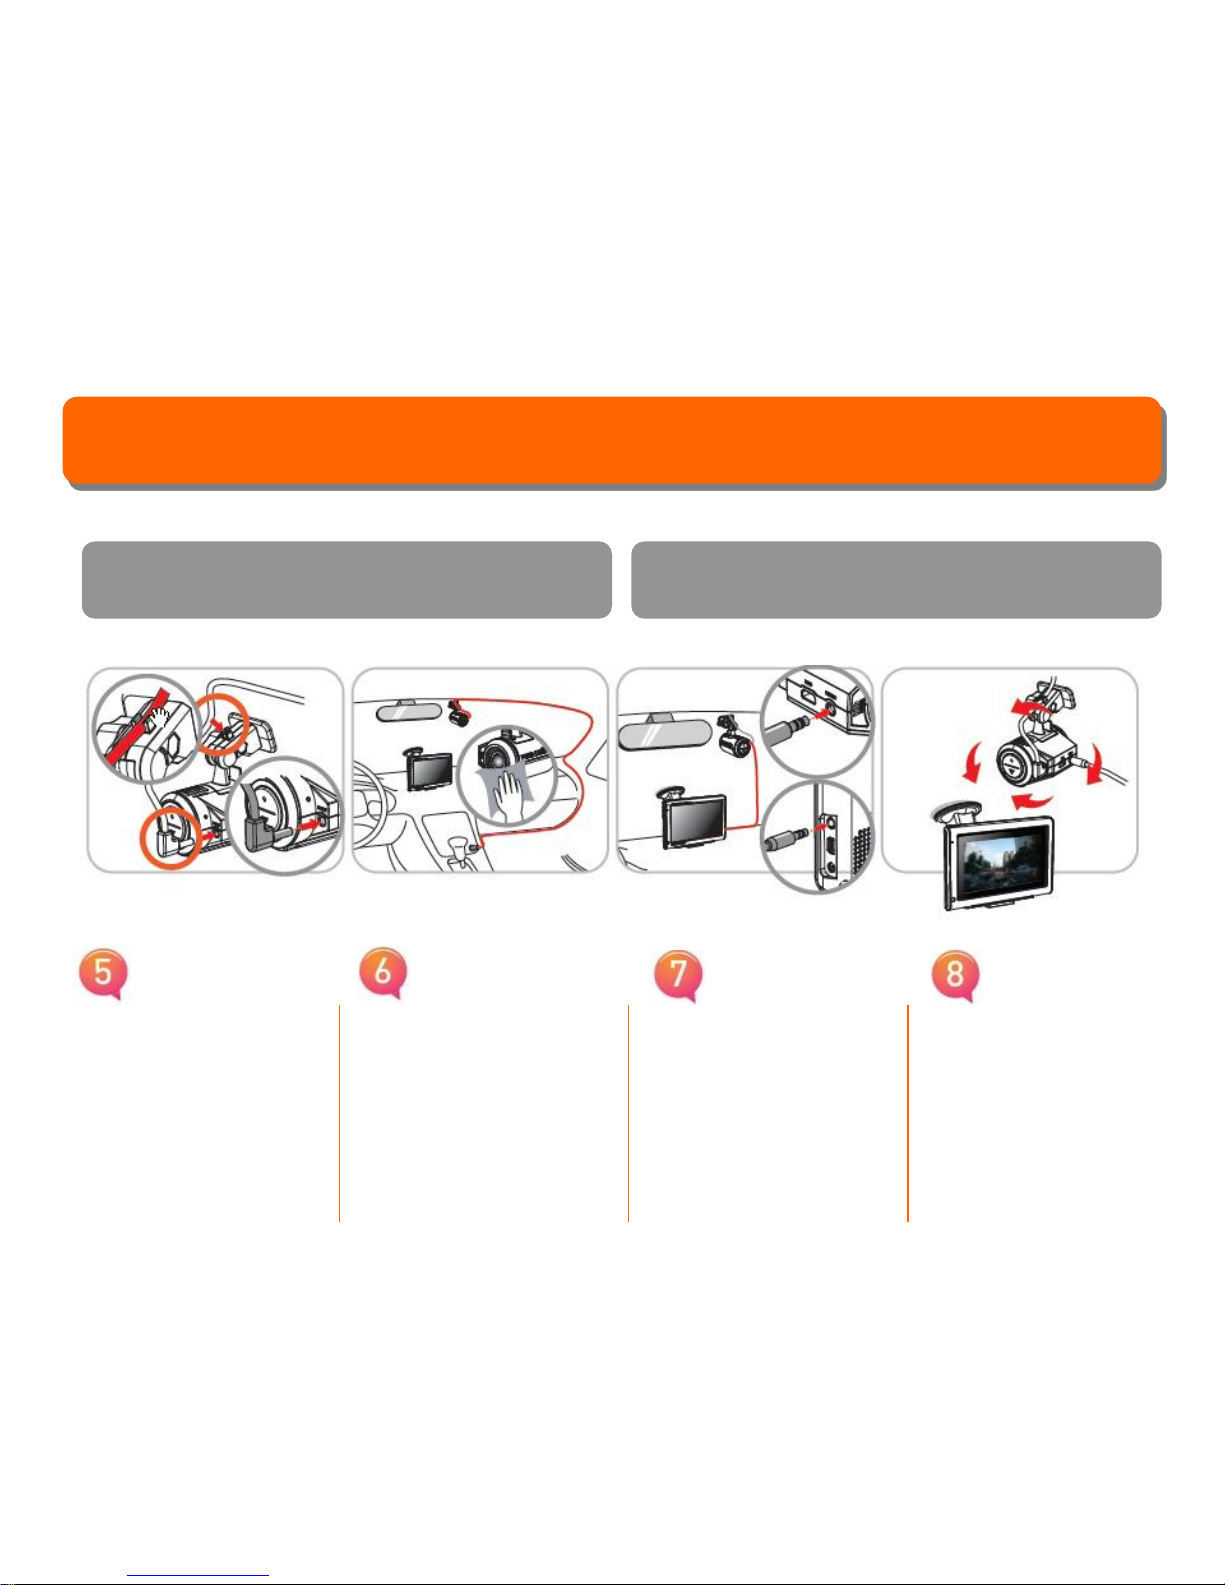
Installation
Connect power cable
with “DC12V” socket
of the camera. Put
cable onto mount’
cable setting holder
and fix it.
Connect vehicle cigar
cord and set cable at
the outside of driver’s
visual filed not to
obstruct driving.
Connect “VIDEO” port
of camera with “AV IN”
port of navigation.
Run navigation’s
external input. Watch
the image and set
shooting location.
(resolution of the image on
the navigation monitor
differs from actual
recording image)
Fix field of view and shooting location
Power cable
Installed in vehicle
5

Information of
system operation
Operation by LED color
●Basic function by
button color
▼Basic function by
button color
Color Info. Description
Yellow Booting Booting after power input
(within 30sec.)
White
Green Recognition of USB memory Mode switch to USB
X
Color Info. Description
Green Cigar cord or PC USB power Video recording
Yellow Built-in battery power Ready to take pic/video
Red Picture taking Picture taking
Parking mode Mode switch to parking
Color Info. Description
Blue Constant record Video recording
Yellow Shock recognition record Recognition of shock
Red Video record Manual recording
Purple Parking mode Mode switch to parking 6
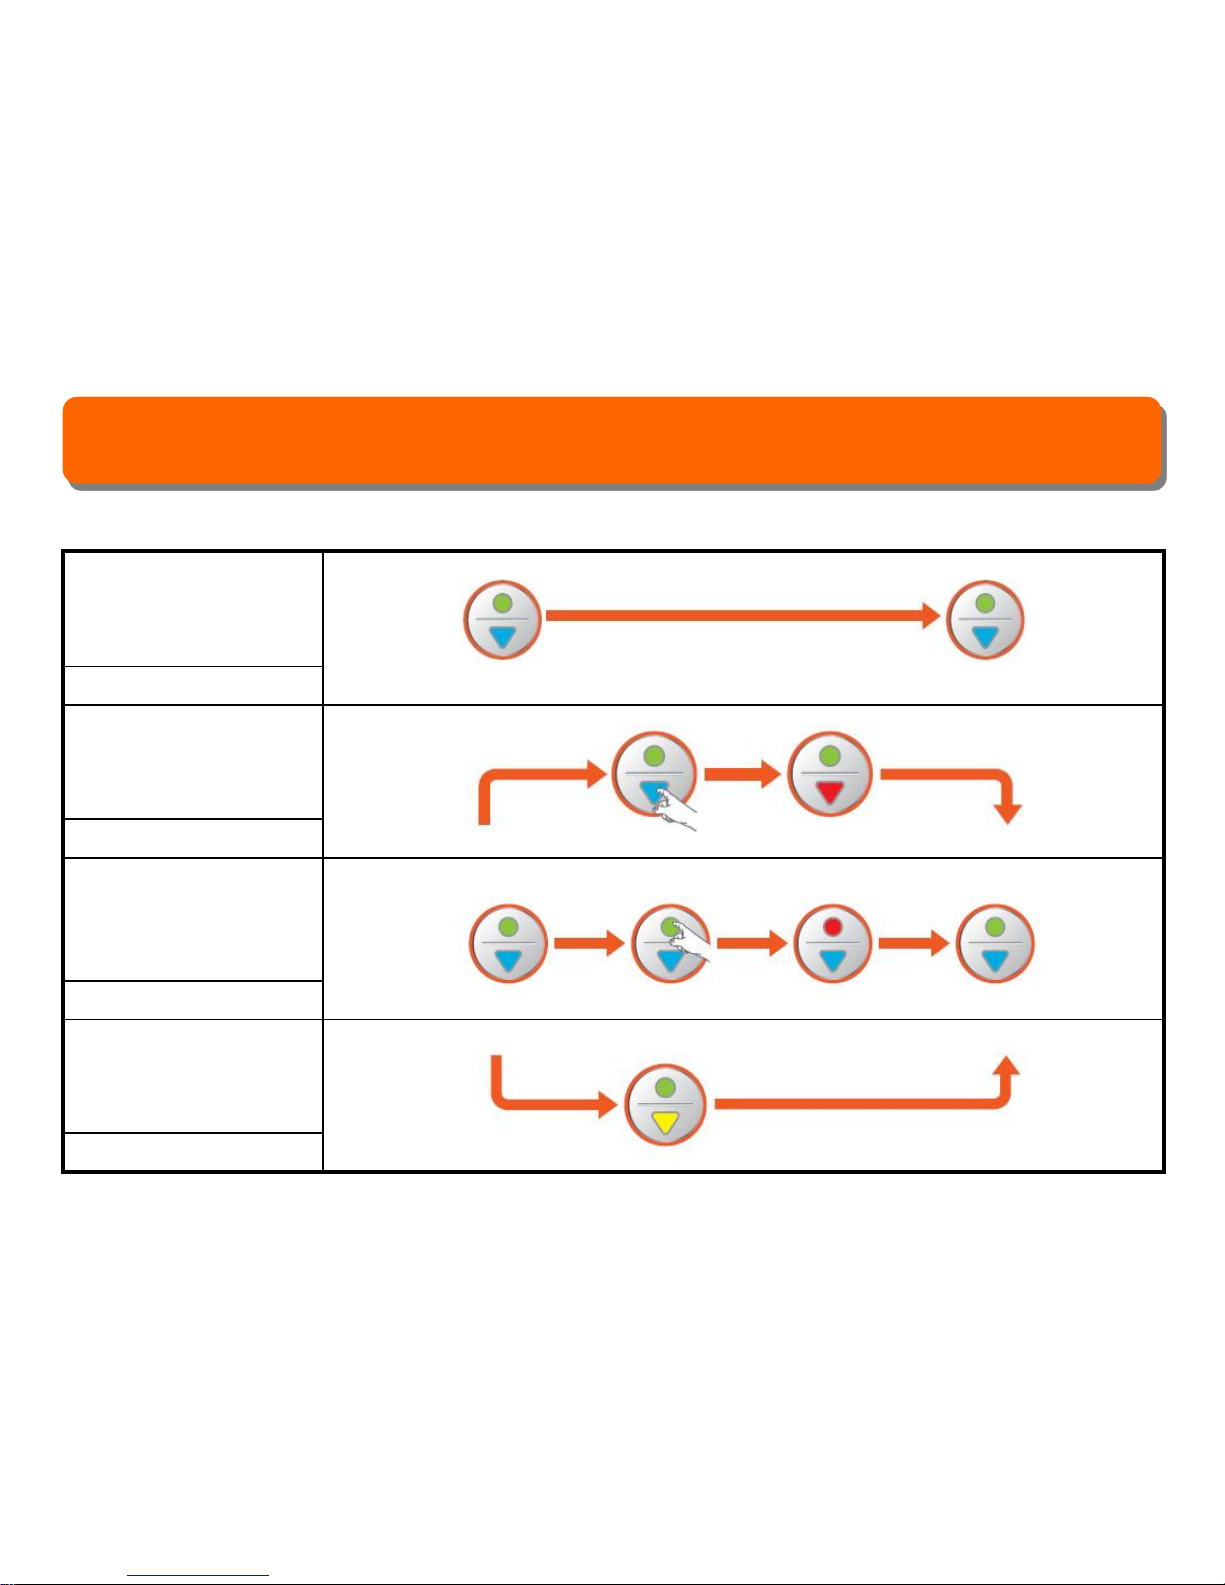
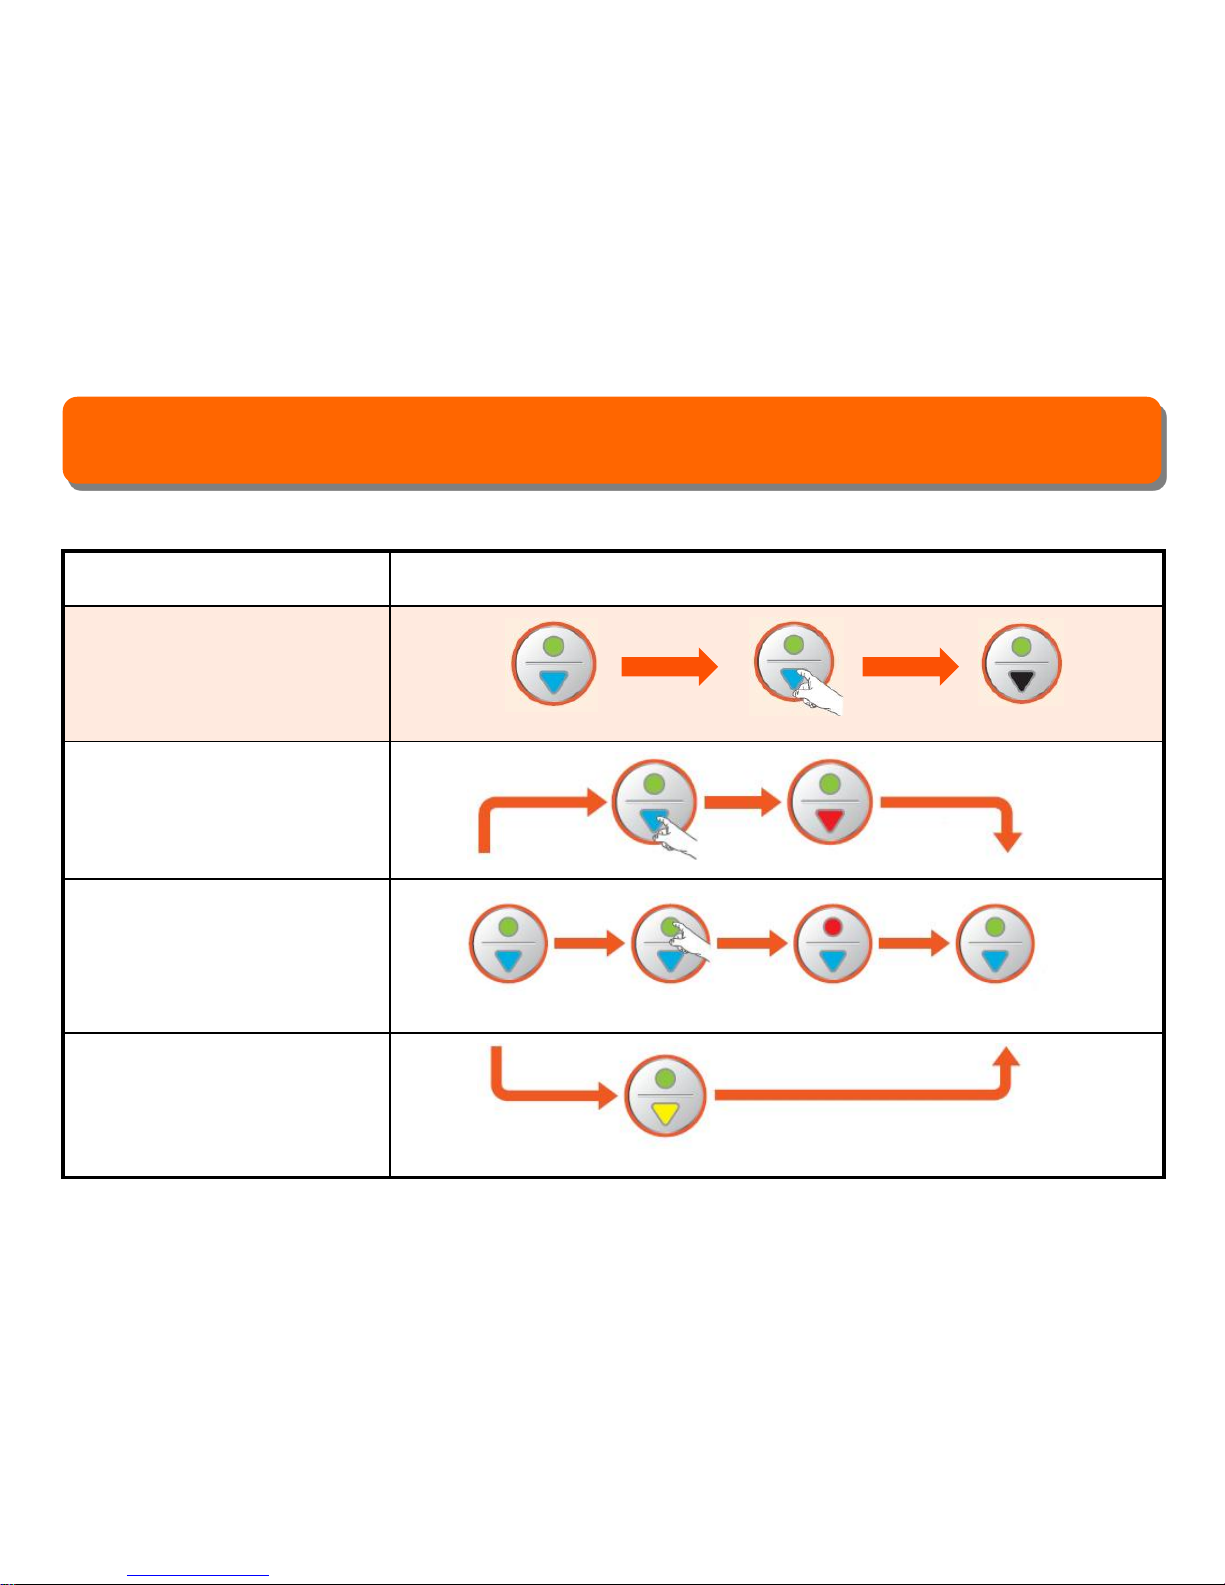
Mode operation (basic operation)
Constant recording
Every 3minitues
Emergency recording
Every 3minitues
Picture taking
1photo per one time
Shock occurrence
recording
Every 40seconds
Select button Video recording
(separate save)
Record processing Select button Return to
recording
Picture tacking
Shock occurrence recording
7

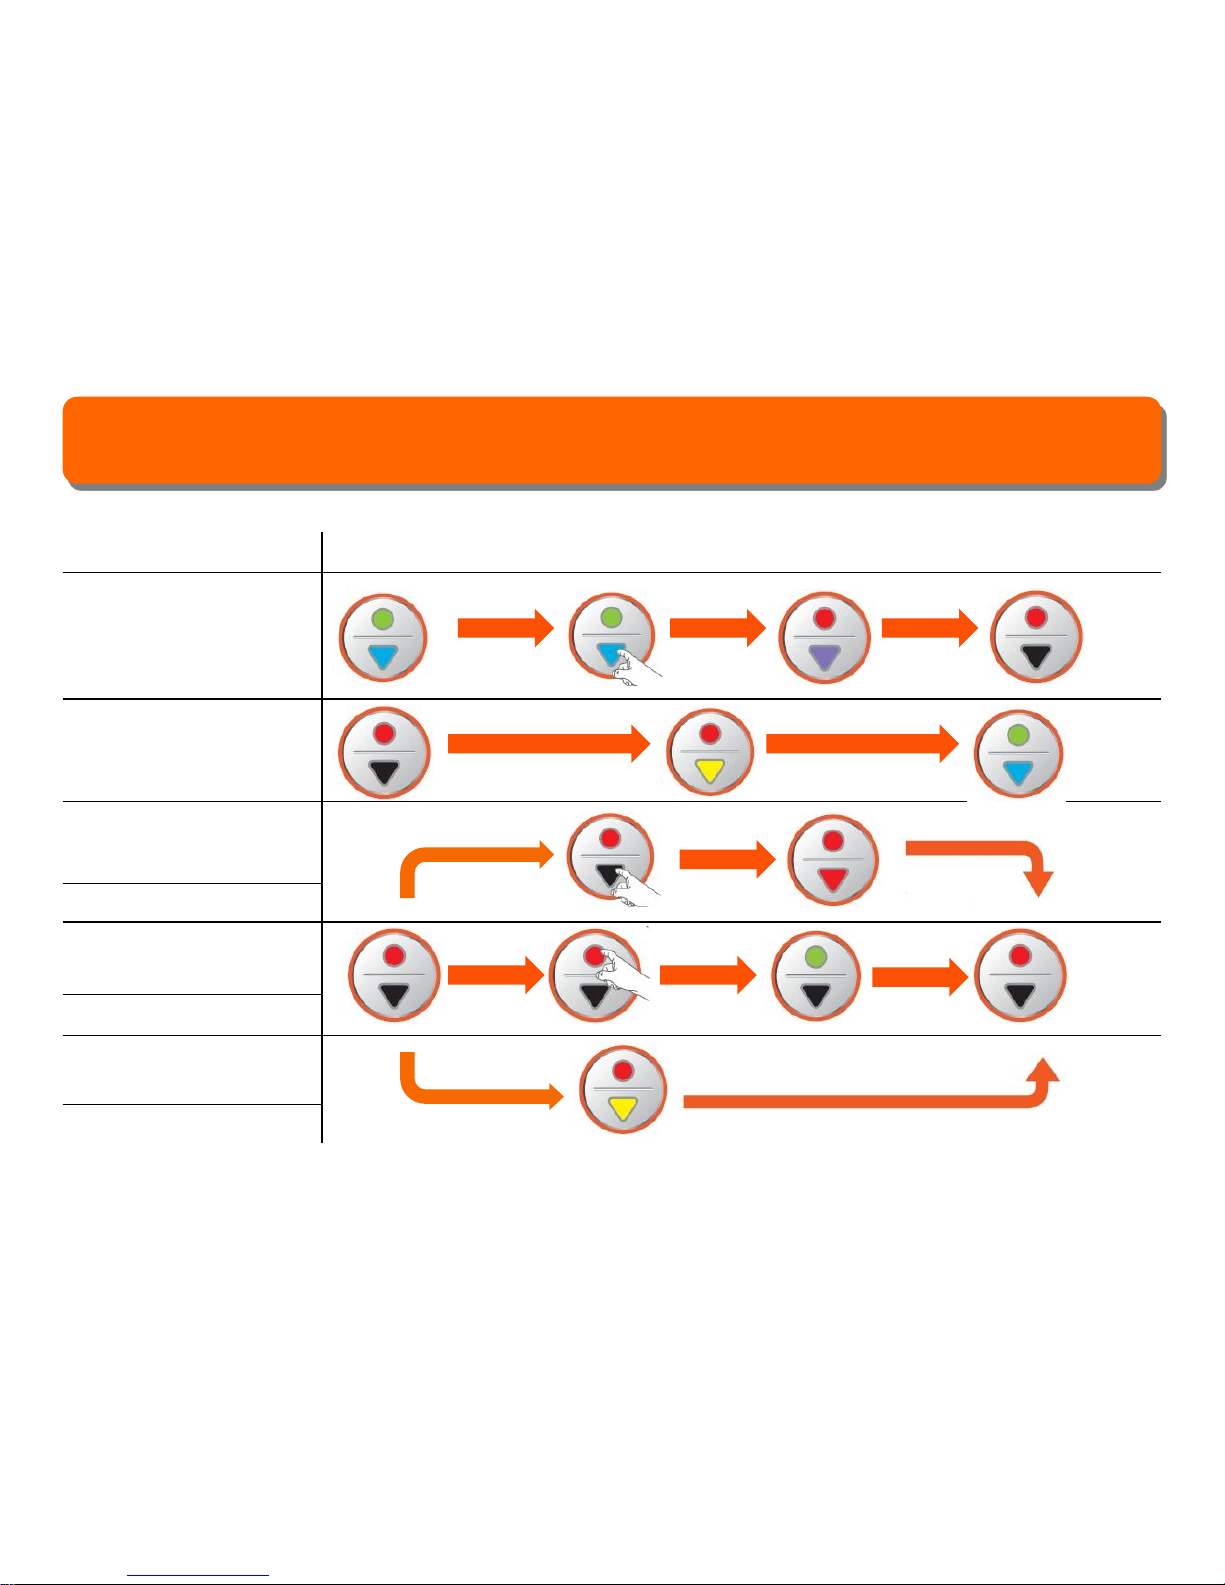
Mode operation (record by built-in battery)
Switchable to record
standby status when
engine OFF or
remove cigar cord
10min recordable
Emergency recording
Every 3minitues
Picture taking
1photo per one time
If no button detected
in 30sec, power turns
OFF automatically
Record processing Power removal Record standby
Select button Video recording
(separate save)
Record processing Select button Picture taking Record standby
Press button more than 1sec Power OFF
8

Product status alarm
Booting & record start “ding~ video recording start” Emergency recording start “chaling~” (projector sound)
Power removal “dingdong~” Emergency recording finish “ding~”
Faulty memory “du du~ Please check your
memory card”
Parking recording start “ding~ changed into parking
mode”
Shock recording “du du”USB Mode “ding~ changed into USB mode”
Picture taking “Crack~” (sound of shutter) Turn off alarm “dingdong~”
Tip
!In case constant recording section is not enough, old data shall be deleted and new data is
saved. (constant recording “normal” / emergency recording “picture” / recording during park and
shock occurrence “event”)
! Use recommended memory card for this product.
!Video can not be recorded if shock sensor does not work according to user setting.
! In all cases, accident or data loss and product damage due to the other cause of failure, the
company is not liable for loss or damages.
9

User setup program (run by PC USB connection)
Connect camera
with PC by USB
cable
Switchable to USB mode
if press button for
1second during
operation, and portable
disk drive runs
Click “Folder open
and see files” like the
above picture
Run “CR-
200HD_Config.exe” then
“Configure.exe” setup
program will be copied to
wallpaper and started
To connect camera with PC,
press button more than
1sec after putting the USB
cable into PC
10
Mode operation (PC USB connection)
PC connection
Connect PC USB when
recorded video check and
product setup is required
Same as basic operation
Same as basic operation
Same as basic operation
Select button Video recording
(separate save)
Record processing Select button Picture tacking Return to
recording
Shock occurrence recording
Record processing Press button more than 1sec USB mode
11

Setup program
Name
Description
Information
display
Model name, FW version displayed
Recording mode
Setup recording mode
Shock sensitivity
Adjust sensitivity of shock detection occurs in
driving and parking mode
Go to parking
mode
Selection menu to enter into parking mode
Set manual / auto (auto entry after 10min of
parking)
Sound setup
Adjust speaker sound , set voice recording
Time setup
Setup
initialization
Initialize system time setup as well as return
to default value
Confirmation
Apply to changed value
(New information will be applied after re-
booting)
SETUP PROGRAM
Model
Record (15fps)
Wide view record (30fps)
Standard record (30fps)
Recording mode
Shock sense in
driving
Shock sense in
parking
Go to parking mode
Speaker sound
Voice recording
System time
Low Standard High
Low Standard High
Manual Auto
Use No
PM
Initialize Confirm
12
Mode operation (parking recording)
Operation
Usable only when
product power is
connected to vehicle
battery
Changeable to
constant recording
when vehicle stars
Emergency recording
Every 3min
Picture taking
1photo per one time
Shock occurrence
recording
Record 40seconds
Parking
mode
Record
processing
Recording
status
Record processing Press button
more than 1sec
Entering to
parking mode
Recording status Vehicle starts
Select button Video recording
(separate save)
Recording status Select button Picture taking
Shock occurrence recording
13
Table of contents


