Fire Mountain JB03705501 User manual

4 Burner + Side Burner BBQ
PLEASE READ AND KEEP THESE INSTRUCTIONS FOR FUTURE USE
SAP Code: JB03705501
For further assistance, other products and more, join us at:
Website: www.firemountain.co.uk
Facebook: www.facebook.com/fire-mountain

Thank you for choosing our Fire Mountain 4 Burner + Side Burner BBQ. Please read this user
manual carefully and keep it for future reference. If you need any assistance, please contact
our customer service team on the details provided on the back page of this manual.
IMPORTANT: Read all instructions and operations before operating this unit.
Follow all steps in order. Never allow children to operate this unit.
Warnings:
•Only to be used outdoors.
•Read the instructions before using the appliance.
•Accessible parts maybe very hot, keep young children away.
•Do not move the appliance during use.
•Turn off the gas supply at the gas container after use.
•Any modification of the appliance may be dangerous.
•Spare parts must not be tampered with.
Attention:
Some parts of this appliance become very hot, take special care when handling especially
around children.
For your safety:
•Do not store or use petrol, mentholated fuels or any other flammable vapors and
liquids in the vicinity of this or any other appliance.
•Never light a gas grill with petrol or comparable fluids!
The recommended gas cylinder is a 5kg-13kg LPG gas bottle. This is sufficient for a heating
period of approx.4.0 hours with full power.
1

2
1. Technical Data
Model: K114BFI2
Fire Mountain
3
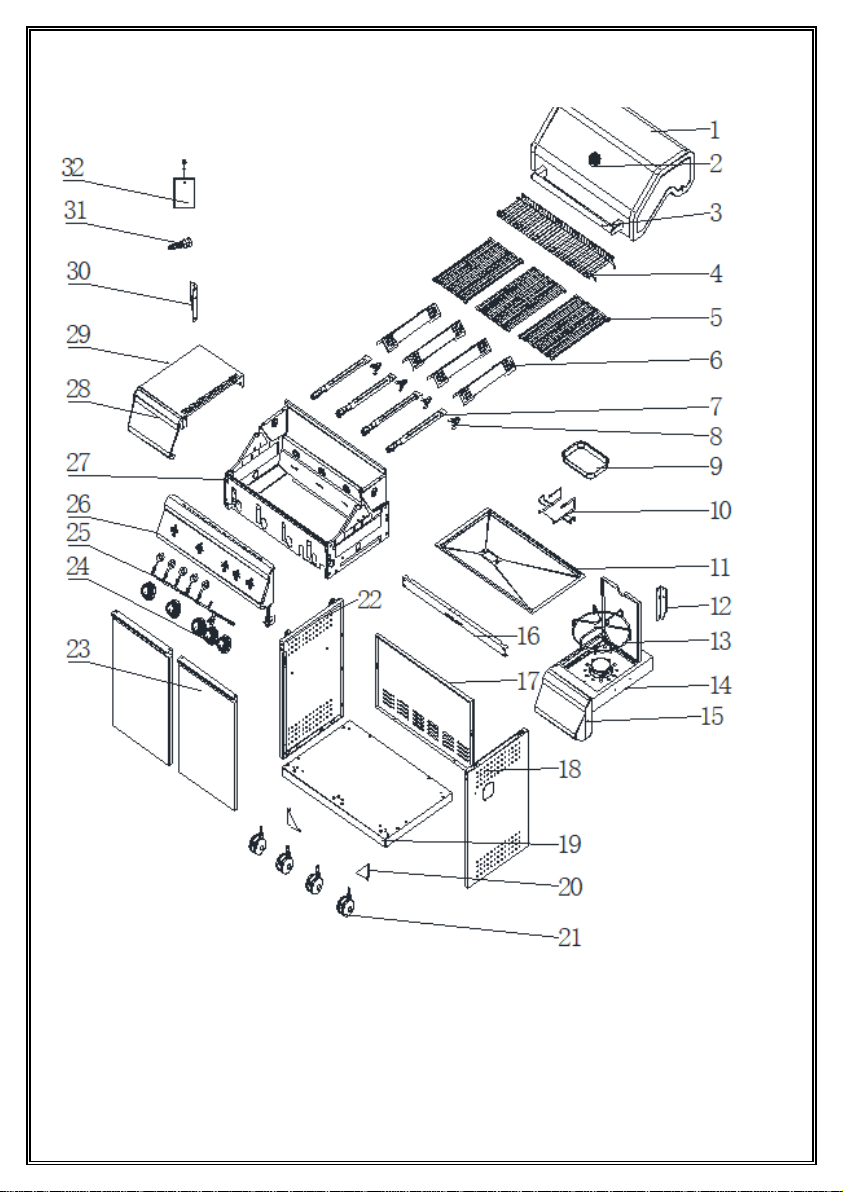
2. Exploded View
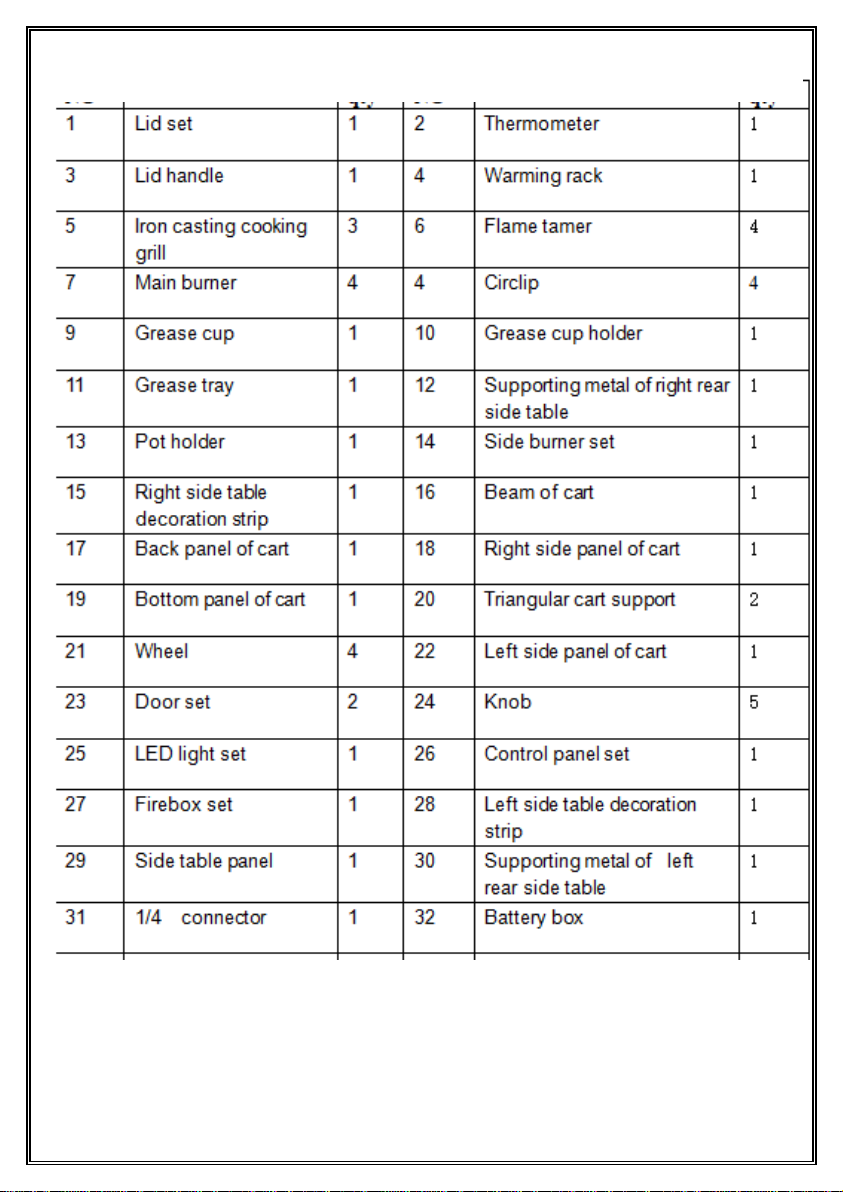
3. Single Part List
4

5
4. Fixing Elements
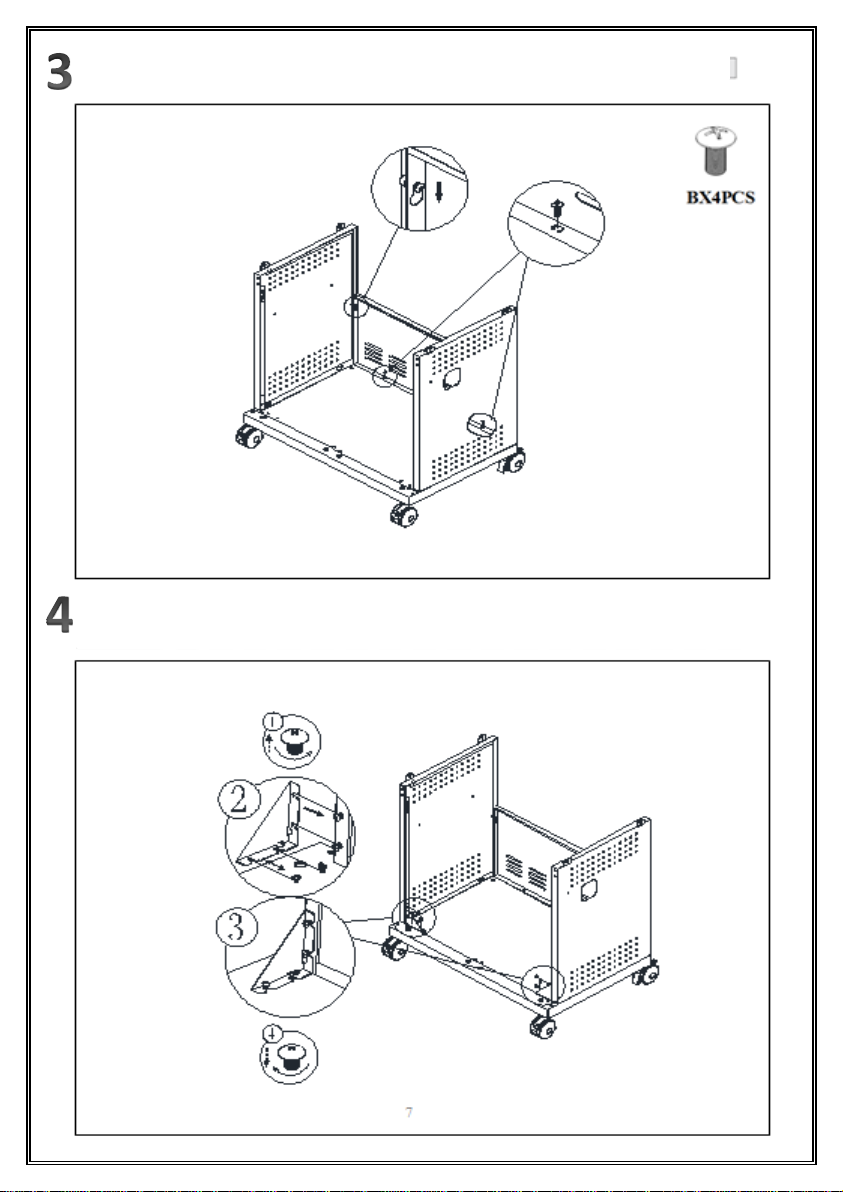
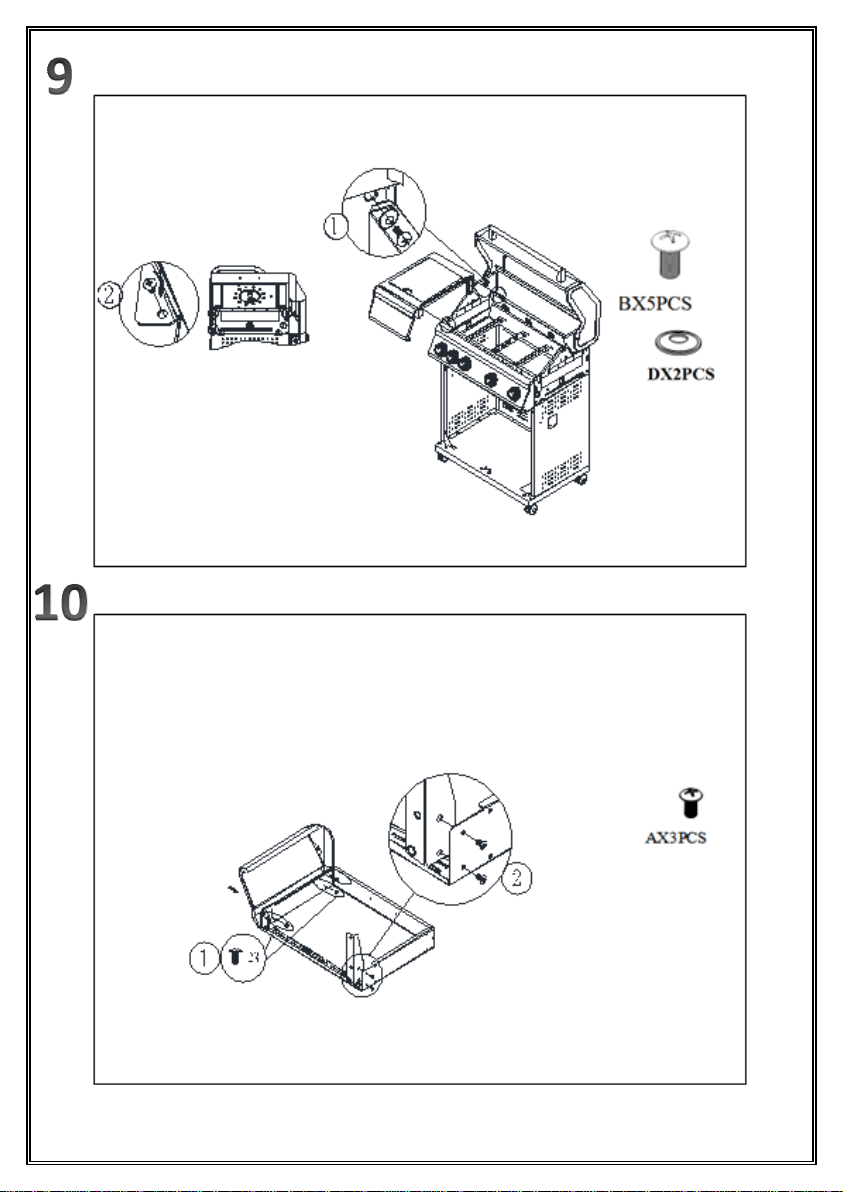
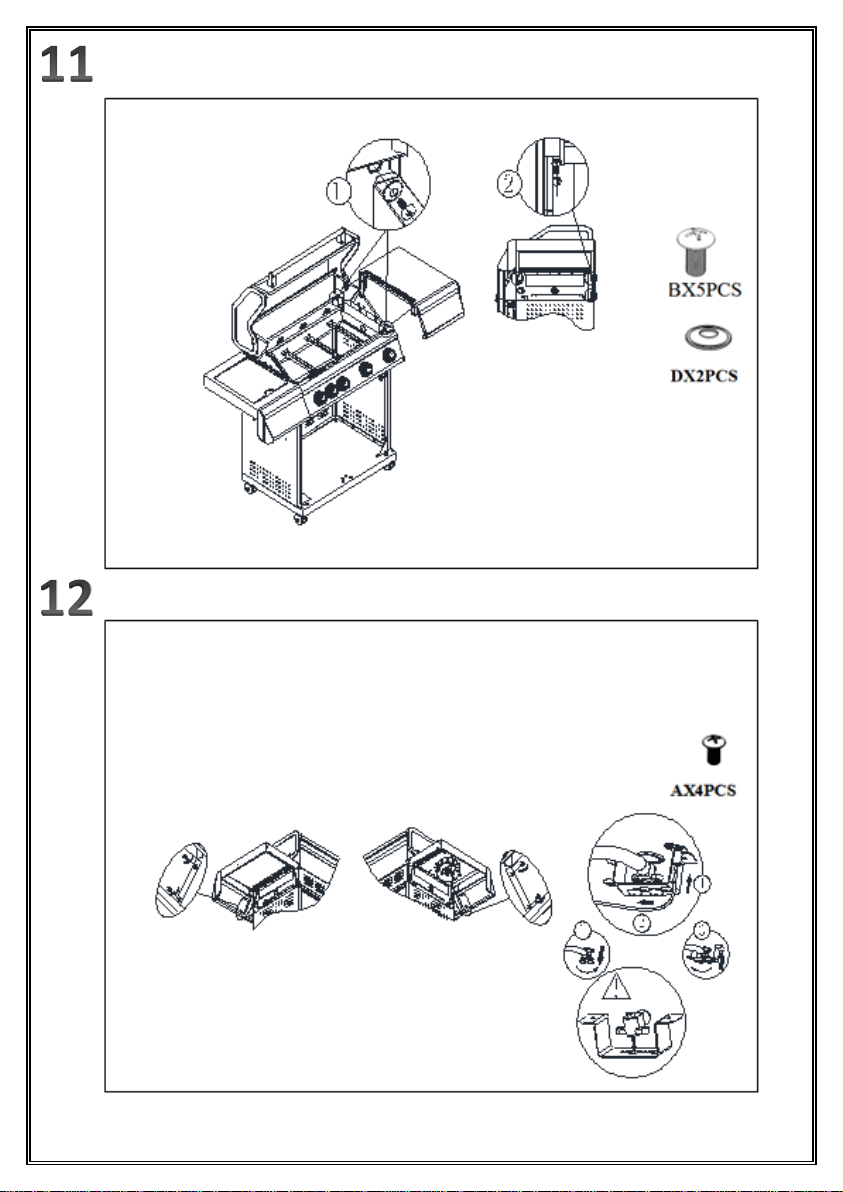
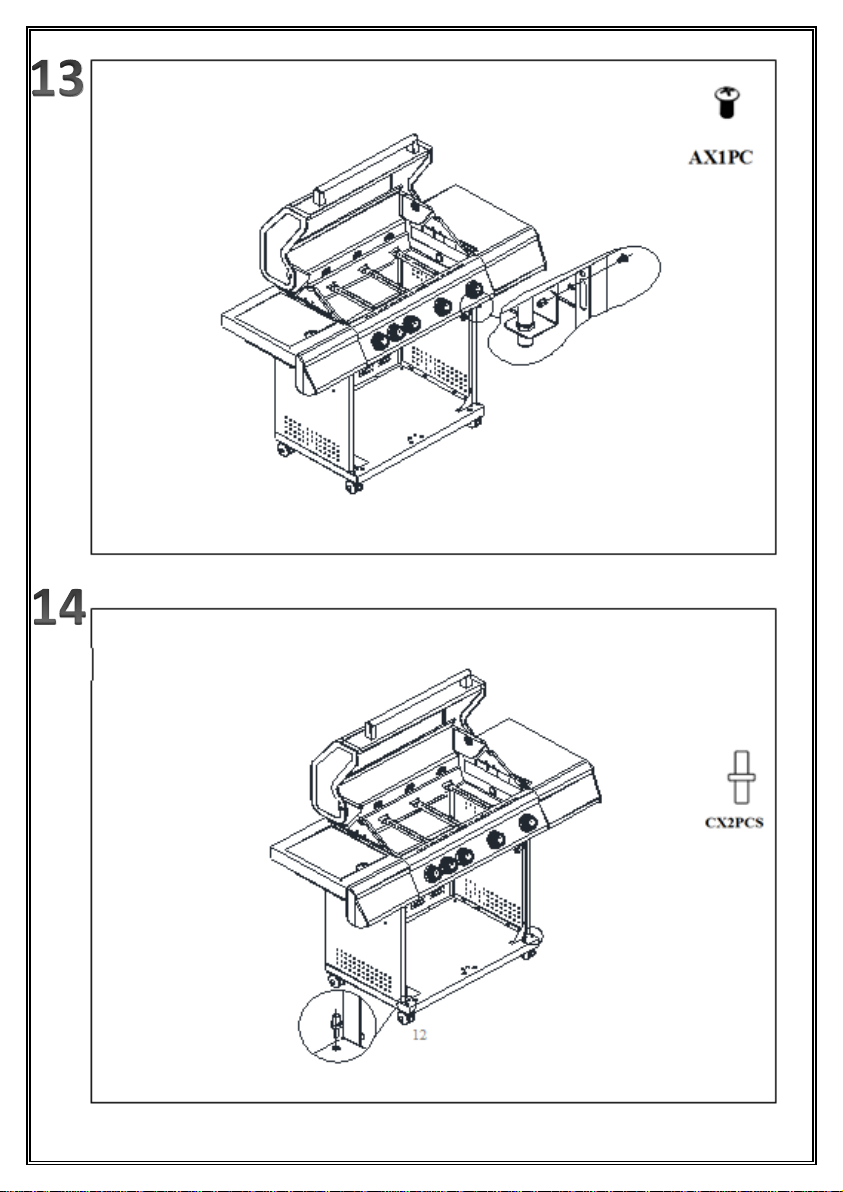
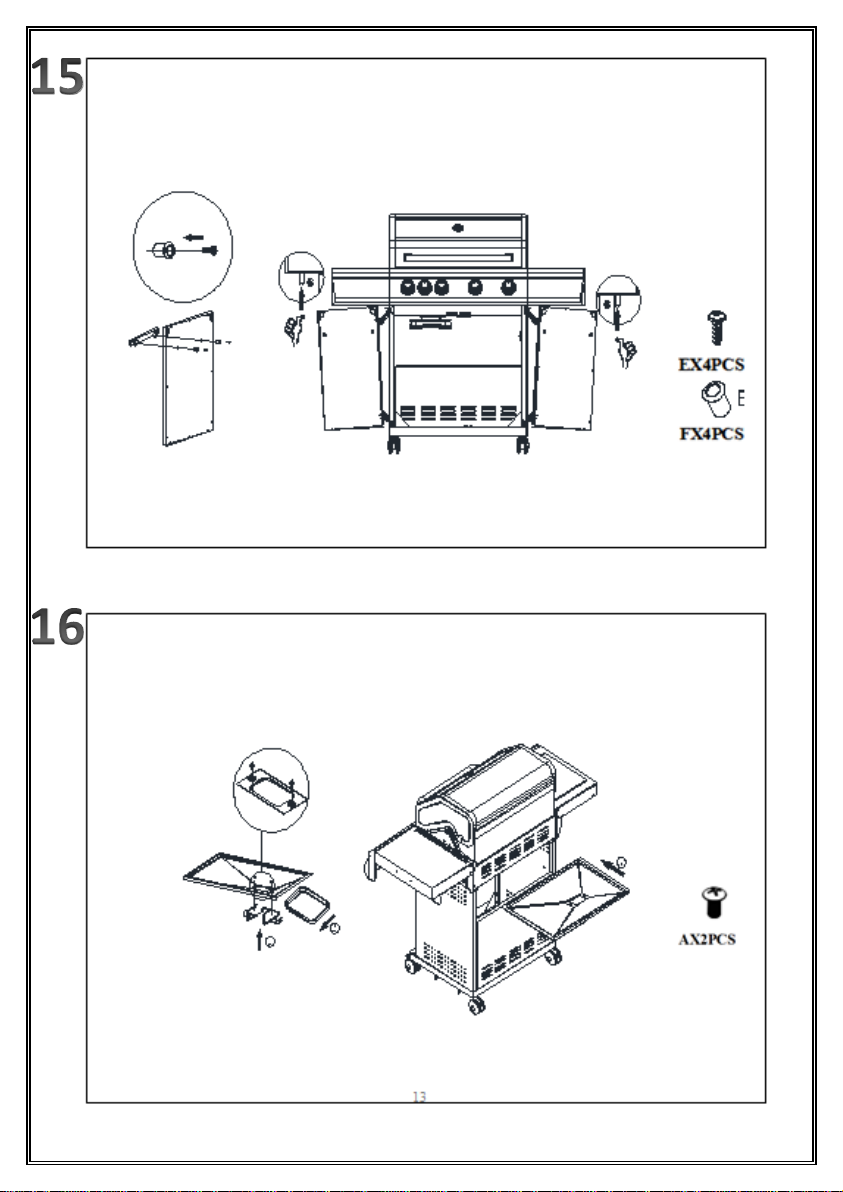
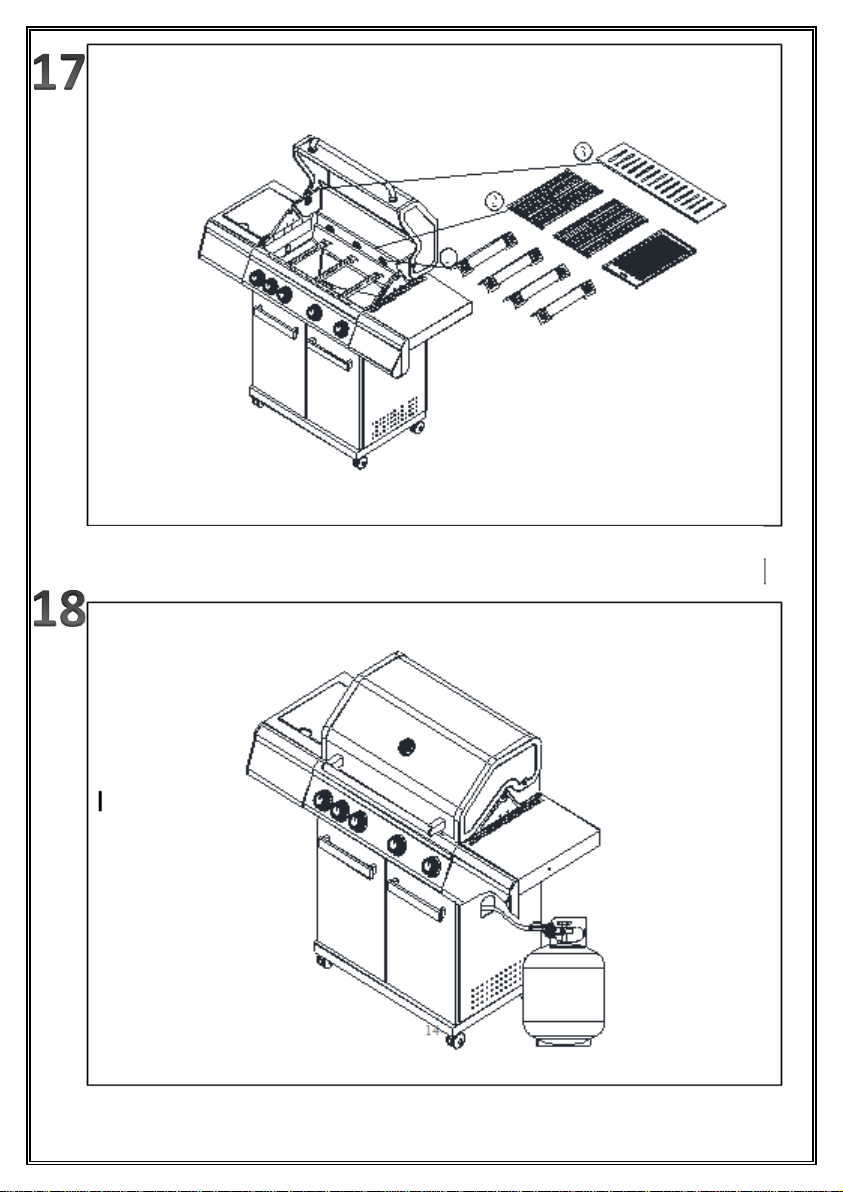
5. Assembly Instructions
Make sure your BBQ is assembled properly. Detailed assembly instructions are packed with
each BBQ giving specific assembly procedures for each model. Follow these instructions
carefully to ensure the correct and safe assembly of the BBQ.
Caution: Although we take every effort to ensure that the assembly process is as easy as
possible, it is inherent with fabricated steel parts that corners and edged can cause cuts if
improperly handled during assembly procedures. Be careful while handling any parts during
assembly. It is strongly recommended that you protect hands with a pair of work gloves.

6
7

8

9
10
11
12
13
14
15
6. Before Use
You will need to purchase a 5kg LPG gas bottle and the pressure regulator should
correspond to the pressure and gas category of the appliance, which can be obtained from
your nearest Gas Retailer. The regulator should comply with EN16436 or EN16129 and
EN16436 with current version and national regulation.
You will need to purchase a gas bottle and a 28-30/37 mbar regulator for I3+ and 28-30mbar
regulator for I3B/P (30), 50 mbar regulator for I3B/P (50) to operate this gas BBQ which can
be obtained from your nearest Gas Retailer.
WARNING
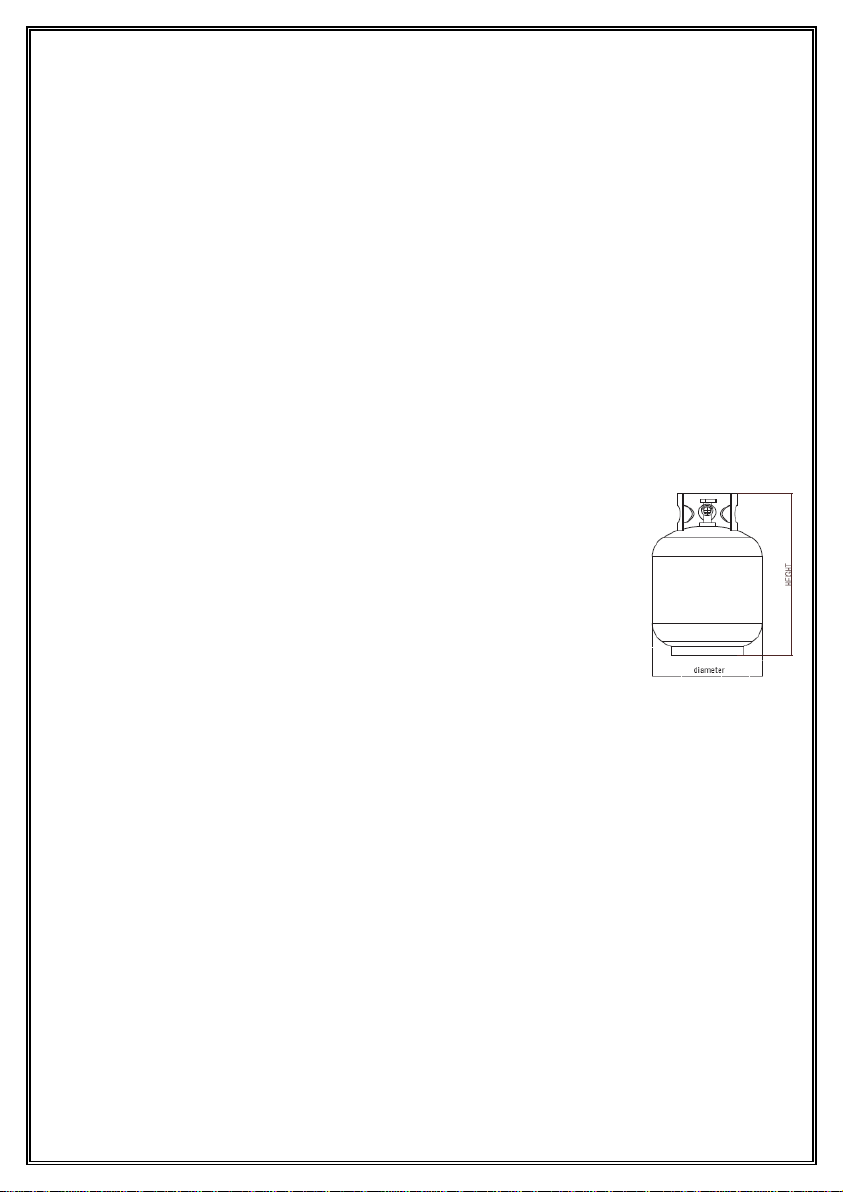
a) The gas cylinder is to be used only in the upright position.
b) Only to be used with a gas cylinder that does not exceed 500 mm in height and >240mm
<310 mm in diameter.
c) This BBQ must only be used with an approved hose and regulator.
Energy saving tips:
a) Do not leave the lid open for longer than required.
b) Turn the BBQ off as soon as cooking is completed.
c) Preheat the BBQ for 10 to 15 minutes only. (Except for the first use)
d) Do not preheat longer then recommended.
e) Do not use a higher setting than required.
Connect the hose and regulator to the gas cylinder at the right side of the gas BBQ .Keeping
in mind that the gas container must be kept away from heat and in a safe position .The hose
dimension is 8mm diameter.
16

7. Installation
After purchasing your gas bottle you will then be ready to set it up with your gas grill.
a) When changing the gas bottle which shall be carried out away from any source of
ignition. Position the gas bottle at the side of your gas grill, not underneath, keeping in mind
that the bottle must be kept away from heat and in a safe position.
b) When ready to use your gas grill insert the regulator into the gas bottle valve and tighten
firmly. The maximum length of hose shall not exceed 1.5m.
Warning: Before attempting to light your gas grill you must refer to your lighting
instructions and warning / safety points.
Check the hose before each use, searching for cracking, cuts or any abrasions. If the hose is
found to be faulty in any way do not attempt to use your gas grill.
When changing your gas bottle ensures that there are no sources of ignition close by i.e.
fires, cigarettes, naked flames etc. Make sure that the appliance is switched off.
Ensure that the hose is not subjected to twisting which will affect the gas flow when using
your gas grill. Also the hose must not have undue tension and must not touch any part of
the gas grill which may be hot.
Please choose flexible hose whose heatproof higher than 80℃
Every 2 years changing the flexible hose when the national conditions require it.
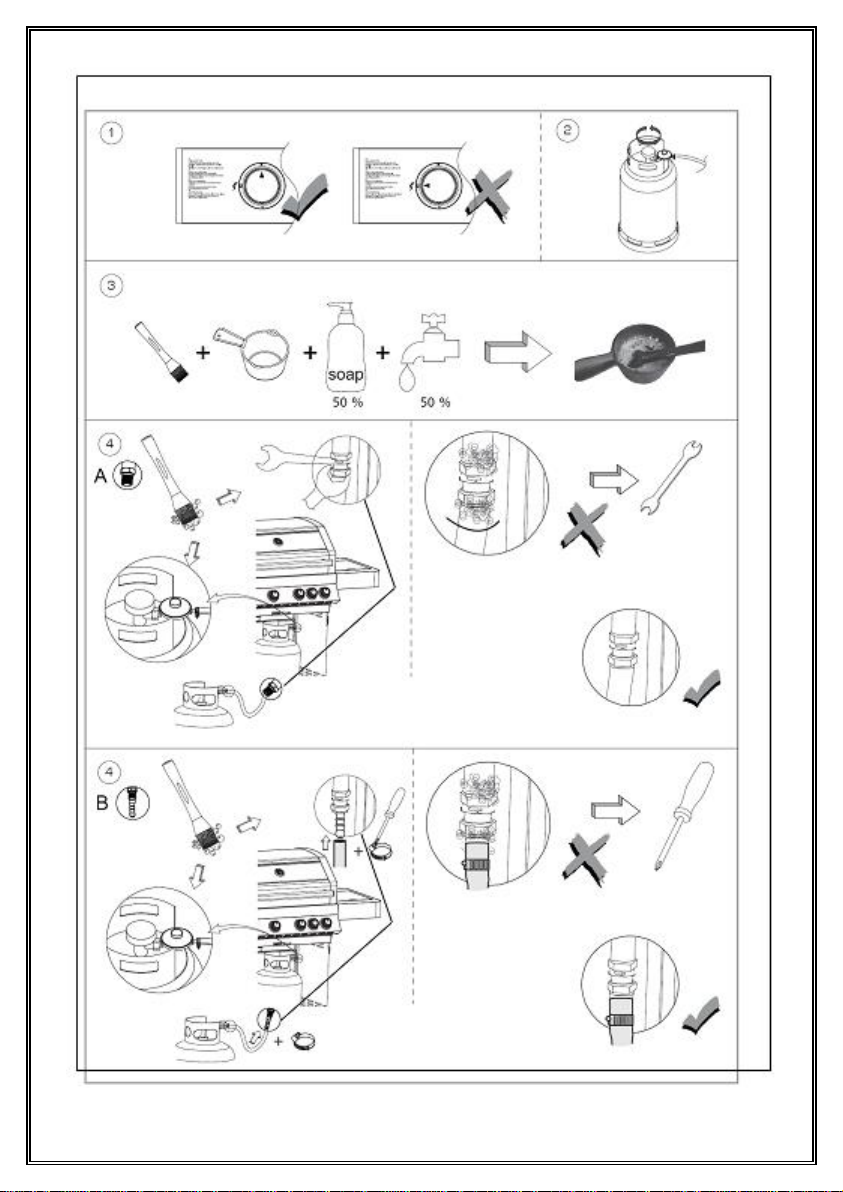
How to Connect a Gas Bottle
a) Turn the orange cap so that the arrow is pointing to the gap in the shroud.
b) Remove the orange safety cap by pulling the lanyard out, then out. Do not use tools.
Leave the cap hanging.
c) Check that the black sealing washer is fitted inside the cylinder valve. Place the regulator
down over the valve with switch.
d) Turn the switch clockwise on gas bottle-then turn on the gas grill as instructed.
Warning: Always test gas line for leaks at connector with soap water checking all
connections.
17

How to Disconnect a Gas Bottle
a) Except for twin-cylinder installations with a changeover valve, turn off the gas tap if fitted
to the appliance. Wait until the burner and pilot light have gone out. For installations with a
changeover valve, it is only necessary to switch off the empty cylinder.
b) Replace the orange safety cap onto the empty cylinder.
GENERAL
Although all gas connections on the grill are leak tested at the factory prior to shipment, a
complete gas tightness check must be performed at the installation site due to possible
mishandling in shipment, or excessive pressure unknowingly being applied to the unit.
Periodically check the whole system for leaks following the procedures listed below. If the
smell of gas is detected at any time you should immediately check the entire system for
leaks.
BEFORE TESTING
Make sure that all packing material is removed from the grill including tie-down straps.
DO NOT SMOKE WHILE LEAK TESTING. NEVER PERFORM LEAK TEST WITH AN OPEN
FLAME.
Make a soap solution of one part liquid detergent and one part water. You will need a spray
bottle, brush, or rag to apply the solution to the fittings. For the initial leak test, make sure
the L.P. cylinder is 80% full.
TO TEST
1. Make sure the control valves are in the OFF position, and turn on the gas supply.
2. Check all connections from the gas regulator and supply valve up to and including the
connection to the manifold pipe assembly (the pipe that goes to the burners). Soap bubbles
will appear where a leak is present.
3. If a leak is present, immediately turn off the gas supply and tighten the leaky fittings.
4. Turn the gas back on and recheck.
5. Should the gas continue to leak from any of the fittings, turn off the gas supply.
18
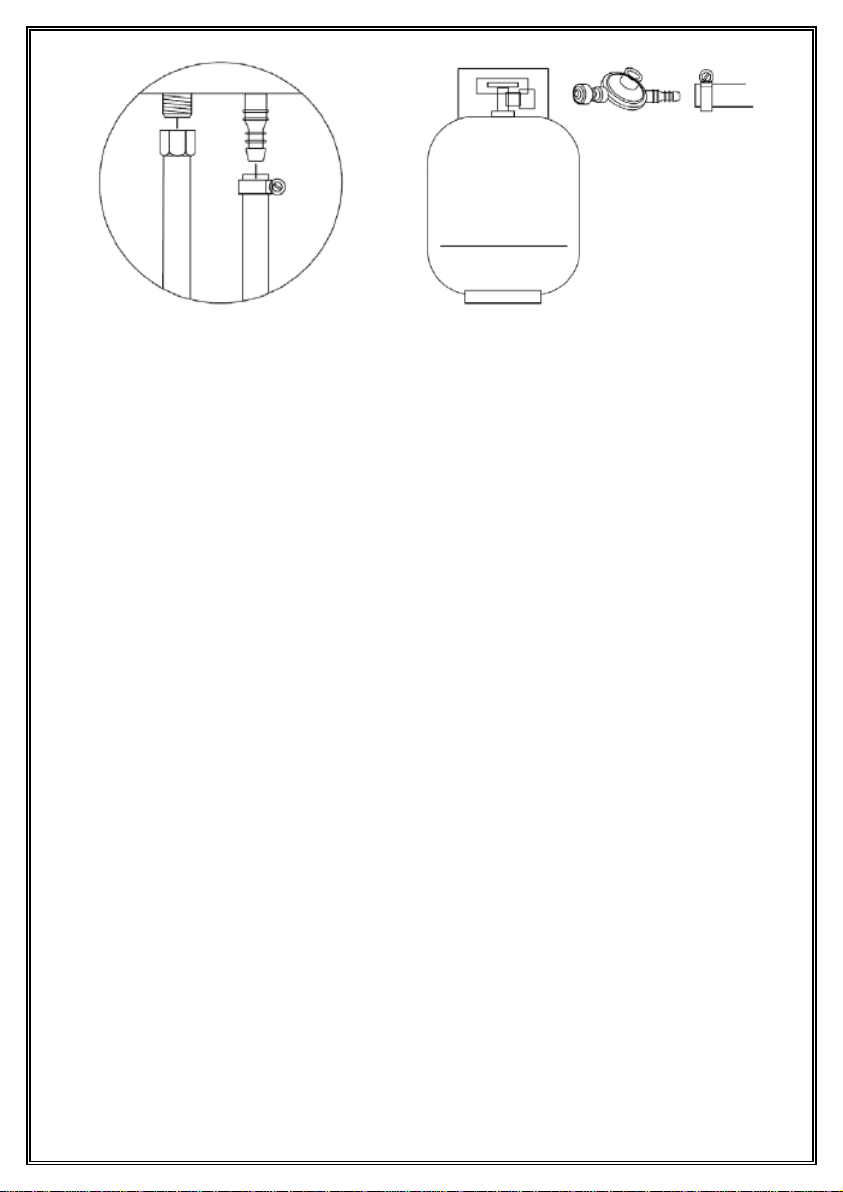
Install Regulator Hose Install Gas Tank & Regulator Hose
Do not use the grill until all connections have been checked and do not leak.
ALWAYS CHECK FOR LEAKS AFTER EVERY GAS TANK CHANGE
Check all gas supply fittings for leaks before each use. It is handy to keep a spray bottle of
soapy water near the shut-off valve of the gas supply line. Spray all the fittings. Bubbles
indicate leaks.
19
Table of contents
Other Fire Mountain Grill manuals

Fire Mountain
Fire Mountain JY03800302 User manual

Fire Mountain
Fire Mountain K116BFI3S User manual

Fire Mountain
Fire Mountain JB03300201 User manual

Fire Mountain
Fire Mountain EVEREST 3 BURNER GAS BBQ User manual

Fire Mountain
Fire Mountain JB03705601 User manual

Fire Mountain
Fire Mountain 24 Kamado BBQ User manual

Fire Mountain
Fire Mountain BQ-R32 User manual


