FireBird CPK 7210 N User manual

Manual
Mounting parallel bench srew
mountingsystem
Flate plate collector
CPK 7210 N
6 9 0 x x x x / version 2008.03

Contents
2
Safety information.........................................................................................3
Transport note ..............................................................................................4
Assembly instructions - Collector .....................................................................5
Overview of tools ..........................................................................................6
Overview of materials ....................................................................................7
Suggestion for attachment points ....................................................................8
Mounting parallel bench srew mountingsystem ..................................................9
Technical data - Collector.............................................................................. 12
Operating tips - Solar power system .............................................................. 13
General Information..................................................................................... 15

Safety information
3
Before commencing mounting work on roofs, set up
mechanical (i.e. non-human) fall protection devices
and fall arrest systems in accordance with DIN 18338
on roof sealing and roof covering works and
DIN 18451 on scaffolding work with safety nets
before starting work! See also German builders’
protection ordinance Bauarbeiterschutzverordnung)
BGBL 340/1994 §7-10!
Safety harnesses should be fixed above the users
where possible. Safety harnesses should only be
fastened to structures or fixing points with sufficient
load-bearing capacity!
If mechanical fall protection or fall arrest systems
cannot be installed for technical reasons, safety
harnesses must be used!
Do not use damaged ladders, e.g. wooden ladders
with split runners or rungs, or bent or buckled metal
ladders. Do not try to repair broken runners, rungs
or steps on wooden ladders!
Only use safety harnesses (safety belts, lanyards and
straps, shock absorbers, fall arresters) which have
been tested and certified by authorised testing
bodies.
Ensure that ladders are put up safely. Observe the
correct leaning angle (68° - 75°). Prevent ladders
from sliding, falling over or sinking into the ground,
e.g. by using wider feet, feet adapted for the ground
or hooking devices.
If no mechanical fall protection or fall arrest systems
are provided, working without suitable safety
harnesses can lead to falls from great heights, thus
causing serious or lethal injuries!
Only lean ladders against secure points. Cordon off
ladders in traffic areas.
Ladders not properly secured against sinking in,
sliding or falling over may lead to dangerous falls!
Contact with live overhead electric cables can be
lethal.
Only work in the vicinity of live overhead electric
cables where contact is possible if:
- they are voltage-free and this state is secured for
the duration of the work.
- the live sections are secured by covering them or
cordoning them off.
- the safety distances are observed.
Voltage radius:
1m with voltages .........................up to 1000 volt
3m with voltages ............ from 1000 to 11000 volt
4m with voltages .......... from 11000 to 22000 volt
5m with voltages .......... from 22000 to 38000 volt
> 5m when the voltage rating is not known
Wear protective goggles when drilling!
Wear safety shoes when carrying out installation
work!
Wear cut-proof safety gloves when carrying out
installation work!
The manufacturer hereby guarantees to take back
products marked with an eco-label and to recycle the
materials used.
Only the heat transfer medium specified may be
used!
Wear a helmet when carrying out installation work!

Transport note
4
ATTENTION:
Do not lift collectors by the connections or the screw threads!

Assembly instructions - Collector
5
Instructions for installation and transport
The installation may only be carried out by qualified personnel. Only the supplied material should be used for the
installation. Please inform yourself about the applicable local norms and regulations before mounting and operating
the solar system. Note: Installing a collector array signifies an intervention into an existing roof. Roof coverings,
e.g. tiles, shingle and slate, especially in the case of converted and inhabited loft spaces or roofs with less than the
minimum slope (with regards to the covering), require additional on-site measures, e.g. sarking, as security against
water penetration caused by wind pressure and driving snow. For large collector arrays it is often advantageous to
mount the collectors on a special supporting structure made of steel channels. This substructure and its connections
to the main building structure should be designed on-site in accordance with the local conditions. Alternatively, it is
possible to install the collectors without perforating the roof membrane by using concrete ballast with guys. The
collectors are mounted on concrete blocks. Rubber mats should be used if necessary to protect the roof membrane
against damage and to increase the friction between the roof and the ballast blocks. In addition, it is necessary to
secure the collectors with 5mm steel cables (minimum tensile strength 1450N/mm²) to absorb any peak wind loads.
The permissible roof loading and the fixing points on the building for the steel cables should be verified on-site by
a structural engineer.
The use of a carrying strap is recommended for transporting the collector. The collector must not be lifted at the
connections or on the threading. Avoid impacts and mechanical action on the collector, especially on the solar glass
and the pipe connections. If the aluminium tray collectors have a protective coating, this must be protected from
sunlight and removed just before installation.
Structure
The collectors may only be mounted on sufficiently load-bearing roof surfaces and substructures. The structural
load-bearing capacity of the roof and the substructure must be tested on-site before mounting the collectors. Here,
particular attention should be paid to the quality of the timber substructure in terms of the stability of the screw
joints necessary for installing the collectors. In particular, it is essential to have the entire collector structure verified
at the installation site according to DIN 1055, Part 4 & 5 or according to country-specific regulations in regions with
heavy snowfalls (Note: 1m³ powder snow ~ 60kg/1m³ wet snow ~ 200kg) or in regions with high wind speeds. The
assessment should also take into account any special features of the particular site that could lead to increased loads
(foehn wind, air jets or eddy formations, etc). Collector arrays should always be installed in such a way that any
possible snow piles caused by snow trap grids (or the position of the collectors) do not reach the collectors. Here
must be at least 1m distance from roof ridging or edges.
Lightning protection / Equipotential bonding of the building
It is not necessary to connect collector arrays to the lightning protection of the building (please observe the country-
specific regulations). For installations on metal substructures at the installation site, authorized lightning protection
specialists must be consulted. The metal tubes of the solar circuit must be connected to the main potential
equalization bus by means of a conductor (green/yellow) with a cross-section of at least 16mm² CU (H07 V-U or R).
It is possible to ground the collectors to a ground rod. The grounding line must be laid outside the house. The ground
rod must also be connected to the main potential equalization bus by a line with the same cross-section as above.
Connections (screw connections)
Depending on the design, the collectors must be connected with one another and/or the connection pipes using
screw fittings (1" internal/external thread) with flat-face sealing. Ensure correct placement of the flat gaskets. If
flexible pipes are not used as connectors, precautions must be taken to protect the connection pipes against
temperature fluctuations caused by heat expansion (expansion bends/flexible piping). In this case, no more than 6
collectors may be connected in series. Larger collector arrays must be assembled with expansion bends or flexible
members inserted in the links (IMPORTANT: check the pump design). When tightening the connections, always
apply counter-pressure with a wrench or another spanner to prevent damage to the absorber.
Collector inclination / General notes
The collector is suitable for angles between 15° (minimum) and 75° (maximum).
Steps must be taken to ensure that water and other contaminants such as dust, etc. are prevented from getting into
the collector connections and ventilation holes.
Connecting support rails
If several support rails are to be mounted in series, they must be connected with the connectors above and below.
Warranty
Warranty claims can only be made if the supplier's own antifreeze is used and maintenance is carried out correctly.

6
Overview of tools
Tape measure Drill Ø 8 mm twist drill (wood)
Ø 14mm stone drill (brick) Hex spanner Angle grinder
Hacksaw Installation wrench

Overview of materials
7
Bench screw M12*350 Rubber seal M12 washer
M12 hex nut Ø 13 mm clamping piece Support rail
M8*30 hex bolt M8 washer M8 hex nut
Flat gasket

Suggestion for attachment points
8
COLLECTOR VERTICAL
Collectors Total length Atachment
points
2 212cm 4
3 318cm 6
4 424cm 10
5 530cm 12
6 636cm 14

9
Mounting system, parallel
1
2
3
4
The attachment points (on the rafter) must be measured pre-
cisely for this type of installation.
1: A = COLLECTOR in a vertical position: 202cm
Generally, the following applies:
one support per vertical collector.
2: Drill tiles
3: Drill rafters
4: Fasten bench screw, minimum screw depth ≥100mm

10
Mounting system, parallel
5
6
7
5: Attach the rubber seal and tighten
Sequence: rubber seal - washer - nut
6: Set the clamping pieces to a common height and secure them
(distance from top edge of the brick to bottom edge of the clam-
ping piece approx. 20-30mm)
Sequence: Nut – clamping piece Ø13 – washer – nut
Cut off excess length of bench screw.
7: Align the support rails at the top and bottom and attach to the
grooved surface
using the clamping pieces.
Sequence: screw - washer - clamping piece - nut

11
Mounting system, parallel
8a 8b 8c
9
8: Insert the collectors and attach them to the support rails with screws.
Sequence: screw - washer - support rail - collector
9: Connect the collectors to one another.

Information about the collector
12
Technical data
Gross area m² 2.12 Weight kg 35
Net area m² 1.80 Contents l 1.4
Apertur m² 2.00 max. Pressure bar 10

Operating tips - Solar power system
13
Flushing and filling
For safety reasons, you should only fill the collectors when there is no direct irradiation from the sun (or cover the
collectors). Especially in regions exposed to frost, for flat plate collectors you should use a mixture of (FS) antifreeze
with water (40% antifreeze). The solar thermal system should be filled and commissioned within one week of
installation, because heat build-up in the collector (array) can damage the flat gaskets in empty systems. If this is
not possible, the flat gaskets should be replaced before commissioning to prevent leakage.
Attention: Antifreeze must be mixed with water before filling!
Recommended antifreeze for flat plate collectors: FS
Note: 40% proportion of antifreeze - freezing point: -22° C/solidification point: -26° C
50% proportion of antifreeze - freezing point: -32° C/solidification point: -44° C
It may not be possible to completely empty collectors once they have been filled. For this reason, collectors exposed
to frost should only be filled with a water/antifreeze mixture, also for pressure and function tests. Alternatively, the
pressure test can also be carried out using compressed air and leak detection spray.
Installing the temperature sensor
The temperature sensor should be installed in the sensor sleeve nearest to the collector array flow. To ensure
optimal contact between the sensor and the surrounding environment, the gap between the sensor sleeve and the
sensor element should be filled with a suitable conducting compound. All materials used for installing temperature
sensors (sensor element, conducting compound, cables, sealing and insulating materials) must be suitably
temperature resistant (up to 250° C).
Operating pressure
The maximum operating pressure is 10 bar.
Bleeding
The system must be bled:
- when commissioning the system (after filling the collectors)
- 4 weeks after commissioning
- when necessary, e.g. if there are malfunctions
Warning: Risk of scalding due to steam and hot heat transfer fluid!
Only operate the bleeding valve if the temperature of the heat transfer fluid is < 60° C.
When bleeding the system, the collectors must not be hot! Cover the collectors and, if possible, bleed the system
in the morning.
Check heat transfer fluid
The heat transfer fluid must be checked every two years with regard to its antifreeze and pH value.
- Check antifreeze using antifreeze tester and replace or refill if necessary!
Target value is ca. - 25° C and - 30° C depending on climatic conditions.
- Check pH value with a pH indicator rod (target value approx. pH 7.5):
If the limit pH value is less than ≤pH 7, replace the heat transfer fluid.
Maintenance of the collector
The collector or the collector array must be inspected visually, once a year, for any damage, leaks and
contamination.
Additional recommendations on operation and maintenance can be found in the supplier's general documentation
and instructions on commissioning and maintenance.
Operating tips - Solar power system
14
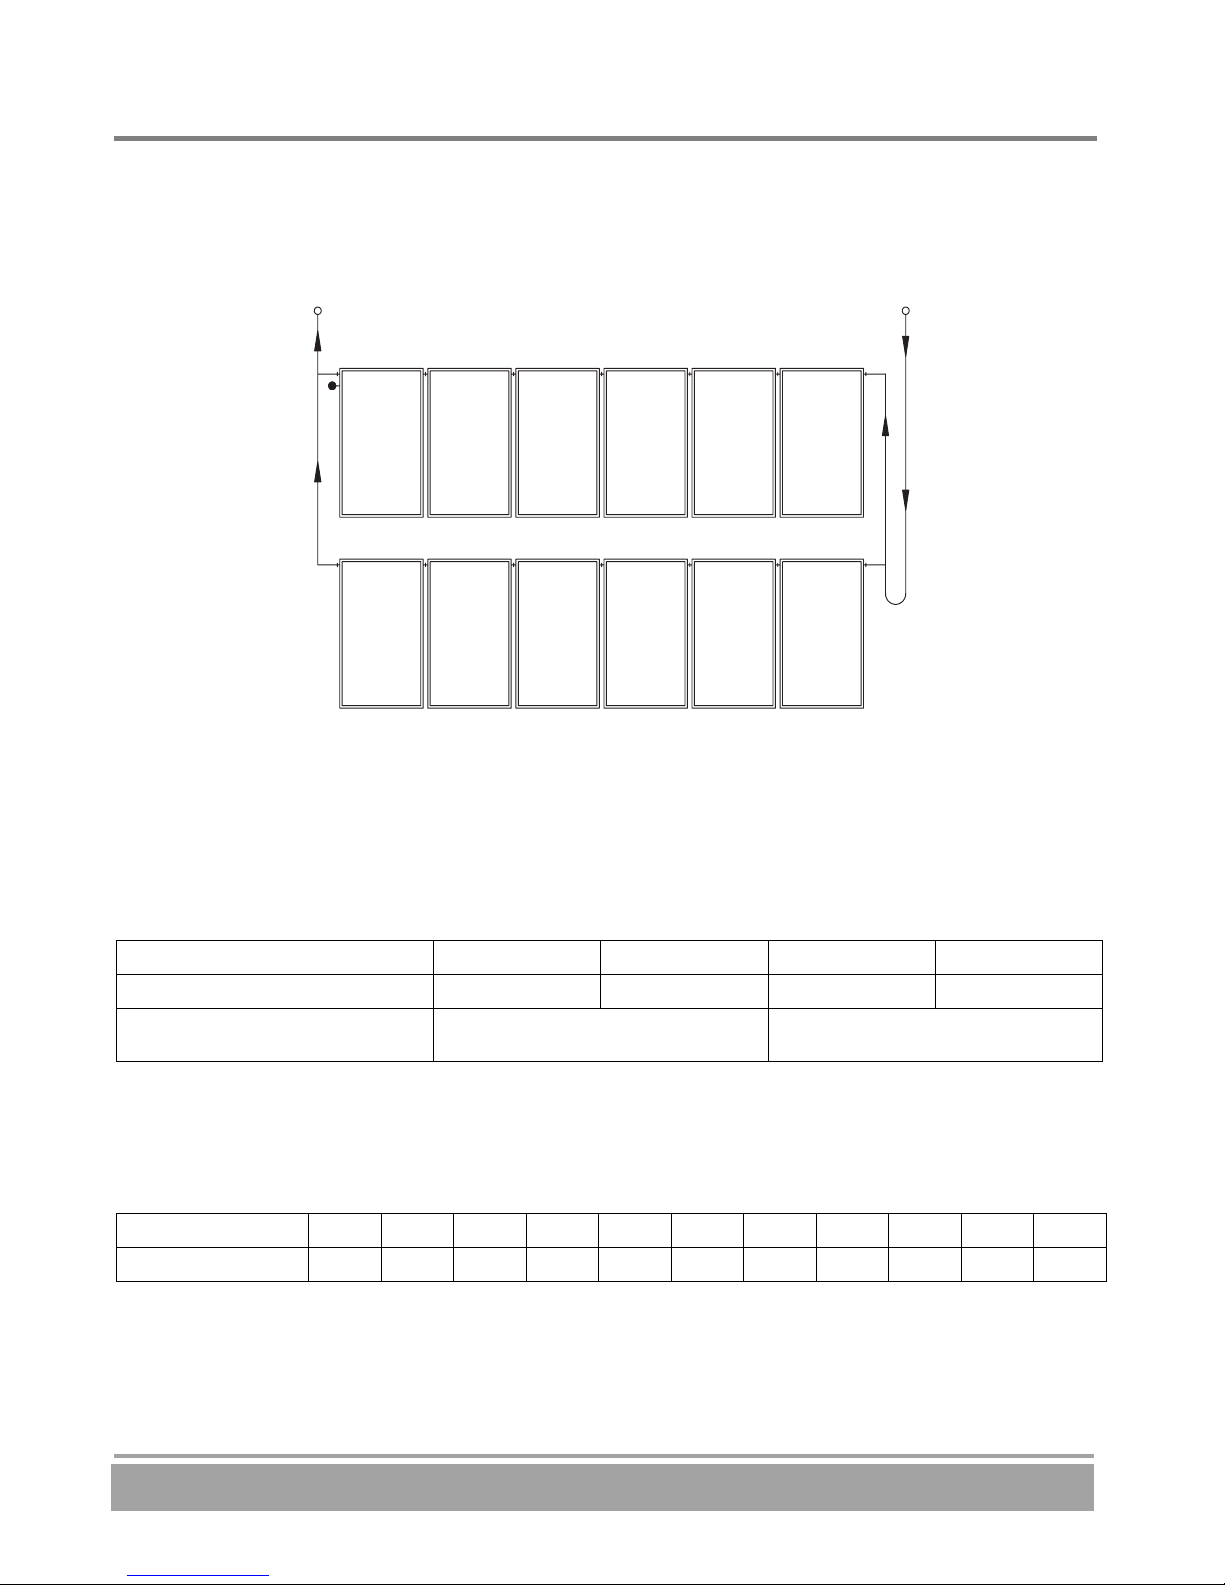
Connecting the collectors to one another
The diagram below is an example of how the collectors can be connected to one another. However, the actual
connection may be different depending on structural conditions. A maximum of 6 collectors may be connected in a
series! If a collector panel is made up of more than 6 collectors, the panel must be connected several times in
parallel.
Mass flow rate
To ensure the performance of the collector, a specific flow rate of 30 l/m²h is to be selected up to a collector panel
size of approx. 25m².
Pipe diameters
Dimensions table with a specific flow rate of 30 l/m²h
Collector panel size [m²] approx. 5 approx. 7.5 approx. 12.5 approx. 25
Pipe diameter / copper [mm] 10 - 12 15 18 22
Pipe diameter / stainless steel cor-
rugated pipe DN16 DN20
Pressure loss collector (Figure1-vertical) for anti-freeze / water mixture (40% / 60%)
at a thermal conducting temperature of 50° C.
Pressure loss curve: Up = 0,0002x² + 0,0395x
Mass flow rate [kg/h] 0 50 100 150 200 250 300 350 400 450 500
Pressureloss[mbar]0 4 9 1419253037436376
Supply Return
Figure-1

General Information
15
Guarantee and Warranty
No liability is accepted for incorrect use, unauthorized changes to the assembly components, or the resulting con-
sequences.
All information and instructions in this manual refer to the current state of development. Please always use the re-
spective assembly instructions supplied with the collectors.
Figures and illustrations used. Due to the possibility of setting and printing errors, and to the need for continuous
technical change, please understand that we cannot accept liability for the correctness of the data.
The current version of the General Terms of Business applies. All photographs used are for illustrative purposes only.
These assembly instructions contain proprietary information protected by copyright laws.
All rights and changes to these assembly instructions are reserved.
Other manuals for CPK 7210 N
1
Table of contents
Other FireBird Solar Panel manuals


