manuals.online logo
Brands
  1. Home
  2. •
  3. Brands
  4. •
  5. Firex
  6. •
  7. Smoke Alarm
  8. •
  9. Firex AD User manual

Firex AD User manual

lVROOM
SMOKE
ALARM
PLACEMENT
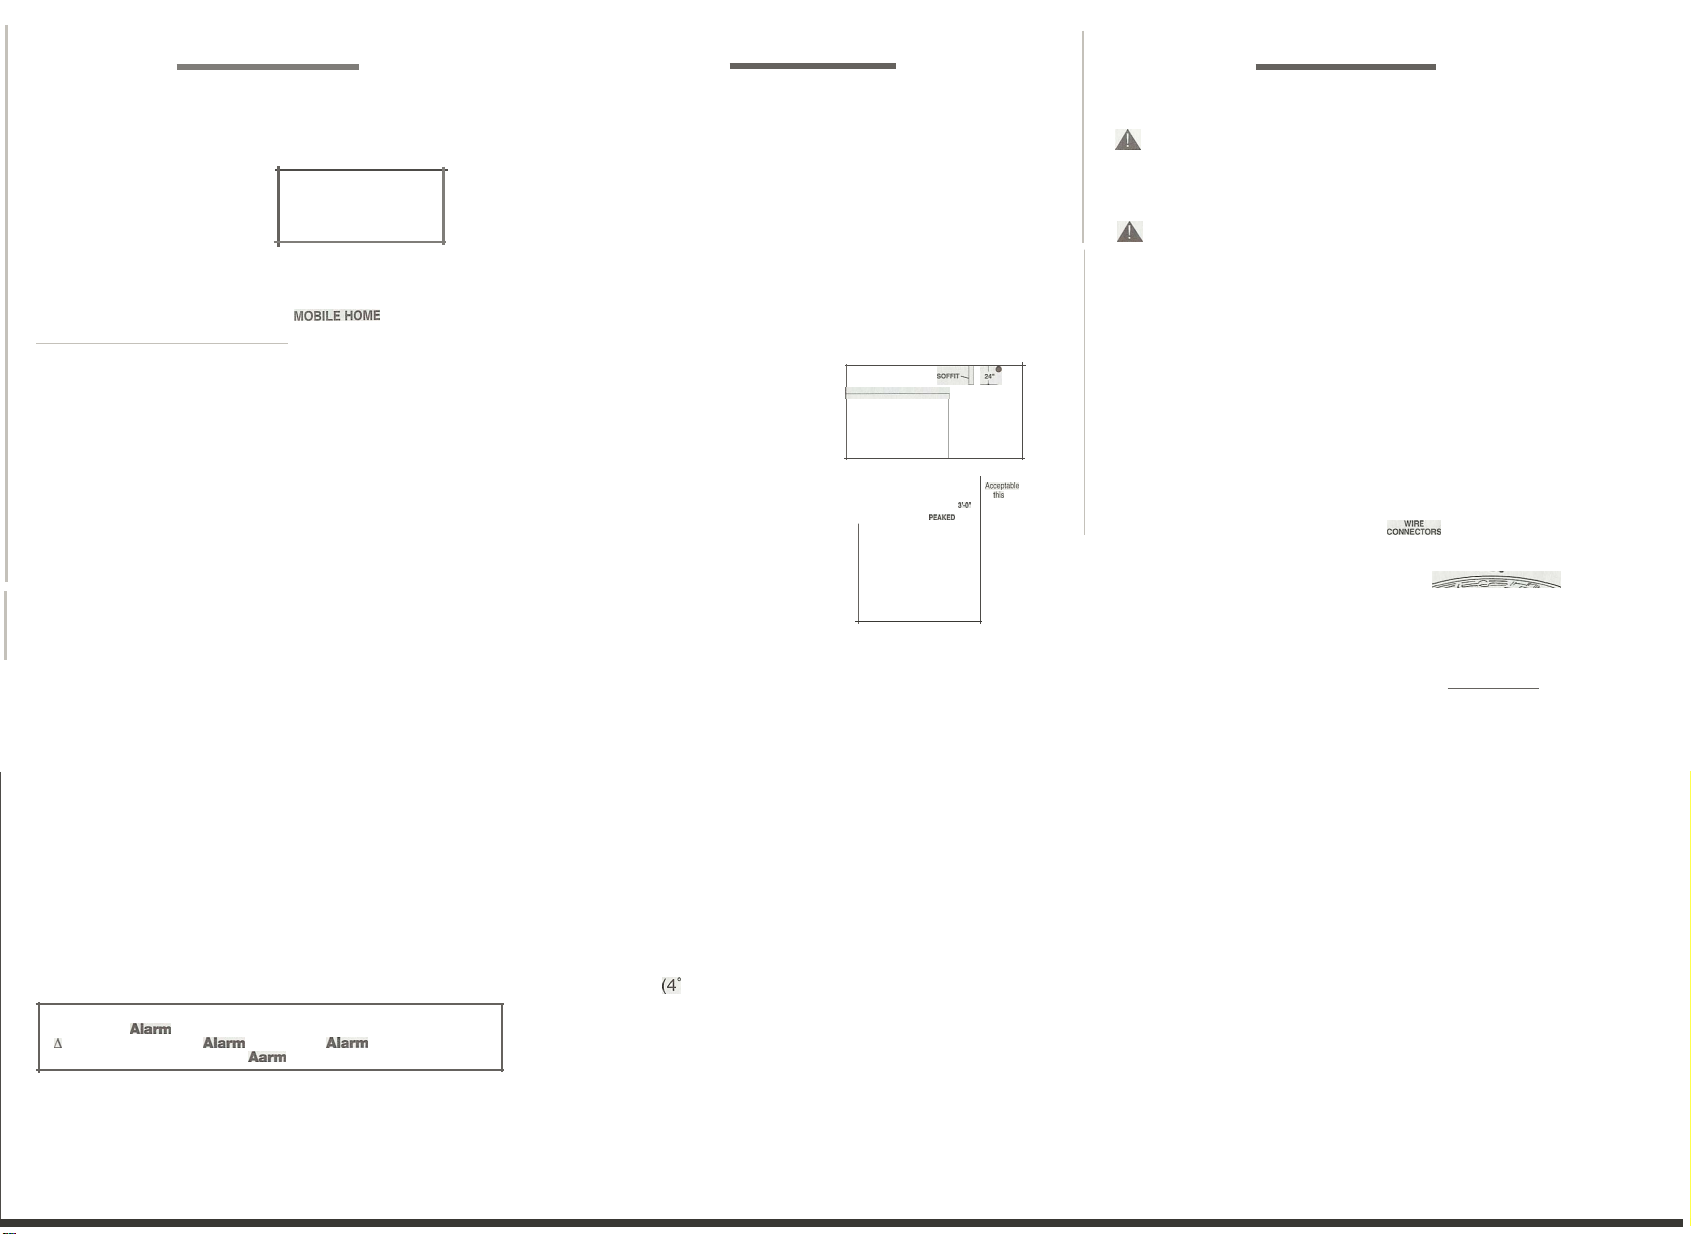
Climate Controls Americas recommends complete coverage pro-
tection achieved by installing a
smoke
alarm
in
every room
of
your
home. The National Fire Protection Association's(NFPA) minimum
requirement, as stated in Standard 72, Chapter
2,
reads as follows:
"2-2
.1.1.1
Smoke detectors shall be
installed outside of each separatesleep-
::::::.0
ing area
in
the immediate vicinity of the
bedrooms and on each additional story of
thefamily living unit including basements
and excluding crawl spaces and unfin-
ished attics.
In
new construction asmoke detector
also shall be installed
in
each sleeping room."
Chapter
2, also
reads
as follows:
"2-2.2.1
In
new
construction, where more than
one smoke detector is required by 2-2.
1,
they
shall be so arranged that operation
of
any smoke
detector shall cause the alarm
in
all
smoke detec-
tors within the dwelling to sound."
The NFPA,1993 Edition,Appendix
Afurther states:
''The required
number
of
smoke
detectors
may
not provide reliable
early warning protection for those areas separated by a
door
from
the areas protected
by
the
required
smoke
detectors. For this rea-
son,it is
recommended
that the
householder
consider the use
of
additional
smoke
detectors for those areas for increased protec-
tion. The additional areas include:
basement
,
bedrooms
,dining
room, furnace room, utility room, and hallways
not
protected
by
the
required
smoke
detectors."
Also,as required
by
the California State Fire Marshal:
"Early warning fire detection is best
achieved
by
the
installation
of
fire detection
equipment
in all rooms and areas
of
the household
as follows:A
smoke
detector
installed in
each
separate
sleeping
area
(in
the
vicinity,
but
outside the bedrooms),
and
heat
or
smoke
detectors
in
the
living rooms, dining
rooms
,
bedrooms
,
kitchens,hallways,attics, furnace rooms, closets,utility and stor-
age
rooms
,
basements
and attached garages."
3
Smoke alarms can only sound their alarms when they detect
smoke. Smoke alarms detect combustion particles
in
the air. They
do not sense heat,flame, or gas.This smoke alarm is designed to
give audible warning of adeveloping fire. However,many fires are
fast-burning,explosive,or intentional. Others are caused by care-
lessness or safety hazards. Smoke may not reach the smoke alarm
QUICKLY ENOUGH to ensure safe escape.
Smoke alarms have limitations. This smoke alarm is not fool-proof
and is not warranted to protect lives or property from fire. Smoke
alarms are not asubstitute for insurance. Homeowners and renters
should insure their life and property.
In
addition,it is possible for the
smoke alarm to fail at any time. For this reason, you must test the
smoke alarm weekly and replace every 10 years.
A..
WARNING
This smoke alarm requires constant 12o-volt, AC power AND a
working 9-volt battery to operate properly. This smoke alarm WILL
NO
Twork if
AC
power
is
not connected or has been interrupted for any
reason AND the battery
is
removed, drained (a beep once per minute
indicates adrained battery) or improperly connected.
DO
NOT use any
other kind of battery except as specified
in
this manual. DO NOT con-
nect this smoke alarm to any other type of smoke alarm or auxiliary
device,except those listed
in
this manual.
DO
NOT
remove or disconnect battery or turn off AC power to
quiet unwanted alarms. This will remove your protection. Open
windows or fan the air around smoke alarm to silence
it.
Model ADC
smoke alarms feature aFalse Alarm
Control™
button which,when
activated,will quiet unwanted alarms for up to 15 minutes.
The Push-to-Test button accurately tests all smoke alarm
functions. DO NOT use any other test method. Test smoke alarm
weekly to ensure proper operation.
This smoke alarm should be installed only by alicensed,
qualified electrician.Observe and follow all local and national
electrical and building codes for installation.
This smoke ala
rm
is designed to be used inside asingle family
household only.
In
multi-family buildings,each individual living unit
should have its own smoke alarms. Do not install
in
nonresidential
buildings or places which house many people like hotels, motels,
dormitories,hospitals,nursing homes,or group homes of any kind.
This smoke alarm is not asubstitute for acomplete alarm system.
Install asmoke alarm in every room and on every level of the
home. Smoke may not reach the smoke alarm for many reasons. For
example,if afire starts
in
aremote part of the home, on another
le
vel,
in
achimney,wall,roof, or
on
the other side of aclosed door,smoke
may not reach the smoke alarm
in
time to alert household members.
Asmoke alarm will not promptly detect afire EXCEPT
in
the area or
room
in
which
it
is
installed.
Interconnected smoke alarms installed
in
every room and on
every level of the household offers maximum protection. The
National Fire Protection Agency (NFPA) recommends interconnecting
smoke alarms
so
that when one smoke alarm senses smoke and
sounds its alarm,
all
others will sound as well.
Do
not interconnect
smoke alarms from one individual family living unit
to
another.
Do
not
connect this smoke alarm to any other type of alarm or auxiliary device.
Smoke alarms may not alert every household member every
time.The alarm horn
is
loud
in
order to alert individuals to apotential
danger. However,there may be limiting circumstances where a
household member may not hear the alarm (e.g.,outdoor or indoor
no
ise,sound sleepers,drug or alcohol usage,the hard of hearing,
etc.). If you suspect that this smoke alarm may not alert ahousehold
member,install and maintain specialty smoke alarms. Household
members must hear the alarm's warning sound and quickly respond
to it to reduce the risk of damage,injury, or death that may result
from fire.If ahousehold member
is
hard of hearing,insta
ll
special
smoke alarms with lights or vibrating devices to alert occupants.
2
IMPORTANT
SAFETV
INFORMATION
PLEASE
READ
AND
SAVE
THESE
INSTRUCTIONS
llO·762C
Installer:
Please
leave
this
manual
with
the
product.
IONIZATION
MODELS
AD,
ADC
PHOTOELECTRIC
MODEL
PAD
PLEASE
READ
AND
SAVE
THIS
MANUAL
SMOKE
ALARM
FEATURES
Model ADC features aFalse Alarm
Control™
which, when activated,
quiets unwanted alarms for
up
to 15 minutes.
This smoke alarm is powered by 120V AC and a9-volt battery back-
up
source. AC/DC smoke alarms offer added protection
in
the event
of apower failure or adrained battery.
Unique power connector prevents interconnection with incompatible
smoke alarms or security systems.
This smoke alarm may be interconnected with as many as
11
other
Firex model
AD
,ADC, FX1218 and
PAD
smoke alarms,or as many
as 6Firex model ADH heat alarms for atotal of not more than 18
interconnected devices.
Optional tamper-resist feature can safeguard against tampering.
Un
ique "battery missing" signal. The smoke alarm will not attach to
the mounting bracket if abattery is not
in
the battery pocket.
Improperly connected or weak battery signal. The smoke alarm will
sound ashort beep about once aminute if the battery is weak or
improperly connected.The red LED will blink 4times per minute to
help identify the alarm with the weak battery.
Separate green and red LEDs indicate whether the smoke alarm is
receiving AC and
DC
power, working under normal operation,
in
alarm, or under false alarm control.
Loud alarm
horn-85
decibels at 10
feet-alerts
you to an emergency.
Test button checks smoke alarm operation.
Model ADC features alatching L
ED
-the red LED blinks 3times per
minute on the unit that initiates the alarm.
Model ADC has aramp-up test horn that emits 2reduced-volume
beeps before reaching the full 85db level during testing.
1
SMOKE
ALARM
DESCRIPTIONS
Model AD and ADC -Ionization type smoke alarm. This type of
smoke alarm responds fastest to fast burning fires with hot,open
flame and small or invisible smoke particles.
Model
PAD
-Photoelectric smoke alarm.Responds to slow burning,
visible smoke caused by smoldering fires. May reduce falsel
nuisance alarms caused by cooking or high humidity.
HOW
TO
INSTALL
THIS
SMOKE
ALARM
A.
DANGER: ELECTRICAL
SHOCK
HAZARD. Turn
off
power
at
the
main
fuse
box
or
circuit
breaker
by removing
the
fuse
or
switching
the
circuit
breaker
to
the
OFF position.
A.
WARNING: This
smoke
alann
should
be
installed
only
by
aqualified
electrician.
Smoke
alann
installation
must
be
in
accor-
dance
with
the
requirements
of
Article
760
of
the
National Electrical Code
and
any
local codes
that
may
apply.
THIS SMOKE ALARM SHOULD BE INSTALLED
IN
ACCOR-
DANCE WITH THE NATIONAL FIRE PROTECTION ASSOCIA-
TION'S STANDARD 72 (National Fire Protection Association,
Batterymarch Park, Quincy, MA02269).
•Install smoke alarm on a4-inch octagon or single gang junction
box only.
1.
From back of smo
ke
alarm,
remove mounting plate.
(To
later
engage tamper-resist feature,
twist out and set aside one of the INTERCONNECT
pins molded into the plate. Both
CON~J~~ORS
pins are exactly the same.)
YELLOW
2.Align recessed slots on plate with
WHITE
mounting holes of a4-inch octa-
~~~~$;=--
gon or single gang junction box.
3.
Gently pull household wires
through center hole
of
plate.
4.
Secure plate to junction box
using mounting screws.
5.
With asmall wire connector, con-
nect white wire from connector plug to white household wire.
6.
Connect black wire from connector plug to black household wire.
7.
If interconnection is desired, connect yellow wire from connec-
tor to interconnect wire between smoke alarms. See section,
INTERCONNECTING SMOKE ALARMS.
NOTE: Ifthis will be asingle-station smoke alarm, cover yellow
wire with electrical tape and tuck into junction box.
8.Lift open battery pocket door.
9.
Connect new 9-volt battery to battery connector inside battery
pocket. BE
SURE
BATTERY
IS
SECURELY
CONN
ECTED.
Smoke alarm may beep briefly when battery
is
installed.
10. Close battery pocket door, snap-
ping it into place. (For tamper-
resist, use long-nosed pliers to
remove thin plastic from notch on
smoke alarm edge.)
11
.Attach connector plug to pins on
back of smoke alarm. Plug will only
fit one way and will snap into place.
12. Gently tug connector to be sure it is
attached securely.
A
cce
pt
able
in
t
hi
s
ar
ea
3'.(1
"
PEAKED
CEILING
•
somr
-tJ
~
.
1-
------,
In
rooms where tempe
ra
tures may fall below 40°F
W
C)
or rise above 100°F (38
°C)
.
In
extremely dusty,dirty, or insect-infested areas.
Loose particles interfere with smoke alarm operation.
Near air returns or heating and cooling supply vents.
The air could blow smoke away from the detector,
interrupting its alarm.
In
areas with high humidity,like bathrooms or areas
near dishwashers or washing machines.Install at least
10 feet (3 meters) away from these areas,
if
possible.
IMPORTANT
SMOKE
ALARM
PLACEMENT
AND
EXCEPTION
INFORMATION:
•Install asmoke alarm as close to
the center of the ceiling as possi-
ble. If this is not practical, mount
no closer than 4inches from a
wall or corner. Also, if local codes
allow,install smoke alarms on
walls,between 4and 12 inches
from ceiling/wall intersections.
•Install aminimum
of
two smoke alarms in every home, no mat-
ter how small the home. New construction codes require amini-
mum
of
two interconnected smoke alarms
in
newly built homes.
•Install asmoke alarm in each room
that
is
divided by apartial wall
(either coming down from the
ceiling at least 24 inches,
or
coming up from the floor).
•Install smoke alarms on peaked,
cathedral,
or
gabled ceilings 3feet
from the highest point (measured
horizontally).
•Install asmoke alarm in lived-in
attics or attics which house electri-
cal equipment like furnaces,air con-
ditioners,
or
heaters.
DO
NOT
install
smoke
alarm:
Near appliances or areas where normal combustion
regularly occu
rs
(kitchens,near furnaces, hot water
heaters). Use specialized smoke alarms with unwanted
alarm controlfor these areas.
TWO STORY
SINGLE STORY
Typical
Mob
i
le
H
ome
NOTE: For mobile homes built before 1978, install smoke alarms on
an
inside wall between 4and 12 inches from the ceiling. (Older
mobile homes have little or no insulation
in
the ceiling.) This
is
especially important
if
the ceiling
is
unusually hot or cold.
•Install asmoke alarm inside each bedroom and
in
the hallway
outside each separate sleeping area.
Typical
Single
Story
Home
•Install asmoke alarm on the ceiling
or wa
ll
inside each bedroom and in
the hallway outside each separate
sleeping area.If abedroom area
hallway is more than 30 feet long,
install asmoke alarm at each end.
If
there
is a
basement:
•Install asmoke alarm on the
basement ceiling at the bottom of
the stairwell.
Typical
Two-Story
or
Split
Level
Home
•Install asmoke alarm on the ceil-
ing
or
wall inside each bedroom
and
in
the hallway outside each
separate sleeping area. If abed-
room area hallway
is
more than 30
feet long, install asmoke alarm at
each end.
•Install asmoke alarm at the top of
afirst-to-second floor stairwell.
If
there
is a
basement:
•Install asmoke alarm on the
basement ceiling at the bottom
of the stairwell.
EFFICIENCY APARTMENT
Key
•
Smoke
Alann
(Ionization)
/!,.
Ionization
Smoke
Alann
with
False
Alann
Control™
or
Photoelectric
Smoke
Aann
~IQ~
QI
·~"~
~
I I
MO","'OM'
FOR
BEST
PROTECTION
.
WE
RECOMMENO
THAT
VOU
INSTALL
A
SMOKE
AL
A
RM
IN
EVERV
ROOM
Inadditi
on,
we recommend that
all
smoke alarms be interconnected.
Typi
cal
Efficiency
Home (A
partment)
•Install asmoke alarm on the
ceiling or wall closest to the
sleeping area.
456
FOR INTERCONNECT: USE #
1SAWG
MINIMUM WIRE
Blinks once aminute
Blinks once asecond
-Indicates weak or improperly
connected battery.
9
MAINTENANCE
A.NO
CLEANING
In
addition to weekly testing, this smoke alarm requires yearly battery
replacement and periodic cleaning to remove dust, dirt, and debris.
A.
DANGER: ELECTRICAL
SHOCK
HAZARD. Turn
off
p
owe
r
at
main
servic
e
panel
by
removing
f
use
or
switching
appropriate
circuit
b
reak
er
to
OFF pos
iti
on
before
replacing
b
att
ery
or
clean
i
ng
smoke
alarm.
BATTERY RE
PLACEMENT
Always turn off power to smoke alarm before replacing battery.
Replace battery at least once ayear,
or
immediately when the low
battery signalsounds (a chirp once per minute indicates low
battery). On Model ADC, the red LED will blink 4times per minute
after each low battery chirp. Batteries should be replaced every
year even when the smoke alarm is receiving AC power.
Use only t
he
following batteries
as
replacements
in
this smoke alarm:
Eveready 522 or 1222, Duracell MN 1604,or Ultralife U9V
L-J
A.
WARNING:
DO
NOT
USE
ANY
OTHER
TYPE OF
BATTERY
EXCEPT
AS
SPECIFIED
IN
THIS
MANUAL
.
DO
NOT
USE RECHARGEABLE
BATTERIES.
1.
Turn off power to smoke alarm at main service panel.
2.
Turn smoke alarm counter-clockwise to detach from mounting
plate.
3.
Gently pull down
smoke
alarm. Be careful not to
separa
te
wire connections.
4.
Pull out power plug from back of smoke alar
m.
5.From back
of
smoke alarm, lift tabto open battery pocket door.
6.Remove battery from pocket. Disconnect and discard drained
battery from battery connector.
7.
Connect afresh, 9-volt battery to connector.Thebatterywill fit
only one way.Be sure battery connector is securely attached to
battery terminals.
8.
Place battery into battery pocket.
9. Close battery pocket door.Push down until it snaps into place.
10.Replace connector plug. Connector will snapinto place.
Gently tug connector to be sure it is attached properly.
1
1.
Reattach smoke alarm to mounting plate by turning smoke
alarm clockwise until it snaps into plate.
12. Turn on power and test smoke alarm using Push-to-Test button.
NOTE:If smoke alarms are interconnected,all smoke alarms
should sound an alarm within three seconds after any test
button
is
pushed and the tested smoke alarm sounds.
3.
If smoke alarm does not sound,turn off power at main fuse box
or circuit breaker and check wiring.Retest smoke alarm.
A.
DANGER:
If
al
arm
ho
rnsounds, and smo
ke
alarm
is
not
being te
sted
,
the
s
mok
e ala
rm
is
s
en
si
ng
sm
ok
e.
THE
SOUND
OF
THE
ALA
RM
HORN REQUIRES
YOUR
IMM
EDIATE ATTENTION ANDACTION.
FALSE
ALARM
CONTROLTM
Model ADC features aFalse Alarm
Control™
that, when activat-
ed, quiets unwanted alarms for up to 15 minutes.
To
use the False Alarm Control™:
Press and release the test button during an unwanted alarm. The
alarm should stop within ten seconds. This means the smoke alarm
is
in False Alarm Control™. For Model ADC
in
an interconnected
system, the red LED on the initiating alarm will continue to blink until
reset by pressing the TEST button.
If
the smoke alarm does not go into False Alarm
Control™
and contin-
ues to sound its loud alarm horn, or if
it
initially goes into False Alarm
Control™
then resounds the alarm,the smoke
is
too heavy and could
be a possibly dangerous
situation-
take emergency action.
•Test each smoke alarm to besure it is installed correctly and
operating properly.
•Test
all
smoke alarms in an
in
terconnected system after installation.
•The Push-to-Test button accurately tests all functions. DO N
OT
use an openflame to test this smoke alarm. You may ignite and
damage the smoke alarm or your home.
•Test smoke alarms weeklyandupon returning from vacation or
when no one has been in the household for sever
al
days.
•Stand at arm's length from the smoke alarm when testing.The
alarm horn is loud to alert you to an emergency and can be
harmful to hearing.
FIELD TESTING IMPORTANT NOTICE:
When testing is required in the field by local inspectors or other par-
ties,
it
should be done using only the Smoke Detector Sensitivity
Analyzer model #5
01
-1manufactured by Gemini Scientific
Corporation.FollowtheGemini test and set-up instructions provid-
ed by the manufacturer,and use the obscuration limits provided on
the back of the smokealarm. Refer to the smoke alarm's instruc-
tion manual for maintenance and push-to-test operation.
Test all smoke alarms weekly by doing the following:
1.Observethe green LED. Aconstant green light indicates the
smoke alarm is receiving 120V ACpower.
2.
Firmly depress the Push-to-Test button f
or
at least five (5)
seconds.The smoke alarm will sound aloud beep about four
(4) times asecond.OnModel ADC,the alarm will sound 2
short reduced-volume beeps, then 1short loud beep followed
by apause, then the pattern repeats. The alarm may sound for
up to 10seconds after releasingthe Push-to-Test button.
S
TESTING
THE
SMOKE
ALARM
A
WARNING
....
_-...;:..;;..------------
Blinks 4times per minute
preceded by an audible chirp
(Interconnected system only):
OFF-another smoke alarm in the network has sensed
smoke and is signalling this alarm.
REO
ANO
GREEN
LEO
INOICATO
RS
This smoke alarm features separate
red
and green LED indicators.
The LEDs indicate the following:
GREEN
LEO
ON
-AC power
is
present.
OFF -AC power is not present.
REO
LEO
-can be seen through the push to
test button.
-indicating normal operation.
-smoke alarm senses smoke and
simultaneously sounds an audi-
ble alarm.
•Use #18 AWGminimum solid or stranded wire. When intercon-
necting, maximum wire length between any two
is
1,500 feet for
#18 AWG or 4,000 feet for
#14AWG
(20 OHMS loop resistance).
•This smoke alarm may be interconnected with as many as
11
other Firex model AD, ADC, FX1218 and PAD smoke alarms,
or as many as 6Firex model ADH heat alarms for atotal of not
more than 18 interconnected devices. DO NOT connect to any
other type
or
model smoke alarm.
•Connect smoke alarms to asingle
AC
branch circuit. If local codes
do not permit, be sure the neutral wire
is
common to both phases.
WHITE WHITE
YELLOW
YELLOW
Model ADC only:
Blinks once every 10 seconds -smoke alarm is quieting an
unwanted alarm.
Blinks 3times per minute -Indicates this unit initiated an
alarm in an interconnected
system (press the
TEST
button
to reset).
7
INTERCO
NNE
CTIN
G
S
MOKE
AL
ARMS
NOT
E:
Smoke alarm will not mount to plate
if
battery
is
not installed.
14. Turn on power at main fuse box or circuit breaker.
15. Test smoke alarm. See TESTING THE SMOKE ALARM.
13. Position smoke alarm to mounting plate and turn clockwise to
lock into place.
(To
engage tamper resist feature, insert pin
into notch on edge
of
smoke alarm after smoke alarm
is
posi-
tioned properly in base. Refer to step #10 on previous page.)
Insert pin here
IJ
TROUB
L
ESHOOTING
A
DANGER
:
Always
tum
off
power
at
main
fuse
box
or c
ircuit
breaker
before
taking
trouble-
shooting
action.
PROBLEM SOLUTION
Smoke alarm does not
1.
Check that AC power
sound when tested.
is
turned
on
.
2.
Turn off power. Remove smoke
NOTE:Push test button for alarm from mounting plate and:
at least five (5)seconds a.check that connector plug is
while testing! securely attached.
b.
check that battery is proper-
ly attached to connector.
3. Clean smoke alarm.
The horn makes 2quiet The alarm is operat
in
g
beeps
and
one loud beep correctly. Model ADC has a
when tested. ramp-up test horn feature.This
allows you
to
release the test
button before the alarm emits
the loud beeps.
Smoke alarm beeps about
1.
Turn off power and replace
once a minute. battery.(See "Battery
Replacement" in the
MAINTENANCE AND
CLEANING section
.)
2.
On
Model ADC only -
be
sure
the red LED is extinguished
after replacing the battery.
Smoke alarm
so
unds
1.
Hire
an
electrician
to
unwanted alarms inter- move smoke alarm to
mittently or when anew location. See
residents are cooking,SMOKEALARM
taking showers,etc.PLACEMENT
2. Clean smoke alarm.
See "Cleaning"
in
the
MAINTENANCE AND
CLEANING section.
,Interconnected smoke Press and hold TEST
alarms
do
not sound when button for at least
system is tested.three seconds after
the first
un
itsounds.
The alarm sounds different The ala
rm
is
operating cor-
than I'm used to. Itstarts and rectly. This alarm features
stops.the internationally recognized
horn signal
fo
revacuation. The
horn
pattern is3short beeps
fo
llo
wed
by
a2second pause
and then repeats.
WARRANTY
INFORMATION
To
return
Ultra
life
10-year
lithium batteries
under
warranty, include the
lithium battery, a
note
describing the nature ofthe difficulty, with proof
of
date
of purchase,
postage
and
return
postage
prepaid
to:
ULTRALIFE
BATIERIES,
INC
.
c/o
CLIMATE
CONTROLS
AMERICAS
P.O.
Box
622
1350
Route
88
South
Newark,
NY
14513
Climate Controls Americas
191
E.
North
Avenue
Carol
Stream
illinois
60188
United StatesofAmerica
5-
YEAR
LIMITED
SMOKE
ALARM
WARRANTY
AND
IO
-Y
EAR
LIMITED
ULTRALIFE
U9VL-J
LITHIUM
BATTERY
WARRANTY
(WHEN
SOLD
WITH
CLIMATE
CONTROLS
AMERICAS
SMOKE
ALARM)
Climate
Controls
Americas
warrants
to
the
original
consumer
purchaser
each
new
smoke
alarm
to
be
free
from
defects
in
material
and
workmanship
under
normal
use
and
service
for
a
period
of
five
(5)
years
from
the
date
of
purchase
.
For
Climate
Controls
Americas
smoke
alarms
sold
with
an
Ultralife
U9VL-J
9-
volt
battery,
C
limate
Controls
Americas
warrants
to
the
original
consumer
purchaser
each
new
Ultra
life
U9VL-J
9-
volt
battery
to
be
free
from
defects
in
material
and
workmanship
under
normal
use
and
service
for
a
period
of
ten
(10)
years
from
the
date
of
purchase.
Cl
imate
Controls
Americas
agrees
to
repair
or
replace,
at
its
option,
any
defective
smoke
al
arm
or
Ultra
l
ife
U9VL
-J
9-volt
battery
-
Iwhen
sold
with
Cl
i
mate
Controls
Americas
smoke
alarm)
provided
that
it
is
returned
with
postage
prepaid
and
with
proof
of
purchase
date
to
Cl
i
mate
Controls
Americas.
This
warranty
does
not
cover
damage
resulting
from
accident,
misuse
or
abuse
or
lack
of
reasonable
care
of
the
product.
This
warranty
is
in
lieu
of
all
other
express
w
arranties,
obligations
or
liabilities.
THE
IMPLIED
WARRANTIES
OF
MER
-
CHANTABILITY
AND
FITNESS
FOR
APA
RTICULAR
PURPOSE
ARE
LIMITED
TO
A
PERIOD
OF
FIVE
(5
)
YEARS
FOR
THE
SMOKE
ALARM
AND
TEN
(1
0)
YEARS
FOR
THE
ULTRALIFE
LITHIUM
U9VL
-J
9-VOLT
BATI
E
RY
(WHEN
SOLD
WITH
CLIMATE
CONTROLS
AMERICAS
SMOKE
ALARM)
FROM
PURCHASE
DATE
.
Some
states
do
not
allow
limitations
on
how
l
ong
an
implied
warran-
ty
lasts,
so
the
above
limitations
may
not
apply
to
y
ou
.
IN
NO
CASE
SHALL
CLIMATE
CONTROLS
AMERICAS
BE
LIABLE
FOR
ANY
INCIDENTAL
OR
CONSEQUENTIAL
DAMAGES
FOR
BREACH
OF
THIS
OR
ANY
OTHER
WAR-
RANTY,
EXPRESS
OR
IMPLIED,
WHATSOEVER,
EVEN
IFTHE
LOSS
OR
DAM-
AGE
IS
CAUSEO
BY
ITS
NEGLIGENCE
OR
FAULT.
Some
states
do
not
allow
the
exclusion
or
lim
itation
of
incidental
or
consequential
damages,
so
the
above
limitation
or
exclusion
may
not
apply
to
you.
This
warranty
gives
you
specific
legal
rights,
and
you
may
also
have
other
legal
rights
which
vary
from
state
to
state.
This
smoke
alarm
's
manufacture
an
d
distribution
are
licensed
by
the
U.S.
Nuclear
Regulatory
Commission
.
This
product
meets
all
the
requirem
ents
of
U.L.
Standard
217
.
~ensy
s
~
DO
NOT
disconnect
battery
or
AC
po
w
er
to
quiet
an
unwanted
alarm.
This
will
remove
your
protection.
Fan
t
he
ai
r
or
open
a
window
to
remove
s
mo
ke
or
dust.
AWARNING:
PRACTICE
FIRE
S
AFETY
If
thes
mok
ealarmso
unds
its
alarm
horn,
and
y
ou
ha
venotp
ushe
d
the
test
bu
t-
ton,
it
is
w
arnin
g
of
ad
angerous
si
tuat
i
on.
Your
immedia
te
res
po
nse
is
n
ec
es
sary.
To
prepare
for
s
uc
hoccu
rrences,
d
ev
elop
f
ami
ly
escap
epl
an
s,d
iscuss
them
wi
th
ALL
househol
d
membe
rs,
and
pra
ctic
et
hem
regularl
y.
•
Expose
e
very
one
to
the
sound
ofasm
oke
alarm
and
ex
pl
a
in
w
hat
t
he
sound
mea
ns.
•
Determine
TWO
exits
from
each
room
and
an
escape
route
to
the
outs
i
de
from
each
ex
it.
•
Teach
all
household
mem
b
ers
toto
uch
the
door
and
usean
alternate
exit
if
the
door
is
hot.
INSTRUCT
T
HE
MNOT
TO
OPEN
THE
D
OO
R
IF
THE
DOOR
IS
HOT.
•
Teach
h
ou
seh
old
me
mbers
to
cr
awl
along
the
f
loor
to
stay
below
dangerou
s
s
mok
e,
fumes,
a
nd
gases.
•
De
te
rmine
a
saf
em
eeting
place
for
all
members
outside
the
buildin
g.
::LEANING
~Iean
the
smoke
alarm
at
least
once
a
month
to remove dust,dirt,
Jr
debris.Always turn off power to smoke alarm before cleaning.
•Using the soft brush
or
wand attachment
to
avacuum cleaner,
vacuum all sides and cover of smoke alarm. Be sure all the
vents are free
of
debris.
• Ifnecessary,turn off power and use a
damp
cloth to clean
smoke alarm cover.
•Do not spray smoke alarm with cleaners. Always place cleaners
on cloth first,then wipe smoke alarm with cloth.
M
PORTANT
:
Do
not attemptto remove the cover or clean inside the
smoke alarm. THIS WILL VOID YOUR WARRANTY.
WHAT
TO
00
IN
CASE
OF
A
FIRE
1.D
on
't
panic;
stay
c
al
m.
2.
Leave
t
he
bUilding
as
quickly
as
possible
.
Touch
doors
to
feel
if
they
are
hot
b
efore
openi
ngt
he
m.
Use
an
alterna
te
xit
If
necessary.
C
rawl
along
the
f
loor,
and
DO
NOT
stop
to
collect
any1hing.
3.
Mee
t
at
apr
e-arranged
meeting
place
ou
t
side
thebu
ilding
.
4.
Ca
ll
t
he
fi
re
departmen
t
from
OUTSIDE
th
ebuil
ding.
5.
DO
NOT
GO
BACK
IN
SIDE
ABU
RNING
B
UILDI
N
G.
Walt
for
the
fire
departmen
t
toarrive.
These guidelinesw
ill
assistyou in the
ev
ent of afire. However, toreduce the chance
thatf
ires
w
ill
start,
pr
ac
ti
ce
fi
re
sa
f
ety
ru
le
sand
preve
nt
hazar
do
us
situati
ons.
RE
PAIR
A.
CAUTION:
Do
n
ot
attem
pt
to
repai
r t
his
sm
oke
alar
m.
Doing
so
will
vo
id
your
war
ra
nty.
Ifsmoke alarm is not operating proper
ly,
see TROUBLESHOOTING.
Ifnecessary, and ifstill under warranty,return smoke alarm to
:::Iimate Controls Americas.Pack it
in
awell-padded carton, shipping
prepaid,with anote describing the nature of the problem and proof of
the date ofpurchase to:
Cl
imateControls
Am
ericas
Product Service Department
28C
Leigh Fisher
Bl
v
d.
EI
Paso
,TX79906
If
the smoke alarm is no longer under warranty, have alicensed
electrician replace the smokealarm immediately with acompara-
bleFirex brand smoke alarm.
1112

Other manuals for AD

4

This manual suits for next models

2

Other Firex Smoke Alarm manuals

Firex 2650-560 User manual

Firex

Firex 2650-560 User manual

Firex A User manual

Firex

Firex A User manual

Firex FADCQ User manual

Firex

Firex FADCQ User manual

Firex TPCI User manual

Firex

Firex TPCI User manual

Firex ADH User manual

Firex

Firex ADH User manual

Firex 4480 User manual

Firex

Firex 4480 User manual

Firex G-6GC User manual

Firex

Firex G-6GC User manual

Firex ADH User manual

Firex

Firex ADH User manual

Firex 2650-660 Operating and safety instructions

Firex

Firex 2650-660 Operating and safety instructions

Firex 5700 User manual

Firex

Firex 5700 User manual

Firex TRUSENSE SMOKE 2060-ASR User manual

Firex

Firex TRUSENSE SMOKE 2060-ASR User manual

Firex 110-1011E User manual

Firex

Firex 110-1011E User manual

Firex G-6 User manual

Firex

Firex G-6 User manual

Firex CC User manual

Firex

Firex CC User manual

Firex 242 User manual

Firex

Firex 242 User manual

Firex I240C User manual

Firex

Firex I240C User manual

Firex i4618AC Series User manual

Firex

Firex i4618AC Series User manual

Firex FADC User manual

Firex

Firex FADC User manual

Firex HR230CT User manual

Firex

Firex HR230CT User manual

Firex FADCM User manual

Firex

Firex FADCM User manual

Firex H230 User manual

Firex

Firex H230 User manual

Firex AD User manual

Firex

Firex AD User manual

Firex ADC User manual

Firex

Firex ADC User manual

Firex FADCP User manual

Firex

Firex FADCP User manual

Popular Smoke Alarm manuals by other brands

SILENT KNIGHT PS-DA manual

SILENT KNIGHT

SILENT KNIGHT PS-DA manual

Panasonic 1740 Specifications

Panasonic

Panasonic 1740 Specifications

Greystone Energy Systems DSD240 Installation and maintenance instructions

Greystone Energy Systems

Greystone Energy Systems DSD240 Installation and maintenance instructions

Quell Q2300 user manual

Quell

Quell Q2300 user manual

VESDA VLS-XXX Product guide

VESDA

VESDA VLS-XXX Product guide

biosystems PhD Ultra Reference manual

biosystems

biosystems PhD Ultra Reference manual

FireAngel ST-623E-INT quick start guide

FireAngel

FireAngel ST-623E-INT quick start guide

Quell Q2300W user manual

Quell

Quell Q2300W user manual

Net Safety UV/IRS-H2-A user manual

Net Safety

Net Safety UV/IRS-H2-A user manual

Vision ZS 6101 EU Installation & operation manual

Vision

Vision ZS 6101 EU Installation & operation manual

PSA LIFESAVER 5800RF quick start guide

PSA

PSA LIFESAVER 5800RF quick start guide

Hekatron ORS 142 installation instructions

Hekatron

Hekatron ORS 142 installation instructions

Tyco Fire Alarm Application guide

Tyco

Tyco Fire Alarm Application guide

System Sensor 2251EIS Installation and maintenance instructions

System Sensor

System Sensor 2251EIS Installation and maintenance instructions

Innotek Protek Wireless IW-101A user manual

Innotek

Innotek Protek Wireless IW-101A user manual

Bellman & Symfon BE1480 manual

Bellman & Symfon

Bellman & Symfon BE1480 manual

Johnson Controls METASYS B501BHJ instructions

Johnson Controls

Johnson Controls METASYS B501BHJ instructions

Tyco SB manual

Tyco

Tyco SB manual

manuals.online logo
manuals.online logoBrands
  • About & Mission
  • Contact us
  • Privacy Policy
  • Terms and Conditions

Copyright 2025 Manuals.Online. All Rights Reserved.