First Office STAKS User manual

STAKS
Crossover Casegoods
ASSEMBLY INSTRUCTIONS

STAKS Crossover Casegoods by FIRST OFFICE | 2
Installation Sequence
1. Wall Panels
a. Connector Kit Part Identification 3
b. T - 3 Panel Connection Preparation 4
c. X Panel Connection Preparation 5
d. T - 2 Panel Connection Preparation 6
e. In-Line Panel To Panel
Connection Preparation 7
f. L Panel Connection Preparation 8
g. T - 3 Panel Connection Preparation 9
h. X Panel Connection Preparation 10
i. High Point of Floor Intersection
Preparation 11
j. Assembly 12
k. Starter Post Installation 13
l. 120˚ Corner Unit Installation 14-15
2. Pedestal Preparation
a. Drawer Removal 16
b. Shelf Removal 17
c. Riser Beam Installation 18
d. Pedestal Bracket Installation 19
3. Pedestal Installation 20-21
4. Cantilever Placement
a. Low Height Tops 22
b. Worksurface Height Tops 23
5. Electrical Installation
a. 8 Wire Electrical Installation 24-26
b. 4 Wire Electrical Installation 27-29
6. Straightener Rail Installation 30
7. H-Base Installation 31
8. Worksurface Support Installation 32-33
9. Worksurface Installation
a. Top Placement 34
b. Clamp Plate Installation 35
c. L-Bracket Installation 36
d. Riser Support Installation 37
e. T-Support Installation 38
10. Shared Shelf/Organizer Installation 39-40
11. Modesty Installation 41-42
12. Privacy Panel Installation 43-45
13. Tackboard Installation 48-49
14. Seat Cushion Installation 46
15. Wall Mounted Storage Installation 47
Tools Required
*Must be purchased from First Oce
SCREWDRIVER PANEL JACK (PRY BAR)
CORDLESS DRILL 2 3/8" HOLE SAW
LEVEL RUBBER MALLET
CANTILEVER GAUGE*
120˚ PANEL GAUGE*
LEVELER WRENCH*
1/8" DRILL BIT
3/16" ALLEN WRENCH
STAKS Crossover Casegoods by FIRST OFFICE | 3
Wall Panels
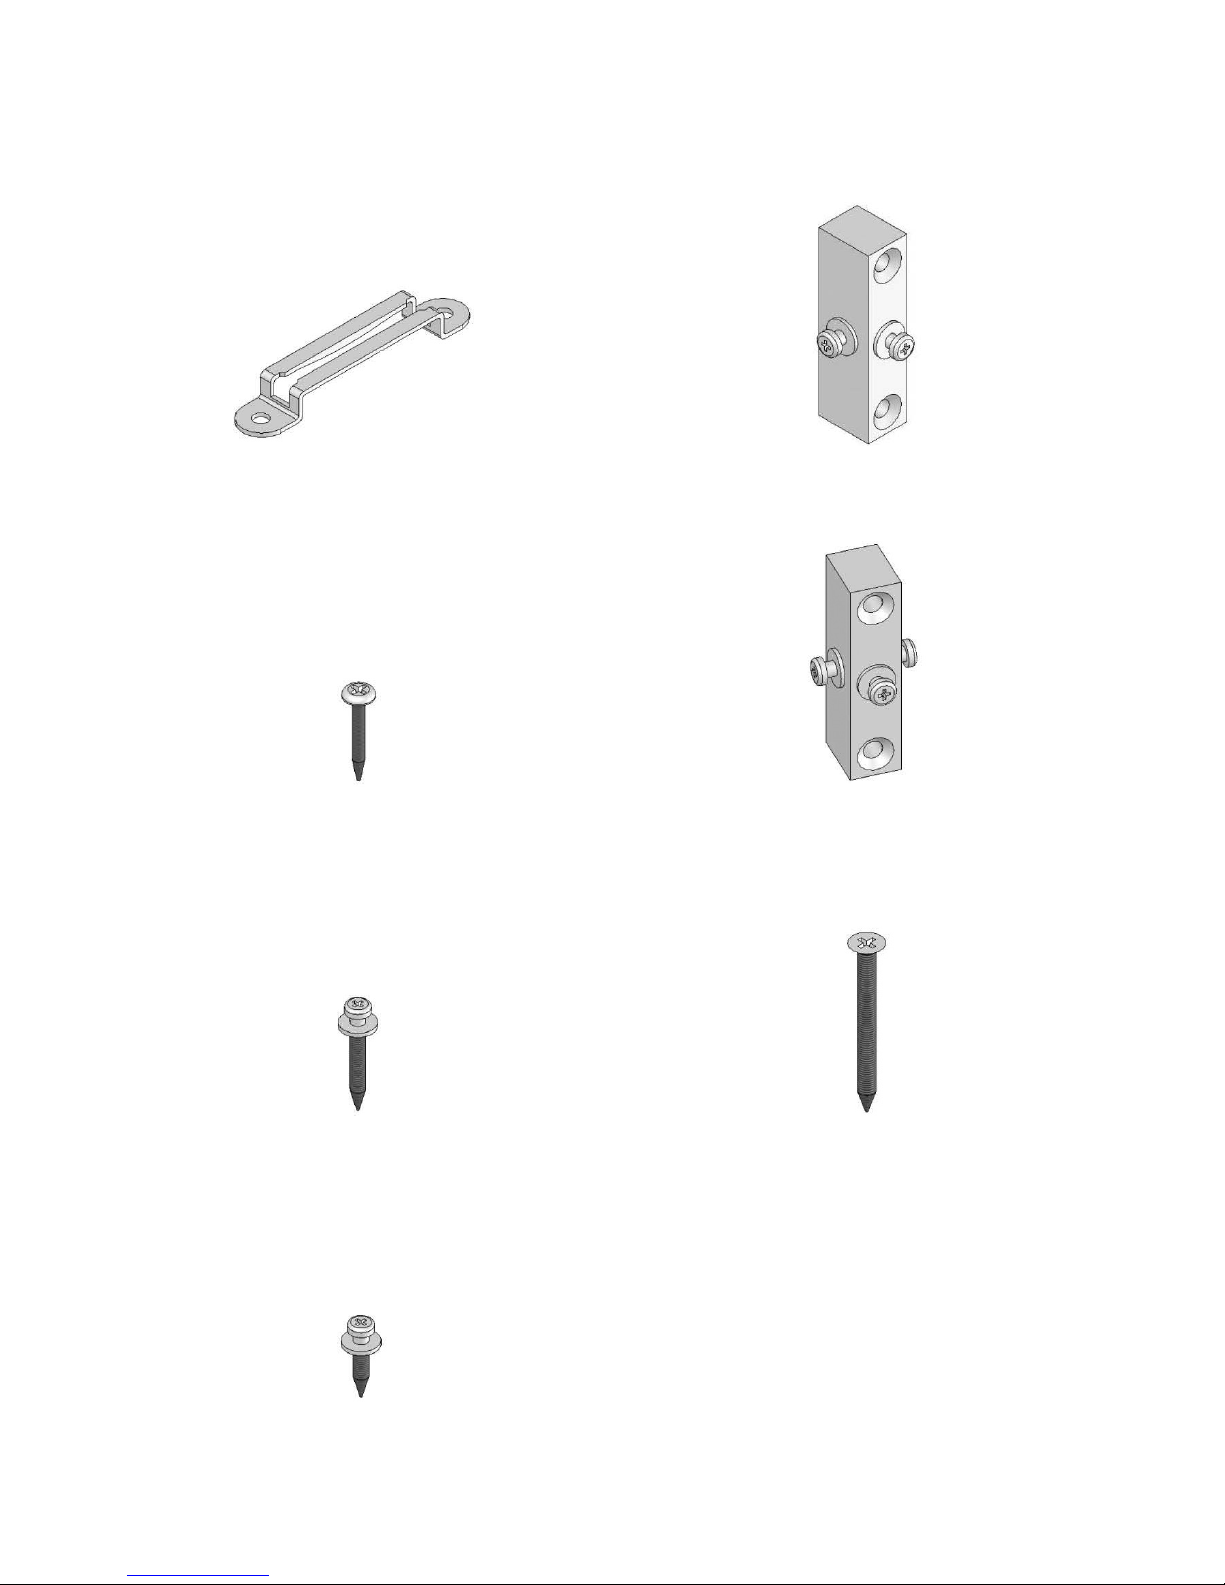
CONNECTOR KIT PART IDENTIFICATION
PANEL CLIP
#8 X 1" BLACK PHILLIPS PAN HEAD SCREW
USE 2 FOR EACH PANEL CLIP WHEN MACHINED ON EDGE OF PANEL
1" SHOULDER SCREW
USE WHEN CLIP POCKET IS MACHINED ON EDGE OF PANEL
5/8" SHOULDER SCREW
USE WHEN CLIP POCKET IS MACHINED ON FACE OF PANEL
T CONNECTION SCREW BLOCK
2 SHOULDER SCREWS (PRE-INSTALLED)
X CONNECTION SCREW BLOCK
3 SHOULDER SCREWS (PRE-INSTALLED)
#8 X 2" BLACK PHILLIPS FLAT HEAD SCREW
USE TWO FOR EACH SCREW BLOCK
STAKS Crossover Casegoods by FIRST OFFICE | 4
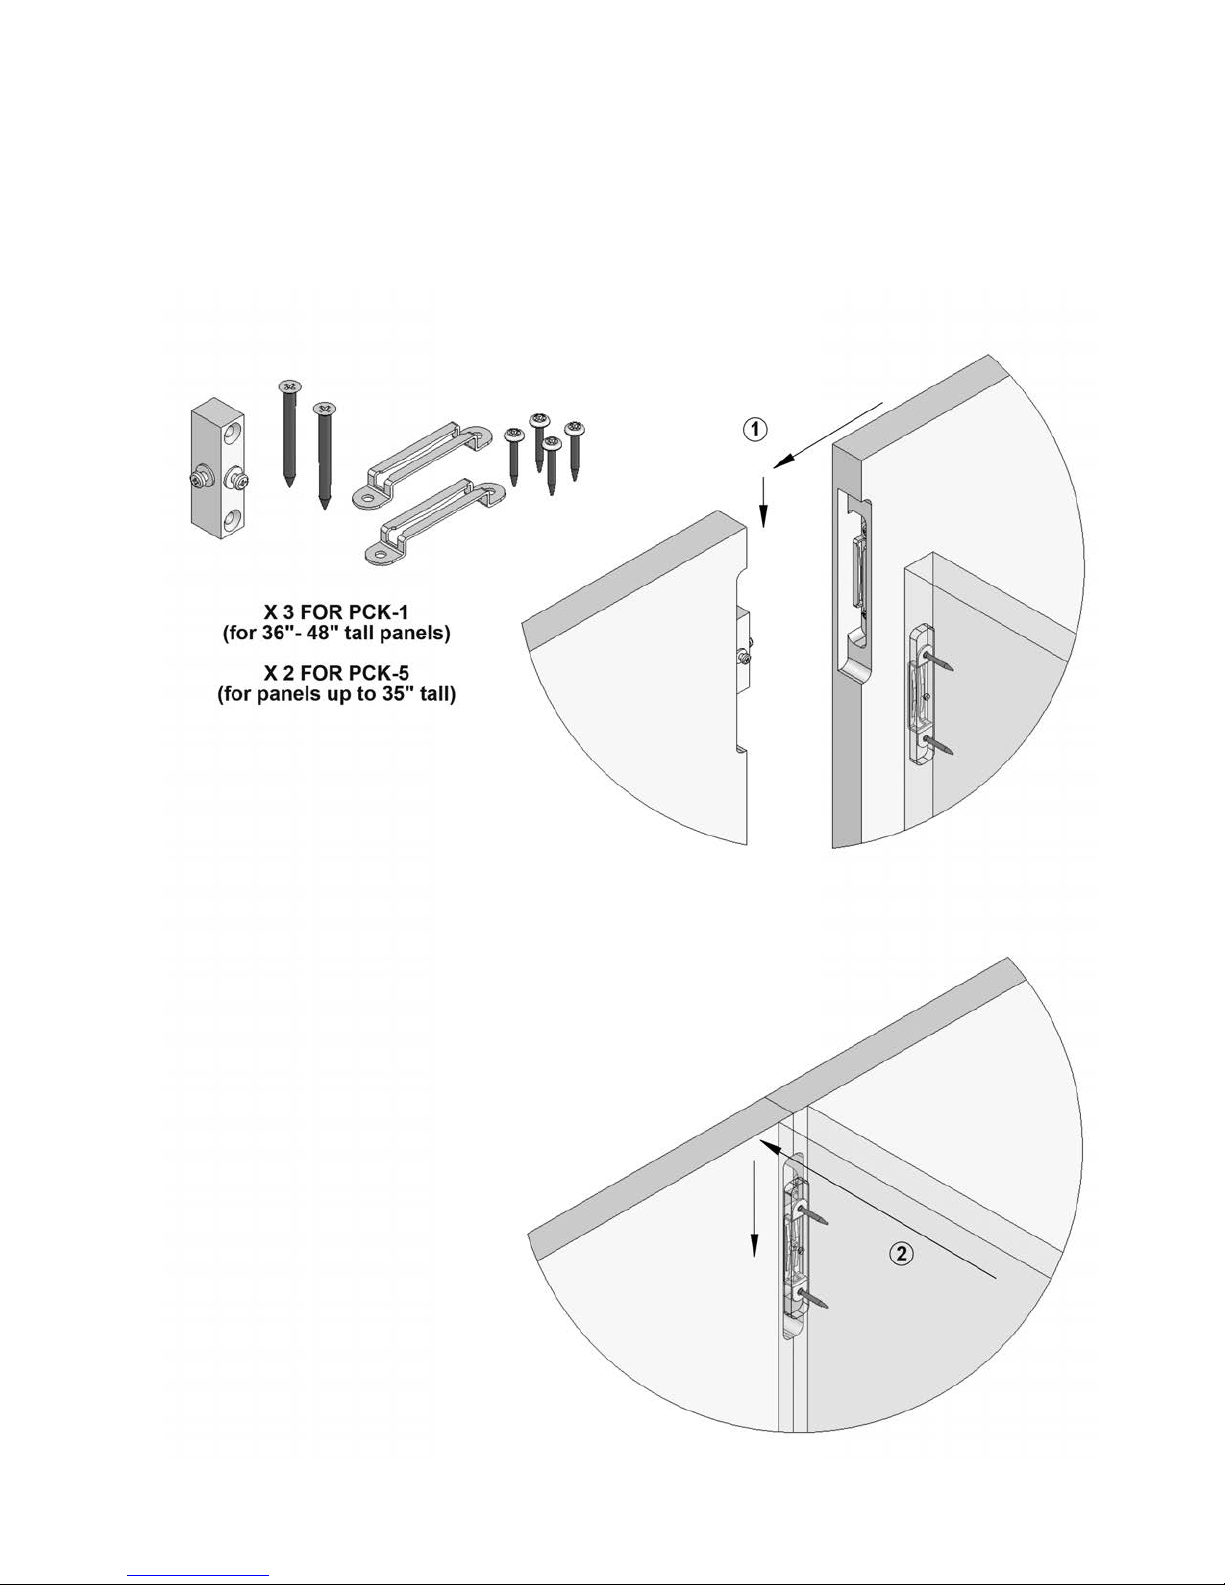
Wall Panels
PREPARATION - T - 3 PANEL CONNECTION
Use Panel Connector Kits PCK-1 or PCK-5 for 33" - 35"

STAKS Crossover Casegoods by FIRST OFFICE | 5
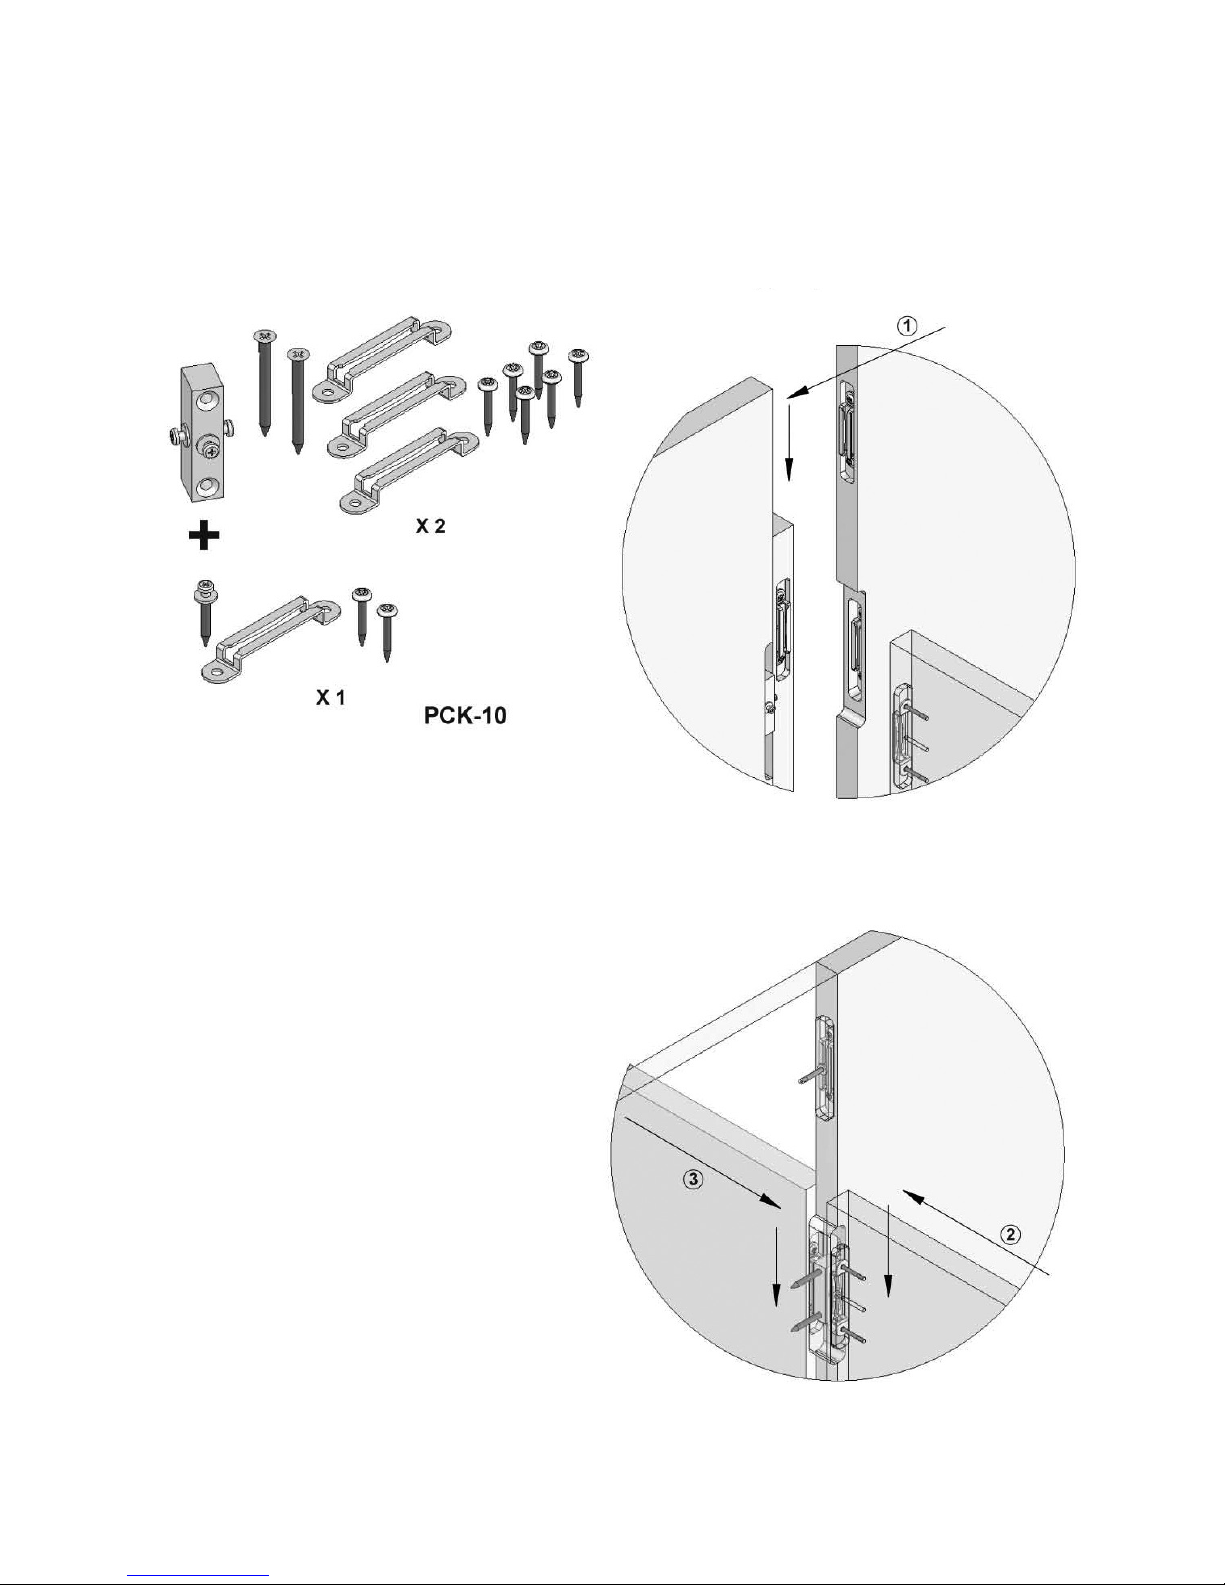
Wall Panels
PREPARATION - X PANEL CONNECTION

STAKS Crossover Casegoods by FIRST OFFICE | 6
Wall Panels
PREPARATION - T - 2 PANEL CONNECTION

STAKS Crossover Casegoods by FIRST OFFICE | 7
Wall Panels
PREPARATION - IN-LINE PANEL TO PANEL CONNECTION

STAKS Crossover Casegoods by FIRST OFFICE | 8
Wall Panels
PREPARATION - L PANEL CONNECTION

STAKS Crossover Casegoods by FIRST OFFICE | 9
Wall Panels
PREPARATION - T - 3 PANEL CONNECTION
(2) 42" OR 48" Tall Panels Connected to (1) 33" Panel

STAKS Crossover Casegoods by FIRST OFFICE | 10
Wall Panels
PREPARATION - X PANEL CONNECTION
(2) 42" OR 48" Tall Panels Connected to (2) 33" Panel
STAKS Crossover Casegoods by FIRST OFFICE | 11
Wall Panels
PREPARATION - INTERSECTION HIGH POINT OF FLOOR INTERSECTION
(2) 48" Tall Panels Connected to (1) 42" Panel

STAKS Crossover Casegoods by FIRST OFFICE | 12
Wall Panels
ASSEMBLY
INTERSECTION
HIGH POINT OF FLOOR
INTERSECTION
NOTE: Leave shrink wrap and pack tags intact while staging panels for easier
identification while installing.
See wall plan drawing for locations of panels, power infeeds, and data ports.
1. Check power and data locations before assembling panels.
2. Panel assemblies can be moved more easily before other components are installed.
3. Access holes can be more easily drilled before other components are installed.
4. Start installing panels at an intersection.
5. If possible start panels at the highest point of an uneven floor.
6. Level all panels before attaching any other components.

STAKS Crossover Casegoods by FIRST OFFICE | 13
Wall Panels
STARTER POST INSTALLATION
When installing a starter post, consider the condition of the floor and the wall where the post is mounted.
• Is the floor even and level?
• Are there any high spots on the floor?
• Is the wall plumb?
When correctly installed, the starter post will be plumb and flush to the top and bottom of the first wall panel.
If possible, position wall panels, as shown on the wall panel installation instructions on the proceeding page, to
determine where the starter post needs to be located on the wall.
1. Remove or cut away any base molding or carpet base so starter post can be mounted flush to the wall.
2. If needed, scroll cut the starter post so the face that mounts to the panel is plumb.
3. Attach starter post to wall using fasteners that are appropriate for the wall. Mounting holes may require
counter-boring so the fastener is not past flush the face of the starter post.
4. Install panel clips in routed pockets.
5. Fasten panel to post.
FLUSH
FLUSH
NO BASE
MOLDING OR
CARPET BASE
BEHIND POST

STAKS Crossover Casegoods by FIRST OFFICE | 14
The 120° Tool Kit is item number TOOL-3.
1. Place lower gauge on the floor where the three panels are to meet.
2. Position levelers in the holes of the lower gauge
3. Place upper gauge on top edge of panels with panels against panel stop.
4. The upper gauge will temporarily hold panels in place until secured by cantilevers
and worksurfaces.
Wall Panels
120° CORNER UNIT INSTALLATION

STAKS Crossover Casegoods by FIRST OFFICE | 15
See bracket plan drawing for locations of cantilever brackets and pedestals placement.
1. Position cantilever brackets as shown on top view diagram (right) unless otherwise specified.
2. Use cantilever gauge to pilot bore two holes at worksurface height.
3. Use two screws in slotted holes on cantilever bracket.
4. Make sure top of bracket is 27 3/8" from bottom edge of panel, adjust if needed.
5. Use two more screws to secure bracket in place.
6. Place worksurfaces on cantilever brackets with 1 1/2" space between tops and panels.
7. Screw tops to cantilever brackets.
8. Remove upper and lower panel gauges (panel jack may be needed).
Wall Panels
120° CORNER UNIT INSTALLATION
STAKS Crossover Casegoods by FIRST OFFICE | 16
Pedestal Preparation
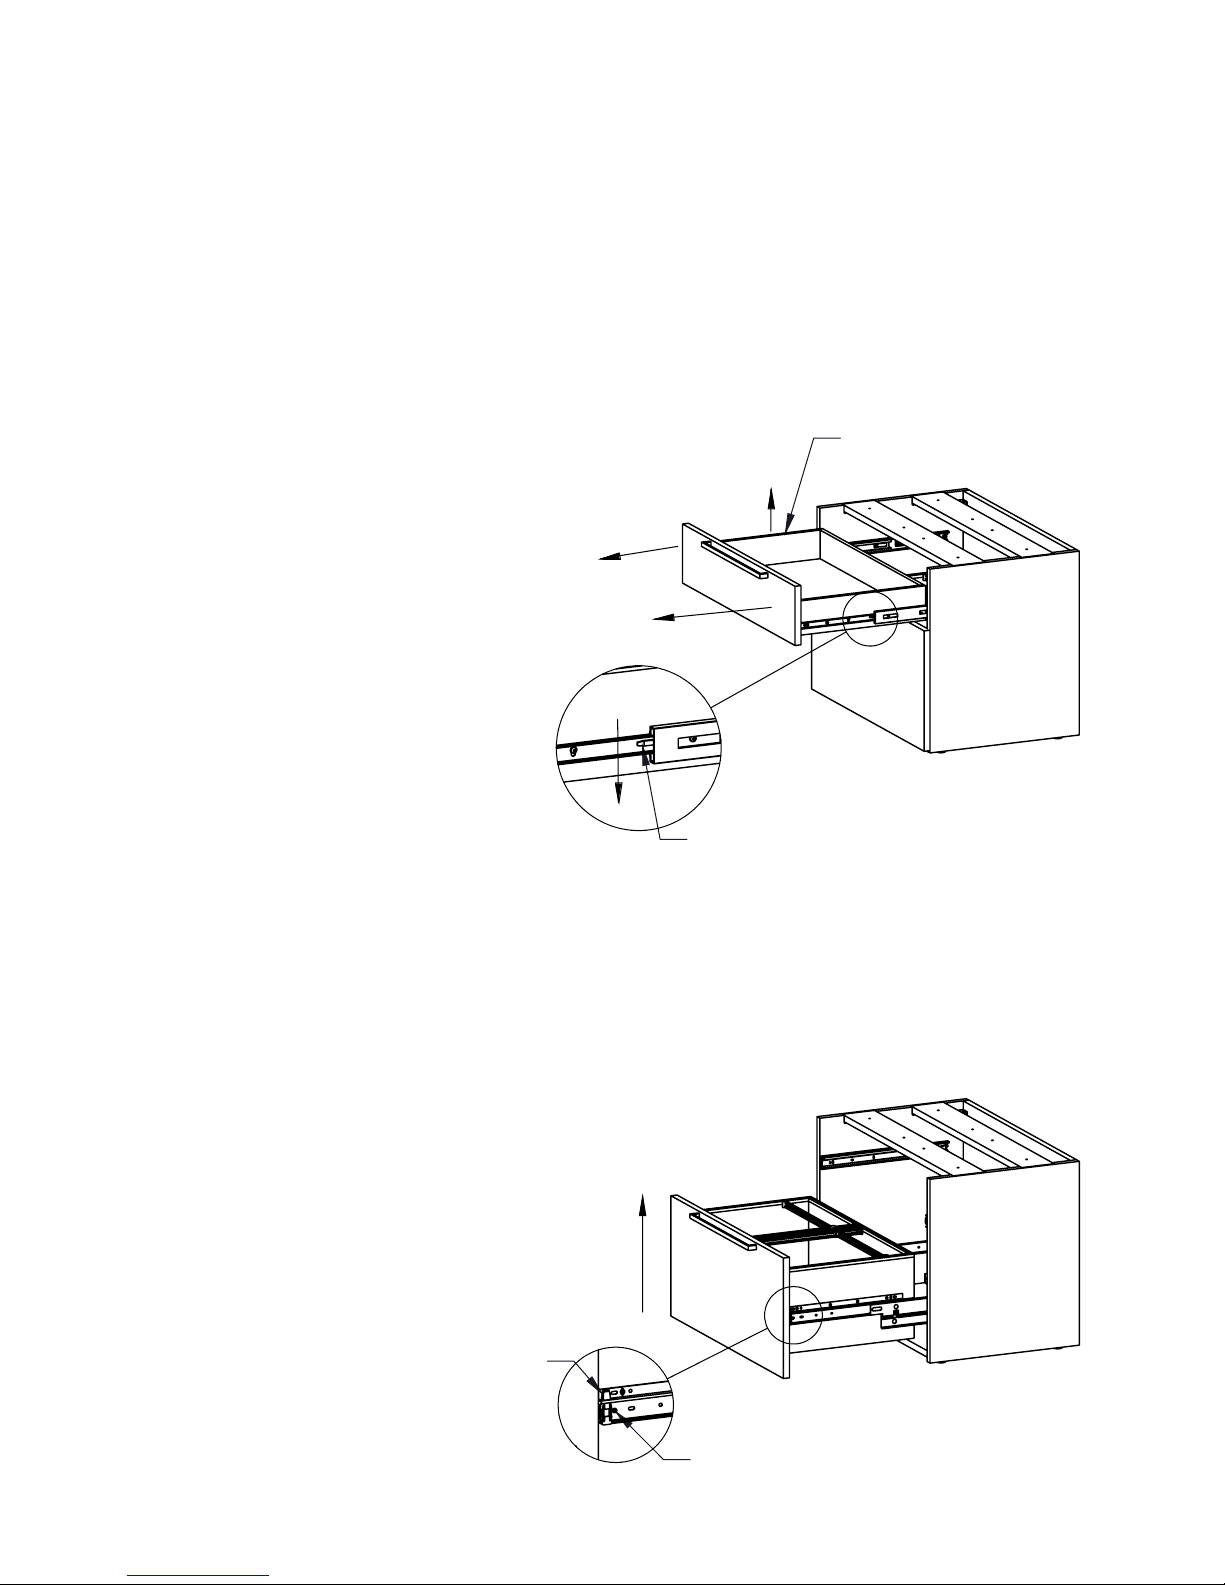
DRAWER REMOVAL
Drawers must be removed for pedestal installation.
BOX & FILE DRAWER REMOVAL
1. Open drawer to full extension.
2. Push drawer release on right hand slide down and at the same time, push drawer
release on the left hand slide up.
3. Pull drawer forward until free from slides.
4. Secure pedestal to top using screws.
5. If applicable, secure to wall panel using pedestal bracket.
LATERAL FILE DRAWER REMOVAL
1. Open drawer to full extension.
2. Remove shipping screw from both sides of drawer.
3. Push drawer release on right hand slide down and at the same time, push drawer
release on the left hand slide up.
4. Lift drawer front straight up until clear of tabs, then pull drawer forward.
DRAWER RELEASE
PUSH UP
DRAWER RELEASE
PUSH DOWN
IMPORTANT:
REMOVE THIS SCREW
BOTH SIDES
PRESS TABS IN ON
BOTH SIDES
STAKS Crossover Casegoods by FIRST OFFICE | 17
Pedestal Preparation
SHELF REMOVAL
Shelf in open shelf pedestals must be removed for access to screw holes for pedestal installation.
1. Remove drawer below shelf.
2. Remove four screws from L-brackets that hold shelf in place.
3. Do not remove screws from end panels.
4. Remove shelf.
5. Replace shelf and secure with screws after installation.
REMOVE 4 SCREWS ON SHELF
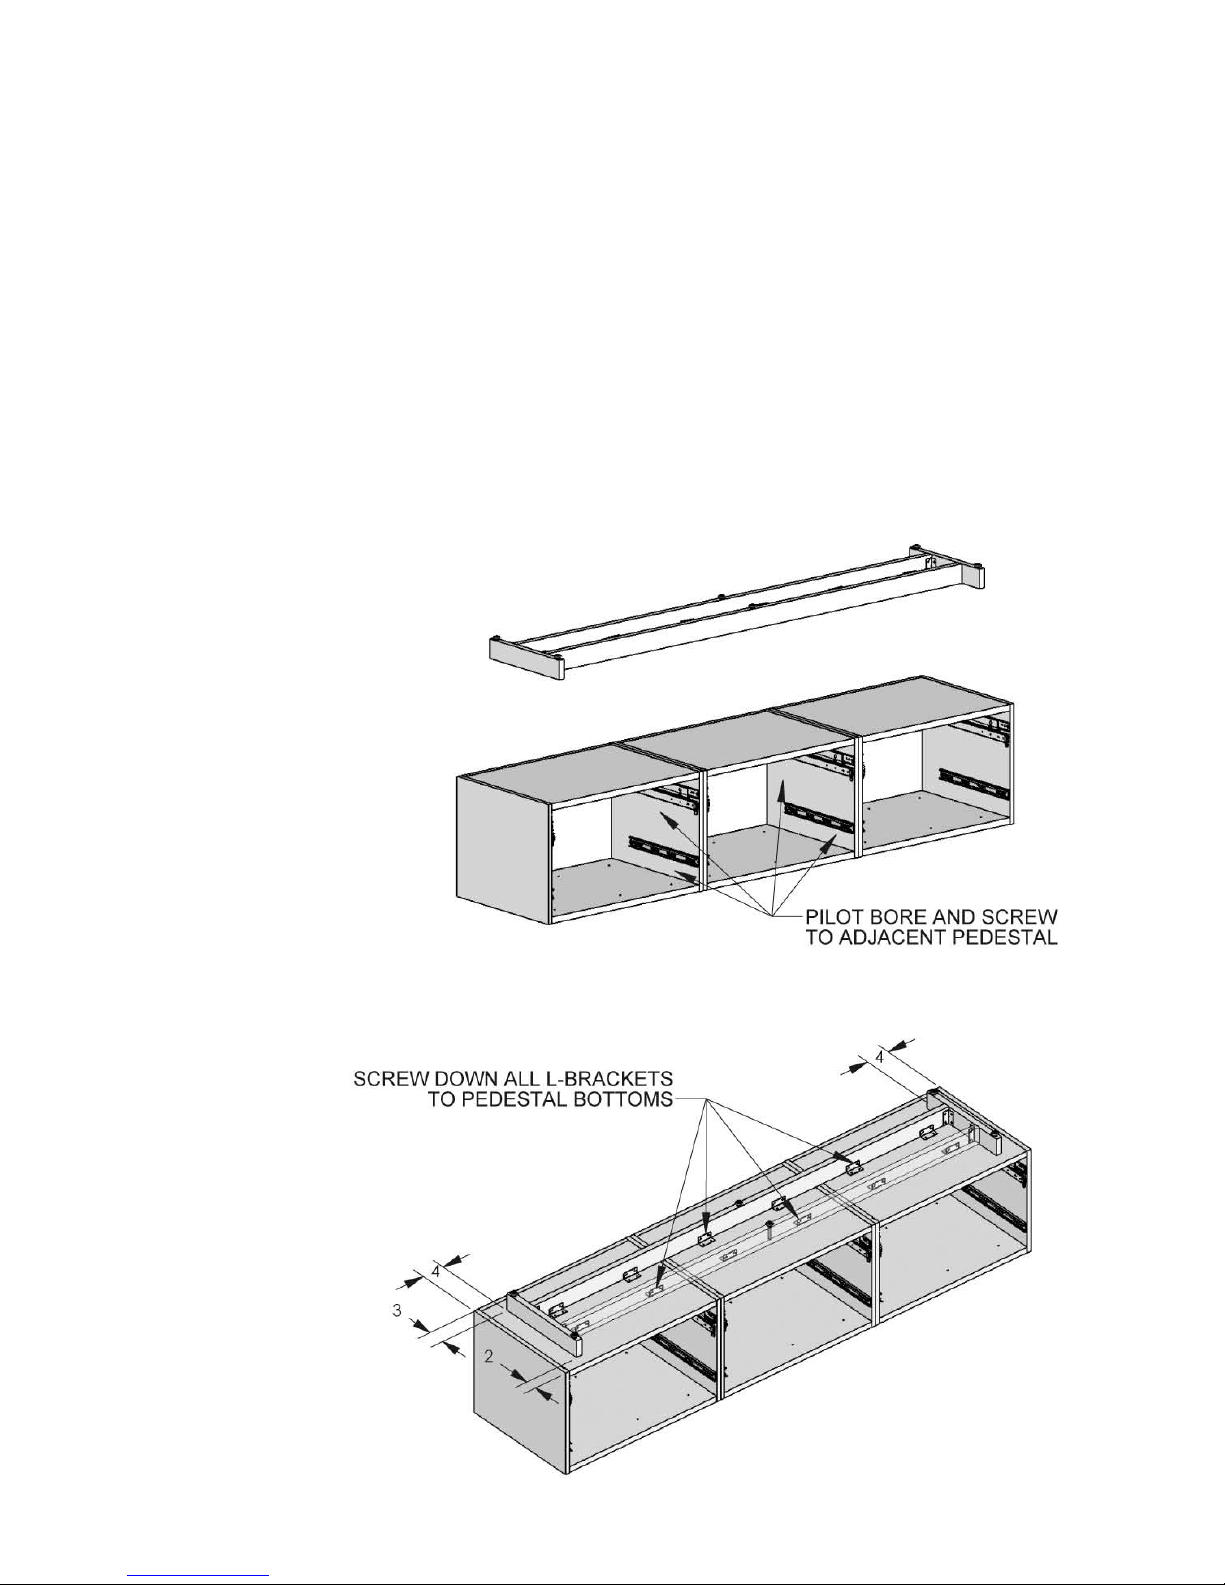
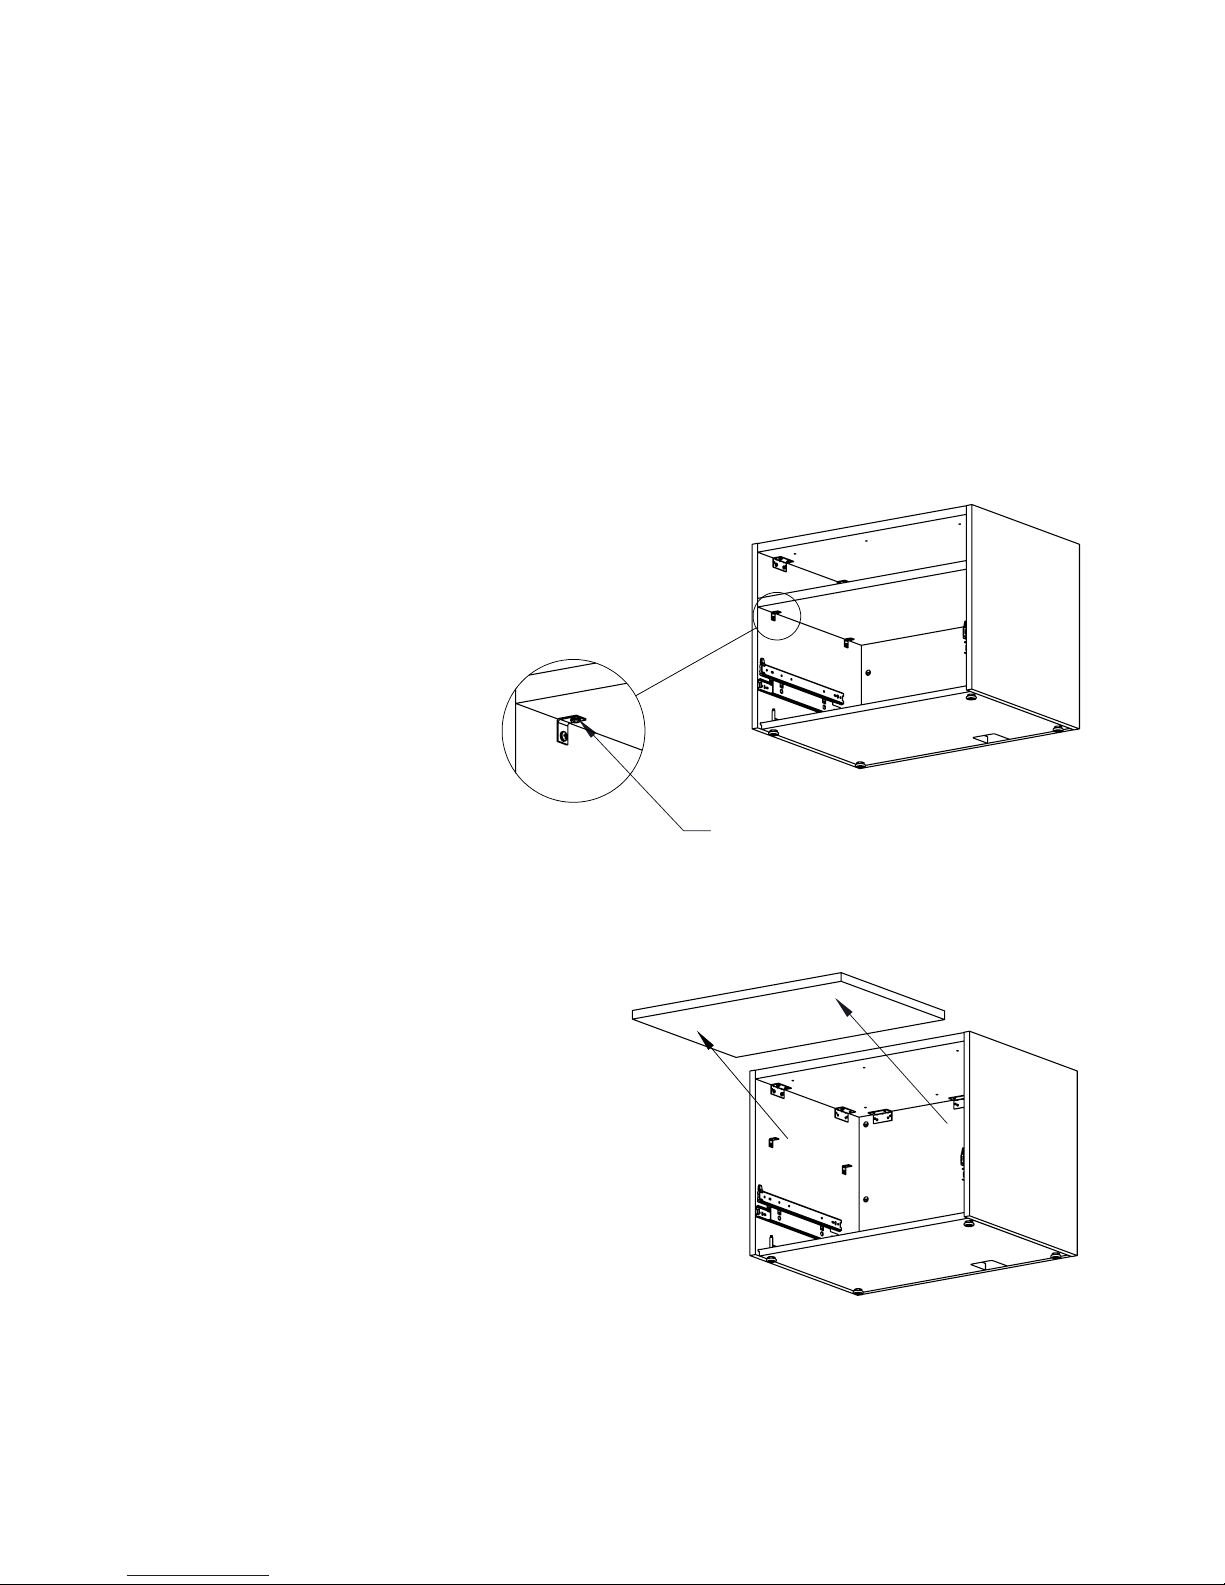
STAKS Crossover Casegoods by FIRST OFFICE | 18
Pedestal Preparation
RISER BEAM INSTALLATION
1. Turn pedestals upside down and place side to side.
2. Pilot bore and screw pedestals together using #8 x 1 1/4" flat head screws
(Hardware Kit HK-3).
3. Place riser beam on pedestal assembly with 4" spacing on both sides and 2"
spacing on the front.
4. Attach riser beam to pedestal assembly by screwing L-brackets to pedestals using
#8 x 5/8" pan head screws (Hardware Kit HK-9).

STAKS Crossover Casegoods by FIRST OFFICE | 19
Pedestal Preparation
PEDESTAL BRACKET INSTALLATION
Bracket Quantities
1 Pair - 16" Wide Pedestals
2 Pairs - 24", 30", & 36" Wide Pedestals
FOLD-DOWN BACK
30" Wide Pedestal
UNFINISHED BACK
24" Wide Pedestal
UNFINISHED BACK
36" Wide Pedestal
UNFINISHED BACK
16" Wide Pedestal
FINISHED BACK
16" Wide Pedestal
"L" BRACKET
ATTACHED TO
INSIDE OF
END PANEL
"Z" BRACKET
ATTACHED TO
CASE SPACER
1
"Z" BRACKET
ATTACHED TO
BACK PANEL
(TOP VIEW)
4-5"

STAKS Crossover Casegoods by FIRST OFFICE | 20
Pedestal Installation
Table of contents
Other First Office Indoor Furnishing manuals


Popular Indoor Furnishing manuals by other brands

Regency
Regency LWMS3015 Assembly instructions

Furniture of America
Furniture of America CM7751C Assembly instructions

Safavieh Furniture
Safavieh Furniture Estella CNS5731 manual

PLACES OF STYLE
PLACES OF STYLE Ovalfuss Assembly instruction

Trasman
Trasman 1138 Bo1 Assembly manual

Costway
Costway JV10856 manual


