Fish Hawk X2 User manual

USER GUIDE
USE PREFFERED WATER TEMP TO FIND FISH
Each species of sh lives in a preferred water temperature range. The chart be-
low shows the preferred water temperature range for the most popular freshwater
game sh and baitsh species in Fahrenheit.
Fish suspend in the water column by water temperature. Using your Fish Hawk will
allow you to nd them. With the Fish Hawk you can create a temperature prole of
the water column by lowering the probe close to the bottom and observing the water
temperature as you slowly raise the probe to the surface. This will allow you to nd the
correct water temperature for the species you are targeting.
WHAT’S THE RIGHT TROLLING SPEED?
Understanding subsurface currents is critical to trolling success. On large bodies
of water, wind and bottom structure work together to create underwater currents. The
collision of warm and cold water also creates current.
Without a speed probe like the Fish Hawk, knowing what sub-surface currents are
doing is nearly impossible. Newcomers to big water trolling often underestimate the
effect on their lures. Trolled against the current, lures can wobble too fast or “burn out.”
Trolling with the current can leave your lure dead in the water!
The Fish Hawk Probe relays important speed information from the depths to the
angler. When trolling against the current, the angler must slow the boat down to keep the
lure working at optimal speed; trolling with a current, the angler needs to speed up.
Allow the sh to tell you what the right trolling speed is. Once you’ve identied a
probe speed that is getting strikes on a particular day, adjust the boat speed accordingly
to get back to that number. Repeatability is the key to maximizing your catch!
Thank you for your purchase. For over 40-years anglers have relied on Fish Hawk
Electronics to give them accurate water temperature and speed information.
Helping them nd and catch more sh!
Our customers are our best sales people. Our mission is to build products that you
happily recommend to your shing friends.
We’ve built a reputation around personalized customer service. No call centers
here! If you have a question or problem with your Fish Hawk, please contact us
immediately. We’ll help you gure it out and do what needs to be done.
Remember, Troling Without a Fish Hawk is
Just Boating!
Trevor Sumption
President
Fish Hawk Electronics
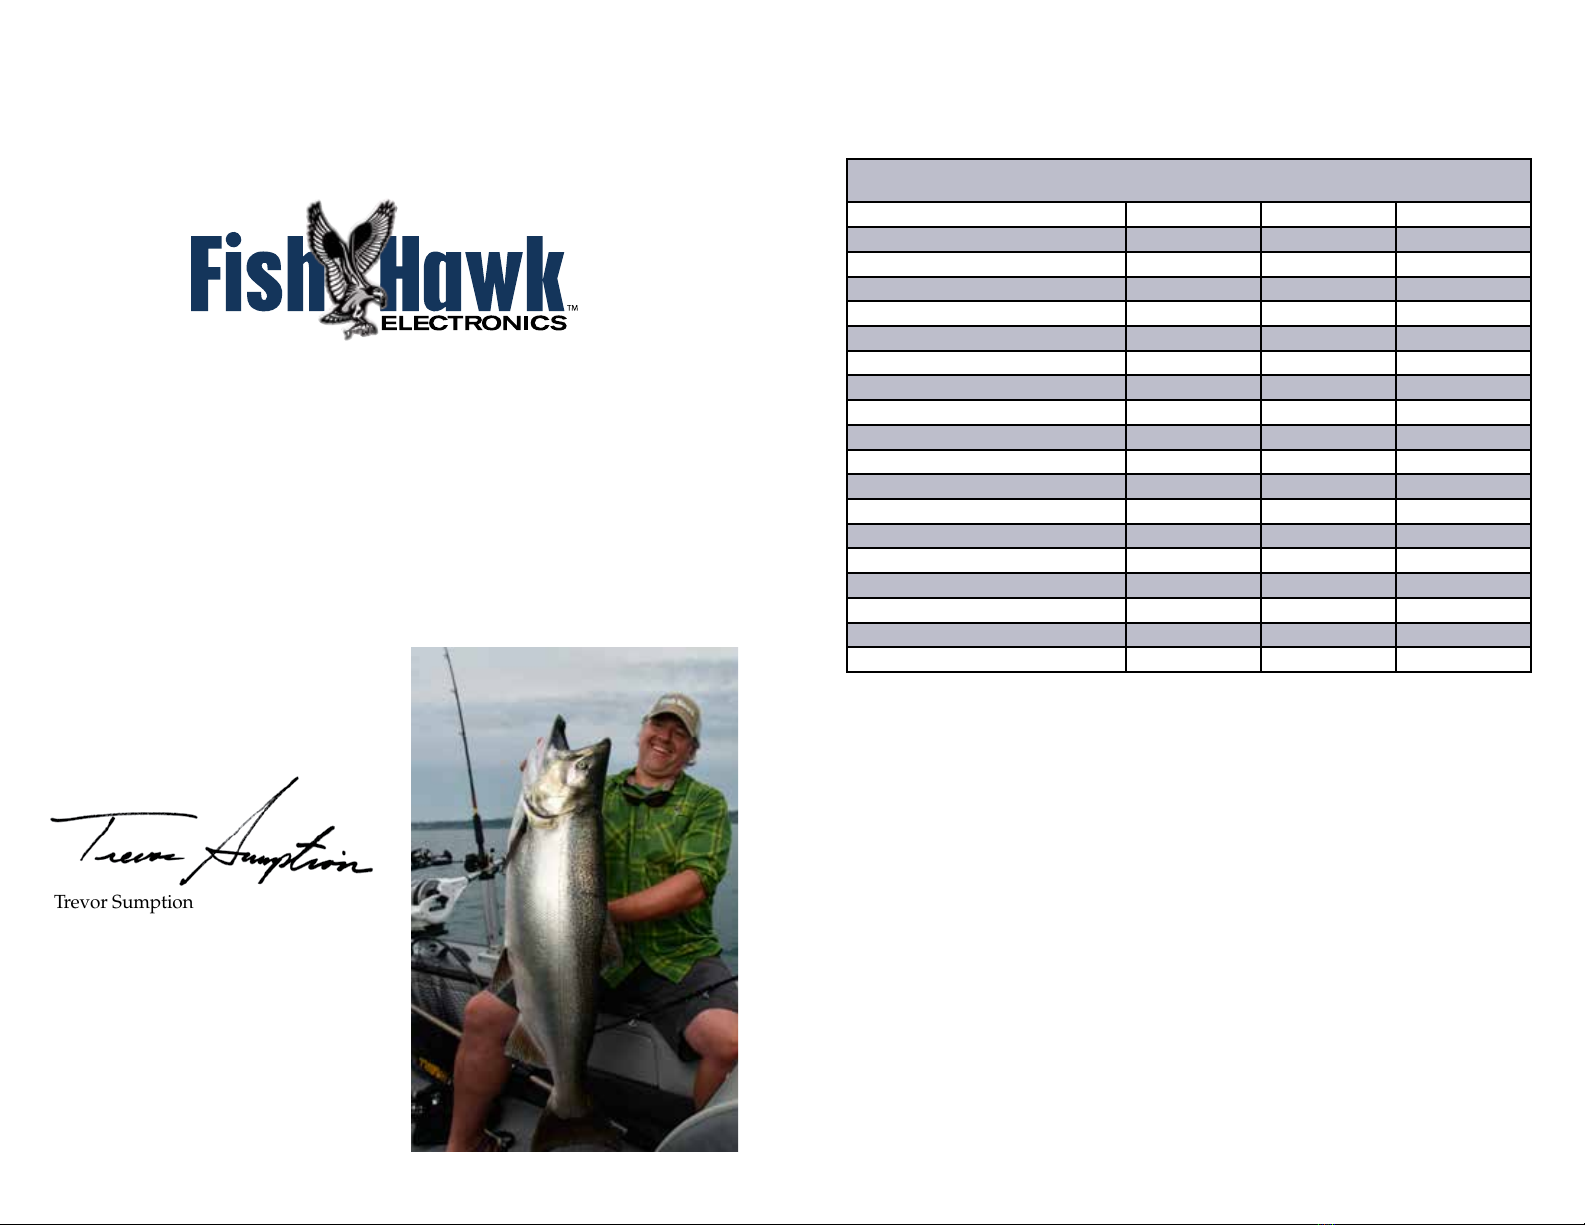
Preferred Water Temperature Ranges
(shown in Fahrenheit)
Species Lower Limit Optimum Upper Limit
Brown Trout 44 60 75
Chinook Salmon 42 50 60
Coho Salmon 44 54 60
Crappie 60 70 75
Kokanee 55
Lake Trout 42 50
Largemouth Bass 50 65 75
Atlantic Salmon 54
Rainbow Trout 44 55 75
Smallmouth Bass 50 65 73
Steelhead 38 55 62
Walleye 50 67 75
Alewife 48 54 72
Cisco 53
Emerald Shiner 61
Gizzard Shad 69
Rainbow Smelt 43 50 57
Spottail Shiner 54
THE FISH HAWK PROBE
Installing the Batteries
The Probe is powered by four AA Alkaline batteries (not included.) Do not use
rechargeable batteries. Fresh Alkaline batteries will provide
100+ hours of in-the-water life depending on water
temperature. To install the batteries:
Unscrew the probe’s battery cap. Care-
fully pull the battery holder out of the probe.
Place the four batteries into the battery hold-
er matching the appropriate +/- terminals. Please
note: pay special attention to the polarity of the batteries
because the probe will function if only three of four batteries are correctly installed, but the
readings provided may be inaccurate.
Place the battery holder back into the probe with the battery wires facing the
rear of the probe. The wires are encased in nylon-mesh wire tubing to encourage
proper orientation of the battery holder. Please note: if the battery holder is replaced
with the wires facing the front of the probe, the wires can be damaged. While this can be
repaired by installing a replacement battery holder, it may cause you to lose shing time
with the probe.
Turn the battery cap back onto the probe and hand-tighten snug. Do not over-
tighten. The battery cap has a double O-ring design that does not need to be overly
tight to keep water out of the battery compartment.
Keep the O-rings clean and lightly lubricated and loosen the battery cap at the
end of each shing day to relieve any pressure and naturally occurring condensa-
tion.
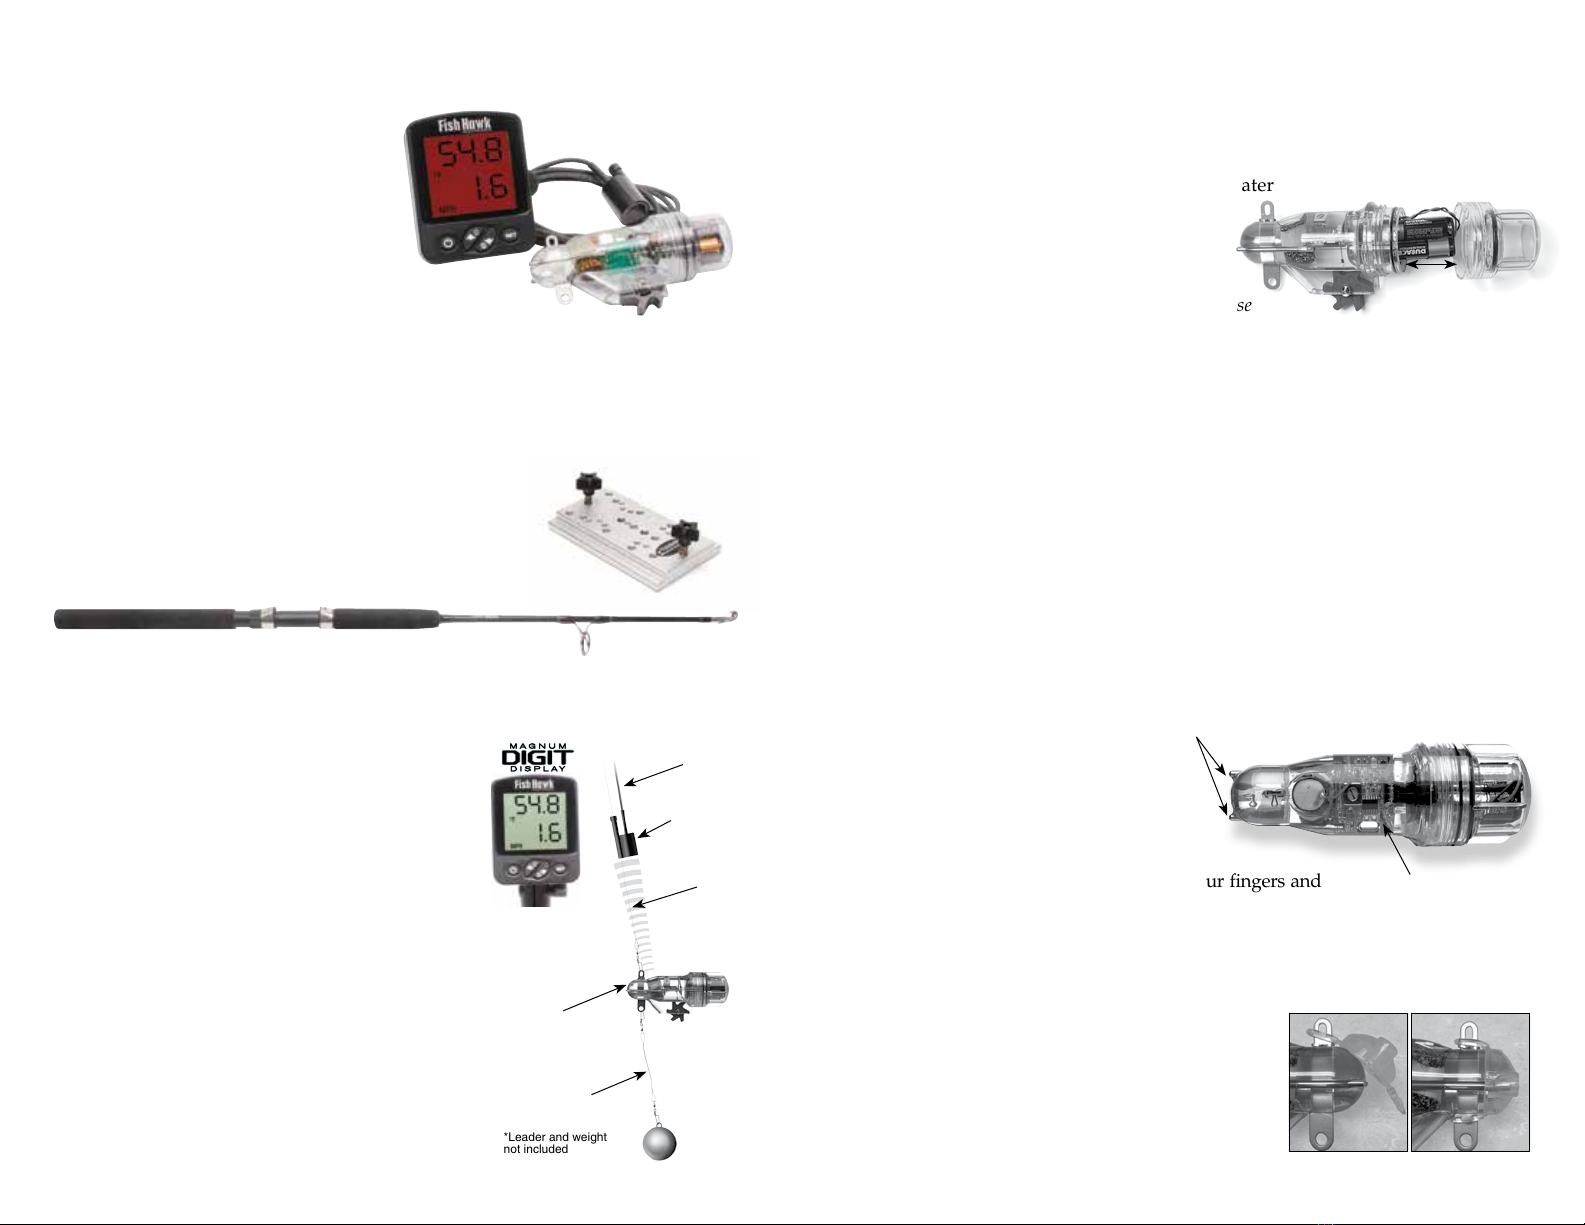
Turning the Probe On and Off
The Fish Hawk Probe features a water
activated auto on/off switch that turns
the probe on when it is lowered into
the water and shuts the probe off when
it is removed from the water, conserving
battery life. To test the probe, simply wet your ngers and
place them across the two activated metal temperature sen-
sors coming out of the front of the probe. A red LED inside the body of the probe will
ash approximately every 10-seconds when the probe is on.
Probe Bumper
A clear silicone rubber bumper comes installed
on the Fish Hawk Probe. The bumper provides ad-
ditional protection for the thermistor tubes against
accidental damage. For storage, remove the Probe
Bumper, insuring that trapped moisture does not
turn the probe on when not in use.
FISH HAWK X2 SYSTEM COMPONENTS
Your package
should include the following:
• Slip-Ducer™ (Patent Pending)
with 10’ cable
• X2 LCD display
• Gimbal bracket and knobs for LCD
• Fish Hawk X4 Probe
• Protective rubber probe bumper installed
Optional, not-included accessories
available at fishhawkelectronics.com:
• Specially designed 35” trolling rod
for using the Fish Hawk Probe and
Slip-Ducer™
• Vinyl coated ball weights
• Adapter plate for mounting the
X2 LCD in track systems
HOW THE FISH HAWK
X2 OPERATES
The Fish Hawk X2 can be used with or without a down-
rigger. The Fish Hawk Probe is fastened to the downrig-
ger cable just above the downrigger ball, or to a probe line
spooled on a short rod and reel set-up with a one-pound
ball weight.
It has sensors that constantly monitor water tempera-
ture and speed as it travels through the water. The probe
sends a sonar signal with that information to the Slip-
Ducer™ (Patent Pending) which rides on the probe line or
downrigger cable. When hooked up to the LCD display, the
Slip-Ducer™ sends the data from the probe to the liquid
crystal display (LCD) in the boat.
As the water temperature or speed changes, the LCD up-
dates to reect the new information. To provide a repeatable
number, the speed is calculated over a 20-second period.
*Leader and weight
not included
Twist off Battery Cap
Pull out battery holder
Flashing Red LED
Water sensitive
Auto On/Off switch
X2 Digital
Display
Slip-Ducer™
Cable to X2
Display
Weight*
Line or
cable
Leader to
Weight*
Probe
split ring also works well for connecting to a downrigger weight. Attach the top
snap swivel to the stamped stainless-steel loop on the bottom of the Fish Hawk
Probe, and the bottom snap swivel to the downrigger ball.
Using the trolling rod and reel method, we recommend attaching a one-pound
ball weight to the probe on a “dropper line.” Make a dropper line by tying two
light-duty snap swivels to each end to a 12” length of 12 to 20lb monolament
line (vary the length of line to your preference). Once tied, attach one of the snap
swivels to the stamped stainless-steel loop on the bottom of the Fish Hawk Probe
and the other to the one-pound ball weight. Should the weight become snagged
on the bottom, the lighter weight monolament line will break before the heavy
probe line, saving the Fish Hawk Probe from being lost.
THE SLIP-DUCER™ (PATENT PENDING)
The Slip-Ducer™ rides
on the probe line or down-
rigger cable. Its unique de-
sign keeps the probe and
receiving element in perfect
alignment, regardless of the
downrigger cable’s or probe
line’s angle in the water. The
Slip-Ducer™ includes 10-feet
of cable. The body of the Slip-
Ducer™ should be 12” to 24”
deep in the water at trolling
speeds. Wave conditions and
trolling speed will dictate the
amount of cable you need to let out. Secure any unused cable inside the boat.
Attaching the Slip-Ducer™ to a Downrigger Cable or Probe Line
Insert the dowrigger cable or probe line into the slotted stopper found in the
tube on the Slip-Ducer™ body. Twist the stopper 180-degrees to capture the down-
rigger cable or probe line. The Slip-Ducer™ should slide freely on the downrigger
cable or probe line.
Avoiding Potential Sonar Interference
Sonar interference is caused when sonar frequencies within 20 kHz of each
other are used in close proximity. The Fish Hawk operates at 70 kHz while most
sh nders operate at 200 kHz. Meaning most sh nders will not interfere with
the Fish Hawk.
Some dual frequency nders have a 50 or 83 kHz frequency option that could
potentially interfere with the Fish Hawk if the transducers are too close together.
You can opt not to use the 50 or 83 kHz frequency in your sh nder’s settings, or
simply use the Fish Hawk’s Slip-Ducer™ in a location further away from your sh
nder’s transducer.
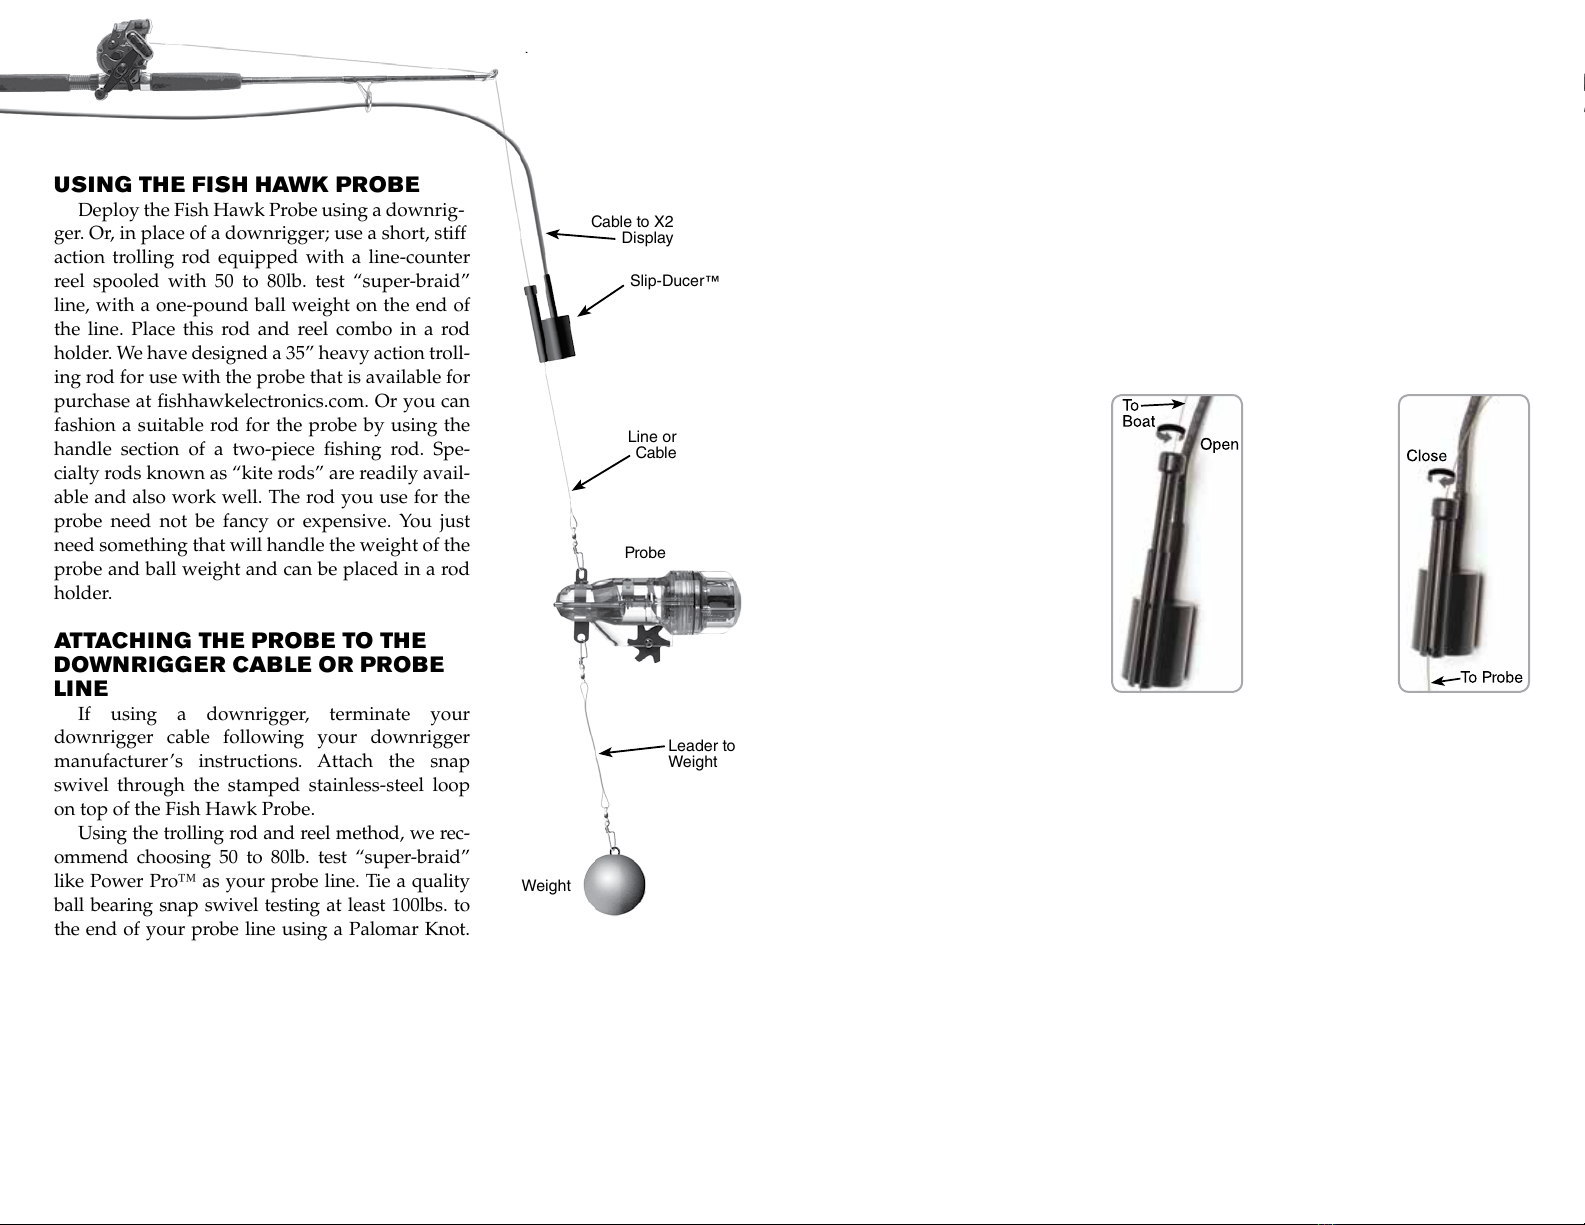
USING THE FISH HAWK PROBE
Deploy the Fish Hawk Probe using a downrig-
ger. Or, in place of a downrigger; use a short, stiff
action trolling rod equipped with a line-counter
reel spooled with 50 to 80lb. test “super-braid”
line, with a one-pound ball weight on the end of
the line. Place this rod and reel combo in a rod
holder. We have designed a 35” heavy action troll-
ing rod for use with the probe that is available for
purchase at shhawkelectronics.com. Or you can
fashion a suitable rod for the probe by using the
handle section of a two-piece shing rod. Spe-
cialty rods known as “kite rods” are readily avail-
able and also work well. The rod you use for the
probe need not be fancy or expensive. You just
need something that will handle the weight of the
probe and ball weight and can be placed in a rod
holder.
ATTACHING THE PROBE TO THE
DOWNRIGGER CABLE OR PROBE
LINE
If using a downrigger, terminate your
downrigger cable following your downrigger
manufacturer’s instructions. Attach the snap
swivel through the stamped stainless-steel loop
on top of the Fish Hawk Probe.
Using the trolling rod and reel method, we rec-
ommend choosing 50 to 80lb. test “super-braid”
like Power Pro™ as your probe line. Tie a quality
ball bearing snap swivel testing at least 100lbs. to
the end of your probe line using a Palomar Knot.
Attach the snap swivel through the stamped stainless-steel loop on top of the Fish
Hawk Probe.
Prior to attaching the probe, it is a good idea to inspect the downrigger cable
or probe line or for any kinks or frays that might weaken the downrigger cable or
probe line, which could cause you to lose your valuable Fish Hawk Probe.
Attaching the Downrigger Ball or Weight to the Probe
For use with a downrigger we suggest the use of shock absorbing downrigger
ball “snubbers.” Two heavy-duty snap swivels connected back to back with a large
Slip-Ducer™
Weight
Line or
Cable
Cable to X2
Display
Leader to
Weight
Probe
Twist the
stopper to open
the slot in the
Slip-Ducer™
Place the line
in the slot and
twist the stopper
180° to close,
securing the Slip-
Ducer™ on
the line.
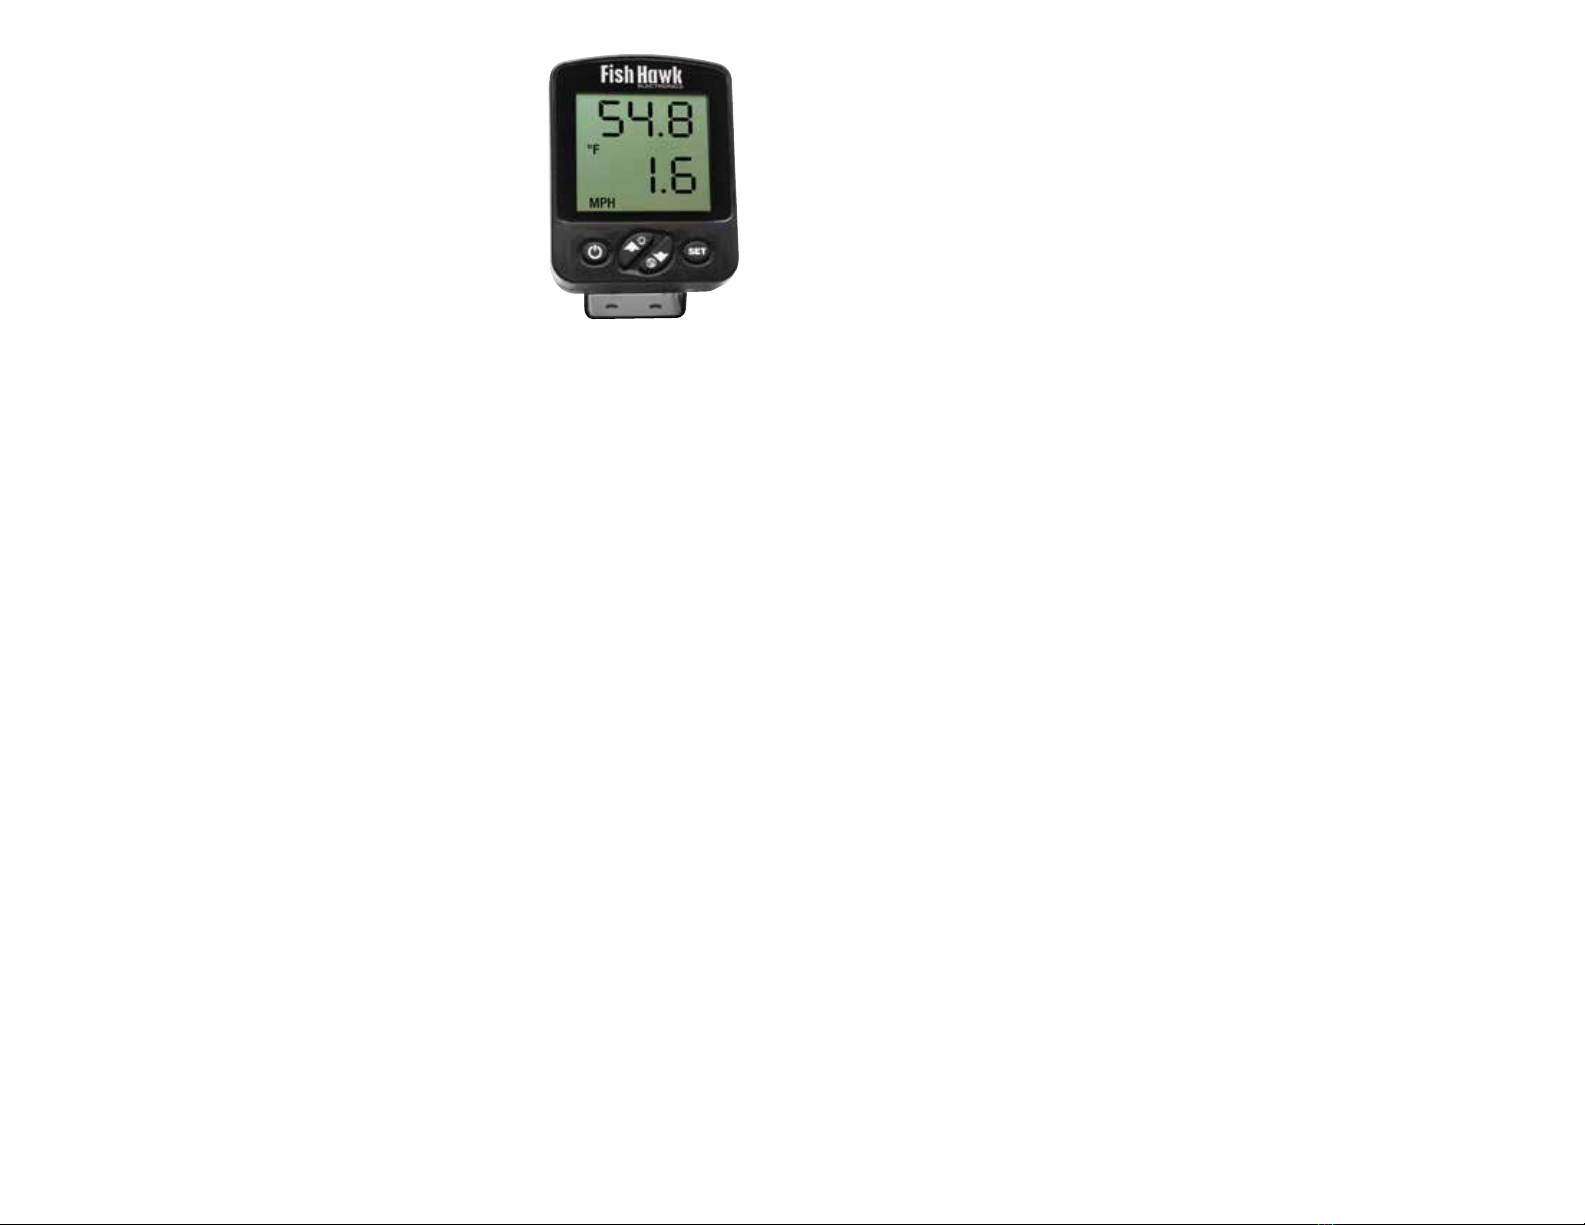
THE FISH HAWK X2 LIQUID CRYSTAL
DISPLAY(LCD)
The Fish Hawk X2 Display is divided into a top and
bottom section. The top number is water temperature
at the probe. The bottom half of the display shows the
mechanical speed at the probe. If the probe signal is not
detected, dashes will appear for both the probe tempera-
ture and speed. To indicate that the probe is functioning
correctly, every time a new signal is received the decimal
points on the screen will ash.
Locating the Display In the Boat
The X2 LCD can be xed mounted or used as a portable unit and moved from
boat to boat. The LCD requires that the Slip-Ducer™ be plugged into the connector
on the back of the case. Place the LCD in a visible location inside the boat that is
within 5-feet of the downrigger or rod holder you plan to use the Slip-Ducer™ on.
For maximum versatility, the X2 LCD includes a gimbal bracket and is tted with
a threaded 1/4”-20 insert, which is compatible with the popular 1” RAM® Ball
mounting system. An adapter plate for use with track systems is also available at
shhawkelectronics.com.
The X2 LCD is weatherproofed to IP54 standards to protect from boat spray and
rain events. It is not submersible.
Powering the LCD
The X2 LCD requires two AA batteries. Quality Duracell® Quantum Alkaline™
or Energizer ® Ultimate Lithium™ Batteries are recommended for maximum bat-
tery life. Expect a minimum of 40-hours of continuous use depending on ambient
temperature and back light use. The battery holders are located in the rear of the
LCD case and require the removal of two small screws to access.
Low Battery Warning
When the LCD’s batteries are low a LOW BAT sign will appear on the LCD
display. When the LOW BAT sign is present you have approximately 8-hours of
run time remaining.
Adjusting the Angle of the Display
You can adjust the angle of or remove the LCD by loosening the thumbscrews
on the sides of the gimbal bracket.
Activating the LCD Backlight
The display is equipped with a backlight for low-light conditions. Enable
the backlight by pressing the UP arrow or turn the backlight off by pressing the
DOWN arrow
Operating the Fish Hawk X2 Display
The display has four screen settings. To access each setting press the SET
button. Each time the SET button is pressed the display will move to the next
screen setting.
• Screen#1 - Set the GAIN (sensitivity) with a range of 0-25. The default setting is
15. Use the UP and DOWN arrows to adjust. Increasing the gain allows probe
readings to be received from greater distances. Lower gain settings reduce the
possibility of sonar interference, and also may be necessary in shallow water
• Screen#2 - Select the temperature unit of measure to Fahrenheit or Celsius.
The default is Fahrenheit. Use the UP and DOWN arrows to adjust.
• Screen #3 - Select the speed unit of measure to MPH, KNOTS, or KPH. The
default is MPH. Use the UP and DOWN arrows to adjust. The Fish Hawk X2
will display speeds from .8 MPH to 11 MPH.
• Screen #4 - Allows you to calibrate the probe’s temperature and speed
readings. Use the UP and DOWN arrows to adjust. Exit these screens by
pressing the POWER button at any time. All changes are saved at that point.
NOTE: Calibration is not necessary. No two boats will read speed exactly the
same. Most of the time factory default settings* will yield the best (and most
importantly) repeatable results.
*Factory default values for water temperature and speed are denoted for each
sensor by a missing decimal point. If you wish to go back to the factory settings
press and hold the SET button down before turning the power on. Continue hold-
ing the SET button. You will eventually see a screen with your offsets and the
decimal points will ash 10-times. Release the SET button and press power once
to restore factory settings.

TROUBLE SHOOTING
Please refer to the following table to help you identify and correct some of the more
common troubleshooting scenarios we encounter.
Problem Possible Cause Solution
Display won’t
turn on Batteries are not installed or
do not have enough power Install two, high quality AA alkaline or
lithium batteries
No probe data
appears on the
display
The probe is out of the water
The batteries in the probe
are low on power
The Slip-Ducer™ is not in
the water
The GAIN setting is too low
The probe is too close to the
Slip-Ducer™
The probe is only on when in the water.
Replace the batteries with high quality
alkaline AA batteries.
The Slip-Ducer™ must be in the water
to receive. Let out more cable to keep the
Slip-Ducer™ 12” below the surface at all
times.
Press the SET button and use the Up-
arrow button to increase the GAIN. 15 is
the default value. You may nd a need to
increase the GAIN for deep or rough water
use.
Lower the probe a minimum of 24”
beneath the Slip-Ducer™.
The probe
temperature
shows on the
display as 3.8
– 4.0
The thermistor tubes on the
probe have been damaged Unfortunately, the thermistor tubes can not
be repaired. Contact Customer Support
for evaluation. To prevent the problem,
always use the supplied Probe Bumper
and do not allow the probe to remain on a
downrigger cable when not in use.
Probe readings
on the display are
wildly erratic
Possible sonar interference The fastest way to eliminate this is to turn
off the 50 kHz or 83 kHz beam on your sh
nder. You can also try reducing the Gain
setting on the Fish Hawk display by press-
ing the SET button and then the arrow
down key, or separating transducer cables
if tied together. The permanent solution is
relocating the transducer away from other
50 or 83 kHz transducers on the transom.
ROUTINE MAINTENANCE
Your Fish Hawk requires simple maintenance to keep it working properly. Use
the following schedule to keep your Fish Hawk in top working order:
Item Check Action Interval
Liquid Crystal
Display Check for dirt and
water spots on the
screen.
Clean with soft cloth. Daily
Transducer Cable Check for abrasion on
the cable jacket. Contact Customer Service. Daily
Downrigger
Cable/Probe Line Check for kinks or
fraying. Replace cable or cut off section
of damaged line Daily
Probe Batteries Check for power. Replace if LED is not ashing
inside the probe. Daily
Probe O-Rings Check for dirt and
lubrication. Clean and apply a light coating
of silicone lubricant if dry. Do
not over-lubricate.
Weekly
Probe Check for condensation
in battery cap Loosen battery cap at the end of
each day Daily
Probe Batteries Remove batteries for extended
storage Seasonally

SERVICE ADVICE
• Please consult the Troubleshooting page on our website before sending your
product in.
• It is best to send your probe and display in together to be tested as a set.
• If you think you have a problem with the transom mount transducer, contact
us prior to removing it. Rarely is the transducer the culprit.
• Ship products back using FedEx, UPS, or Priority Mail and keep the tracking
number.
• Stick an address label on each part you send back to us.
• Please print the Service Request Form conrmation e-mail and include it with
the product being returned for service.
NOTES:
SERVICE
“HELP! I can’t sh without my Fish Hawk!” Many customers tell us that their Fish
Hawk is so important to their sh catching success that they won’t sh without it!
We make getting service simple to get you back on the water as quickly as pos-
sible.
WARRANTY
All Fish Hawk Products come with a one-year standard warranty protecting
against defects in parts or workmanship. If you have a warranty issue, we’ll arrange
to repair or replace the product at no cost to you.
If your Fish Hawk product is in need of warranty service, please visit the Sup-
port/Request Service page at shhawkelectronics.com. Please have a copy of your
sales receipt available.
OUT OF WARRANTY SERVICE
If your Fish Hawk is out-of-warranty we will repair it for a fee. If it can’t be re-
paired, we’ll replace it for the at rate shown below. Return shipping is $10 inside
the Continental U.S. Actual shipping charges plus applicable taxes, duties and bro-
kerage apply for international shipping.
FLAT RATE REPLACEMENT CHARGES
Model Flat Rate Charge
X4 Probe $210
X2 LCD $250
Slip-Ducer $75
If your Fish Hawk product is in need of service, please visit the Support/Re-
quest Service page at shhawkelectronics.com.
Return Address
Fish Hawk Service
Grayden Outdoor LLC
7845 Brians Way
Brainerd, MN 56401
Contact Information:
Phone (218) 454-4760
Website: shhawkelectronics.com
Ofce hours: 8:00 AM to 4:30 PM CST, Monday through Friday.

Grayden Outdoor LLC
Fish Hawk Electronics
7845 Brians Way
Brainerd, MN 56401
Phone (218) 454-4760
www.fishhawkelectronics.com
Made in the U.S.A.
Table of contents
Other Fish Hawk Fish Finder manuals

Popular Fish Finder manuals by other brands


Humminbird
Humminbird 587ci HD Operation manual

Garmin
Garmin echo 550c installation instructions

Bottom Line
Bottom Line Fishin Buddy 4200 Operation manual

Lowrance
Lowrance Hook Reveal Series Operator's manual

Garmin
Garmin Fishfinder 240 Blue owner's manual

Garmin
Garmin echoMAP 70 Series installation instructions


